1
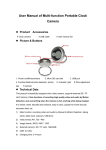
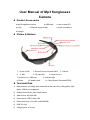
User Manual of Mp3 Sunglasses Camera Product Accessories ● Mp3 Sunglasses camera ● a clip ● USB cable ● Glasses bag and cloth ● User manual CD ● a pair of earphone ● Charger Picture & Buttons 1. Power on/Off 2. Record/ Volume Increase/PREV 2. 5. SD card slot 4. MIC 7. Earphone port / USB port 9. Reset 10. Model switch 3. Camera 6. Earphone port 8. Indicator light 11. Photo/Volume Decrease/FFWD Technical Data 1) Main functions: recording video and audio at the same time, taking photo, Mp3 player, USB drive, sunglasses 2) Quality Polaroid Lens from brand makers 3) Video format: AVI, 640*480 4) Photo format: JPEG, 1280*1024 5) External memory: micro SD card 2GB-8GB 6) USB: 2.0 (Hs) 7) Charging time: 4-5 hours 8) Battery use time: Polymer Li battery. can use 2 -3 hours continually 9) Operation systems: No need for driver installation if the operating system is Windows ME/ 2000/ XP/ Vista or above (Windows98 is excepted) Operation Before switch on, insert the Micro SD card. Switch on Under power off mode, long press the Power on/Off button, blue light first on then off, then yellow light keeps on, the camera is under standby mode. Note: 1) If there are not Mp3 files in the SD card when power on, the camera will come into standby mode, if there are Mp3 files in the SD card when power on, the camera will come into playing mp3. 2) In the case that there is no SD card when power on, blue lights on first, seconds later turns to yellow light and then turns off, the system automatically shut down. Recording video and audio 1) Start to record Under standby mode, short press Record/ Volume Increase/PREV, yellow light flash three time quickly and keeps on, five seconds later, the yellow light keeps flashing slowly, the camera comes into the recording video mode. 2) Stop and Save Short press the Record/ Volume Increase/PREV again, the yellow light turn off, five seconds later the yellow light keeps on. The video file stopped and saved, the camera backs to standby mode. Note: If continuous recording video, the system will save a video file automatically every 30 minutes. Taking Photo Under standby mode, press Photo/Volume Decrease/FFWD , the camera enters into taking photo state, the yellow light turn off, ten seconds later, the yellow light keeps on, indicating one photo is taken and saved and the camera returns to standby mode. Mp3 playback: Under standby mode, short press the Model switch button, the yellow light is off, blue lights flash slowly, the device comes into MP3 playback mode. Short press Record/ Volume Increase/PREV, choose the next song music files; short press Photo/Volume Decrease/FFWD button, selecting last song music files. To pause play, short press the power on / off button, then the indicator light keeps blue; if we want to continue playing, short press power on / key button. Long press the Record/ Volume Increase/PREV to increase volume; long press Photo/Volume Decrease/FFWD button, reducing the volume; then short press Mode switch mode, stop the music player and return to standby. Switch Off Under standby mode, press the power on / off button, the yellow light off, the camera is power off. Or use the paper clip to touch of the reset button, the yellow light goes out and shut down. Reset Insert the pin into the RESET hole to restart the device once it does not work normally under incorrect operations. Note: Under recording video mode, if you shut down the camera by reset button, video files will not be saved. Charging Under power off/standby mode, connect the camera to the computer via a USB cable, blue light keeps flashing slowly, indicating the camera is under charging, when blue light keeps on it is full charged; when power is low, yellow light keeps on for 30 seconds, automatic shutdown. Note: The camera built-in high capacity lithium polymer battery, a memory effect, so the initial use of the first five times, and then charge the battery to run out of capacity, to start the battery maximum capacity, access to standard working hours. Playback Finishing recording video/ taking photo, connect the camera to the computer with a USB data cable, click on removable disk, and select the video file you can double-click the computer to play. Connect computers to ensure that the relevant player software has been installed, double-click to see photos. Note: Make sure the USB cable is connected to the USB interface to be read the disk, If it is connected to the other side, mp3 earplugs, it cannot read the data. Setting time When using the device for the first time or the time is incorrect, you can reset the time through the following way: 1) Connect the camera with computer 2) Create a new “Time.txt” file 3) Edit time as format: 2010.12.12 12:12:12 in the file 4) Copy the file to the root of the disk of the camera When starting the camera again next time, the time will be simultaneous as the computer. Attention 1) When it is recording, if power is low, the system will first save the video content first, then automatically shut down. 2) When continuous recording, every single operation, the system will automatically generate a new video file. 3) When the memory inventory is full, the yellow light keeps on, under standby mode, can play MP3 music. 4) Please keep the camera in brighter environment, to maintain the camera vertical and stable, and keep the review within a certain distance to obtain better effect. 5) The time of PC recognizing the device is different according to its different system and configuration, so please not operate during recognizing. If the device can’t be recognized, please check your computer’s operation system, device drivers, USB port and the USB cable is normal, and then connect the hardware again. 6) Remember that when you tap with the paper clip to reset, do not be too hard to avoid damage to other components.