1
3&$XWKRUL]H
8VHU·V*XLGH
Version 1.1
Tellan Software, Inc.
Disclaimer
Tellan Software, Inc., makes no warranties, either expressed or implied, regarding the enclosed computer
software package, its merchantability, or its fitness for any particular purpose. Tellan Software, Inc., does not
warrant that the functions contained in the software will meet your requirements or the operation of the
program or any updates will be uninterrupted or error-free.
The liability of Tellan Software, Inc., under the warranty set forth above shall be limited to the amount paid
by the customer for the program license. In no event shall Tellan Software, Inc., be liable for any special,
consequential, or other damages for breach of warranty. In no event shall Tellan Software, Inc., be liable for
any damages whatsoever (including, without limitation to damages for loss of business, loss of profits,
business interruption, loss of information, lawsuits, or other pecuniary loss) arising out of the use of or
inability to use the program.
The exclusion of implied warranties is not permitted by some states. The above exclusion may not apply to
you. This warranty provides you with specific legal rights. There may be other rights that you have which
vary from state to state.
Unlawful Software Duplication
PCAuthorize software and User’s Guides are protected under copyright law. Unlawfully copying,
duplicating, selling, or otherwise distributing these products is hereby expressly forbidden.
Warranties, updates, and user support will not be honored for any program which has been unlawfully
copied.
PCAuthorize is a registered trademark of Tellan Software, Inc., San Jose, CA
Other trademarks and registered trademarks are owned by their respective companies.
The information in this document is subject to change without notice.
Part Number: 2001
Revision Number: 1.1a
Printing Date: May 1999
Tellan Software, Inc.
2680 S. White Road, #160
San Jose, CA 95148
1996-1997, 1999 Tellan Software, Inc. All rights reserved under Pan-American Copyright Conventions.
Printed in the United States of America. No part of this publication may be reproduced, stored in a retrieval
system, or transmitted in any form or by any means, electronic, mechanical, photocopy, recording, or
otherwise, without prior written permission from Tellan Software, Inc.
Contents
Section 1: Getting Started......................................................................... 1
Welcome to PCAuthorize .......................................................................... 1
Credit Card Awareness................................................................................ 1
Preventing Fraud ......................................................................................... 2
Installing PCAuthorize .............................................................................. 3
System Requirements ............................................................................. 3
What You Need to Know Prior to Installing PCAuthorize .................. 3
Installing PCAuthorize on Your Hard Drive........................................ 3
Plug-In Modules ..................................................................................... 4
Transact Directory.................................................................................. 4
Getting Help, Icons, Shortcuts, and Demo Mode .................................. 5
Help Window .................................................................................... 5
Technical Support ............................................................................. 5
Icons .................................................................................................. 5
Shortcuts............................................................................................ 5
Demo Mode....................................................................................... 6
Section 2: Setting Up PCAuthorize ........................................................ 7
Hardware Setup ........................................................................................... 7
Modems .................................................................................................. 7
Magnetic Stripe Readers ........................................................................ 7
PIN Pad .................................................................................................. 8
PCAuthorize Setup .................................................................................... 8
Intro Setup .............................................................................................. 9
Communications Setup ........................................................................ 10
Merchant Setup .................................................................................... 13
Receipts Setup ...................................................................................... 14
Services Setup ...................................................................................... 16
Card Types Setup ................................................................................. 18
Addenda Setup ..................................................................................... 20
Administrative Setup............................................................................ 22
Personal Setup ...................................................................................... 24
PIN Pad Setup ...................................................................................... 27
Split Dial or Additional Network Setup ............................................... 28
Multiple Merchant Setup...................................................................... 29
iii
Multiple Bank Network Plug-In Setup...................................................... 32
Section 3: Transactions........................................................................... 33
Before You Enter a Transaction................................................................ 33
Opening the Transaction Window............................................................. 34
Transaction Window Navigation Techniques ........................................... 35
Entering a Transaction .............................................................................. 35
Card Type ............................................................................................. 35
Transaction Type.................................................................................. 35
Entry Items ........................................................................................... 37
Address Verification ............................................................................ 38
Message Box ........................................................................................ 39
Entry Mode........................................................................................... 39
Force Duplicate .................................................................................... 39
Credit Card Magnetic Stripe Authorization .............................................. 39
Credit Card Manual Entry Authorization.................................................. 40
Check Guarantee MICR Authorization..................................................... 40
Check Guarantee License Authorization................................................... 41
Authorizing an Entire Batch...................................................................... 42
Discount Rates........................................................................................... 42
Retail Businesses................................................................................. 42
Mail-Order and Direct Marketing Businesses..................................... 43
Purchase Cards .................................................................................... 43
Corporate and Business Cards............................................................. 43
The Transaction List Screen Contents....................................................... 44
The Command Bar ............................................................................... 44
Transaction Titles ................................................................................. 45
Transaction Line Items......................................................................... 45
Selecting a Transaction ............................................................................. 47
Voiding a Transaction ............................................................................... 47
Changing a Transaction............................................................................. 48
Deleting a Transaction .............................................................................. 48
Finding a Transaction................................................................................ 49
The Totals Screen...................................................................................... 50
Section 4: Batches.................................................................................... 53
Handling Batches ...................................................................................... 53
Handling Transactions within Batches...................................................... 53
Batch List Screen ...................................................................................... 54
iv
Opening an Existing Batch........................................................................ 55
Deleting a Batch ........................................................................................ 56
Selecting the Batch Contents List ............................................................. 56
Authorizing a Batch .................................................................................. 57
Intermixing Batch and Single Authorizations ........................................... 58
Section 5: Settlement ............................................................................... 59
What is Settlement?................................................................................... 59
Settlement Types ....................................................................................... 59
Settlement Procedures ............................................................................... 60
Interactive Balance .................................................................................... 61
Section 6: Reports and Troubleshooting............................................... 63
Reports ...................................................................................................... 63
Troubleshooting ........................................................................................ 64
Section 7: Network-Specific Instructions.............................................. 67
American Express ..................................................................................... 68
ECHO Network ......................................................................................... 72
FDMS North – Card Establishment Services............................................ 74
FDMS Nashville – Envoy ......................................................................... 76
FDMS South – NaBanco........................................................................... 78
FDMS – Omaha ETC Plus ........................................................................ 81
FDMS – TeleMoney.................................................................................. 83
Paymentec – Gensar .................................................................................. 85
Global Payment – NDC (Host Capture).................................................... 87
Global Payment – MAPP .......................................................................... 91
Global Payment – Modular Data............................................................... 95
Nova .......................................................................................................... 97
VisaNet...................................................................................................... 99
Glossary.................................................................................................. 101
Appendix A: Exchanging Information ................................................ 107
Appendix B: Interapplication Communication .................................. 117
Index ....................................................................................................... 133
v
vi
Section 1: Getting Started
Welcome to PCAuthorize®!
Before getting started, please review any information provided by your bank.
Information or instructions provided by your authorizing agency or merchant
bank always take precedence over instructions in this manual.
Note: If you are a new user of Windows, you need to learn about using
the mouse, working with disks, and other Windows conventions. Refer
to your Windows documentation for this information.
You may press the ) key to obtain help in almost every window.
Credit Card Awareness
PCAuthorize® is designed to process credit cards and ATM/Debit cards and to
obtain check guarantees. Before processing a transaction, you should be aware of
your responsibilities in accepting credit cards and ATM/Debit cards. Credit cards
acceptance practice requires the following:
1. The cards must be either manually imprinted or swiped (slid through the
card reader).
2. Keying in transactions manually can raise your discount rate and increase
the risk of fraud. Swipe cards through the card reader to maintain the
lowest possible rate.
3. The cardholder must sign the charge slip or printed receipt.
4. The transaction batch must be closed daily.
Note: If you do not obtain the cardholder’s signature on the swiped on
manually imprinted paperwork, you may lose your chargeback rights.
MasterCard and Visa require you to save this paperwork in date order
for at least three years.
1
Preventing Fraud
When you accept a cardholder’s credit or ATM/Debit card you should:
•
Compare the signature on the cardholder’s ID with that on the back of the
credit card and on the receipt.
•
Check the appearance of the card to see if it has been fabricated or
tampered with. Uneven numbering, a false logo, or a hologram that
doesn’t “move” can all be signs of a counterfeit card.
•
Compare the number embossed on the card with the number printed on the
sales slip; altered account numbers often show ghosted images.
•
When accepting a Visa card, check the printed bank ID number above the
account number. The four-digit prefix number should match the first four
digits of the embossed account number.
•
If the card doesn’t read when you slide it through the card reader and you
must key the numbers in manually, you must use a manual imprinter. Even
when the printer prints a receipt, the customer must sign both the printed
receipt and the manually imprinted slip. The two slips should be stapled
together.
•
Check both the start and expiration dates on the card. The card is not valid
before the start date or after the expiration date.
•
If you are instructed to recover a card, attempt recovery by reasonable and
peaceful means. Notify your voice authorization center of whether you
were able to retrieve the card.
2
Installing PCAuthorize
System Requirements
PCAuthorize® runs on any Windows system, including 3.11, NT and 95. Be
sure you have the correct version for your Windows system.
An asynchronous modem is required to connect to the authorizing agency or
bank. Bank networks operate differently from most consumer networks. Most
commercially-available modems should work with PCAuthorize® and your
bank network; however, we cannot guarantee it.
If you are authorizing transactions when the cardholder is present, you should
also purchase a magnetic stripe card reader for your PC.
What You Need to Know Prior to Installing PCAuthorize®
You must know which bank network you will be using! If in doubt, call your
merchant service provider.
You may need an installer password to enable installation for your particular
bank network. This should either come with the package, or be provided by
the person installing your software.
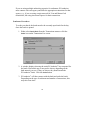
Installing PCAuthorize® on Your Hard Drive
1. Insert the PCAuthorize® Disk 1 into your disk drive.
•
If you are installing under Windows 95 or NT 4.0:
Select 5XQ from the taskbar Start menu
•
If you are installing under Windows 3.11 or NT 3.5:
From the Windows Program Manager, select 5XQ from the File
menu
2. Type D?VHWXS and press the (QWHU key (or E?VHWXS if the diskette is in drive
b).
3
3. Check the bank network you wish to install. Only one network may be
chosen. Be sure you check the correct one.
4. Check the split dial plug-ins (American Express, Equifax, etc.) only if you
have made arrangements to connect directly to their network. Most major
networks already handle these transaction types.
5. You may be asked for a password to enable you to install certain items.
Key in your password and click 2.. If you don’t know your password,
check with your merchant service provider or call Tellan Software at 8004-TELLAN.
6. A new program group and directory named TELLAN will be created
automatically on your hard drive. Within that directory will be a PCAuth
folder. Open the folder and double-click on the PCAuthorize® icon.
Plug-In Modules
Plug-in modules are usually automatically installed; however, depending on
your supplier of PCAuthorize®, you may also receive a plug-in diskette. Plugin files always end in .PLG. The plug-in files provide PCAuthorize® with
specific instructions on how to connect with your particular bank or
authorizing agency service. Some plug-in modules also add functionality to
PCAuthorize®.
Transact Directory
All transactions are stored in a directory called Transact, which is normally a
directory within the PCAuthorize® application directory. You may move this
directory elsewhere using Windows or other utilities. If you do so, you must
also change the directory path name on the Personal Setup screen. For
additional information, see the section entitled “Personal Setup.”
4
Getting Help, Icons, Shortcuts and Demo Mode
Help Window
You may display help information by pressing ) from almost any window. If
a window is currently open when you ask for help, then a help window will
open for the subject pertaining to that window.
Technical Support
Technical support may be provided either by your merchant bank or by Tellan
Software. Instructions from your bank will indicate whom you should call for
technical support.
Icons
The following PCAuthorize® icons may appear in Windows:
PCAuthorize® application
Transaction files found in the Transact directory
Shortcuts
As in most Windows applications, you may issue PCAuthorize® commands by
making selections from the pull-down menus at the top of the screen. Many
menu items are duplicated as buttons in the PCAuthorize® windows.
Many of the frequently used menu commands may be issued from the
keyboard by holding down the command key and then a specific character.
Any menu that has a command symbol (&RQWURO) and a character on the right
can be issued from the keyboard.
5
Demo Mode
Demo mode allows you to practice entering transactions with PCAuthorize®
without actually affecting anyone’s account.
When you are in demo mode transactions are stored in a normal manner; there
is no distinguishing factor other than how the transaction is authorized. Do not
intermix the demo and normal modes during normal working procedures.
When you authorize a transaction using demo mode, PCAuthorize® displays a
canned response according to the value of the last cents position:
•
•
•
•
2 returns a Decline
3 returns a Referral
4 returns an Error
5 returns a Hold Card
All others will be Approved.
You may access demo mode by selecting 'HPR0RGH in the Agency Access
field in the Communications Setup screen.
6
Section 2: Setting Up PCAuthorize®
Hardware Setup
Modems
PCAuthorize® supports most Hayes-compatible asynchronous modems. Some
modems, however, cannot connect to banks’ networks, so we cannot
guarantee all modems will work. This is typically a hardware problem
between the modem and the network, and not directly related to the software.
Follow the instructions from the modem manufacturer in connecting the
modem to your computer. For more information about modem setup, see
“Communications Setup.”
Magnetic Stripe Card Readers
PCAuthorize® supports most magnetic stripe card readers which connect via
the keyboard port. Both track 1 and/or track 2 readers are supported.
PCAuthorize® requires that the reader be configures to send “start and end
sentinel” characters. Most, but not all, readers come configured properly from
the manufacturer.
If you are having problems with a magnetic stripe card reader, ensure the
following:
•
You must have a batch open prior to swiping the card. When the card
is swiped, PCAuthorize® creates a new Transaction window and
positions the cursor to the Amount line.
•
Ensure the reader is configures to send “start and end sentinel”
characters. Usually this is done by setting certain dip switches on the
reader. Refer to the manufacturer’s installation instructions.
•
Some readers may “overrun” your computer; i.e., transmit more
characters than can be accommodated by the buffer. Many readers
have a dip switch option to slow the transmission rate to your
computer. Again, refer to the manufacturer’s installation instructions.
7
PIN Pad
PIN Pads are used for ATM/Debit cards only. Not all versions of
PCAuthorize® support PIN Pads and debit cards. PCAuthorize® supports
several popular manufacturers, including Verifone.
The PIN Pad is attached to a serial port on your computer. For more
information, see the manufacturer’s installation instructions and “PIN Pad
Setup.”
PCAuthorize® Setup
Prior to using PCAuthorize® to authorize transactions, you must complete
certain setup items. Review the network plug-in documentation and
instructions from your local bank for additional information. Setting up
PCAuthorize® doesn’t take long—just follow these guidelines.
When PCAuthorize® is first opened after installation, a Setup menu displays.
You must complete the first three Setup menu items (,QWUR, &RPPXQLFDWLRQV
and 0HUFKDQW) prior to authorizing real transactions. All other Setup menu
items are optional and may be completed according to your needs.
8
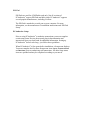
Intro Setup
You must enter a valid Product Serial Number and Product Password prior to
authorizing transactions. The Product Serial Number is printed on your
diskette and Warranty Card. Your Product Password is enclosed with your
PCAuthorize® shipping package. If you do not have a Product Password, call
Tellan Software at 800-4-TELLAN. Have your Product Serial Number, bank
network name, and bank merchant information ready when you call.
9
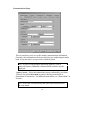
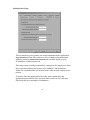
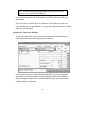
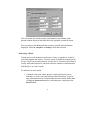
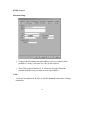
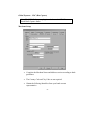
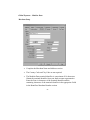
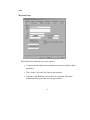
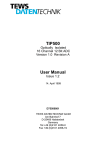
Communications Setup
This screen allows you to set up the modem communication information.
Generally, this information must be provided by your authorizing merchant
bank. It may already be set up to work with their system.
Note: If you are using multiple authorizing agencies, such as
American Express, additional communications windows may be
displayed.
Agency Access—Select the authorization agency indicated by your bank.
You may also select 'HPR0RGH to practice entering transactions or
demonstrate PCAuthorize®. For additional information, see “Demo Mode” in
Section 1.
Note: Never mix real transactions and demo mode transactions in
the same batch.
10
Auto Detect—This option causes PCAuthorize® to attempt to automatically
set up and configure your modem by scanning your system and checking for
modems attached to serial ports. If a modem is found, the system then
attempts to configure the modem. If no modems are found, then you must
manually configure the modem by selecting the appropriate serial port and
modem type. If your computer locks up during the scanning phase, restart and
manually configure the modem.
Dial Type—Set the dial type, either 7RQH or 3XOVH, for your local telephone
system. This should generally be set for Tone in most areas of the United
States.
Port—Select the Windows port to which your modem is attached. This may
be any of the COM1-type ports.
Modem Type—Select the modem manufacturer and model of the modem you
are using. When you select a particular modem, the baud rate will be forced to
1200 and the Modem Init string will be completed with the appropriate
information for most bank networks. If your modem is not listed, select 2WKHU
and complete the Modem Init string as explained below.
Phone Number—Type in the telephone numbers of the authorizing bank
computer. Obtain these numbers from your merchant bank. If you received
only one authorization telephone number, enter it in both the Authorization
and Settlement fields.
Baud Rate—Set the baud rate as indicated by your merchant bank. Most
banks operate at 1200 baud. Different baud rates may be selected for
authorization and settlement. Check your bank network plug-in
documentation for additional details.
Note: If you select certain modem types, the Baud Rate and
Modem Init fields are generally set for you.
Modem Init—Enter the appropriate AT modem commands (without the AT
prefix). Consult your modem user’s manual or call your modem manufacturer
for further information.
11
Bank networks operate differently from most consumer networks. Most bank
networks require the following modem configuration:
•
•
•
•
Bell 212A asynchronous (1200 baud)
No error correction or compression
No negotiation
No additional features or feature negotiation
12
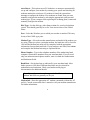
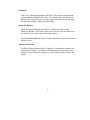
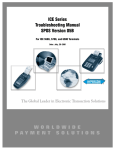
Merchant Setup
This setup screen enables you to enter all your merchant and store-identifying
information.
The first section of the screen contains standard name and address
information. You must complete this information in order to properly print
receipts and reports. Enter the name, address, city, state, zip code and
telephone number of your store or merchant location. Enter a country and/or
city code if supplied by your authorizing bank.
Note: If you are using multiple authorizing agencies, such as
American Express, additional merchant information windows may
be displayed.
Other sections contain information provided by your authorizing bank. The
content of this section varies, depending on the bank network. See your bank
network plug-in documentation for further instructions.
13
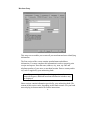
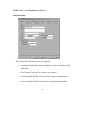
Receipts Setup
The Receipts screen contains optional items which do not directly affect credit
authorization. We recommend, however, that you complete the fields on this
screen.
Printer
You may print receipts on either a 6WDQGDUG3ULQWHU, or on a 6SHFLDO5HFHLSW
3ULQWHU. Select the type of printer you will be using for receipts. If you select
the Standard Printer, any Windows printer may be used. If you select the
Special Receipt Printer, you must complete the 3RUW and 7\SH fields. We
recommend you select Special Receipt Printer for small, serial receipt printers.
If you want a print job dialog box during receipt printing, then select 8VH3ULQW
'LDORJ; otherwise, PCAuthorize® will automatically print receipts with no
dialog.
14
Options
You may have PCAuthorize® automatically print a receipt if a transaction is
approved by checking the $XWRPDWLFDOO\3ULQW5HFHLSW field and entering the
number of copies to be printed in the &RSLHV field.
PCAuthorize® can also automatically calculate the sales tax if you enter the
sales tax rate in the 7D[5DWH field. This rate should be entered as a percentage.
Message
This section of the screen allows you to:
1. Specify the standard heading and special messages which will be
printed on the receipt. The header portion will normally contain your
business name and address, and is automatically set to do so. The
footer may contain any message you wish. The items are limited to the
following:
•
•
•
Title—One line of up to 40 characters
Header—Two lines of up to 40 characters each
Footer—Four lines of up to 40 characters each
2. Specify the default description to be applied to each transaction. Each
description may be a maximum of 20 characters. When you open a
new transaction, the description lines are automatically set based on
these default descriptions. You may change these in the transaction
entry window for each transaction.
15
Services Setup
This setup screen allows you to select various items that may be entered on
the transaction entry window. Allowable transactions are dictated by your
authorizing bank.
Allowable Transactions
To enable entry of a transaction in the transaction entry window, enter a
checkmark adjacent to any of the following transaction types:
•
Sale & Deposit—Allows you to enter regular sale and deposit
transactions.
•
Authorization Only (NO DEPOSIT)—Allows authorization-only
transactions (non-draft capture).
16
•
Post Authorization—Allows posting of telephone authorizations to
the batch. Post Authorizations are used when a telephone call is made
to the issuing bank to obtain an approval. If the transaction is
approved, you may enter it into your batch even though it was not
authorized electronically by PCAuthorize®.
•
Return/Credit—Allows entering credit (refund or return) transactions
to the batch. Returns are normally entered the next or following day
after a transaction is authorized.
•
Void—Allows entering a void transaction.
Check Guarantee
Select either (check with your authorizing bank to see which form, if any, of
check guarantee transaction may be used):
•
Check Guarantee Driver’s License—Allows entering a check
guarantee using a driver’s license.
•
Check Guarantee MICR—Allows entering a check guarantee using
the check MICR number.
Sales Type Default
Select the default, either Take or Send, for the type of sales you will be
making. This option may be changed for each transaction, as necessary.
17
Card Types Setup
The fields on this screen are optional and do not generally affect
authorization.
Services
Most bank networks accept all major credit cards, but may limit the card types
accepted by your business. The Services fields allow you to prevent entry of
the credit card types you do not accept.
Check each box if you plan to accept and/or deposit the card type shown.
Normally, card types you do not accept will be rejected by the bank network
upon attempting authorization. Entries on this screen allow you to terminate
the transaction before processing proceeds to that point.
18
Discount Rate and Per Transaction Charge
You may enter your Discount rate and/or Per Transaction Charge for each
card type. This allows you to display totals of what you will be making from
the sale.
Enter both amounts I dollars; e.g., a discount rate of 2.4 percent would be
entered as .024.
The discounted totals for a particular batch are shown on the Totals screen by
card type.
19
Addenda Setup
Options
The Addenda screen allows you to append certain information to the
transaction when it is authorized. The information allowed depends on the
authorizing agency you are using. If the authorizing agency cannot handle the
information, or you are not configured properly, the Addenda check boxes
will be “grayed” and you will be unable to enter information. Check with your
authorizing bank to confirm which options you may use.
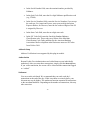
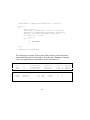
Address Verification/Direct Marketing—Address verification is used
primarily by mail-order businesses as a double check to ensure that the card
has not been stolen. It does not affect whether the transaction is actually
authorized, but returns a status message on how close the address to which the
purchase is to be sent matches the cardholder’s address.
20
The bank network plug-in software will only send address verification to the
network if either the Zip and/or Address fields are entered in the transaction
screen. Prior to authorization, the Zip code and address will display in the
Transaction List screen under the Addenda column. After authorization, a
special verification response code from the network will display in the
Transaction List screen, indicating the results of the verification.
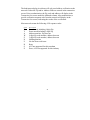
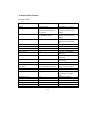
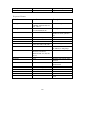
Most networks return the following AVS response codes:
Code
Description
X
Y
A
W
Z
N
U
R
S
E
Exact match, including 9-digit Zip
Exact match including 5-digit Zip
Address matches, Zip does not
9-digit Zip code matches, address does not
5-digit Zip code matches, address does not
Nothing matches
No date from card issuer
Retry
AVS not supported for this merchant
Error, AVS not supported for this industry
21
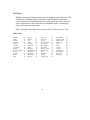
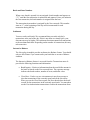
Administrative Setup
This screen allows you to protect your setup information and/or application.
6HWXS3DVVZRUG will not allow anyone to view or change setup information
without a password. $SSOLFDWLRQ3DVVZRUG will not allow anyone to open
PCAuthorize® without a password.
This setup screen is usually completed by a manager or key employee to limit
the access other employees may have to PCAuthorize® and/or functions
within. We recommend that you set this feature when no other employees are
present.
To protect either the application or the setup, enter a password in the
appropriate password text field. You must enter it twice to verify the entry.
Passwords may be a maximum of 8 characters.
22
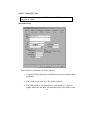
Once Setup is protected and is selected from the File menu, a window will
display requesting the password. If the appropriate password is entered, the
Setup menu displays and changes may be made.
23
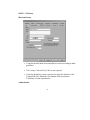
Personal Setup
This screen allows you to personalize certain options in PCAuthorize®. Items
on this screen are optional and generally do not affect credit authorization.
Identification
There are four operator identification fields:
•
Operator ID—Identification assigned by the bank or store manager. It
may be used to identify you on certain authorization networks.
•
Initials—To or three initials of the operator. This information is
included in each transaction and is used as a reporting identifier in the
Batch List screen and certain reports.
•
Name—Operator’s full name.
24
•
Department—Operator’s department code (maximum of 4 characters).
This information is included in each transaction.
New Transaction Defaults
Select the card and transaction type defaults to be used for new transaction:
•
Card Type—Select the card type (either Credit Card, T & E, Debit
ATM, Check/MICR, Check/License, or Private Label) you wish to
have automatically set when entering a new transaction.
•
Type—Select the transaction type (either Sale & Deposit, Authorize
Only, Return/Credit, or Void) you wish to have automatically set when
entering a new transaction. This should normally be set for Sale &
Deposit; however, if you are doing many returns, you may wish to
change this to Return/Credit.
Preferences
You may select either or both of the following confirmation preferences:
•
Confirm Delete Batch—Indicates a confirmation box is to display
every time you delete a batch.
•
Confirm Delete or Void Transaction—Indicates a confirmation box
is to display every time you delete or void a transaction.
Note: Only nonapproved transactions may be deleted.
•
Open Batch List with only pending batches—Indicates that you
wish to show only pending batches when you first open the Batch List
window.
•
Open Batch Detail with only pending transactions—Indicates that
you wish to show only pending transactions when you first open the
Batch Detail List window.
25
•
Unattended operation—Used only for kiosks, Internet gateways and
other special situations where you wish fewer error or prompting
dialogs.
Data Directory
This field tells PCAuthorize® where your transaction data files are located. It
is usually a directory within the PCAuthorize® directory named Transact. If
you wish to store your transactions in a different directory, use Windows to
move them, and enter the path name to the directory.
26
PIN Pad Setup
Note: Not all versions of PCAuthorize® support PIN pads.
PIN pads are used only if you are processing ATM/Debit cards. They allow
the customer to enter their PIN number for ATM/Debit cards.
If you have a PIN pad, select the model type and the serial port to which it is
attached. To ensure your PIN pad is connected and working properly, select
the 7HVW5HVHW button to run diagnostics. If diagnostics fail, check all your
connections.
Note: Some PIN pads allow you to run diagnostics independently
from PCAuthorize®. Refer to your PIN pad manufacturer’s manual
for additional information.
27
Split Dial or Additional Network Setup
Not all installations of PCAuthorize® contain this screen. It is only used if you
are dialing into alternate networks, such as American Express, or check
guarantee services such as Equifax, Cardservice, Telecheck, etc.
Complete the Authorization and Settlement sections with the network
telephone numbers, baud rates, and modem initialization fields.
Identifiers vary depending on the bank network you use. The information to
be entered in these fields is provided by your authorizing bank. Also see your
bank network plug-in documentation for additional information.
28
Multiple Merchant Setup
Note: Most users can skip this section unless they have a specific
requirement.
General
PCAuthorize® can support multiple merchants or merchant information on one
machine. We don’t necessarily recommend you set up multiple merchants on
a single machine, but if necessary, use the following setup guidelines.
Note: Your license agreement allows use of each copy of
PCAuthorize® on one Windows machine at a time. This does
not imply you can use one copy of PCAuthorize® on multiple
machines for multiple merchants.
You need only one copy of PCAuthorize® on your hard drive for all
merchants.
PCAuthorize® stores all setup information in a setup file. This includes most
of the information entered under the File/Setup menu. The setup file is named
Setup.PAI.
If you create multiple setup files, all you have to do is open the setup file for
the merchant for whom you wish to process transactions. (A bank network
plug-in module may be used for all merchants on the same machine.)
Creating Multiple Setup Files
To create multiple setup files:
•
Open PCAuthorize® and complete all setup items under the File/Setup
menu for the first merchant. Refer to the setup information in this
document and your bank network plug-in documentation for
information.
•
Authorize some transactions for the first merchant to ensure your
Communications and Merchant information is correct.
29
•
Be sure the current batch is settled or closed for your first merchant.
Do this by selecting &ORVH%DWFK from the File menu.
•
Select 6ZLWFK6HWXS from the File menu. A new screen will open. If
you wish to create a new setup file, simply type a unique name
followed by .PAI. Click the 2SHQ button.
•
If you are creating a new setup file, PCAuthorize® prompts to ensure
you wish to create one. Click <HV to create the new setup file.
•
PCAuthorize® will now display the setup screens for the new merchant.
Note: In the Preferences fields on the Personal screen is a field
called 'DWD'LUHFWRU\. We recommend you change the name to
something unique so that all transactions for a particular setup will
be stored in a separate directory for each merchant. For example,
change C:Tellan\PCAuth\Transact to C:Tellan\PCAuth\MerchA.
30
Repeat the above process for each merchant. The result will be a series of
setup files, one for each merchant.
Using Multiple Setup Files
To use each merchant setup file, select 6ZLWFK6HWXS from the File menu and
then select the *.PAI file you wish.
Do not intermix transactions between/among merchants. Always be
certain that you are entering and authorizing transactions for a merchant
under the correct setup. Failure to do so will result in a serious
accounting problem.
31
Multiple Bank Network Plug-in Setup
Note: Most users can skip this section unless they have a specific
requirement.
PCAuthorize® can support multiple bank card networks on one machine. We
don’t necessarily recommend you set up multiple bank plug-in modules on a
single machine, but if necessary, use the following setup guidelines.
Note: Your license agreement allows use of each copy of
PCAuthorize® and a PCAuthorize® network plug-on module on
one Windows machine at a time. This does not imply you can
use one copy of PCAuthorize® on multiple machines for
multiple merchants.
Be sure all bank network plug-in modules are in the same directory as the
PCAuthorize® application. You only need one copy of PCAuthorize® on your
hard drive to use all bank networks.
In general, follow the procedures above under “Multiple Merchant Setup.” For
each merchant, choose the appropriate Agency Access on the Merchant Setup
screen.
32
Section 3: Transactions
This section provides instructions on entering a transaction.
Before You Enter a Transaction
Review your bank network plug-in documentation and be sure you complete
the required information discussed under “Setting Up PCAuthorize®” prior to
entering a transaction. If this information is incomplete, your transactions may
not be properly authorized by your merchant bank.
Make certain your PC clock is set to the current date and time. If not, you may
be unable to accurately authorize transactions, resulting in chargebacks to
your account.
Prior to entering a transaction you should have a batch open. You should start
a daily routine of opening a new batch each business day, and settling it each
evening. Batches can be thought of as a business day’s worth of transactions.
For point-of-sale merchant stores, one batch is usually created each business
day. Each transaction is authorized as it occurs, and the transaction is stored in
the day’s batch. Once a day is complete, the current batch is closed, balanced,
settled, and deposited.
For mail-order businesses and other merchants, a transaction does not
necessarily have to be authorized when it is entered. In this situation,
transactions are simply stored as they are entered. Then, all transactions may
be authorized at one time, saving time and money.
Some banks allow you to open several batches in a day, or occasionally
continue a batch into another day’s business. Check with your bank to ensure
that you follow their business rules.
Additional information on batches may be found in Section 4.
To open a new batch, select 1HZ%DWFK from the File menu. Once the new
batch is open, an empty Transaction List and a transaction screen will open. If
you are not ready to enter transactions, close the transaction screen.
33
Note: The batch remains open regardless of the windows that are
open, or even if you exit PCAuthorize®.
As you add transactions, the Transaction List will be updated with the new
information.
If you do not have a batch open, PCAuthorize® will confirm you want one
open and then open it automatically. You may only add transactions to a batch
that has not been settled.
Opening the Transaction Window
To open the transaction screen, press the &WUO and 1 keys simultaneously or
click on the 1HZ icon on the Transaction List screen.
You may also start a new transaction automatically if you have a magnetic
stripe reader by simply sliding the card through the reader. If PCAuthorize®
detects a magnetic stripe read, it will automatically open a new transaction
with the magnetic stripe data.
34
Transaction Window Navigation Techniques
PCAuthorize® uses standard Windows mouse and keyboard techniques to
navigate the various windows and text fields. A brief description of important
techniques follows.
7DE
6KLIW-7DE
&WUO-6SDFH
5HWXUQ
(QWHU
/HIW$UURZ
5LJKW$UURZ
Moves the cursor from one text field to the next.
Moves the cursor to the previous text field.
Moves the cursor to the next Amount field.
Adds or updates the transaction.
Adds or updates the transaction.
Moves the cursor backward one character at a time until it
reaches the beginning of the text field.
Moves the cursor forward one character at a time until it
reaches the end of the text field.
Entering a Transaction
After opening the transaction window do the following:
Card Type
Select the major card type using the Card Type popup menu. Items in this
popup vary depending on your bank network and setup options. Generally,
this need only be selected if you are doing Debit/ATM, private label cards or
check guarantee. If the credit card is a major, nationally-recognized card, then
PCAuthorize® can determine the card type based on the account number.
Transaction Type
Select the transaction type. Items in this menu vary depending on your bank
network and setup options. All sale transactions should be Sale & Deposit.
Auth Only (NO DEPOSIT) should be used only if instructed in your bank
network plug-in documentation. You may also choose Return/Credit, Void, or
Post Authorization. Exact use of these transactions is determined by your
merchant bank.
35
•
6DOH'HSRVLW—used to
authorize a sale and electronically capture the
draft for deposit.
•
$XWK2QO\12'(326,7—used to authorize a sale and not capture it for
deposit. This will be your normal sales transaction if you do not use a
draft capture service. If you are using a draft capture service, then this
transaction type is used to preauthorize a transaction such as car-rental
check-out, hotel check-in, etc. An authorization checks the validity of
the cardholder’s account, verifies that the card is not stolen, and
verifies that the account has credit available at the time if the request.
•
5HWXUQ&UHGLW—used when merchandise is returned the next
•
9RLG—used
only by certain merchant banks for voiding transactions on
a day following the sale. For normal voids, use the Void button. See
the discussion on “Voiding a Transaction.”
•
3RVW$XWKRUL]DWLRQ—used
day or
several days after the purchase. Void a transaction the same day of
purchase rather than use a Return/Credit. Use of a Return/Credit
transaction is determined by your merchant authorizing bank. A
Return/Credit will appear in your Batch List as a negative amount, and
the batch totals will be adjusted accordingly.
if you receive a voice authorization, or
performed a prior Auth Only (NO DEPOSIT), and you wish to record
the transaction without authorizing it again. This may occur when your
merchant bank computer is down, you receive a referral response to an
authorization, or other unusual circumstances.
Note: A Post Authorization is sometimes called a Force or a
Ticket Only transaction by some bank networks.
The Post Authorization records the transaction for electronic deposit
without obtaining further authorization. It is used only if you are
electronically depositing your drafts. Enter the authorization number you
received from the bank. Some bank networks allow you to change a
regular authorization that received a “Call” response to a Post
Authorization. Consult your bank network plug-in documentation for
more details.
36
Entry Items
The following are the entries for a transaction. Only three items—Account
Number, Expiration Date and Amount—are required to obtain an
authorization. Other items are optional, but some may help reduce your
merchant charges.
Note: Actual items displayed depend on the card type, transaction
type, and other factors.
Account (required). Enter the account number on the card.
Exp date (required). Enter the expiration date on the card. This may be
entered in the format mmyy, mm/yy, or m/yy.
Retrieval Number. This number is returned by some bank networks as an
additional identifier for the transaction.
Auth Code. This number is returned by the bank network when the
transaction is approved.
Date. The date of the transaction.
Initials (optional). This information is copied from the Personal setup screen.
You may change it here for each transaction if you wish.
Department (optional). This information is copied from the Personal setup
screen. You may change it here for each transaction if you wish.
Line Descriptions (required for receipt). You may enter up to 4 line items and
amounts. The description is initially set to the default specified in the
Receipts screen, may be changed for each transaction.
Amounts (required). Enter the amount(s) to be authorized. You may
optionally include a dollar sign ($). Be sure to include a decimal point if
the sale is not a whole dollar amount. Tax may be required for certain
types of bank networks (e.g., American Express Purchase Card). The Total
Amount is the amount to be authorized.
37
Invoice/Folio (required for mail order). Enter any identification you wish up
to 12 characters.
Customer ID (optional). Enter any identification you wish up to 17
characters.
Micr (required if check guarantee). For check guarantee, enter the MICR
number on the check. Your merchant bank will tell you wish number to
enter.
Driver’s license (required if check guarantee). For check guarantee, enter the
driver’s license number.
State code (required if check guarantee). Enter the two-character state code of
the state issuing the license.
Birth date (optional). Enter the birth date on the driver’s license. Enter the
month, day, and year with or without slashes (mm/dd/yy or mmddyy).
Sale Type Items. Click on the icon for the type of sale you will be making—
Take (for general retail, restaurant, etc.) or Send (for mail or phone order).
Sales Tax. Toggle the icon to automatically calculate sales tax. The sales tax
rate is set in the Receipts screen.
Address Verification
If you use address verification, the following items will also be displayed (you
must request Address Verification in the Addenda setup screen):
Address (optional). Enter the shipping address of the cardholder. Your
merchant bank will tell you how to enter this.
Zip (optional). Enter the “ship to” Zip code of the cardholder.
38
Message Box
The box on the lower left of the screen is for messages. It displays errors and
other information pertaining to the transaction prior to authorization. Once a
transaction is authorized, it displays additional information resulting from the
authorization.
Entry Mode
The Entry Mode indicates whether the transaction was keyed or entered via a
magnetic stripe reader.
Force Duplicate
Some authorization networks reject duplicate transactions. This allows you to
override the duplicate check. Refer to your bank network plug-in
documentation for further information.
Credit Card Magnetic Stripe Authorization
To authorize a transaction using a magnetic stripe reader:
1. Swipe the card through the magnetic stripe reader. A transaction
screen displays with the account number and date.
2. Enter the amount or amounts and line item descriptions, if desired. The
Total Amount is the amount that will be authorized.
3. Click on $XWKRUL]H or press the &WUO and $ keys simultaneously. A
dialog box displays indicating the status of the connection to your
merchant bank.
4. Once the transaction is authorized, the transaction screen displays the
authorization response. The transaction is automatically recorded in
your open batch.
39
Credit Card Manual Entry Authorization
To authorize a transaction by manually entering the information:
1. Select 1HZ7UDQVDFWLRQ from the Transactions menu or press the &WUO
and 1keys simultaneously. A transaction screen displays.
2. Select 6DOH'HSRVLW or $XWK2QO\ from the Type menu.
3. Enter the account number, expiration date, the amount or amounts, and
line item descriptions, if desired. The Total Amount is the amount that
will be authorized.
Note: The expiration date should be entered as four digits with
no slashes.
4. Click on $XWKRUL]H or press the &WUO and $ keys simultaneously. A
dialog box displays indicating the status of the connection to your
merchant bank.
5. Once the transaction is authorized, the transaction screen displays the
authorization response. The transaction is automatically recorded in
your open batch.
Check Guarantee MICR Authorization
Checks are generally guaranteed by using either the MICR number on the
bottom of the check, or the driver’s license number. Check with your bank to
see which to use. To authorize a check guarantee transaction using the MICR
number:
1. Select 1HZ7UDQVDFWLRQ from the Transactions menu or press the &WUO
and 1keys simultaneously. A transaction screen displays.
2. Select &KHFN0,&5 from the Card Type menu and $XWKRUL]H2QO\ from
the Transaction Type menu.
40
3. Enter the MICR number, the amount or amounts, and line item
descriptions, if desired. The Total Amount is the amount that will be
authorized.
4. Click on $XWKRUL]H or press the &WUO and $ keys simultaneously. A
dialog box displays indicating the status of the connection to your
merchant bank.
5. Once the transaction is authorized, the transaction screen displays the
authorization response. The transaction is automatically recorded in
your open batch.
Check Guarantee License Authorization
Checks are generally guaranteed by using either the MICR number on the
bottom of the check, or the driver’s license number. Check with your bank to
see which to use. To authorize a check guarantee transaction using the driver’s
license number:
1. Select 1HZ7UDQVDFWLRQ from the Transactions menu or press the &WUO
and 1keys simultaneously. A transaction screen displays.
2. Select &KHFN/LFHQVH from the Card Type menu and $XWKRUL]H2QO\
from the Transaction Type menu.
3. Enter the driver’s license number, the code for the state from which
the license was issued, the birth date, the amount or amounts, and line
item descriptions, if desired. The Total Amount is the amount that will
be authorized. The birth date should be entered in the format mmddyy.
4. Click on $XWKRUL]H or press the &WUO and $ keys simultaneously. A
dialog box displays indicating the status of the connection to your
merchant bank.
5. Once the transaction is authorized, the transaction screen displays the
authorization response. The transaction is automatically recorded in
your open batch.
41
Authorizing An Entire Batch
To authorize an entire batch:
1. Enter each transaction as discussed above. Rather than click on the
$XWKRUL]H button, press the (QWHU key or click the 5HFRUG button. Each
transaction will be recorded and the transaction screen cleared
awaiting entry of the next transaction.
2. Once all transactions have been entered, close the transaction screen
by selecting &ORVH from the pull-down menu.
3. Click on the Transaction List screen to bring it to the front. The
Transaction List screen is discussed in detail under “The Transaction
List Screen Contents” following the discussion on “Discount Rates.”
4. Click the $XWK icon or select $XWKRUL]H%DWFK from the Transactions
menu. A dialog box displays indicating the status of the connection to
your merchant bank.
5. As each transaction is authorized, it is highlighted in the Transaction
List screen and the authorization response is indicated.
Discount Rates
To achieve the most favorable discount rates, follow these simple rules:
Retail Businesses
1. If you are a storefront and/or the customer is present, be sure to get a
card swipe or manual imprint.
2. The cardholder must sign the charge slip or printed receipt.
3. The batch must be settled daily.
4. Save your paperwork for three years.
42
Mail-Order or Direct-Marketing Businesses
1. Always use Address Verification. This can be turned on under the
Addenda setup.
2. Always enter an invoice number.
3. Ensure all transactions use “Send” rather than “Take.”
4. The batch must be settled daily.
5. Save your paperwork for three years.
Purchase Cards
To achieve the most favorable rates for purchase cards, do all of the
following:
1. Be sure you enter Tax Amount if applicable.
2. Always enter an invoice number.
3. Always enter a Customer Code/Order #. Make sure these codes are
strictly alphanumeric with no special characters.
4. Always enter Zip code information.
Corporate and Business Cards
There is no specific bin range for corporate or business cards; therefore, to
achieve the most favorable rate for corporate or business cards, you must enter
a Tax Amount.
43
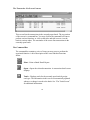
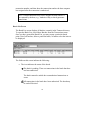
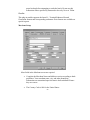
The Transaction List Screen Contents
This screen lists the transactions in the currently-open batch. The top portion
of the screen is a command bar. You may click on the command bar icons to
perform various functions, or click on the titles and title icons to view the
batch in various orders. The remainder of the screen lists transactions in the
currently-open batch.
The Command Bar
The command bar contains a series of icons you may press to perform the
associated function. A brief description of the icons and their functions
follow.
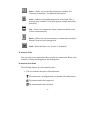
Print—Prints a Batch Detail Report.
Open—Opens the selected transaction. A transaction detail screen
displays.
Totals—Displays totals for the currently-open batch by major
card type. The information in this screen is automatically updated
whenever a change is made to the batch. See “The Totals Screen”
for additional information.
44
Select—Allows you to select the transactions to display. See
“Selecting Transactions” for additional information.
Auth—Authorizes all pending transactions in the batch. This is
generally only available if your bank supports multiple transaction
processing.
New—Starts a new transaction. Opens a transaction detail screen
to allow transaction entry.
Delete—Deletes the selected transaction. A transaction can only be
deleted if it has not yet been approved.
Settle—Settles the batch. See “Section 5: Settlement.”
Transaction Titles
You may click on any transaction title to sort the list in that order. Resize each
column by clicking and dragging on the dividing lines.
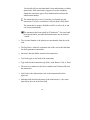
Transaction Line Items
The following displays for each transaction line:
•
The icon indicates the status of the transaction:
The transaction is pending and not yet submitted for authorization
The transaction has been approved.
The transaction has been declined.
45
You should call your merchant bank for an authorization or further
instructions. If the transaction is approved over the telephone,
change the transaction type to Post Authorization and enter the
authorization number.
The transaction was in error. Generally, you should retry the
transaction. If it fails a second time, call your bank’s Help Desk.
The transaction is suspect. Hold the card if it is safe to do so and
call your merchant bank.
The transaction has been settled by PCAuthorize®. For some bank
networks the batch, not individual transactions, may be marked
“settled.”
•
The Account Number is the primary account number from the credit
card.
•
The Exp Date is either the expiration date of the card or the birth date
for check guarantee transactions.
•
Amount is the total dollar amount of the transaction.
•
Card is the type of card used in the transaction.
•
Type indicates the transaction type (Sale, Auth, Return, Void, or Post).
•
The next two columns are the Invoice number and Customer ID from
the transaction.
•
Auth Code is the authorization code is the transaction has been
approved.
•
Addenda field describes the status of the transaction (i.e., the status
depicted by the icon in the first field).
46
Selecting a Transaction
There are two methods used to select transactions:
1. Use the 6KRZpull-down menu from the command bar line to select
either All, Pending Only, or Submitted Only transactions. This is a
quick way to see which transactions have not been submitted for
authorization.
2. Use the 6HOHFW icon from the command bar line to limit the selection of
transactions. When this icon is selected a window displays asking for
further selection criteria. You may enter a partial account number, or
check the boxes to limit the type of responses displayed (pending,
accepted, hold-call, declined, referral, and error).
Click the &DQFHO button to cancel any changes you make. Click the
5HVHW button to reset the selection criteria to normal.
Note: Both Select and Show selection criteria are combined to
determine which transactions are displayed.
Voiding a Transaction
The 9RLG button is used when merchandise is returned the day of purchase.
Use the Return/Credit transaction if merchandise is returned the following or
subsequent days after purchase.
Procedures for voiding a transaction are determined by your merchant bank;
however, the following general guidelines can be used.
1. Locate the transaction to be voided by selecting 6KRZ7UDQVDFWLRQV
from the Transactions menu.
2. Scroll the Transaction List screen until you find the transaction you
wish to void. Either double-click on the transaction line or click and
select the 2SHQ icon on the command bar line.
47
3. A transaction screen will open. Click the 9RLG button.
The transaction will be voided and display a special void icon.
Some banks require authorization of a void transaction, particularly if you are
using electronic draft capture. If so, you must authorize the voided transaction
by clicking on the $XWKRUL]H button or icon.
Changing a Transaction
A transaction may be changed only if it has not been approved, and the batch
not settled.
To change a transaction:
1. Select 6KRZ7UDQVDFWLRQV from the Transactions menu. The
Transactions List screen displays. Scroll until you find the transaction
you wish to change.
2. Double-click on the line showing the transaction you wish to change.
The transaction entry window will open.
3. Make your changes. Click on the $XWKRUL]H button to immediately
connect to the bank and authorize the transaction, or click on the
8SGDWHbutton to save the changes for later authorization.
Deleting a Transaction
A transaction may be deleted only if it has not been approved. To delete a
transaction:
1. Ensure the batch containing the transaction is open.
2. Select 6KRZ7UDQVDFWLRQV from the Transactions menu. The
Transactions List screen displays.
48
3. Scroll to the transaction you wish to delete and click on that line. This
will highlight the line.
4. Click on the 'HOHWH icon.
If the 'HOHWH icon is grayed, then you are not allowed to delete the transaction.
Finding a Transaction
PCAuthorize® includes a transaction search feature which allows you to search
for a transaction by date range, card number, amount range, invoice number,
and/or customer ID. To use the Find function:
1. Your current batch will be closed prior to the search. Once you have
completed your search, you should reopen today’s batch to resume
transaction processing for the day.
2. Select )LQG7UDQVDFWLRQ from the File menu. A search dialog box
displays.
3. Enter the information on which you wish to search. Information in the
Account Number, Invoice and Customer Number fields will cause a
match if any of the numbers match.
Note: Using “Date from” and “to” will cause the search to
proceed more rapidly since only batches created or modified
between the dates entered will be searched.
49
4. Click on the )LQG button to begin the search.
5. If a matching transaction is found, the transaction screen, along with
the batch in which it exists, will be opened.
6. You may continue searching by clicking the )LQG button again. You
may also change your search criteria and begin the search again.
Once you have completed your search, close the search window and reopen
the batch you were working on prior to beginning the search.
The Totals Screen
This screen displays the totals by major card type of the currently-open
batch. The Totals screen is automatically changed whenever a change is
made to the batch.
The Totals screen may be open only if a batch is currently open. To open
the window, either select 7RWDOV from the Transaction menu, or click on the
7RWDOV icon in the Transactions List screen.
Several types of totals are displayed in the Totals screen by major card
type. Totals not included in major card type totals are indicated in the
“Other” row.
50
Tot Items—Total number of items in the batch.
Amount—Net amount in the batch.
Settle Value—Net amount in the batch to be settled with the bank.
Discount Amount—Actual amount you will receive after discounts are
applied. These amounts are calculated according to information supplied
in the Card Types screen under the Setup menu.
51
52
Section 4: Batches
Handling Batches
PCAuthorize® keeps each batch in a separate file within the Transact
directory. PCAuthorize® usually numbers each batch sequentially, starting
with “1.” If your merchant bank automatically captures your transactions,
PCAuthorize® may use the batch number assigned by the host computer rather
than its own batch number. In this case, PCAuthorize® will initially show
pound signs (###) or question marks (???) for the batch number, and then
show the batch number the host computer has assigned after the first
transaction is authorized.
A batch may be open even though you may not have any windows open. In
other words, if you close the Transaction List window, it does not close the
batch. You must explicitly open and close each batch. PCAuthorize® keeps
track of which batch is open even if you exit and reopen the application.
Only one batch may be open at a time, regardless of whether it is a new batch
into which you are entering transactions, or an existing batch which you are
reviewing. This restriction prevents you from entering transactions into the
wrong batch, or causing a mix-up with the host computer if it is electronically
capturing your transactions.
Handling Transactions within Batches
Some banks limit the number of transactions allowed per batch. There is a
manageable limit, however, depending on your situation. We recommend you
limit a batch to around 100 transactions, although bank networks generally
allow up to 500 transactions and more in a particular batch. When batches
reach this limit, balancing and finding transactions becomes cumbersome.
Each transaction in a batch is numbered sequentially, starting with “1.” If your
merchant bank electronically captures your transactions, PCAuthorize® may
use the transaction number assigned by the host computer rather than its own
number. In this case, PCAuthorize® will initially show question marks for the
53
transaction number, and then show the transaction number the host computer
has assigned after the transaction is authorized.
Note: Certain transactions may not be assigned an item number if
not captured by the host; e.g., Authorize Only or check guarantee
transactions.
Batch List Screen
The Batch List screen displays all batches currently in the Transact directory.
To open the Batch List, select Show Batches from the Transactions menu.
Once you have opened the Batch List, you may reopen a particular batch,
print a list of all batches, delete a particular batch, or further select the items to
be displayed.
The fields on this screen indicate the following:
•
The icon indicates the status of the batch:
The batch is pending. There are transactions in the batch that have
not been authorized.
The batch cannot be settled due to unauthorized transactions or
errors.
All transactions in the batch have been authorized. The batch may
be settled if desired.
54
The batch has been settled by PCAuthorize®. Once a batch is
settled it cannot be modified.
Note: If your bank automatically settles your
transactions, then the batch status will not be indicated
as “settled.”
•
Date—The month, day and year the batch was created.
•
Who—Initials of the individual who opened the batch. This
information is taken from the Personal setup screen.
•
Batch—The batch number.
•
Pending—Item count and dollar amount of pending items in the batch;
i.e., those items not yet submitted for authorization.
•
Submitted—Item count and dollar amount of items in the batch
submitted for authorization. This total includes both approved and
nonapproved transactions.
•
Total—Total item count and dollar amount of items in the batch.
•
Settle Value—Actual value to be deposited in your bank account.
You may print the Batch List by clicking the 3ULQWicon. The Batch List
contents will be printed in a format similar to what is shown on the screen. For
additional information about printing and page setup, consult your Windows
user’s guide.
Opening an Existing Batch
To open an existing batch, select 2SHQ%DWFK from the File menu or 6KRZ
%DWFKHV from the Transactions menu. The Batch List displays. Scroll to the
batch you want to open and either click on the line and then select the 2SHQ
icon, or simply double-click on the line. The Transaction List for the batch
displays.
55
PCAuthorize® allows you to have one batch open at a time. If a batch is
currently open, you must either close it prior to opening another batch or,
when opening a batch, click 2. in response to the prompt.
Generally, you should not authorize, modify, or add to prior day’s batches.
Check your bank network plug-in documentation for further procedures on
modifying prior batches.
Deleting a Batch
To delete a batch, select Show Batches from the Transactions menu. The
Batch List displays. Scroll to the batch you want to delete, and then click on
the line, highlighting the batch. Once the batch is highlighted, click on the
'HOHWH icon. Once a batch is deleted in PCAuthorize®, it is immediately
erased; there is no “undo” or retrieve function.
Delete a batch only if you are completely finished with it. It is a good idea to
either copy it elsewhere (using the Finder), or export it into another format
(using the PCAuthorize® export feature) prior to deleting it.
Note: We recommend you keep batches for at least six months in
case there are chargebacks to your account.
To delete a batch with Windows, exit PCAuthorize® if it is active. Follow the
procedures you would when throwing any document in the Recycle Bin, as
outlined in your Windows user’s guide.
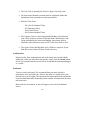
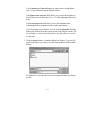
Selecting the Batch List Contents
A 6HOHFW icon allows you to search for batches meeting specified selection
criteria. If you click on the 6HOHFW icon, the following screen displays:
56
You may search for a batch by date, batch number, total amount, settle
amount, and the initials of the individual who originally opened the batch.
You may also use the 6HOHFW pull-down menu to quickly limit the batches
displayed. Select $OO, &RPSOHWH, or 3HQGLQJ to limit the selection.
Authorizing a Batch
Transactions may be authorized at the time of entry or together in a batch if
your bank supports this feature. You may choose to authorize transactions all
at once only if your merchant bank is set up to do so. Generally, this feature is
used by mail-order businesses who do not need to authorize each transaction
individually or as a sale is made.
To authorize an entire batch:
1. If a batch is not open, either open the existing batch you wish to
authorize, or start a new batch and enter the transactions. You may
only add transactions to a batch that has not been settled. Rather than
clicking the $XWKRUL]H button for each transaction, simply press the
5HFRUG button.
57
2. Open the Transaction List by selecting 6KRZ7UDQVDFWLRQV from the
Transactions menu.
Note: All pending transactions in a batch are authorized in the
original entry order regardless of what is displayed in the
Transaction List.
3. Click on the $XWKRUL]H icon, or select $XWKRUL]H%DWFK from the
Transactions menu. Once you have clicked on this icon, a message
displays indicating the status of the connection to your merchant bank.
As each transaction is authorized, it will be highlighted and the
authorization response will appear.
4. Once the batch is authorized, you may continue with other work.
Intermixing Batch and Single Authorizations
Most banks allow you to intermix authorization of a single transaction or the
entire batch. When you authorize a batch, only the transactions that have not
been authorized, or resulted in an authorization error, will be sent for
authorization.
Refer to the documentation provided with your bank network plug-in software
for additional information.
58
Section 5: Settlement
What is Settlement?
Settlement is balancing the books at the end of the day. You settle with your
bank network, your merchant bank account, and all the people who charged
on their card. It ensues that your credit card charges match what you have
authorized, balances everything, and send it all off to your bank account.
Some bank networks settle for you, some insist you settle daily, and some
give you the ability to settle when you want to. Check your bank network
plug-in documentation for more information.
Most bank networks follow a business day and allow settlement only for the
current business day’s batch. To settle your batch, the batch must be the
currently-open batch for the day. This is usually the batch you have been
working on throughout the day.
Settlement Types
There are two ways in which settlement can be handled—host capture
settlement and terminal capture settlement. PCAuthorize® uses the same
settlement procedure for all bank networks, regardless of the type of
settlement.
If your merchant bank is capturing the transactions for deposit, then settlement
is used to ensure the batch maintained on the bank’s computer matches the
batch maintained by PCAuthorize®. This is done by comparing the totals for
the two batches. If the totals match, then the batch is considered settled and
will be deposited. If the totals do not match, then either the entire batch is
retransmitted to the host, or you must balance it manually to match the host.
Check with your merchant bank for additional information.
If you are using terminal capture, then settlement causes the entire batch to be
sent to the bank’s host. This may take some time depending on the number of
transactions.
59
If you are using multiple authorizing agencies for settlement, PCAuthorize®
must connect with each agency and settle the appropriate transactions for that
agency; e.g., if you are using a major network for Visa and MasterCard
transactions, but using American Express for their transactions.
Settlement Procedures
To settle your batch, the batch must be the currently-open batch for the day.
Once the batch is opened:
1. Either select 6HWWOH%DWFK from the Transactions menu or click the
6HWWOH icon on the Transaction List screen.
2. A window displays showing the totals PCAuthorize® has computed for
the batch. Host totals may or may not be shown, depending on the
bank network you use. If they are shown, they should match the
PCAuthorize® totals. Click the 6HWWOH button.
3. PCAuthorize® will then connect with the bank and settle the batch.
Depending on the type of settlement and number of transactions, this
may take some time.
60
4. After PCAuthorize® has completed the settlement, a window displays
with the batch totals and indicates whether the settlement was
completed. Assuming it completed successfully, click the 2. button.
Note: Once a batch is completely settled it cannot be modified.
Settlement for multiple authorizing agencies is handled in the same manner as
standard settlement; however, you will be prompted for each agency as
settlement begins. You may temporarily bypass settlement for a particular
agency by pressing the %\SDVV button.
A batch will be marked “settled” only if all agencies and transactions have
successfully settled.
Interactive Balance
Some bank networks provide additional aids for balancing and settling your
transactions. If your bank network and bank network plug-in support this, an
additional item—,QWHUDFWLYH%DODQFH—appears at the bottom of the
Transactions menu.
The content and use of Interactive Balance varies among networks. Consult
your bank network plug-in documentation for details. You should, however,
observe the following guidelines.
You may open the Interactive Balance window at any time by selecting
,QWHUDFWLYH%DODQFH from the Transactions menu. A screen similar to the
following displays:
61
To perform an interactive balance transaction, first select the transaction type
from the Type pull-down menu. Complete any additional data in the fields
according to your bank network plug-in documentation. Click the &RQQHFW
button.
Once the transaction has been transmitted to your bank, a response will be
returned and displayed on the screen. Consult your bank network plug-in
documentation for the meaning of these responses.
62
Section 6: Reports and Troubleshooting
Reports
PCAuthorize® allows you to print the following reports:
•
Transaction Sale Invoice—Detail of an individual transaction, printed on
either a standard Windows printer or special receipt printer. You will
usually be printing a transaction immediately after entering and
authorizing it. To effect automatic receipt printing, check the
Automatically Print Receipt field on the Receipts setup screen. If you are
printing a receipt at a later time, you must first open the transaction screen
by selecting 6KRZ7UDQVDFWLRQV from the Transactions menu. Highlight the
transaction for which you wish an invoice printed and press the 3ULQWicon.
•
Bank Audit List—Detail listing of each transaction. This report is used to
research chargebacks and other situations. To print this report, select the
3ULQW icon from the open batch. Select %DQN$XGLW/LVW from the Report
Type pull-down menu. Card type totals may be included if this field is
checked.
•
Merchant Summary—Detail listing of each transaction, including
merchant information such as invoice number, customer number, etc. To
print this report, select the 3ULQW icon from the open batch. Select 0HUFKDQW
6XPPDU\ from the Report Type pull-down menu. Card type totals may be
included if this field is checked.
•
Merchant Detail—Detail listing of each transaction, each description
line, etc. To print this report, select the 3ULQW icon from the open batch.
Select 0HUFKDQW'HWDLO from the Report Type pull-down menu. Card type
totals may be included if this field is checked.
•
Batch Detail List—To print a Batch Detail List, select 6KRZ7UDQVDFWLRQV
from the Transactions menu to open the Transaction List screen. Sort the
batch in the order in which you wish to have the report printed by clicking
on the titles. You may also limit the items printed by clicking the 6HOHFW
63
•
button or using the 6KRZ pull-down menu. Select 3ULQW from the File menu
or click on the 3ULQWicon.
Batch Summary List—To print a Batch Summary List, select 6KRZ
%DWFKHV from the Transactions menu to open the Batch List screen. Sort
the batches in the order in which you wish to have the report printed by
clicking on the titles. You may also limit the items printed by clicking the
6HOHFW button or using the 6HOHFW pull-down menu. Select 3ULQW from the
File menu or click on the 3ULQWicon.
Troubleshooting
This section discusses what to do when:
You get a “Host is not responding” message
If this is your first authorization, then your modem is not configured
properly for the bank network. You must enter the appropriate modem
initialization string in the Communications setup screen. Refer to your
bank network plug-in documentation.
If you have been using PCAuthorize® for some time, call your bank’s Help
Desk to see if their network is down.
You do not get a response from the bank network
Try the authorization again. If it fails several times, call your bank’s Help
Desk to see if their network is down.
Merchandise is returned
If the merchandise is returned the same day it was sold, find that
transaction and void it. If it was returned on another day, enter the new
transaction as a Return/Credit.
You get a call response
64
Call your bank’s Authorization Center for authorization. If the transaction
is approved over the telephone, change the transaction type to Post
Authorization and enter the authorization number. See the discussion on
Post Authorization under “Transaction Type” for additional information.
You receive a voice authorization over the telephone
Start a new transaction or, with the current transaction, change the
transaction type to Post Authorization. Enter the authorization number.
See the discussion on Post Authorization under “Transaction Type” for
additional information.
You receive the message “Settlement Incomplete”
If PCAuthorize® totals do not match the host settlement totals, you must
balance your batch. This generally occurs when there are communication
problems and a transaction was not captured properly.
Check the batch for duplicate or missing transactions and adjust
accordingly.
65
66
Section 7: Network-Specific Instructions
This section provides specific instructions for each bank network. Be sure to read
the section for the network you are using. Any additional instructions from the
bank take precedence over these instructions. The network name is the one
selected in the Agency Access field Communications setup screen.
67
American Express
Merchant Setup
Most fields in the Merchant setup screen are required.
•
Complete the Merchant Name and Address section according to
American Express guidelines. Your merchant name, city and state are
transmitted upon electronic draft settlement. Ensure that this
information is correct.
•
Country Code and City Code are not required.
•
All items in the Identifiers section must be completed. Obtain the
appropriate information from the fax/letter sent to you by American
Express, or call 1-800-352-9814.
68
Addenda Setup
This plug-in module does not support Address Verification.
Receipts Setup
American Express has certain guidelines relating to item descriptions. At least
one charge description is required. The other three descriptions should be
blank if not used. Descriptors should be as concise as possible. A generic
“Merchandise” description is not acceptable. Use, for example, something like
the following:
OFFICE SUPPLIES/PENCILS/PAPER
American Express Test Procedures
Once you have completed all of the setup items under the Setup menu, and
before you accept American Express transactions, you must run a test
settlement with American Express.
1. Complete the setup items under the Setup menu. The Communications
and Merchant setups must be completed.
2. Select &RPPXQLFDWLRQV from the Setup menu. The Communications
setup screen displays. Select $PH[7HVW6HWWOH in the Agency Access
field. Click 2..
3. A second screen displays. Complete all the settlement information
fields. For the settlement telephone number, type in 703-761-3744.
Click 2..
4. Select 6KRZ%DWFKHV from the Transactions menu. A list of batches
displays.
5. Double-click on the first batch (batch number 1). A Transaction List
opens. This is a preset test batch.
69
6. Click the 6HWWOHicon on the Transaction List screen. A Settle Batch
screen will open.
7. Click 2.. PCAuthorize® will dial the American Express network and
perform the test settlement.
8. Once you have completed the test, select &RPPXQLFDWLRQV from the
Setup menu. The Communications setup screen will open. Select
$PHULFDQ([SUHVV in the Agency Access field. Click 2.. Select &ORVH
%DWFK from the File menu.
Authorization
American Express has special guidelines relating to certain items on the
transaction screen.
•
A “ship to” Zip code is required for telephone or mail-order
transactions. This will appear in a special box in the transaction screen.
You will not receive a response code when verifying the address, but it
will be registered in Amex’s system.
•
The Customer ID is optional and is placed in the Customer ID field.
•
An Invoice/Folio Number is required and is limited to nine characters.
•
Sales Tax should be completed, if applicable.
•
At least one charge description is required. The other three
descriptions should be left blank if not used. Descriptors should be as
concise as possible.
Return/Credits, Post Authorizations, and voided items are not authorized;
when you enter these transactions, simply click the 5HFRUG button. If you void
a transaction, the window will be closed and the transaction flagged as
“voided.”
70
Settlement
You must settle each batch. We recommend that you settle each day’s
transactions at the end of the day. If this is not done on a timely basis, your
discount rate may be higher. The settlement function transmits all transactions
to the American Express host. Depending on the number of transactions, this
may take some time.
71
ECHO Network
Merchant Setup
•
Complete the Merchant Name and Address section according to bank
guidelines. Country Code and City Code are not required.
•
The ECHO terminal identifier is 11 characters in length. Obtain the
terminal identifier from your bank account representative.
Voids
Voids must be authorized. Be sure to click the $XWKRUL]Hbutton after voiding a
transaction.
72
Settlement
There is no settlement procedure for ECHO. ECHO settles all transactions
automatically at midnight Pacific time. You should open a new batch each
business day. You may check your total captured amounts for the day using
the Interactive Balance feature described below.
Interactive Balance
The ECHO plug-in module provides for an additional feature called
Interactive Balance. This feature allows you to run a modem test and review
the last three day’s totals stored in the network host.
Choose ,QWHUDFWLYH%DODQFH from the Transactions menu to open the Interactive
Balance screen.
Address Verification
For Sale & Deposit transactions, PCAuthorize® automatically transmits two
transactions to ECHO—an Authorize-Only transaction to check the credit
limit and, if the transaction is approved, a Post Authorization to deposit the
funds.
73
FDMS North – Card Establishment Services
Merchant Setup
Most fields on the Merchant screen are required.
•
Complete the Merchant Name and Address section according to bank
guidelines.
•
The Country Code and City Code are not required.
•
In the Merchant ID field, enter the CES 12-digit merchant number.
•
In the Terminal ID field, enter the CES six-digit terminal number.
74
Authorization
Return/Credits, Post Authorizations and voided items are not individually
authorized; when you enter these transactions, simply click the 5HFRUG button.
If you void a transaction, the screen will be closed and the transaction flagged
as “voided.”
Settlement
You must settle each batch. We recommend that you settle each day’s
transactions at the end of the day. If this is not done on a timely basis, your
discount rate may be higher. The settlement function transmits all transactions
to the merchant bank host. Depending on the number of transactions, this may
take some time.
75
FDMS Nashville – Envoy
Merchant Setup
Most fields in the Merchant screen are required.
•
Complete the Merchant Name and Address section according to bank
guidelines.
•
The Country Code and City Code are not required.
•
In the Merchant ID field, enter the Envoy merchant number.
•
In the Terminal ID field, enter the Envoy terminal number.
76
Authorization
Return/Credits, Post Authorizations and voided items are not individually
authorized; when you enter these transactions, simply click the 5HFRUG button.
If you void a transaction, the screen will be closed and the transaction flagged
as “voided.”
Settlement
You must settle each batch. We recommend that you settle each day’s
transactions at the end of the day. If this is not done on a timely basis, your
discount rate may be higher. The settlement function transmits all transactions
to the merchant bank host. Depending on the number of transactions, this may
take some time.
Address Verification
The possible AVS response codes are:
•
First character is address match:
Y
Match
N
No match
X
Service not available
•
Second character is Zip match:
Y
Match
N
No match
X
Service not available
77
FDMS South – NaBanco
Merchant Setup
Most fields in the Merchant screen are required.
•
Complete the Merchant Name and Address section according to bank
guidelines.
•
The City Code is the first five digits of your Zip code.
•
The Country Code is 840 for the United States.
•
In the Merchant ID field, enter the NaBanco nine-digit merchant
number.
78
•
In the Serial Number field, enter the terminal number provided by
NaBanco.
•
In the Qual Code field, enter the five-digit NaBanco qualification code
(e.g., 25800).
•
In the Service Numbers fields, enter the Service Numbers if you accept
the card type. For American Express, enter your ten-digit American
Express number; for Discover, enter the low-order ten digits of the SE
# assigned by Discover.
•
In the State Code field, enter the two-digit state code.
•
In the SIC Code field, enter the four-digit Standard Industry
Classification code. These codes are a subset of the Merchant
Classification Code Guide published by the American Banking
Association. Mail or telephone-order businesses must use SIC codes
from 5960 to 5969.
Addenda Setup
Address Verification is not supported by this plug-in module.
Authorization
Return/Credits, Post Authorizations and voided items are not individually
authorized; when you enter these transactions, simply click the 5HFRUG button.
If you void a transaction, the screen will be closed and the transaction flagged
as “voided.”
Settlement
You must settle each batch. We recommend that you settle each day’s
transactions at the end of the day. If this is not done on a timely basis, your
discount rate may be higher. The settlement function transmits all transactions
to the merchant bank host. Depending on the number of transactions, this may
take some time.
79
Mail Order
NaBanco has special requirements for mail or telephone-order businesses. The
PCAuthorize® NaBanco plug-in module uses the Merchant Classification
Code to determine if transactions should be indicated as mail-order. All mailorder transactions are also processed as nonmagnetic stripe, even though a
stripe reader may have been used.
Mail or telephone-order businesses must us a SIC code from 5960 to 5969.
State Codes
Alabama
Alaska
Arizona
Arkansas
California
Colorado
Connecticut
Delaware
Dist. of Columbia
Florida
Georgia
Hawaii
Idaho
01
02
04
05
06
08
09
10
11
12
13
15
16
Illinois
17
Indiana
18
Iowa
19
Kansas
02
Kentucky
21
Louisiana
22
Maine
23
Maryland
24
Massachusetts 25
Michigan
26
Minnesota
27
Mississippi 28
Missouri
29
Montana
Nebraska
Nevada
New Hampshire
New Jersey
New Mexico
New York
North Carolina
North Dakota
Ohio
Oklahoma
Oregon
Pennsylvania
80
30
31
32
33
34
35
36
37
38
39
40
41
42
Rhode Island
South Carolina
South Dakota
Tennessee
Texas
Utah
Vermont
Virginia
Washington
West Virginia
Wisconsin
Wyoming
44
45
46
47
48
49
50
51
53
54
55
56
FDMS – Omaha ETC Plus
Note: You must be set up on the FDR Network as ETC Type 7 to use
this plug-in module.
Merchant Setup
Most fields in the Merchant screen are required.
•
Complete the Merchant Name and Address section according to bank
guidelines.
•
The Country Code and City Code are not required.
•
The FDR merchant account number is a maximum of 19 digits in
length. Obtain the merchant account number from your bank account
81
representative. Under the Identifiers Merchant Number section, enter
the first ten digits; enter the remaining digits in the appropriate fields.
•
The FDR device ID is four characters. It allows you to identify
multiple terminals or devices under the same merchant number.
Generally, enter a “0001” for your first workstation, “0002” for your
second, etc.
Personal Setup
The Operator ID is transmitted to the FDR network, if entered. Complete the
other items if desired.
Authorization
Return/Credits, Post Authorizations and voided items are not individually
authorized; when you enter these transactions, simply click the 5HFRUG button.
If you void a transaction, the screen will be closed and the transaction flagged
as “voided.” All Return/Credits, Post Authorizations, and voided items are
sent to the host upon settlement.
Settlement
You must settle each batch. We recommend that you settle each day’s
transactions at the end of the day. If this is not done on a timely basis, your
discount rate may be higher. The settlement function transmits all transactions
to the merchant bank host. Depending on the number of transactions, this may
take some time.
82
FDMS – TeleMoney
Merchant Setup
•
Complete the Merchant Name and Address section according to bank
guidelines.
•
The Country Code and City Code are not required.
•
Under the Identifiers section, enter the five-digit Site Number in the
Terminal ID field. Obtain the Site Number from your bank or
TeleMoney account representative.
Authorization
83
When a new batch is opened, it is not assigned a batch number and appears as
“???” until the first transaction is authorized. Once you authorize the first
transaction, the batch number is assigned from the host.
Settlement
Settlement is supported but is optional, depending on your requirements.
Check with your bank or Telemoney representative for more information. If
you use the TeleMoney “auto close” and “auto release” features, then you are
not required to settle. We recommend, however, that you settle each day’s
transactions at the end of the day.
84
Paymentec – Gensar
Merchant Setup
•
Complete the Merchant Name and Address section according to bank
guidelines.
•
The Country Code and City Code are not required.
•
In the Client field, enter the four-digit Gensar client number.
•
In the Merchant ID field, enter the 12-digit Gensar merchant number.
•
In the Terminal # field, enter the three-digit Gensar terminal number.
85
Settlement
You must settle each batch. We recommend that you settle each day’s
transactions at the end of the day. If this is not done on a timely basis, your
discount rate may be higher. The settlement function transmits all transactions
to the merchant bank host. Depending on the number of transactions, this may
take some time.
86
Global Payment – NDC (Host Capture)
Note: The NDC Draft capture plug-in module uses the NDC Hostbased Draft Capture feature.
Merchant Setup
•
Complete the Merchant Name and Address section according to bank
guidelines.
•
The Country Code and City Code are not required.
•
Obtain the following identifiers from your bank account
representative:
87
-
The NDC Bank ID (six digits in length)
The Merchant Number (from 1 to 15 digits in length)
The Category Code (required only if you are a mail or telephoneorder business. Mail or telephone-order business must use an SIC
code from 5960 to 5969)
Addenda Setup
This plug-in module supports Address Verification. Check the Address
Verification box if you plan to use it.
Batch and Item Numbers
When a new batch is opened it is not assigned a batch number and appears as
“???” until the first transaction is authorized and captured. Once you authorize
the first transaction, the batch number is assigned from the host.
This plug-in module stores the running dollar total from the NDC host in the
Host Settlement totals. This total may be viewed in the Transaction List
screen.
When a new transaction is opened, it is not assigned an item number and
appears as “---” until the first transaction is authorized and captured. Once you
authorize the first transaction, the batch number is assigned from the host.
Authorize-Only Transactions
This feature is not currently supported.
Void
Voids must be authorized. Be sure you click the $XWKRUL]H button after voiding
a transaction. If a void is not authorized, the batch will not balance with the
host totals, and you will not be able to settle.
Duplicate Transaction
88
NDC uses a safeguard to prevent duplicate transactions from being captured
in case of time-outs, premature line disconnects, and other failures. When this
occurs, NDC captures the transaction even though it may not be returned to
PCAuthorize®.
If a “Duplicate Transaction” response is returned from a previous time-out,
the transaction has already been captured. NDC scans the previous 25
transactions to check for duplicates. When this occurs, PCAuthorize® does the
following:
•
PCAuthorize® attempts to determine whether this is a real duplicate. It
does this by scanning all transactions in the batch for a matching
authorization number. If a matching reference number is found, then it
is an indication that the transaction is a valid duplicate.
•
Conversely, if a matching reference number is not found, it can be
assumed a prior failure occurred, and the authorization and reference
number should be used for the transaction.
•
Regardless of the search outcome, PCAuthorize® adds a Force
Duplicate Transaction checkbox to the Transaction screen. If this
transaction is a true duplicate, check the box and click the $XWKRUL]H
button. PCAuthorize® will force the transaction to be authorized and
captured.
•
If the duplicate transaction is the result of a prior failure, then simply
record the authorization number and close the Transaction screen.
Settlement
Depending on your NDC host setup. You should settle each batch at the end
of your business day. The settlement function compares the host totals with
the PCAuthorize® totals. If the totals match, the batch is closed and marked as
“settled.”
Once a batch is settled, NDC returns a batch settlement control number. The
settlement control number is displayed in the Transaction List screen. You
89
should make a note of this number, as it may be required for future reference
by the bank.
If you cannot settle due to an out-of-balance situation, use the Interactive
Balance function described below.
Interactive Balance
The NDC plug-in module provides an Interactive Balance feature. You should
only use this feature if you cannot settle your batch due to an out-of-balance
situation.
The Interactive Balance feature is accessed from the Transactions menu. It
provides the following functions and information:
•
Host Totals Review—Retrieves information about the total dollar
amount in the batch as stored on the NDC network host. The response
message indicates the batch number, number of items, and dollar
value.
•
Force Balance—This function forces a balance to be deposited even if
it is out of balance. If you cannot identify the problem when a batch is
out of balance you may use the Force Balance function to override the
out-of-balance condition. When the NDC host receives a Force
Balance request, it closes the batch and settles it regardless of the
situation.
•
Clear Host—Under very rare circumstances it may be necessary to
clear the transactions in the currently-open batch at the NDC host.
When you use the Clear Host request, the NDC host deletes the detail
records for the transactions in the currently-open batch. You must then
use the Post Authorization transaction to reenter the transactions from
paper backup before attempting to settle the batch. Do not use this
transaction unless specifically instructed to do so by NDC or Tellan.
90
Global Payment – MAPP
MAPP Host Setup Requirements
The following items are required for setup on the MAPP host:
•
•
•
•
Host Draft Capture – Automatic batch open
Multitran
Address Verification (AVS), if used
20-character window display
Merchant Setup
•
Complete the Merchant Name and Address section.
91
•
The Country Code and City Code are not required.
•
The MAPP terminal identifier is 13 characters. Obtain the terminal
identifier from your bank account representative. Enter the first six
characters of the terminal identifier and the remaining seven characters
of the terminal identifier in the appropriate fields. The terminal
identifier is split this way for historical reasons.
Note: MAPP has assigned the first two characters of the
terminal identifier as “ID” for PCAuthorize®. If your
identifier starts with something different, PCAuthorize®
may not work properly.
Batch and Item Numbers
When a new batch is opened it is not assigned a batch number and appears as
“???” until the first transaction is authorized and captured. Once you authorize
the first transaction, the batch number is assigned from the host.
This plug-in module stores the running dollar total from the MAPP host in the
Host Settlement totals. You may click on the 6HWWOH button to see the total and
ensure you are in agreement. After clicking on the 6HWWOH button, be sure to
click &DQFHOin the Settle screen unless you really want to settle the batch. The
host total items are not retained.
The transaction item number is assigned from the last three digits of the
returned reference number. This number starts at “1” at the beginning of the
day and is incremented for each transaction during the day.
Authorize-Only Transactions
Once an Authorize-Only transaction is authorized, MAPP allows it to be
changed to a Post Authorization and captured if it is Visa magnetic-stripe read
and qualifies for the PS2000 discount rates.
Void
92
Voids must be authorized. Be sure you click the $XWKRUL]H button after voiding
a transaction. If a void is not authorized, the batch will not balance with the
host totals, and you will not be able to settle.
Duplicate Transaction
MAPP uses a safeguard to prevent duplicate transactions from being captured
in case of time-outs, premature line disconnects, and other failures. When this
occurs, MAPP captures the transaction even though it may not be returned to
PCAuthorize®.
If a “Duplicate Transaction” response is returned from a previous time-out,
the transaction has already been captured. MAPP scans the previous 25
transactions to check for duplicates. When this occurs, PCAuthorize® does the
following:
•
PCAuthorize® attempts to determine whether this is a real duplicate. It
does this by scanning all transactions in the batch for a matching
authorization number. If a matching reference number is found, then it
is an indication that the transaction is a valid duplicate.
•
Conversely, if a matching reference number is not found, it can be
assumed a prior failure occurred, and the authorization and reference
number should be used for the transaction.
•
Regardless of the search outcome, PCAuthorize® adds a Force
Duplicate Transaction checkbox to the Transaction screen. If this
transaction is a true duplicate, check the box and click the $XWKRUL]H
button. PCAuthorize® will force the transaction to be authorized and
captured.
•
If the duplicate transaction is the result of a prior failure, then simply
record the authorization number and close the Transaction screen.
Settlement
Depending on your MAPP host setup, you must either settle each batch or let
the MAPP host close the batch at a fixed time each evening. Check with your
bank to see which option you should use. We recommend that you either settle
93
each batch at the end of your business day or, if the MAPP host closes and
settles automatically, be sure to close your batch at the end of the day.
The MAPP settlement function compares the host totals with the
PCAuthorize® totals. If the totals match, the batch is closed and marked as
“settled.”
Host transaction counts are not retained, only total dollar amount, so they will
be zero in the initial Settlement screen. Once a settlement is sent to the host,
the Settlement screen will show the host transaction count and amount.
If the batch does not settle, then you must adjust the transactions by voiding,
crediting, or post-authorizing the appropriate transactions.
Address Verification
If the transaction is approved, PCAuthorize® will automatically send a Post
Authorization to MAPP to record for deposit.
94
Global Payment – Modular Data
Merchant Setup
•
Complete the Merchant Name and Address section.
•
The Country Code and City Code are not required.
•
The Modular Data terminal identifier is a maximum of 16 characters.
Obtain the terminal identifier from your bank account representative.
Enter the first six characters of the terminal identifier and the
remaining characters of the terminal identifier in the appropriate fields
in the Identifiers Merchant Number section.
95
•
If you plan to do Authorization-Only transactions (no electronic
deposit), then a separate terminal identifier should be entered in the
appropriate field.
Voids
Always use the 9RLG button to void a transaction. Voids must be authorized.
Be sure to click the $XWKRUL]H button after voiding a transaction.
Settlement
There is no settlement procedure for Modular Data. Modular Data settles all
transactions automatically at midnight Pacific time. You should open a new
batch each business day. You may check your total captured amounts for the
day using the Interactive Balance function described below.
Interactive Balance
The Modular Data plug-in module provides an Interactive Balance feature.
Access this feature by selecting Interactive Balance from the Transactions
menu.
This feature provides today’s totals for the following card-type categories:
•
•
•
•
Visa/MasterCard
Discover Card
American Express
Diner’s Club/Carte Blanche
96
Nova
Merchant Setup
Most fields in the Merchant screen are required.
•
Complete the Merchant Name and Address section according to bank
guidelines.
•
The Country Code and City Code are not required.
•
All items in the Identifiers section must be completed. Obtain the
information from your bank account representative.
97
Batch and Item Numbers
When a new batch is opened it is not assigned a batch number and appears as
“???” until the first transaction is authorized and captured. Once you authorize
the first transaction, the batch number is assigned from the host.
The transaction item number is assigned by the Nova network. This number
starts at “1” at the beginning of the day and is incremented for each
transaction during the day.
Settlement
You must settle each batch. We recommend that you settle each day’s
transactions at the end of the day. If this is not done on a timely basis, your
discount rate may be higher. The settlement function transmits all transactions
to the merchant bank host. Depending on the number of transactions, this may
take some time.
Interactive Balance
The Nova plug-in module provides an Interactive Balance feature. You should
only use this feature if you cannot settle your batch due to an out-of-balance
situation.
The Interactive Balance feature is accessed from the Transactions menu. It
provides the following functions and information:
•
Batch Inquiry—Retrieves information about the total dollar amount in
the batch as stored on the Nova network host. The response message
indicates the batch number, number of items, and dollar value.
•
Clear Host—Under very rare circumstances it may be necessary to
clear the transactions in the currently-open batch at the Nova host.
When you use the Clear Host request, the Nova host deletes the detail
records for the transactions in the currently-open batch. You must then
use the Post Authorization transaction to reenter the transactions from
98
paper backup before attempting to settle the batch. Do not use this
transaction unless specifically instructed to do so by Nova or Tellan.
VisaNet
This plug-in module supports the latest K – Terminal Enhanced Second
Generation formats and corresponding settlement. Prior formats are available on
special request.
Merchant Setup
Most fields in the Merchant screen are required.
•
Complete the Merchant Name and Address section according to bank
guidelines. Your merchant name, city, and other identifying
information are transmitted upon electronic draft settlement. Ensure
they are correct.
•
The Country Code is 840 for the United States.
99
•
The City Code is generally the first five digits of your Zip code.
•
All items in the Identifiers section must be completed. Obtain the
information from your bank account representative.
•
Enter the Time Zone:
- 108 (Pacific Standard Time)
- 107 (Mountain Time)
- 106 (Central Time)
- 105 (Eastern Standard Time)
•
The Category Code is a four-digit Standard Industry Classification
code. These codes are a subset of the Merchant Classification Code
Guide published by the American Banking Association. Mail or
telephone-order businesses must use SIC codes from 5960 to 5969.
•
The Agent, Chain, and Merchant Lock # fields are required. If your
bank does not use them, fill these fields with zeros.
Authorization
Return/Credits, Post Authorizations and voided items are not individually
authorized; when you enter these transactions, simply click the 5HFRUG button.
If you void a transaction, the screen will be closed and the transaction flagged
as “voided.”
Settlement
You must settle each batch. We recommend that you settle each day’s
transactions at the end of the day. If this is not done on a timely basis, your
discount rate may be higher. The settlement function transmits all transactions
to the merchant bank host. Depending on the number of transactions, this may
take some time.
Host totals are not retained, so they will appear as zero in the Settlement
screen.
100
Glossary
Account number. The card account number is the primary number embossed on
the credit card.
Acquirer. Any merchant, store, mail-order business, etc., who accepts a credit
card as payment.
Address verification. A function of many bank networks where you can verify
the street address and/or Zip code for an account number. Used primarily
by mail-order business to prevent fraud.
Agency. A bank network which accepts credit authorization requests.
ATM card. Automated Teller Machine card. A card which immediately deducts
the amount indicated from the cardholder’s account.
Authorization network. A bank computer system which authorizes credit card
transactions.
Authorization code. A code returned to PCAuthorize® if a transaction was
approved. This code is recorded on the sales slip as proof the transaction
was authorized.
Authorize. The process in a credit card transaction where the cardholder’s
account is verified as being in good standing. Generally, an authorization
lowers the cardholder’s available credit limit and guarantees the merchant
will receive the money.
Authorize only. A transaction where a transaction is authorized and no electronic
draft capture is made.
101
Batch. A set of transactions. This is generally a business day’s worth of
transactions. Most bank networks number a merchant’s batches
sequentially starting with 1 or 100, etc.
Baud rate. The speed at which a modem transmits data.
Card type. Major type of card; i.e., Credit, Travel and Entertainment (T&E), etc.
Chargeback. A situation where a customer disputes a credit card purchase. You
may be asked to provide proof of the authorization.
Check guarantee. Process where a check is guaranteed.
DDE. A feature of Windows allowing different applications to directly transmit
information among themselves.
Debit card. An ATM or other card which immediately deducts the amount from
the cardholder’s account.
Decline. A transaction is normally declined when a cardholder has exceeded his
credit limit.
Demo mode. A feature of PCAuthorize® allowing you to practice entering
transactions without actually dialing a bank network.
Dial type. Type of telephone system dialing, either pulse (old, outdated method),
or tone (which most telephone systems now support).
Discount rate. A percentage the bank takes of each transaction for processing and
handling your merchant bank account.
Discounted totals. Amount after the discount rate has been applied.
Draft capture. See “Electronic draft capture.”
Electronic draft capture. If a transaction is approved, the amount is
automatically deposited to the merchant bank account and billed to the
cardholder. This process eliminates sending paper drafts to the bank.
102
Expiration date. The expiration date on the credit card. Usually expressed in
mm/yy format.
Export. Process where transactions in a batch are copied into a text file that can
then be used by other applications.
Force transaction. See “Post authorization.”
Hold card. A response from the bank network indicating you should not return
the card to the customer (if it is safe to do so). You should call the bank
customer support center to inform them of the disposition of the card.
Host. Authorization network computer.
Host capture. Transactions are captured and held for deposit in the bank’s host
computer at the time they are authorized.
Host totals. The total amount of a batch held on the host computer.
Import. Process of reading a text file into PCAuthorize® to create new
transactions.
Issuer. The bank which issued the credit card.
Magnetic stripe. A stripe on the back of a credit card which contains certain
information.
Magnetic stripe entry. The process of swiping a credit card though a magnetic
stripe reader. PCAuthorize® extracts the account number and expiration
date from the stripe.
Magnetic stripe reader. A device which reads the magnetic stripe.
Manual entry. The process of manually keying in the credit card number.
MICR. Magnetic Ink Character Recognition. The numbers across the bottom of
all checks which may be read by a computer.
103
Modem init string. A string of commands (called Hayes or AT commands)
which set options in the modem.
Multiagency. A function of PCAuthorize® allowing different agencies to
authorize and/or settle certain card types; e.g., all American Express cards
may be directly authorized and settled via the American Express Network.
Network plug-in module. A separate icon which tells PCAuthorize® how to
interface to a bank network.
PIP. A term used by American Express to allow PCAuthorize® to directly dial
their network for credit authorization.
Point-of-sale. POS. The place where a sale is made, usually a check-out counter.
Port. The connection for a modem or printer.
Post authorization. A transaction type where the authorization has been obtained
over the telephone and is being recorded for electronic deposit.
Private label card. A credit card usually issued by a department store, etc.
Purchase card. A special card used for business purchases.
Reference number. An identifying number returned by the bank network for a
particular transaction. Not all networks return a reference number. This is
not to be confused with the authorization number.
Referral. When you get a response which indicates you are to call the
authorization center for further instructions.
Referral number. See “Reference number.”
Return/Credit. When a customer returns merchandise and you credit their creditcard account.
Sale/deposit. A transaction which is authorized and then deposited.
104
Send. Used for mail or telephone-orders when the customer is not present. See
also “Take.”
Settle totals. Total amount of a batch that is to be settled.
Settlement. The process where a batch is balanced and released for deposit.
Split-dial. A function of PCAuthorize® allowing different agencies to authorize
and/or settle certain card types; e.g., all American Express cards may be
directly authorized and settled via the American Express Network.
T&E. Travel and Entertainment. Cards such as American Express.
Take. Used when the customer is present and will be taking the merchandise. See
also “Send.”
Terminal capture. The process whereby PCAuthorize® holds each transaction as
it is authorized, and then transmits the entire batch to the bank upon
settlement.
Transaction. Any authorization, credit, or void of a credit card.
Transaction type. Indicates whether the transaction is a sale, return, post
authorization, etc.
Void. Making a transaction null and void; i.e., reversing the transaction.
Wedge. A magnetic stripe reader.
105
106
Appendix A: Exchanging Information
Exporting Transactions
Exporting transactions allows you to create data in text files. These files can
then be used with other applications such as Microsoft Excel, Microsoft
Access, etc.
If the Transaction List screen is open, the records shown will be exported in
the order they are shown. If the Transaction List screen is closed, the entire
batch will be exported in the original order entry.
Export Formats
The exported file is in ASCII (Text) format. It is important to note that some
data items are in a “coded” form, such as the transaction type. The export data
items and their standard coded form are listed below. The coded form of some
items may be configured by your bank. If your bank supplies you with
additional data, use it rather than the information here.
Item name
Description
•Filler•
Account Number
Account Source
Address Ver Address
Address Ver Resp Code
Address Ver Resp Text
Address Ver Zip
Amount
Places a blank item in the export file
Primary account number
Account source
Address verification address
Response code for address verification
Response text for address verification
Address verification Zip code
Amount of transaction
107
Amount, Tax
Amount, Tip
Amount, Line 1
Amount, Line 2
Amount, Line 3
Amount, Line 4
Tax amount
Tip or other charge amount
Amount for line item 1
Amount for line item 2
Amount for line item 3
Amount for line item 4
Item name
Description
Auth Code
Auth Source
Batch Number
Card Type
Authorization code from bank
Source of authorization from bank
Batch number
Type of card:
CC – Credit
TE – T&E card
PL – Private label card
MN – MICR number
DL – Driver’s license
Initials
Sales person’s initials
Customer ID
Any ID up to 17 characters
Department
Department ID up to 5 characters
Description Line 1
Item description for line 1
Description Line 2
Item description for line 2
Description Line 3
Item description for line 3
Description Line 4
Item description for line 4
Driver’s License State
State code from driver’s license
Expiration date
Expiration date from card
Merchant Name
From Merchant screen
Merchant Address
From Merchant screen
Merchant BIN
From Merchant screen
Merchant City
From Merchant screen
Merchant City Code
From Merchant screen
Merchant Country Code From Merchant screen
Merchant State
From Merchant screen
Merchant Telephone
From Merchant screen
Merchant Number
From Merchant screen
Merchant Time Zone
From Merchant screen
Merchant ZIP
From Merchant screen
Operator Initials
From Personal screen
108
Operator name
Operator Number
PS Amount
PS Currency
PS Indicator
PS ID
PS Response
From Personal screen
From Personal screen
PS2000 amount
PS2000 currency
PS2000 indicator
PS2000 identifier
PS2000 response
Item name
Description
PS Validation
Reference Number
Response Code
PS2000 validation code
Transaction reference number from bank
Transaction response code from bank. See your
bank network plug-in module documentation for
more information
Response Text
Transaction response text from bank. See your
bank network plug-in module documentation for
more information
SE Number
Transaction service establishment number
Status, Transaction
Transaction status:
PD – Pending
AA – Authorized
ND – Declined
NR – Referral
E1 – Error
F1 – Hold call
Store Number
Store number from Merchant screen
Transaction Month/Day Transaction date in format mmdd
Transaction Number
Transaction item number
Transaction Resp Date Authorization date in format mmdd
Transaction Settle Date Settlement date in format mmdd
Transaction Time
Transaction time in format hhmmss
Transaction Trace
Trace number from bank
Transaction Type
Transaction type:
NA – Normal authorize
AO – Authorize only
CR – Return/credit
VD – Void
PA – Post authorization
Terminal Number
Terminal number from Merchant screen
109
Terminal ID
Terminal Category
Voided
Terminal ID from Merchant screen
Terminal category from Merchant screen
Void flag:
Void
No
Export Procedures
To export a batch:
1. Open the batch you wish to export, if it is not already open. See the
instructions under “Opening an Existing Batch.”
2. Select ([SRUW%DWFK from the File menu. The following screen displays:
Double click on each item in the Item List column (or click on the item
and then click on the 0RYH button) to move each field to the Output
column. The data items will be exported in the order shown in the
Output column, so plan which items you wish to export.
110
Use the 5HPRYH and &OHDU$OO buttons to either remove an individual
item, or clear all items from the Output column.
The 6HSDUDWHHDFKLWHPZLWK field allows you to select the delimiter to
be used between each data item. Use a “t” if the separating character is
a tab.
The (QFORVHLWHPVZLWK field allows you to surround data items
containing blanks or quotation marks or other punctuation.
If you frequently export batches, you can click the 5HPHPEHU7KLV/LVW
button once all data items have been moved to the Output column. The
list will then be saved in your Setup file so you don’t have to recreate
it each time.
3. Click the ([SRUW button. A standard dialog box displays. Type the file
name under which you wish to save the batch, and then click the 6DYH
button.
PCAuthorize® creates the file for you and exports the data specified to
the file.
111
Importing Transactions
Importing transactions allows you to create transactions from data in text files.
These files can be created by other applications such as Microsoft Excel,
Claris FileMaker, etc.
Import Formats
The import file must be in ASCII (text) format. It is important to note that
some data items are in a “coded form, such as the transaction type. The import
data items and their standard coded form are listed below. The coded form of
some items may be configured by your bank or Tellan Software and is
dependent on the bank network plug-in module you are using. If your bank
supplies you with additional data, use it rather than the information here.
Note: For an imported transaction to be complete, you must have
an Account Number, the Expiration Date, and the Amount. All
other items are optional.
Item name
Description
•Filler•
Account Number
Address Ver Address
Address Ver Zip
Amount, Total
Skips over and ignores the input item
Card account number
Address verification address line
Address verification Zip
Total amount of transaction. If other amounts are
imported, this amount is adjusted accordingly.
If the amount is negative, the transaction is
automatically changed to a Credit/Return.
Tax amount
Tip or other charge amount
Amount for line item 1
Amount, Tax
Amount, Tip
Amount, Line 1
112
Amount, Line 2
Amount, Line 3
Amount, Line 4
Auth Code
Amount for line item 2
Amount for line item 3
Amount for line item 4
Authorization code. Import this only if you are
importing post-authorization-type transactions.
Item name
Description
Card Type
Type of card:
CC – Credit
TE – T&E card
PL – Private label card
MN – MICR number
DL – Driver’s license
Sales person’s initials
Any ID up to 17 characters
Department ID up to 5 characters
Item description for line 1
Item description for line 2
Item description for line 3
Item description for line 4
Two-character state code for check guarantee
transactions only
Expiration date. May be in the format mmyy,
mm/yy, or m/yy
Up to 12 characters of invoice number
Transaction reference number. Use only in
special circumstances for certain types of voids.
Type of transaction:
NA – Normal authorize
AO – Authorize only
CR – Return/credit
VD – Void
PA – Post authorization
Initials
Customer ID
Department
Description Line 1
Description Line 2
Description Line 3
Description Line 4
Driver’s License State
Expiration date
Invoice Number
Reference Number
Transaction Type
Import Procedures
To import a set of transactions:
113
1. Open the batch you wish to import, if it is not already open. See the
instructions under “Opening an Existing Batch.”
2. Select ,PSRUW7UDQVDFWLRQV from the File menu. The following screen
displays:
Double click on each item in the Item List column (or click on the item
and then click on the 0RYH button) to move each field to the Input
Order column. The data items will be imported in the order shown in
the Input Order column, so plan which items you wish to import.
Use the 5HPRYH and &OHDU$OO buttons to either remove an individual
item, or clear all items from the Input Order column.
The ,WHPVDUHVHSDUDWHGZLWK field allows you to select the delimiter to
be used between each data item. Use a “t” if the separating character is
a tab.
The ,WHPVDUHHQFORVHGZLWK field allows you to surround data items
containing blanks or quotation marks or other punctuation.
114
If you frequently import transactions, you can click the 5HPHPEHU7KLV
button once all data items have been moved to the Input Order
column. The list will then be saved in your Setup file so you don’t
have to recreate it each time.
/LVW
3. Click the ,PSRUW button. A standard dialog box displays. Type the file
name from which you wish to import, and then click the 2SHQbutton.
PCAuthorize® will read the import file and create the new transactions
based on the imported ASCII file.
The import process is a “two-pass” process. If there are errors in the
import file, you will be asked if you wish to continue. If not, click &DQFHO
in the appropriate dialog box.
If you choose to continue to import transactions when errors are present,
transactions imported in error will be flagged with an error icon along with
an error message. Be sure to correct any errors as a result of the import.
All imported transactions are appended to the end of the currently-open
batch and assigned the appropriate batch and item numbers.
115
116
Appendix B: Interapplication Communication
Note: This appendix contains technical information intended for
use primarily by developers.
Other applications can communicate with PCAuthorize® using Dynamic Data
Exchange (DDE) and/or named pipes.
Additional detail information about DDE is provided on your diskette in the
directory labeled DDE. Included are general instructions, along with specific
instructions and examples for popular databases and applications.
Dynamic Data Exchange
Introduction
PCAuthorize® can receive transactions from any application capable of
sending DDE messages. This includes Microsoft Excel, Microsoft Access, and
many others.
This section presents general information on using DDE to interact with
PCAuthorize® for the purpose of retrieving and authorizing credit card and
other sale transactions.
Audience
This appendix is aimed at those organizations that require access to selected
transaction data maintained by PCAuthorize®, and is oriented to software
development personnel.
117
This appendix assumes the reader has a working knowledge of the basics
of Dynamic Data Exchange (DDE). It also assumes the reader can read and
understand Microsoft Visual Basic for Applications source code. There is no
attempt made to provide a tutorial on either DDE programming or the Visual
Basic language.
DDE Overview
Dynamic Data Exchange (DDE) is a protocol that permits two applications to
communicate by continuously and automatically exchanging data through a
DDE “channel.” To control a DDE conversation between two applications,
you establish a channel, select a topic, request and send data, and then close
the channel. The following table lists the tasks that Microsoft Excel performs
with DDE and the methods used to control each task in Visual Basic.
Task
Method
Starting DDE
Getting text from another
application
Sending text to another
application
Carrying out a command
in another application
Ending DDE
DDEInitiate
DDERequest
DDEPoke
DDEExecute
DDETerminate
To communicate with PCAuthorize®, only DDEInitiate, DDERequest, and
DDETerminate are used. Refer to the PCAuthorize® sample DDE
applications.
Service Names, Topic Names, and Item Names
A DDE server uses a three-level hierarchy—service name, topic name, and
item name—to uniquely identify an item of data the server can exchange
during a conversation.
Service Names
118
A server name is a string to which a server application responds when a client
attempts to establish a conversation with the server. A client must specify this
service name to establish a conversation with the server. The service name
may or may not be the same as the executable program name of the
application. In the case of PCAuthorize®, the service name “PCAuthorize” is,
in fact, not the same as the executable name, “PCAuth.exe.”
Topic Names
A topic name is a string that identifies a logical data context. A client must
specify a topic name along with the server’s service name when it attempts to
establish a conversation with a server.
PCAuthorize® supports the standard service name “System,” and four
application-specific names: GetBatches, GetBatch, AuthorizeTransaction, and
StoreTransaction.
Item Names
An item name is a string that identifies a unit of data a server can pass to a
client during a transaction. PCAuthorize® only supports item names under the
“System” topic name. The “System” topic names supported by PCAuthorize®
are : Topics, SysItems, Formats, Status, and Help.
PCAuthorize® does not support item names under its application-specific
service names because there is only one item type supported for each service.
For example, to authorize a transaction, the service name is
“AuthorizeTransaction” and the request item is the data representing the
transaction to be authorized. No other items have meaning under the
“AuthorizeTransaction” service.
Making Requests
To make a request to PCAuthorize®:
•
•
Establish a connection for the desired topic (DDEInitiate).
Pass one or more requests (DDERequest).
119
•
Terminate the connection (DDETerminate).
It is good practice to always terminate the connection when you no longer
need to make requests for the initiated topic. Failure to do so may eventually
result in the exhaustion of system resources.
System Topic
The System topic provides a context for information of general interest to any
DDE client.
Formats
The Formats item name is defined as a tab-delimited list of strings
representing all clipboard formats potentially supported by the service
application.
PCAuthorize® only supports one format:
Text
Help
The Help item name is defined as a user-readable information of general
interest.
PCAuthorize® responds to the Help item name with the string:
The supported topics are:
System: PCAuthorize DDE server services.
GetBatches: Get a list of batches.
GetBatch: Get a list of transactions in a batch.
AuthorizeTransaction: Authorize a transaction.
StoreTransaction: Store a transaction.
The supported System items are:
Topics: Get a topic list.
SysItems: Get an item list for this topic.
Status: Get a server status: “Ready” or “Busy”.
Formats: Get a format list.
120
Help: Get help info (print this message).
This Help text is returned by PCAuthorize® as a single, null-terminated string,
with imbedded “carriage return” “new line” (0D0A16) characters at the end of
each logical line of text.
Status
The Status item name requests the current status of the DDE Server
(PCAuthorize).
PCAuthorize® responds to the Status request with the text string:
Ready
SysItems
The SysItems item name requests the list of items supported under the System
topic.
PCAuthorize® responds to the SysItems request with the text string:
Topics
SysItems
Status
Formats
Help
This SysItems text is returned by PCAuthorize® as a single, null-terminated
string, with a “tab” (0916) character between each item.
Topics
The Topics item name requests a list of topics supported by the server.
PCAuthorize® responds to the Topics request with the text string:
System
GetBatches
StoreTransaction
GetBatch
AuthorizeTransaction
This Topics text is returned by PCAuthorize® as a single, null-terminated
string with a “tab” (0916) character between each topic.
121
Sample
The following is a code sample for retrieving Help:
channelNumber=Application.DDEInitiate(“PCAuthorize”,”System”)
returnList=Application.DDERequest(channelNumber,”Help”)
Application.DDETerminate channelNumber
GetBatches
GetBatches is the request that a DDE client uses to obtain a list of one or more
of the batches currently in PCAuthorize®.
To get a list of batches, you begin by initiating a conversation with
PCAuthorize® with a topic name of “GetBatches.” If this connection is
successful, you may begin requesting bathes by passing a message constructed
of the string “Tela00001031” plus a tab character (0916), plus the relative
record number of the batch desired. PCAuthorize® will respond with a
message of the form described under “Batch Data Format” later in this
appendix. If no batch corresponding to the relative record number exists, the
response message will be a series of empty fields.
The following sample illustrates how to retrieve all the currently-available
batches.
ChannelNumber = DDEInitiare(“PCAuthorize”, “GetBatches”)
iBatch = 0
Do
iBatch = iBatch + 1
szBatchReq = “Tela00001031” + Chr$(9) + CStr(iBatch)
szReturnList = DDERequest(channelNumber, szBatchReq)
iFieldCnt = ddeParse1(szReturnList, szFields())
If szFields(1) = “” Then
Exit Do
End If
•
•
process batch
•
Loop
DDETerminate channelNumber
122
__________
1
ddeParse is a sample function that parses the fields from each batch record and stores them in
sequential elements of an array (szFields).
The following is a sample of the results of the preceding code instructions
when loaded into an Excel spreadsheet. Note that the formatting of currency
values was supplied by the spreadsheet, not by PCAuthorize®.
Status
OPN
OPN
OPN
OPN
OPN
OPN
ERR
Batch
1
2
3
4
5
6
7
Pending
Pending
Amount
26
$6.00
28 $143,795.00
9 $16,888.00
1
$21.00
1
$21.00
10
$625.00
0
$0.00
Submitted
Submitted
Amount
0
0
0
1
1
2
0
$0.00
$0.00
$0.00
$21.00
$21.00
$42.00
$0.00
RespText
GetBatch
GetBatch is the request that a DDE client uses to obtain a list of one or more
of the transactions in the batch that is currently open in PCAuthorize®.
To retrieve the transactions in the currently-open batch, you begin by
initiating a conversation with PCAuthorize® with a topic name of “GetBatch.”
(Remember, there must be an open batch in PCAuthorize® in order for this
request to be successful.) If the connection is successful, you may begin
requesting transactions by passing a message constructed of the string
“Tela00001011” plus a tab character (0916), plus the relative record number
of the transaction desired. PCAuthorize® will respond with a message of the
form described under “Transaction Data Formats” later in this appendix. If no
transaction corresponding to the transaction number exists, the response
message will be a series of empty fields.
The following sample illustrates how to retrieve all the transactions in the
currently-open batch.
123
ChannelNumber = DDEInitiare(“PCAuthorize”, “GetBatch”)
iTran = 0
Do
iTran = iTran + 1
szBatchReq = “Tela00001011” + Chr$(9) + CStr(iTran)
szReturnList = DDERequest(channelNumber, szBatchReq)
iFieldCnt = ddeParse2(szReturnList, szFields())
If szFields(1) = “” Then
Exit Do
End If
•
•
process batch
•
Loop
DDETerminate channelNumber
The following is a sample of the results of the preceding code instructions
when loaded into an Excel spreadsheet. Note that the formatting of currency
values was supplied by the spreadsheet, not by PCAuthorize®.
Tran Type
CardType Account Number
SALE
SALE
SALE
CC
CC
CC
AuthCode
RespText
Demo16
Demo17
Approved
Approved
ExpDate Amount Rsrved Issuer Src Status
4012345678990
370000000000002
4012345678990
Refnum
1198 $21.00
1298 $21.00
1198 $21.00
0 Othr
0 Othr
0 Othr
N
N
N
MMDD
HHMM
Settle Tot
Batch#
Item#
702
702
1434
1508
$42.00
$42.00
6
6
1
2
124
Approved
Approved
Pending
AVS Code
__________
2
ddeParse is a sample function that parses the fields from each batch record and stores them in
sequential elements of an array (szFields).
AuthorizeTransaction
AuthorizeTransaction is the request that a DDE client uses to instruct
PCAuthorize® to authorize a transaction supplied by the client.
To authorize a transaction, initiate a conversation with PCAuthorize® with a
topic name of “AuthorizeTransaction.” (Remember, there must be an open
batch in PCAuthorize® in order for this request to be successful.) If the
connection is successful, you may pass a message constructed of the string
“Tela00001011” plus a tab character (0916), plus the fields of the transaction.
The fields in the transaction portion of the message must conform to those
described under “Transaction Data Formats” later in this appendix. The fields
must be tab delimited, but should not be followed by a “carriage return” “new
line” (0D0A16) sequence.
You are only required to supply an account number, an expiration date, and an
amount. All other fields may be empty (“”). (Note that additional fields may
be required to achieve the best bank discount rates. Refer to your bank
network plug-in documentation for more information.) PCAuthorize® will
respond with a message of the form described under “Transaction Data
Formats.”
The following code sample illustrates how to construct a transaction from a
row in an Excel spreadsheet.
ChannelNumber = DDEInitiare(“PCAuthorize”, “AuthorizeTransaction”)
szTransaction = “Tela00001011” + Chr$(9)
For i = 1 To r.Columns.Count
szTransaction = szTransaction + CStr(r.Cells(1,I))
If i < r.Columns.Count Then
szTransaction = szTransaction + Chr(9)
End If
Next i
125
returnList = Application.DDERequest(channelNumber,szTransaction)
DDETerminate channelNumber
The following is a sample of the results of the preceding code instructions
when loaded into an Excel spreadsheet. Note that the formatting of currency
values was supplied by the spreadsheet, not by PCAuthorize®.
TranCode
CardType Account Number ExpDate Amount Rsrved Issuer Source Status
SALE
CC
AuthCode
RespText
123456
Demo17
AP123456
Approved
4012345678990
Refnum
1198 $21.00
0 Othr
N
Approved
MMDD
HHMM
Settle Tot
Batch#
Item#
714
702
1623
1508
42
$42.00
6
6
15
2
AVS Code
StoreTransaction
StoreTransaction is the request that a DDE client uses to instruct
PCAuthorize® to store a transaction, supplied by the client, into the currentlyopen batch.
To store a transaction, initiate a conversation with PCAuthorize® with a topic
name of “StoreTransaction.” (Remember, there must be an open batch in
PCAuthorize® for this request to be successful.) If the connection is
successful, you may pass a message constructed of the string “Tela00001011”
plus a tab character (0916), plus the fields of the transaction. The fields in the
transaction portion of the message must conform to those described under
“Transaction Data Formats” later in this appendix. The fields must be tab
delimited, but should not be followed by a “carriage return” “new line”
(0D0A16) sequence.
You are only required to supply an account number, an expiration date, and an
amount. All other fields may be empty (“”). (Note that additional fields may
be required to achieve the best bank discount rates. Refer to your bank
network plug-in documentation for more information.)
126
PCAuthorize® will respond with a message of the form described under
“Transaction Data Formats.”
The following sample illustrates how to construct a transaction from a row in
an Excel spreadsheet.
ChannelNumber = DDEInitiare(“PCAuthorize”, “StoreTransaction”)
szTransaction = “Tela00001011” + Chr(9)
For i = 1 To r.Columns.Count
szTransaction = szTransaction + CStr(r.Cells(1,I))
If i < r.Columns.Count Then
szTransaction = szTransaction + Chr(9)
End If
Next i
returnList = Application.DDERequest(channelNumber,szTransaction)
DDETerminate channelNumber
The following is a sample of the results of the preceding code instructions
when loaded into an Excel spreadsheet. Note that the formatting of currency
values was supplied by the spreadsheet, not by PCAuthorize®.
TranCode
CardType Account Number ExpDate Amount Rsrved Issuer Source Status
SALE
CC
AuthCode
RespText
4012345678990
Refnum
1198 $54.32
MMDD
HHMM
714
1623
Settle Tot
0 MC
Batch#
N
Item#
AVS Code
Data Formats
All PCAuthorize®-specific requests and responses of more than one field are
tab (0916) delimited. Responses of more than one field are terminated by a
“carriage return” “new line” (0D0A16) sequence.
127
For example, a transaction response might look like:
00000000
00000010
00000020
00000030
00000040
00000050
53
33
43
75
31
0D
41
09
09
6E
34
0A
4C
31
4E
74
09
45
32
09
20
31
09
39
45
74
36
43
38
72
6F
32
43
09
72
6F
33
09-35
35-34
6F-72
20-73
09-34
34
2E
09
68
32
33
33
09
6F
09
35
32
21
72
36
34
09
41
74
09
35
30
63
09
31
34
09
63
09
35
33
4D
6F
37
09
SALE.CC.54354543
3.1298.54.32.0.M
C.N.Error..!Acco
unt too short..7
14.1623.42.6.15.
The primary two data messages contain either transaction data or batch data.
128
Transaction Data Formats
Request Format
Field Name
Attributes
Description
Header
TranType
Header Constant
One of: SALE, AUTHONLY,
CREDIT, POSTAUTH, NA,
AO, CR, PA
One of:
CC,TE,DB,MN,DL,PL
“Tela00001011” + Chr(9)
Transaction Type
(Defaults to Personal setup
setting)
Card Type
(Defaults to Personal setup
setting)
Card account number, MICR
number for check guarantee,
etc.
Expiration date
Amount of transaction
Send only if post authorization
Send only if check guarantee
Send only if using address
verification
Send only if using address
verification
Required for best bank
discount rate
Customer identifier
CardType
Account
Text
ExpDate
Amount
AuthCode
Driver’s License State
Street Address
Four numeric digits
Currency
Authorization Code
Two-character state code
Text
ZIP
Numeric
Invoice Number
Text
Customer ID
Text
Cashier ID
Department
Tax
Shipping or Tip
Text – maximum 3 characters
Text – maximum 5 characters
Currency
Currency
Description Line 1
Amount Line 1
Description Line 2
Amount Line 2
Description Line 3
Amount Line 3
Text
Currency
Text
Currency
Text
Currency
129
Initials of clerk or cashier
Department code
Tax
Required for best bank
discount rate for purchase
cards
Optional description
Optional amount
Optional description
Optional amount
Optional description
Optional amount
Description Line 4
Amount Line 4
Text
Currency
Optional description
Optional amount
Field Name
Attributes
Description
TranType
One of: SALE, AUTHONLY,
CREDIT, POSTAUTH, NA,
AO, CR, PA
One of:
CC,TE,DB,MN,DL,PL
Numeric
Transaction type
Response Format
CardType
Account
ExpDate
Amount
Rsrved
Issuer
Source
Status
Four numeric digits (mmdd)
Currency
NA
One of: Visa, MC, Amex,
Ctbl,, Dinr, Disc, JCB, Othr
One of: N or Y
AuthCode
RespText
One of: Pending, Approved,
Declined, Call, Error,
HoldCall, PD, AA, ND, NR,
E1, F1
Numeric
Text
RefNum
Numeric
MMDD
HHMM
SettleTot
Batch#
Item#
AVS Code
Four numeric digits (mmdd)
Four numeric digits (hhmm)
Currency
Numeric
Numeric
130
Card type
Card account number, MICR
number for check guarantee,
etc.
Expiration date
Amount of transaction
Reserved for future use
Issuer card type
Account data source –
N=Manual; Y=Mag Stripe
Transaction status
Authorization number
Response text from the bank
network
Reference number from the
bank network
Date of transaction
Time of transaction
Net settlement amount
Batch number
Item number
Address verification result
code
Batch Data Format
Field Name
Attributes
Description
Status
Batch
Pending
Pending Amount
Submitted
One of: ERR, OPN, STL
Numeric
Numeric
Currency
Numeric
SubmittedAmount
Currency
RespText
Text
Batch status
Batch number
Total number of items in batch
Total amount of items in batch
Total number of items
submitted
Total amount of items
submitted
Response text
Named Pipes
Introduction
This section presents general information on using named pipes to interact with
PCAuthorize®. This section assumes the reader has a working knowledge of
Windows NT and named pipes. There is no attempt made to provide a tutorial on
NT internals and named pipes.
Named pipe supports only an authorize function. Data management functions are
not currently supported.
Named Pipes Overview
If PCAuthorize® detects it is running under Windows NT, it opens a named pipe.
The named pipe is for the local machine only, and allows one connection at a
time. This does not, however, prevent more than one transaction from being
processed since NT queues transactions via the named pipe mechanism. The
named pipe is named: \\.\PIPE\PCAuthorize
131
Generally, the Call Named Pipe function should be used to send a data packet to
PCAuthorize® and receive a response. The format of the data packet is identical to
the Authorize transaction format described under DDE.
The following is a sample piece of code written in C to demonstrate the named
pipe call:
char transString[2048] = “Tela00001011\t\t\t4012345678990\t1299\t1.00”;
DWORD
retLen = 0;
BOOL pipeRet = FALSE;
DWORD BytesRead;
do {
char pipeName[] = \\\\.\\PIPE\\PCAuthorize;
pipeRet = CallNamed Pipe(pipeName,
// pointer to pipe name
transString,
// pointer to write buffer
strlen(transString), // size, in bytes, of write buffer
transString, // pointer to read buffer
sizeof(transString), // size, in bytes, of read buffer
&BytesRead,
// pointer to number of bytes read
60000 // time-out time, in milliseconds
);
if( !pipeRet ) {
DWORD err = GetLastError();
...process error;
}
} while (!pipeRet);
132
Index
Check Guarantee MICR, 17
Check Guarantee MICR Authorization,
40
Check/License, 25
Check/MICR, 25
Command bar, 44
Communications Setup, 10
Confirm delete batch, 25
Confirm delete or void transaction, 25
Corporate and business cards, 43
Credit card, 25
Credit Card Magnetic Stripe
Authorization, 39
Credit Card Manual Entry
Authorization, 40
Data directory, 26, 30
Debit ATM, 25
Deleting a batch, 56
Deleting a transaction, 48
Demo mode, 6
Dial type, 11
Direct marketing, 20
Discount amount, 51
Discount rate, 19, 42
Driver’s license, 38
Duplicate transactions, forcing, 39
Dynamic Data Exchange, 117
ECHO Network, 72
Entry ttems, 37
Entry mode, 39
Error messages, 64
Expiration date, 2, 37
Exporting transactions, 107
FDMS – Omaha ETC Plus, 81
FDMS – TeleMoney, 83
.PLG files, 4
Account number, 37
Addenda Setup, 20
Address verification, 20, 38
Administrative Setup, 22
Agency Access, 10
American Express, 68
Application password, 22
ATM/Debit cards, 1
Auth code, 37
Auth Only (NO DEPOSIT), 36
Authorization Only (NO DEPOSIT), 16
Authorizing a batch, 42, 57
Automatically print receipt, 15
AVS response codes, 21
Bank Audit List, 63
Batch and single authorizations,
intermixing, 58
Batch Detail List, 63
Batch List contents, selecting, 56
Batch List Screen, 54
Batch, authorizing, 42, 57
Batch, deleting, 56
Batch, opening an existing, 55
Batches, handling, 53
Baud rate, 11
Birth date, 38
Card Type, 25, 35
Card Types Setup, 18
Changing a transaction, 48
Chargeback rights, 1
Check Guarantee, 17
Check Guarantee Driver’s License, 17
Check Guarantee License Authorization,
41
133
FDMS Nashville – Envoy, 76
FDMS North – Card Establishment
Services, 74
FDMS South – NaBanco, 78
Finding a transaction, 49
Fraud, 2
Global Payment – MAPP, 91
Global Payment – Modular Data, 95
Global Payment – NDC (Host Capture),
87
Hardware Setup, 7
Help, 5
Icons, 5
Importing transactions, 112
Interactive balance, 61
Intermixing batch and single
authorizations, 58
Intro Setup, 9
Line descriptions, 37
Magnetic stripe card readers, 7
Mail-order businesses, 20, 33, 43
Merchant Detail, 63
Merchant Setup, 13
Merchant Summary, 63
Messages, printing on receipts, 15
MICR, 38, 40
Modem init string, 11
Modem type, 11
Modems, 7
Multiple Bank Network Plug-in Setup,
32
Multiple Merchant Setup, 29
Named Pipes, 131
Network-specific instructions, 67
Nova, 97
Open batch detail with only pending
transactions, 25
Open batch list with only pending
batches, 25
Opening an existing batch, 55
Operator ID, 24
Paymentec – Gensar, 85
PC clock, 33
PCAuth folder, 4
PCAuthorize®, installing on hard drive,
3
Per transaction charge, 19
Personal Setup, 24
PIN pad, 8
PIN Pad Setup, 27
Plug-in modules, 4
Point-of-sale merchant, 33
Port, 11
Post authorization, 17, 36
Printers, 14
Private label, 25
Product password, 9
Product serial number, 9
Purchase cards, 43
Receipt messages, printing, 15
Receipt printers, 14
Receipts Setup, 14
Reports, 63
Retail businesses, 42
Retrieval number, 37
Return/Credit, 17, 36
Sale & Deposit, 16, 36
Sale type items, 38
Sales tax, 38
Sales type default, 17
Selecting the Batch List contents, 56
Send, 38
Services Setup, 16
Settlement, 59
Settlement procedures, 60
Settlement types, 59
Setup
Addenda, 20
Administrative, 22
Card Types, 18
Communications, 10
Intro, 9
Merchant, 13, 29
Multiple Bank Network Plug-In, 32
134
Personal, 24
PIN Pad, 27
Receipts, 14
Services, 16
Split Dial or Additional Network, 28
Setup files, creating multiple, 29
Setup files, using multiple, 31
Setup menu, 8
Setup password, 22
Shortcuts, 5
Split Dial or Additional Network Setup,
28
Split dial plug-ins, 4
State code, 38
Switch Setup, 30, 31
System requirements, 3
T & E, 25
Take, 38
Tax, 38
Technical support, 5
TELLAN directory, 4
Totals screen, 50
Transact directory, 4
Transaction defaults, 25
Transaction line items, 45
Transaction List, 34
Transaction List screen, 44
Transaction Sale Invoice, 63
Transaction titles, 45
Transaction type, 25, 35
Transaction window navigation
techniques, 35
Transaction window, opening, 34
Transactions within batches, handling,
53
Transactions,
changing, 48
deleting, 48
entering, 33, 35
finding, 49
selecting, 47
voiding, 47
Troubleshooting, 64
Unattended operation, 26
VisaNet, 99
Void, 17, 36
Voiding a transaction, 47
135