1
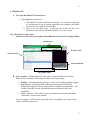
INTERACTIVE DIGITAL SOLUTIONS VBrick EtherneTV - Teacher User Guide The VBrickETHERNETV End User Client Training user manual was the primary reference for this manual 1 I. HOME PAGE A. To Access the EtherneTV Portal Server 1. Type avontv in your browser. i. The EtherneTV media control server will open. It’s set up as a single sign on, which means if you are already signed into your computer, you should not need to enter a login or password here. ii. There is no true home page. It will take you to the last area (Live Broadcast, Asset Library, Schedule Calendar, etc.) you accessed. Fig. 2 Portal Server Key Areas Selection Area, Preview Area (with Control Buttons), Search Tool, Navigation Links Search Tool Preview Area Selection Area Control Buttons Navigation Links B. User categories – Within EtherneTV users can be set up with different privileges. Within Avon Community Schools there are three levels of privileges. 1. Admins. – full administration privileges – this is your building technical support 2. Power Users – media specialists, media specialist assistants (if desired), technology integration, literacy, professional development, and principals – will be able to schedule, record, and publish content in addition to basic user capabilities. 3. Users – teachers – will be able to view live broadcasts, access the on-demand video library, and view the schedule. Your user category will determine some of the choices available to you on the various screens within the portal server. 1 2 II. LIVE BROADCAST PAGE A. What is a Live Broadcast? 1. This is a live stream being sent out on the network. The source of the stream could be a DVD Player or VCR, a camera, or a live feed from your local cable TV provider that is connected to an Encoder. Examples of live feeds you may receive at your school: a. Cable TV Stations b. DVD or VCR live feed c. PC or live camera from the mobile cart B. Using the Live Broadcast Page 1. Selection Area – where you choose your stream. a. Streams are listed in alphabetical order. If channel numbers or custom icons are added to your CATV stations, they will move to the top of the list. b. Channel Guide – You did not purchase the Tribune Company (Time Warner and Comcast) channel guide, so programming information will not appear for the various cable channels. www.meevee.com has a good listing of the local Brighthouse programming for reference. c. Icons – different icons in the selection area denote the type of stream. a. b. c. denotes standard live streams such as TV stations. denotes live streams from a DVD or VCR that can be controlled from the portal server. custom icon, typically will be used with a TV station. d. Playing a Stream a. Standard live stream (i.e. tv station) – just click on the stream listing (e.g. NBC) to start playing the stream. b. Control device stream (i.e. DVD or VCR) – when you click on this stream, you will receive pop up controls for this device. Note: If you are not the teacher that requested the live playing of a video from the VCR or DVD, do NOT touch the controls. 2 3 2. Preview Area – provides a view of the live stream, as well as control functions and recording (if applicable) for each video stream. a. Blue control buttons – play, pause, stop, record, full screen. i. Pause – you cannot truly pause a live stream, so in most cases, this button will show up as gray and will not be clickable. ii. Record – this will only show if you have recording privileges. iii. Full – provides a full screen view of the video stream. Push ESC to return to preview. b. Audio Controls – mute button and a slider for volume control. c. External View (Small White Square icon with green arrow) – this launches a separate (external) video viewing window. This is helpful when you are playing a video, but wish to close the portal window so that you can open another application, such as PowerPoint. d. cc button – enables closed captioning. This feature only works if the live source has closed captioning enabled. 3. Navigation Links – links at the bottom of the page which allow you to “jump” to another page. Note, you will only see the links that you have access to. III. ASSET LIBRARY (VIDEO-ON-DEMAND LIBRARY) A. What is in the Asset Library? 1. This is stored content. Examples would include such things as: Teacher or student created videos. Digital media that has been purchased (i.e. instead of digitizing a DVD or VHS tape, you can purchase a digital format of most educational videos). Guest speakers that were recorded. TV programming that was recorded. 3 4 B. Using the Asset Library Page 1. Selection Area – where you choose your stream. a. Folder and Content Selections – this lists all of the available videos on the system including the folders which can be used to group recordings by content type. Note the ETV portal is the “link” to all content. The content resides on the VOD server, but the list resides on the portal server. The list of stored video files from the VOD server is completely updated every 2 hours. Your content folders are currently set up as the following: Elementary Language Arts Mathematics Social Studies/Science Life Skills Intermediate Language Arts Mathematics Social Studies Science Arts Middle School Language Arts Mathematics Social Studies Science Arts Family and Consumer Science Industrial Technology Computers High School Art Business English Family and Consumer Science Guidance Mathematics Media Center Music Performing Arts Physical Education and Health 4 5 Resource Science Social Studies Technology Education World Language Literacy Technology Integration Note: Folders do not appear in the list until they have a video stored in them. You will only have access to the shared folders that are appropriate for the school you work at. For example, if you work at Pine Tree Elementary, you will only have access to the Elementary Folder and its accompanying subfolders. Every person on EtherneTV also has their own MyMedia folder, which is where bookmarks and playlists are stored. b. Icons – videos in the asset library will have one of three icons. a. Filmstrip is the standard icon for a stored video. b. Thumbnail – a small picture from a frame of the video. c. A filmstrip .... denotes a playlist. c. Info Icon – this provides the viewer with information on the video. To access, hover your mouse over the right side of the Asset Library screen; you’ll see the Info icon appear. Clicking on the icon will launch another window with the following information: i. Name – this is the name that has been assigned to this video. ii. Folder – location where has this video has been stored. iii. Description – brief description of the video. iv. Keywords – these are the keywords that have been entered for the search tool. v. Any Custom Fields your Administrator has added. 2. Preview Area – provides control for each video stream. 5 6 a. Blue control buttons – play, pause, stop, rewind, fast forward, full screen i. Rewind/Fast Forward – allow you to move quickly from scene to scene. ii. Slide Bar (above the control buttons) – allows the viewer to quickly move the playing location even further by sliding the bar to the left or right. iii. Full – provides a full screen view of the video stream. Push ESC to return to preview. b. Audio Controls – mute button and a slider for volume control. c. External View (Small White Square icon with green arrow) – this launches a separate (external) video viewing window. This is helpful when you are playing a video, but wish to close the portal window so that you can open another application, such as PowerPoint. d. cc button – enables closed captioning. This feature only works if the stored video was recorded with closed captioning enabled. e. Mark – this allows you to bookmark a location in a video. We will discuss this feature in more detail later. 3. Search Tool – allows viewers to search for a video by title, keyword or any custom field criteria that has been entered. Note that this is a global search; there are not advanced search features, so be as specific as possible to reduce the number of videos returned. a. The search tool will only work if information, such as keywords, has been entered for the videos. i. Only media specialists or a portal administrator (i.e. the technical team) have the capabilities to add or modify the information stored in the portal server about a video. If you request a program recorded, please plan on providing the media specialist with the information needed for the info page (title, program description, keywords, etc). b. The search tool will return the folder that qualifying videos appear in; it does not pull up the exact video. IV. BOOKMARKS AND PLAYLISTS 6 7 A. What are bookmarks and playlists? 1. Bookmark – marks the starting point you would like to use for a video clip. For example, perhaps I have recorded a five-hour broadcast of the Summer Olympics, but I’m the Gymnastics Coach and I only want to show my gymnastics team the U.S. Women’s team all-around (which occurs a little over 3 hrs into the video). I can set a bookmark so that it starts at that section of the video, and then it will play to the end of the video. a. Bookmarks are designed to mark one video clip. b. Creating a bookmark does not change the original video in any way. c. Bookmarks only appear in your MyMedia folder, so it also does not affect where anyone else viewing this video starts the clip. 2. Playlist – marks the start and end point you would like to use for a video clip. For example, perhaps I have recorded a five-hour broadcast of the Summer Olympics and I’m the Swim Coach, and I just want to show a segment in the middle of the video of Michael Phelps swimming the 200m Butterfly. I can set it so I only see that segment of the video. In a playlist, you can set several clips to play in succession. Therefore, I could show that segment and follow it immediately with another segment from my playlist showcasing Michael Phelps in a different event topic from that same fivehour broadcast (or even from a different broadcast). a. Playlists are designed when you either want to mark the start and end of one video clip or you want to show several clips in succession. b. Creating a playlist does not change the original video in any way. c. Playlists are stored your MyMedia folder. B. How do I set up a bookmark or playlist? 7 8 1. Bookmark a. The MARK button is available in the Blue Control Buttons below the Preview Window. Just press the button at the location you wish to bookmark as the start. b. The marked video now resides in your MyMedia folder. The video folder will have …. in front of it, denoting it as a bookmark or a playlist. c. If you hover your mouse to the right, in addition to the info tab, you will now have Edit Playlist available. This will open up a Playlist that shows that bookmarked clip as the only item. From here, you can add additional clips by choosing a video and again marking the start and if desired end time desired. Or, if you just want this one bookmarked segment, it will allow you to rename the bookmarked clip. If you do not change the name, it will be named after the bookmarked file name and the date it was created. It will store in your MyMedia folder (which is your private folder), or you can select to save it in any Folder that you have access to. 2. Playlist a. There are two ways to access the Playlist area. 1. If you are creating a new playlist, use the playlist navigation button at the bottom of the page to open the user’s playlist page. 2. If you wish to access a playlist you have already created or turn a bookmarked video into a playlist, then go into your My Media folder and hover on the right side of any video listed and in addition to the Info icon, you will now have an edit playlist selection. b. Once in the playlist area, all available content folders/videos are shown in the top panel; if you hover over a video, you will get the selection Add to Playlist which will copy the listing playlist to the lower panel. You can do this multiple times to add multiple clips to your playlist. c. From within the playlist, you can set the Start and End times for the video segment. This can be done two ways: 1. Push Start and enter the time (0 h 0m 0s) you would like to use as the starting point for this video segment. Push End and enter the 8 9 time (0 h 0m 0s) you would like to use as the ending point for this video segment. 2. More commonly, you are not going to know the exact times you wish to use for the starting and ending points of the video segment. In this case, fast forward or use the sliding bar to set up the point you want the segment to start, then push the Start button and it will automatically populate the start time. Then, fast forward or use the sliding bar to set up the point where you would like the segment to end and push the End button; it will automatically populate the end time. d. Use the Up or Down buttons to change where the video is in the playlist. The clips will play in the order that they are listed. e. Use the Remove button if you would like to remove a clip from your playlist. f. Just as with a bookmark, you can name your playlist so that it is easily identified. If you do not change the name, it will be named after the first file in the playlist and the date the playlist was created. It will store in your MyMedia folder (which is your private folder) or you can select to save it in any Folder that you have access to. g. When done setting up your playlist, make sure to press Save Playlist at the bottom of the page. h. If you wish to delete the entire playlist, then press Delete Playlist at the bottom of the page. i. To make another playlist, press New Playlist. C. How do I play my playlist? 1. Go to MyMedia and select the desired playlist. Playlists are denoted with … in front of the file name. The clips will play one after another in the order they are listed in the playlist. 2. You can also manually jump ahead or back in the playlist listing by using the Previous and Next control buttons that will now appear under the preview window. 9