1
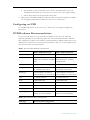
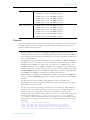
VBrick
ETV Network Video Recorder
EtherneTV v4.2.1 NVR
Release Notes
May 9, 2008
4410-0162-0005
Copyright
© 2008 VBrick Systems, Inc. All rights reserved.
12 Beaumont Road
Wallingford, Connecticut 06492, USA
www.VBrick.com
This publication contains confidential, proprietary, and trade secret information. No part of this document may be
copied, photocopied, reproduced, translated, or reduced to any machine-readable or electronic format without
prior written permission from VBrick. Information in this document is subject to change without notice and
VBrick Systems assumes no responsibility or liability for any errors or inaccuracies. VBrick, VBrick Systems, the
VBrick logo, StreamPlayer, and StreamPlayer Plus are trademarks or registered trademarks in the United States and
other countries. Windows Media is a trademarked name of Microsoft Corporation in the United States and other
countries. All other products or services mentioned in this document are identified by the trademarks, service
marks, or product names as designated by the companies who market those products. Inquiries should be made
directly to those companies. This document may also have links to third-party web pages that are beyond the
control of VBrick. The presence of such links does not imply that VBrick endorses or recommends the content of
any third-party web pages. VBrick acknowledges the use of third-party open source software and licenses in some
VBrick products. This freely available source code is posted at http://www.vbrick.com/opensource.
About VBrick Systems
Founded in 1997, VBrick Systems, an ISO 9001 certified vendor, is a privately held company that has enjoyed rapid
growth by helping our customers successfully introduce mission critical video applications across their enterprise
networks. Since our founding, VBrick has been setting the standard for quality, performance and innovation in the
delivery of live and stored video over IP networks—LANs, WANs and the Internet. With thousands of video
appliances installed world-wide, VBrick is the recognized leader in reliable, high-performance, easy-to-use
networked video solutions.
VBrick is an active participant in the development of industry standards and continues to play an influential role in
the Internet Streaming Media Alliance (ISMA), the MPEG Industry Forum, and Internet2. In 1998 VBrick
invented and shipped the world's first MPEG Video Network Appliance designed to provide affordable DVDquality video across the network. Since then, VBrick's video solutions have grown to include Video on Demand,
Management, Security and Access Control, Scheduling, and Rich Media Integration. VBrick solutions are
successfully supporting a broad variety of applications including distance learning and training, conferencing and
remote office communications, security, process monitoring, traffic monitoring, business and news feeds to the
desktop, webcasting, corporate communications, collaboration, command and control, and telemedicine. VBrick
serves customers in education, government, healthcare, and financial services markets among others.
NVR v4.2 Release Notes
The Network Video Recorder (NVR) is a component of VBrick's Media Control Server Suite
and provides a dedicated platform to perform multiple simultaneous recordings of live
streams coming from VBrick encoders. The NVR lets you off-load all recording tasks from
the ETV Portal Server machine to one or more separate "recorder server" machines. The
NVR is available in two versions—one that supports 10 simultaneous records and one that
supports 40—and is ideal for environments that require large scale recording on a robust and
reliable platform. The NVR is tightly integrated with the Portal Server, the Scheduler, and
VBrick's Video-on-Demand servers. See the ETV Portal Server Administrator Guide for
related information.
Topics in this document
Installing an NVR . . . . . . . . . . . . . . . . . . . . . . . . . . . . . . . . . . . . . . . . . . . . . . . . . . . . . . . . . . 1
Configuring an NVR . . . . . . . . . . . . . . . . . . . . . . . . . . . . . . . . . . . . . . . . . . . . . . . . . . . . . . . . 2
NVR Hardware Recommendations . . . . . . . . . . . . . . . . . . . . . . . . . . . . . . . . . . . . . . . . . . . . . 2
Caveats . . . . . . . . . . . . . . . . . . . . . . . . . . . . . . . . . . . . . . . . . . . . . . . . . . . . . . . . . . . . . . . . . . . 3
Installing an NVR
The NVR is sold as a hardware/software combination or as software-only product. If you
purchased the hardware/software combination from VBrick, the Standard or Standalone
NVR software will be pre-installed and your server license(s) will be activated. You will still
need to configure the NVR as explained in the Portal Server Admin Guide.
If you purchased only the software from VBrick, you must install the NVR software as
explained below and then configure it using the instructions in the Admin Guide. If you are
using server hardware not purchased from VBrick, be sure to read NVR Hardware
Recommendations on page 2.
Installing a Standard NVR
T
To install a standard NVR:
1.
2.
3.
Go to the "Network Video Recorder" page on the Product CD and double-click on
the Standard NVR setup file.
Follow the prompts and exit the window when done.
Then open the Portal Server Admin Console and configure the NVR: see
"Configuring a Standard NVR" in the Portal Server Admin Guide.
Installing a Standalone NVR
T
To install a standalone NVR:
1.
Go to the "Network Video Recorder" page on the Product CD and double-click on
the Standalone NVR setup file.
Network Video Recorder Release Notes
1
2.
4.
The installation steps are identical to those used to install the Portal Server. See
"Installing the Portal Server" in the Portal Server Release Notes for complete details.
3. Follow the prompts and exit the window when done.
Then open the Standalone NVR Portal Server Admin Console and configure the NVR:
see "Configuring a Standalone NVR" in the Portal Server Admin Guide.
Configuring an NVR
See "NVR Configuration" in the Portal Server Admin Guide for complete configuration
instructions.
NVR Hardware Recommendations
If your server hardware was not purchased from VBrick, it must meet the following
minimum specifications. The following tables show the recommended hardware and hard
drive configuration relative to the number of purchased licenses. VBrick requires that you use
dedicated server that meets or exceeds these specifications. The use of a less capable system
may adversely affect system performance.
Table 1. Recommended Hardware Specifications
NVR – 10 Record Licenses
NVR – 40 Record Licenses
Platform
Dell PowerEdge 2950
Dell PowerEdge 2950
Processor
Dual Core Xeon Processor 5130, (2) Dual Core Xeon Processor
4MB Cache, 2.00GHz, 1333MHz 5130, 4MB Cache, 2.00GHz,
FSB
1333MHz FSB
Memory
1 GB 533 MHz
2 GB 533 MHz
Storage capacity
(2) 73 GB OS drives
(4) 146 GB content drives
(2) 146 GB OS drives
(4) 300 GB content drives
RAID Type
2 drive RAID1 for OS drives
2 drive RAID1 for OS drives
4 drive RAID5 for content drives 4 drive RAID5 for content drives
CPU
(1) 3 GHz dual core
(2) 3 GHz dual core
RAM
1 GB DDR RAM
2 GB DDR RAM
CDROM
24X IDE CD-ROM
24X IDE CD-ROM
Chassis
2U
2U
Power supply
Redundant
Redundant
Operating System
Windows Server 2003 Web
Edition or Standard Edition
Windows Server 2003 Web
Edition or Standard Edition
Table 2. Recommended Drive Configuration
NVR Type
2
Recommended Configuration
© 2008 VBrick Systems, Inc.
NVR v4.2 Release Notes
NVR – 10 Licenses
•
•
•
•
•
•
73GB, SAS, 3.5-inch 10K RPM hard drive
73GB, SAS, 3.5-inch 10K RPM hard drive
146GB, SAS, 3.5-inch 10K RPM hard drive
146GB, SAS, 3.5-inch 10K RPM hard drive
146GB, SAS, 3.5-inch 10K RPM hard drive
146GB, SAS, 3.5-inch 10K RPM hard drive
NVR – 40 Licenses
•
•
•
•
•
•
146GB, SAS, 3.5-inch 10K RPM hard drive
146GB, SAS, 3.5-inch 10K RPM hard drive
300GB, SAS, 3.5-inch 10K RPM hard drive
300GB, SAS, 3.5-inch 10K RPM hard drive
300GB, SAS, 3.5-inch 10K RPM hard drive
300GB, SAS, 3.5-inch 10K RPM hard drive
Caveats
This section addresses known issues in this release, most of which have an easy workaround.
For more information about any item, or help with an issue not listed here, contact your
reseller or VBrick Customer Service.
•
•
•
•
•
When recording to an NVR from an MPEG-1/MPEG-2 encoder, and you stop the
recording before it reaches 1% of the Defined Record Duration, the FTP will fail with an
error message on the Status page. The NVR does not recognize extremely small files and
this is standard behavior.
The NVR 40 lets you record any combination of up to 40 MPEG-1, MPEG-2, MPEG-4,
and WM streams at a time. There are however performance limitations when recording
multiple high-rate MPEG-2 or WM streams at the same time. At MPEG-2 rates up to
5.5MBps or WM rates up to 1.2MBps 40 simultaneous recordings are fully supported. At
higher rates however the full licensing capacity cannot be used. For example, when using
the Best Quality WM template at 4.5MBps, 10 simultaneous records are supported; when
using MPEG-2 at 15MBps, 15 simultaneous recordings are supported.
Batch recording to an NVR from a WM VBrick encoder is not supported; the Batch tab
is greyed out on the Scheduling page. Batch recording is supported from all other VBrick
encoders.
The Portal Server and the NVR are tightly linked. In order to avoid backward
compatibility issues, always upgrade the NVR from the same package when you upgrade
the Portal Server, and vice versa.
In some cases, because of a naming resolution issue, a LAN Network Video Recorder
(NVR) does not record when the ETV Portal Server server is in a DMZ. As shown on
the status page, the recording will either fail or run indefinitely (without actually
recording). To work around this issue, modify (or create) a hosts file on the ETV Portal
Server as shown below. Go to c:\windows\system32\drivers\etc\hosts. Open the
hosts file in an editor and add the IP address and computer name of the NVR as shown
below. (If the hosts file is not present, you must create one by saving a txt file with no
extension.)
#
#
#
#
#
Copyright (c) 1993-1999 Microsoft Corp.
This is a sample HOSTS file used by Microsoft TCP/IP for Windows.
This file contains the mappings of IP addresses to host names. Each
entry should be kept on an individual line. The IP address should
be placed in the first column followed by the corresponding host name.
Network Video Recorder Release Notes
3
#
#
#
#
#
#
The IP address and the host name should be separated by at least one
space. Additionally, comments (such as these) may be inserted on
individual lines or following the machine name denoted by a '#' symbol.
For example:
102.54.94.97
rhino.acme.com # source server
38.25.63.10
x.acme.com
# x client host
127.0.0.1
nvr ip address
•
•
localhost
nvr computer name
The ETV Portal Server and the NVR must be in the same time zone. Also, in order to
record successfully, the system time on ETV Portal server and the NVR must be
synchronized. You can synchronize the machines, for example, by running the Service
for Windows Time on both machines. See "Synchronizing the Portal Server and the
NVR" in the Portal Server Admin Guide.
In order to record multiple streams, the Recorder path must be under FTP root. For
example, if root is C:\Inetpub\ftproot the Recorder path must be
C:\Inetpub\ftproot\<your_folder>
•
•
4
If you try to uninstall the Microsoft .NET 1.1 framework prior to uninstalling the
Network Video Recorder, the uninstall of the Microsoft .NET 1.1 framework will fail
because the Network Video Recorder uses this framework. If you need to uninstall the
Microsoft .NET 1.1 Framework, you first need to uninstall the Network Video Recorder
software.
The default FTP path in IIS is automatically set via the installer, but, depending on the
particular machine's configuration, it may need to be changed. The installer sets the
default FTP path to D:\Inetpub\ftproot in IIS, if a D: drive is detected. Otherwise it sets
the path to C:\Inetpub\ftproot. If you have a machine with an E: drive and you want to
set the FTP path to E:, you need to do two things. First, go to IIS and use the right
mouse button to select on the Default FTP Site, select Properties from the popup menu.
The Default FTP Site Properties dialog box will appear. Select the Home Directory tab. In
the Local Path edit box, change the value to E:\Inetpub\ftproot and hit OK . Second, you
need to go to the Admin Console > Global Settings > Global Assignments and change
Select FTP root path to E:\inetpub\ftproot and then change Select a media storage path
to E:\inetpub\ftproot\MCS\Record.
© 2008 VBrick Systems, Inc.
VBrick Systems, Inc.
12 Beaumont Road
Wallingford, Connecticut 06492, USA