1
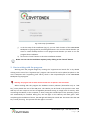
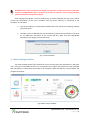
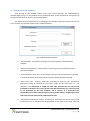
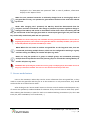
CRYPTONOX Multipoint Crypt
1. Installation program
Prior to installing the CRYPTONOX Multipoint Crypt program, the .NET Framework version 3.5
must be installed onto the computer were you want to use this program. Without it, the CRYPTONOX
program will not be functional! .NET Framework 3.5 can be installed from the installation CD under
the folder “Framework” or directly from manufacturer’s web site.
The installation package of the CRYPTONOX Multipoint Crypt program is located on the
installation CD, which is included in the product’s case. The procedure for installation is the
following:
a)
b)
c)
d)
Insert the installation CD into a drive.
Open CD contents.
Insert HW key to USB port into your computer.
Run “Cryptonox_Setup.exe”. Language window will appear. (Fig. 1)
Fig. 1 Language window
MULTIPOINT Crypt - user manual rev. 1.4
Page |1
e) After the language has been chosen the first Installation window will appear. (Fig. 2)
Fig. 2 First step of installation
f)
Enter the user’s password, which is included in the product’s case. Then click on the
“Next” button. This will take you to the 2nd step of installation.
Fig. 3 Second step of installation - licence terms
g) In the second step (Fig. 3), please read carefully the licence terms and conditions for
working with the CRYPTONOX Multipoint Crypt program. For proceeding with the
installation, click on the “I accept” button. This will take you to the 3rd step of the
installation. (Fig. 4)
MULTIPOINT Crypt - user manual rev. 1.4
Page |2
Fig. 4 Third step of installation - .NET Framework
h) In third step (Fig. 4), the user is prompted whether Microsoft .NET Framework version
3.5 is installed on the computer. Without this Framework, the CRYPTONOX program
will not correctly work! By clicking on the “Yes” button, you will be taking to the 4th
step of the installation. (Fig. 5)
Fig. 5 Fourth step of installation – selection of target folder
i)
In fourth step of the installation (Fig. 5), select a target folder for the installation for
the product by clicking on the “Browse...” button. After selecting, click on the “Install”
button to start installation of the software. Then the last step of installation will be
displayed. (Fig. 6)
MULTIPOINT Crypt - user manual rev. 1.4
Page |3
Fig. 6 Last step of installation
j)
In the last step of the installation (Fig. 6), you can check location of the CRYPTONOX
Multipoint Crypt program for protecting documents. You can also choose whether you
want to create desktop shortcut to this program and whether you want to run the
program after installation.
k) Click on the “Finish” button to close the installation window.
NOTE: You can exit the installation anytime just by clicking on the “Cancel” button.
2. Start working with the program.
Working with the program begins by running the “Cryptonox.exe launch file” or by double
clicking on the icon of the “Cryptonox.exe” program. This launch file can be placed anywhere in the
user’s computer with “Cryptonox_fx.dll” library, which is the inseparable part of the CRYPTONOX
Multipoint Crypt program.
Warning: the program will not work when these files are not placed in the same folder.
When working with this program the hardware security element (hereinafter only as “HW
key”) must placed into one of the USB ports. The HW key can be found in the product’s case. Each
HW key has one unique ID and one changeable password serving as a high level of security. After
connecting the HW key to the computer, a driver, being the standard part of the operating system,
will automatically be installed. During this, the LED light on the HW key will blink green. After
completing the installation of driver, the LED light will always be switch ON. This means that the HW
key is ready for using. This process will take approx. 1 minute.
MULTIPOINT Crypt - user manual rev. 1.4
Page |4
WARNING: Some antivirus programs may display warning about a possible threat when starting this
program. The CRYPTONOX program represents no risk for your computer. Such a warning should be
ignored to allow the running of this program.
After starting the program, a control window (Fig. 7) will be displayed onto the screen, which
verifies the authenticity of the user’s condition that the correct HW key is connected to the
computer. In case when:
•
The correct HW key is connected this window will close and the main working window
(Fig. 8) will open.
•
The NOT correct or NO HW key is connected this window will count down 10 seconds
for an additional connection of the correct HW key. After that the CRYPTONOX
Multipoint Crypt program terminates itself.
Fig. 7 Control window
3. Main working window.
The main working window (Fig. 8) launches only in the case when the requirement in the point
one is met (the correct HW key has to be connected). The program will continue to work provided
that the HW key is continuously connected to the computer. When the HW key is disconnected, the
program terminates.
Fig. 8 Main control window
MULTIPOINT Crypt - user manual rev. 1.4
Page |5
The main control window consists of the following elements:
•
The user chooses the work mode during the basic run of the program by clicking on
individual buttons “ENCRYPT” - “DECRYPT”.
•
“ENCRYPT” button - selecting this button when you want to secure/encrypt any
document/file/data in the computer. The button is standardly active already at
program start.
•
“DECRYPT” button - select this button when you want to decrypt an already encrypted
document/file/data.
•
“Save last used task” check box – by selecting this box the CRYPTONOX software will
start with the last used task. When user decrypts data and finishes his work, the
CRYPTONOX software at his next start is set in decrypted mode. When user encrypts
data and finishes his work, the CRYPTONOX software at his next start is set in
decrypted mode.
•
“file(s)” and “folder” check box – this options gives a choice to the user to secure a
single file, multiple files or the whole folder. Both options cannot be chosen.
•
“Source file”– this field should indicate the full path to the file in the computer, the
user wants to work with (whether to encrypt or decrypt). This is the source file, i.e.
the one, which the cryption status will be changed! For specifying specific path to a
given file, click on the “Browse ...” button to select location of the source file in the
computer.
•
“Target folder”– this field should indicate full path to the folder in the computer,
where encrypted/decrypted file will be saved. For specifying the specific path to the
desired folder, click on the “Browse …” button to select the location of the target
folder in the computer. In case the user enters a non-existing folder, the program
prompts the user, whether the program has to create a folder.
A predefined target fold is identical to the folder, in which the source file is saved. This
information is automatically added after selecting a source file.
•
“File name”– this field should indicate the name of the encrypted/decrypted file after
completion of this task. I.e. the name of the file, under which the program creates and
saves it. This is ONLY the name of the file, not the file type (not file extension). This
means that file extension should not be entered in this field. File type (and file
extension) remains the same as the source file has.
Predefined file name is “Encrypt_yourfile.xxx” or “Decrypt_yourfile.xxx” and is
automatically added after selection of the source file.
WARNING: The file name you entered cannot be the same as the source file name.
MULTIPOINT Crypt - user manual rev. 1.4
Page |6
•
“EXECUTE!” - After filling above mentioned fields, chosen operation (encryption or
decryption) is performed by clicking on this button and entering user password (Fig.
9). When some of these fields are not filled, user will be notified of this.
A predefined unique password is included in the product’s case.
Fig. 9 Dialog window for entering password
•
“Reports”– the user is notified in this field about the successfulness of performed
operation of encryption/decryption. In case of an error occurring during the process,
the user is informed about this error in this field.
(e.g. wrongly entered user password, connection of wrong HW key not operating with
this specific program – combination of program + HW key is unique,…)
•
CRYPTONOX logo - after clicking on the logo, you will be redirected, when you are
connected to internet, to the web presentation of the product, where you can read
various information, FAQ, and also subscribe for receiving information about new
products.
•
“ADMIN” button – see Chapter 4. "Administration window"
•
“Secure mode” button – see Chapter 5. "Secure mode feature".
MULTIPOINT Crypt - user manual rev. 1.4
Page |7
4. Administration window.
After clicking on the “ADMIN” button in the main control window, the “Administration”
window displays (Fig. 10). This window serves as administration access password for encryption and
decryption operations or for work in the Safety Mode.
The Administration window serves as changing of the already unique password when the user
has a suspicion of a possible misuse of the present password.
Fig. 10 Administration window.
•
“Old password”– the field for entering the current password, which should be
changed.
•
“Re-enter old password”– check field for re-entering the currant password, which
should be changed.
•
“Show password” check box – by selecting this box you can switch between a secured
or unsecured display of entered present password, which should be changed.
•
“Seed code” field – arbitrary seed code, according to which the user password is
generated, should be entered into this field. Length of the seed code is 1 - 64
characters. It is important to forget the seed code, because the user will not be
prompted in the future to re-entry of the seed code selected by user. The seed code
in not important for the user anymore, but it remains as a permanent and
inseparable part of the protection against cloning of the HW key. Forgetting the seed
code increases the safety of the product and the user.
•
“Generate new password!” button - by clicking on this button and correct entry of old
password, new user password will be generated on the basis of the seed code and
MULTIPOINT Crypt - user manual rev. 1.4
Page |8
displayed in the “Generated new password” field. In case of problems, information
displays in the “Reports” field.
NOTE: the user password cannot be an arbitrarily changed. Due to ensuring high level of
encrypted files security, user password is generated on the basis of the seed code selected
by the user.
NOTE: After changing user’s password, the HW key should be disconnected from the
computer and then reconnected. This change of password represents significant change in
settings of the HW key and results in reinstallation of the driver. After reconnecting the HW
key, you should wait till the LED light glows with an uninterrupted green light. Only then the HW
key can be safely used already with new user password.
WARNING: You should safely keep and remember the new generated password!!! In case of loss or
forgetting the password, user’s access to encrypted files will be irretrievably disabled. (This process is
irreversible) Without the password the HW key is useless.
NOTE: When the user wants to archive encrypted files on the long-term basis, then we
recommend purchasing multiple licences, which are also configured for working in a group
and then storing one HW keys at another safe place e.g. Bank.
NOTE: For using the product in a group or multiple groups, we recommend purchasing
multiple licences beyond the size of the present groups in use and then storing HW keys at
another safe place e.g. Bank.
WARNING: After purchasing the product for use in a group or multiple groups, the number of users in
the group it cannot be modified. This rule is so as to increase the security of the users.
5. Secure mode feature
Users in this situation is when they need to access information from encrypted files, or they
need to create encrypted file and they are in at that moment in a risky environment, they should
work with files in so-called “Secure mode”.
After clicking on the “Secure mode” button in the main control window and subsequent entry
of correct user password, standard window for selection of file, the user wants to work with, opens.
After selecting the document, it opens for work in its standard working environment. (xls, xlsx in MS
Excel; doc, docx in MS Word; crd in Corel Draw; ...)
MULTIPOINT Crypt - user manual rev. 1.4
Page |9
What is Safety Mode about?
In case the user has opened document in this Safety Mode and disconnects the HW key, following
actions will happen:
1. Operation of standard working environment of the program (MS Excel, MS Word, Corel
Draw; ...) immediately terminates and at the same time, this document is encrypted in its
last saved version.
2. Original (not encrypted) file is deleted from the computer and only encrypted file is
retained. File is encrypted and saved in the same folder as the original file was located.
3. The CRYPTONOX Multipoint Crypt program terminates its operation.
WARNING: In case of disconnecting the HW key in the Safety Mode, only the last saved versions of
files are saved and encrypted! Therefore we recommend saving changes from time to time to not
losing any information (Ctrl+S).
NOTE: Always pay attention to really removing all deleted files. We recommend using for
instance SW CCleaner, you can find on http://www.piriform.com/.
WARNING: In case of opening several documents in the same program using MDI (Multiple
Document Interface), all such documents can be closed. Therefore we recommend having only 1
document opened in given program during work in the Safety Mode.
MULTIPOINT Crypt - user manual rev. 1.4
P a g e | 10