1
Preliminary
Tel-Lynx User’s Guide
October 18, 2015
TM
Introduction
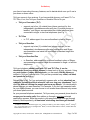
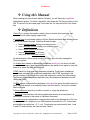
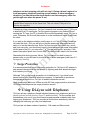
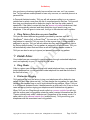
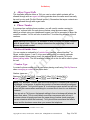
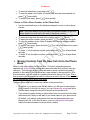
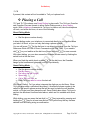
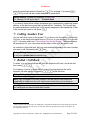
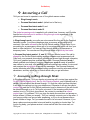
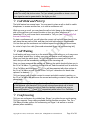
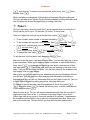
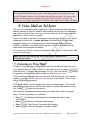
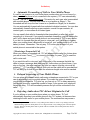
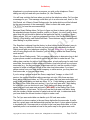
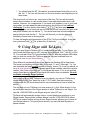
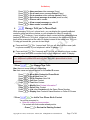
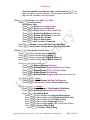
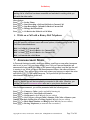
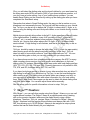
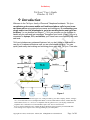
Welcome to the Tel-Lynx family of Personal Telephone Assistants. Tel- Lynx
coordinates and screens mobile and land-based phone calls in your home
and home office using patented processes and techniques. By connecting your
single and/or two-line telephones to up to two mobile phones and up to two
landlines1 (or one landline and Skype ™2), Tel-Lynx provides you the freedom to
handle all your calls and text messages3 throughout your home. When Tel-Lynx is
connected to laptops, PCs, and tablets, you'll have even more flexibility with calls
and texts.
Tel-Lynx includes many advanced features, but you don't have to understand or
use any of its advanced features until you are comfortable doing so. You can
quickly and easily start making and receiving phone calls with Tel-Lynx. Then take
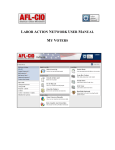
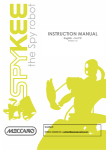
Mobile 1 Mobile 2
Bluetooth
….
Line 1
TLC
Line 2
Landline
….
Telco
USB
Optional use with PC(s)
PC
LAN
PC
PC
….
PC
Router
Skype
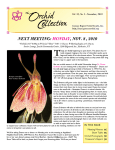
Figure 1
1
A landline could be a traditional copper wire, VoIP (provided by your cable company, Ooma ®, Vonage®,
etc.), or wireless home service (Straight Talk® Home, Verizon's Home Phone Connect, AT&T's Wireless
Home Phone Service, etc.). Tel-Lynx is compatible with any phone service you can plug a traditional
telephone into. Connection to a second landline requires TLC Plus or Guardian Plus.
2
Tel-Lynx must be attached to a PC (running the Skype Desktop Client) using the provided USB cable.
3
Text message access requires TLC's free app running on your smartphone.
Copyright 2013-2015, nVideon, Inc. Atlanta, GA All Rights Reserved Worldwide
Page 1 of 84
Preliminary
your time to learn about its many features, and to decide which ones you’ll use in
your home or home office.
Tel-Lynx comes in four versions. If you have mobile phones, you’ll want TLC or
TLC Plus; if not, the Tel-Lynx Guardian or Guardian Plus is for you.
Tel-Lynx Connexion (TLC)
o supports up to four (4) outside lines (phone services) for four
independent, simultaneous calls using two (2) mobile phones, a
landline4, and Skype; accommodates two inside telephone lines
connected to single- or two-line telephones (see Fig. 1).
TLC Plus
o to TLC, adds support for a second landline in place of Skype.
Tel-Lynx Guardian
o supports up to two (2) outside lines (phone services) for two
independent, simultaneous calls using one landline and Skype;
accommodates one inside line connected to standard single-line
telephones.
Tel-Lynx Guardian Plus
o to Guardian, adds support for a second landline in place of Skype;
accommodates a second inside line connected to single- or two-line
telephones.
Tel-Lynx includes a phone book (with TLC and TLC Plus, it can be
downloaded from your mobile phones) to keep track of all your contacts. Using
any push button or rotary dial telephone, you can easily Dial-By-Name any
contact in Tel-Lynx 's phone book. Tel-Lynx also provides easy redial, call back,
and speed dial operation.
Perhaps best of all, Tel-Lynx automatically screens calls, so that absolutely no
robocalls, including political robocalls, will ever ring your telephones. And it
does this without causing the people you know any hassle. You decide which
phone services you want screened. For example, if you don't get unwanted calls
on your mobile phones, you can choose to not screen those calls and only screen
your home phone service.
As your personal telephone assistant, Tel-Lynx uses your personal phone book to
screen your incoming calls. New callers go through a one-time patented
qualification process, while the people in your personal phone book get through
instantly. Most importantly, all unwanted robocalling machines get blocked!
4
A landline could be a traditional copper wire, VoIP (provided by your cable company, Ooma ®, Vonage®,
etc.), or wireless home service (Straight Talk® Home, Verizon's Home Phone Connect, AT&T's Wireless
Home Phone Service, etc.)
Copyright 2013-2015, nVideon, Inc. Atlanta, GA All Rights Reserved Worldwide
Page 2 of 84
Preliminary
And you can set up Tel-Lynx with phone numbers for the automated calls that you
do want, such as those from your doctor’s office, pharmacy, school, or community
emergency alert system.
When your telephone does ring, distinctive ringing will let you know who the call
is for. When you answer your telephone, Tel-Lynx will announce the caller's name,
who is being called, and the outside line they are calling in on. Tel-Lynx always
announces new callers, and you can set it to announce callers in the phone book
or not. You can then take the call, send it to voice mail, or block the caller. You
can listen in while a caller leaves a message, or change your mind and take the
call. You can do all this from any telephone, PC, laptop, or tablet in your home 5.
When you’re away from home, TLC and TLC Plus can automatically and
selectively transfer incoming Skype™ and landline6 calls to your mobile
phone. You can select which contacts’ calls will be forwarded, and you'll never
have to turn this feature on or off.
With TLC and TLC Plus, you can also send and receive mobile phone text
messages7 using your home telephones, PCs, laptops, or tablets. You can
leave your mobile phone on its charger and never miss a call or text again!
You can set up Tel-Lynx using contact types so that your telephone only rings for
the calls you want and only when you want them. You can set regular Do-NotDisturb periods for your workday, sleep, and awake hours for workday contacts,
normal contacts, and super contacts, and you can temporarily override the
schedule. Tel-Lynx always allows urgent calls from your super contacts to get
through.
Tel-Lynx supports seven users plus a general user called anyone. Each user is
assigned a voice mailbox and can be assigned one of nine ring patterns for
receiving calls. Tel-Lynx also works with services like RingMaster® for use with
fax machines, or to identify the called party with different incoming ring patterns
on your landline.
You can set up an administrator contact who can remotely manage Tel- Lynx's
phone book, new call list, and settings. This is great for caregivers who want to
provide Tel- Lynx to a loved one to protect them from telephone scammers.
Caregivers can call in remotely, listen to new caller voice mail, and add new callers
to the phone book when appropriate. Tel-Lynx can also be operated in a mode
where only those people in its phone book are allowed through. All others go
through the one-time qualification process, but can only leave a voice mail, so no
telephone scammers can get through.
When using Tel-Lynx with a PC, you can record your phone conversations.
Note: In some states, recording phone conversations may be illegal without the
5
6
7
Windows Vista, Win7, Win 8.x, and Win 10 PCs, laptops, and tablets supported.
Forwarding on your landline requires 3-way calling service.
Requires an Android phone running TLC's free Android App.
Copyright 2013-2015, nVideon, Inc. Atlanta, GA All Rights Reserved Worldwide
Page 3 of 84
Preliminary
permission of all parties to the conversation. Know the legal requirements for
recording a phone conversation before using this feature.
Tel-Lynx can conference its outside lines as well as work with the 3-way calling
capability of your landline and mobile phones. And it also works with Skype's 24way conferencing.
Additional features include timers and alarms, as well as an intercom that makes
communication by PC, laptop, or tablet easy and convenient for TLC users.
Tel-Lynx keeps track of your calls in a log, including phone number, time, date,
length of call, and the name of the line that was used to make or receive the call.
You can download the log with Tel-Lynx software running on an attached PC, or
you can access it by entering # # 5 at the dial tone.
Some offices and communities use a PBX that requires that you dial 9 for an
outside line. If the PBX can be used with standard telephones, Tel-Lynx is
compatible with it. Tel- Lynx can be set up to call both internal extensions and
outside phone numbers, and with Tel-Lynx you won’t have to dial 9 first.
Tel-Lynx is not associated with any particular mobile or landline phone
service, so you are free to keep, get rid of, or change phone services whenever
you want. Best of all, there are no monthly fees for using Tel-Lynx.
It’s easy to set up and use Tel-Lynx to make and receive phone calls using a
cordless telephone set. Please take the time to carefully read through this
manual to familiarize yourself with Tel-Lynx’s many additional powerful features.
At www.tel-lynx.com, you’ll find frequently asked questions and answers,
downloadable updates, and video tutorials that describe how to install and use
Tel- Lynx products.
Requirements and Compatibility
Tel-Lynx is compatible with push button and rotary dial telephones and mobile
phones that have Bluetooth®. Tel-Lynx can also be connected to a PC running
Windows Vista, Windows 7, Windows 8.x or Windows 10 to provide home network
and Skype™ connectivity.
Copyright 2013-2015, nVideon, Inc. Atlanta, GA All Rights Reserved Worldwide
Page 4 of 84
Preliminary
Copyright 2013-2015, nVideon, Inc. Atlanta, GA All Rights Reserved Worldwide
Page 5 of 84
Preliminary
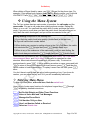
Using this Manual
When reading this manual with Adobe ® Reader®, you will find many hyperlinks
highlighted in purple. To follow a hyperlink, hold down the 'Ctrl' key and click on the
link. To return from the linked page, hold down the 'Alt' key and hit the 'Left Arrow'
key.
Definitions
Caller ID is a system that sends a caller’s phone number (and optionally their
name) before or while ringing a phone line.
A contact type is used when setting a Do-Not-Disturb schedule, and defines whose
calls will be allowed through. Calls are allowed through:
from a normal contact during your waking hours;
from a workday contact during your workday hours;
from a super contact at all times;
from an administrator at all times;
and never from a blocked contact.
An administrator is like a super contact, plus they can remotely manage the
Tel- Lynx system.
To double flash means to depress the telephone switch hook for about one-half
second, then release, then immediately depress the switch hook again for one half
second (or press the flash button twice).
DTMF stands for dual-tone multi-frequency signaling. Push-button telephones
(sometimes referred to as touch-tone telephones) use DTMF signaling to dial
phone numbers. This differs from rotary dial telephones, which use pulse dialing.
Push-button telephones slowly replaced rotary dial telephones between the mid1960s and 1990.
To flash means to depress the telephone switch hook for about one-half second (or
press the flash button on a cordless phone) and then wait for Tel-Lynx to indicate
what to do next.
A home telephone may be a cordless, corded, or rotary dial telephone.
A hyperlink is an electronic link that provides direct access from one place in a
document to another in the same or a different document.
An inside line is an independent communication path or line between the Tel- Lynx
system and either a telephone or a USB headset connected to a PC. Inside lines
are identified as inside line 1, 2, 3, or 4. Telephones are connected to lines 1 and
2, and PC audio devices are used on lines 3 and 4 .
Copyright 2013-2015, nVideon, Inc. Atlanta, GA All Rights Reserved Worldwide
Page 6 of 84
Preliminary
A landline is a wired voice communication line that has a unique phone number
assigned by a Telco or VoIP service provider. Tel-Lynx connects to a landline with
a modular telephone cable.
A mobile phone transmits and receives over-the-air and is not restricted to
operating in and around your home. Mobile phones are assigned a unique phone
number by the wireless carrier that provides the mobile phone service. Tel-Lynx
connects to mobile phones using Bluetooth ®.
A modular telephone cable connects a telephone to Tel-Lynx, and also connects
Tel-Lynx to a Telco landline or to a VoIP provider’s Internet gateway using either
the RJ-11 or RJ-14 Telco standard. The cable has either one pair of wires (RJ-11)
for a single-line telephone or two pair (RJ-14) for a two-line telephone.
A new call has a phone number with no record in the Tel-Lynx phone book. It may
be a number that you called, or it may be that a call has come in from this number.
Qualified new calls create a contact in the new call list. Contacts in the new call list
can be added to the phone book, and may eventually drop off the list if not added
to the phone book.
An outside line is a communication path or line to a service provider such as a
Telco/VoIP provider, mobile phone service provider, or Skype™. Outside lines are
assigned a unique identifying phone number by their respective service provider. In
the US and its territories, Canada, Bermuda, and many of the Caribbean Islands,
this number is assigned according to the North American Number Plan (NANP). It
is eleven digits long and always begins with a one.
A PBX or Private Branch Exchange is a telephone system that operates within a
business or residential community of telephone extensions. It provides the means
for the telephone extensions to communicate with each other and the Public
Switch Telephone Network. Within a PBX, a caller can usually dial another
extension directly using only three or four digits, and must dial a '9' before dialing a
regular telephone number on the Public Switch Telephone Network.
PSTN stands for Public Switch Telephone Network. It is the aggregate of the
world's circuit-switched telephone networks that are operated by national, regional,
or local telephony operators, providing infrastructure and services for public
telecommunication.
A qualified new call is a call from a new caller that has successfully gone through a
one-time process to make sure the new caller is not a robocaller.
The secret code is the four digit code used to access the Tel-Lynx setup menu.
The factory default code is "1234". You can set the secret code using the setup
menu.
A service provider is a Telco, VoIP company, wireless carrier, or Skype™.
Skype™ is a PC-based VoIP service. Tel-Lynx connects with Skype™ over a USB
cable. Skype is a trademark of Skype. It can be used for computer-to-computer
Copyright 2013-2015, nVideon, Inc. Atlanta, GA All Rights Reserved Worldwide
Page 7 of 84
Preliminary
communication using Skype ™ names. You can also set it up with a phone number
and place and receive calls to and from other phone numbers.
A switch hook is used to switch the telephone between an idle, on-hook condition
that allows the telephone to ring, and an active, off-hook condition that allows you
to place or answer a call. Most rotary dial telephones have a handset (with a
microphone and speaker) that depresses the switch hook when the telephone is
idle (on-hook). The switch hook is hidden on cordless telephones and is activated
by a flash button near the keypad.
A Telco is a phone company (such as AT&T) that provides voice communication
service over a land-based Public Switch Telephone Network (PSTN) to many other
telephones.
A telephone is a device that transmits and receives voice communication over a
pair of wires. It has either a push-button keypad or a rotary dial. It may be cordless,
but it always connects through a pair of wires in your home or business, as
opposed to a mobile phone, which communicates strictly over-the-air. Tel-Lynx
provides full support for cordless, corded, and rotary dial telephones.
An urgent call is a call from someone who believes they need to talk to a Tel- Lynx
user immediately, even if the user has Tel-Lynx in a Do-Not-Disturb mode.
An unknown caller has no record in the Tel-Lynx phone book or new call list.
VoIP or Voice over IP is Voice over Internet Protocol service, provided by cable
companies or by companies such as Skype ™, Vonage®, Ooma®, and others.
Tel- Lynx will interface with VoIP services other than Skype ™ via that company’s
VoIP gateway box, connected to Tel-Lynx’s landline port.
A wireless carrier is a company such as AT&T, T-Mobile®, Sprint®, Verizon, or
others that provide phone service to mobile phones. It may be referred to as a
mobile or cell phone service provider or carrier. Some wireless carriers provide a
wireless home phone service that can be interfaced to Tel-Lynx's landline port.
Copyright 2013-2015, nVideon, Inc. Atlanta, GA All Rights Reserved Worldwide
Page 8 of 84
Preliminary
Safety Information
911 Emergency Service
When a Tel-Lynx user places a 911 emergency call, Tel-Lynx will override the DoNot-Disturb feature and switch into Ring-through mode, allowing all calls directly
through for one (1) hour8. This ensures that returned emergency calls get through
without delay. When the emergency is over, at the dial tone, you can press #
6 # to cancel the override feature.
When a user makes an emergency call, Tel-Lynx will select an available outside
line based on the user-defined shared outside line calling table for emergency
calls, unless the user specifies a line before dialing 911 (see Selecting an Outside
Line).
It is imperative that the emergency calling table is setup correctly; otherwise
you may not be able to place an emergency call at a critical time. As of this
printing, Skype™ does not provide 911 emergency call services for the US;
therefore, you should NOT use Skype™ as an outside line for emergency
calls. By default the emergency calling table is setup to dial out first on the landline
if it is available, then on mobile phone 1 if it is available, then on mobile phone 2 if
it is available.
If you change the default emergency calling table setting and specify Skype, you
should specify it as the last line to try when all others fail. You can program a
phone number that Skype™ will call when you dial 911 on a Skype™ line. Be
sure to program an appropriate phone number for your area.
Power Interruptions
If the power is out or Tel-Lynx is not operating for any reason, no calls, not
even emergency calls, can be placed or received through Tel-Lynx. If this
happens, you can call 911 directly on your mobile phone, or, if you have a
Telco line, you can connect a wired telephone directly to it to call 911.
Remember that most cordless telephones cannot be used when the power is
out.
It is highly recommended that you put your cordless phone base station
and Tel- Lynx on a UPS (uninterruptable power supply) to avoid service
interruptions during power outages.
It is also safe practice to place a wired telephone in parallel with Tel-Lynx on
your landline (if you have one) so that the wired telephone can be used in an
emergency when the power is off. You can silence the ringer on the wired
8
The call to 911 must last for at least 10 seconds in order for Tel-Lynx to switch into ring through mode. This
avoids accidental 911 calls from switching modes.
Copyright 2013-2015, nVideon, Inc. Atlanta, GA All Rights Reserved Worldwide
Page 9 of 84
Preliminary
telephone so that incoming calls will not ring it. During national, regional, or
local emergency situations involving severe weather or other emergency
situations, you should turn the ringer back on so that emergency calls can
get through even when the power is out.
Warning: You should not attempt to use your landline with both Tel-Lynx and the
parallel wired telephone at the same time. This can cause Tel-Lynx to not
behave as expected.
Following a power interruption, Tel-Lynx’s internal clock must be reset. If Tel- Lynx
is attached to a PC running the Tel-Lynx service program or an Android Phone
running the TLC app, the PC or Android Phone will automatically reset Tel- Lynx s
clock. Otherwise, the first call that comes in on the landline with caller ID will reset
the clock.
If you pick up the telephone before a call comes in, or if the PC/Smart Phone has
not reset the clock, Tel-Lynx will tell you that the power was interrupted and will
ask you to set the date and time. Since Tel-Lynx records the current day, month,
and year every day, you should only need to reset the time if the power interruption
did not span a day (i.e. you may enter # for the year, month, and day). If the
power interruption spans two or more days, the date will also need to be corrected.
Remember that during a power failure, Tel-Lynx cannot be used to place or
answer calls, so you will need to provide a way to make emergency calls (see 911
Emergency Service).
Surge Protection
It is recommended that you provide surge protection for Tel-Lynx’s A/C adapter to
help prevent damage that can be caused by lightning and other electrical surges
from outside your house.
Although Tel-Lynx has surge protection on its landline port, if you have home
phone service from your local telephone company, it is advisable to provide an
external surge protector on Tel-Lynx 's landline connection as well.
Many power strips and most UPSes provide A/C line surge protection and some
UPSes provide telephone line surge protection as well.
Using Tel-Lynx with Telephones
Tel-Lynx acts as a telephony firewall situated between your telephones and your
phone services (mobile phones, Skype™ and/or landline). Tel-Lynx unifies and
standardizes your use of your phone services and prevents unwanted calls from
ringing your telephones. Tel-Lynx provides all its functions seamlessly, without
changing the basic way you use your telephones.
Tel-Lynx has two basic modes of operation: Call mode and Menu mode.
Copyright 2013-2015, nVideon, Inc. Atlanta, GA All Rights Reserved Worldwide
Page 10 of 84
Preliminary
Call mode is used in the traditional way (with dial tone and ringing) to place and
receive calls, but adds a telephone assistant to guide you when appropriate. And
you can Dial-By-Name at the dial tone from standard touch tone and rotary dial
telephones to make it even more convenient.
Menu mode is used to access Tel-Lynx’s features, such as Do-Not-Disturb, timers,
voice mail, call conferencing, and phone book management. To enter or exit the
menu mode, flash the switch hook on your telephone.
Tel-Lynx guides you through its menus using voice prompts. Although it’s not
necessary to know how to navigate the menu system before using it, it’s a good
idea to read this manual to get acquainted with Tel-Lynx’s many features.
Note: If you press a key, dial a digit, or flash the switch hook while Tel-Lynx is
speaking, Tel-Lynx will stop speaking and instantly respond. You do not have to
wait for Tel-Lynx to stop or even start speaking before acting.
TLC and TLC Plus always use Smart Dialing to place calls. The Tel-Lynx Guardian
can operate in either Smart Dialing mode or direct dialing mode. Smart Dialing
allows you to use advanced dialing features like Dial-By-Name, Speed Dialing,
4-Digit Dialing, and Redial/Call Back. Smart dialing also allows you more options
when on a call (See the On a Call Menu). The advantage of direct dialing is that
first-time set up is very easy and there is nothing new to know about when placing
a call.
Touch Tone Telephones
You control and respond to Tel-Lynx using your telephone’s push-button keypad
and switch hook, and you listen to Tel-Lynx’s responses and prompts over your
telephone’s earpiece.
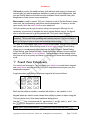
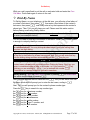
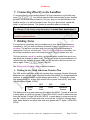
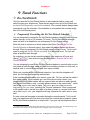
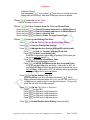
A typical modern push-button telephone keypad is laid out as follows:
1 2 3
4 5 6
7 8 9
* 0 #
Each key has either a number, a number with letters, or the symbols + or #.
Keypad letters are used to enter names when dialing by name or when using the
Tel-Lynx phone book. Note these additional designations:
Use the 1 key for ampersand (&), apostrophe (‘), at (@), dash (-), and 1. Use
the 0 key to designate a space and the number zero.
Note: The 1 key is used like this: ! and the 0 key is used like this: ".
Copyright 2013-2015, nVideon, Inc. Atlanta, GA All Rights Reserved Worldwide
Page 11 of 84
Preliminary
If you’re using an old telephone keypad or a rotary dial telephone, you’ll notice that
the Q and the Z are missing, so you’ll have to remember their positions. Here are
the buttons for Q: 7 and Z: 9.
Note: When entering names into Tel-Lynx, you will press the key associated with
the letter you want to enter the number times corresponding to the letter's
position on the key (e.g. for the letter 'C' you would press the C key three
times quickly).
When Dialing-By-Name, you only press the key once for each letter.
The * and # keys are used extensively by Tel-Lynx. They have different
functions depending on whether they are entered at the dial tone or after another
key has been pressed.
Note: Cordless telephones do not have a visible switch hook. They have a
button near the keypad called flash that is used to flash the internal switch hook
in their base station. Use this button whenever this manual calls for you to flash
the switch hook.
Rotary Dial Telephones
Rotary dial phones work best with the Smart Dialing mode. With Smart Dialing,
Tel-Lynx allows rotary dial users to easily navigate its menus and to Dial-By-Name.
You can also navigate phone trees that require touch tones while on a call.
Tel- Lynx 's menus and Dial-By-Name feature make use of the touch tone *
and # keys. Tel-Lynx uses the switch hook in a special way to provide the
equivalent of these keys when rotary dialing.
When on a Call (on Rotary Dial Telephones)
To navigate phone trees, Tel-Lynx will generate touch tone signals that correspond
to any digits you dial on a rotary telephone. To generate a touch-tone *, flash
the switch hook and then dial 1. To generate a touch-tone #, flash the switch
hook and then dial 2. To enter Tel-Lynx’s On a Call Menu, flash the switch hook
and then dial 3.
Note: When you are on a call, Tel-Lynx always audibly reminds you of your
options after you flash the switch hook.
When in a Tel-Lynx Menu (on Rotary Dial Telephones)
Flash the switch hook once to enter a * or double flash to enter a #.
When Dialing (on Rotary Dial Telephones)
After dialing at least one digit, flash the switch hook to enter a * and Double
flash to enter a #
Copyright 2013-2015, nVideon, Inc. Atlanta, GA All Rights Reserved Worldwide
Page 12 of 84
Preliminary
To enter a * at the dial tone (before dialing any digits), dial 0, then immediately
flash the switch hook. For example to dial * 6 7 you dial 0, then flash
the switch hook, and then dial 6, then 7.
To enter a # at the dial tone, dial 0, then immediately double flash the switch
hook. For example to dial # 2, dial 0, then double flash the switch hook,
hear "pound", and then dial 2.
To make redialing easy with rotary dial telephones, we break the switch hook rules.
To redial quickly, double flash the switch hook at the dial tone (without dialing any
digits). Tel-Lynx will redial the last call. This is equivalent to dialing * * at
the dial tone on a touch tone telephone.
Note: If you double flash the switch hook at the dial tone, Tel-Lynx will assume
you are using a rotary dial telephone. Tel-Lynx presents menus in a different way
when you’re using a rotary dial telephone, so be sure to use this re-dialing
method only if you are using a rotary dial telephone.
__________________________________
Look for boxes like the one below throughout this manual, where you will find
instructions for using Tel-Lynx’s features with a rotary dial telephone.
Rotary Dialing: Rotary dial instructions for the equivalent push-button functions
will be found in gray boxes like this.
Tel-Lynx Users & Lines
Out of the box, Tel-Lynx has one user (the 'anyone' user) enabled, with its own
mailbox. The anyone user cannot be removed, disabled, or assigned to an outside
line. It is automatically selected when Tel-Lynx answers any outside line that has
no other user assigned. You can add up to seven more users, each with a
separate mailbox. Each user can be assigned to receive calls on one or more
outside lines.
Outside Lines
Outside lines are connected to your mobiles phones through Bluetooth, to your
home phone service(s) through a standard telephone cord, and to Skype through a
USB cable.
Personal vs. Common
A common outside line has more than one user assigned to it, whereas a personal
outside line has only one user assigned to it. For example, the landline 9 that comes
9
A landline could be a traditional copper wire, VoIP (provided by your cable company, Ooma ®, Vonage®,
etc.), or wireless home service (Straight Talk® Home, Verizon's Home Phone Connect, AT&T's Wireless
Home Phone Service, etc.)
Copyright 2013-2015, nVideon, Inc. Atlanta, GA All Rights Reserved Worldwide
Page 13 of 84
Preliminary
into your home or business typically has more than one user, so it’s a common
line. Tel-Lynx allows mobile phones to have only one user, so a mobile phone is a
personal line.
In Personal Assistant modes, Tel-Lynx will ask a person calling in on a common
outside line to select a user from the list of users assigned to that line. Tel-Lynx will
then ring your telephone with a distinctive ring for the user the caller wants to
speak with. If the caller’s contact info has the person only called attribute set, that
user is automatically selected, and their distinctive ring is used to ring your
telephone. If the call goes to voice mail, it will go to the selected user’s mailbox.
Ring Pattern Detection on your Landline
Tel-Lynx can detect different ring patterns provided by services such as
RingMaster®, Ident-a-Call, or Smart Ring®. You can set up Tel-Lynx to assign each
ring pattern to a specific Tel-Lynx user or to the anyone user. If a ring pattern is
assigned to anyone, Tel-Lynx will ask callers who they want to speak with (this is
the factory default mode). If a ring pattern is assigned to a specific user, Tel-Lynx
will automatically select that user when a call with that ring pattern comes in.
Tel-Lynx can also be set up to ignore (not answer) a specific ring pattern.
Inside Lines
Your inside lines are connected to your telephones through a standard telephone
cord, and optionally to your PC through a USB cable.
Ring Modes
Calls to a given user can be set to ring both inside telephone lines, one particular
inside telephone line, or one particular inside telephone line and then the other if
the first line is busy.
Distinctive Ringing
Tel-Lynx is set up from the factory to ring your telephones with a distinctive ring
pattern for each user (when set up). You can change the ring pattern for each user,
choosing the standard ring or one of eight distinctive ring patterns. When Tel-Lynx
is in a Personal Assistant mode, it determines who a given call is for (if two or more
users are set up) before ringing your telephones with a distinctive ring pattern.
When Tel- Lynx is in Ring-through mode, calls to a common outside line will ring
with the anyone user’s ring pattern unless the caller's contact information has the
"Person normally/only called" attributes set. Regardless of the answer mode, if a
caller calls in on a personal outside line (mobile phone), Tel-Lynx will ring your
telephones with the associated user's ring pattern.
Copyright 2013-2015, nVideon, Inc. Atlanta, GA All Rights Reserved Worldwide
Page 14 of 84
Preliminary
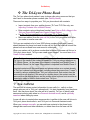
The Tel-Lynx Phone Book
The Tel-Lynx phone book makes it easy to place calls using names so that you
don't have to remember phone numbers (see Dial-By-Name).
There are four ways to populate your Tel-Lynx phone book with contacts:
Import contacts from your mobile phones (TLC and TLC Plus only; see
Importing Contacts from a Mobile Phone).
Enter contacts using a telephone handset (see Enter or Edit a Name in the
Tel-Lynx Phone Book and Auto-Create Contact Option).
Use the Tel-Lynx application on a Windows PC or Smart Phone.
Move new callers (from the new call list) to the Tel-Lynx phone book after
you make or receive new calls.
Tel-Lynx can maintain a list of over 3000 phone numbers (each with a name),
shared between its phone book and its new call list. Both the new call list and the
phone book are ordered from most recent to oldest call.
When you make a call to a phone number that is neither in the new call list nor in
Tel-Lynx’s phone book, Tel-Lynx can create a new contact. You must have Auto
Create Contact enabled.
Note: Tel-Lynx keeps track of which device sourced or "owns" a contact.
Tel- Lynx is the owner if the contact is created on Tel-Lynx using a telephone or
PC, Mobile Phone 1 is the owner if the contact is imported from Mobile Phone 1,
and Mobile Phone 2 is the owner if the contact is imported from Mobile Phone 2.
Imported contacts with the same name and phone number as a contact already
in Tel-Lynx's phone book are merged, including where they came from ("owner").
In order to remove a contact from Tel-Lynx's phone book, that contact must be
removed from all sources. If the source is a mobile phone, the contact must be
removed from the mobile phone, and the mobile phone's phone book must be reimported in order to remove that contact from Tel-Lynx.
New Call List
The new call list stores contact information for new calls (i.e., calls to or from
people who are not in Tel-Lynx's phone book). It is kept separately from the phone
book. Like the phone book, the new call list is used by Tel-Lynx to identify and
announce incoming calls when in a Personal Assistant mode, and is optionally
searched when dialing by name.
A new call entry is created when someone who is neither in the new call list nor in
Tel-Lynx’s phone book calls in, and Tel-Lynx is in Personal Assistant mode.
When you manage new calls, you can add new contacts to the phone book,
change their name and other attributes, or delete them from the new call list.
Copyright 2013-2015, nVideon, Inc. Atlanta, GA All Rights Reserved Worldwide
Page 15 of 84
Preliminary
Note: Phone book entries with no voice tag (typically created by robocalling
machines blocked by Tel-Lynx) are automatically deleted. However, the caller ID
for these deleted entries is still recorded in the caller ID log. You can press
# # 5 at the dial tone to review the caller ID log.
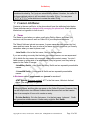
Contact Attributes
Contacts in the new call list or in the phone book have the attributes listed below.
These attributes can be changed while managing the phone book. Each attribute
title below is a hyperlink to how to set it.
Name
The Name is used when you place a call using Dial-by-Name, and when you
receive a call, the name is sent as Caller ID to your telephone handsets.
The 'Name' field can include two names. A space separates two names into first
name and last name. Be sure to enter a first name and last name that you’ll easily
remember when you want to place a call.
John Smith: John is the first name, Smith is the last name.
If you are creating one entry that includes two contact names, use an ampersand
(&) to divide the two names into separate, searchable contact names. You don’t
need spaces on either side of an ampersand—they’re ignored, and they take up
space on the Caller ID screen.
John&Mary Smith: John Smith and Mary Smith are two separately searchable
names.
J Jones&M Smith: J Jones and M Smith are two separately searchable
names.
In Business entries, ampersands are ignored in searches!!
AT&T Atlanta (Business contact): ATT is the first name, Atlanta is the last
name. The ampersand is ignored.
Note: Avoid using middle names and middle initials, as they are ignored when
Dialing-by-Name, and they take up space on the Caller ID screen. However, they
can be helpful when two different contacts have the same first and last names.
Here is an example of how not to create an entry:
Dr John Smith Jr: Dr is the first name, Jr is the last name. John and
are ignored as middle names. A better entry might be Dr J Smith.
Smith
Note: If only one name is entered for a contact, it is considered a first name.
Copyright 2013-2015, nVideon, Inc. Atlanta, GA All Rights Reserved Worldwide
Page 16 of 84
Preliminary
Voice Tag
A voice tag is an audio recording of a contact’s name, and is created :
by a new caller the first time they call in,
by a Tel-Lynx user the first time they call a new contact, or
by a Tel-Lynx user when entering a new contact into Tel-Lynx’s phone book.
Voice tags can be up to about four seconds long.
Contact Type
Contact type is most often used when the Do-Not-Disturb schedule has been
enabled. The Do-Not-Disturb schedule is used to allow calls through or send them
to voice mail.
Calls from Normal contacts are allowed during defined waking hours.
Calls from Super contacts are allowed at all times.
Calls from Workday contacts are allowed during defined workday hours.
Calls from Blocked contacts are never allowed, even when the Do-NotDisturb schedule is disabled.
Calls from Administrator contacts are always allowed.
The Do-Not-Disturb schedule can be overridden by a temporary Do-Not-Disturb
period where you can set which contact types will be sent to voice mail.
An administrator contact has all the characteristics of a super contact plus the
ability to remotely manage Tel-Lynx's phone book, new call list, and its settings.
When an administrator contact remotely calls into Tel-Lynx, Tel-Lynx will ask them
to select the user they wish to speak with, even when there is only one user. This
allows the administrator to enter the remote access menu without ringing the
telephones attached to Tel-Lynx.
Person Normally Called
When a call comes in on a common line, this attribute identifies the person this
contact normally calls. It can be set so that the person is automatically selected
when the call comes in (person only called), or so that the person is selected if the
caller does not make a selection (person normally called). Voice mail will be sent to
the selected person’s voice mailbox on Tel-Lynx if no one answers the call. By
default, this attribute is set to the person who is called the first time a contact calls
in.
Note: For phone numbers that you have requested to call you in an emergency,
set the contact type to super contact and the person normally called to anyone
only. Calls from this contact will ring your telephones without regard to the
answer mode and Do-Not-Disturb setting. In addition, the personal assistant is
bypassed, and when you answer the telephone, you will be connected directly to
the caller.
Copyright 2013-2015, nVideon, Inc. Atlanta, GA All Rights Reserved Worldwide
Page 17 of 84
Preliminary
Allow Urgent Calls
This true/false attribute allows a Tel-Lynx user to select which contacts will be
allowed through with an urgent call during periods when the caller would normally
be sent to voice mail (Do-Not-Disturb in effect). Remember that super contacts are
always allowed through with urgent calls.
Phone Number
If someone has multiple phone numbers, you will need to create a contact in
Tel- Lynx 's phone book for each phone number using the same name. When
adding a contact using your telephone's keypad, you will be prompted to enter the
contact’s number. You do not have to enter the 1 for either long distance or local
numbers.
Note: Although not required, it is advisable to enter local and toll phone numbers
with all eleven digits. Tel-Lynx always determines the proper way to dial a full
eleven digit phone number.
Preferred Outside Lines
You can create an ordered list of outside lines (landline, second landline10 or
Skype, mobile phones 1 and 2) to be used when calling a contact's particular
phone number. When placing a call, this ordered list will override Tel-Lynx’s
shared calling tables. The first available outside line in this list will be used to place
the call.
Number Type
A contact’s phone number type is used when placing a call using Dial-By-Name or
when managing a contact in the phone book.
Number types are:
Business(B), Fax(F), Home(H), Misc 5, Mobile(M),
Skype™(S), User(U), Work(W), and Unspecified (1).
Note: The "Business" number type should be assigned to contacts that represent
a business, not a person. A person who works in a business should be assigned
a "Work" number. Tel-Lynx will ignore '&' in a business name and will not split the
name into two names when searching for a contact like it does for non-business
contacts.
You can set up Tel-Lynx so that people calling in from a business will always be
asked their name. This is useful when more than one person calls in from a
business where all employees have the same phone number (each employee
has an extension within the business). Tel-Lynx will then announce the caller's
name and the business name when you answer the telephone.
10
The second landline is only available on TLC Plus.
Copyright 2013-2015, nVideon, Inc. Atlanta, GA All Rights Reserved Worldwide
Page 18 of 84
Preliminary
Note: Skype™ and User phone number types are automatically assigned based
on the phone number, and cannot be changed or assigned manually.
Note: A first-time (new) caller is asked to identify the type of phone number they
are calling in on. A user who is calling out to a number unknown to Tel-Lynx will
have the option to select the number type and to record a voice tag for the called
number.
Exclude Number from Dial-By-Name
This true/false attribute allows you to exclude/include phone numbers in the DialBy-Name feature. This is most useful for contacts who call from a business that
has multiple phone lines with multiple phone numbers that may show up on your
caller ID when they call in. You can place all of those phone numbers in the
contact's phone number list, but exclude all but the main number for dialing by
name. By default, the first number of a number type (such as the first work
number) added for a contact in the phone book is included for Dial-By-Name. If the
number type already exists, it is (by default) excluded from Dial-By-Name.
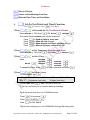
Extensions
Many businesses have a PBX phone system with office extensions that must be
dialed after you are connected to the main number. You can set an extension of up
to 6 digits (see Modify Contact Information under Manage New Calls, Add a New
Phone Book Contact, and Manage Phone Book Contacts). Once you are
connected to the main number, you can instruct Tel-Lynx to dial the extension.
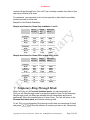
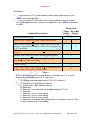
If you have multiple contacts with the same company phone number but different
extensions, first set up a “company” contact with no extension, and then set up a
contact for each person at that company, including their extension.
For example:
Name
Acme Rental
Jane Doe
John Smith
Phone Number
212-555-1000
212-555-1000
212-555-1000
Extension
101
105
Extensions within a local PBX System
To mark a phone number's extension as 'local' (within the PBX) when Tel-Lynx is
used with a PBX (see Using Tel-Lynx with a PBX), precede the extension number
with a '+'. A local extension will be used to call the contact when Dialing-By-Name
on the PBX system. In other words, the call will stay internal to the PBX.
When setting a phone number's extension, if a ' +' is entered alone without an
extension number, the last digits of the phone number will be used as the local
extension. This is useful for PBXes with direct inward dialing, where each
extension has a unique outside phone number, and the last (usually four) digits of
the phone number are also the local extension number on the PBX.
Copyright 2013-2015, nVideon, Inc. Atlanta, GA All Rights Reserved Worldwide
Page 19 of 84
Preliminary
Managing Tel-Lynx's Phone Book
From the Manage Tel-Lynx's Phone Book menu, you can move contacts from the
new call list to the phone book, add new phone book contacts, edit existing
contacts, call or text contacts, remove contacts, add and remove speed dial
assignments, import contacts from your mobile phones, and add or change voice
tags.
Note: When accessing contacts, they are always presented in chronological
order, beginning with the most recent call made or received.
Note: Tel-Lynx handles "Business" contacts differently from non-business
contacts. A business contact should have its name be the name of the business
and should be assigned a "Business" number. A contact for a person who works
in a business should have its name be the name of the person and should be
assigned a "Work" number.
Importing Contacts from Mobile Phones (TLC/TLC Plus only)
With TLC and TLC Plus, you can import contacts to Tel-Lynx 's phone book from
both your mobile phones. During import, only contacts with at least one valid
(callable) phone number are added to Tel-Lynx 's phone book. If you hang up
during import, or if you receive a call on the mobile phone, the import will be
terminated. Importing will continue from where you left off the next time you import
from that mobile phone. See Notes on Importing Contacts from Mobile Phones for
more information.
Adding Voice Tags to Imported Contacts
If one of your connected mobile phones is an Android Smart Phone running
Tel- Lynx's mobile app, or if Tel-Lynx is attached to a PC running Tel-Lynx's
Windows app, Tel-Lynx will automatically add voice tags, using text-to-speech, to
the imported contacts. Please note that about 25 text-to-speech voice tags are
added per minute, so it can take some time depending on how many contacts were
imported.
When calling a contact with a text-to-speech generated voice tag, Tel-Lynx will ask
you to accept the recording or re-record the voice tag. If you do nothing, Tel- Lynx
will dial the call without accepting the voice tag. Once you have accepted or rerecorded the voice tag, Tel-Lynx will not ask this again.
You can add voice tags to imported contacts manually if text-to-speech capability
is not available. You can also review and change the text-to-speech voice tags for
the imported contacts.
When recording a voice tag, you can press # to end the recording, or Tel-Lynx
will automatically end it after you stop speaking. After the recording has ended, you
can press # to hear what you recorded before accepting it.
Copyright 2013-2015, nVideon, Inc. Atlanta, GA All Rights Reserved Worldwide
Page 20 of 84
Preliminary
Enter or Edit Names and Phone Numbers in the Tel-Lynx
Phone Book Using Your Telephone Keypad
Before you set up Tel-Lynx, we strongly suggest you remove any contacts you
have entered in your cordless telephone’s phone book. You will want to use
Tel- Lynx’s phone book instead so that you can Dial-By-Name and not have to
remember phone numbers. Using both your telephone's phone book and Tel- Lynx
's phone book will be very confusing.
Entering names and phones numbers into Tel-Lynx’s phone book is different from
entering names and phone numbers in your telephone's phone book because
Tel- Lynx has no display and no direct access to your telephone's display. The
main difference is that you will not be able to see the letters on your telephone's
display as you enter them. To compensate for this, Tel-Lynx will say the letters as
you enter them. At any point in the entry process, you can display (on your
telephone's caller ID display) what you have entered so far by pressing #. You
will need a telephone with Caller ID with Call Waiting11 to use this feature.
Enter or Edit a Name in the Tel-Lynx Phone Book
Here’s how to enter contacts using your telephone's keypad:
Use the letters on the telephone keypad. For each letter in the name,
repeatedly press a key for the number of times that correspond to the
position of the letter on the key. For example, press 2 once for A, twice
quickly for B, three times quickly for C, and four times quickly for 2.
Press 7 once for P, twice quickly for Q, three times quickly for R,
four times quickly for S, or five times quickly for 7. After you pause,
Tel- Lynx will translate the key press(es) into the letter, and when you hear
the name of the letter you just entered, you can continue.
Note: The cursor always sits at the end of the name, so you will always
delete from and add to the end of the name.
Tel-Lynx will capitalize letters appropriately as you enter them. To change
the default case, press the key until you reach the letter the second time.
For example, press 2 seven times (abc2ABC) for the upper case C in
McCann.
Press the ! key once for ampersand (&),
twice quickly for apostrophe (’),
three times quickly for at (@),
four times quickly for dash (-) and
five times quickly for one (1).
Press the " key once for space or two times quickly for zero.
To erase one character from the end of the name, press * briefly.
11
Caller ID with Call Waiting allows you to see a caller's name and phone number for calls that come in
while you are on the telephone.
Copyright 2013-2015, nVideon, Inc. Atlanta, GA All Rights Reserved Worldwide
Page 21 of 84
Preliminary
To erase all characters, press and hold *.
To view the name on the caller ID display and hear the name spelled out,
press # once briefly.
To commit your entry, press # twice quickly.
Enter or Edit a Phone Number in the Phone Book
Use the numbered keys on the telephone keypad to enter or edit a phone
number.
Note: The cursor always sits at the end of the phone number, so you will
always delete from and add to the end of the phone number.
To erase one digit from the end of the number, press * briefly.
To erase the entire number, press and hold * for one to two seconds.
To view the number on the caller ID display and hear the number spoken,
press # once briefly.
To commit your entry, press and hold # for one to two seconds or press
# twice quickly.
To enter '+' into the phone number, press and hold * for at least three
seconds.
To enter '#' into the phone number, press and hold # for at least three
seconds.
Moving Contacts from the New Call List to the Phone
Book
When a new caller calls in for the first time, Tel-Lynx's interactive personal
assistant will qualify them by asking their name and what kind of phone they are
calling on. This information, along with the caller’s phone number and name (if
present) in the caller ID, will be stored as a new contact in the new call list. With
this information, you can create a complete phone book entry in Tel-Lynx. Every
time a person on the new call list calls in, they are moved to the top of the new call
list (i.e. they are the most recent new caller).
There are three reasons to move new callers to the phone book:
1. By default, if you want to use Dial-By-Name, you will need to have phone
book contacts. In the Set Up menu, you can change this setting and allow
Dial-By-Name using the new call list as well as the phone book.
2. If you prefer to speak directly to callers whom you know and not have them
announced first, then you will want to put those callers in your phone book.
By default, only callers in the phone book are not announced when you
answer their call. In the Set Up menu, you can change this setting and
enable the announcement for phone book contacts.
Copyright 2013-2015, nVideon, Inc. Atlanta, GA All Rights Reserved Worldwide
Page 22 of 84
Preliminary
3. Contacts in the phone book are never removed. The phone book and new
call list combined can hold at least 3300 contacts, so it is unlikely, but if the
new call list gets full, the contact at the bottom of the new call list will be
removed when the next first-time, new caller calls in.
You can easily move a new caller from the new call list to the phone book using
Tel-Lynx's Manage New Calls menu. You will have the opportunity to edit or
change the name that was received from caller ID. You can also rotate the first and
last names if they are in the wrong order.
Tel-Lynx expects names to be stored first name first and last name last. However,
most caller ID databases store the last name first, followed by the first name, then
any middle names. Sometimes, the caller ID will have a comma after the last name
and sometimes not. Tel-Lynx removes the comma, if present, and rotates the
names so the first name appears first and the last name last when it creates the
contact in the new call list.
If the contact name is not ordered correctly on the caller ID screen when you go to
move it to the phone book, you will have the opportunity to rotate it again.
Notes on Importing Contacts from Mobile Phones
(TLC/TLC Plus only)
Tel-Lynx keeps track of the source, or ownership, of each contact. A given contact
can have one or more owners. A contact can be owned by Tel-Lynx only, by one
or both mobile phones only, or by Tel-Lynx and one or both mobile phones. If an
imported contact matches the name and phone number of a contact on Tel- Lynx,
the two will be merged and ownership will be shared.
If an imported contact matches the name and phone number of a contact on
Tel- Lynx and the contact's attributes don't match, you will be informed of the
discrepancy and you can choose to accept or reject the change(s).
When you delete a contact from your mobile phone, the next time you import your
mobile phone’s contacts, Tel-Lynx will remove the mobile phone’s ownership. If
that contact no longer has an owner, Tel-Lynx will ask whether you want to keep or
delete that contact. If you choose to keep the contact, then its ownership passes to
Tel-Lynx.
If you change a contact's name or phone number on your mobile phone, the next
time you import your mobile phone's contacts it will appear to Tel-Lynx that the
contact with the old name or phone number has been deleted and a new contact
with the updated information has been added.
A contact with a phone type of 'Business' or 'Company' will be imported as a
Business(B) phone number type. If a contact with non-business phone number
types also has a business phone number type and no work number type, the
business phone number type will be imported as a work number. If the contact has
Copyright 2013-2015, nVideon, Inc. Atlanta, GA All Rights Reserved Worldwide
Page 23 of 84
Preliminary
an organization, a separate contact with the organization name will be created
using the business phone number.
Note: Phone book import is terminated if you receive a call on the mobile phone
that is being used to import contacts, or if you hang up the telephone that is
being used to import the contacts.
If an imported contact's name is "Do Not Answer" (case insensitive), it will be
marked as a blocked contact, and calls from the associated phone number(s) will
not get through. You can override this using the "+Type" attribute below.
If your mobile phone does not support phone number types, append the number
type, within parentheses, to the contact’s name.
For example: John Smith (Work)
Tel-Lynx examines only the first letter of the number type, ignores case, and does
not require a closing parenthesis or a space before the opening parenthesis.
However, no spaces may appear after the opening parenthesis for the remainder
of the name. So the above example could be entered as:
John Smith(w
Tel-Lynx recognizes the following number types within the parentheses: Business,
Fax, Home, Mobile or Cell, and Work.
If your mobile phone can add a note to a given contact, you can set Tel-Lynx’s
contact attributes by adding a note (case insensitive). Each contact attribute must
start with a plus '+' and must appear in a separate line in the first lines of the note.
Any line without a valid attribute terminates Tel-Lynx’s attribute search. If an
attribute is not specified in the note, it is not changed in Tel-Lynx’s phone book
when the contact is imported. The following is a list of attributes that can be set in
this way. Enter the plus ‘+’ followed by the attribute (e.g., Business), followed by
one of the attributes inside brackets (e.g., =Ask). The attributes inside the brackets
are optional.
+Business{=Ask}
If this attribute is present, all phone numbers for this contact will be marked as
business numbers (i.e., the number of a business, not the work number of an
individual contact) in Tel-Lynx, regardless of how they are marked on the mobile
phone. If the value is set to 'Ask', callers from this number will be asked their name
every time they call in; otherwise they will not be asked their name.
The 'Business' phone number type is not specified in the vCard standard, but many
phones support it through a custom or a "Company" phone type. If the phone type
on the mobile phone starts with "Company" or "Business", Tel-Lynx will assume it
is a business phone type.
Copyright 2013-2015, nVideon, Inc. Atlanta, GA All Rights Reserved Worldwide
Page 24 of 84
Preliminary
It is good practice to set the '+Business' attribute for a "Business" contact since a
“Business” contact should only have business numbers assigned to it.
For example, to mark all phone numbers for this contact “business”, and to have
Tel-Lynx ask all callers to say their name: +Business=Ask
+Ext={+}{XXXX}
Sets the extension for the contact. The extension (represented by 'XXXX') can be
up to 6 digits in length. If the extension is preceded by ' +', the contact's home or
work phone number is a local extension (on the same PBX as Tel- Lynx). If only the
'+' is present, the last digits of the home or work phone are used as the local
extension. If a work number is present, the extension is applied to the work
number. Otherwise, the extension is applied to the home number (if present).
For example, to set a local extension: +Ext= +1234
If the contact has an extension, a work number, and an organization name, a
separate "Business" contact with the organization name and the work phone
number will be created.
+Type={Super, Normal, Work, or Blocked}
Sets the contact type.
For example, to set the contact’s type as a work day contact: +Type=Work
+TxtAlert={True, False}
Sets whether new text messages from this contact will ring the telephones to alert
you when the contact's type does not allow the alert. In other words, if set to 'True',
text messages from this contact will override the text message alert group setting
for the contact's type and will alert you.
For example, to set a contact so text messages from this contact will alert you
when the contact's type is not set to alert you: +TxtAlert=True
+Urgent={True or False}
Allows urgent calls from this contact (True) or not (False).
For example, to disallow urgent calls from this contact: +Urgent=False
+User={#}{1,2,3,4,5,6,7, or 8}
This sets the person normally called by this contact. If the user's number is
prefixed with '# ', Tel-Lynx will always send calls to the specified user.
For example, to always send calls from this contact to user 2: +User = #2
Copyright 2013-2015, nVideon, Inc. Atlanta, GA All Rights Reserved Worldwide
Page 25 of 84
Preliminary
+X
If present, this contact will not be added to Tel-Lynx’s phone book.
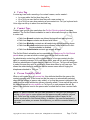
Placing a Call
TLC and TLC Plus always use Smart Dialing to place calls. The Tel-Lynx Guardian
and Guardian Plus can operate in either Smart Dialing mode or direct dialing
mode. With a telephone connected to Tel-Lynx, to place a call, take the telephone
off-hook, and at the dial tone, do one of the following:
Direct Dialing Mode:
Dial the phone number directly,
In direct dialing mode, your telephone is connected directly to your landline when
you take it off hook, so you can only dial using a phone number.
You can still press # at the dial tone to use direct commands (see the Tel-Lynx
Reference Guide for a list of Direct Commands at the Dial Tone). If you need to
dial # on your landline at the dial tone, press and hold # for one seconds.
With direct dialing, you can also access the Guardian's main menu by flashing the
switch hook at the dial tone.
When you flash the switch hook or press # at the dial tone, the Guardian
hangs up the landline and interprets your key input directly.
Smart Dialing Mode:
Dial the phone number directly,
Dial-By-Name,
Dial using the last 4 digits,
Speed dial,
Call a Tel-Lynx user, or
Have Tel-Lynx redial or return the last call.
With Smart Dialing, Tel-Lynx alone interprets the digits as you dial them. When
Tel-Lynx determines a call should be placed, it formats the phone number to be
called for the specific phone service that will be used to place the call (landline,
mobile, or Skype) and then places the call. Smart Dialing also allows Tel-Lynx to
perform the advanced functions listed above, which are not available with direct
dialing.
While dialing, you can erase the last digit (or * key) entered by pressing and
holding the * key for at least one second. Tel-Lynx will say the key that was
deleted from the dialing string as confirmation.
Copyright 2013-2015, nVideon, Inc. Atlanta, GA All Rights Reserved Worldwide
Page 26 of 84
Preliminary
While on a call, press flash to put the call on exclusive hold and enter the On a
Call Menu. Press flash again to return to the call.
Dial-By-Name
To Dial-by-Name, on your telephone, at the dial tone, you will enter a few letters of
a contact’s first name, then press *, then enter a few letters of the contact’s
last name, then press *, and finally enter a key that represents the contact’s
phone type. Then Tel-Lynx will place your call. Please read this entire section
before placing a call using Dial-by-Name.
Note: When dialing by name, you press a key only once for each letter you want
to enter (see examples below).
You do not need to enter all of the letters of the name. Usually two or three letters
is enough to uniquely identify a contact.
Warning: Do not dial more than six letters for the first name or you may place
an unintended call!! You may dial up to nine letters if your local calling area
requires ten-digit dialing.
Tip: When dialing by name, press and hold the key associated with the last letter
of the first or last name for at least one second, and Tel-Lynx will enter that key
into the dialing string and then automatically add the * key for you.
Warning: Although you may have included punctuation when you created a
contact name, do not enter punctuation when Dialing-by-Name. Each key you
enter is considered either a letter or a number, so if you press the 1 key
thinking you are entering &, ‘, @, or -, you’ve entered the number 1.
Punctuation in a contact's name is ignored in searches.
Rotary Dialing: Flash the switch hook instead of pressing * or double flash
the switch hook instead of pressing #.
After you have entered the first name with the *, Tel-Lynx will switch into DialBy-Name mode and will prompt you to enter the last name, ending in *.
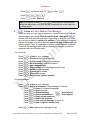
Next, Tel-Lynx will prompt you for the contact’s phone number type.
Press the * key to search for any number type,
the B key for a business number,
the F key for a fax number,
the H key for home number,
the 5 key for miscellaneous,
the M key for mobile number,
the S key for Skype™ number, and
the W key for work number.
Copyright 2013-2015, nVideon, Inc. Atlanta, GA All Rights Reserved Worldwide
Page 27 of 84
Preliminary
Next, Tel-Lynx will search its phone book12 for a matching contact and phone
number type. If one match is found, Tel-Lynx will use the matching contact’s phone
number to place the call. If Tel-Lynx finds more than one matching contact or
phone number type, it will prompt you to choose the one you want to call.
If there are no matches, Tel-Lynx will report that there were no matches. If you
entered a phone number type other than *, Tel-Lynx will search again for any
number type.
If still no matches are found and Tel-Lynx’s expanded search option is enabled
(factory default), Tel-Lynx will subtract a letter from the end of the first name (if you
entered more than two letters for the first name) and try the search again. Tel-Lynx
will continue subtracting letters from the end of the first name until there are only
two letters left, or until one or more matches are found.
If still no matches are found and Tel-Lynx’s expanded search option is enabled,
Tel-Lynx will a subtract a letter from the end of the last name (assuming you
entered more than two letters in the last name) and try the search again. It will
continue this until there are only two letters in the last name, or until one or more
matches are found.
If still no matches, Tel-Lynx will provide a dial tone so that you can try again.
For example, to call John Smith’s mobile phone, you could enter:
JOH*S*M
(JOH+S+M)
Rotary Dialing: 5JKL 6MNO 4GHI flash 7PQRS flash 6MNO
If you don’t enter any letters for the last name, Tel-Lynx will match contacts with
any last name (including no last name).
For example, you could enter:
DIA**M
(DIA++M)
Rotary Dialing: 3DEF 4GHI 2ABC flash flash 6MNO
In this case, Tel-Lynx would match all contacts with mobile phone numbers that
have a first name that starts with DIA, and would prompt you to choose the one
you want to call.
Note: Each key press can represent one of several letters. Tel-Lynx will attempt
to match any combination of the letters on the keys you press. If there is more
than one matching contact, Tel-Lynx will prompt you to choose the one you want
to call.
12
Tel-Lynx will also search the new call list if enabled to do so (factory default is disabled).
Copyright 2013-2015, nVideon, Inc. Atlanta, GA All Rights Reserved Worldwide
Page 28 of 84
Preliminary
Note: Although you don’t have to enter any letters of the last name, you must
enter at least one letter of the first name; otherwise, Tel-Lynx will assume you
are entering a vertical service code like *67 (Block Caller ID).
To call a contact who has only a first name, you can enter " for the last name.
For example, to call a contact's mobile number whose first name starts with DIA
and who has no last name, you could enter:
DIA*"*M
(DIA+_+M)
Rotary Dialing: 3DEF 4GHI 2ABC flash 0OPER flash 6MNO
To call a contact by last name, ignoring their first name, enter ", then *,
then enter a few letters of the last name followed by * and then the phone
type.
For example, to call Diane Jones Mobile phone enter:
"*JON*M
(0+JON+M)
Rotary Dialing: There is no rotary dial equivalent to this operation.
Caution: Do not delay in entering the first letter after the " or you will
invoke the operator feature.
4-Digit Dialing
You can dial using the last four digits of a contact's phone number. At the dial tone,
dial the four digits and then press #. Tel-Lynx will search the phone book and
new call list for a match. If only one match is found, Tel-Lynx will dial the entire
phone number for you. If more than one matching phone number is found,
Tel- Lynx will prompt you for the one you want call. Tel-Lynx will tell you if no
matches are found and will then provide a dial tone.
Warning: Do not pause between the third and fourth digit! For example, if you
dial '9113' and you pause before the 3, Tel-Lynx will place an emergency
call!!
Note: 4-Digit Dialing may not be available when using Tel-Lynx with a PBX. See
Using Tel-Lynx with a PBX for more information.
Rotary Dialing: Dial the last four digits and then double flash the switch hook.
Speed Dialing
Tel-Lynx supports nine speed dial numbers corresponding to keys 1 through
9. To assign a speed dial see the Manage Phone Book Contacts in the Main
menu. To use speed dialing, take the telephone off-hook, and at the dial tone,
Copyright 2013-2015, nVideon, Inc. Atlanta, GA All Rights Reserved Worldwide
Page 29 of 84
Preliminary
press the speed dial number followed by #. For example, if you press 2
# Tel-Lynx will call the number assigned to speed dial 2.
Rotary Dialing: {Speed Dial Number}, double flash.
For example, to call speed dial 5: 5, double flash
If you want to learn which contact and phone type is assigned to a particular speed
dial key, at the dial tone, press that key and wait for 3 seconds. Tel-Lynx will say
the name and phone number type of the contact assigned to that speed dial. If that
is the contact you want to call, press #.
Calling Another User
You can call other users on the system 13 if you have a two line phone connected to
Tel-Lynx, or are using both inside lines on Tel-Lynx, or you are using Tel-Lynx with
a PC,. Use main menu item "Call another User on the System." The menu system
will prompt you for your user name and the name of the user you want to call.
As a shortcut, at the dial tone, dial your user number followed by the user's number
you want to call, followed by the # key.
Rotary Dialing:. Dial your user number followed by the user's number you want
to call, then double flash the switch hook.
Redial / Call Back
To redial, or to call back the last call, take the telephone off-hook, and at the dial
tone, press * *.
For instance, if you’re on a call that you placed (or received) and the call is
dropped, call back quickly by pressing * * at the dial tone.
Rotary Dialing: To redial, double flash at dial tone
Note: Tel-Lynx keeps the phone number of the last call for each inside line
separately, so make sure you pick up the same inside line you just hung up.
Note: For the call back to work properly, Caller ID service is required, and the
last caller must not have blocked their number.
13
Please note that you cannot cause any telephones to ring that are attached to the same inside line as the one
you are using to place the call. The Tel-Lynx Guardian can only call other users if they are using the TelLynx application on a PC.
Copyright 2013-2015, nVideon, Inc. Atlanta, GA All Rights Reserved Worldwide
Page 30 of 84
Preliminary
Outbound Call Options
Auto Create Contact Option
When auto create contact is enabled, you can create contacts in Tel-Lynx’s phone
book as you call people. When you dial a number that is not in Tel-Lynx’s new call
list or phone book, Tel-Lynx will prompt with two options. Press 1 or do
nothing and Tel-Lynx will dial the phone number without creating a new contact.
Otherwise, press 2 to create a new contact before calling the phone number.
If you opt to create a new contact, Tel-Lynx will ask you to record the name, enter
the phone number type, set the urgent call status for the contact, and then key in
the contact's name.
When recording the contact's name, you can press # to end the recording, or
Tel- Lynx will automatically end it after you stop speaking. After the recording has
ended, you can press # to hear what you recorded before accepting it.
If you press # # when asked to enter the name, Tel-Lynx will put the
phone number and recorded name in the new call list without a name and then call
the number.
The auto create contact feature helps you to efficiently expand your phone book. It
can be enabled and disabled (see Main Menu Set up the System Set the
Answer Mode and Call Out Mode).
Selecting a Specific Outside Line
When placing a call, Tel-Lynx will select an available outside line based on a set of
user-defined calling tables. To override the calling tables and specify an outside
line for a call:
At the dial tone, press # and then enter the outside line number.
Outside line 1= Landline
Outside line 2= Skype™
Outside line 3= MobilePhone1
Outside line 4= MobilePhone2
If the outside line is available, Tel-Lynx will produce a dial tone with two stutters,
and then you can place the call. The line selection is cancelled when you hang up.
Example: # 2 selects Skype™ for the call.
Rotary Dialing: 0, double flash, {Outside Line}
For example, to select MobilePhone2: 0, double flash, 4
Copyright 2013-2015, nVideon, Inc. Atlanta, GA All Rights Reserved Worldwide
Page 31 of 84
Preliminary
Connecting Directly to the Landline
To connect directly to the landline without Tel-Lynx intervention, at the dial tone,
press # # 1. You will then hear the dial tone provided by your landline
provider, not the dial tone provided by Tel-Lynx, and you can dial directly on the
landline service. You will not be able to use Tel-Lynx’s phone book, speed dial,
redial, or call back features. This feature is cancelled when you hang up.
Rotary Dialing: 0, double flash, double flash, 1
For example, to dial directly using the landline: 0, double flash, double flash, 1
Caution: Do not delay in flashing the switch hook after dialing 0 or you will
invoke the operator feature.
Dialing Notes
It is important to remember that your telephones in your home or business are
connected to Tel-Lynx and not directly connected to any of your phone service
providers. The dial tone you hear when you pick up your home telephone is
coming from Tel-Lynx, not from your Telco, VoIP, or mobile phone provider. You
will not be connected to any of those services until Tel-Lynx places your call.
Tel-Lynx monitors outside line activity, so it knows which outside lines are in use
and which are available to place a call. Tel-Lynx will make an announcement if no
outside lines are available to place a call, and will provide a dial tone so that you
can try again. Press * * to retry the call.
See Setting up the Outside Lines for more information.
Dialing in the North American Number Plan
The USA and its territories, along with several other countries (Canada, Bermuda,
Bahamas, etc.) use the North American Number Plan (NANP) to assign telephone
numbers. A complete NANP number always starts with a ‘1’ followed by a three
digit area code (NPA), a three digit central office or prefix code (NXX), and a four
digit subscriber number (XXXX).
1
Country
Code
-
NPA
Area
Code
-
NXX
Prefix
-
XXXX
Subscriber
Number
The dialing rules for a given area vary throughout the NANP. To place a local call,
in some areas you dial only the last 7 digits (NXX-XXXX), while in other areas you
must dial the last 10 digits (NPA-NXX-XXXX). In some areas, to place a local call,
you dial 7 digits in your home area code, but must dial 10 digits in a foreign area
code. Many areas do not allow local calls to be placed with 11 digits (1-NPA-NXXXXXX).
Copyright 2013-2015, nVideon, Inc. Atlanta, GA All Rights Reserved Worldwide
Page 32 of 84
Preliminary
With Tel-Lynx, you dial phone numbers as you are used to. However, regardless of
your local dialing rules, Tel-Lynx always allows you to dial phone numbers in the
NANP with all 11 digits, so you don't have to know if a call is local or toll. Also, you
can use numbers received by caller ID without having to edit them to conform to
your local dialing rules.
Tel-Lynx uses a set of tables to decide how to dial a given call and announces the
toll status of a call when you place it.
If a given phone number's toll status is different from Tel-Lynx’s tables, you
may get a message saying you may not dial 1 when making a local call, or
you must dial a 1 when making a toll call, even if you dialed the number
correctly. If you receive such a message, hang up, wait a second, take the
telephone off-hook, flash the switch hook, then press 5 3.
Alternatively, you can press # and hold for one second. In either case,
you will be asked to press 1 for two seconds to confirm the toll status
change in Tel-Lynx’s local prefix table. You can then hang up and dial again,
and your call should go through.
Star Codes (Vertical Service Codes)
Vertical Service Codes are special codes (two digits preceded by *) dialed
before dialing a phone number. Using a rotary dial telephone, dial 0, then flash the
switch hook, then dial the two-digit code. You cannot dial vertical service codes
using Tel-Lynx by dialing '11nn' where 'nn' is the code.
Tel-Lynx stores up to four vertical service codes to be dialed before the phone
number. They are stored as long as your telephone is off-hook. When you hang
up, the vertical services codes are cleared from Tel-Lynx’s memory.
After dialing a vertical service code, you will hear a stutter dial tone. You can then
dial as usual, or you can dial another vertical service code.
Calling Premium Numbers
Premium numbers (those that begin with 900 area codes and 976 prefixes) may
incur an additional fee from your service provider. Please consult your service
provider(s) regarding how these fees will be charged. As of this printing, Skype™
does not allow calls to premium numbers.
Note: Premium calls are disabled initially. You can enable premium calls by
adding outside line(s) to the Premium Calling Table (See Calling Tables).
Operator Feature
You can invoke the operator feature by dialing 0 at the dial tone and waiting
two seconds. The operator feature allows you to use voice commands and is only
available when Tel-Lynx is attached to a PC with the Tel-Lynx software.
Copyright 2013-2015, nVideon, Inc. Atlanta, GA All Rights Reserved Worldwide
Page 33 of 84
Preliminary
International Dialing
If you are making an international call outside the North America Number Plan
Area, enter the international dialing prefix (011), followed by the country code and
phone number. Be careful not to pause too long (5 seconds by default) while
dialing, or Tel-Lynx will place the call with the digits you have dialed. Press #
when you have completed the number. This will cause Tel-Lynx to dial the number
immediately without waiting 5 seconds (or whatever delay you have set).
Rotary Dialing:. Dial the international number, including the international dialing
prefix, then double flash the switch hook to complete the international dialing
without waiting for the delay.
Contacts may have international phone numbers. Please note that you must
include the 011 before the international number when creating the contact.
Caution: Do not delay in entering the 1 after the 0 when dialing
0 1 1 or you will invoke the operator feature.
Picking up a Call in Progress
You can use your home telephones to pick up a call that originated on your mobile
phone handset (TLC or TLC Plus only) or a Skype™ call that originated on your
PC. Additional Tel-Lynx features allow you to pick up a call after it has gone to
voice mail or has been placed on hold, and to pick up a ringing line from the other
line.
If a call is in one of the states mentioned above, when you take your telephone offhook, Tel-Lynx will tell you that you can flash the switch hook to pick up or transfer
the audio. Flashing the switch hook will put you into the special menu, and from
there you will have the option pick up the call or to enter the main menu.
You can also pick up calls that originated on Skype or your mobile phone without
flashing the switch as follows:
At the dial tone:
Press # # 2 to transfer audio from Skype
Press # # 3 to transfer audio from Mobile Phone 1
Press # # 4 to transfer audio from Mobile Phone 2
Rotary Dialing: 0, double flash, double flash, {Outside Line}
For example, to pick up a call from Mobile Phone 1: 0, double flash, double
flash, 3
Caution: Do not delay in flashing the switch hook after dialing 0 or you will
invoke the operator feature.
Copyright 2013-2015, nVideon, Inc. Atlanta, GA All Rights Reserved Worldwide
Page 34 of 84
Preliminary
Answering a Call
Tel-Lynx can be set to operate in one of four global answer modes:
Ring-through mode,
Personal Assistant mode I (default out of the box),
Personal Assistant mode II, and
Personal Assistant mode III.
The global answering mode is applied to all outside lines, however, each outside
line can be individually set to answer in Ring-through mode regardless of the
global answering mode.
In Ring-through mode, your calls are not screened like they are in the Personal
Assistant modes. Your home telephone rings as soon as an incoming call is
received, if the call is allowed by the Do-Not-Disturb setting. This is useful if you
are waiting for an emergency return call or for an automated return call from your
bank or other institution. You can set Ring-through mode on a permanent or
temporary basis. You can also set Ring-through mode on a line-by-line basis.
In Personal Assistant modes I, II, and III, Tel-Lynx checks to see if the call is
allowed by the Do-Not-Disturb setting and then answers and screens each call.
Calls from your personal phone book contacts are allowed right through; otherwise,
Tel-Lynx’s patented process qualifies new callers. Personal Assistant mode I
allows qualified new callers to ring your telephones; mode II sends all qualified
new callers to voice mail; and mode III sends all qualified new callers to voice mail
and requires the secret code to access the messages. The Personal Assistant
modes eliminate calls from automated calling machines used by sales and political
advertisers, and they allow you to control which calls you get and when.
Answering in Ring-through Mode
In Ring-through mode, Tel-Lynx checks an incoming call’s contact type against the
Do-Not-Disturb override timer, the Do-Not-Disturb schedule, and its phone book to
decide if the call should be allowed through. If it finds the caller has been blocked,
it will reject the call and not ring your telephones. Otherwise it will use the caller’s
contact type and the Do-Not-Disturb permission level to determine if the call should
be allowed through or go to Tel-Lynx's voice mail. If the incoming call's phone
number is not in Tel-Lynx’s phone book, the contact is considered a normal
contact type. If it is allowed, Tel- Lynx rings the inside line and does not answer or
further screen it. When you answer, Tel-Lynx instantly connects you to the caller. If
you hang up within one second after answering, or if you do not answer after a
preset number of rings, Tel-Lynx sends the call to its voice mail. However, if you
have a phone service-provided voice mail and its ring delay is shorter than TelLynx's ring delay, your phone service’s voice mail will take the voice mail, not
Tel- Lynx.
Copyright 2013-2015, nVideon, Inc. Atlanta, GA All Rights Reserved Worldwide
Page 35 of 84
Preliminary
If you dial 911, Tel-Lynx automatically goes into Ring-through mode and overrides
the Do-Not-Disturb schedule so that all calls come directly through for the next
hour.
You can also set Ring-through for a few minutes so you can receive an automated
callback from your bank or other institution that needs to validate some request
you made. To set a temporary Ring-through mode, at the dial tone, press #
6. Tel-Lynx will then ask you how many minutes to set Ring-through. After the
temporary Ring-through period is over, Tel-Lynx will revert to its previous mode of
operation.
Note: When you switch from a Personal Assistant mode to permanent Ringthrough mode, then for the next 15 times you take a telephone off-hook Tel-Lynx
will remind you that Ring-through mode has been selected. You can disable the
reminder by selecting Ring-through mode again (Flash 7, <secret code>, 1, 1).
Answering in Personal Assistant Modes
In Personal Assistant modes I, II, and III, in addition to checking an incoming
call’s contact type against the Do-Not-Disturb override timer, the Do-Not-Disturb
schedule, and phone book to decide if the call should be allowed through, Tel-Lynx
answers and screens each call, blocking unwanted calls from ringing your
telephone.
If the caller’s phone number is in Tel-Lynx’s phone book or on the new call list,
Tel- Lynx will answer and optionally greet the caller with your personal greeting. If
the call is allowed through, Tel-Lynx will ring your telephone while it informs the
caller that they are being connected. If the call is not allowed through, it is sent to
voice mail after your personal greeting.
If you have more than one user set up, Tel-Lynx will ask the caller which user they
want to speak with, and then ring your telephones with a distinctive ring for the
selected user.
Robocall Blocking Feature
If a caller’s phone number is neither in Tel-Lynx’s phone book nor on the new call
list, Tel-Lynx requires that the caller go through a one-time qualification process to
identify themselves (See Call-In Menu). If the caller does not successfully identify
themselves, the call is terminated before ever ringing your telephones. In the onetime process, Tel-Lynx asks the caller to press a key it randomly selects, then to
record their name, and then to specify their phone type. If successful, a new caller
will be considered qualified, placed on the new call list, and will ring your
telephones. This completely blocks unwanted robocalling machines and strongly
discourages "cold" sales calls.
A qualified new caller’s phone number, name (if present in the caller ID), recorded
name, and phone number type are placed as a contact in the new call list, and that
contact will not have to go through the qualification process again. You can add
Copyright 2013-2015, nVideon, Inc. Atlanta, GA All Rights Reserved Worldwide
Page 36 of 84
Preliminary
the new call contact to the phone book at your convenience if you wish. New
contacts are assigned a normal contact type.
When you answer a call from a new caller, your Tel-Lynx Personal Assistant will
announce the new caller so you can screen the call further. When you answer a
call from a contact who is in your Tel-Lynx phone book, by default you will be
immediately connected. You can instead set Tel-Lynx to announce callers who are
in your phone book as well.
Note: Even if you set Tel-Lynx to not announce callers in the phone book, if you
flash the switch hook as soon as you take the telephone off-hook, the call will be
announced.
When a caller is announced, you will have the opportunity to further screen the
call. Tel-Lynx will say the caller's recorded name, tell you which line the call came
in on, and say who the call is for. If you hang up, the call will go to voice mail (or
forward to the user's mobile phone, if appropriate). Otherwise, Tel-Lynx will
present you with a number of options. See the Announcement Menu for all the
options. While you are in the Announcement Menu, the caller will hear a ringing
signal until you decide what to do.
You can choose to connect to the caller, send the call to Tel-Lynx’s voice mail and
listen in, remove the caller's phone number from the new call list, or block the
caller's phone number.
For example: If John Doe is calling for Jane Smith on the landline and the call is
allowed through, when Jane answers the telephone, Tel-Lynx will announce:
“Call from John Doe on landline for Jane Smith. Press 1 to connect to caller at
any time. Press 2 or hang up to send the call to voice mail, ...”
If you choose to send the call to voice mail, you can stay on the line and screen the
message as the caller is leaving it. While listening, you can decide to connect to
the caller, or you can hang up and they will continue to leave their message.
Unless you decide to connect, the caller will not be able to hear you. If you connect
while they are leaving a message, that message will automatically be erased. You
can also terminate the voice mail by choosing to remove the caller's phone number
from the new call list, or by choosing to block the caller's phone number.
If you choose to remove the caller's phone number from the new call list
(i.e., forget the phone number), Tel-Lynx will instruct the caller to remove your
phone number from their calling list, and then it will say goodbye and hang up.
If you choose to block the caller's phone number, Tel-Lynx will tell the caller that
their calls have been blocked, instruct the caller not to call again, and then say
goodbye and hang up.
As with Ring-through mode, if you do not answer the telephone after a preset
number of rings, Tel-Lynx will send the call to its voice mail or forward the call, as
appropriate.
Copyright 2013-2015, nVideon, Inc. Atlanta, GA All Rights Reserved Worldwide
Page 37 of 84
Preliminary
Note: If you hang up immediately after answering, the call will be sent to voice
mail or forwarded if appropriate
Spoofed Robocall Phone Numbers
In an attempt to bypass Tel-Lynx 's qualification process, robocallers and
telemarketers may spoof their phone number with the phone number they are
calling (your phone number). Tel-Lynx automatically detects this for calls on your
mobile phones and rejects the call.
For such spoofed calls to your landline(s) and Skype, you can create a "Blocked"
contact for your landline and Skype phone numbers. Tel-Lynx will then block calls,
on all outside lines, that have those phone numbers in the caller ID.
If you don't want to block your landline's or Skype's phone number on all your
outside lines, but still block the spoofed calls, you can create "Normal" contacts
with three special characters appended to the name.
For the phone number for outside line 1 (landline), add a contact with "- -1" added
to the end of the name. Tel-Lynx will reject calls with the caller ID phone number
equal to the landline's phone number only on outside line 1 (landline).
For example, add a contact with the phone number of outside line 1 with the
name: "My Number - -1".
For the phone number for outside line 2 (Skype or second landline14), add "- - 2" to
the end of the name. Tel-Lynx will reject calls with the caller ID phone number
equal to your Skype (or your second landline's) phone number only on the outside
line 2.
Personal Assistant mode I
In Personal Assistant mode I, once a new caller is qualified, Tel-Lynx will ring
your telephones and put the new caller through. Qualified new callers will get right
through next time they call in.
Personal Assistant mode II
In Personal Assistant mode II, only calls from contacts in your Tel-Lynx phone
book will ring your telephones. Tel-Lynx will answer and optionally greet callers
with your personal greeting. If a call is allowed through (contact type is allowed at
this time and Do-Not-Disturb override is not set), Tel-Lynx will ring your telephones
while it is greeting the caller. All new callers, including those on the new call list,
are automatically sent to voice mail, so even persistent telemarketers won’t get
through (i.e. they can only leave a message). However, urgent calls will be allowed
through if the caller knows the last four digits of the phone number of a super
contact or a contact that is allowed to make urgent calls.
14
TLC Plus only
Copyright 2013-2015, nVideon, Inc. Atlanta, GA All Rights Reserved Worldwide
Page 38 of 84
Preliminary
In this mode, as in Personal Assistant mode I, voice mail messages may either be
picked up from the home telephone, or remotely using the secret code. New
callers must be added to the Tel-Lynx phone book in order to get right through the
next time they call.
Personal Assistant mode III
Personal Assistant mode III is like Personal Assistant mode II, except that
extra safety measures are invoked: 1) voice mail messages from new callers may
only be accessed by a Tel-Lynx administrator using the secret code. 2) the main
Tel-Lynx menu is only accessible by entering the secret code.
Personal Assistant modes II and III are designed to prevent vulnerable persons
from answering scam phone calls devised to lure them into dangerous
transactions.
On a Call Menu
The On a Call Menu is only available with the Smart Dialing mode. While you are
on a call, you can press flash (flash the switch hook) to enter and exit the On a
Call Menu, which allows access to the features described below. While in the On a
Call Menu, the caller cannot hear you and you cannot hear the caller. If you hang
up, your telephone will ring, and when you answer, you will be connected to the
call you were on before entering the On a Call Menu.
The exception to this rule is when a call waiting call comes in. In that case, flashing
the switch hook will bypass the On a Call Menu and connect you immediately to
the waiting call.
Dialing an Extension
To dial a contact’s extension once you are connected to the contact's main
number, flash the switch hook and then press #. Tel-Lynx will dial the
extension you set for that contact.
Rotary Dialing: flash, 3, double flash
Navigate Phone Tree Mode
If you have problems navigating a phone tree while on a call, it may be that the
touch tones generated by your telephone are not being received cleanly by the
phone tree system. Press and hold # for at least one second to enter Navigate
Phone Tree mode. Now, when you press touch tones on your telephone, Tel-Lynx
will intercept and regenerate them in a way that they should be received more
cleanly by the phone tree system.
You must exit Phone Tree Navigate mode in order for the called party to be able to
hear you. To exit the Navigate Phone Tree mode, flash the switch hook.
Copyright 2013-2015, nVideon, Inc. Atlanta, GA All Rights Reserved Worldwide
Page 39 of 84
Preliminary
Rotary Dialing: No equivalent function. Phone Tree Navigate mode is not
useful for rotary dial phones since Tel-Lynx already generates as clean a touch
tone signal as can be generated for the digits you dial.
Call Hold and Pick Up
The hold feature has several uses. You may want to place a call on hold to switch
telephones, to answer another line, or to start a conference call.
While you are on a call, you can place the call on hold, hang up the telephone, and
pick up the call from your current location or from any other telephone or
networked PC in your house that is connected to Tel-Lynx (see Picking up a Call
from an Outside Line).
To start a conference call, you will place the current call on hold, then place a new
call, place the new call on hold, and then join both held calls into a conference.
You can then put the conference on hold and repeat the process two more times,
for a total of up to four calls. [Here add automated Skype call conferencing info]
Call Waiting
A call waiting call may come in on the outside line you’re talking on, or it may come
in on another outside line. In either case, you will receive a call waiting signal.
When you flash the switch hook, Tel-Lynx will cause the current call to be put on
hold, and you will be immediately connected to the incoming call.
Once you have answered the waiting call, flashing the switch hook will place you in
the On a Call Menu. To switch to the on hold call, flash the switch hook to enter the
On a Call Menu and then press 1. You will be presented with other options in
the On a Call Menu as well. Please follow Tel-Lynx 's directions for these other
options if so desired.
Tel-Lynx keeps track of which contact is current and which contact is waiting, so
the On a Call Menu will announce the current and waiting contacts if they are in the
phone book.
Note: When using call waiting with a landline, Tel-Lynx cannot reliably keep track
of the contacts, and therefore Tel-Lynx will not announce which call is which.
However, you will always be able to flash the landline's switch hook once or
twice using options 1 and 4 respectively while in the On a Call Menu.
Conferencing
Tel-Lynx can conference its outside lines. Skype ™ provides its own conferencing,
Tel-Lynx supports 3-way calling available through landline providers. The On a
Call Menu provides options for conferencing on Skype ™ as well as on mobile
phones (when available).
Copyright 2013-2015, nVideon, Inc. Atlanta, GA All Rights Reserved Worldwide
Page 40 of 84
Preliminary
Sending a Call Back to Your Mobile (TLC/TLC Plus
only)
or PC
While on a call on your mobile phone or Skype ™, you can go to the On a Call
Menu and press 8 to transfer the audio back to your mobile phone or PC.
Using a Fax machine with Tel-Lynx
Tel-Lynx works with fax machines in one of two ways. The fax machine and
Tel- Lynx can share the landline, or you can attach your fax machine to one of
Tel- Lynx 's inside lines.
Fax Sharing the Landline with Tel-Lynx
In this method, both Tel-Lynx and the fax machine are attached to your landline.
You must have a separate fax phone number using a service like RingMaster ®. Fax
calls will have a different ring pattern than normal calls. Set up Tel-Lynx to ignore
the ring pattern for calls to the fax number, and set up your fax machine to answer
calls with that ring pattern (or to not answer a call for several rings).
Fax Attached to one of Tel-Lynx’s Inside Lines
In this method, the fax machine is connected to one of Tel-Lynx 's inside lines (just
like your telephones are). Set up a user on Tel-Lynx with the name "Fax" (case
insensitive) and set up the fax user as follows:
Set Ring Pattern to two rings15,
Set Ring Mode to ring only the inside line attached to the fax machine, and
Set Select Outside Lines to be the landline only.
Set up your fax machine to only answer a two-ring pattern. When a call from
another fax machine comes in and Tel-Lynx hears the fax Tone (beep sound), it
will skip the qualification process and immediately ring the inside line for the fax
machine with the two-ring pattern. When the fax machine answers, it will be
immediately connected to the calling fax machine. In this method, you do not need
a service like Ring Master® or a separate phone number for your fax machine.
Make sure no other users have their ring mode set to ring the same inside line as
the fax machine is attached to, or make sure no other users have the same ring
pattern (two-rings of any kind) that the fax machine answers.
When sending a fax, Tel-Lynx will bypass the Auto Create Contact option (if
enabled) as soon as it hears the fax tone.
15
No other TLC users who answer the same inside line as the fax should have a two-ring pattern when using
this method. Please note that the fax machine will most likely not distinguish between short and long rings in
a given pattern.
Copyright 2013-2015, nVideon, Inc. Atlanta, GA All Rights Reserved Worldwide
Page 41 of 84
Preliminary
Timed Functions
Do-Not-Disturb
Tel-Lynx uses the Do-Not-Disturb feature to send selected calls to voice mail
without ringing your telephones. There are two ways to set up Do-Not-Disturb: set
a schedule or temporarily override the schedule. The override feature always takes
precedence over the schedule. If the schedule is not enabled, the override simply
sets a Do-Not-Disturb period.
Temporarily Overriding the Do-Not-Disturb Schedule
You can temporarily override the Do-Not-Disturb schedule, allowing fewer or more
callers through, for up to 720 minutes (12 hours). The Do-Not-Disturb schedule
does not have to be enabled to set a temporary Do-Not-Disturb period.
Enter the time in minutes or in hours and minutes (See Override the Do-NotDisturb Schedule in the main menu), then select the callers that will be allowed
through. When the temporary Do-Not-Disturb period you set is over, Tel-Lynx will
revert to using the Do-Not-Disturb schedule. If no schedule is set, Tel-Lynx will
allow all qualified calls through.
As a shortcut, you can set an override by taking your telephone off-hook and
dialing # 5, then enter the time as described in Override the Do-NotDisturb Schedule.
You can temporarily override the Do-Not-Disturb schedule to send all calls to voice
mail, allow all calls through, send only calls from workday contacts to voice mail, or
send all calls to voice mail except calls from super contacts.
When you override the Do-Not-Disturb schedule, if you take the telephone offhook, you will hear the remaining override time.
If the override causes a caller to be sent to voice mail, Tel-Lynx will ask the caller if
their call is urgent. If they indicate yes, and if they are a super contact, your
telephone will ring. Other callers with an urgent matter are asked to enter the last
four digits of their home, work, or mobile phone number or the secret code 16, which
can be the secret code used to setup Tel-Lynx or any one of the passwords
assigned to Tel-Lynx users, including the "Anyone" password. If this corresponds
to the secret code or the last four digits of a super contact or a contact that is set
up to allow urgent calls, your telephone will ring; otherwise the call is sent to voice
mail.
If a new voice mail message is recorded during the override period, Tel-Lynx will
ring your telephones with five short rings when the override period expires, unless
the Do-Not-Disturb schedule is in sleep mode. If you pick up the telephone after a
16
Using the secret code to make urgent calls should be reserved for TLC users only. You should not give out
the secret code to anyone you do not want to have complete access to TLC's setup.
Copyright 2013-2015, nVideon, Inc. Atlanta, GA All Rights Reserved Worldwide
Page 42 of 84
Preliminary
new message is recorded during an override period, you will hear a stutter dial
tone, and the short rings will be cancelled.
Setting Do-Not-Disturb Schedules
You can use Tel-Lynx’s Do-Not-Disturb schedules to send selected groups of
callers to voice mail depending upon the day of the week and the time of day.
Tel- Lynx is pre-programmed with the schedule disabled, so all qualified calls come
through all the time, unless a temporary Do-Not-Disturb override period is set.
As an example, you could set one schedule for weekdays and another for
weekends, each with up to four periods per day.
The four periods of the day are:
Between wake up and start of your work day;
Your workday hours;
After your workday and before you go to sleep; and
Your sleep hours.
Note: You can disable the workday period by pressing # for the workday
start time without entering a time. You can disable the entire Do-Not-Disturb
schedule by entering no days for schedule 1.
Tel-Lynx uses a caller’s Contact Type to determine whether or not their call should
be allowed through. Normal contacts get through while you’re awake. Workday
contacts only get through during your workday. Super contacts are allowed through
at all times, even while you’re asleep.
New callers are initially set up as normal contacts. Callers with an unavailable or
blocked phone number are also regarded as normal contacts.
Note: Urgent calls from super contacts and contacts whose 'allow urgent calls'
attribute is set can always get through. Other callers who know the last four digits
of a home, work, or mobile phone number of a contact who is allowed to make
urgent calls, or who knows the secret code or a Tel-Lynx user's password, can
also get through at any time.
If You Don’t Have a Home Office
If you don’t work out of a home office, you may only want to set two periods for
each of the two schedules (weekday and weekend). For example, waking hours
might be 7am to11pm, and sleep hours 11pm to 7am.
If You Have a Home Office
If you work out of a home office, you will usually have four periods in a day. Your
work day may start at 9AM and end at 5PM; before and after work hours may be
7am to 9am and 5pm to 11pm; and sleep hours may be 11pm to 7am. Normal
Copyright 2013-2015, nVideon, Inc. Atlanta, GA All Rights Reserved Worldwide
Page 43 of 84
Preliminary
contacts will get through from 7am until 11pm, workday contacts from 9am to 5pm,
and super contacts at all times.
For weekends, you may want to set only two periods so that calls from workday
contacts are sent to voice mail.
Sample Do-Not-Disturb Schedules:
Sample start times for Home Only schedules 1 and 2:
Days of
the week
Sample
start
time
Enter start
time as:
Schedule 1
Wake
Work
Sleep
M-F
M-F
M-F
8am
N/A
11pm
800#1
#
1100#2
Schedule 2
Wake
Work
Sleep
SS
SS
SS
9am
N/A
11pm
900#1
#
1100#2
Sample start times for Home Office schedules 1 and 2:
Days of
the week
Sample
start time
Enter start
time as:
Schedule 1
Wake
Work
End Work
Sleep
M-F
M-F
M-F
M-F
7am
9am
5pm
11pm
700#1
900#1
500#2
1100#2
Schedule 2
Wake
Work
Sleep
SS
SS
SS
9am
N/A
11pm
900#1
#
1100#2
Temporary Ring-Through Mode
When Tel-Lynx is in a Personal Assistant mode, you can temporarily set
Tel- Lynx into Ring-through mode for a specified period of time. In the temporary
Ring-through mode, all callers are allowed through immediately and are not
announced. When the specified period of time is over, Tel-Lynx will return to the
Personal Assistant mode and resume screening calls.
To set Tel-Lynx into temporary Ring-through mode, take your telephone off-hook
and press # 6. Enter the number of minutes you want to set, followed by
Copyright 2013-2015, nVideon, Inc. Atlanta, GA All Rights Reserved Worldwide
Page 44 of 84
Preliminary
#, and hang up. To enter hours and minutes, enter hours, then *, then
minutes, then #.
When you take your telephone off-hook while in temporary Ring-through mode,
Tel-Lynx will remind you that the Do-Not-Disturb schedule is being overridden and
that all callers are allowed through before providing a dial tone.
Timers
Tel-Lynx maintains a timer for inside line 1 and a separate timer for inside line 2.
Timers can be set for up to 720 minutes (12 hours). To set a timer:
Take your telephone off-hook and at the dial tone, press # 7.
To set minutes: enter number of minutes followed by #.
To set minutes and seconds: enter minutes, then *, seconds, then #.
To set hours, minutes, and seconds: enter hours, then *, minutes, then
*, seconds, then #.
To set seconds only: enter *, then seconds, then #.
To cancel the timer enter # only.
To set the timer, the final entry must always be the # key.
After you’ve set the timer, it will start to count down. You can then hang up or listen
to the countdown. While you’re listening to the countdown, to cancel the existing
timer, press #, or to change the remaining time, enter a new amount of time
and then press #. If someone calls while you are listening to the timer count
down, Tel-Lynx will announce the caller. You can then hang up, the telephone will
start ringing, and you can answer.
After you’ve set the timer and hung up, whenever you take the telephone off-hook
you will hear Tel-Lynx announce the remaining time followed by the dial tone,
indicating that you can dial out. Remember that you don't have to wait for Tel-Lynx
to finish announcing before taking any action, including dialing out.
To change or cancel the timer, take the telephone off-hook, then press #
7, and either press # to cancel the existing timer, or enter a new amount
of time and then press #.
When the time is up, Tel-Lynx will ring the associated inside line with a series of
single short rings if set on line 1, or a series of two short rings if set on line 2.
(Short rings have a ring cycle of 4 seconds instead of 6 seconds.) If unanswered,
the telephone will continue to ring for about 6 minutes and then stop. When you
pick up the inside line, Tel-Lynx will tell you that the timer has reached zero.
Copyright 2013-2015, nVideon, Inc. Atlanta, GA All Rights Reserved Worldwide
Page 45 of 84
Preliminary
If the timer goes off while you’re on a call using the telephone line used to set the
timer, you will hear a beep. Press flash, and the timer message will play. Then
press flash or 0 to return to your call.
Note: Since the timers are reset after a power failure, it is recommended that you
put your cordless phone base station and Tel-Lynx on a UPS (uninterruptable
power supply) so that you will not have any service interruption during power
outages.
Alarm Clocks
Tel-Lynx maintains an alarm clock for inside line 1 and a separate alarm clock for
inside line 2. You set, reset, or cancel the alarm clock for the inside line you’re on.
You can record a personal message to play when the alarm goes off. You can set
recurring alarms. You can also set a one time alarm for today, or for tomorrow, or
for any single day of the week. (See Set the Alarm Clock.)
When the alarm goes off, Tel-Lynx will ring the telephone(s) for the line you set
with one short ring followed by more short rings if line 1, and a series of two short
rings if line 2. The telephone will ring for up to 6 minutes. When you pick up the
ringing telephone, Tel-Lynx will play the personal message and offer a five- or tenminute snooze option. When you hang up, the alarm will reset. If you selected the
snooze option, the alarm will go off again after the snooze period.
If the alarm goes off while you’re on a call using the telephone line used to set the
alarm, you will hear a beep. Press flash, and the alarm message will play. Then
press flash or 0 to return to your call.
Note: Since the alarms may not ring your telephones at the appropriate time
after a power failure, it is recommended that you put your cordless phone base
station and Tel-Lynx on a UPS (uninterruptable power supply) so that you will not
have any service interruption during power outages.
Setting up the Outside Lines
You can create a voice tag to name each outside line, and you can record a
greeting for each outside line. See Set up Outside Lines in the menu system.
Setting up Greetings
You can record a unique personal greeting for each outside line connected to
Tel- Lynx, such as, “This is [your name]’s Personal Assistant,” or “Hello, you have
reached [your name(s)]” for each outside line. See Manage Greetings in the menu
system to record your greeting. It's best to keep your greeting short. First time new
callers will always hear your personal greeting followed by Tel-Lynx saying "You
will be connected in a moment. First I need to collect some information ...". See the
Robocall Blocking Feature for more information. DO NOT say "Please leave a
Copyright 2013-2015, nVideon, Inc. Atlanta, GA All Rights Reserved Worldwide
Page 46 of 84
Preliminary
message" in your greeting. Although Tel-Lynx includes a voice mail system, it is
screening calls when it answers and not simply taking a message.
Special Information Tone
To receive fewer telemarketing calls, you can have Tel-Lynx play a three-tone
sequence called a special information tone (SIT) before the greeting for new and
unknown callers. The SIT is enabled/disabled on a per outside line basis. The SIT
will cause some automated calling machines to hang up and remove your phone
number from their calling database.
Note: Callers whose phone number is in the Tel-Lynx phone book or new call list
will not hear the SIT even when enabled.
Skip Greeting Known Callers
When this option is enabled, Tel-Lynx will not play the greeting when a caller in the
phone book calls in. This option is enabled by default.
Call Waiting Enable
When this option is disabled, Tel-Lynx will dial *70 before placing your call. Also, if
disabled for a mobile phone, Tel-Lynx will reject all waiting calls that come in on
mobile phones.
Ring-Through Mode
When enabled, Tel-Lynx will allow all calls (except those specifically blocked in
Tel-Lynx's phone book) to ring through on this outside line without screening them,
When enabled, this option overrides the global answer mode.
Rejecting Waiting Calls from Callers not in
TLC's Phone Book
Tel-Lynx checks the phone number of each call waiting call to see if it should be
rejected or passed through. Tel-Lynx will reject all waiting calls from callers you
have set up as blocked contacts. If you have the Unknown Caller ID Rejection
option set, it will also reject waiting calls from calls without caller ID or with blocked
or out of area caller ID.
If the Rejecting Waiting Calls option is enabled, Tel-Lynx will reject waiting calls
from anyone not in Tel-Lynx's phone book.
For mobile phones, Tel-Lynx rejects waiting calls by telling the mobile phone to
ignore the call. This will send the waiting call to the mobile phone's voice mail.
Copyright 2013-2015, nVideon, Inc. Atlanta, GA All Rights Reserved Worldwide
Page 47 of 84
Preliminary
For landlines, Tel-Lynx rejects the waiting call by placing it on hold at the phone
company (i.e., flashes the switch hook twice). The waiting call will remain on hold
until the caller hangs up. While the waiting call is on hold, you will not hear any
more tones reminding you that the call is waiting. The caller will hear silence.
Recording Names for Outside Lines
When Tel-Lynx announces a call, it will announce the caller’s name, who the call is
for, and the outside line they called in on. To record the name for an outside line,
see Manage the Names of the Outside Lines.
Calling Tables
When placing a call, Tel-Lynx selects an outside line using a set of calling tables.
Tel-Lynx will either use one of six shared calling tables based on the type of call
(local, toll-free, toll, international, premium, or emergency) or a calling table specific
to the contact you are calling.
Note: If the contact you’re calling has its own calling table, it will override the
shared calling tables. For instance, if you and one of your contacts are on the
same mobile phone provider plan, and mobile-to-mobile calls are free, you could
set up a calling table for this contact so that calls to them are placed through your
mobile phone.
Note: Phone book contacts are created with no assigned calling table. When
editing a contact, you can assign a calling table as a separate operation.
A calling table contains an ordered list of outside lines that Tel-Lynx will use when
placing a call.
All of the shared calling tables (except the emergency table and premium table)
are pre-programmed to try outside line 1 (landline) first, followed by outside line 2
(second landline17 or Skype™), and then outside line 3 and outside line 4 (mobile
phones). The emergency calling table is pre-programmed to try the landline
first, followed by mobile phones, and finally Skype™. (See 911 Emergency
Service.) The premium table is pre-programmed with no outside lines so premium
calls cannot be placed without explicitly selecting a line first.
You can set each calling table to suit your needs. For instance, to allow calls to
premium numbers on your landline, set the premium calling table to use the
landline. (See Setting up the Calling Tables and Setting Preferred Outside Lines
for Contacts.)
17
Second landline only available on TLC Plus.
Copyright 2013-2015, nVideon, Inc. Atlanta, GA All Rights Reserved Worldwide
Page 48 of 84
Preliminary
Caution: Tel-Lynx determines whether a given call is a toll or a local call using a
set of predefined tables that are part of the dialing plan you selected when you
set up Tel-Lynx. However, the toll status can change over time. You can correct
any errors using the menu system (Hear Last Phone Number /Change Toll
Status), or more easily using the PC or Smart Phone app used to setup Tel-Lynx.
Voice Mail on Tel-Lynx
The Tel-Lynx voice mail system supports up to seven individual voice mail boxes
and one general, or anyone, mailbox. Each mailbox can hold up to 25 messages
and each can have its own voice tag. For home office use, a voice tag might be a
department, such as sales or support.
Once a voice mail is recorded, it becomes a new message. When you pick up the
telephone to make a call, a stutter dial tone will indicate that you have new
messages waiting. If your telephones are Visual Message Waiting Indicator
(VMWI) compatible or can detect stutter dial tone, a light or other indicator will
show when new messages are waiting.
You can set up Tel-Lynx so that your telephones will ring 2 to 15 times before calls
are sent to voice mail.
Note: Any voice mail having less than one second of speech will be
automatically erased.
Listening to Voice Mail
To listen to messages from your telephone, wait for the dial tone, flash the switch
hook, and then press 2 on the main menu. Alternatively, you can press # 8
at the dial tone. To access your messages remotely, call in and press # during
the greeting. Remote access requires that you enter the secret code.
Tel-Lynx will announce who has new voice mail, and will then ask you to select a
mailbox. If you have set up a password for the user of the mailbox, Tel-Lynx will
ask you to enter the password.
For a given mailbox, new messages play before saved messages. Tel-Lynx will
announce the caller’s name, the line they called on, and the date and time of the
call. (Press 1 to skip this information.)
After listening, messages are saved unless you delete them. After a message
plays, Tel-Lynx will prompt you as follows:
Press 1 to Replay the Message from the beginning without caller
information.
Press 2 to Back up 3 seconds while playing.
Press 3 to Fast Forward 3 seconds while playing.
Press 4 to Move the message to another mailbox.
Copyright 2013-2015, nVideon, Inc. Atlanta, GA All Rights Reserved Worldwide
Page 49 of 84
Preliminary
Press 5 to Replay the message including caller information.
Press 6 to Save and Replay the Previous message.
Press 7 to Delete the message.
Press 8 to Return the call.
Press 9 to Save the message and Play the Next message.
Press 0 to Go Back and select another mailbox.
Setting up the Voice Mail System
Tel-Lynx is preprogrammed with only the general anyone voice mailbox enabled.
The anyone voice mailbox cannot be disabled. To set up additional mailboxes, use
the Set Up User and Voice Mail Menu in the Main Menu. When you setup a user
and their mailbox, you will be asked to record the user's name and to assign the
user to answer one or more outside lines. A common outside line has more than
one user assigned to it, while a personal outside line has only one user. See
Common vs. Personal Outside Lines for more information.
Remote Management and Retrieving
Tel-Lynx Voice Mail
You can call into Tel-Lynx and listen to voice mail and manage Tel-Lynx's phone
book, new call list, and settings. When you call in and hear the greeting start to
play, press # immediately. Tel-Lynx will ask for the secret code. You can enter
either the secret code used to set up the system or any one of the passwords you
have setup for Tel-Lynx users (excluding the "Anyone" user). If a user's password
is entered, only voice mail for that user and the "Anyone" user can be accessed.
If you entered the secret code and the phone number you are calling from is set as
an administrator contact in the Tel-Lynx phone book, you will be able to manage
Tel-Lynx's phone book, new call list, and settings as well as access all the voice
mail.
Once you have successfully entered the code, a menu of options (Call-In Menu)
will be presented.
Managing Mobile Phones (TLC & TLC Plus Only)
With TLC and TLC Plus, Tel-Lynx supports up to two mobile phones through Bluetooth® connections. Both mobile phones can be used at the same time (i.e. two independent calls). Mobile phones must first be paired with the TLC system before
they will able to connect with it. Once paired, mobile phones are automatically enabled to connect to the system. Through the menu system, mobile phones can be
disabled from connecting to the system, enabled to connect to the system, or unpaired from the system.
Copyright 2013-2015, nVideon, Inc. Atlanta, GA All Rights Reserved Worldwide
Page 50 of 84
Preliminary
Pairing a Mobile Phone
To pair (or unpair) a mobile phone, use the outside line setup menu to set up
outside line 3 or outside line 4. If outside line 3 or 4 is not currently paired with a
mobile phone, you can take the telephone off-hook and press # 3 to start
pairing on outside line 3 or press # 4 to start pairing on outside line 4.
Make sure you follow TLC 's spoken instructions. The TLC system will be
discoverable for two minutes. You can then hang up the telephone and use your
mobile phone to scan (search, add new device, etc.) for Bluetooth ® devices (in this
case TLC). See the mobile phone's instruction manual to learn how to scan or
search for Bluetooth® devices. The mobile phone will find the TLC system and you
will be led through a pairing process. If asked to enter a password, the password is
"4321".
Note: If you have previously paired a mobile phone with the TLC system and
then unpaired it, make sure you have removed the pairing from the mobile phone
before attempting to pair it again. If you don't, the re-pairing may not succeed.
Mobile Phone Usage
When a mobile phone is connected to TLC, calls can be placed and received using
the mobile phone handset directly or by using an inside line (telephone, PC,
laptop, or tablet) on the TLC system.
The audio for calls placed or received directly on the mobile handset will remain on
the handset. You may experience a short, momentary loss of audio when you have
been out of Bluetooth® range of the TLC system and then come back into range
and the mobile phone re-connects to TLC.
The audio for calls placed or answered directly using a mobile handset can be
transferred to an inside line (telephone or PC) on the TLC system (see Picking up
a Call in Progress).
Conversely, while an inside line is connected to a call through a mobile phone, you
can transfer the call's audio to the mobile phone. Please see your mobile phone's
user manual for instructions on re-routing the audio back to your mobile phone
away from a Bluetooth® device (in this case, the TLC system).
A call can be transferred back and forth between the TLC system and the mobile
handset any number of times.
To temporarily disconnect a mobile phone from TLC for 10 minutes, at the dial
tone, press #, then press and hold for one second either 3 for mobile
phone 1 or 4 for mobile phone 2. After the 10 minutes is up, TLC will return to
attempting to connect to the mobile phone. This can allow your car's Bluetooth to
connect with your mobile phone when you leave the house. Some car systems
only try once to connect to a mobile phone, and if your mobile phone is still
connected to TLC, they will fail to connect and give up trying.
Copyright 2013-2015, nVideon, Inc. Atlanta, GA All Rights Reserved Worldwide
Page 51 of 84
Preliminary
Mobile Phone Text Message Access
TLC’s Android Phone app allows TLC to ring your telephones when an incoming
text message is received on your Smart Phone. Messages can be read to you and
you can reply to them using your home telephone.
While listening to or when composing a text message, you can adjust the playback
volume. Press *, and then press 0 one or more times to lower the volume,
or # one or more times to raise the volume. When the maximum or minimum
volume is hit, TLC will play a short beep. Pressing any key other than *, 0,
or # will exit the volume adjustment mode and execute the function
corresponding to that key. TLC remembers the playback level you set so the next
time you listen to a text message, it will play back at the level you previously set.
Listening to Your Text Messages
When you access your text messages using your home telephone, by default TLC
ignores those that are more than twelve hours old. You can change the default
number of hours using the TLC settings on your Smart Phone. In addition, text
messages are accessed with the most recent messages first. This makes
managing your messages easier.
Composing Text Messages
You can compose or reply to text messages using your telephone's keypad. The
message you compose will be broken down into sentences. Initially, a period ('.')
will be appended to your message after you say it. You will then have the option to
add a new sentence, add to the last sentence, or send as is. You can review your
message before sending it. You can either hear the message spoken, or you can
have it displayed in fragments on your telephone's caller ID display. TLC will also
spell the message as it displays it on your telephone.
To compose and send a message to one of your contact's mobile phones, at the
dial tone, dial a few letters of the contact's first name and press *, then enter a
few letters of the last name and press *, then press #. TLC will ask you to
select the mobile phone from which to send the message and will then ask you to
speak your message. This is similar to Dialing-By-Name to make a call, but the
# is used for the phone type to indicate that you want to send a text message
instead.
You can also compose and send a text message to the last number dialed or
received by pressing * # at the dial tone.
When you are asked to say your message, you can switch to entering your
message with your telephone's keypad by pressing either 7 to add text to the
end of the last sentence or 8 to add a new sentence. To enter a given letter,
press the key on your telephone's keypad multiple times according to the letters
position on the key. TLC will speak the letter that you entered. To view the last part
of the message on the caller ID display, press # once. To hear the last
Copyright 2013-2015, nVideon, Inc. Atlanta, GA All Rights Reserved Worldwide
Page 52 of 84
Preliminary
sentence of the message, press # three times quickly. When you’re done
entering text, press # twice quickly. To erase the last letter you entered, press
the * key. To erase the last word, press and hold the * key for one
second.
While composing a message to be sent, if you hang up before sending the
message, it will be kept as a draft for the specified recipient. Draft messages will
be presented to you next time you go to send a message to that recipient.
Siri and other Mobile Phone Voice Commands
You can use your telephone to access Siri on your iPhone and get your iPhone to
do all kinds of useful things. You can also use this feature with Android phones that
support voice commands. Non-smart phones may also support some form of voice
commands, but they are generally limited.
To use voice commands on your mobile phone, do the following. Pick up a
telephone (attached to TLC), and at the dial tone press # # 3 for
Mobile Phone 1 on outside line 3 or # # 4 for Mobile Phone 2 on
outside line 4. Your mobile phone may respond with a beep or other audible signal,
or it may talk to you. For instance, it may ask, "What do you want to do?"
Most mobile phones that support voice commands support the "call" command. So
you can say "Call John Smith". Most also allow you to append the type of phone
number (i.e. Call John Smith, Mobile"). Remember that your mobile phone uses its
phone book, not TLC's phone book, for voice commands. Some mobile phones
have additional voice commands, such as commands for reading and sending text
messages.
Voice command availability and voice recognition quality vary from mobile phone
to mobile phone. Most Smart Phones use a data connection to send your voice
command to an internet-based server that does the voice recognition and sends
the result back to the phone. This method usually works well. Many non-Smart
Phones either do not support voice commands or do a poor job of it, and even the
best voice recognition systems have difficulty with some names.
To adjust the playback volume, press 0 one or more times to lower the volume
or # one or more times to raise the volume. When the maximum or minimum
volume is hit, TLC will play a short beep. TLC remembers the playback level you
set.
Mobile Phone Options
TLC provides several mobile phone options, including automatic forwarding,
delayed answering, call rejection without answer, and options that promote mobile
phone compatibility.
Copyright 2013-2015, nVideon, Inc. Atlanta, GA All Rights Reserved Worldwide
Page 53 of 84
Preliminary
Automatic Forwarding of Calls to Your Mobile Phone
If a call for you comes in to your home phone number when you’re not home (i.e.,
when your mobile phone is not connected to the system), TLC can automatically
forward18 the call to your mobile phone. This works for each user who is associated
with a mobile phone. The call must come in on a landline or Skype ™. The
forwarded call will tie up the line it came in on (landline or Skype) for its duration.
You can automatically forward calls from selected individual contacts. You can also
automatically forward calls from super contacts, normal & super contacts, all
contact types, or new callers & all contact types.
You can specify that calls be forwarded either immediately or after they would
normally go to voice mail. If you specify immediate forwarding, you risk missing the
call if you’re home and your mobile phone is not connected to TLC for any reason.
If you set it to forward after the call goes to voice mail, you’ll have time to answer
when your mobile phone's Bluetooth® is turned off, your mobile phone is off, or the
battery is dead. Remember: The only way TLC knows you’re home is if your
mobile phone is connected to the system.
Receiving a Forwarded Call
When you receive a forwarded call, TLC will announce the caller like it does when
you are at home. Press 1 to connect to the caller, or press 2 to send the
call to voice mail.
If you send the call to voice mail, wait for the start of the message that tells the
caller to leave a message, and then hang up. Unlike when you are at home, if you
stay on the line, the caller can hear you, and you cannot stop the voice mail by
pressing 1. If you stay on the line, both you and the caller will be recorded and
TLC will hang up on both of you when the maximum length voice mail is reached.
Delayed Answering of Your Mobile Phone
You can place and answer mobile calls using a telephone connected to TLC or you
can do so directly from your mobile phone. If you want the option to answer on
your mobile phone before TLC picks up, you can set up TLC to delay answering
your mobile phone for a specified number of rings. If you answer your telephone
during the delay, TLC will immediately answer and you will be connected to the
caller.
Rejecting Audio when TLC did not Originate the Call
If you’re talking on your mobile phone when you return home, TLC will
automatically reconnect your mobile phone to the TLC system, at the same time
retaining the call's audio on your mobile phone. The reconnection may cause a
18
Your home phone service must have 3-way calling for this feature to work. 3-way calling is often an
additional charge option on home phone service. Skype includes 3-way calling as part of its basic phone
service. The user's mobile phone must be paired with TLC and that user's mobile phone must also be
enabled on TLC.
Copyright 2013-2015, nVideon, Inc. Atlanta, GA All Rights Reserved Worldwide
Page 54 of 84
Preliminary
brief interruption in the audio. To avoid this interruption, you can set up TLC to
reject the audio transfer request. However, iPhones will not work properly if this
setting is enabled. Enabling this setting seems to work fine with the Android
phones we have tested.
Use Network Operator Defaults for Call Waiting, Merging,
and Switching Between Calls
Call waiting and 3-way calling work differently for different mobile phone providers
(network operators like Verizon, AT&T, T-Mobile, and Sprint). Some providers
allow you merge (or conference) a waiting call with the active call, while others only
let you switch between the waiting call and the active call. Some providers allow
you switch between a third called party and the on hold party(ies), and some only
allow you merge (or conference) the calls. Some providers allow you to use *70 to
disable call waiting for a given call and some do not.
TLC attempts to get the name of the network operator from your mobile phone. If
the phone provides the name and TLC recognizes it, it will use that network
operator’s default settings. Otherwise, you will have to set them manually if you
want TLC to use the call waiting and 3-way calling features properly. The following
three options will be set automatically if you enable this option and TLC is
successful in getting a recognized network operator name.
Allow *70 to Disable Call Waiting on Network
Some mobile phone providers allow you to dial *70 to disable call waiting on a callby-call basis; other providers will give an error message. TLC will automatically
add *70 to any number you dial if you set the Disable Call Waiting option (see
menu item Set up the Outside Lines). If you don't allow *70 and you have call
waiting disabled, TLC will instruct your mobile phone to ignore waiting calls. You
will hear waiting calls come in, but they will be immediately sent to your mobile
phone's voice mail.
Call Waiting Merging
When you answer a waiting call, some mobile phone providers allow you to merge
(or conference) the waiting call with the active call, while some only let you switch
between them. TLC keeps track of the waiting call and the active call, but if a
provider does not allow merging, the mobile phone does not indicate that merging
did not work, so TLC can get confused about which call is which. Disabling this
option prevents you from accidentally trying to merge a waiting call with an active
call.
Switching Between a Third Party Call and the Holding
Party(ies)
When making a conference call, the active call is placed on hold and a new call is
made to a third party. When the third party answers, you can merge (conference)
Copyright 2013-2015, nVideon, Inc. Atlanta, GA All Rights Reserved Worldwide
Page 55 of 84
Preliminary
the held call with the active call (third party). Some providers also allow you to
switch between the party(ies) on hold and the third party before you merge the
calls, and some don't., If you disable this option for a provider that does not allow
switching, you won’t accidentally try to switch between calls.
Recording a Phone Conversation
You can record your phone conversations to a PC attached to Tel-Lynx. While on a
call, flash the switch hook and press 9, then press 2 to start recording;
flash the switch hook and press 9, then press 3 to stop recording. You will
hear, "Recording the call" or "Recording stopped", and you will be automatically
reconnected to the call in each case.
Rotary Dialing: To start recording flash, 3, 9, 2.
To stop recording flash, 3, 9, 3.
The conversation will be recorded to a wave file (.wav) in a directory named
'Recordings' under the main Tel-Lynx 'SupportFiles' directory on the attached PC.
The name of the file will start with the phone number of the other party, followed by
the outside line number and then the date:
Example: 14045551212_1_2014-1-15_13-25-14.wav
Recordings made with blocked caller ID will have a file name that starts with '$'.
Note: Tel-Lynx will automatically record emergency (911) calls.
During any given conversation you may start and stop the recording any number of
times. Only one wave file will be generated per call, and only the parts of the
conversation where the recording is 'started' will be present in the wave file.
The "Recording the call" announcement will be recorded into the wave file every
time the recording is started. The "Recording stopped" announcement will not be
recorded.
Make sure you have sufficient disk storage on the attached PC before starting the
recording. If the disk space is exhausted during a recording, Tel-Lynx will
announce "Recording stopped". Each recording will consume almost 1 MB of disk
storage per minute.
Warning: You may be legally required to notify or get the permission of all
parties to a conversation before recording it. Be sure you know the legal
requirements for recording a phone conversation before using this feature.
Landline Calibration
If you hear a significant sidetone while on a landline call, you can calibrate
Tel- Lynx's landline to help eliminate it. At the dial tone, press # #, then
Copyright 2013-2015, nVideon, Inc. Atlanta, GA All Rights Reserved Worldwide
Page 56 of 84
Preliminary
press and hold 1 (or 219 for landline 2) for five (5) seconds. You'll hear a
dial tone followed by “Please wait” several times. If you hear only a dial tone, you
didn't hold 1 (or 2) long enough; hang up and try again. When completed,
Tel-Lynx will say “Updated”, and you can hang up. You only need to do this once
for each landline service you are using with Tel-Lynx.
Using Tel-Lynx with a PBX
Many businesses and communities use a PBX to provide phone service to offices
or residences within the business or community.
Tel-Lynx can be used in conjunction with a PBX that requires a caller to dial '9' to
make an outside call and where the extensions are at least 3 digits. When in PBX
mode, Tel-Lynx will automatically dial '9' for you at the appropriate time. In other
words, Tel-Lynx users should not dial ‘9’ when making an outside call.
To enable or disable PBX operation, see Set the PBX Mode of Operation. When
setting up Tel-Lynx, you should select the dialing plan code of the phone service
the PBX uses. Ask your PBX manager if you do not know what type of service is
used.
To dial an extension on the PBX, dial the extension number as usual. After a
preset period of time Tel-Lynx will place the call to the extension. To dial an
extension without waiting, dial the extension and then press #.
Rotary Dialing: Dial the extension, then double flash
For use with Dial-By-Name, a contact's phone number can be marked as having a
local extension on the PBX (See Local Extensions).
Note: When using Tel-Lynx with a PBX with four digit extensions, extension
dialing supersedes 4-Digit Dialing.
Warning: Tel-Lynx should not be used with PBXes that have three digit
extensions where any of the extensions are the same as the emergency number
(911 by default). This is generally not a problem, as most PBXes require the
caller to dial ‘9’ before dialing an outside phone number such as 911.
Smart Dialing vs. Direct Dialing
TLC and TLC Plus always use Smart Dialing to place calls. The Tel-Lynx Guardian
can operate in either Smart Dialing mode or direct dialing mode. With Smart
Dialing, when you pick up the telephone, you are connected only to Tel-Lynx, not
any phone service. In other words, Tel-Lynx interprets the digits as you dial them.
Once it has received enough digits to place a call, Tel-Lynx determines how to dial
the call on the particular phone service (mobile, landline, or Skype) that will be
used to make the call and then dials for you. Direct dialing connects your
19
TLC, TLC Plus, and Tel-Lynx Guardian Plus only
Copyright 2013-2015, nVideon, Inc. Atlanta, GA All Rights Reserved Worldwide
Page 57 of 84
Preliminary
telephone to your phone service as soon as you pick up the telephone. Direct
dialing can only be used with your landline (i.e., the Guardian).
You will hear a stutter dial tone when you pick up the telephone when Tel-Lynx has
a message for you. This message could alert you to a new voice mail, timer, or DoNot-Disturb, etc. When in Smart Dialing mode, the stutter dial tone will be followed
by the announcement of the message(s). When in direct dial mode, press
# 9 to hear the announcement(s).
Because Smart Dialing allows Tel-Lynx to figure out how to place a call on any of
the attached phones services (landline, mobile, or Skype), you don't have to worry
about how the call should be dialed on that particular service. In addition, Smart
Dialing allows Tel-Lynx to perform advanced functions, like Dial-By-Name, Speed
Dialing, 4-Digit dialing, and Redial/Call Back. These features are not available with
direct dialing on a phone service.
The Guardian is shipped from the factory in direct dialing mode to make it easy to
set up. Once you have the Guardian up and running, you can enable the Smart
Dialing mode with your telephone using the Tel-Lynx Setup menu. If you plan to
call out using Skype with the Guardian, you will have to enable the Smart Dialing
mode as well.
When in Smart Dialing mode, Tel-Lynx uses a dialing plan to determine how to dial
a given phone number on whichever service will be used to make the call. The
dialing plan consists of a table of local area codes, a local prefix map for each local
area code, the number of digits required to make a local and toll call in your home
area code (e.g., the first area code in the area code list), and the number of digits
required to make a local and toll call in the other local area codes. If you have
phone service from your local phone company or cable service, you may have one
local area code, or you may have many.
If you’re using a phone service like Ooma, magicJack, Vonage, or other VoIP
service, the concept of a local calling area does not exist. With these services,
there are no local area codes, so Tel-Lynx will ignore the local area code table and
prefix maps when dialing out and use either 10- or 11-digit dialing as specified in
the Dialing Plan Code (see next section). If you live in an area with 7-digit dialing
for local calls, you can continue to use 7-digit dialing with these services by
specifying your local area code and prefix (NPA NXX) in the Dialing Plan Code
described below. In that case, Tel-Lynx will use the local area code table, along
with the number of digits required to make local and toll calls, to determine when
you have dialed the correct number of digits to make a call.
The Tel-Lynx area code table can handle up to 24 local area codes.
The prefix in a phone number is the next three digits after the area code. A prefix
map for a given area code defines which prefixes are local. A given phone number
is considered toll if its area code is not listed in the local area code table, or if the
specified prefix is not marked as local in the prefix map for the given area code.
Copyright 2013-2015, nVideon, Inc. Atlanta, GA All Rights Reserved Worldwide
Page 58 of 84
Preliminary
Tel-Lynx is programmed from the factory with a database of local area codes and
prefixes for all areas in the North American Number Plan. You can use this
database, or you can set up the local area code and prefix maps manually. The
database occupies memory in Tel- Lynx, and will be deleted when the phone
book/new call list gets close to being full. Even without the database, you can set
up the Dialing plan using a PC, or using the Android app 20. You can also setup or
change prefixes manually using your telephone, PC, or Android app.
Dialing Plan Setup
The dialing plan is set up using Tel-Lynx's setup menu. To make things as simple
as possible, you will use a Dialing Plan Code to set up all aspects of the dialing
plan.
The Dialing Plan Code is formatted as 'ABCD NPA NXX', where each letter
represents a digit 0 - 9. The number of digits required to dial a given number will
automatically be set by the NPA NXX code for your home telephone number. You
can also specify the code as 'ABCD 0EFGH NPA NXX' to manually set the
number of digits required to dial a phone number.
The NPA NXX code is used to set the dialing rules for dialing your telephones on
TLC's inside lines, and for when TLC dials out when using dialing codes 1 and 7
from Table 1.
If you don't have a home phone number or your home phone service requires (or
allows) you to always dial ten or eleven digits to make a call, you can specify NPA
NXX as 000 000, and you will use ten digits (or eleven digits if you like) to make all
your calls.
Before using Table 1: If you have a service provider named in Table 1, use the
provided dialing code. If not, does your phone service have 3-way calling? If you
don't know, ask your phone service provider. Most digital cable phone services
provide it, but check to be sure. If you can't figure it out, assume that you don't
have 3-way calling.
Also, check to see if you can dial all 11 digits for local phone numbers. If you can,
it is preferred that you use dialing code 3 or 9 instead of 1 or 7.
For the Guardian: Determine 'A' from Table 1. 'BCD' should be set to '333'
For TLC: Determine 'A' from Table 1. 'BCD' should be set to '333'
For TLC Plus: Determine 'A' and 'B' from Table 1. 'CD' should be set to '33'.
20
TLC and TLC Plus only.
Copyright 2013-2015, nVideon, Inc. Atlanta, GA All Rights Reserved Worldwide
Page 59 of 84
Preliminary
For example:
If you are using TLC (or the Guardian) with Vonage phone service, your
'ABCD' code would be 2333.
If you are using TLC Plus with Ooma® Premier phone service on outside
line 1 and magicJack phone service on outside line 2, your 'ABCD' code would
be 0833.
Dialing Code
Landline Phone Service
3-Way
Calling
No Home Phone Service
Local Phone Company or Digital Cable phone service
Local Phone Company or Digital Cable phone service that
allows 11-digit dialing for local and toll calls (preferred over
1 & 7 if available)
AT&T Wireless Home Phone Service or PhonePower VOIP
service
No 3-Way
Calling
3
1
7
3
9
3
Straight Talk®, Net10, or Verizon Wireless Home Service
5
Vonage or phone service w/3-way calling that requires 10digit dialing not listed in this table
2
Ooma® Premier
0
Ooma® Basic, Basic Talk, magicJack, or phone service w/o
3- way calling that requires 10- digit dialing
Table 1
8
A, B, C and D set how Tel-Lynx will dial out on outside lines 1, 2, 3, and 4
respectively. Valid values for A, B, C, and D are:
1 - Use the local dialing plan set by 'NPA NXX' to dial out*
2 - Always use 10-digit dialing to dial out*
3 - Always use 11-digit dialing to dial out*
4 - Reserved
5 - Same as 2, but flash switch hook after dialing the 2nd call
6 - Reserved
7 - Same as 1, but no 3-way calling
8 - Same as 2, but no 3-way calling
9 - Same as 3, but no 3-way calling
0 - Same as 2, but double flash the switch hook to join the 1 st and 2nd calls
(Ooma® Premier style 3-way calling)
Copyright 2013-2015, nVideon, Inc. Atlanta, GA All Rights Reserved Worldwide
Page 60 of 84
Preliminary
* For landlines, values 1, 2, and 3 assume that associated phone service
has standard 3-way calling (i.e., the switch hook is flashed before dialing
the second call when 3-way calling).
A sets how Tel-Lynx will dial out on your home phone service. If you don't have
a home phone service, set A to 3.
B sets how Tel-Lynx will dial out on your second home phone service if you
have TLC Plus. If you don't have TLC Plus, set B to 3.
C and D are for mobile phones, so they should be set to 3, as most, if not all,
mobile phones allow 11-digit dialing for both local and toll calls.
E, F, G, and H (if used) set the number of digits you must dial to enter a
complete phone number when dialing out. E is for local calls in your home area
code, F is for toll calls in your home area code, G is for local calls in a foreign
(not home) area code, and H is for toll calls in a foreign area code.
Valid values for E, F, and G are:
1 - Require seven digits
2 - Require ten digits
3 - Require eleven digits
H should always be 3.
For example, say your local phone number is in Cincinnati and is
513-671-xxxx. Local calls in your 513 home area code can be dialed with
seven digits. Local phone numbers in area codes 812, 859, and 937 are
dialed with ten digits. All other calls are dialed with 11 digits.
If you use the 'ABCD NPA NXX' form to set the dialing plan and TLC tells
you the wrong number of digits required to make a call, set the dialing
plan again using EFGH = 1323 to correct the problem.
NPA is your 3-digit home area code, and
NXX is your 3-digit home prefix (next three digits after area code).
Changing the Local/Toll Status of an Area Code
and Prefix
If you have traditional telephone service from your local telephone company (or in
some cases, digital cable phone service), and your phone service does not allow
you to make local calls using all 11 digits of a phone number (1- NPA NXX
-XXXX), phone numbers must be dialed with a '1' and then area code if they are
toll calls, or without the '1' if they are local calls. In other words, you have set A
and/or B to 1 or 7 in the dialing plan described earlier in this section.
When using Smart Dialing, Tel-Lynx relies on its local area code table and prefix
maps to know how to dial phone numbers with the correct use of the '1'. The local
area codes and prefix maps can change as new ones are added to your local
calling area; they may have changed since Tel-Lynx's database was created..
Copyright 2013-2015, nVideon, Inc. Atlanta, GA All Rights Reserved Worldwide
Page 61 of 84
Preliminary
If the prefix map for a given area code and prefix is incorrect, you will hear an
announcement from your phone company such as, "You may not dial a 1 when
calling a local phone number" or "you must dial a 1 when calling a toll phone
number". The announcement may be preceded with a high-pitched, three-tone
sequence called a SIT (Special Information Tone). The particular frequencies used
and their duration indicate why the call did not go through.
If the SIT is present, Tel-Lynx can detect it and automatically switch the toll status
of the dialed area code and prefix for you. Tel-Lynx is programmed from the factory
to detect the SIT for the Atlanta, Georgia area. You can train Tel-Lynx to detect the
SIT for your area. If you do not hear the SIT when the message is played, you will
need to change the toll status manually.
NOTE: If your area uses 7-digit dialing for local calls in both your home area
code and foreign area codes, you should dial all 11 digits to properly change the
prefix map for the correct area code. After the prefix map is corrected you can
dial using only 7 digits.
Changing the Toll Status of Dialed Numbers Manually
To switch the toll status manually, after you hear the message telling you not to
dial '1', or that you must dial '1', hang up, wait two seconds, take your telephone
off-hook, and press and hold # for 1 second. Tel-Lynx will display the phone
number you just called on your telephone's caller ID display and ask you to press
and hold 1 for two seconds to change the toll status. After you do that, you will
hear a dial tone and you can now dial * * to redial the call.
Training Tel-Lynx to Detect Toll Status Changes
Automatically
Tel-Lynx can detect up to two SITs (Special Information Tones) when it dials a
number incorrectly (when its local area code/prefix map indicates that a number is
local when it is actually toll, or vice-versa). When dialing out, if Tel- Lynx detects
one of these SITs, it will hang up, change the toll status for the dialed area code
and prefix from local to toll (or vice-versa), and then redial the call.
Tel-Lynx is programmed from the factory to detect the SIT used in the Atlanta, GA
area for incorrect use of '1' when dialing. You can train Tel-Lynx to detect the
particular SIT or SITs that are played when using '1' incorrectly in your area.
To train Tel-Lynx to detect the SIT(s) for your area, do the following:
1. At the dial tone, dial # #, then press and hold 1 for at least one
second. This will put Tel-Lynx in the training mode and connect your
telephone directly to the landline. You will now hear the phone company's
dial tone.
2. Now dial a local number using '1', then the area code and the rest of the
phone number.
Copyright 2013-2015, nVideon, Inc. Atlanta, GA All Rights Reserved Worldwide
Page 62 of 84
Preliminary
3. You should hear the SIT, followed by an announcement that tells you not to
dial the '1'. Tel-Lynx will then tell you the tone duration and frequency for all
three tones.
This may be all you have to do, since most of the time Tel-Lynx will incorrectly
think a phone number is a toll number when it has really been added as a local
number. However, for completeness, if you know a toll number in one of your local
area codes, you can repeat the above procedure, but dial the toll call without
dialing the 1. In other words, after dialing # # and then pressing and
holding 1 for one at least one second, dial the toll call using only the area code
and phone number (do not dial the '1'). You should now hear an announcement
saying that you must dial the ‘1’. Tel-Lynx will then tell you the duration and
frequency of each tone in the sequence.
To hear the lengths and frequencies of the SIT(s) Tel-Lynx will detect, at the dial
tone, press and hold # for at least five (5) seconds.
Using Skype with Tel-Lynx
Tel-Lynx uses Skype's Desktop API to coordinate Skype calls. To use Skype, you
must install the Skype app on a PC running Windows Vista, Win 7, Win 8.x, or Win
10. You must also have Tel-Lynx attached to that PC with the provided USB cable,
and you must be running the TlxServer app that you can download from our
website at www.tel-lynx.com/software.
Since Microsoft purchased Skype, it has broken the Desktop API at least twice.
The known non-working versions are 6.22 through 7.1 and 7.9 through 7.1x. You
can download the latest working version of Skype, version 7.8, from our website, at
www.tel-lynx.com/software. If you already have Skype installed, check the version
number; click “Help=>About Skype” in the Skype app menu. If it is a non-working
version listed above, uninstall it, and install the version from our website. Be sure
to disable automatic Skype updates!
After installing Skype and TlxServer from our website, you can run TlxServer by
double clicking the “Run” batch file in the C:\TLC folder. See the instructions
included with the PC server download for more information on how to install the
server.
The first time you run TlxServer or a new version of it, click “Allow Access” in the
top notification window of the Skype window to allow TlxServer to use Skype. You
can dial 1-000-000-0000 to test Skype using its “echo123” test.
TlxServer will automatically assign unique, unused telephones numbers to your
Skype friends. Skype phone numbers always look like 1-000-000-XXXX (where
XXXX is a unique number among all your Skype friends), allowing you to have all
your Skype friends in Tel-Lynx's phone book so you can dial them by name or
phone number.
Copyright 2013-2015, nVideon, Inc. Atlanta, GA All Rights Reserved Worldwide
Page 63 of 84
Preliminary
When dialing a Skype friend by name, use S (Skype) for the phone type. For
example, if your phone book contains John Smith's Skype number, you could dial
JOH*SMI*S. That's J O H * S M I * S.
Using the Menu System
The Tel-Lynx system has two main modes of operation: the call mode and the
menu mode. You are in call mode when dialing a phone number, Dialing-ByName, or on a call. You can flash the switch hook to enter and leave the menu
mode. If you are on a call when you flash the switch hook, that call will be put on
hold; flash the switch hook again, and you will be reconnected to the call.
Rotary Dialing: exceptions to this flashing rule:.
1) If you flash the switch hook twice quickly (double flash) at the dial tone,
Tel- Lynx will call the last number dialed.
2) When looking up a contact or setting a timer in the On a Call Menu, the switch
hook simulates the * (single flash) and # (double flash) keys.
3) When in any of the submenus of the main menu, once you start dialing, the
switch hook always simulates the * (single flash) and # (double flash) .
There are four root menus in the Tel-Lynx system: Main Menu, On a Call Menu,
Announcement Menu, and Call-In Menu. Each menu is organized in a tree
structure. Menu instructions will repeat until you press a key. To return to a
previous branch, press 0. If you’re entering a number or name, press and hold
0 to return to the previous branch. On many menus, press * and then the
option number to hear its description. To replay a menu from the start, press *
twice.
You don’t have to wait to hear an option before pressing a key. If you know its
number, you can press the key and Tel- Lynx will immediately take action.
Tel-Lynx Main Menu
To enter the Main Menu, at the dial tone, flash the switch hook.
Here is a list of main menu functions for telephone keypad keys 1 through
9, followed by detailed instructions.
1
2
3
4
5
6
Set Do-Not-Disturb and Other Timed Functions
Listen to Voice Mail and Text Messages
Manage the Phone Book
Call Another Tel-Lynx User
Hear Last Number Called or Received
Select an Outside Line
Copyright 2013-2015, nVideon, Inc. Atlanta, GA All Rights Reserved Worldwide
Page 64 of 84
Preliminary
7 Set up Tel-Lynx
8 Leave a Voice Message for a User
9 Hear the Date, Time, and Line Status
1 Set Do-Not-Disturb and Timed Functions
Press # to Cancel, Press 0 to Go Back
Press 1 1 to Override the Do-Not-Disturb Schedule
Enter minutes (< 720), then # OR hours *, minutes #
Then select which contacts can ring the telephone:
Press
Press
Press
Press
1 to Send all calls to voice mail
2 to Allow all calls through
3 to Allow Normal and Super contacts through
4 to Allow only Super contacts through
Press 1 2 to Set Temporary Ring-through Mode
Enter minutes (< 720), then # OR hours *, minutes #
Press 1 3 to Set a Timer
Enter:
minutes
minutes
minutes
#
* seconds #
hours *
* seconds #
* seconds #
To cancel the timer, press #; to reset, enter time and press #.
Press 1 4 to Set an Alarm
1) Enter day(s), then #
1 Sun
8 M→F
2 Mon 3 Tues 4 Weds
9 tomorrow (one time)
5 Thurs 6 Fri 7 Sat
0 today (one time)
2) Enter time, then #, then 1 for AM or 2 for PM
3) Tel-Lynx will invite you to record a wake up message.
Try it: set a one time alarm for 7:00AM tomorrow.
Press 9 for tomorrow, #.
Press 7 0 0 #.
Enter 1 for AM. Got it!
Try it: set a recurring alarm for 6:00AM Mon through Sat every week.
Copyright 2013-2015, nVideon, Inc. Atlanta, GA All Rights Reserved Worldwide
Page 65 of 84
Preliminary
Press 8 for Mon through Fri, 7 for Sat, #.
Press 6 0 0 #.
Press 1 for AM. That’s it!
Note: If you press and hold 1 - 7 for at least one second when
setting the alarm days, only that day will be selected for a one time (not
recurring) alarm.
2 Listen to Voice Mail or Text Messages
When you pick up a non-ringing telephone, a stutter dial tone will indicate
that messages are waiting. Flash the switch hook, then press 2 to
access voice mail and text messages. Depending on how Tel-Lynx is set
up, you may be asked to select your mailbox. If you have both voice mail
and text messages, you will be asked to select the type of messages you
want to access. Then, if a message is waiting, you will hear the message.
To access the message again and any previous messages, you will be
presented with the following menu:
For voice mail:
Press 1 to Listen to your message
Press 2 to Rewind while playing message
Press 3 to Fast Forward while playing message
Press 4 to Move message to another mailbox
Press 5 to Hear message info
Press 6 to Play previous older message thread (if any)
Press 7 to Delete current message
Press 8 to Place a call to sender
Press 9 to Play next message
Press # to Hear sender's phone number
For text messages:
Press 1 to Listen to your message
Press 2 to Reply (or compose a new message) to sender
Press 1 to Listen to composed message
Press 2 to Send message
Press 3 to Add sentence(s)
8 …from keypad
Press 4 to Add to last sentence
7 …from keypad
Press 5 to Listen to last sentence
Press 6 to Delete last sentence
Press 9 to View current message on caller ID
Press # to Hear recipient's contact info
Press 3 to Hear next newer message (if any)
Copyright 2013-2015, nVideon, Inc. Atlanta, GA All Rights Reserved Worldwide
Page 66 of 84
Preliminary
Press 4 to Hear previous older message (if any)
Press 5 to Go to next newer message thread (if any)
Press 6 to Go to previous older message thread (if any)
Press 7 to Set current message to unread (mark as new)
Press 8 to Place a call to sender
Press 9 to View current message on caller ID
Press # to Hear sender's contact info
3 Manage Tel-Lynx's Phone Book
While managing Tel-Lynx's phone book, you can display the currently selected
contact's name and phone number on your telephone's caller ID screen by
pressing #. However, if your telephone has a contact with the same telephone
number as the one in Tel-Lynx's phone book, the name in the telephone's phone
book will be presented on the caller ID display instead of the name from Tel-Lynx .
To help get around this, you can do two things:
1. Press and hold # for 1 second and Tel-Lynx will send just the name (with
no phone number) to your telephone's caller ID display.
2. Press and hold # for 2 seconds and Tel-Lynx will send the phone number
in the name field (with no number field) to your telephone's caller ID display.
Warning: We strongly suggest that you remove any contacts you may have in
your telephone's phone book and only use Tel-Lynx's phone book to avoid
confusion.
Press 3 1 to Manage New Calls
Hear the most recent new call’s voice tag.
See their name and phone number on the caller ID screen.
Press 1 to Move New Contact to Phone Book
Press 2 to Go to Next New Call
Press 3 to Go to Previous New Call
Press 4 to Call New Contact
Press 5 to Text New Contact
Press 6 to Modify New Contact Information*
Press 7 to Delete New Contact
Press 9 to List other Contacts with the Same Phone Number
Press # to Display New Contact's Name/Number on Caller ID Screen
Press 3 2 to Add a New Phone Book Contact
You will be prompted to:
Enter the contact’s phone number.
If a contact with that number already exists:
o Press 1 to Review the Existing Contact.
Copyright 2013-2015, nVideon, Inc. Atlanta, GA All Rights Reserved Worldwide
Page 67 of 84
Preliminary
o See the name and phone number on the caller ID screen.
o Hear the voice tag, number type, and contact type.
o Press 2 to Replace the Existing Contact (with new contact).
o Press 3 to Proceed Entering New Contact.
Enter the contact’s number type. Number types are:
Business(B), Fax(F), Home(H), Misc 5, Mobile(M),
Skype™(S), User(U), Work(W), and Unspecified
(1).Skype™ and user are automatically selected and cannot be
changed.
Enter the contact’s name.
Enter the contact type: normal, super, workday, or blocked.
Blocked contacts cannot leave messages or ring any telephones
connected to Tel-Lynx, even in an emergency.
Record a voice tag.
When your new contact entry is complete:
Press 1 to Modify Contact Information*
Press 2 to Add another Phone Book Contact
Press 4 to Call the Contact
Press 5 to Text the Contact
Press 6 to Assign a Speed Dial Number
Press 7 to Delete the Contact
Press 9 to List other Contacts with the Same Phone Number
Press # to Display Contact's Name/Number on Caller ID Screen
Press # # to Commit Contact Info
Press 3 3 to Manage Phone Book Contacts
Enter the name using Dial-By-Name procedure
or
Enter the last few digits of the contact’s phone number, then press #
or
Press # to select (match) all contacts.
_______________________________
Tel-Lynx will select contacts that match your input. You can move
chronologically21 through the selected list of matching contacts using keys
2 for older and 3 for newer.
(If you press the 0 key for longer than one second22, you will go back
one menu level.)
21
22
Chronological order is the order in which the contact called in, was called, or was entered into the phone
book.
Your phone must produce a continuous tone for the entire time you press the key.
Copyright 2013-2015, nVideon, Inc. Atlanta, GA All Rights Reserved Worldwide
Page 68 of 84
Preliminary
Then you can:
Press 1 to Modify Contact Information*
Press 2 to Go to the Next Selected Contact
Press 3 to Go to the Previous Selected Contact
Press 4 to Call the Contact
Press 5 to Text the Contact
Press 6 to Assign a Speed Dial Number
Press 7 to Delete the Contact
Press 8 to Accept Voice Tag as Recorded by Text-to-Speech
Press 9 to List other Contacts with the Same Phone Number
Press # to Display Contact's Name/Number on Caller ID Screen
* When modifying contact information, the options are:
Press 1 to Change the Voice Tag
Press 2 to Set the Person Normally Called
Press 3 to Set the Contact Type
(Normal Contact, Super Contact, Work Contact, Blocked Contact)
Press 4 to Set the Extension for the Contact
Press 5 to Set the Phone Number Type (Home, Mobile, etc.)
Press 6 to Allow or Disallow Urgent Calls from this Contact
Press 7 to Set the Preferred Outside Line(s) for this Contact
Press 8 to Enable or Disable Dial-By-Name for this Phone Number
Press 9 for More Options
Press 1 to Edit the Phone Number
Press 2 to Edit the Name
Press 3 to Rotate the Name Parts to the Left within the Name
Press # to Display New Contact Info on Caller ID Screen
Press # to Display New Contact's Name/Number on Caller ID Screen
Press 3 4 to Hear Speed Dial Assignments
Press 1 through 9 to Hear Speed Dial Assignments
Press 3 5 to Remove a Speed Dial Assignment
Press 1 through 9 to Remove speed dial assignments
Press 3 6 to Import Contacts / Continue from Mobile 1
Press and hold 6 for at least one second to start over.
Press 3 7 to Import Contacts / Continue from Mobile 2
Press and hold 7 for at least one second to start over.
Copyright 2013-2015, nVideon, Inc. Atlanta, GA All Rights Reserved Worldwide
Page 69 of 84
Preliminary
Press 3 8 to Add/Change/Accept Voice Tags
Tel-Lynx will select all contacts that have a Text-to-Speech generated voice tag or
no voice tag. You will then be able to add, accept, or change the voice tag as
appropriate.
Press 1 to Add/Modify Contact Information
Press 2 to Go to the Next Selected Contact
Press 3 to Go to the Previous Selected Contact
Press 4 to Call the Contact
Press 5 to Text the Contact
Press 6 to Assign a Speed Dial Number
Press 7 to Delete the Contact
Press 8 to Accept Voice Tag as recorded from Text-to-Speech
Press 9 to List other Contacts with the Same Phone Number
Press # to Display Contact's Name/Number on Caller ID Screen
Press 4 to Call a Tel-Lynx User
Select your own user number.
Select the user number of the user you want to call.
Press 5 to Hear Last Phone Number/Change Toll Status
After you hear the last connected number you can:
Press 5 1 to Call the Number
Press 5 2 to Add the Number to Phone Book
Press 5 3 to Change Toll Call Status for the Number
Press 5 4 to Compose Text to the Number
Press 6 to Specify an Outside Line
When you place a call, Tel-Lynx selects an outside line based on a call list that you
have set up. If you want to specify a line other than the one on your call list,
choose from the following:
Press 6 1 to Select Line 1, Landline
Press 6 2 to Select Line 2, Skype™
Press 6 3 to Select Line 3, Mobile Phone 1
Press 6 4 to Select Line 4, Mobile Phone 2
After you have selected one of the four lines, you’ll hear, “(Name of line) selected”
and then a stutter dial tone. If you choose a line that is busy or not available, you’ll
hear, “(Busy line) is busy; returning to default calling sequence.” After you hang up,
Tel-Lynx will return to using the default outside line.
Copyright 2013-2015, nVideon, Inc. Atlanta, GA All Rights Reserved Worldwide
Page 70 of 84
Preliminary
Note: At the dial tone you can specify an outside line by pressing #, then the
line number. For example # 1 selects outside line 1.
Press 7 to Set up Tel-Lynx
The set up menu requires you to enter the secret code. The factory default is
1234. If you forget the secret code, you can reset it with a program on the PC
called ResetPassword.exe.
Press 1 to Set Answer Mode and Call Out Mode
Press 2 to Set Do-Not-Disturb Schedules
Press 3 to Set up Users and Voice Mail
Press 4 to Set up Outside Lines and Greeting
Press 5 to Set up Calling Tables
Press 6 to Set Secret Code
Press 7 to Reset the Phone Book
Press 8 to Set up Number Plan Data
Press 9 to Set Date, Time, and Temperature Preference
Press 1 to Set the Answer Mode and Outbound Call Options
Press 1 to Select Ring-through mode
Press 2 to Select Personal Assistant mode I
Press 3 to Select Personal Assistant mode II
Press 4 to Select Personal Assistant mode III
Press 5 to Enable Auto Create Contact for outgoing calls
Press 6 to Disable Auto Create Contact for outgoing calls
Press 7 to Setup Ring Pattern Detection for Landline 1
Press 8 to Setup Ring Pattern Detection for Landline 2 (TLC Plus)
Press 9 for More options
Press 1 to Enable/Disable Announcement of outbound call info23
Press 2 to Allow/Disallow New Call List in Dial-By-Name
Press 3 to Enable/Disable Expanded Search in Dial-By-Name
Press 4 to Enable/Disable Alert Ring at end of Do-Not-Disturb
Press 5 to Enable/Disable Unknown Caller ID Rejection
Press 7 to Enable/Disable Announcing callers in the phone book
Press 8 to Enable/Disable Announcing digits while dialing
Press 2 to Set Do-Not-Disturb Schedules for Incoming Calls
Press 1 to Set Times for Schedule 1
Press 2 to Set Times for Schedule 2
Press 3 to Set Days for Schedule 1
To set days for schedule 1, choose days from this list:
1=Sunday, 2= Monday, 3=Tuesday, 4=Wednesday, 5=Thursday,
6=Friday, 7=Saturday
23
TLC does not wait for the outbound call announcement to finish before placing the call. Therefore,
disabling it saves no time in dialing.
Copyright 2013-2015, nVideon, Inc. Atlanta, GA All Rights Reserved Worldwide
Page 71 of 84
Preliminary
Press the numbers one after the other, and then press #. The
days you have not set for schedule 1 will be used for schedule 2. If no
days are left, schedule 2 will not be used.
Press 3 to Set up Users and Voice Mail
Press 1 to Set up a User
Select User, then:
Press 1 to Select User's Ring Pattern
Press 2 to Select User's Ring Mode
Press 3 to Select Outside Lines for this User
Press 4 to Enable Call Waiting for this User
Press 5 to Disable Call Waiting for this User
Press 6 to Record User's Name
Press 7 to Edit the User's Name
Press 8 to Edit the User's Password
Press 2 to Disable a User and Delete their Messages
Press 3 to Set Number of Rings before Going to Voice Mail
Press 4 to Set up the Outside Lines
Press 1 to Setup Outside Line 1 (Landline)
Press 2 to Setup Outside Line 2 (Skype™)
Press 3 to Setup Outside Line 3 (Mobile Phone 1)
Press 4 to Setup Outside Line 4 (Mobile Phone 2)
Submenu for Managing Outside Lines:
Press 1 to Hear and Change Greeting
Press 2 to Enable/Disable Skip Greeting Known Callers
Press 3 to Enable/Disable SIT for Unknown Callers
Press 4 to Enable/Disable Call Waiting
Press 9 to Enable/Disable Ring-through mode for current line
The following applies to Skype:
Press 6 to Enable/Disbale Waiting Call Rejection
Press 8 to Re-record the Name of the Outside Line
The following applies to Landlines:
Press 5 to Enable/Disable *70 to Disable Call Waiting
Press 6 to Enable/Disable Waiting Call Rejection
Press 7 to Set Dialing Mode
Press 1 to Dial Landline using Normal Dialing Rules
Press 2 to Dial Landline using 10 Digits (Area Code first)
Press 3 to Dial Landline using 11 Digits (1 first)
Press 4 to Dial Landline using Pulse Dialing
Press 5 to Dial Landline using DTMF (touch-tone) Dialing
Press 6 to Set up 3-Way Calling
Press 1 to Disable 3-Way Calling
Copyright 2013-2015, nVideon, Inc. Atlanta, GA All Rights Reserved Worldwide
Page 72 of 84
Preliminary
Press 2 to Enable 3-Way Calling w/ Flash Before Dialing
Press 3 to Enable 3-Way Calling w/ Flash After Dialing
Press 4 to Enable 3-Way Calling w/ Flash Before Dialing
and Double Flash to Join 3-Way Calls (for Ooma®)
Press 7 to Enable Waiting for Dial Tone
Press 8 to Disable Waiting for Dial Tone
Press 8 to Re-record the Name of the Outside Line
The following applies to Mobile Phones (TLC and TLC Plus only):
Press 5 to Enable/Disable *70 to Disable Call Waiting
Press 6 to Set Mobile Phone Options
Press 1 to Setup Automatic Call Forwarding
Press 1 to Forward All Callers
Press 2 to Forward All Except New Callers
Press 3 to Forward Super and Normal Contacts
Press 4 to Forward Super Contacts
Press 5 to Forward only Specified Contacts
Press 6 to Enable Instant Forwarding
Press 7 to Disable Instant Forwarding
Press 2 to Set # of Rings before TLC answers mobile
Press 3 to Enable/Disable Waiting Call Rejection
Press 4 to Enable/Disable Audio Request Rejection
Press 5 to Enable/Disable Network Defaults
Press 6 to Enable/Disable Waiting Call Merging
Press 7 to Enable/Disable 3-Way Call Switching
Press 8 to Hear Mobile Phone's Bluetooth® Capabilities
Press 9 to Re-record Mobile Phone's Name
Press 7 to Pair/Stop/Unpair Mobile Phone
Press 8 to Enable/Disable Connection to Mobile Phone
Press 5 to Set up the Calling Tables
Enter the table for the type of call:
Press 1 for Local
Press 2 for Toll-Free
Press 3 for Toll
Press 4 for International
Press 5 for Premium
Press 6 for Emergency
Enter the outside line(s) in preferred order:
1=landline
2=second landline24/Skype
3=Mobile Phone 1
24
The second landline is only available on TLC Plus & Guardian Plus.
Copyright 2013-2015, nVideon, Inc. Atlanta, GA All Rights Reserved Worldwide
Page 73 of 84
Preliminary
4=Mobile Phone 2
and then press #. If you press # and enter no outside lines, the
calling table will be empty, and calls of that type cannot be placed.
Press 6 to Set the Secret Code
Enter a four digit numeric code.
Press 7 to Clear Contacts from the Tel-Lynx Phone Book
Press and hold 1 to Clear All Contacts Imported from Mobile Phone 1
Press and hold 2 to Clear All Contacts Imported from Mobile Phone 2
Press and hold 3 to Clear the New Call List
Press and hold 4 to Clear the Entire Tel-Lynx Phone Book
Press 8 to Set up the Dialing Plan Data
Press 1 to Set the Dialing Plan and Enable Smart Dialing
Press 2 to Hear the Dialing Plan Settings
Press 3 to Manage the Area Code(s) that can be called locally
Press 1 to Hear the Current Local Area Code List
Press 2 to Add a Local Area Code
Enter the 3-digit area code to add. All prefixes (NXX codes) will
be set to local call status.
Press 3 to Remove a Local Area Code
Enter the 3-digit area code to remove
Press 4 to Set the Toll Status for an Area Code and Prefix
Enter the six digit area code and prefix. If the prefix is '000', all
prefixes (NXX codes) within the specified area code will be set to
toll call status. If the prefix is '001', all prefixes within the specified
area code will be set to local call status.
Press 4 to Set the Dialing Time Out
Enter the dialing time out in seconds followed by #. When
dialing internationally and when dialing an internal PBX extension, if
a caller has not dialed a digit for the specified timeout, Tel-Lynx will
place the call with the number entered.
Press 5 to Set the PBX Mode of Operation
Press 1 for No PBX
Press 3 for PBX with 3-digit extensions
Press 4 for PBX with 4-digit extensions
Press 5 for PBX with 5-digit extensions
Press 6 for PBX with 6-digit extensions
Press 6 to Enable/Disable Smart Dialing (Guardian Only)
Copyright 2013-2015, nVideon, Inc. Atlanta, GA All Rights Reserved Worldwide
Page 74 of 84
Preliminary
Press 9 to Set the Date, Time, and Temperature Preference
Press 1 to Set the Date and Time
Press 1 to Enable Automatic Daylight Saving Time
Press 2 to Disable Automatic Daylight Saving Time
Then enter the date and time as prompted by Tel-Lynx. You may enter
# for the year, month, and day to keep the current setting.
Press 2 for Degrees Celsius
Press 3 for Degrees Fahrenheit
Note: To set temperature preference, an optional temperature sensor is
required.
Press 8 to Leave a Voice Message for a User
You will be asked which user will leave the message, then to select a mailbox
(user) for the message, and then you will be asked to leave your message.
Press 9 to Hear the Temperature, Time, Date, and Outside
Line Status
You can also hear this information by pressing # 9 at the dial tone.
Note: To hear the temperature, an optional temperature sensor is required.
On a Call Menu
To use the On a Call Menu while you are on a call, flash the switch hook. The On
a Call Menu is only available when Smart Dialing is enabled. This places the call
on exclusive25 hold.
Press 0 to Go Back to Current Call
Press 1 to Answer Pending Call / Switch to Waiting Call
Press 2 to Send Pending Mobile Call to Mobile Voice Mail
Press 3 to End the Current Call and Connect to Pending/Waiting Call
Press 4 to Place a New Call
Press 5 to Conference Current Call and Waiting Call
Press 6 to Place the Current Call on Inclusive Hold26
Press 8 to Transfer the Audio from telephone to Mobile Phone or PC
Press 9 to More Options (see below)
Press # to Dial Contact's Extension or, if no Extension, enter Phone Tree Mode
25
26
An exclusive hold allows only the inside line that placed the call on hold to go back to that call.
Inclusive hold allows any line on the system to pick up the call.
Copyright 2013-2015, nVideon, Inc. Atlanta, GA All Rights Reserved Worldwide
Page 75 of 84
Preliminary
Note: A pending call is a second incoming call that has never been answered. A
waiting call is a call that has been answered and switched to waiting while you
talk with the other caller.
More Options:
Press 1 to Set the Timer
Press 2 to Start Recording a Call and Go Back to Current Call
Press 3 to Stop Recording a Call and Go Back to Current Call
Press 4 to Manage the Phone Book
Press 0 to Go Back to the Main On a Call Menu
While on a Call with a Rotary Dial Telephone
Rotary Dialing: While on a call using a rotary dial telephone, flashing the switch
hook will present a different menu with more options, including going to the On a
Call Menu described above.
Dial 0 to Go Back to Current Call
Dial 1 to Send *, then Go Back to the Current Call
Dial 2 to Send #, then Go Back to the Current Call
Dial 3 to Enter the On a Call Menu.
Announcement Menu
In Personal Assistant modes, when you answer a call from a new caller (someone
who is not in your Tel-Lynx phone book), your Tel-Lynx Personal Assistant will
announce the new caller, the name of the person being called, and the line the call
is coming in on. While you are in the Announcement Menu, the caller will hear a
ringing signal. They will not go to voice mail unless you hang up or select the voice
mail option (2). If the caller hangs up, Tel-Lynx will tell you the call was
disconnected and provide a dial tone.
Note: When you answer a call from a contact who is in your Tel-Lynx phone
book, by default you will be immediately connected to the caller. However, you
can set Tel-Lynx to announce callers who are in your phone book as well.
After the announcement, you will be presented with the following menu:
Press 1 to Connect to Caller (can be used while listening in)
Press 2 to Send Call to Voice Mail and Listen In
Press 3 to Get Reason for the Call (only for new callers)
Press 4 to Get Tel-Lynx to Forget Caller's Number, Tell Caller to Remove your
Number from their Calling List, then Hang Up the Call (only for new callers)
Press 5 to Block Phone Number and Hang Up the Call (only for new callers)
Press 6 to Re-ring Telephones (so someone else can answer)
Copyright 2013-2015, nVideon, Inc. Atlanta, GA All Rights Reserved Worldwide
Page 76 of 84
Preliminary
Note: If you hang up while in the Announcement Menu, the call will be sent to
voice mail or forwarded as appropriate. If you hang up while listening in, the
caller will continue to leave their message. If you hang up and change your mind
and want to listen in, you can take the telephone off-hook and Tel-Lynx will
instruct you how to reconnect to the caller. If you press 1 while listening in,
you will be connected to the caller.
See Answering in Personal Assistant Modes for more information.
Call-In Menu
A caller’s first introduction to Tel-Lynx is the Call-In Menu. The Call-In Menu is only
presented to callers when Tel-Lynx is in Personal Assistant Mode.
First Time Caller
A first time, new caller (someone not in Tel-Lynx's new call list or phone book) will
first hear your personal greeting. For example, “You have reached Jane and John
Roberts.” Then, Tel-Lynx says, “You will be connected in a moment. First I need to
collect some information so that I may announce your call." Tel-Lynx will then ask
the caller to press a specific key to continue. The caller must press the requested
key in order to move forward; otherwise, Tel- Lynx will hang up. (This prevents
automated calls from getting through.)
The caller will then be asked to record their name. After they record and accept
their recorded name, Tel-Lynx says, “If you are calling from a home number press
4, mobile number press 6, work number press 9, etc.” After the caller has pressed
a key for phone type, Tel-Lynx adds the caller's information to its new call list and
they will not be asked this information in the future. Tel-Lynx then asks the caller to
choose the user they wish to speak with if they are calling in on an outside line
that's answered by more than one Tel-Lynx user. Tel- Lynx then says, “Please
hold while I connect you to (person being called)” and rings your telephones. The
caller hears a ringing sound while Tel-Lynx rings your telephones. When you
answer, you will be connected to the caller or Tel-Lynx will announce the caller as
appropriate (See AnnounceCallers and Answering a call).
Callers in New Call List or in Tel-Lynx Phone Book
A caller who is in the new call list or in Tel-Lynx’s phone book will hear your
personal greeting only if enabled (factory default is disabled). If the caller is calling
on an outside line that's answered by more than one Tel-Lynx user, Tel- Lynx then
asks the caller to choose the user they wish to speak with. Tel- Lynx then says,
“Please hold while I connect you to (person being called)” and rings your
telephones. The caller hears a ringing sound while Tel-Lynx rings your telephones.
When you answer, you will be connected to the caller or Tel- Lynx will announce
the caller as appropriate (See AnnounceCallers and Answering a call).
Copyright 2013-2015, nVideon, Inc. Atlanta, GA All Rights Reserved Worldwide
Page 77 of 84
Preliminary
Remote Access
While away from home, you can retrieve your messages and change a limited
number of Tel-Lynx's settings. When you call in and hear Tel-Lynx start to speak,
press #. Tel-Lynx will ask for the secret code and then the following menu of
options will be presented.
2 Listen to Voice Mail (only if voice mail is present)
4 Setup Outside Lines and Greetings
9 Hear the Date, Time, and Line Status
Using Tel-Lynx with a PC, Laptop, or
Tablet
<Intentional blank for now>
Warranty
All Tel-Lynx products purchased on the www.tel-lynx.com website or other
authorized website are covered by a one-year limited warranty. The limited
warranty period commences on the original purchase date and covers material
and production defects for the duration of the limited warranty period.
This limited warranty does not cover failure or problems relating to:
Improper or incorrect installation of the product;
Modification of the product in any way, including attempts to repair the
product without nVideon’s prior written authorization;
Failure to follow safety and care instructions as outlined in the Tel-Lynx
User’s Guide;
Defects and damage resulting from improper treatment or product
misuse;
Use in conjunction with a third-party product or products not approved in
writing by nVideon; or
Damage by lightning, water, or power surges.
nVideon, Inc.’s sole liability under this limited warranty shall be to replace
or repair the product covered by this limited warranty. A warranty
replacement does not extend or renew the warranty period.
Should your Tel-Lynx product be defective or fail under the terms of this limited
warranty, you should return the product to nVideon, Inc., along with your
original receipt of purchase for replacement or repair.
Copyright 2013-2015, nVideon, Inc. Atlanta, GA All Rights Reserved Worldwide
Page 78 of 84
Preliminary
All warranty claims must be processed by requesting a Return
Merchandise Authorization (RMA) code through our Support page. We
cannot accept warranty returns without an RMA.
Miscellaneous Information
North American Number Plan Information
Tel-Lynx has been optimized to work within the North American Number Plan
(NANP), which includes 24 countries and territories: the United States and its
territories, Canada, Bermuda, and sixteen Caribbean countries.
NANP phone numbers are eleven digits long. The first digit is always a 1, which
corresponds to the country code. Next is a three-digit area code, followed by a
three-digit prefix (or central office) code, followed by a four-digit subscriber
number. The area code is more formally known as the number plan area (NPA).
The central office code is known as an NXX code. The subscriber number
identifies an individual phone line connected to the central office.
1
Country
Code
-
NPA
Area
Code
-
NXX
Prefix
-
XXXX
Subscriber
Number
For a given area, a phone number can be one of four types: local, toll (long
distance), toll-free, and premium. A local call is often dialed using either the last
seven or the last ten digits of the NANP number. A toll call normally requires all
eleven digits. Toll-free numbers are 1-800-NXX-XXXX (also 888, 877, etc).
Premium numbers are 1-900-NXX-XXXX, NPA-976-XXXX, or 976-XXXX.
The dialing requirements for local and toll calls may be different for different areas.
Toll calls normally require eleven digits, including the 1 (country code). Some
areas require ten-digit local dialing, and do not allow the 1 for local calls; some
require seven-digit dialing for local calls; others permit all eleven digits for local
calls. When you set up TLC or TLC Plus , you will select the dialing rules for your
area and Smart Dialing will be used. The Guardian uses direct dialing mode after
its initial setup. In direct dialing mode you are connected directly to your landline
phone servce as soon as you pick up the telephone. If you want to use the
advanced dialing features of the Guardian, like Dial-By-Name, you must enable
Smart Dialing by setting up a dialing plan.
When Smart Dialing is enabled, Tel-Lynx uses a set of dialing rules and local prefix
tables to determine how to dial a given number on a given outside line. These
tables must be set up correctly in order for Tel-Lynx to work correctly when dialing
out. Tel-Lynx is factory programmed with the dialing rules and local prefix tables for
all parts of the North American Dialing Plan. When you initially set up TLC or TLC
Copyright 2013-2015, nVideon, Inc. Atlanta, GA All Rights Reserved Worldwide
Page 79 of 84
Preliminary
Plus, you will select the dialing rules and local prefix tables for your area based on
the home area code (NPA) and prefix (NXX) of your home telephone number, or if
you don't have a home number, one of your mobile phone numbers. You can
enable Smart Dialing on the Guardian by setting up the dialing plan after you have
completed the Guardian's setup.
Remember that when in Smart Dialing mode, the way you dial a number on your
telephone is not necessarily the way Tel-Lynx will dial that number on your outside
line. Tel-Lynx can be set up to always dial 10 digits, to always dial 11 digits, or to
dial out using the dialing rules and local prefix tables, on an outside line-by-outside
line basis.
Mobile phones typically allow callers to dial all 11 digits regardless of the toll status
of the called number. In addition, many VoIP providers (Ooma ®, magicJack,
Vonage®, etc.), as well as wireless home providers (Straight Talk ® Home, Net10,
Verizon, etc.) require that callers always dial 10 digits. AT&T's Wireless Home
service allows 11-digit dialing for all numbers, and that is the safest way to dial on
their system.
Tel-Lynx should be setup to always dial with either 10 or 11 digits (as appropriate)
when placing a call with the above mentioned services. In this case, Tel-Lynx
does not need to know which calls are "local" and which calls are "toll". You can
set up the dialing plan so that you can dial numbers like you always have.
If you have phone service from a traditional wire line company like AT&T or many
cable company phone services, they may require strict adherence to the local
dialing rules. For instance, Atlanta has seven area codes with local dialing prefixes
(404, 770, 678, 470, 256, 706, and 702). Currently there are no toll prefixes in 404,
770, 678, and 470, but there are in 256, 706, and 702.
If you have local phone service in Atlanta (or any other area that does not allow 11digit dialing for all calls), you should set up Tel-Lynx to use the local dialing plan
when making a call. The dialing rules and prefix tables can change over time, so
you may need to adjust these rules with newer information for your local calling
area. The PC and Smart Phone apps can be used to obtain the latest dialing rules
and local prefix tables. You can also adjust these tables manually.
See the setup guide for specific information on how to setup Tel-Lynx.
Skype™ Numbers
With Skype™, you can call other people using their Skype ™ Name or you can call
regular phone numbers. The Skype ™ Name is an alphanumeric string (starting
with a non-numeric character) and cannot be dialed directly using a home
telephone. Therefore, Tel-Lynx assigns Skype™ Numbers to Skype™ Names.
Skype™ Numbers look like regular phone numbers and always start with 1-000000, thus allowing up to 10,000 Skype ™ Names to be assigned a unique phone
number that can be dialed directly on your telephone.
Copyright 2013-2015, nVideon, Inc. Atlanta, GA All Rights Reserved Worldwide
Page 80 of 84
Preliminary
This allows you to add Skype™ contacts to the Tel-Lynx phone book and use
Dial-By-Name, redial, call back, or even speed dialing from your home telephone
as you would for a regular phone number.
Note: Tel-Lynx will only use the Skype-to- Skype ™ VoIP network to call a
Skype™ Number.
When new Skype™ contacts call in and you add them to your Skype ™ contact list,
Tel-Lynx software will assign them ascending Skype ™ phone numbers. Skype™
contacts in the Tel-Lynx phone book have the same attributes as a normal
contact, but Skype™ is the only outside line that will be used to call them.
Note: Making calls with Skype ™ requires Tel-Lynx to be attached to a computer
running the Skype ™ application.
Copyright 2013-2015, nVideon, Inc. Atlanta, GA All Rights Reserved Worldwide
Page 81 of 84
Preliminary
FCC Information
This equipment complies with Part 68 of the FCC rules and the requirements
adopted by the ACTA. On the underside of this equipment is a label that contains,
among other information, a product identifier in the format US:AAAEQ##TXXXX.
On the bottom of this equipment is a label that contains an FCC Part 68
registration number in the format:
US:SWQHN00BTLC001
and a ringer equivalence in the format:
REN: 0.01B
If requested, these numbers must be provided to the telephone company.
Plug and Jack: The plug and jack used to connect this equipment to premise
wiring and telephone network must comply with the applicable FCC Part 68
rules and requirements adopted by ACTA. A compliant telephone cord and
modular plug is provided with this product. The telephone cord is designed to
be connected to a compatible modular jack that is also compliant. See
installation instructions for details.
Ringer Equivalency Number (REN): The REN is used to determine the number
of devices that may be connected to a telephone line. Excessive RENs on a
telephone line may result in the devices not ringing in response to an incoming
call. In most but not all areas, the sum of the RENs should not exceed five
(5.0). To be certain of the number of devices that may be connected to a line,
as determined by the total RENs, contact the local telephone company. The
REN for the equipment is part of the ACTA/FCC number that has the format
US:AAAEQ##TXXXX. The digits represented by the ## are the REN without
the decimal point (e.g., 01 is a REN of 0.1) and are followed by the Ringer
Class (A or B).
Harm to the Network: If this equipment causes harm to the telephone network,
the telephone company will notify you in advance that the temporary
discontinuance of service may be required. But if advance notice isn’t practical,
the telephone company will notify the customer as soon as possible. Also, you
will be advised of your right to file a complaint with the FCC if you believe it is
necessary.
Notification of Changes in Telephone Company Equipment: The telephone
company may make changes in its facilities, equipment, operations or
procedures that could affect the operation of the equipment. If this happens,
the telephone company will provide advance notice in order for you to make
necessary modifications to maintain uninterrupted service.
Repairs or Returns: If trouble is experienced with this equipment, for repairs
or warranty information, contact the factory service center or other authorized
servicer. If the equipment is causing harm to the telephone network, the
telephone company may request that you disconnect the equipment until the
problem is resolved. Repairs should be made only by a qualified factory
Copyright 2013-2015, nVideon, Inc. Atlanta, GA All Rights Reserved Worldwide
Page 82 of 84
Preliminary
representative.
Party Lines: This equipment must not be used on party lines.
Alarm Equipment: You should ensure that this equipment does not disable
alarm equipment in installations where the alarm equipment utilizes the same
telephone network connection as this equipment. If you have questions about
what will disable the alarm equipment, consult your telephone company or a
qualified installer.
Electrical Safety Advisory: Telephone companies report that electrical
surges, typically lightening transients, are very destructive to customer terminal
equipment connected to AC power sources. This has been identified as a
major nationwide problem. A commercially available, power surge arrestor is
recommended for use with this equipment to minimize damage in the event of
an electrical surge.
Note: This device complies with Part 15 of the FCC rules. Operation is subject to
the following two conditions. (1) this device may not cause harmful interference,
and (2) this device must accept any interference received, including interference
that may cause undesired operation.
Note: Use only the power supply delivered with the equipment.
Caution: Any changes or modifications not expressly approved by the party
responsible for compliance could void the user's authority to operate this device.
Note: This equipment has been tested and found to comply with the limits for a
Class B digital device, pursuant to part 15 of the FCC Rules. These limits are
designed to provide reasonable protection against harmful interference in a
residential installation. This equipment generates, uses and can radiate radio
frequency energy and, if not installed and used in accordance with the instructions,
may cause harmful interference to radio communications. However, there is no
guarantee that interference will not occur in a particular installation. If this
equipment does cause harmful interference to radio or television reception, which
can be determined by turning the equipment off and on, the user is encouraged to
try to correct the interference by one or more of the following measures:
—Reorient or relocate the receiving antenna.
—Increase the separation between the equipment and receiver.
—Connect the equipment into an outlet on a circuit different from that to which the
receiver is connected.
—Consult the dealer or an experienced radio/TV technician for help.
Notice: FCC ID can be found on the label on the bottom of the unit.
Copyright 2013-2015, nVideon, Inc. Atlanta, GA All Rights Reserved Worldwide
Page 83 of 84
Preliminary
Notes -----------------------------------------------------------------------------------------Local Calling Area Data Bases
Comcast - www.comcast.com/callingarea
AT&T - www.usa.att.com/localcallingarea
http://www.localcallingguide.com
Dialing plan data base
http://nanpa.com/enas/npaDialingPlansReport.do
http://www.localcallingguide.com
Skype Issues:
https://support.skype.com/en/support_selection_after_search
Copyright 2013-2015, nVideon, Inc. Atlanta, GA All Rights Reserved Worldwide
Page 84 of 84