1
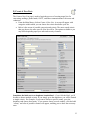
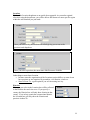
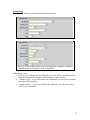
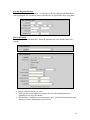
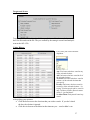
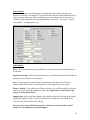
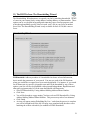
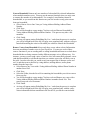
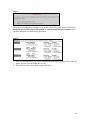
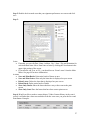
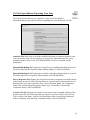
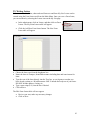
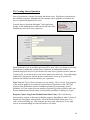
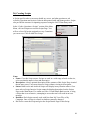
LABOR ACTION NETWORK USER MANUAL MY VOTERS Table of Contents Getting Started 1) About The Labor Action Network 2) Security and Access 3) Your Password and PIN Number 4) The Main Menu 5) Folders 6) Quick Look Up 3 3 4 5 7 8 Analyze Data 7) View Canvass Results 8) Counts and Crosstabs 10 12 Create a List & My List 9) Create a New List 10) My List: What To Do With It 11) The Householding Wizard 13 19 21 Produce Canvassing Materials 12) The Print Icon: Print a Call List 13) The Labels Icon: Print Mailing Labels 14) The Letters Icon: Printing Form Letters 15) The Export Icon: Exporting Your List 16) The Cut Turf Icon: Printing Turf Packets 23 25 26 29 30 Load Data 17) Loading Data Back Into the LAN 18) Input Type and Contact Type 19) Scan Barcodes 20) Script View 21) Grid View 22) Once the Data Is In 36 37 38 38 41 42 Administrative Functions 23) Writing Letters 24) Creating Activist Codes 25) Creating Survey Questions 26) Creating Scripts 27) Creating Report Formats 28) Creating Label Formats 43 44 46 48 51 53 2 1) About The Labor Action Network: What is it?: The Labor Action Network (LAN) is an online information management tool, which is used to manage the AFL-CIO and affiliated unions’ voter contact program. This user-friendly web platform allows field organizers to develop canvassing materials of union member voters and manage their labor activists. The LAN has solved the most difficult data challenges facing organizers - moving large numbers of IDs daily from the door or phone into a central database, and making that information available when it is needed in the form it is needed. In turn, this helps the AFL-CIO and its affiliated unions to organize at the grassroots level and win Labor-endorsed political campaigns. My Voter vs. My Campaign: There are two different sides to the LAN. This user manual is about My Voters. My Voters is used to analyze voters and create canvassing material. My Campaign is the labor activist database, which allows users to search, edit, and add local union contact information, volunteers, worksite information, and track activities of local unions during grassroots campaigns. You may have access to My Voters, My Campaign, or both databases. If you have access to both, you can switch between the two databases by clicking the tabs, which are illustrated above. 2) Security & Access: Security: The LAN is a secure website which uses the latest in encryption software to protect data stored on the system. All information on union membership is stored in individual data silos by both union (international and local) and by geographic area (state). All data is fire-walled between unions. In addition, information on approved users is encrypted and each user is required to change their password every 30 days. For additional protection, the log-in process is protected with the same features commonly used in ATM bank machines. If either the user name or password is entered incorrectly more than twice, the user will be locked out of the system, only to be readmitted by the national LAN administrator. Access: User access to the LAN is determined either by an international union leader for affiliates and staff or by the staff in the AFL-CIO Political Dept. Each approved user has a unique user name and password. Please do not, under any circumstances, share your user name and password. Sharing this information undermines the system’s security and your union’s ability to track user activities. In addition, simultaneous log-ins on a single user name can confuse the system, creating havoc in the “save” function and jeopardizing your work product. 3 3) Your Password and PIN Number: Once a LAN administrator creates your account, you will receive an email from [email protected] with a link to set up your password. If you do not set up your password within 48 hours, your account will be locked and you will have to contact your LAN administrator to have your account unlocked. Password Setup: When you click the link in the email, you will be prompted to set up a password. Every 30 days, you will have to change your password. Password Requirements: must have at least 8 characters must have at least 1 letter must have at least 1 non-letter character cannot be easily guessed PIN Setup: After you set up your password, you will be asked to select a four digit PIN number. Enter the letters that correspond to each digit on the keypad. You will need to remember this numeric PIN for future log-ins. You do not need to remember which letters you typed. Every time you log into the LAN, the letters that correspond to each digit will change. You will be prompted to enter the letters that correspond to your numeric PIN. Do not type the numbers themselves. Unlike your password, your PIN can be permanent and will NOT be subjected to changes every 30 days. If you want to change your PIN, click on ‘Change PIN’ option on the LAN’S main menu. 4 4) Main Menu: After logging on, the Main Menu will appear. This is the starting point for anything you want to do on the LAN. The actual contents of your Main Menu will depend upon your level of security clearance. The middle and right-hand columns contain different LAN functions. Quick Look Up (pg. 8): Search for a specific voter using contact information like name, address and email. Create A List Create a List (pg. 13): Create a list of voters, based on union membership information, geography, demographics, voting history, and previous Survey Results or any other kind of voter data stored in the My Voter file. Go to My List (pg. 19): Your current list of voters, from the Create a List tool, or a Saved List or Search. You can do things like save your list to a Folder, cut turf or print a report. View My Folders (pg. 7): Access your Saved Lists and Saved Searches. Analyze Data View Canvas Results (pg. 10): View cumulative results from Canvass activities such as phone banks or canvass data, which has been entered into the My Voter File. 5 Run Counts and Crosstabs (pg. 12): Access powerful tools to compare multiple data fields stored in the system. This is where you should go to analyze union member density in different precincts, counties, state house districts, etc. Load Data: Enter data about voters back into the system. Scan Bar Codes (pg. 40): Enter data from a printed report using hand held barcode scanners Script View (pg. 42): Users can view an interactive script that allows them to enter data on screen while they are making phone calls. Users view information as one voter per page. Grid View (pg. 43): Create an on-screen version of a printed Report for easy data entry. Run Bulk Uploads (pg. 45): The Bulk Uploads tool is for adding large amounts of data back into the site after a list of voters from the My Voter File has been exported and appended. Welcome Menu: In the upper left on the Main Menu is a blue area with tools that allow you to keep track of your own account. Switch States: Immediately below the welcome message is the name of your current Committee. If you have access to multiple committees and/or states, this will appear as a blue link which allows you to switch your current committee. My Requests: If your product goes through the approval process, you can download it here. My Export Files: Download your export files in Excel or .txt format here Support Requests: Review support tickets, which you can submit by using the ‘Contact the Admin’ link below. Contact the Admin: Write questions and support requests to the LAN administrator. For a quicker response, please email [email protected]. Admin Menu: Below the welcome menu is a white section containing options to manage the tools, Users and data in the system. My Profile: Edit your contact details. Change Password (pg. 4): Change your account password. Change PIN (pg. 4): You can reset your PIN here. Reports • Labels (pg. 57, 59): Create and manage report formats and label formats. Letters (pg. 49): Create and manage letters that can be sent to a group of voters. Codes • Questions • Scripts (pg. 50, 52, 54): Create and manage Activist Codes, Survey Questions and Scripts. Monitor the System (pg. 60): Review LAN user activity using the tools under this heading. There is also a small icon in the upper right-hand corner of the screen, which takes you to a help section. , 6 5) Folders Folders are used to store Saved Lists and Saved Searches, including map regions and turfs created in Turf cutter. Folders and their contents can be shared between users on the same Committee or across Committees. Creating Folders To create a folder, from the My Folders page, click ‘Add New Folder’ in the top right corner of the page. In addition to a name, it’s a good idea to make liberal use of the description box as list and search names can begin to all look alike after dozens are created! Users also have the option of creating new Folders when saving a Saved List, Saved Search, or mapping turf. On the Edit Folders page, users will notice a checkbox to ‘Allow other users to save into this folder’. Checking that box will give any user listed in the ‘users with access’ box on this page the ability to put his or her lists and searches (including turfs) into this folder. It is, however, still the case that only the owner – that is, the person who created the folder – has the ability to grant access to a folder or delete or rename that folder. Sharing Folders After creating a Folder, users who have the ability to share folders will see an 'Assign Users' page section with a Committee dropdown box and the familiar assign/unassign boxes to give other users access. To navigate back to the Edit Folders page where other users can be granted access to a Folder, click on the name of the Folder on the My Folders page and, on the next page, click the 'Edit Folder' button in the top right corner. Only the user who created the folder has the ability to share it. To do so, that user must have the security function 'Basic: Share Folders'. 7 Adding lists and searches to Folders From the My List page, click on the Save icon and choose whether to save it as a Saved List (Fixed set of people) or a Dynamic Search (Dynamic set of search criteria). Then select which Folder you want to save the search in from the dropdown menu. You can also create a new Folder by clicking on the New Folder check box and entering the name of the Folder you want to create. Once you have created a name and a description for the search, click on the Save button to add your new list or search to the Folder. Deleting Folders Navigate to the Edit Folder page (from the My Folders page, click on the name of a Folder and on the next page, click Edit Folder) then click Delete. Any user who has been given access to a Folder can delete it so that it no longer appears on his or her Folders list. But this Folder will still appear for the creator and any other user who has been granted access to the Folder. Only the creator of a Folder can actually delete that folder; doing so erases all access to it by any user. Moreover, any list, search, or turf still in that Folder will also be deleted. Users should take great caution before deleting a Folder that no list or search in a Folder is used in a Target or some other Saved Search. Print All Lists in a Folder Print All Lists allows users to automatically load the consecutive lists (including turfs) in their folder and print without needing to load each individual list. All lists will be printed in the same format and with the same script that is selected at the time of initial setup. Each list will also have a distinct list number in order to comply with limits for data entry. This function only works with lists, and any saved searches in the folder will be skipped over in printing. From the My Folders page, click the link to Print All Lists. You will be asked ‘Are you sure you want to load this Folder and overwrite your current version of My List?’ Click OK. You will be brought to the Print Report page, where you can select the report format, Script, Source, Title, and Sort Order for your printed reports. You can also choose to print a map with voters (or not) if you are printing out cut turf. Click Next. Make sure your page is set up correctly to print and click Finish. You will notice buttons at the top of Print Preview page that will allow you to either click Next to go to the next list in your folder, or that will direct you back to My List. Click Next. When you have reached your final list, there will be no Next button, and you can click on My List to return to the My List page. 8 6) Quick Look Up Quick Look Up is a rapid way of accessing a voter’s record by searching on a name, part of a name, address or some combination thereof. When searching the files, Quick Look Up applies a “smart name” search technology that recognizes Sue as Susan, Mike as Michael, and Sam as Samuel. From the list of possible matches, click on a single Voter Record. The voter record includes the person’s basic union membership info/contact info/vital stats. It also includes voter history (which elections the person has voted in?), Survey Question responses (who does the voter support?), and contact history (who has talked to the voter?). When you are in a voter record, you have the ability to: Update salutation/envelope name and add phone #’s, email addresses and notes Add new mailing addresses Apply survey responses and activist codes Mark bad addresses and bad phone numbers Mark voter as deceased Add voter to the LAN’s Do Not Walk and/or Do Not Call lists Quick Look Up is NOT meant for a broad search – use “Create A New List” for that. This option allows you to quickly check on the specifics of individual voters. 9 7) Analyze Data: View Canvass Results Canvass Results returns counts of instances of people canvassing, intended to help measure and manage a canvassing operation. Canvass Results returns information about the number of voter contacts, NOT the number of voters. Like some other summary tools in the LAN, the data reported by Canvass Results is run overnight. Canvassing data entered into the LAN is available immediately via the Create-A-List page, but will not be available until the next day in Canvass Results. Canvassing Summary: This page will show a summary of the Walk Results specified by your Scripts. You can narrow the results displayed by the following criteria: Date: Select a date range; this page will display only those canvass results that were obtained in this time period. Note: this date range corresponds to the Data Canvassed field in the Contact History of each voter, not the date this information was entered into VAN. Committee: Select the Committee that you want to view. This will be a list of all Committees you can access. Input Type: This data is automatically generated depending on what tool was used to enter canvass data into the system. Contact Type: Users entering canvass data can specify how these Voters were contacted. Filter: Show only canvass results from within My List or any Saved Lists in your Folders. You will not be able to view any Saved Searches in this menu. Group By: allows you to group the canvass results you are viewing into larger units. You can break down your results by various geographical areas. After specifying the parameters of your summary page, click ‘Export to Excel’ to export an Excel file that contains the same data currently displayed on screen. Survey Question Summary: This page works exactly like the Canvassing Summary Page described above, except that instead of viewing canvass results, you can select one Survey Question at a time, and view detailed information about the responses to it that your canvassers received. Set My Report Preferences: Canvass Results Preferences are set up by the user to define which results will be displayed on the summary page. You can specify the default filter settings to narrow down your canvass, as well as the default Geo View. You can also select the Survey Questions and canvass responses that will appear as columns when displaying Canvass Results. Viewing Canvass Trends: The Canvass Results by Hour of the Day, Canvass Results by Day of the Week, and Canvass Results by Day and Hour pages allow you to identify large scale trends within your canvassing data. On each page, you can narrow your 10 canvass results by the parameters described above. Results are then automatically grouped by time and day of the week collected. Canvass Results vs. Create a New List vs. vs. Counts and Crosstabs: Here is why you get different members when you look at the same data in these three areas of the LAN. Canvass Results: As explained above, Canvass Results returns information about the number of voter contacts, NOT the number of voters. The numbers will tend to be much larger than the numbers from Create a List because one or more canvassers may have asked the same voter the same question multiple times. Create a New List: returns exclusively counts of people, regardless of how many times they've been canvassed or asked particular questions. So if a voter is asked three times whether they support a candidate and they say they love her three times, a search for that candidate's supporters will return that voter just once. Counts and Crosstabs: like Create a New List, returns counts of people, but will differ from it for a couple reasons. First, because Counts and Crosstabs is used for analytic purposes, we include various suppressed individuals in the totals. Second, some people don't have relevant data, even for seemingly universal categories like sex or age. So if you use Counts and Crosstabs to get a breakdown of all ages, the total number will differ from all voters since there are always some voters for whom a date of birth is simply missing. 11 8) Analyze Data: Counts and Crosstabs You can run counts on: The portion of the voter file that you have access to. Available on the Main Menu. The list that you have created. Available on My List page. This is a GREAT way to double check your work!!!!!!!! You can also export your report into an Excel spreadsheet. You can run counts on one or a combination of the selects listed below. Regional Info City County Precinct Zip Code CD: U.S House District HD: State House District SD: State Senate Districts CLC: Central Labor Council Zone: Regions designated by each respective State Labor Federation to be used for voter contact programs during elections Union Membership Info Member Type: AFL CIO Members vs. AFL-CIO Household Members Member Status: Retired vs. Active union members International Local Voting Info Reg Status: Voter registration status General Voting: Lists # of General Elections that person has voted in during the past 3 cycles Primary Voting: Lists # of Primary Elections that person has voted in during the past 3 cycles Party: Political Party Affiliation Personal Info Age Phone Race/Ethnicity Sex 12 9) Create A New List: The Create a New List page is used to begin the process of creating target lists for canvassing, mailings, phone banks, GOTV, and other communications with voters and volunteers. From the Main Menu, click on Create A New List. A screen will appear with categories within which you can choose the criteria that define your list. Below is the screen of possible categories and criteria. The more search criteria that you choose, the more specific your list will be. The options available to you may differ depending upon your state and security clearance. Sometimes the label next to a dropdown is underlined – if you click the label, you’ll be able to choose multiple criteria. If you simply go to the dropdown, you will be limited to single criteria. For example, if you want to choose a specific county, go to the dropdown and choose that county. If you want to choose several counties, click the label “county” and a list of possible counties will appear, enabling you to check the necessary ones. 13 Location Think of the Location dropdown as an upside down pyramid. As you make regional selections using the dropdowns, you will be able to drill down to a more specific region within the selection that you just made. Once you select a city, this section will refresh giving you access to the precinct/ward dropdown. Once you select a precinct, the street name label becomes clickable. Other things to note about Location In some states the organization of the Locations section differs, as some do not have precincts or are organized by townships, civil districts, wards etc. Street # From /To: a good option if you are canvassing in a city. Districts: Whatever you select in the Location box will be reflected in the Districts box and visa-versa. If you specify a county, the Districts box will only show districts in that county. If you select a particular congressional district, the Location box will only show the counties and precincts in that CD. 14 Membership This section is similarly set up like an upside down pyramid. When you select an international, the Locals dropdown will appear. A District Council dropdown will appear as well, if applicable. Other things to note: If you specify a union in the Local dropdown, the list of CLCs and Zones will be limited according to the region in which members of the Local live. “Member Type”: if your screen shows this dropdown, you can specify members and/or household members “Member Status”: if your screen shows this dropdown, you can specify either active or retired members 15 Age and Registration Date: The registration date is a misnomer – it is the date of the last change to an individual’s voter registration. So, if someone moves, the date they re-registered is their “Reg Date.” Survey Questions: Survey questions are all about IDs. Select the question you want, and the menu will expand. Specify which response you want. When you select more than one response, the list will include people who responded in one way OR another. The checkbox “include most recent response only” will include only those people whose last answer matches the search criteria. 16 Targets and Scores: Targets and Scores loaded into the LAN are predictions of data that we don’t currently have for all records on the file. They are created by the strategic research and analytics team at the AFL-CIO. Voting History: First, select your criteria from the dropdown. Any: Find voters who have voted in any of the selected elections. All: Find voters who have voted in all of the selected elections At Least: Find voters who have voted in at least x of the selected elections that you specify. Exactly: Find voters who have voted in excactly x of the selected elections – it’s saying, “Find me people who’ve voted in only 2 of these elections. Doesn’t matter which 2 – just find them!” No More Than: Find yourself some lazy voters! After picking your operator: Click the boxes next to the elections that you wish to search. If you don’t check the box, the election is ignored. Click the circles next to the behavior that interests you – voted or didn’t vote. 17 Canvas Status: Here you can specify a particular group of people based upon their participation in previous canvassing. For instance, if your list will form the basis for a phone-bank list to target everyone whom you didn’t reach during a previous phone bank, you can select “exclude” in the dropdown and subsequently check “canvassed”, “deceased”, “moved”, “not eligible”, “wrong number”, etc. Other Selects: Party: In the states that have party affiliation, you can specify a particular affiliation in this section. Registration Status: Unless you check other boxes, the default selection will include all registered voters, both active and inactive. Race: The options shown here reflect information from the State Voter File and commercially obtained data. The information is only as good as the data source. Phones - Emails: If you check one of these two boxes, you will limit your list to include only those people with either phones or emails. It is important to select Phones Only when you create phone lists!!! Suppressions: Unless you make changes, the default selection will include good voting and mailing addresses only. It will also exclude the deceased and voters listed on the LAN’s Do Not Walk and Do Not Call lists. Once you have selected all of the necessary criteria for your list, hit the “search” button. In a few minutes your list will appear. 18 10) My List: What To Do With It After you click Search in Create a List, you will be presented with Your List of voters! Add People brings you back to the search screen to run another search. The results will be added to your existing list. Remove People takes you back to the search screen and allows you to run another search. The results will be removed from your existing list. Narrow People runs another search, but only searching inside your existing list. People not on the list, regardless of the search criteria, are ignored. Click the print button to print call sheets. The Letters button brings you to the form letter system. This will let you send mail to your constituents, automatically! It will let you send the same letter to everyone on the list, though it does give you the option to customize individual letters on top of your form letter. In addition, you can mail merge a form letter from everyone on My List to a specific individual. The labels function will let you generate standard sized labels for letters and postcards. The Export Wizard allows you to export the voters in your list and their information that you specify into an Excel spreadsheet or a tab delineated Text file. Double check your list by using Counts & Crosstabs. HIGHLY RECOMMENDED! Turf Cutter gives you the ability to easily create and print maps showing the location of each door on a canvassing Turf. 19 The Householding Wizard gives you the ability to narrow or expand your list by matching households of voters in your current list by voting address, mailing address or phone number. The save button allows you to save either the search criteria you used to create your list OR the list of voters itself. Saving the search criteria allows you to return to the same universe of people, however, the list will be constantly updating to reflect new data that has been uploaded. You can access your saved lists from View My Folders on the Main Menu. Take your lists and create a random sample! From My List, display up to 25 voter records on screen, alongside dropdown menus to enter data about the canvass responses, survey questions, and/or activist codes defined on a script. Grid View can thus create an electronic version of report printed out from LAN. Script View allows users to interactively view a script and a voter record from My List together. While viewing the contact details of the record, the user can read from the script, and enter data about the voter directly into the survey question and/or activist code in the script. Create a printable map from this list. Records will appear as red dots on the map. This button will only appear if your list contains less than 2,500 doors. The Restore button appears after you have either used the Add People, Remove People or Narrow People buttons. It allows you to “Undo” the last step you made while creating your list. This button sends your list to Bulk Upload to add Survey Question Responses, Activist Codes, Phone Numbers, etc. to the records in your list 20 11) The HH Wiz Icon: The Householding Wizard The Householding Wizard narrows or expands your list by matching households of voters in your current list by voting address, mailing address, or phone number. These options can be very helpful in targeting and contacting voters for most purposes, and works through matching specific criteria in each voter’s file in your list or in another Saved List. The Householding Wizard is only available for lists of 120,000 voters or fewer. Fill Household: Adds any member of a household who shares selected information, but is outside the parameters of your search. You may use each of the Fill functions when you would like to expand your list to entire households. For instance, if you search for all Democrats in a specific geographic area and Fill the household by any of these options, your list will now be populated with registered Independents, Republicans and other party registrants who live in the same households with Democrats. Select Fill Household by Voting Address/Mailing Address/Phone Number. Click Next. You will be brought to a page stating 'You have selected Fill Household by Voting Address/Mailing Address/Phone Number. This process may take a few moments.' Click Finish An icon will appear stating 'Rebuilding My List...' and when the process is complete you will be brought back to the My List page, now populated with the other voters matching the criteria with which you wanted to Fill the Household. 21 Narrow Household: Returns only one member of a household by selected information where multiple members exist. You may use the narrow functions when you only want to contact one member of each household. For example, Letter Batches cannot be householded, so you would run this function on your list in order to only print out one letter per household. Select Narrow List to One Voter per Voting Address/Mailing Address/Phone Number. Click Next. You will be brought to a page stating 'You have selected Narrow Household by Voting Address/Mailing Address/Phone Number. This process may take a few moments.' Click Finish. An icon will appear stating 'Rebuilding My List...' and when the process is complete you will be brought back to the My List page, now populated only with one voter per household matching the criteria with which you wanted to Narrow the Household. Remove Voters from Household: Keeps only those voters whose selected information does not match that of another voter in your Saved List. You may use each of these remove functions if you are sending mail or calling households and want to exclude those households that are being contacted with a different message or in a different way. For instance, you may want to send a piece of mail to a list, but contact likely absentee voters (and their households) at a different time than you contact voters who will likely vote at the polls. In order to do this you would create your targeted list of absentee voters and save it, and then remove that list by voting address, mailing address, and/or phone number from the larger list. Select Remove any Voter with a Voting Address/Mailing Address/Phone Number in another Saved List. Click Next. Select the Folder, then the Saved List containing the households you wish to remove from your list. You will be brought to a page stating 'You have selected Remove any voter with a Voting Address/Mailing Address/Phone Number in another Saved List. This process may take a few moments.' Click Finish. An icon will appear stating 'Rebuilding My List...' and when the process is complete you will be brought back to the My List page, now populated only with the voters whose information did not match that in the Saved List you did not want included. 22 12) The Print Icon: Create a Call List The Print icon is where you’ll go when you want to print call lists or walk lists. However, you’ll most likely want to use the Turf Cutter tool if you want to print a walk list because then you can include turf maps to accompany your walk list. Step 1: Report Format: What kind of report do you want to make? Script: Which questions (if any) should appear on this report? Source: Are you calling or walking? Choosing one or the other will automatically populate the Sort Orders. Print List Number: This assigns a unique number to this set of people so that you can return to them either in Grid View or Script View Split Report: The list will print in batches containing the number of records you specify in the Split Report field. The default split is prepopulated at 2,500 because lists larger than that will cause many browsers to crash. Here’s an example of how to set up a call list. 23 Step 2: The next screen asks you to configure your printer. This varies from browser to browser. Please be sure to follow these instructions or your sheet will not be scan-able! Once you have adjusted your Print Setup, press next. Step 3: You will see the list of your voters inserted into your report format. The script will appear as well if you included one as well. From the file menu, select Print to print your lists! 24 13) The Labels Icon: Print Mailing Labels Step 1: 1) Label Format: Select either Avery 5160, Avery 5263 or Avery 5264 mailing labels 2) Householding: Choose to print one label per individual, per last name, or per address. We suggest you print one label per address. 3) Household Label: Choose how to refer to the household 4) Middle Names: Choose how to refer to the voter’s middle name 5) Sort Order: Choose from the six sort options that allow you to sort by name, zip code, city, etc. Note: If you are printing letters with the labels, you should make sure that you set up the Householding and the Sort Order in Print Labels and Print Letters the SAME WAY. This will make the process of stuffing letters into envelopes much easier. Step 2: The next screen asks you to configure your printer. This varies from browser to browser. Please be sure to follow these instructions or your sheet will not be scan-able! Once you have adjusted your Print Setup, press next. Step 3: Print your labels! 25 14) The Letters Icon: Printing Form Letters Before printing, double check to make sure that your form letter has been saved to the LAN. See page 49 for more information. Step 1: Choose the appropriate form letter from the dropdown Choose a “Batch Name.” Choose the letter date by clicking on the empty box, a calendar will appear. This is the date that will appear on your letters Change the Household Label and Middle Name format, if necessary. For Householding, we suggest that you select ‘Print one letter per address’. Under From/To, you have the option to send letters to voters in your list or from the voters on your list. Change the Sort Order, if necessary and then click Next Once you have completed Step 1, your project will be saved as a Letter Batch. You will be able to access your project from the Admin Menu from the Main Menu of the LAN. Note: If you are printing labels with the letters, you should make sure that you set up the Householding and the Sort Order in Print Labels and Print Letters the SAME WAY. This will make the process of stuffing letters into envelopes much easier. 26 Step 2: Double check to make sure that your signature preferences are correct and click save. Step 3: Letter: If needed, you can edit Date, Name, Address, City * State * Zip and Salutation for each individual letter. Move from letter to letter by clicking the Next button in the upper right portion of the screen. If you need to edit Text, or P.S., you should access ‘Form Letters’ from the Main Menu. See page 49 for more information. Actions: Save and Print Batch: Print entire batch of letters at once Save and Print Letter: Print only the letter that is displayed on your screen Delete Letter: Delete the letter that is displayed on your screen Delete Batch: Delete entire batch of letters Show Only Drafts: Show the letters that have not yet been sent to the print screen Show Only Sent: Show the letters that have been sent to print screen. Step 4: Would you like to make a contact history? Under Contact History in the voter’s record, it will note that a letter was mailed to/from the voter once you press the Save and Print button. Example: 27 Step 5: Print your Letters! Go to the “File” dropdown at the top left of your web browser and click on Page Set-Up Check that your page set-up allows for your letterhead. Make sure there are no unwanted headers or footers included. Go to the “File” dropdown at the top left of your screen and click on Print 28 15) The Export Button: Exporting Your Lists The Export Wizard allows you to export the voters in your list and their information that you specify into an Excel spreadsheet or a tab delineated Text file. Standard Text: Select one or all of the available fields that you want to export for each voter on your list. You can also export up to six activist codes and/or up to six survey question responses. The voters’ LAN ID and DWID will also be exported into the spreadsheet. Householded Mailing List: Export one record for every mailable household in your list. The following fields are exported: Name, Mailing Address, LAN ID and DWID. Householded Phone List: Exports one record for each unique phone number in your list. The following fields are exported: Phone Number, LAN ID and DWID. Survey Responses List: Exports one record for each survey response associated with any of the people in your list. The following fields are exported: Survey Question ID, Survey Response Id, Cycle, Survey Question Type, Survey Question Name, Survey Response Name, Date Created, Date Canvassed, Contact Type, Created By, Canvassed By, Committee Name, LAN ID and DWID. Activist Code List: Exports one record for each activist code associated with any of the people in your list. The following fields are exported: Activist Code ID, Activist Code Type, Activist Code Name, Activist Code Description, Date Created, Date Canvassed, Scope, Created By, Canvassed By, Committee Name, LAN ID and DWID. 29 16) The Cut Turf Icon: Printing Turf Packets How to Cut Turf Step 1: Click the Cut Turf button. This button will not be active if: Your list is larger than 2,500 doors. Your list was created and left unsaved for more than 10 minutes Your list is reloaded from a Saved List that was saved more than 24 hours ago Step 2: Save the Map Region/Turf Lists. When you save your work in Turf Cutter, you are actually creating a Saved Search, called the Map Region, which has the same criteria as your original search. You're also creating Saved Lists for each of your Turfs in that Map Region. 1. You will be prompted to give the Map Region a name and identify the Folder where the Map Region and Turfs will be saved. 2. Click Save Step 3: Fill out the LAN product request form. You must fill out the following fields in order to submit your request: Request Name: A very brief overview of your request Race or purpose for which product is to be used: specify what kind of race (presidential, congressional, state legislative, etc.) or the issue (for instance, a county ballot on living wage) 30 List of all candidates or issue/position being taken: you must identify the candidate we are supporting, as well as the opponent(s). If it is a ballot question, do we support or oppose it. Description of records selected: this is a basic description of the record types. For instance, all retired members of such and such union, all persuasion targets of such and such union, etc. List of exclusions: List all international or local unions that informed the AFLCIO headquarters that they requested to be excluded from the candidate race, ballot initiative, campaign, etc. Contact Person & Phone #: Please enter your name, phone number and email address in case we need to contact you. Date Required By: If you are requesting call sheets, mailing labels or letters, please give a reasonable estimate of when you need to PRINT your lists. If you are requesting turf packets, please give a reasonable estimate of when you need to CUT TURF and PRINT your lists. This will help your LAN administrator prioritize the order in which he/she approves requests. Click Submit to send the request to your LAN administrator Step 4: After the LAN administrator reviews your request, you can access your LAN product by clicking My Requests from the Main Menu of the LAN. A table will appear with your requests listed and whether they have been approved or denied. If your Walks request has been approved, click on the Cut Turf link to print your product. NOTE: You have 72 hours from the time your list was approved to print your lists!!! If your LAN product has expired, contact your LAN administrator. 31 Step 5: You will be directed to the Turf Cutter page, which includes an interactive Google map of the general geographic area in which all the voters on your list reside. Note that each pin represents the physical address for a voter or voters, depending on whether they share a physical address. The Legend: Shows each Turf’s corresponding color and count. By default, the legend will show counts by the number of doors, which – because of shared households – will inherently be much less than the number of voters. Show Counts By: Allows you to change the settings in order to show counts by voters or both doors and voters in The Legend. Note that when you toggle between showing counts by doors or voters, the number of pins on the map doesn’t actually change. Step 6: Draw a Turf outline. Make sure Draw Turf button is selected in upper left hand portion of screen. The outline should encompass all of the voters/doors you want assigned to that Turf: 1. To begin drawing an outline, click once on the map to make a starting point. A red ‘S’ pin will appear. 2. Click again along the perimeter of the group of doors/voters that you want assigned to your Turf. A red line connecting the two outline points appears. (Do not attempt to click and hold down the mouse button and drag the mouse.) 3. In this manner, draw an outline completely encompassing all of the voters/doors you want assigned to the same Turf. You may find it helpful to zoom in closely on the map. 32 4. You can undo your last click by clicking the Undo Last Click button on the left side of the page. 5. In order to pan in any direction, click and hold down the mouse on the map and move it opposite to the direction in which you want to pan. 6. Complete the outline by clicking on the red ‘S’ pin, thus drawing a final line between your last outline point and your starting point. 7. Once you complete the outline, all of the voters/doors inside of it will turn yellow, indicating that they are selected. You can also see the counts for selected doors/voters in the legend. The remaining number of doors will be reflected in the legend as well. 1) 2) 3) 4) Step 7: Save voters/doors to the Turf. With all of the voters you want assigned to a Turf selected: 1. Click on the drop down menu next to the Save button on the left side of the page. 2. Select which Turf of Turfs 1 through 30 you want to assign the voters/doors to. 3. Click Save. Your outline should disappear, and all of the selected voters/doors should change to the color corresponding to the Turf to which they are assigned. The Turf color and count should also now appear in the legend. Adding individual voters to saved turfs: Choose the Select Individuals tool from the left side of the page, and click on the voters/doors to highlight them (press and hold Ctrl to select more than one at a time). Choose the Turf to which you want to add the voters/doors from the drop-down menu and click Save. Note: Voters who are individually assigned to a Turf will not be surrounded by an outline. NOTE: You may spend up to an hour on the Turf Cutter page before your login times out. After an hour, if you try to click Finish, you will be directed back to the login page, your work not having been saved. The login timeout for all other pages is 30 minutes. 33 How to Print Turf Lists/Maps Step 1: Navigate to the My Requests page and click on the ‘Print Region’ button associated with the Turf Packets that you want to print. z Step 2: Report Format: What kind of report do you want to make? Script: Which questions (if any) should appear on this report? Source: Choose Walking Print List Number: This assigns a unique number to this set of people so that you can return to them either in Grid View or Script View Split Report: The list will print in batches containing the number of records you specify in the Split Report field. The default split is pre-populated at 2,500 because lists larger than that will cause many browsers to crash. Here’s an example of how to set up a Walk List: 34 Step 3: The next screen asks you to configure your printer. This varies from browser to browser. Please be sure to follow these instructions or your sheet will not be scan-able! Once you have adjusted your Print Setup, press next. Step 4: A map of your first turf will appear. Press Print button to print the map. Press the Next button when done printing. Step 5: You will now see the list of your voters associated with the map that you just printed. The script will appear as well if you included one as well. From the file menu, select Print to print your lists. Press Next button to move onto the next turf packet. 35 17) Loading Data Back Into the LAN The information you gain from your walks and phone banks are critical to the strategic decisions we make on which members and which areas we will target as we move forward toward GOTV. The need to get this information to us correctly and in a timely manner is vital. IMPORTANT: You can only scan LAN product back into the LAN. You cannot scan walk/call lists into the LAN if it was produced somewhere else. This is what LAN product looks like: On the main menu of My Voter, you will see three different options for entering data onto the LAN from call or walk sheets: Scan Bar Codes: takes you to a scanning interface to return data using a bar code scanner Script View: brings up a display of your list in an easy to follow format – thus allowing you to phonebank without paper. Grid View: brings up your list in a spreadsheet that allows you to simply click on each canvassed member’s response. Run Bulk Uploads: The Bulk Uploads tool is for adding large amounts of data back into the site after a list of voters from the My Voter File has been exported and appended. 36 18) Load Data: Input Type and Contact Type Whenever you load activist codes, survey question responses or canvas statuses into the LAN, each piece of data will be labeled with an input type and contact type. When running searches on activist codes, survey question responses and canvas statuses in Create a List, you can search using input type and contact type. You can also run reports using these two selects in ‘View Canvas Results’ and ‘View National Reports’ from the Main Menu. Input Type: Input Type answers the question, ‘How was the data inputted into the LAN?’ Input type is automatically applied to your data anytime you load data into the system. Auto Dial – Data entered while using the LAN’s Predictive Dialer System Back End – Data uploaded by the developers of the LAN (Voter Activation Network) Bar Code – Data loaded using Scan Barcodes Bulk – Data loaded using the LAN’s Bulk Upload tool Manual – Data entered using Quick Lookup, Script View or Grid View or Quick Mark Palm – Data entered while using the LAN mobile app on a Palm Pilot device VPB – Data entered while using the LAN’s Virtual Phone Bank System Contact Type: Input Type answers the question, ‘Where did the data come from?’ When using Scan Barcodes, Script View, Grid View, you will have the choice to select Call (for call lists) or Walk (for walk lists). If bulk uploading, you be able to choose one of the options listed below: Bulk Mail Call Email Event Historic: normally used when applying old data to system. You’re not aware where the data came from but you still want it preserved. Letter Paid ID Postcard Robocall Walk Web Survey 37 19) Load Data: Scan Barcodes On the main menu, click on the box “Scan Bar Codes”. The following table with dropdowns will appear: Select the script that was canvassed – this will determine which response barcodes are printed. Select the date the data was collected, NOT the date you are scanning (that is automatically entered). Select the canvasser (either a user login or the generic “volunteer”) and then the method of collection. Finally, decide your entry order. Bar Code Report Once you’ve selected your options, click “next” to get to the “Bar Code Report”. Bar codes that are matched to possible survey responses will be listed in this report. There are also bar codes that correspond to transactional results – not home, wrong number/address, etc. In page setup, be sure to set your page orientation to LANDSCAPE with 0.5 inch margins before printing. 38 Click “Finish” and the “Bar Code Entry Data” screen will appear. This is where you scan in the data. Make sure your cursor is clicked on the box. Green means go, Red means you are not ready. First scan the voter barcode, then scan the response code from the printout sheet (IF that is the entry order you selected when setting up your scanning). If your scanner malfunctions, you can manually enter stuff in this section as well. Make sure your Caps Lock is off. 39 20) Load Data: Script View Script view allows you to enter data into the system by simply filling in the “blanks” of the canvassing script. Click on “Script View”, the “Script View” table will appear with dropdowns Choose the appropriate script Choose the appropriate canvasser Click on the date the data was collected in the calendar that appears after you click in the box Choose the appropriate source for the data – walking or calling Determine the order in which you want to sort the data – by name, phone, street, zip code, etc. Click “Next”. A screen with the actual script used will appear, the name of a concrete voter will be in the upper left-hand corner of the screen. A dropdown(s) will provide the possible responses. 40 Choose the appropriate results/replies (transactional or content) for this specific person Hit “Next” in the upper right-hand corner of the screen to move on to the next person canvassed. 21) Load Data: Grid View Grid view provides you with a spreadsheet of your list with result/response dropdowns. Click onto “Grid View”, the “Grid View” table will appear In order to identify a list by number, look at the bottom of the list you want to choose and type this number into the boxes. Use can only use list numbers if the printed report was produced within the last 30 days. List numbers will expire after this amount of time. . 41 Click “next”, and a second “Grid View” table will appear with dropdowns Choose the appropriate script Choose the appropriate canvasser Click on the date the data was collected in the calendar that appears after you click in the box Choose the appropriate source for the data – walking or calling Determine the order in which you want to sort the data – by name, county, phone, street, zip code, etc. Click “Next” The “Grid View” spreadsheet of your list will appear. The first column from the left has the LAN ID of a concrete voter on your list of canvassed voters. The second column from the left is the list of the names of these voters. On the right-hand side, there are columns with dropdowns that provide possible transactional results or responses for each of the individual voters listed. Select the correct responses from the dropdowns Click “Save” when you are done. 22) Load Data: Once the Data Is In If you accidentally scan the wrong data, simply click on the voter and delete the item from their history. The edit and delete options are there until midnight of the night you enter the data. Then it gets fully committed to the LAN and is no longer editable. Under their Contact History you’ll see the name of the canvasser, the date of the canvass, how the data was entered, and a description of the result: 42 23) Writing Letters You can create, edit, delete, share and send Letters to and from My List. Letters can be created using the Form Letters tool from the Main Menu. Once you save a Form Letter, you can use them by selecting the Letters icon on the My List page. In the admin menu, click on Letters, and then click on Form Letters. The My Form Letters table will appear. Click the Add New Form Letter button. The New Form Letter table will appear. Choose the letter type from the dropdown box. Name the letter in a unique, identifiable manner including date and issue/reason for letter Type the text of the letter directly into the Text box, or cut & paste a text that you have already written as a Word document. ONLY include the body text of your letter. DO NOT include address, closing, etc. Type a post script (P.S.) into the box if desired Click on Save The Edit Form Letter table will now appear. Review your text, make any necessary changes Click on Save 43 24) Creating Activist Codes Activist Codes are tags, or labels, that can be applied to individual voters. If you are only interested in keeping track of ‘Yes’ responses to a question, an Activist Code is ideal. For example, you may want to keep track of voters that are School Board members or whether a Voter wants a yard sign for a political campaign. However, it is not necessary to keep track of voters who are not School Board members or who refuse the yard signs. When more information is required, consider using Survey Questions. From the Main Menu under ‘Codes * Questions * Scripts’, click on Activist Codes From the Activist Code list page, click New Activist Code to create a new tag for users to apply to Voters. From here, enter in the following information: Activist Code Type: The "type" property is used for the purposes of sorting and viewing Activist Codes in a list; this is particularly helpful when the number of Activist Codes becomes large and otherwise unwieldy. Long Name, Medium Name, Short Name: The system chooses between three versions of the name for display purposes, depending on what will fit in a particular display. It displays the Long Name whenever possible. It uses the Medium Name when space is an issue, such as on Reports. And it displays the short name when space is very tight, such as in column headings on Canvass Results or Counts and Crosstabs. Description: The description field allows a User to explain thoroughly what the Activist Code is meant to say about a voter that has been assigned it. It is not necessary to enter anything in this field. Script Question: Script Question is an optional feature that will be added to the canvasser’s walking or calling Script on a printed Report if the user wants to ask Voters questions such as "Would you be willing to take a yard sign?" 44 Scope: A public or private Activist Code determines who can see the Voters that have the Activist Code assigned to them. When a public Activist Code is applied to a voter, every User on the site that has access to that Voter who has access to that Activist Code will see the Activist Code applied to them. When a user applies a private Activist Code to a Voter, only Users on the same Committee that applied the code will see the Activist Code on that Voter. Note that it is not necessary to create a separate private Activist Code for each committee that uses it. For example, if three Committees want to ask voters if they want a yard sign, simply create one private Activist Code named "Yard Sign" and give all three committees access to that code. This one step automatically creates a private Activist Code named "Yard Sign" in the database for each committee without having to do extra work. Is Also Activist: "Is Also Activist" means that a Voter who has this Activist Code applied should be generally considered a political activist. This becomes a useful tool when you are organizing Voters to a rally, for example. On the Create a List page, a user may select all Activist Codes marked "Is Also Activist" at one time rather than creating separate lists by using the Activist Code picker. It may seem as though anyone with an Activist Code is an activist; however, these codes are used for a variety of purposes. For instance, if a state party or campaign obtains a list of voters with a hunting or fishing license, they can apply an Activist Code to highlight this information. While these people will have an Activist Code, there is no reason to assume that they are political activists. Can Be Assigned or Removed: This allows Users to assign or remove the Activist Code from a Voter. Some Activist Codes should not be assigned by Users after an initial group is listed. For instance, if a Voter who participated in a specific event is given an Activist Code for that event, others should not be assigned that Activist Code. Similarly, if a list of subscribers to a hunting magazine is matched against the voter database, those subscribers may be given an Activist Code reflecting that specific subscription. Other hunters would not be assigned that Activist Code. Active, Archived, Inactive: By default, Activist Codes start out as active. An archived Activist Code can still be used in searching. However, to avoid clutter, it does not appear on normal lists. An inactive Activist Code will no longer appear on the site unless an administrator reactivates it. Applying Activist Codes: Once you have saved an activist code, you can apply it to voters by inserting it into a script and using any of the Load Data tools. You can also apply it to voters by using the Bulk Upload tool. See Pg. 45 for more information. You can also apply activist codes to voters by using Quick Look Up 45 25) Creating Survey Questions Survey Questions are a means for storing data about voters. Each Survey Question may have multiple responses, although only one response can be applied to a record on any day, to a question being asked of a voter. From the Survey Questions link under ''Codes Questions Scripts'' in the Administrative toolbar on the left side of the Main Menu, select New Survey Question. Cycle: Enter the Cycle in which the question will be used. The Cycle option is used only for purposes of sorting and viewing Survey Questions, or limiting the number of questions displayed in a list. If you ask the exact same Survey Question in more than one election cycle, you do not need to create a new question for each cycle. You could simply update the Cycle property for that question so that it now shows up in your Survey Question list with the rest of the current cycle’s questions. Type: Enter the Type of Survey Question you are asking. Like Cycle, the Type property is just used for purposes of sorting and viewing Survey Questions in a list. The Type property helps differentiate between Candidate questions, Issue questions, Action questions, etc. If the system does not include a Question Type that would be useful, your System Administrator should contact LAN about the possibility of adding new Types. Response Values: Long Name/Medium Name/Short Name: The LAN chooses between three versions of the name for display purposes, depending on what it’s doing. It displays the Long Name when possible. It uses the Medium Name when space is an issue, such as on Walk Lists. And it displays the short name when space is very tight, such as in column headings on Canvass Results or Crosstabs. 46 Question: This is the question you would like to ask voters. Keep in mind that you have complete flexibility to enter any question you would like to ask. Survey Questions (and their corresponding responses) can NOT be deleted or removed once a response has been recorded on a single record. Database: Choose whether you want to survey question to appear in My Campaign as well. Please be aware that Survey Questions are NOT linked between the voter file and My Campaign, so records in one database will not be tagged with responses to Survey Questions in the other, even if both databases contain a Survey Question that asks the same question. Survey Question Status Active: By default, Survey Questions are Active, but you can change that status in order to get them out of your way - and out of your users' way. Archived: Hidden from LAN users by default, but can be displayed with a little extra effort. On the Create a List page, for example, the drop down Survey Questions list displays only Active Survey Questions by default, but users can select the 'Show Archived' option at the bottom of the list to expand the Survey Question list to include both Active and Archived questions. Inactive: Hidden from users entirely, except in the Administer Survey Questions area. Users will never encounter an Inactive question until the Administrator changes the question's status to Active or Archived. Applying Survey Questions Once you have saved a Survey Question, you can apply it to voters by inserting it into a script and using any of the Load Data tools. You can also apply it to voters by using the Bulk Upload tool. See Pg. 45 for more information. You can also apply survey questions to voters by using Quick Look Up 47 26) Creating Scripts A Script specifies what a canvasser should say as text, and what questions to ask as Survey Questions and Activist Codes in their printed walk and phone product. Scripts also provide the structure for inputting responses using the LAN’s Data Entry tools. In the “Codes • Questions • Scripts” section of the Main Menu, click on Scripts to access the Scripts Page. You will see a list of all scripts assigned to every Committee you can access. Click on Add New Script. Name Name: Give this Script a name. Scripts are used in a wide range of tools on the site, so be sure that the name is clear and descriptive. Description: A brief, optional description of the contents of this Script. Keep in mind that in many cases, Users must choose a Script without viewing its description. Status: Both Active and Archived Scripts will display in any situation where a User must select a Script. Inactive Scripts cannot be displayed anywhere but the Scripts Page on the Main Menu. If a certain tool, like a Virtual Phone Bank session, is using a Script that is set to Inactive, attempting to access that tool will result in an error message. Database: Each Script can only work with lists from My Voter File, or My Campaign. Once a Script is created, its database cannot be changed. Hit Next to create the Script and go to the Script Details Page for this Script. 48 Preview: This section will not appear until at least one Script Element has been added to the Script, and displays all Script Elements that have been added to this script. To the left of every Script Element are arrow buttons that allow you to move it up or down on the Script. Click Delete to remove any Script Element from the Script, and Edit to edit the contents of any Text Element. Add Script Element Text: You can create a custom Text Element to add to any Script. Simply type some text in the box and click Add to add it to the Script. Text elements are only displayed when a Script is printed. Survey Question: You can add a Survey Question to any Script. Survey Questions can be added to My Voter File Scripts, and only My Campaign Survey Questions can be added to My Campaign Scripts. When a Survey Question is added to a script, the Question text and Long Name for every possible Survey Response will be displayed when the Script is printed. When the Script is used in other tools, the Question text may be omitted, and the Medium or Short Name for every Survey Response may be used. Activist Code: You can add an Activist Code to any Script, but only My Voter File Activist Codes can be added to Voter File Scripts. Depending on what tool is using a script, the Long, Medium or Short name of the Activist Code may be displayed. Walk Results: Give Door-to-Door Canvassers several options to record why they did not talk to a Voter. Call Results: Give Callers several options to record why they did not talk to a Voter 49 Script Example How Script Appears on Cover Sheet of Printed Walk/Phone Product 50 27) Creating Report Formats Report Formats can be designed for Walking and Calling Lists. You can modify the standard walking or calling reports, an already-created custom report, or you can click on Add New Report Format and start from scratch. Using the Script Space Section: This feature determines how much space on your Report will be reserved for the Script. You have five options to choose from: No Room: This is for a Report that does not have any Script associated whatsoever. Short Script: Used for Reports where you anticipate using one to three Survey Questions and/or Activist Codes. Medium Script: Used for Reports where you anticipate using four to six Survey Questions and/or Activist Codes. Long Script: Used for Reports where you anticipate using seven to nine Survey Questions and/or Activist Codes. Huge Script: Used for Reports where you anticipate using up to 20 Survey Questions and/or Activist Codes. This option will reserve an amount of space that is equal to the amount reserved for the Script on standard Walking Lists and Calling Lists, about half the width of a landscape page. 51 Report Format Builder: Once you have selected the proper set of Layout Options and Script Space you are brought to a screen where you can add the following Display Fields your printed report: Available Fields: These are the current available data fields that can be added to your Report Format. If you scroll over the data fields a pop up will appear that displays what piece of information it corresponds in the LAN. Add Activist Code: A list of available Activist Codes that your committee has access to is displayed in this pull down, which you can add as a possible data field. Add Survey Question: You can also add a survey question response as a possible data field. Add Text Field: You can create a custom data field that will be displayed on every record in your report. Note, this text field does not "pull" any particular data from any records in your VoterFile. Add Checkbox: This adds a Checkbox as an available field to capture data on your Report. Add Columns: Allows you to arrange the sections of your report format in easy to read columns The Field Formatter: Allows you to make your Display fields print off in Bold Italic and Underlined. In order for you to modify your Display Field, drag and drop the desired Display Field into the Field Formatter, make the desired changes and drag and drop back into the Available Fields box. 52 Building a Report Format Click your cursor on a desired field and drag it onto the work board, or drag the field to the field formatter to Bold, Italicize or Underline the field Remember to place check boxes next to text fields where you anticipate a response from a voter Remember to organize the fields both in rows and columns, which will make your canvassers’ lives much easier. Click “Save” when you have finished building your report. Sample Report Format in Report Format Builder Mode Preview of Report Format Note: While the page size, number of rows, and page orientation are all editable after making the initial selections, the text size is not. Because text size is so integral to what fits where on the Report, it is the one item that remains fixed once it is selected. If you need to change the text size on a Report Format, you will need to start again from the beginning. 28) Creating Label Formats The Label Format Builder, much like the Report Format Builder, allows users to build and share custom label formats to meet their specific needs such as addressing postcards, printing mailing labels or printing address book cards. You can access the Label Format Builder from the Main Menu, Click ‘Reports • Labels’, then Label Formats. On the next page you will see the list of all the Label Formats that you have created or have access to while logged in on your current Committee. Each of the hyperlinked label format names takes you into the details page of that format where you will see the options to share and edit the format. In the upper right corner of Label Format list page, you will find a button to 'Add a New Label Format' which allows you to create a custom label by dragging and dropping the appropriate fields onto the grid. The LAN’s Label Format Builder program works the same way as the Report Format Builder program works. 53


![Section VII - Technical Specifications [ 920 KB]](http://vs1.manualzilla.com/store/data/005668651_1-8dca2c6e1104d59f56f239e80ee70ed9-150x150.png)