1
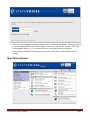
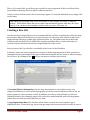
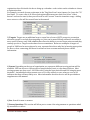
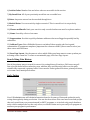
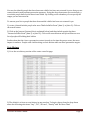
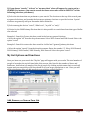
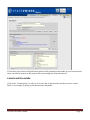
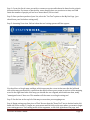
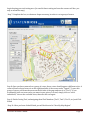
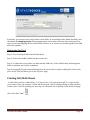
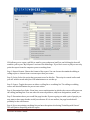
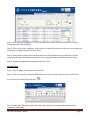
VANual A user manual for the van access via the Tools for All Fund [email protected] Tools for All Fund: VANual Introduction Logging into the VAN (Voter Activation Network) Main Menu Options Create a New List My List Options and Functions Counts and Crosstabs Cutting Turf Printing Calling and Walk Lists Data Collection and Entry Other Features Conclusion 3 3 5 8 12 14 15 18 20 22 24 Tools for All Fund: VANual Page 2 Introduction The VAN (Voter Activation Network) is an online information management tool. Its purpose is to promote organizing and activism. It combines powerful infrastructure, state-‐of-‐the-‐art programming, and user-‐friendly instructions to let organizers focus on their core mission without having to learn new computer skills. VAN has solved the most difficult data challenges facing organizers: moving thousands of IDs weekly from the door or phone into a central database, getting that information out when it is needed, and sharing it with other coalition partners in order to avoid duplication of efforts and maximize impact. You will be getting access to the State Voices Van. For most users, the VAN’s principle functions fall into two major categories – tools for creating targeted lists of voters from the database and tools for moving newly collected data on those voters back into the database. Getting targeted data from the database involves two choices: • Deciding which voter should be in the list – Organizers use ‘Create a New List’ to build lists of targeted voters, using criteria as simple or as complex as they need. Using any pieces of information in the data base – including geography, demographics, voter history, and previous survey results – users can create a list of voters, and then massage it by adding or removing certain voters to get to exactly the target list they are looking for. • Choosing a form of output for that voter list – Once they’ve selected a target pool of voters, organizers have a choice as to how they use the list they have created. They can print the list for phone banking or canvassing, print labels for a mailing, merge the list into letters they can print, export it for use by a vendor, or send the list to a Palm Pilot, iPod Touch or iPad for door-‐to-‐door canvassing. The Data in the VAN comes from the Catalist Voter File, which is comprised of a list of registered voters and voting information. This includes Vote History, districts, and the addresses one registers to vote with. You will also find unregistered people from consumer data and contact info that is enhanced by things like national change of address forms. You will also find "Synthetics" in the VAN which are like models and scores. These are a best guess but are better than guessing at random. You may also see shared data from past programs, ballot initiatives, etc. Logging into the VAN (Voter Activation Network) Your VAN administrator will create an account for you in VAN, and will send you an email that looks like this. Tools for All Fund: VANual Page 3 (Your name), Your username is username (pre-assigned by the VAN administrator) Click here to set your password. Thanks, van.statevoices.org Site Management Can't click on the link? Copy and paste this URL into your browser: http://van.statevoices.org/ChangePassword.aspx?ForgotPassword=8A56E5F7-6AD7-44B0-B0D38C0B4FF3ED75 This link expires in 48 hours. Click on the password link within 48 hours of receiving this email and follow the directions to set up your password and write it down so you won’t forget it. Do not share your password with anyone else. The VAN tracks the IP address used by our users and will notify the system administrator if multiple IP addresses are in use for a single subscriber. If you do share your login information, your access will be discontinued and could be held liable under the terms of the VAN contract. Each user’s access is customized for that user’s need. It is essential that we are conscious of the confidentiality and integrity of the data contained in the VAN. Tip: Bookmark the log in page for future reference Tools for All Fund: VANual Page 4 • • Enter your pre-‐assigned username and password. Click the Login Button. After you provide your new password the screen will re-‐direct users to the “My profile” section of the VAN. Fields marked with a red * are required. Be sure to provide your email address. After you have updated your information, click the “Save” button. The Main Menu will appear. Main Menu Options Tools for All Fund: VANual Page 5 When you have logged on to the VAN the first thing you see is the Main Menu. This screen directs you to all of the other system functions and tools that you will use. Below is a brief description of the important functions that you can access from the Main Menu. 1. System User Information This information is viewable at the top left hand corner of the main menu and should have your name and the voter file committee that you have been assigned to. **If the name or committee is not yours please log off and contact the system administrator immediately.** 2. Help Center The Help Center on the VAN is designed to provide users with basic answers about system functionality and troubleshooting. The Intro to VAN 4 tab provides users a look at some of the new system features on the VAN. The Help Center is also where the new “ticketing” system is located. By clicking on “Contact the Admin” users can send a ticket to the system administrator about system errors or other questions or comments. When you press contact the Admin, it is important to note that this go to ISSI staff first. 1) To Activate the Ticketing system click on the link “Contact the Admin” 2) If there are any pending or complete tickets you wish to view, choose either one in the drop down menu and click refresh 3) To start a new ticket, click “Send the Request” 4) Label the ticket as a problem or suggestion, give it a subject and provide a thorough description. Then click “done”. 5) The System Administrator will reply via the VAN or email within 48 hours You can also get support by e-‐mailing [email protected] 3. Creating and Viewing Lists From here users have three primary functions: 1) Creating lists of targeted voters based on multiple criteria including voting history, geographic area, demographic data, model scores, etc. 2) The “Go to My List” link allows users to access a list that they have been working on. If a user logs off, or does other activities, the last list that they were working on is accessible from here. 3) From here, users can view their folders, which includes saved lists and saved searches. This is the directory of lists and searches that users accumulate while they use the VAN. Saved Turf Cutting is also accessible from this link. 4. Data Entry Functions Tools for All Fund: VANual Page 6 There are six ways users can enter data back into the VAN. All six are accessible from the main menu, but the following five are commonly used by organizers: 1) Scan Bar Codes-‐ allows users to utilize bar code scanning to enter large amounts of data into the system. 2) Script View-‐ Users can select a script and start phoning directly from the web site. As voter records appear on their computer screen they pull up the voters and simply fill in the responses as they go through the script. 3) Grid View- Users can rapidly enter data from a list of selected voters. Just enter the List Number from a printed list along with the script used for canvassing. 5) Run Bulk Uploads – Have your VAN administrator upload date from spreadsheets or databases that have been converted to a text file. 6) MiniVAN – Contact your VAN administrator to help configure iPhones, iPods and iPads to be used for door canvassing and to sync data collected at the door back into VAN. Android devices are not available yet, but this feature is coming soon. 5. Quick Tasks Virtual Phone Bank – Allows organizers to set up a Virtual Phone Bank where volunteers can make phone calls from lists in VAN and enter data directly into VAN will on the phone. Requires a phone line and an internet connection. 6. Quick Look Up • To do a quick look up on a particular voter, enter the last name and first name in the fields and click the “Search” button. Users can also input information such as phone number, county, address, zip code or city in order to refine a search. • Please note that if the “Use search technology” box is checked, the VAN will return information for first name derivatives. If you enter Bob in the first name field, you will get all matching records for both Bob and Robert. If the “SmartName” capability is not checked, you will only get exact matches. Tools for All Fund: VANual Page 7 That is, if you enter Bob, you will only get records for voters registered as Bob, not Robert. Note: Smart Name technology does not apply to address searches! • Once you have clicked search a list of voters may appear. To view the individual voter, simply click on the name. TIP: On the top right hand corner of the screen there is wheel shaped icon called “Change my settings”. This function allows the user to control what information appears when they do a quick look up. You can choose from multiple variables such as precinct, LD, name, etc. Creating a New List Use this function to begin the process of creating walk lists, call lists or mailing lists. Using the drop down menus and select the district, you want to report on. Select any other criteria to meet your targeted needs, like party, gender, age, registration date, etc. The phones only and e-‐mails only selections will only pull records, which have that data available. Once you have selected your criteria, click the search button on the top right hand side of the screen. Every section of the Voter Profile is searchable in the Create A List Workflow. From here, users can create targeted lists of voters to fit the targeting needs of their operation or campaign. Below is an example of the types of data and functions one has access to when creating a list of voters. By clicking on the + /-‐ box you can open or collapse each section. 1) Location/District Information: Use the drop down menus to select which county, city, congressional district, or other political geography you wish to search. When you select a city, an option appears to select precincts as well. In addition, in order to select multiple precincts or legislative districts (for example) simply click on the blue underlined link next to the drag down menus then select the precincts/districts you need. 2) Age/Registration Date: This function allows users to search for voters based on age or registration date. To search by age, enter in an age range in the boxes provided. In order to enter a Tools for All Fund: VANual Page 8 registration date click inside the box to bring up a calendar—select a date on the calendar to choose a registration date. For example, to search for new registrants, in the “Reg Date From” enter January 1st. Leave the “To” box blank. To create a list of all voters that registered between two dates, first select “oldest known” and run the search, then you will need to add “current” from the same date range. Adding more voters to a list will be covered later in the manual. 3) Targets: Targets are an additional way to create lists of voters (GOTV prospects, persuasion universes, people to exclude from targeting, etc.) that can be more efficient and more accessible to more users. However, only VAN administrators have the ability to create Target universes and they can help you do so. Targets can be shared across committees. Below are examples of targets of people in VAN listed as not registered to vote, separated into those who live in housing appropriate for door to door canvassing, and those for whom we have accurate mail and phone contact information. 4) Scores: Depending on the type of organization you represent, different scoring options will be available. ISSI has access to various types of turnout based, issue or value based clusters. Most scoring systems are done on a 1-‐100 scale with 1 being the least desirable and 100 being the most desirable. An individual with a turnout score of 2 is very unlikely to vote, where a score of 98 indicates that they will most likely vote. More information about each score will be provided as a supplement to this manual. 4) Sex: Search for men or women. 5) Survey Questions: This section will allow you to create a list using answers to questions asked by canvassers or callers. Tools for All Fund: VANual Page 9 6) Activist Codes: Member lists and other codes are accessible in this section. 7) My Saved Lists: All of your previously saved lists are accessible here. 8) Notes: Any notes entered can be searched through here. 9) Marital Status: You can search by single or married. This is a model so it is not perfectly accurate. 10) Phones and Emails: Limit your search to only records that have an email or a phone number. 11) Name: Search by a first or last name. 12) Suppressions: Use this to quickly eliminate addresses that were flagged as possibly bad by canvassers. 13) Address Types: Select Walkable Houses to exclude all those people who live in gated communities or apartment complexes (important for volunteer walks!!) Users can also select just those voters with PO Boxes. 14) Save Page Layout-‐ Use the panes to select which fields you always want to come up when you are using create a new list. To create a customizable page, click Save Page Layout. Search Using Vote History One of the primary ways to search for voters is by voting history. From here, VAN users can pull lists of people based on how often they vote, whether they voted by early ballot or at the polls, whether they requested a primary ballot. Users can also look at general elections, primary elections, or in some cases, municipal elections. Early Voting Your VAN administrator will obtain information from the Secretary of State and update the early voting data regularly during an election. You can check on either of the two boxes toexclude people that early voted from your persuasion and/or GOTV programs, or to include only people that have early voted to analyze who are the early voters, or which of them are in your early vote program to measure your program’s performance. Tools for All Fund: VANual Page 10 You can also identify people that have been sent a ballot but have not returned it yet so that you can contact them for non-‐partisan persuasion purposes. Using the drop down menu you can include p or exclude people based on the three items listed. By clicking on the calendars you can specify the ranges you are interested in. To narrow your list to people that have been mailed a ballot but have not returned it yet: 1) create a list and include people who were “Mailed a Ballot From” (date 1) to (date 2). Click on the search button. 2) Click on the [narrow] button (this is explained below) and then include people that have “returned a Ballot From” (date 1) to (date 2). Click on the search button and you will have a new list of people still holding their ballots. Studies show that the closer a persuasion contact is made to the time the person votes, the more impact it can have. People with a ballot sitting on their kitchen table are ideal persuasion targets. Vote History 1) Go to the vote history section of the create a new list page 2) The default is to have no vote history in any searches. To begin, choose from the drop down menu the following selections: “Any”, “All”, “At Least”, “Exactly” and “No More Than” Tools for All Fund: VANual Page 11 3) If you choose “exactly”, “at least” or “no more than” a box will appear for you to put in a NUMBER. For instance, you want to search for those voters who voted in EXACTLY 3 of the following (elections you choose) 4) Select the elections that are pertinent to your search. The elections at the top of the search pane are general elections, and towards the bottom are primary elections or special elections. Special elections are generally odd year November ballot initiatives. 5) Select among the choices “voted”, “didn’t vote”, “at polls” or “early”. 6) Notice for the 2008 Primary Election that it is also possible to search based on what type of ballot was selected. Example 1: Search for Voters who have voted in the last two general elections • Select the option “all” from the drop down menu. Select 2010 General and 208 General. Select the option “voted” Example 2: Search for voters who have voted in 4 of the last 5 general/primary elections. • Select the option “exactly” from the drop down menu. Enter the number “4”. Select 2010 General, 2010 Primary, 2008 General, 2008 Primary, 2006 General. Select the option “voted”. My List Options and Functions Once you have run your search the “My List” page will appear with you results. The total number of people is located at the top left hand side of the screen. Also listed is the number of doors and mailboxes. And below is a sample of the list of people. By clicking on their name their record will appear and you can quickly see if they should be in your target population, or not. If not you will need to determine what you did wrong in your selection criteria and fix it. Add, Remove, or Narrow Your List Tools for All Fund: VANual Page 12 • You can refine your search using the “Add Names”, “Remove Names” or “Narrow My List” functions located at the top of the page. Selecting any of these options will take you back to the search criteria screen. • “Add Names” will select additional people based on your new criteria and add them to your current list. • “Remove Names” will delete people from your current list based on your new criteria. Just remember you want to “include” people in your search criteria in order to remove them. • “Narrow My List” will narrow your list based on your new criteria (i.e. If you selected records for the entire district and use the “Narrow My List” to only one precinct, you will get voters records for only the precinct you chose in the new selection.) Saved Lists and Searches • Use this option to save your list or your search. • Click on Save. Save your list as either a saved list, or a saved search. A saved search is dynamic, meaning that the VAN will save the search criteria and add names, or remove names from your search based on canvass results, or new additions to the voter file (new voters). A saved list is static, so the list is saved will not be changed or altered in anyway, regardless of changes. • Name your saved list or search and either place the list/search in a new folder or an already existing folder. Enter in a detailed description in the description box. Click Save. Tip: Over time you will amass quite a few saved lists and searches. Get in the habit of giving those lists and searches self-‐explanatory names. Having a list with a cryptic name won’t do you much good if you can’t remember what it is for. The description box that is available when you save the list is your best friend. • Saved lists and searches are accessible from the main menu by looking clicking on the My Folders icon. • When you click on the folder and click on the blue highlighted “edit” button to the right of the Saved Search you are directed to the saved search editing screen. Tools for All Fund: VANual Page 13 • From here users can see a detailed description of the parameters that make up your saved search. Users can edit the search or add steps to the search using the drop down menu. Counts and Crosstabs Click on the “Counts Option” in order to view cross tabs of data about the list that you have created. Below is an example of pulling counts based on age and gender. Tools for All Fund: VANual Page 14 • • • • Pull the options on the drop boxes labeled “Column 1”, and “Cross tab 1”. You can choose variables such as age, sex, legislative district, precinct, etc… Once you have selected your criteria click “Refresh” Your cross tab will appear at the bottom of the page. You can export the cross tab to an excel file. Turf Cutting Often when executing your walk program you will have a limited amount of time and volunteer resources to “Cut Turf,” the process by which a field organizer assembles walk packets complete with voter lists, scripts and maps for a “Walkable Area.” Most of our precincts have numerous North-‐South or East-‐West streets periodically interrupted by gaps in those streets. Sending walkers down the entire length of some streets may be impossible. The Turf Cutting feature of the VAN will allow you to assemble logical walk groups. Tools for All Fund: VANual Page 15 Step 1: Create the list of voters you wish to canvass or create walk sheets for based on the criteria discussed earlier. For issues of practicality, users should select one precinct at a time, and VAN limits the number of people per turf to no more than 2,500 at a time. Step 2: Once you have produced your list, select the “Cut Turf” option on the My List Page. (you should save your list before cutting turf!) Step 3: Assessing Your Area. Below is how the turf cutting system will first appear. You should see a Google map, and dots, which represent the voters in that area. On the left hand side of the map you should see a pull down bar which allows you to zoom in and out of the mapping area. On the right hand side of the map you should also see a legend, which indicates how, many “unassigned voters” there are. This number will decrease as we begin cutting turf. Step 5: Use the bar at the top left of the map to zoom into your mapping area Step 6: Begin cutting your first piece of Turf. Be sure that the “Draw Turf” box is checked on the left hand side of the screen. To begin, use your mouse and left click on the spot where you want to begin your cutting process. Turf cutting works in line segments, so left click again down the page, and Tools for All Fund: VANual Page 16 begin shaping your turf cutting area. (be careful about cutting turf near the zoom scroll bar-‐ you may re-‐zoom the map) Step 7: Complete the box, or whatever shape necessary, in order to cut a group of voters. Step 8: Once you have centered on a group of voters, those voters should appear a different color. A count of those selected voters is on the right hand side of the screen under “legend.” To save this group of voters, pull down the menu on the left side of the page and save it as “Turf 1.” If you accidentally leave out voters who you want in your piece of cut turf, simply click on “select individuals,” choose the excluded voter, then save the turf again. Step 9: Finish Cutting Turf, and assigning them Turf Numbers (Turf 1, Turf 2, Turf 3, etc.) and Click Finish Step 10: After you have clicked Finish, you will be directed to “Save My Map Region.” Tools for All Fund: VANual Page 17 From here, you can save your turf in either a new folder, or an existing folder. Name the folder, and then name the mapping region. The mapping region is area where the user was cutting turf. You can re-‐access the mapping area to select leftover voters, or to cut new voters that appear in the VAN after later updates. Retrieving Cut Turf Step 1: Go to View My Folders on the Main Menu. Step 2: Click on the Folder, which has the cut turf in it. Step 3: To share the turf you have cut with another VAN user, click on Edit Folder, and assign the folder to another user in your committee. Step 4: (Optional) To pull up an individual piece of turf in order to print a walking list, click on the piece of turf. This will direct you to the “My List” page. Printing Call/Walk Sheets A walk/call list consists of three things: 1) A list of voters 2) A report format and 3) A script used for voter contact. After you complete a search and decide upon a list for calling/walking (or when you have loaded a piece of turf for printing), the next step is to format the list for printing. From the My List page click on the link “Print” Tools for All Fund: VANual Page 18 VAN allows you to create a .pdf file to email to your volunteers/staff/etc and clicking the box will send the .pdf to your “My Requests” section of the Main Page. If you don’t create a .pdf you can only print the report from the computer you are working from. Step 1: Report Format-‐ Choose the format of the report. You can choose the standard walking or calling report or choose from a custom report that you create. Step 2: Script-‐ Select the script that you want to use for this list. The script is created earlier and you will need to work with your VAN administrator to set this up. Step 3: Source-‐ Toggle the source as either a calling list or a walking list. The calling or walking source will also determine the pre-‐set sort orders Step 4: Determine Sort Order-‐ From here, users can determine in which order voters will appear on the calling/walking lists. You can order the voters by address, odd/even designations, name, etc.. Step 5: Determine where you would like page breaks. If you are going out with a pair of people you may want to have page breaks at odd/even houses. If it is one walker, the page break should probably be the street name. Step 6: If you are printing a walking list you have the option of selecting:”Print Map with Voters” This will print a map along with the report. Tools for All Fund: VANual Page 19 Step 7: Click Next. You will be printing to a PDF and you will have to retrieve this under my PDF files in the notification box in the top left hand corner of the VAN. There will be a link that will take you right to this step. It is important to note that you can only print to PDF, due to a recent change. Step 8: In order to print the map for your canvasser simply click on the Print button on the top left hand side of the page, or use your internet browser’s print function. Once you have printed the map, click next. Step 9: Your Walk/Call sheet will appear. Print the list and distribute it to your volunteers!! NOTE: Some printers have difficulty printing VAN walk/call lists even with the pre-‐set settings. Test your printer first by printing a few pages, and adjust your settings as needed. Data Collection and Entry In addition to being an excellent program for distributing information about voters, the VAN is also designed to collect the results from your canvass, and store them for later use. Not only can you ask a series of multiple-‐choice questions (see Survey Scripts and Survey Questions) you can enter that data back into the VAN for use later in your campaign or program. There are three primary functions for data entry: Grid View, Script View and Bar Code Scanning. NOTE: Both Grid View, and Script View DO NOT require walk sheets or call sheets to be in paper. Bar Code Scanning does rely on printed walk/call sheets NOTE: Activist Codes and Survey Questions can also be entered by looking up the individual voter! Grid View Grid View Data entry is a way to enter data from canvassers and phone banks on to the VAN directly. Step 1: Click on “Grid View” from the VAN main menu Tools for All Fund: VANual Page 20 Step 2: Enter in your list number, or select the list in your queue. (all lists produced in a report format generate a list number) Step 3: Select your script, canvasser, source and sort order (the same sort order you used when you printed your original report) and click “Next” Step 4: Enter in the results of the calls/knocks via the drop down menus provided. Be sure the script used during canvassing corresponds to the script questions used in the grid view entry. Step 5: Toggle the appropriate responses and click “Save”. Script View Step 1: Open a unique list from your “Saved Lists” Step 2: Click on Script View from the Main Menu (you need to click on the arrow to scroll to the Script View icon, which looks like this ) Step 3: Under the “Change Settings” link adjust the script you are using, and the name of the canvasser, if necessary Tools for All Fund: VANual Page 21 Step 4: Enter in the results of the canvass and click next. Bar Code Data Entry In order to do Bar Code Data Entry you will require a Bar Code Scanner that hooks up to a PC or lap top computer, usually via USB connection. Step 1: Click on “Scan Bar Codes” from the main menu Step 2: Select the script, canvasser, and the source (calling or walking sheets) Click Next Step 3: A list of canvass responses, and the corresponding bar codes will appear. You must print this page and place it next to your bar code scanner. (Please use a high quality printer!!) Step 4: After you have printed the bar codes, click NEXT. Step 5: Begin scanning. Start with the bar code on the walk/call sheet. The name of the voter on the walk sheet should appear on the computer. Then scan the canvass result. Step 6: Continue scanning until complete. Information is sent directly to the VAN database. Other Features There are several other features available when you have created a list. These features are found at the top of my list and can be accessed as you can see here: Tools for All Fund: VANual Page 22 Letters – allows you to merge your list into a form letter Labels – allows you to create mailing labels from your list Emails – VAN provides a blast email service at an additional charge. If interested, contact your VAN administrator. Calls – VAN offers four different services. The first, which is free, is called Virtual Phone Bank. VPB allows you to create a list and have your volunteers log into VAN, begin calling people from the list and enter the call results directly into VAN. VAN prevents callers from calling the same person twice, and you can monitor the progress of the phone bank remotely. Your VAN administrator will need to create logins for your volunteers and set up the VPB so contact her or him if you are interested. The next three services are provided at an additional fee. If you have an interest setting RoboCalls, a RoboSurvey or a Predictive Dialer Campaign, contact your VAN administrator. Export – allows you to export your list. (see next page) Tools for All Fund: VANual Page 23 Choose from any of the following options, then click “next” and follow the directions. Once you complete the export, your VAN administrator will receive an email saying you are exporting a list and she or he will review the export and approve it. Once approved, the list will show up on the main menu in “My Export Files.” Note: For security purposes users are limited in how large a file they can export. UNDER NO CIRCUMSTANCES IS ANYONE ALLOWED TO EXPORT THE ENTIRE VOTER MAINE FILE. MiniVAN – this option pushes your list to a mobile device, such as an iPod, iPhone, or iPad. Canvassers can use these devices as they go door to door and the list will appear on their device and they can collect information at the door and sync it back to the VAN. Your VAN administrator will have to set this up for you so contact them if interested. Split – allows you to split your list into multiple lists. Sample - allows you to create random samples from your list. Tools for All Fund: VANual Page 24 Conclusion Please don’t hesitate to reach out to us at [email protected] if you have further questions or concerns. **There may be administrative system tools that are not covered in this manual. If you have any questions please contact your VAN Administrator** Tools for All Fund: VANual Page 25