1
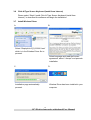
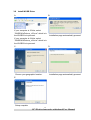
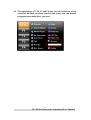
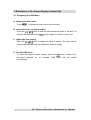
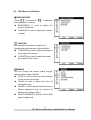
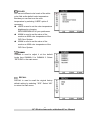
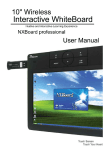
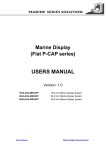
0
Digital Writing Pad User Manual
Table of Content
1. Product....................................................................................................... 2
1-1
1-2
1-3
1-4
Product Introduction...............................................................................2
Features ..................................................................................................2
Product and Accessories .......................................................................2
Functions.................................................................................................3
2. Hardware Installation ................................................................................ 4
2-1
2-2
Illustration of Installation........................................................................4
Install Step by Step ................................................................................5
3. Edu Tab Software and Touch Driver ........................................................ 6
3-1
3-2
3-3
3-4
3-5
3-6
3-7
3-8
3-9
Install Microsoft Dot Net Framework .......................................................7
Install Microsoft XP Tablet PC Edition Development Kit 1.7....................8
Install Microsoft XP Tablet PC Edition 2005 Recognizer Pack
(Windows XP Only)...............................................................................10
Install Touch Driver ................................................................................11
Install Edu Tab Software.........................................................................13
Click-N-Type Screen Keyboard (Install from Internet)............................14
Install Wireless Driver ............................................................................14
Install WUSB Driver...............................................................................15
Wireless Transmission ............................................................................16
4. Instruction of Edu Tab............................................................................. 17
5. Definitions of On Screen Display Control Key...................................... 19
5-1
5-2
Navigating the OSD Menu ..................................................................19
OSD Menu on VGA Mode ...................................................................20
5. Revision History ...................................................................................... 22
1
10" Wireless interactive whiteboard User Manual
1. Product
1-1
Product Introduction
The 10” wireless interactive whiteboard integrates 10” widescreen display
with touch technology, which is a creative solution for teaching environment.
You can instantly present through a second display or a projector, what you
just wrote on the 10” wireless interactive whiteboard would be
simultaneously showed on the projector wall. You can easily make marks
and comments on digital files which enables you to interact with your
students as well as improve your teaching quality, renewing the traditional
teaching methods.
1-2
Features
1. Intuitive Operation
Different from other products in the market, 10” wireless interactive
whiteboard is embedded with 10” widescreen display that is user-friendly
and requires no practice before operating.
2. Wireless Transmission
With a wireless design, 10” wireless interactive whiteboard help you get
rid of those annoying cables and it allows maximum distance of data
transmission 10 meters.
3. Ergonomic Design
Taking place of the traditional mouse, the writing stylus efficiently
reduces injuries caused by using mouse constantly.
4. Multiple functions
10” wireless interactive whiteboard is built-in four hot keys for NXBoard
software.
1-3
Product and Accessories
l 10” wireless interactive whiteboard
l Stylus
l User manual
l Wireless PC Adapter
l
l
l
l
Wireless Device Adapter
Wireless USB Dongle Driver CD
Driver CD
Power Adapter
2
10" Wireless interactive whiteboard User Manual
1-4
Functions
Hotkeys (Functions are enable under OSD menu)
Battery information/Exist OSD menu
Enter OSD menu / Select
Decrease the value “ ━ ” (minus), or “◄” (Left) Select below function
Increase the value “ ┿ ” (plus), or “►” (Right) Select up function
No function
No function
3
10" Wireless interactive whiteboard User Manual
2. Hardware Installation
2-1 Illustration of Installation
※ To release the battery pack:
※ Battery can be used about 3 hours when it is fully charged.
4
10" Wireless interactive whiteboard User Manual
2-2 Install Step by Step
•
•
•
•
Step 1
Step 2
Step 3
Step 4
Install Wireless USB Dongle Driver Software (Refer to page 13 )
Plug your projector’s VGA connector in PC’s VGA port.
Plug the Wireless PC Adapter in the PC’s USB port.
Plug the Wireless Device Adapter in the PC’s another USB port.
• Step 5 Waiting for dialogue box shows “Wireless USB Dongles has been
paired”. Check and choose “ok” when the wireless USB dongle has
been paired.
• Step 6
Press the power button locating in the upper left to turn on the
wireless interactive whiteboard.
• Step 7
Pull the Wireless Device Adapter out the PC’s another USB port, and
plug it in the Wireless interactive whiteboard’s USB port.
• Step 8
The indicator light of Wireless Device Adapter and Wireless PC
Adapter start to twinkle.
• Step 9 When the Wireless PC Adapter has been connected to Wireless
Device Adapter, the
will be showed in right descend corn.
(※ When you change the computer, you need to pair Wireless Device Adapter and
Wireless PC Adapter again.)
Wireless PC Adapter
Wireless Device Adapter
5
10" Wireless interactive whiteboard User Manual
3. Edu Tab Software and Touch Driver
The installation process will automatically run after put the driver CD in the
CD-ROM Drive; please select step1 to 6 in the main page accordingly.
6
10" Wireless interactive whiteboard User Manual
3-1 Install Microsoft Dot Net Framework
Select “Step1. Microsoft Dot Net Framework” to begin the installation.
A.
B.
Select “I accept the terms of the
Enter the installation page.
Select “Next” to proceed.
License Agreement” and click
“Next” to proceed.
D.
C.
Installation is complete.
Microsoft Dot Net Framework is
being installed.
7
10" Wireless interactive whiteboard User Manual
3-2 Install Microsoft XP Tablet PC Edition Development Kit 1.7
Select “Step2. Microsoft Windows XP Tablet PC Edition Development Kit
1.7” to begin the installation.
A.
B.
Select “Next” to proceed.
Enter the installation page.
C.
D.
Select “Everyone who use the
computer (all users)” and “Next” to
proceed。
Select “I accept the terms in the
license agreement” and “Next” to
proceed.
8
10" Wireless interactive whiteboard User Manual
E.
F.
Select “Custom” and “Next” to
proceed.
G.
Select “Next” to proceed.
H.
Select “Install” to install the
software.
The installation page will be closed
automatically after the installation is
done.
9
10" Wireless interactive whiteboard User Manual
3-3 Install Microsoft XP Tablet PC Edition 2005 Recognizer Pack
(Windows XP Only)
Select” Step3. Microsoft Windows XP Tablet PC Edition 2005
Recognizer” to begin the installation (Windows XP only)
A.
B.
Select “Next” to proceed.
Please select “I accept the terms in
the license agreement” and select
“Next” to proceed。
C.
D.
Select “Next” to proceed after filling
out Customer Information.
E.
Please select “Custom” and “ Next”
to proceed.
F.
Select “Install” to install the software.
The installation page will be closed
automatically after the installation is
done.
10
10" Wireless interactive whiteboard User Manual
3-4 Install Touch Driver
Select “Step4. Install Touch Driver” to begin the installation”
A.
B.
After entering the installation page,
select “Next” to proceed.
C.
Select “Next” to proceed.
D.
Please select “None” to do 4 point
calibration when the system starts
and select “Next” to proceed.
Select “Next” to proceed.
E.
F.
After making sure the USB Touch
device is installed correctly, select
“OK” to proceed.
Select “Next” to proceed.
11
10" Wireless interactive whiteboard User Manual
G.
H.
Select “Next” to proceed.
Select “Next” to proceed.
I.
The installation page will be closed
automatically after the installation is
done.
12
10" Wireless interactive whiteboard User Manual
3-5 Install Edu Tab Software
Please select “Step 5. Install Edu Tab” to begin the installation.
If you have never installed “.Net Framework 2.0 or later edition”, please do the
installation of “dotnetfx2.0.exe” in the driver CD before proceeding to Step 5.
A.
B.
Please select “All users” or “Just
me” according to your demand and
select “Next” to proceed.
After entering the installation page,
select “Next” to proceed.
C.
D.
Select “Next” to install the
software.
Please select “Close” to close the
installation page.
13
10" Wireless interactive whiteboard User Manual
3-6 Click-N-Type Screen Keyboard (Install from Internet)
Please select “Step6. Install Click-N-Type Screen Keyboard (Install from
Internet)” to download the software and begin the installation.
3-7 Install Wireless Driver
A.
B.
Select “DisplayLink-5[1].2.22663.exe”
which is in the Wireless Driver file to
proceed.
Select language and read the license
agreement, select “I Accept” and precede
installation
C.
D.
Installation page automatically
proceed.
Wireless Driver has been installed in your
computer.
14
10" Wireless interactive whiteboard User Manual
3-8 Install WUSB Driver
A.
B.
If your computer is 32 bits, select
“WUSB WinDrivers_×32.exe” which is in
the WUSB file to proceed.
If your computer is 64 bits, select
“WUSB WinDrivers_×64.exe” which is in
the WUSB file to proceed.
Installation page automatically proceed.
D.
C.
Choose your geographic location.
Installation page automatically proceed.
E.
Setup complete
15
10" Wireless interactive whiteboard User Manual
3-9 Wireless Transmission
•
Step1: After you installed the wireless driver, you will find a new icon
your tool bar.
•
Step2: Pair the wireless USB dongle. (Refer to page 5)
•
Step3: Plug the PC Adapter into the USB port of your computer.
•
Step4: Plug the Device Adapter into the USB port of wireless interactive
whiteboard.
•
Step5: Turn your wireless interactive whiteboard on.
•
Step6: The indicator of both wireless USB dongles (PC/Device Adapter) will
start to flashing and the monitor of wireless interactive whiteboard will
on
receive images. The Wireless icon turns to green .
(The Wireless icon turns to red
represent no signal is being
received.)
•
Step7: A new icon
is shown on the tool bar while the wireless transmission
is being activated.
•
Step8: Wireless transmission setting is done.
※If you has some problems with the images on the screen of wireless interactive
whiteboard, try to click
(The icon
to open the menu and choose “ mirror“.
is only shown while wireless transmission is being activated.)
16
10" Wireless interactive whiteboard User Manual
4. Instruction of Edu Tab
4-1 After your computer reboots, the Edu Tab Digital Writing Pad
software will automatically run when you log on Windows. Double
click the Edu Tab icon to call main page.
4-2 Main page of Digital Writing Pad software:
Main Menu
Notes Tab*
Onscreen
Keyboard
Hotkeys
*Please refer the Notes Tab software manual in driver CD for details.
17
10" Wireless interactive whiteboard User Manual
4-3 Through Hotkeys (F1, F2, F3 and F4) you can set 4 shortcuts of any
functions. Besides functions listed on the menu, you can browse
programs (executable files) you need.
18
10" Wireless interactive whiteboard User Manual
5. Definitions of On Screen Display Control Key
5-1 Navigating the OSD Menu
A. Display the main menu
Press
to display the main menu on the screen.
B. Select the item you want to adjust
Press the
/
button to shift the item selections down or up until it is
desired, and then press the
button again to enter the menu item.
C. Adjust the item setting
Press the
/
button to adjust the value of setting. The value will be
stored automatically once you adjust the value of setting.
D. Exit the OSD menu
To return the regular screen viewing, press the
button. If there is no
command respond for 10 seconds, OSD menu will be closed
automatically.
19
10" Wireless interactive whiteboard User Manual
5-2
OSD Menu on VGA Mode
BRICONTRAST
Press “
” to increase or “
” to decrease
the brightness or contrast
u BRIGHTNESS is used to adjust the
screen’s brightness.
u CONTRAST is used to adjust the screen’s
contrast.
POSITION
You can adjust the screen’s position by
changing its horizontal and vertical position.
u H-POSITION is used to adjust the image to
left or right of the screen.
u V-POSITION is used to adjust the image
up or down of the screen.
IMAGE
You can change the screen quality through
adjusting items under “IMAGE”
u AUTO is used to choose the best settings
for the current input signal.
u CLOCK is used to adjust the value of
horizontal image.
u PHASE is used to adjust the phase control
(Phase adjustment may be required to
optimize the display quality )
u WHITE BALANCE is used to set the RGB
signal voltage level
20
10" Wireless interactive whiteboard User Manual
COLOR
You can set different color levels of the white
color field as the default color temperature.
Besides you can fine tune the color
temperature by selecting “USER” option if
necessary.
u USER is used to set the color temperature
brightness by choosing
RED/GREEN/BLUE for your preference.
u 9300K is used to set the value of the
monitor as 9300 color temperature of the
CIE Color System.
u 6500K is used to set the value of the
monitor as 6500 color temperature of the
CIE Color System.
GAMMA
GAMMA is used to adjust it at four default
levels from GAMMA 0 to GAMMA 3. Select
“RETURN” to the main menu.
RECALL
RECALL is used to recall the original factory
default setting by selecting “YES”. Select “NO”
to return the main menu.
21
10" Wireless interactive whiteboard User Manual
OSD EXIT
You can quit the OSD menu by selecting “YES”.
Select “NO” to return the main menu.
SUMMARY
BRICONT BRIGHTNESS
CONTRAST
RAST
POSITION
IMAGE
COLOR
GAMMA
GAMMA 0
GAMMA 1
GAMMA 2
GAMMA 3
YES
NO
H-POSITION
RECALL
V-POSITION
AUTO
CLOCK
YES
PHASE
OSD EXIT
NO
WHITE
BALANCE
USER(RED/GREEN/BLUE)
9300K
6500K
ADC BRIGHTNESS
5. Revision History
Version
Date
1.0
2010.02.01
Note
ü
First Version
Author
Alicia Liao
22
10" Wireless interactive whiteboard User Manual