1
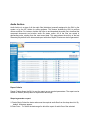
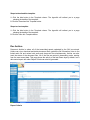
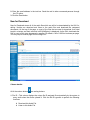
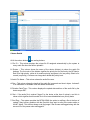
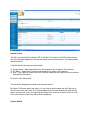
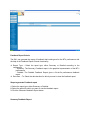
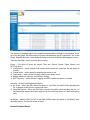
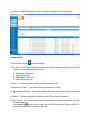
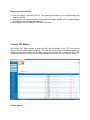
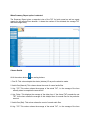
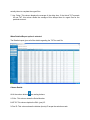
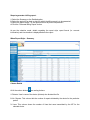
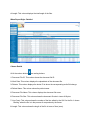
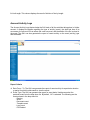
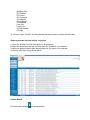
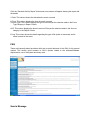
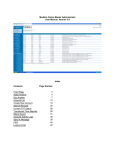
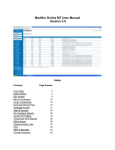
Medikin Online QA1 User Manual Version 3.0 Index Contents Front Page Audio Archive Doc Archive New for Download MT Bench Under Edit Download Recent Files Template Archive Search Records QA Feedback Reports My Feedback Current TAT Status Turnaround Time Reports Billing Report Account Activity Logs FAQ Page Number 2 4 9 13 16 18 21 23 25 31 35 39 41 44 47 49 Send A Message Change Password Logout & Exit 50 51 51 Front Page The QA1 can manage and control the entire activity of his/her account from this page. Details of the front page are as follows: 1. The company logo and the site name are on the top frame of the page. 2. There is an orange help image on every page that contains online help for that specific page. 3. Below the logo and name, the system shows the QA1 greeting with the current time and the last login time information as per EST. 4. The software version is above the details of recent account activity. 5. The details of recent account activity are displayed next. The system shows details of the last 50 activities of the account with date, time of occurrence of event, type of event, account IDs and IP address from where login occurred. The recent activity log contains all of the past date details. 6. There are two round buttons on the top right corner: Audio and Doc (Document) Archive. Audio Archive details all of the audio files assigned to the QA1. Doc Archive shows the details of the document files. 7. To the right of Audio and Doc archives are two reports: New for Download – This report shows the list of all the audio files that are to be downloaded by the QA1 for editing. MT Bench – This report shows the list of all the audio files that are being transcribed and are expected to come to the QA1 for editing. The functionality of this feature is based on the fixed routing module. For instance, if the workflow for any doctor is set as MT->QA1->Client, then the list of all the audio files uploaded by this doctor will be displayed in this report. Under Edit - This report shows the total number of audio files that are being edited. The QA1 can upload the files from this screen. 8. There are Navigation Menu options below these reports on the right blue bar of the page. The options available are as follows: Download Recent Files – This option helps the QA1 to download the audio files with one click. Template Archive – Template Archive shows the list of all the templates uploaded by the doctor. Search EPR – This option helps the QA1 to retrieve the audio and transcribed files depending upon the selected search criteria. QA Feedback – This option helps the QA1 generate a report of the feedback given by the QA2 for his/her performance. My Feedback – This option helps the QA1 generate a report of the feedback that he/she gave concerning the MT’s performance on files that were routed to him/her for editing. TAT Summary –This option displays the details of Turn Around Time for the audio files that are being edited. TAT Report – This option displays the details of Turn Around Time for completed (edited) files. Billing report – This option helps the QA1 to generate the billing report depending upon the selected criteria. Recent Activity Log – This option gives a detailed description of all events occurring in the QA1’s account on an event and account basis for the selected duration. FAQ – These are frequently asked questions and answers for most of the QA1’s general queries. Send a Message – In case of any technical or non-technical problem, the QA1 can send a message to the Site Administrator. There is no need to enter an email address or setup Outlook to use this web-based messaging function. Change My Password – The QA1 can change his/her account password through this option. Logout – The QA1 can logout by clicking this button. At the end of the page a hyperlink called email the administrator appears which will help you send a message to the Site Administrator in case of any technical or non-technical problem. Audio Archive Audio Archive is a store of all the audio files (dictations) manually assigned to the QA1 by the system or by the MT Admin for editing purpose. This feature enables the QA1 to perform various activities. For instance, he/she can listen to and download the audio files, download the compared documents and monitor audio file status online. All of the files are sorted in descending order, starting from the most recent date. This page shows the activity of the last fifteen days by default but a date sorted report with other Report Criteria can also be generated. Report Criteria Report Criteria allows the QA1 to sort the report as per required parameters. The report can be sorted on dictator (doctor) basis for a particular date range. Steps to generate a report 1. Doctor Basis: Select the doctor who owns the required audio files from the drop down list. By default, All doctors appear. 2. Date From – To: Select the date range for which the report of audio files of the selected dictator is to be generated. 3. Click on the Generate Report button. As per the report criteria selected, the system shows the total number of audio files, file length in minutes and size in KB (kilo bytes). By default, a list of 100 files is shown per page. You can jump to another page from the Page List. Column details: All of the column buttons are sorting buttons. 1. File ID – This column displays the unique file ID assigned automatically by the system to every audio file when the doctor uploads it. Click the link to File ID to perform the following functions: Download this Audio File Listen to this Audio File View/Download the MT/QA1/QA2 document files if the file is “Completed.” 2. Dictator – This column shows the name of the doctor (dictator) to whom the audio file belongs. The font color of the dictator signifies the priority set for him/her by the MT Admin. Red is for high priority, yellow is for medium priority and green is for low priority. Black is for normal (no priority). A mouse-over image also details this priority level. 3. Audio File Name – This column shows the audio file name. 4. Size – This column shows the audio file length in seconds and size in bytes. It shows 0 if no information is available in the file header information. 5. Dictation Date / Time – This column displays the upload date and time of the audio file by the doctor as per EST. 6. Stat – If the audio file is marked “Urgent” by the doctor at the time of upload, a red tick is shown to signify that this audio file is to be transcribed/edited on a priority basis. 7. Red Flag – The system provides the MT/QA1/QA2 with the option to red flag a file at the time of upload if there was a problem with the file and he/she wants to refer it to the senior editor or the MT Admin. This column shows a red flag image if the file was red flagged along with the account ID of the person who red flagged it. 8. Status – This column shows the file status. It helps the QA1 to track the file online through a color schema. Yellow 1– Under QA1: When the audio file is with the QA1 for editing, this column shows a yellow button (“1” image on it) with an “Under QA1” mouse-over image. Yellow 2 – Under QA2: When the file is with the QA2 for further editing, it shows a yellow button (“2” image on it) with an “Under QA1” mouse-over image. Green – Completed: After the final file is completed and uploaded for the doctor, it shows a green button (tick mark on it) with a "Completed" mouse-over image. Green – e Signed: When the doctor e-signs the file, it shows a green button (“e” image on it) with an “e Signed” mouse-over image. Once a file is e signed, the system locks it so that no other operations can be performed on the document file. 9. MT File – This column shows the MT ID who was assigned the file for transcription. It also shows the transcribed file ID with a blue button and a “View MT File” mouse-over image. Click the button to download or review the file. 10. QA1 File – This column displays the QA1 ID who was assigned the file for editing. If the QA1 has already uploaded the edited document file, it also shows a blue button with a “View QA1 File” mouse-over image. Click it to download, update or review the file. If the when workflow for the doctor is set as MT->QA1->Client, it displays a dark green button the doctor uploads the corrected file against the QA1 file. 11. QA2 File – This column displays the QA2 ID who was assigned the file for further editing. If the QA2 has already uploaded the edited document file, it also shows a blue button with a “View Document File” mouse-over image. Click it to download and review the file. If workflow for the doctor is set as MT->QA1->QA2->Client, it shows a dark green button when the doctor has uploaded the corrected file against the QA2 file. 12. Compared Document – The QA1’s document file is compared with the final file that has been uploaded for the doctor. This serves as direct feedback for the QA1 based so that he/she can improve his/her accuracy. This column shows “NA” when the file is not compared because the account is not set for file comparison, “Waiting” when the file is in the process of comparison and “Same when there were no changes made to this document file. While a dark blue button signifies the compared document file. Click it to view the file. 13. Template – If the doctor has uploaded any template along with the audio file, or there has been an auto selection of the template by the system, this column shows the link in the form of a blue button for the template. Click it to perform the following functions: Download this Template View this Template 14. Attachment – The doctor can upload any attachment along with the audio file. This column displays a paper clip image to signify that there is a file attachment with the audio file. Download the attachment by clicking this image. 15. Upload – This column shows an orange button to upload the document file against the corresponding audio file. Nothing is shown if the document file has already been uploaded. 16. Remarks – The last column displays the dictator's (doctor’s) remarks for the transcriptionist of the file. It shows “REJECTED” when the doctor rejects the file. Checkbox Functions At the bottom of the page, there are certain checkbox functions to facilitate group activity on a single click. The QA1 can check-mark selected audio files and can perform the following functions on all the files at once: Download Selected Audio Files Download Compared Document(s) with the option of downloading audio file(s) of the doctor selected from the drop down list. By default, “All” doctors is selected. Steps to play an audio file: 1. In the first column, click on the File ID. The hyperlink will redirect you to a page showing the details of the file. 2. At the bottom, click the Listen to this audio file button. Steps to download an audio file: There are two ways to download an audio file through Audio Archive: To download multiple files at a time: 1. Click on the check box in front of the file ID you want to download. 2. You can select multiple files to download. 3. Go to the bottom of the page and select Download Selected Audio files button. 4. Click the Perform Checkbox Operation button. To download a single file: 1. Click on the File ID you want to download. The hyperlink will redirect you to a page showing the details of the file. 2. At the bottom, click the Download this Audio file button. Steps to Update the file information: 1. Click on the blue button in the QA1 File column. The hyperlink will redirect you to a page showing all of the details of the file. 2. Update the required information. 3. At the bottom, click the Update File Information button. Steps to upload the document file: 1. Click the orange button in the Upload column. 2. Browse the local hard drive for the document file. 3. Enter the information as required. 4. Click the Upload and Attach Selected File(s) button. Steps to download or view MT/QA1/QA2 document files: Document Files can be downloaded in two ways: 1. Click the ID of the file in the first column. This will redirect you to the page showing the details of the file. This page will show a blue button for the MT/QA1/QA2 file in the following cases: If workflow for the doctor is MT->QA1->Client and status is yellow1 (i.e. QA1 has the file), a blue button for the MT file will appear. If workflow for the doctor is MT->QA1->QA2->client and status is yellow2 (i.e. QA2 has the file), blue buttons for the MT file and the QA1 file will be displayed. If status is green (completed), blue buttons for all of the MT files, the QA1 and the QA2 files will appear, depending upon the workflow set for the doctor. 2. Click the corresponding blue button to view the MT/QA1/QA2 file. A new screen will appear. 3. Click the Download this Document or the View this Document button as required. OR 1. Click on the blue button in the MT/QA1/QA2 File column as required. The hyperlink will redirect you to a page showing all of the details of the file. 2. Click the Download this Document button. Steps to listen the audio file as well as view the corresponding transcribed file: 1. Click on the blue button or the document file ID in the MT/QA1/QA2 File column. The hyperlink will redirect you to a page showing the details of the file. 2. At the bottom, click the Review Audio/Doc button. This enables the QA1 to review the transcribed file while listening to the audio file. Steps to download compared document files: 1. Click on the check box in front of the file ID for the compared document that the QA1 wants to download. 2. Multiple files can be selected. 3. Go to the bottom of the page and select the Download compared document(s) (if audio file is also to be downloaded, then select that check box also) button. 4. Select the required QA2 from the combo box. 5. Click the Perform Checkbox Operation button. Steps to download the template: 1. Click the blue button in the Template column. The hyperlink will redirect you to a page showing the details of the template. 2. Click the Download this Template button. Steps to view template: 1. Click the blue button in the Template column. The hyperlink will redirect you to a page showing the details of the template. 2. Click the View this Template button. Doc Archive Document Archive is where all of the transcribed reports uploaded by the QA1 are stored. He/she can view, download and delete document files, update the file information, listen to the linked audio file and review both audio and document files simultaneously. He/she can also track the status of the document files. All of the files are sorted in descending order, starting from the most recent date. This page shows the activity of the last fifteen days by default, but a date sorted report with other Report Criteria can also be generated. Report Criteria Report Criteria allows the QA1 to sort the report as per the required parameters. The report can be sorted on dictator /doctor basis for a particular date range. Steps to generate a report 1. Doctor Basis: Select the doctor for whom you uploaded the required document files from the drop down list. By default, All doctors appear. 2. Date From – To: Select the date range for which the report of document files of the selected dictator is to be generated. 3. Click on the Generate Report button. As per the report criteria selected, the system shows the total number of transcribed files. By default, a list of 100 files is shown per page. You can jump to another page from the Page List. Column details: All of the column blue buttons are sorting buttons. 1. File ID – This column shows the unique file ID assigned automatically by the system to every edited file when the QA1 uploads it. Click the File ID to perform the following functions: Update File Information Download this Document View this Document 2. MT ID – This column displays the QA1 ID. 3. Patient Name – This column shows the patient/client name. 4. Document File – This column depicts the document file name. 5. Transcription Date/Time – This column shows the upload date and time details of the file edited by the QA1 as per EST. 6. Status – This column shows the file status. It helps the MT to determine the file status which is depicted in a color schema to make it clearly visible. Red – For Approval: When the QA1 uploads the document file but the doctor has not downloaded it, this column shows a red button with a “For Approval” mouse-over image. Green – Approved: When the doctor downloads the document file, this column displays a green button with an “Approved” mouse-over image. The transcribed file must be downloaded by the doctor. Green – e Signed: When the doctor e-signs the document file, this column shows a green button (“e” image on it) with an “e Signed” mouse-over image. 7. Dictator – This column shows the name of the doctor (dictator) to whom the audio file belongs. 8. Audio File – This column shows the audio file ID. It also displays a green button signifying that the file is online. Click it to perform the following functions: Download this Audio File Review Audio/Doc signifies that the audio file is offline. Click this button to send a message A red button requesting the Admin to get the file online. 9. Remarks – If the QA1 has a problem while editing the audio file and he/she feels that it should be brought to the doctor’s attention, the system provides him/her with the option to add a remark to the audio file while uploading the document file. This column displays this remark for the file. Checkbox Functions At the bottom of the page there are certain checkbox functions to facilitate group activity on a single click. The QA1 can check-mark selected audio files and can perform the following functions on all the files at once: Download/View Selected Documents Delete Selected Documents Steps to Update the file information: You can update only the file information of your document file and not the MT’s file. 1. Click on the File ID in the File ID column. The hyperlink will redirect you to a page showing the details of the file. 2. Enter the required information. 3. At the bottom, click the Update File Information button. Steps to download/view an edited report: There are two ways to download a document file through Doc Archive: To download multiple files at a time: 1. Click on the check box in front of the file ID you want to download. 2. You can select multiple files to download. 3. Go at the bottom of the page and select the Download/View Selected Documents button. 4. Click the Perform Checkbox Operation button. To download a single file 1. Click on the File ID that the QA1 wants to download. The hyperlink will redirect you to a page showing the details of the document file. 2. At the bottom, click the Download this Document or the View this Document button as required. Steps to listen the audio file as well as view the corresponding transcribed file: 1. In the Audio File Column, click the file ID or the green button. The hyperlink will redirect you to a page showing the details of the audio file. 2. At the bottom, click the Review Audio/Doc button. This enables you to correct the transcribed file while listening to the audio file. Steps to delete the transcribed file: 1. Select the files to be deleted by enabling the check boxes in the File ID column. 2. Go to the bottom of the page. 3. Select the Delete Selected Documents button. 4. Enter your account password in the text box next to the Confirm your password for file deletion: to assure the system that an authorized user is deleting the file. 5. Click the Perform Checkbox Operation button. 6. Enter the reason for the file deletion. 7. Click the Delete Selected Files button. Steps to play (listen) an Audio File: 1. In the first column, click on the File ID. The hyperlink will redirect you to a page showing the details of the document file. 2. At the bottom, click the blue button. The hyperlink will again redirect you to a page showing the details of the corresponding audio file. 3. At the bottom, click the Listen to This Audio File button. Steps to download an audio file: 1. In the first column click on the File ID. The hyperlink will redirect you to a page showing the details of the file. 2. At the bottom, click the blue button. The hyperlink will again redirect you to a page showing the details of the corresponding audio file. 3. At the bottom, click the “Download this Audio File” button. OR 1. In the Audio File Column, click the file ID. The hyperlink will redirect you to a page showing all the details of the audio file. 2. At the bottom, click the Download This Audio File button. Steps to send a message to the administrator asking him/her to make the offline files online again: 1. Click the red button in the Audio File column. 2. Enter the email address in the text box. Send the mail to other concerned persons through the CC option. 3. Click the Send button. New for Download New for Download stores all of the audio files which are still to be downloaded by the QA1 for editing. He/she can download and listen to the audio files and download the compared documents. At the top of the page, a count of the files that are new for download, their total length in minutes, and their total size in KB (KiloBytes) is displayed. As the QA1 downloads the files, a count of this store decreases by number. By default, a list of 100 files is shown per page. You can jump to another page from the Page List Column details: All of the column buttons are sorting buttons. 1. File ID – This column displays the unique file ID assigned file automatically by the system to every audio when the doctor uploads it. Click the file ID hyperlink to perform the following functions: Download this Audio File Listen to this Audio File 2. Dictator – This column shows the name of the doctor (dictator) to whom the audio file belongs. The font color of the dictator signifies the priority set for him/her by the MT Admin. Red is for high priority, yellow is for medium priority and green is for low priority. Black is for normal (no priority). A mouse-over image also details this priority level. 3. Audio File Name – This column displays the audio file name. 4. Size - This column displays the audio file length in seconds and size in Kbytes. It shows 0 sec/K if no information is available in the file header information. 5. Dictation Date/Time – This column shows the details of upload date and time of the audio file by the doctor as per EST. 6. Stat – If the audio file is marked “Urgent” by the doctor at the time of upload, a red tick is shown to signify that this audio file is to be transcribed/edited on a priority basis. 7. Red Flag – The system provides the MT/QA1/QA2 with the option to red flag a file at the time of upload if there was a problem with the file and they want to refer to the senior editor or to the MT Admin. This column shows a red flag image if the file was red flagged along with the account ID of the person who red flagged it. 8. Status – This column shows the file status. Yellow1-Under QA1: When the file is assigned to the QA1, it shows a yellow button (“1” image on it) with an "Under QA1" mouse-over image. When the QA1 downloads the file, this file stops displaying here. 9. MT File – This column shows the MT ID and his/her file ID with a blue button. Click it to download or review the MT File. 10. QA1 File – This column shows your (QA1) ID. 11. QA2 File – Shows the ID of the QA2 who further edited the file. 12. Compared Document – The MT’s document file is compared with the QA1’s edited file. The MT is required to know his/her mistakes, so the compared document is generated for him/her. This column shows “NA” when the file is not compared, “Waiting” when the file is in the process of comparison and “Same when the same file is uploaded by the QA1. A dark blue button to view the compared Document of the MT is also displayed. 13. Template – If the doctor has uploaded any template along with the audio file, or there has been an auto selection of the template by the system, this column shows the link in the form of a blue button for the template. Click the blue button to perform the following functions: Download this Template View this Template 14. Attachment – The doctor can upload any attachment along with the audio file. This column displays a paper clip image to signify that there is a file attachment with the audio file. Download the attachment by clicking this image. 15. Upload – This column displays an orange button with an up arrow. The MT can upload the document file against the audio file by clicking it. 16. Remarks – The last column depicts the dictator's (doctor’s) remarks for the transcriptionist of the file. Steps to download an audio file: There are two ways to download an audio file: To download multiple files at a time: 1. Click on the check box in front of the file ID you want to download. 2. You can select multiple files to download. 3. Go to the bottom of the page and select the Download Selected Audio files button. 4. Click the Perform Checkbox Operation button. To download a single file: 1. Click on the File ID want to download. The hyperlink will redirect you to a page showing all the details of the audio file. 2. At the bottom, click the Download this Audio file button. Steps to play an audio file: 1. In the first column, click on the File ID. The hyperlink will redirect you to a page showing the details of the file. 2. At the bottom, click the Listen to this audio file button. Steps to download or review the MT File: 1. Click the blue button or the file ID in the MT File column. The hyperlink will redirect you to a page showing the details of the MT document file. 2. Click the Download This Document or the Review Audio/Doc button. Steps to download compared documents: 1. Click on the check box in front of the file ID for which you want to download the compared documents. 2. Multiple files can be selected. 3. Go to the bottom of the page and select the Download Compared Documents (and tick the check box if the audio file is also to be downloaded) button. 4. Click the Perform Checkbox Operation button. Steps to download template: 1. Click the blue button in the Template column. The hyperlink will redirect you to a page showing all of the details of the template. 2. Click the Download this Template button at the bottom. Steps to view template: 1. Click the blue button in the Template column. The hyperlink will redirect you to a page showing all of the details of the template. 2. Click the View this Template button at the bottom. MT Bench The MT Bench folder stores all of the audio files that are expected to come to the QA1 for edit. This feature is based on the fixed routing module. If the workflow for any doctor is MT->QA1>Client or MT->QA1->QA2->Client and Workpool type is fixed, then this screen displays all of the audio files which are with the MT but will be routed to the QA1 by the system when they are uploaded by the MT. No activity can be performed this screen as this is a view only screen. This feature helps you schedule your work. Column Details All of the column buttons are sorting buttons. 1. File ID – This column displays the unique file ID assigned automatically by the system to every audio file when the doctor uploads it. 2. Dictator – This column shows the name of the doctor (dictator) to whom the audio file belongs. The font color of the dictator signifies the priority set for him/her by the MT Admin. Red is for high priority, yellow is for medium priority and green is for low priority. Black is for normal (no priority). A mouse-over image also details this priority level. 3. Audio File Name – This column shows the audio file name. 4. Size - This column shows the length of the audio file in seconds and size in bytes. It shows 0 if no information is available in the file header information. 5. Dictation Date/Time – This column displays the upload date and time of the audio file by the doctor as per EST. 6. Stat – If the audio file is marked “Urgent” by the doctor at the time of upload, a red tick is shown which signifies that this audio file is to be transcribed/edited on a priority basis. 7. Red Flag – The system provides the MT/QA1/QA2 the option to red flag a file at the time of upload if they had any problem with the file which they want to refer to the senior editor or the MT Admin. This column shows a red flag image if the file was red flagged along with the account ID of the person who red flagged it. 8. Status – This column shows the file status: Red: When an audio file is still required to be downloaded by MT, this column shows a red button with an “In Transit” mouse-over image. Yellow: If the audio file is with MT for transcription, it displays a yellow button with an “In Process” mouse-over image. 9. MT – This column shows the MT ID who has the audio file for transcription. 10. QA1– This column displays your (QA1) ID as the file is expected to come to you for editing. 11. QA2 – This column displays the QA2 ID who will further edit the file after the QA1 uploads it, if the workflow for the doctor is set as MT->QA1->QA2->Client. 12. Remarks – The last column shows the dictator's (doctor’s) remarks for the transcriptionist of the file. Under Edit Under Edit shows all of the files being edited by the QA1. The QA1 can upload the transcribed files against the respective audio file from this screen. He/she can also add various attributes to the file while uploading it if the information is available. Upload Criteria The QA1 can sort the files by dictator, MT or stat files. For instance, if the MT selects dictator sort, the system will display the files that are owned by the selected doctor. This makes upload easier for the MT. 1. Enable (Select) the required criteria button. Dictator Basis – Select the dictator from the drop down list. By default, All is selected. MT Basis – Select the MT from the drop down list. By default, All is selected. Stat – If this option is selected then all of the files marked as stat (urgent) by the doctors are displayed by the system. 2. Click the View Files button. The files will be displayed according to the selected criteria. By default, 50 files are shown per page. You can jump to another page from the Page List to view the rest of the files. There is an “Upload/Approve Now” button located at the top and the bottom of the screen. Click it to upload the document files. At the top of the list of files, a count of the total number of files being transcribed is displayed. Column Details All of the column buttons are sorting buttons. 1. File ID: This column displays the unique file ID assigned automatically by the system to every audio file when the doctor uploads it. Click the File ID hyperlink to perform the following functions: Download this Audio File Listen to this Audio File 2. Dictator: This column shows the doctor’s login ID. 3. Audio File Name: This column shows the audio file name. 4. Size: This column shows the length of the file both in seconds as well as in bytes. It shows 0 if no information is available in the file header information. 5. Dictation Date/Time: This column displays the upload date and time of the audio file by the doctor as per EST. 6. Stat: If the audio file is marked “Urgent” by the doctor at the time of upload, a red tick mark is shown which signifies that this audio file is to be transcribed/edited on a priority basis. 7. Remark: The last column displays the dictator's (doctor’s) remarks for the transcriptionist of the file. Other Details – If all the information is not provided by the doctor, leave those options blank. Document to Upload: With the help of the “Browse” button, search your local drive for the transcribed file to be uploaded against the respective audio file. Red Flag this file: If you had a problem with the file that you want to refer to the senior editor or the MT Admin, the system provides the option to red flag the file. Check this option and this will red flag the file. Patient Name: Enter the patient name in this text box. Report Type: Select the report type from the drop down list. Provider Name: Enter the name of the provider (dictator/doctor). Medical Record#: Enter the patient’s medical record number. Insurance Policy: Enter the patient’s insurance policy if known. Location: Select the location where the audio file was dictated from the drop down list. Referring Physician: Enter the name of the physician who had been referred to by the doctor/dictator. Patient SSN: Enter the patient’s social security number. DOB: Date of Birth: Enter the patient’s date of birth. Consultation Date: Select the date when the patient last consulted the doctor. Admit Date: Select the date when the patient was admitted if applicable. Operation Date: Select the date when the patient was operated upon if applicable. Expiry Date: Select the date of expiry of the patient if applicable. Sex: Select the appropriate button. File Comment: The system gives you the option of adding a comment for the audio file if required. For instance, if the MT had a problem while transcribing the file due to the doctor not speaking clearly or for any other reason, he/she can add a comment the file to bring it to the doctor’s attention. File Rating: The system gives the QA1 the option of giving his/her feedback regarding the MT’s performance by rating the MT file. Choose a option from this list depending upon the requirement. Rating Comment: The QA1 can also add a file rating comment so that the MT will get direct feedback. Steps to upload the files: There are two ways to upload the document files: Multiple File Upload: 1. Browse the local drive for the transcribed file against the audio file. 2. Enter all the required information. 3. To red flag the file, enable the check box at the right top of the description of every file. 4. You can also put the file comment for the doctor at the bottom. 5. Click the Upload/Approve Now button. A new screen will appear confirming the upload of files. Single File Upload: 1. Click the File ID in the File ID column. You will be redirected to page showing the details of the audio file. 2. An orange button appears next to Upload and Link Document to this Dictation. Click this button to upload the file. 3. Enter the available information. 4. Click the Upload and Attach Selected Files button. Steps to Download the Document File: 1. Click the File ID in the file ID column. You will be redirected to the page giving the details of the file. 2. Click the blue button next to the Linked Document File. You will be redirected to a new page showing the details of the document file. 3. Click the Download this Document button. Steps to View the Document File: 1. Click the File ID in the file ID column. You will be redirected to the page giving the details of the file. 2. Click the blue button next to the Linked Document File. You will be redirected to a new page showing the details of the document file. 3. Click the Download this Document button. Steps to Download Audio File: 1. Click the File ID in the file ID column. You will be redirected to the page giving the details of the file. 2. Click the Download this Audio File button. Steps to listen to/play the audio file 1. Click the File ID in the file ID column. You will be redirected to the page giving the details of the audio file. 2. Click the Download this Audio File button. Template Archive The Template Archive stores all of the templates uploaded by the doctor for the MT/QA1/QA2. The QA1 has the flexibility to view and download the templates from this screen. The total number of templates is displayed at the top of the page. Column details: All of the column buttons are sorting buttons. 1. Template ID: This column shows the unique ID assigned automatically by the system to every template when the doctor uploads it. 2. Template Name: This column displays the name given by the doctor to the template while uploading it. 3. File Name: This column displays the actual name and extension of the template file. 4. Owner ID: This column shows the dictator (doctor) ID who uploaded the template file. 5. Default: The doctor has the flexibility to mark a template as default while uploading it so that system automatically picks up this template whenever he/she uploads any audio file. If the doctor uploads any other template along with the audio file, the system picks up this template and not the default one. This column shows a tick mark with a Default mouse-over image if the template is default. 6. Last Modified Date: This column shows the date of the last modification made to the template. 7. Remarks: This column shows the comment made by the doctor. Checkbox Functions At the bottom of the page, there is a checkbox function to facilitate multiple template download on a single click. The QA1 can check-mark the templates and can perform the following function: − Download Selected Templates Steps to download the templates: There are two ways to download template file through Template Archive: To download multiple template files at a time 1. Click on the check box in front of the Template ID you want to download. 2. You can select multiple templates to download. 3. Go to the bottom of the page and select the "Download Selected Templates" button. 4. Click the Perform Checkbox Operation button. To download a single file: Click on the Template ID you want to download. The hyperlink will redirect you to a page showing the details of the template. At the bottom, click the Download this Template button. Steps to view the template: 1. Click the blue button in the Template column. The hyperlink will redirect you to a page showing the details of the template. 2. Click the View this Template button. Search Records Search EPR is one of the most attractive features of our system. It helps the QA1 to retrieve the medical (patient) records according to the selected search criteria. He can search the files (both audio and transcribed) on the basis of various criteria – file type, file fields, file ownership, patient details, report type and doctor details for a particular duration. Search Criteria are based on the following points- 1. File Type - You can search the files on the basis of its type – audio or document. 2. Upload Date From – To - You can select the period during which you think the file/files was/were uploaded. 3. Search on File Fields - You can search files on the basis of their fields as mentioned below: File ID - You can search file on the basis of File ID assigned to it by the system when it is uploaded. Select “File ID” from the drop down list and enter the required file ID in the text box against “matching”. File Name – Files can also be searched on the basis of their names. Select “File Name” from the drop down list and enter the required file name in the text box against “matching”. File Extension – Files can also be searched on the basis of their extension. Select “File Extension” from the drop down list and enter the required file extension. For instance .wav, .dss for audio files or .doc, .txt for document files. 4. Search on file Ownership - You can search the file on the following ownership basis Audio File - Dictator ID – You can search the file on the basis of Dictator ID to whom it actually belongs. Select the particular dictator from the drop down list. Document File - Transcriptionists ID – You can also search the file on the basis of your own ID. 5. Search for Patient Details - You can search the file by entering the details of Patient as mentioned below: Name – Enter the required patient’s name. SSN – Social Security Number MRN – Medical Record Number Date of Birth – Date of Birth of the patient Sex – Gender of the Patient Dates – Files can be searched on the basis of important dates as mentioned below: Date of Consultation – When the patient consults the doctor. Date of Admission – When the patient gets admitted in the hospital or clinic. Date of Operation – When the patient is operated upon. 6. Search on Report - You can search the file depending on the following criteria: Report type – There can be different types of reports depending upon the specialization areas in the medical field such as ophthalmology, orthopedics, operative etc. You can search the file on the basis of its type. Location – System allows the doctor to dictate audio file from locations such as home, hospital, clinic or any department in the hospital. File can also be searched on the basis of these locations from where it was dictated. Stat (urgent) - You can also search the file if it was marked stat (urgent) or it was just a normal file. Note- File can also be searched on the basis of any specific note attached to the file while uploading it. 7. Search on Doctors - You can search the file on the following bases also: Providers Name – Name of the doctor (dictator) who dictated the audio file. Referring Physician – Name of the physician who has been referred to the patient by the doctor (dictator). Steps to search files. 1. Select Audio or Document radio button as required. 2. Select the approximate date duration i.e the time period within which you think the file was uploaded. 3. If you want to search for the files on the basis of any file field, select the appropriate field from the drop down list and enter the required value in the text box. 4. If you want to search for the files on the basis of file ownership, select the dictator ID for audio file and transcriptionist ID for document file from the respective drop down lists. 5. If you want to search for the files on the basis of patient details, enter the patient information such as patient name, SSN, MRN, date of birth, sex, admit date, consultation date or operation date. It is not necessary to enter all the patient details to search for the file. 6. If you want to search for the files on the basis of report details, enter the required information in the fields such as report type, location, stat (urgent), and note. 7. If you want to search for the files on the basis of doctor details, enter the available information such as doctor (provider) name and referring physician. 8. Click on the Search EPR Button. Steps to search the files on the basis of file fields: 1. Select the file type – audio or document 2. Select the duration 3. Select the search field – File ID, File Name or File Extension and then enter the required matching value for the field selected. 4. Click Search EPR button Steps to search the files on the basis of file ownership: 1. Select the Dictator ID from the combo box if you are searching for the audio file. 2. Select the Transcriptionist ID from the combo box if you are searching for the document file. 3. Click Search EPR button Steps to search the files on the basis of patient details: 1. Enter the name, SSN, MRN, Date of Birth whatever information is with you. If you know the gender then select it. You can also select the consultation date; admit date or operation date from the combo box below the option of Sex. 2. Click Search EPR button. Steps to search the files on the basis of report details: 1. Select the report type, location from the combo boxes according to the information you have. You can also search files on the basis of emergency status of the files (normal or stat) by selecting the required radio button. If you remember that any note was attached to it, you can enter the note in the text box against Note. 2. Click Search EPR button. Steps to search the files on the doctor details: 1. If you remember, then select the name of the provider from the combo box or the referring physician. 2. Click Search EPR button. System allows you to search for the files not only on one-search criteria but also on the combination of various search criteria. For instance if you want to find the audio file of which you remember only file ID and the provider name, you can select the Audio radio button in the File Type search criteria, file ID from the combo box in Search on File Fields and enter the required ID in the text box. And select the provider name from the combo box in Search on Doctor and then click the Search EPR button. The report is generated depending on the criteria chosen. Following are the column details. If an Audio file is chosen Column details: All of the column buttons are sorting buttons. 1. File ID – This column displays the unique file ID assigned to every audio file automatically by the system as soon as the doctor uploads it. You can perform the following functions by clicking the hyperlink to File ID. Download this Audio File Listen to this Audio File Update the File (QA1) Information Download the MT/QA1/QA2 Document View the MT/QA1/QA2 Document 2. Doc ID - This column shows the user ID of the doctor (dictator) who is the owner of the audio file. 3. Audio Filename - This column shows the audio file name. 4. Length - This column displays the audio file length in seconds. 5. Transcription Date / Time – This column displays the upload date and time of the audio file as per EST. 6. Stat – This column displays a red color tick with “Urgent” mouse over image if the audio file is marked stat (Urgent) by the doctor at the time of upload. 7. Status – This column shows the file status. It helps the MT to track the file online. Different colors are assigned to tell different file status. Yellow 1 – Under QA1 – When the file is with QA1 for editing, it shows a Yellow button (1 written on it) with “Under QA1” mouse over image. Green – Completed – After the final file is completed and assigned to the doctor, it shows green button (tick mark on it) with "Completed" mouse over image. Green – e Signed – When the doctor e-signs the file, status changes to green with (“e” written on it) with “e Signed” mouse over image. Once a file is e signed, system locks it so that no operations can be performed on the document file. 8. MT ID – This column displays the QA1 (your) ID if the file is complete. Otherwise it shows nothing. 9. Document File – This column displays The orange color button with “Upload Document File” mouse over image if the file is under the process of transcription or editing. If you click this button, a new screen appears which helps you to upload the document file. And if file is complete then this column displays one blue button . You can view the document file by clicking it. 10. Remarks – Last column depicts the Dictator's (Doctor’s) remarks for the transcriptionist of the file. If a document file is chosen Column details: All of the column buttons are sorting buttons. 1. File ID – This column displays the unique file ID assigned to every document file automatically by the system when it is uploaded. Click the file ID to perform the following functions. Download the Document View the Document Update the File (QA1) Information Download the corresponding Audio File Listen to the corresponding Audio File 2. MT ID – This column shows your ID. 3. Patient Name – This column displays the patient name. 4. Document File – This column displays the document file name. 5. Transcription Date/Time – This column displays the upload date and time of the transcribed file. 6. Status – This column shows the file status. It helps you to track the file status online with the help of a color schema. Red – This column displays red button with “For Approval” mouse over image when file is completed and is ready for the approval by the doctor. Green () – Approved - This column displays green button with "Approved" mouse over image when doctor downloads the file. Green (e) – e Signed – This column displays green button (e written on it) with “e Signed” mouse over image when doctor e signs the file. System locks the file when the doctor e signs it so that no operation can be performed on it. 7. Doc ID – This column displays the ID of the doctor. 8. Audio File – This column displays The green color button if audio file is online if audio file is offline. You can send a message to the administrator Red color button to make the file online by clicking on the red button. 9. Remarks – This column displays the comment made by the transcriptionists while uploading the file. QA Feedback Reports nd The QA Feedback feature helps the QA1 to monitor his/her own performance. Editors at the 2 level (QA2) give performance feedback for editors on various criteria such as no edits, format errors, clinical errors, ADT Tags, Typos, approved reports, no rating etc. The QA1 can generate the summary or detailed QA2 feedback report for himself/herself. Feedback Report Criteria The QA1 can generate the feed back report of the QA2 with the help of the Feedback Report Criteria functionality. Report Type – Select the report type, either Summary or Detailed according to the requirement − Summary: The Summary Feedback report is the graphical representation of your performance. − Detailed: The Detailed Feedback Report gives file-to-file performance feedback report. Date from – To: Select the date duration for which you want to view the feedback report. Steps to generate QA Feedback report 1. Select the report type, either Summary or Detailed. 2. Select the period for which the QA1 wants to view the feedback report. 3. Click the “Generate Feedback Report” button. Summary Feedback Report The Summary Feedback report is the graphical representation of the QA1’s performance. At the top of the bar graph, the total number of reports edited by the QA1 is specified. “Reports” is displayed on the X-axis while the Y-axis displays different bars showing percentages of reports having different errors, accurate reports and reports that were not rated. There are three bars showing errors, accurate and no rating. Errors – Five types of errors are shown. They are: Clinical, Format, Typos, Blanks, and ADT/Tag errors. Clinical errors – errors related to results of lab reports (blood test, sugar test etc) are shown in maroon. Format errors – errors related to templates are shown in red. Typos errors – errors related to typing (spelling) are shown in red. Blanks (where not required)– are shown in orange. ADT/Tag errors – errors related to tagging and ADT interface are shown in orange. Accurate – No Errors and Approved Reports. No Errors – When the QA1 selects the option of “No Edits” for the MT while uploading the file, it appears here No Errors in a sea green color. Approved Reports – When the QA1 does not select any option while uploading the file, it is considered that the reports have been approved and they are shown in a dark bottle-green color. No Rating – When the QA1 (for the MT) or the QA2 (for the QA1) selects the option of No Rating while uploading the file, the result is shown in black. Detailed Feedback Report The Detailed Feedback Report gives file-to-file details regarding the errors or approval. Column details: All of the column buttons are sorting buttons. 1. Doc File ID – This column displays the document file ID edited by the QA1. Click the hyperlink to file ID to perform the following functions: − Update File Information − Download the Document − View the Document 2. QA1 ID – This column displays your (QA1) ID. 3. Document File Name – This column shows the document file name. 4. Transcription Date/Time – This column displays the upload date and time of the document file. 5. Dictator – This column displays the dictator (doctor) ID who is the owner of the audio file. 6. Audio File ID – This column shows the file ID assigned by the system to the audio file when the doctor uploads it. It also displays a green button to signify that the file is online with a “Listen to Audio File” mouse-over image. Click it to play the audio file. a red button if the file is offline with a “File Offline (Click to Send Message)” It displays mouse-over image. Click this button to send the message to the Site Administrator to get the file online. 7. QA2 ID – This column shows the QA2 ID who further edited the file. 8. QA2 File – This column shows the QA2 file ID. 9. C – This column shows a dark bottle green color if the file has Clinical Errors. 10. F - This column shows a blue color if the file has Format Errors. 11. T - This column shows an ash color if the file has Typos Errors. 12. B - This column shows a dark green color if the file has Blanks. 13. A - This column shows a red color if the file has ADT/ Tag Errors. 14. NE - This column shows a black color if the file has No Edits. 15. NR - This column shows different colors for the approved files and for the files that have not been rated. 16. Rating Comment – This column shows the comment given by the QA2 for the QA1’s work on the file. If the Detailed Report Type is chosen, you can perform the following activities: Steps to Update the file information: 1. In the File ID column, click on the File ID you want to update. The hyperlink will redirect you to a page showing the details of the file. 2. Enter the required information. 3. At the bottom, click Update File Information button. Steps to view or download transcribed report: 1. Click on the File ID that you want to download. The hyperlink will redirect you to a page showing the details of the file. 2. At the bottom, click the View this Document or Download this Document button as required. Steps to play an Audio File: 1. In the first column, click on the File ID. The hyperlink will redirect you to a page showing the details of the file. 2. At the bottom, click the blue button. The hyperlink will again redirect you to a page showing the details of the corresponding audio file. 3. At the bottom, click the Listen to This Audio File button. Steps to download an audio file: 1. Click on the File ID in the Audio File ID column. The hyperlink will redirect you to a page showing the details of the file. 2. At the bottom, click the Download this Audio File button. Steps to Review Audio/Doc: 1. Click on the File ID in the Audio File ID column. The hyperlink will redirect you to a page showing the details of the file. 2. At the bottom, click the Review Audio/Doc button. My Feedback The My Feedback feature helps the QA1 to keep a continuous check over the performance of the MTs. Generate a Summary or Detailed Report of the feedback that you gave concerning the MT’s performance while uploading the final document file after editing. Feedback Report Criteria The QA1 can generate the report of feedback that he/she gave for the MT’s performance with the help of the Feedback Report Criteria functionality. Report Type – Select the report type, either Summary or Detailed according to the requirement − Summary: The Summary Feedback report is the graphical representation of the MT’s performance. − Detailed: The Detailed Feedback Report gives a file-to-file performance feedback report. Date from – To: Select the date duration for which you want to view the feedback report. Steps to generate Feedback report 1. Select the report type, either Summary or Detailed. 2. Select the period for which you want to view the feedback report. 3. Click the Generate Feedback Report button. Summary Feedback Report The Summary Feedback report is the graphical representation of the MT’s performance. At the top of the bar graph, the total number of reports transcribed by the MT is specified. The X-axis shows “Reports” while the Y-axis shows the rating in the form of different percentages of errors. There are three bars: errors, accurate and no rating. Errors – Five types of errors are shown. They are: Clinical, Format, Typos, Blanks, and ADT/Tag errors. Clinical errors – errors related to lab report results (blood test, sugar test etc) are shown in maroon. Format errors – errors related to templates are shown in red. Typos errors – errors related to typing (spelling) are shown in red. Blanks (where not required)– are shown in orange. ADT/Tag errors – errors related to tagging and ADT interface are shown in orange. Accurate – No Errors and Approved Reports. No Errors – When the QA1 selects the option of “No Edits” for the MT while uploading the file. It appears as No Errors in a sea green color. Approved Reports – When the QA1 does not select any option while uploading the file, it is considered that reports have been approved by them and are shown in a dark bottle green color. No Rating – When he QA1 (for MT) or the QA2 (forQA1) select the option of “No Rating” while uploading the file. The result is shown in black. Detailed Feedback Report The Detailed Feedback Report gives file-to-file details regarding the errors or approval. Column details: All of the column buttons are sorting buttons. 1. Doc File ID – This column shows the document file ID transcribed by the MT. Click the file ID hyperlink to perform the following functions: Download the Document View the Document Download this Audio File Listen to this Audio File 2. MT ID – This column displays the MT ID who transcribed the file. 3. Document File Name – This column shows the document file name. 4. Transcription Date/Time – This column displays the upload date and time of the transcribed file. 5. Dictator – This column displays the dictator (doctor) ID who owns the audio file. 6. Audio File ID – This column shows the file ID assigned by the system to the audio file when the doctor uploads it. It also displays a green button to signify that the file is online with a “Listen to Audio File” mouse-over image. Click it to play the audio file. It displays only a red button if the file is offline with a “File Offline (Click to Send Message)” mouse-over image. Click this button to send a message to the Site Administrator to get the file online. 7. QA1 ID – This column shows your (QA1) ID who edited the file. 8. QA1 File – This column shows the QA1 file ID. 9. C – This column shows a dark bottle green color if the file has Clinical Errors. 10. F - This column shows blue if the file has Format Errors. 11. T - This column shows an ash color if the file has Typos Errors. 12. B - This column shows a dark green color if the file has Blanks. 13. A - This column shows red if the file has ADT/ Tag Errors. 14. NE - This column shows black if the file has No Edits. 15. NR - This column shows different colors for the approved files and for the files not rated. 16. Rating Comment – This column shows the comment given by the QA1 for the MT’s work on the file. You can perform the following activities if the Report Type is chosen as Detailed. Steps to download a transcribed report: 1. In the first column, click on the file ID that you want to download. The hyperlink will redirect you to a page showing the details of the file. 2. At the bottom, click the Download this Document button. Steps to view a transcribed report: 1. In the first column, click on the file ID that you want to view. The hyperlink will redirect you to a page showing the details of the file. 2. At the bottom, click the View this Document button. Steps to download an audio file: 1. In the first column click on the File ID that you want to download. The hyperlink will redirect you to a page showing the details of the file. 2. At the bottom, click the blue button. The hyperlink will again redirect you to a page showing the details of the corresponding audio file. 3. At the bottom, click the Download this Audio File button. Steps to play an Audio File: 1. In the first column, click on the File ID. The hyperlink will redirect you to a page showing the details of the file. 2. At the bottom, click the blue button. The hyperlink will again redirect you to a page showing the details of the corresponding audio file. 3. At the bottom, click the Listen to This Audio File button. Current TAT Status The Current TAT Status feature provides the QA1 with the details of the TAT (Turn Around Time) of the files, which he/she is editing. TAT is the time taken by the transcription company to transcribe and edit the audio file and then upload the document file. It helps the QA1 track his/her own efficiency. No activities can be performed from here as this is a view only screen. Column details: All of the column buttons are sorting buttons. 1. Audio File ID: This column shows the file ID that was assigned to the audio file when the doctor uploaded it 2. Dictator: This column shows the dictator (doctor) ID who is the owner of the audio file. 3. Audio Filename: This column displays the audio file name. 4. Size: This column shows the details of the audio file size in terms of Kbytes and length in time (seconds) in the bracket. 5. Dictation Timestamp: This column shows the upload date and time of the audio file. 6. Stat: This column displays a tick mark if the doctor marks the file as stat (urgent) while uploading it. 7. Status: This column shows the status of the files: Red – In Transit: When the MT has not downloaded the audio file, a red button with an “In Transit” mouse-over image is displayed. Yellow1 – This column shows a yellow button (“1” image on it) with an “Under QA1” mouse-over image if the file is being edited. When the file is completed and uploaded by the QA1, it stops displaying in this folder. 8. Report Type: This column displays the type of report as marked by the doctor. If the report type is not given, nothing is shown here. 9. TAT target: This column shows the actual TAT target within which the file must be transcribed/edited and uploaded for the doctor. 10. TAT Remaining: This column displays the remaining time for the transcription. This value is updated by the system each time the page is refreshed. If the file is not transcribed within the TAT target, it displays the overdue time in red font. 11. MT ID: This column displays the MT ID who had transcribed the file. 12. QA1 ID: This column shows the QA1 (your) ID. 13. QA2 ID: This column shows the ID of the QA2 who has the file for final editing. It will not show anything if the QA2 does not have the file. Turnaround Time Reports The TAT (Turn Around Time) Report gives an assessment of how the transcription company (MTSO) is performing in terms of uploading the transcribed documents. This option generates a Summary or Detailed report on a dictator account basis for the selected time duration. The Summary report gives a snap-shot view of the TAT details for normal and urgent reports. The Detailed report gives file-to-file TAT details of an account. Report Criteria The QA1 can generate the TAT report on doctor account basis with the help of the Report Criteria functionality. Report Type – Select the report type, either Summary or Detailed according to the requirement − Summary − Detailed Date from – To: Select the date duration for which you want to view the report. Report Format – This drop down list shows the names of all the doctors whose files are assigned to you. Select the required doctor. By default, “All” is selected. Steps to generate TAT Report: 1. Select either the Summary or the Detailed option. 2. Select the period for which the TAT report must be generated. 3. Select the report format, i.e. the account (doctor/dictator) for which the report must be generated. 4. Click the Generate TAT Report button. When Summary Report option is selected: The Summary Report gives a snap-shot view of the TAT for both normal as well as urgent reports for the selected time duration. It shows the number of files dictated, the average TAT and the average delay. Column Details All of the column buttons are sorting buttons. 1. Doc ID: This column depicts the doctor (dictator) ID as per the selection made. 2. Audio files (Normal): This column shows the count of normal audio files. 3. Avg. TAT: This column shows the average of the actual TAT, i.e. the average of the time actually taken to complete the normal files. 4. Avg. Delay: This displays the average of the delay time. If the Actual TAT exceeds the set TAT, this column shows the average of this delayed time for normal files for the particular account. 5. Audio files (Stat): This column shows the count of normal audio files. 6. Avg. TAT: This column shows the average of the actual TAT, i.e. the average of the time actually taken to complete the urgent files. 7. Avg. Delay: This column displays the average of the delay time. If the Actual TAT exceeds the set TAT, this column shows the average of this delayed time for urgent files for the particular account. When Detailed Report option is selected: The Detailed report gives all of the details regarding the TAT for each file. Column Details: All of the column buttons are sorting buttons. 1. S No.: This column shows the Serial Number. 2. MT ID: This column depicts the QA1 (your) ID. 3. Doc ID: This column shows the dictator (doctor) ID as per the selection made. 4. Audio File ID: This column displays the Audio File ID. 5. Dictation Date/Time: This column shows the upload date and time of the audio file by the doctor. 6. Document File ID: This column shows the corresponding document file ID. 7. Transcription Date/Time: This column displays the upload date and time of the transcribed file by the MT. 8. Set TAT: According to the doctor’s requirement, the TAT target for both normal and urgent files is set in the “TAT Settings” of his/her account. Whenever the doctor uploads the normal or stat (urgent) file, the system automatically picks up the set TAT accordingly. This column displays the TAT set for the doctor. 9. Actual TAT: This column shows the actual time taken by the transcription company to complete and upload the file. 10. Difference: If the actual TAT is more than the set TAT, this column shows a red button with a “Late” mouse-over image. If the actual TAT is less than the set TAT, a green button with an “OK” mouse-over image is displayed. The totals and averages of the set TAT, the actual TAT and the difference are displayed at the bottom of the page. Billing Report This option helps the QA1 to generate an online Summary or Detailed billing report for a specific doctor/dictator account for a particular time period. The Summary Report gives a snap-shot view of the number of lines transcribed, the number of dictation minutes and the number of fax pages sent from the server during the selected period. The Detailed Report gives file-to-file billing details of the account for the selected period. This is a view only screen. File activity cannot be performed from this screen. Report Criteria The QA1 can generate the billing report on doctor account basis for the selected duration with the help of the Report Criteria functionality. Report Type – Select the report type, either Summary or Detailed according to the requirement. − Summary: Shows only totals for each account. The Summary Report gives a snap-shot view of the billing report. − Detailed: Shows file details for each account. The Detailed Report gives file-to-file billing details. Date Range - Select the date duration for which you want to view the billing report. Report Format – Select the doctor from the drop down list as required. By default, “All” is selected. Steps to generate a billing report: 1. Select the Summary or the Detailed option. 2. Select the period (from date to date) for which the billing report is to be generated. 3. Select the report format, i.e. the doctor account as per the requirement. 4. Click the "Generate Billing Report" button. As per the selection made, details regarding the report style, report format (i.e. account information) and time duration is displayed above the report. When Report Style – Summary Column Details All of the column buttons are sorting buttons. 1. Dictator: User’s name of the doctor (dictator) who dictated the file. 2. No. Reports: This column tells the number of reports dictated by the doctor for the particular period. 3. Lines: This column shows the number of lines that were transcribed by the MT for the selected doctor. 4. Length: This column displays the total length of the files. When Report Style –Detailed Column Details All of the column buttons are sorting buttons. 1. Document File ID: This column shows the document file ID. 2. Work Date: This column displays the upload date of the document file. 3. Dictator: This column displays the doctor ID to whom the corresponding audio file belongs. 4. Patient Name: This column shows the patient name. 5. Document File Name: This column displays the document file name. 6. Document File Size: This column shows the document file size in terms of Kbytes. 7. Line Count: This column shows the number of the line edited by the QA1 for the file. It shows “Waiting” when the file is in the process of comparison by the server. 8. Length: This column shows the length of the file in terms of time (secs). 9. Line/Length: This column displays the result of division of line by length. Account Activity Logs The Account Activity Logs feature helps the QA1 track of all the activities taking place in his/her account. It displays the details regarding the type of activity (event), the date and time of its occurrence, the account ID from where the event occurred, and the details of the file involved in the event. The QA1 can also generate the report of recent activity on the event (activity) type and date basis. Report Criteria Date From – To: The QA1 can generate the report of recent activity for a particular duration or period for which he/she wants to view the report. Event Type: The QA1 can generate the report on event basis. He/she can select the particular event from the drop down list. By default, “All” is selected. The following are the events shown in the drop down list: − Routing − Audio − Document event − Template event − Logo event − File Deleted − Message Sent Emailed − File Faxed − File Corrected − File eSigned − File Unsigned − File Rejected − Login info − Logout info − Account Update − File Split − File •Account Type: The QA1 can also generate the activity report on doctor account basis. Steps to generate Account Activity Log report: 1. Select the duration for which the report is to be generated. 2. Select the particular event from the drop down list. By default, All is selected. 3. Select the particular doctor from the drop down list. By default, All is selected. 4. Click the Generate Activity Report button. Column Details: All of the column buttons are sorting buttons. Click the “Generate Activity Report” button and a new screen will appear showing the report with the details. 1. Date: This column shows the date when the event occurred. 2. Time: This column displays the time the event occurred. 3. Event Type: This column displays the type of event as per the selection made in the Event Type Category in Report Criteria. 4. ID: This column displays the doctor’s account ID as per the selection made in the Account category in the Report Criteria. 5. Log: This column shows the details regarding the type of file (audio or document) and its name involved in the event. FAQ These are frequently asked questions which act as quick reference for the QA1 for his general queries. This section gives answers to QA1’s queries related to the software/hardware requirements, use of the system and many more. Send a Message The Send Message Function feature helps the QA1 to send messages to the site administrator and the MT administrator if he/she faces any technical problem and to the MTs/QAs and the MT Administrator if he/she has any transcription problem. Message Type: Select the message type by enabling the required radio button. Technical issue: If you have any technical problem regarding the ASP, send a message explaining the problem in detail. The system will send the message to the Site Administrator as well as to the MT Administrator. Transcription issue: If you have any transcription problem, send a message to the other MTs/QAs. The system will also send this message to the MT Administrator. Message To: If you have selected the Transcription Issue option in the Message Type category, you can select the required MT/QA from the drop down list. Subject: Enter a subject title for the message going to the recipient. Message: Enter the message explaining each and every detail of the technical/transcription problem in this text box. Steps to send the message: 1. Select the message type by enabling the radio button. 2. Select the required MT/QA from the drop down list. 3. Enter the subject for the message in the text box. 4. Enter the message in detail in the text box. 5. Click the Send button at the bottom of the screen. A new screen will appear confirming that the message had been sent. Change Password Change Password option enables the QA1 to change his account password if desired. Steps to Change Password 1. Enter Old Password – User is required to enter the old password. 2. Enter New Password – User is asked to enter the new password for his account. 3. Confirm New Password – User is required to retype the new password for confirmation. 4. Click the Change Password button. A new screen appears confirming the update of account password. Logout & Exit This option logs out the QA1 from the system.