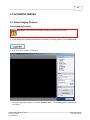
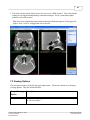
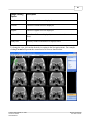
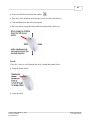
1
Table of Contents
1.0 READ THIS FIRST
1
1.1 Radiation Guidelines
................................................................................................................................... 1
1.2 Detailed Safety
...................................................................................................................................
Instructions
1
1.3 Table of Symbols
................................................................................................................................... 2
1.4 Electromagnetic
...................................................................................................................................
Interferance
4
1.5 Cleaning and
...................................................................................................................................
Service
6
1.6 Data Backup
................................................................................................................................... 7
1.7 Regulatory...................................................................................................................................
Compliance
7
2.0 INTRODUCTION
9
2.1 Welcome ................................................................................................................................... 9
2.2 MiniCAT ...................................................................................................................................
Overview
10
2.3 Manual Updates
................................................................................................................................... 10
2.4 Scanner Hardware
................................................................................................................................... 11
2.5 Other Components
................................................................................................................................... 12
2.6 Connectivity
...................................................................................................................................
Diagram
14
2.7 Operation...................................................................................................................................
Sequence
16
2.8 Laser Alignment
................................................................................................................................... 17
3.0 STARTUP AND SHUTDOWN
18
3.1 Emergency
...................................................................................................................................
Shutdown
18
3.2 System Startup
................................................................................................................................... 18
3.3 User Management
................................................................................................................................... 20
3.4 System Shutdown
................................................................................................................................... 22
3.5 UPS
................................................................................................................................... 24
4.0 DAILY CALIBRATION
26
5.0 PATIENT DATABASE
28
5.1 Patient Database
................................................................................................................................... 28
5.2 Enter New
...................................................................................................................................
Patient
28
5.3 Find Existing
...................................................................................................................................
Patient
29
5.4 Advanced...................................................................................................................................
Search
31
5.5 Delete Patient
................................................................................................................................... 32
5.6 Purge Files
................................................................................................................................... 32
© Xoran Technologies®, Inc. 2007
XoranForm SOP9.2
Part# 020009-03
Rev 002 DCO # 278
Rev date: 07/27/07
6.0 ACQUIRING IMAGES
34
6.1 Select Imaging
...................................................................................................................................
Protocol
34
6.2 Educate Patient
................................................................................................................................... 35
6.3 Seat and ...................................................................................................................................
Position Patient
37
6.4 Dry Run and
...................................................................................................................................
Scout View
42
6.5 Start Acquisition
................................................................................................................................... 45
7.0 VIEW IMAGES
48
7.1 Open Study
................................................................................................................................... 48
7.2 Viewing Options
................................................................................................................................... 49
7.3 Select Slices
................................................................................................................................... 51
7.4 Viewing Tools
................................................................................................................................... 53
7.5 Annotation
...................................................................................................................................
Tools
60
7.6 Oblique and
...................................................................................................................................
TMJ Tools
65
8.0 OUTPUT IMAGES
76
9.0 TECHNICAL SPECIFICATIONS
78
9.1 General Information
................................................................................................................................... 78
9.2 Imaging Properties
................................................................................................................................... 79
9.3 X-Ray Specifications
................................................................................................................................... 80
9.4 Scatter Map
................................................................................................................................... 83
9.5 Dose Information
................................................................................................................................... 86
9.6 Installation
...................................................................................................................................
Requirements
87
9.7 IGS Compatibility
................................................................................................................................... 89
10.0 QUALITY CONTROL TESTS
91
10.1 CT Number
...................................................................................................................................
Accuracy Test
91
10.2 CT Number
...................................................................................................................................
Linearity Test
92
10.3 Artifact ...................................................................................................................................
Test
92
10.4 Spatial Resolution
...................................................................................................................................
Test
92
10.5 QC Test...................................................................................................................................
Log Form
93
INDEX
© Xoran Technologies®, Inc. 2007
XoranForm SOP9.2
Part# 020009-03
95
Rev 002 DCO # 278
Rev date: 07/27/07
1
1.0 READ THIS FIRST
This section contains important safety information about using your MiniCAT™.
1.1 Radiation Guidelines
MiniCAT™ is an X-ray emitting device.
Warning: This X-ray unit may be dangerous to patient and operator
unless safe exposure factors and operating instructions are observed.
Unauthorized use is prohibited.
· It is the responsibility of the user to learn about X-ray radiation health risks and to adopt
and follow proper X-ray radiation safety policies and procedures before operating the
MiniCAT™.
· All government and local regulations pertaining to radiation safety must be observed.
· Please refer to your local state radiation safety regulations for specific requirements about
the safe and proper use of the scanner.
· Stand behind the operator's barrier when using X-ray.
· Lead-shielded aprons and dose monitoring badges may be required.
Note: The best practice is to consult with a qualified medical physicist to ensure safety and
compliance. Feel free to contact Xoran for assistance in locating an appropriate medical
physics professional in your area. 1-800-70-XORAN (800-709-6726)
1.2 Detailed Safety Instructions
Emergency Stop:
This manual contains instructions for safe operation of this X-ray system. In the event
of an emergency (i.e. any moving component collides with any parts of the equipment or
items in the environment, or that could cause physical injury to the patient), the operator
should utilize the EMERGENCY STOP (E-Stop) button to turn off the power to all
moving parts in order for the patient to be safely removed from the machine.
Patient E-Stop
© Xoran Technologies®, Inc. 2007
XoranForm SOP9.2
Part# 020009-03
Operator E-Stop
Rev 002 DCO # 278
Rev date: 07/27/07
2
X-Ray Warning System:
The MiniCAT™ has a flashing light (yellow) and makes an audible sound when the
X-ray is firing. In addition it is possible to install external warning lights and/or audible
alarms when X-ray is enabled in ready state. Call Xoran to learn more about these
options if required in your area.
Door Interlock System:
The MiniCAT™ is equipped with provisions for an optional door interlock circuit. This
type of circuit shuts off power to the X-ray source when the door is opened. Call Xoran
to learn more about these options if required in your area.
Disposal:
Follow local regulations on disposal of waste parts. The X-ray source assembly, image
sensor and all electronic circuits should be regarded as non-environmental friendly
waste product.
Extension Cords / Cables:
Do not use any extension cords which have not been provided with the MiniCAT™.
Use only the interface cables provided with the MiniCAT™. Do not alter the cabling
configuration. (See section 2.6 Connectivity Diagram)
Additional Software and Accessories:
Do not connect any items or equipment to the MiniCAT™ which are not part of the
system. Do not install any additional software on the system. Either of these actions
can cause the system to malfunction and will result in voiding your warranty.
1.3 Table of Symbols
The following symbols can be found in this manual and on the equipment. They are
described below.
© Xoran Technologies®, Inc. 2007
XoranForm SOP9.2
Part# 020009-03
Rev 002 DCO # 278
Rev date: 07/27/07
3
Symbol
Description
Type B Applied Part
Electric Shock, High Voltage: This symbol,
wherever it appears, alerts you to the presence of
uninsulated dangerous voltage inside the enclosure -voltage that may be sufficient to constitute a risk of
shock.
Protective Earth, Ground: Grounding reliability
can only be achieved with the equipment is
connected to an equivalent receptacle marked
"Hospital Only" or "Hospital Grade."
Attention: Consult accompanying documents.
X-ray Caution: These symbols indicate the
presence of X-radiation. This X-ray device may be
dangerous to patient and operator unless safe
exposure factors and operating instructions are
observed.
© Xoran Technologies®, Inc. 2007
XoranForm SOP9.2
Part# 020009-03
Rev 002 DCO # 278
Rev date: 07/27/07
4
Symbol
Description
Pinch Point: This symbol alerts you to the potential
for injury due to moving mechanical parts. Keep
hands clear during operation.
X-Ray Focal Spot: This symbol appears on the
X-ray tube head, showing the approximate location
of the X-ray focal spot.
Class II Laser: This symbol alerts you to the
presence of Class II laser light. Do not stare into the
beam.
1.4 Electromagnetic Interferance
The MiniCAT™ has been tested and found to comply with the limits for Class B equipment,
pursuant to IEC 60601-1-2. These limits are designed to provide reasonable protection
against harmful interference in a commercial environment. The MiniCAT™ generates, uses
and can radiate electromagnetic energy. If MiniCAT™ is not installed and used in
accordance with these instructions, it may cause harmful interference to surrounding
equipment.
MiniCAT™ is intended for use in an electromagnetic environment specified below. The
customer or user of the MiniCAT™ should ensure that it is used in such an environment.
Immunity / Test
Electrostatic Environment- Guidance
Electrostatic
Discharge
Compliant to +4 kV. Floors should be wood, concrete or ceramic
tile. If floors are synthetic, the relative humidity should be at least
30%.
EFT and Surge
Electrical power quality should be that of a typical commercial or
© Xoran Technologies®, Inc. 2007
XoranForm SOP9.2
Part# 020009-03
Rev 002 DCO # 278
Rev date: 07/27/07
5
Immunity / Test
Electrostatic Environment- Guidance
hospital environment.
Voltage Dips/Dropout Mains power quality should be that of a typical commercial or
hospital environment. If the user requires continued operation
during power mains interruptions, it is recommended that the
equipment be powered from an uninterruptible power supply
(included).
Conducted RF
Portable and mobile communication equipment should be separated
from the MiniCAT™ by no less than 19 feet (6 meters).
Radiated RF
The MiniCAT™ is intended for use in an electromagnetic
environment in which radiated disturbances are controlled. The
customer or user can help prevent electromagnetic interference by
maintaining a minimum distance between portable and mobile RF
communications equipment and the MiniCAT™ as recommended
below, according to the maximum output power of the
communications equipment.
Maximum Output
Power
(Watts)
Separation
Separation
(150 kHz to 800
MHz)
(800 MHz to 2.5
GHz)
0.01
15 in (38 cm)
30 in (76 cm)
0.1
15 in (38 cm)
30 in (76 cm)
1
46 in (117 cm)
8 ft (2.4 m)
10
12 ft (3.7 m)
24 ft (7.3 m)
100
38 ft (11.7 m)
77 ft (23.4 m)
Note: Field strengths from transmitters, as determined by an
electromagnetic site survey, should be less than the compliance
level of 3 V/m.
If the MiniCAT™ is suspected of causing harmful interference to other surrounding
equipment the customer or user is encouraged to try to correct the interference by one or more
© Xoran Technologies®, Inc. 2007
XoranForm SOP9.2
Part# 020009-03
Rev 002 DCO # 278
Rev date: 07/27/07
6
of the following methods:
· Turn the MiniCAT™ off and on to verify that the interference is coming from the
MiniCAT™.
· Move the other equipment farther away from the MiniCAT™.
· Connect the other equipment into an outlet on a circuit different from that to which the
MiniCAT™ is connected.
· Contact Xoran Technologies customer support for additional assistance.
1.5 Cleaning and Service
Cleaning Schedule
It is recommended that the equipment be cleaned and disinfected in the following manner:
· Between Patients:
ØClean patient head holder, head strap and chair with alcohol. Do not spray.
· Daily:
ØClean dust from surfaces by wiping with a dry or slightly damp cloth.
· Monthly:
ØCheck for defective X-ray indicator lights and sounds.
ØGently vacuum dust from fans behind acquisition workstation and server (if
applicable).
ØOpen server front panel and gently vacuum out dust accumulation (if applicable).
Service and Maintenance
There are no user-serviceable parts on the MiniCAT™. It is recommended that the equipment
be inspected and serviced annually. Inspection and service must be performed by Xoran
Technologies, Inc. or other technician licensed and qualified to service this equipment.
Service/preventative maintenance for the first year of equipment operation is covered by
Xoran Technologies under the equipment warranty. Ongoing service and preventative
maintenance can be purchased under a service agreement with Xoran Technologies.
It is the responsibility of the user to ensure that the equipment is maintained in compliance
with the manufacturer recommended maintenance schedule. The manufacturer and the
© Xoran Technologies®, Inc. 2007
XoranForm SOP9.2
Part# 020009-03
Rev 002 DCO # 278
Rev date: 07/27/07
7
assembler/installer can not be held responsible for the failure of the owner/user to have the
manufacturer's recommended maintenance performed.
1.6 Data Backup
Every effort has been made to ensure that patient data is stored safely on the MiniCAT™.
However, it is recommended that periodic backup is performed to prevent data loss in the
event of catastrophe or system failure. It is the user's responsibility to ensure adequate data
backup is performed.
Call Xoran Customer Service for recommendations on how to perform data backup most
effectively.
1.7 Regulatory Compliance
Regulatory Compliance Information (USA and Canada)
MiniCAT™ has been tested and/or evaluated against and found compliant with the
following IEC standards/requirements:
·
IEC 60601-1
·
IEC 60601-2-32
·
IEC 60601-2-44
·
IEC 60601-1-1
·
IEC 60601-1-2
·
CAN / USA 60601-A1
Equipment Class
·
Protection against electric shock: Class I
·
Applied part has degree of protection against electric shock: Type B Applied Part
© Xoran Technologies®, Inc. 2007
XoranForm SOP9.2
Part# 020009-03
Rev 002 DCO # 278
Rev date: 07/27/07
8
MiniCAT™ has been tested and/or evaluated against and found compliant with the
following IEC standards/requirements:
·
Class of equipment against ingress of liquids: Ordinary Equipment, IPX0
·
Radiated emissions: Class B
·
LED - Class 2 / IEC 60825-1
© Xoran Technologies®, Inc. 2007
XoranForm SOP9.2
Part# 020009-03
Rev 002 DCO # 278
Rev date: 07/27/07
9
2.0 INTRODUCTION
2.1 Welcome
Predrag (“Pedja”) Sukovic
President/CEO
309 N. First Street
Ann Arbor, Michigan
48103
(734) 663-7194 Phone
(734) 663-8500 Fax
E-mail:
[email protected]
Web: www.xorantech.com
May 1, 2006
Dear Valued Xoran Customer,
Thank you for purchasing the MiniCAT™ scanner.
We designed the MiniCAT™ scanner and the User’s Manual to be easy to use. This User’s
Manual gives you chronological, step-by-step instructions for operating the scanner. It also
provides you with technical specifications for the MiniCAT™ scanner.
To ensure the safe and proper use of your new scanner, please make sure that you read and
understand this User’s Manual before operating the scanner and follow the User’s Manual’s
operating and safety instructions when using the scanner. The instructions in this User’s
Manual are meant to supplement your Xoran on-site training, your radiation safety training as
required by your State’s Radiation Safety Regulations, and your own professional training and
expertise.
Customer Service and Support is our #1 priority. We want to do everything we can to help
you use your new MiniCAT™ scanner in a safe and efficient manner.
If you have any questions, please call us at: 800-70-XORAN (800-709-6726). Our Customer
Service Engineers will be happy to help you.
Sincerely,
Predrag Sukovic
© Xoran Technologies®, Inc. 2007
XoranForm SOP9.2
Part# 020009-03
Rev 002 DCO # 278
Rev date: 07/27/07
10
President/CEO
2.2 MiniCAT Overview
What is a MiniCAT™?
Xoran Technologies has created a revolutionary compact CT scanner for sinuses and ears that
is specifically designed to be used by physicians at the patient's point of care. Unlike large
full-body CT scanners, the MiniCAT™ allows patients to sit comfortably upright in an open,
patient-friendly design. This is a significant feature, because many patients complain of
feeling claustrophobic in traditional CAT scanners. Adult sinus and temporal bone scans are
collected in a single 360° rotation around the head that takes only 40 seconds. Children’s
scans take 20 seconds, and the scanner has a significantly lower radiation dose than full-body
scanners. Doctors get instant, high-quality images on a computer monitor allowing them to
diagnose problems and begin treatment as quickly as possible.
2.3 Manual Updates
Online Manual
The most up-to-date version of this manual can always be viewed online:
http://www.xorantech.com/Help/MiniCAT/HTML/index.html Navigate the online manual by
clicking chapter headings in the table of contents (on the left).
© Xoran Technologies®, Inc. 2007
XoranForm SOP9.2
Part# 020009-03
Rev 002 DCO # 278
Rev date: 07/27/07
11
Tip: From the MiniCAT™ software, press the F1/HELP key at any time to launch the online
manual.
Hard Copy Manual
For a hardcopy, download the latest version in PDF format at the following link:
http://www.xorantech.com/Help/MiniCAT/MiniCAT Users Manual.pdf. This manual is
originally written in the English language.
2.4 Scanner Hardware
The following diagram shows the MiniCAT™ scanner hardware with the main components
identified. These components will be referred to throughout this manual.
© Xoran Technologies®, Inc. 2007
XoranForm SOP9.2
Part# 020009-03
Rev 002 DCO # 278
Rev date: 07/27/07
12
In addition to the scanner hardware shown in the above picture, MiniCAT™ also ships and is
installed with an acquisition workstation and server (optional) which are shown in subsequent
sections of this User's Manual.
2.5 Other Components
Following is a list of accessories that accompany the MiniCAT™. Call Xoran Customer
Service for replacements as needed.
Part Number
Description
20007
Phantom Holder
20008
Seat Cushion
20009
MiniCAT™ User's Manual
© Xoran Technologies®, Inc. 2007
XoranForm SOP9.2
Part# 020009-03
Rev 002 DCO # 278
Rev date: 07/27/07
13
Part Number
Description
20011
Workstation with Keyboard and Mouse
20012
Server
20013
Xoran Labeled CD Stack
20014
Foam Spacers - Calibration Phantom
29045
Operator Control Box
29080
Patient E-Stop
29081
Elevation Remote
30001
Accessory Bin
30004
Ethernet Cable
30005
DGL-4100 Broad Band Router
30006
Foot Stool
30007
HP96 Black Printer Ink
30008
HP97 Color Printer Ink
30009
HP 6540 Printer
30010
HP 6940 Printer
30011
HP Premium Plus Photo Paper
30012
Workstation Monitor
30014
USB 2.0 AB Printer Cable
30016
Tripp-lite UPS Battery Backup
30017
Operator's Desk
30018
Water Phantom
30019
Booster Seat
30020
Extension Strap for Booster Seat
30021
Chin Strap
30022
Forehead Strap - Adult
© Xoran Technologies®, Inc. 2007
XoranForm SOP9.2
Part# 020009-03
Rev 002 DCO # 278
Rev date: 07/27/07
14
Part Number
Description
30023
Forehead Strap - Child
30024
Linksys 5-Port Network Switch
Warning: Only use original accessories provided during installation of the
equipment. Do not use any other parts or accessories.
2.6 Connectivity Diagram
Power cables from the workstation (and server if applicable) are connected to the back of the
MiniCAT™ scanner hardware. Do not alter this configuration.
All peripheral devices used with the MiniCAT™ should be certified to meet the requirements
of standard IC60950-1, including modems and networking/ethernet cards and devices.
© Xoran Technologies®, Inc. 2007
XoranForm SOP9.2
Part# 020009-03
Rev 002 DCO # 278
Rev date: 07/27/07
15
© Xoran Technologies®, Inc. 2007
XoranForm SOP9.2
Part# 020009-03
Rev 002 DCO # 278
Rev date: 07/27/07
16
2.7 Operation Sequence
Overview of Steps for Performing a MiniCAT™ Scan
Note: This page is meant only as an overview or reminder. Please attend
MiniCAT™ training with a qualified instructor and read the complete MiniCAT™
user's manual before operating the equipment.
1. System Startup. (Chapter 3)
à Scanner should be warmed up for one hour before calibrating or
scanning.
2. Perform a Daily Calibration. (Chapter 4)
à Be sure to remove the head holder!
3. Enter Patient Information (Chapter 5)
4. Click [Acquire New] and Select Imaging Protocol (Chapter 6)
à Scanner will initialize for scanning, may move and make a sound.
5. Seat and Position Patient (Chapter 6)
à Have patient remove jewelry, glasses, hair accessories, etc.
à Adjust height of patient chair until top of ear is properly aligned in
head holder.
à Use laser cross-hair to position patient based on imaging protocol:
- Sinus Scan: Laser on High Cheekbone
- Temporal Bone Scan: Laser on Tragus
6. Take a Scout View to Confirm Patient Position (Chapter 6)
à Have patient relax, close eyes, remain still and avoid talking,
chewing and swallowing.
à Ask patient to remain seated until instructed to exit scanner.
à Perform a Dry Run to familiarize patient with scanner movement.
7. Click [Start Acquire] to initiate scan (Chapter 6)
à Scan will be performed, and overhead gantry will rewind.
à When gantry stops moving, instruct patient to exit scanner.
8. View images (Chapters 7)
à Use MPR view and other tools to scroll through scan volume.
9. Output images (Chapter 8)
à Images can be sent to printer or other media.
© Xoran Technologies®, Inc. 2007
XoranForm SOP9.2
Part# 020009-03
Rev 002 DCO # 278
Rev date: 07/27/07
17
2.8 Laser Alignment
Warning: Class II laser light. Do not stare into the beam.
To confirm alignment light accuracy:
· Turn off lights.
· Press and hold [Alignment Light] button to turn on laser.
· Side lasers should align with the marks on perimeter of X-ray detector.
· Front laser should hit the center of the headrest.
Note: If lasers are not aligned properly, call Xoran Customer Service.
© Xoran Technologies®, Inc. 2007
XoranForm SOP9.2
Part# 020009-03
Rev 002 DCO # 278
Rev date: 07/27/07
18
3.0 STARTUP AND SHUTDOWN
3.1 Emergency Shutdown
Emergency Shutdown
In the case of an emergency, the system rotation can be stopped and X-ray emission can be
halted by pressing the EMERGENCY STOP (E-Stop) button. The operator E-Stop is
located on the Main Control Box on the operator’s desk. The Patient E-Stop is located on the
Patient Control Box which can be held by the patient during the scan.
Patient E-Stop
Operator E-Stop
After pushing the E-Stop, the overhead gantry can be manually rotated if needed so that the
patient can safely exit the scanner.
Warning: Turn E-Stop clockwise to reset. It is also recommended to restart
MiniCAT™ software after resetting the E-Stop.
3.2 System Startup
Warning: It is recommend that the scanner remain on at all times. If the scanner
has been shut down for any reason, please allow one hour for the scanner to warm
up before scanning patients to ensure the best quality images.
Both the MiniCAT™ scanner hardware and the workstation must be turned on for the system
to function properly.
Turn on the Workstation
© Xoran Technologies®, Inc. 2007
XoranForm SOP9.2
Part# 020009-03
Rev 002 DCO # 278
Rev date: 07/27/07
19
The workstation computer controls the MiniCAT™ system hardware and software.
Press the power button to start the workstation.
Also, turn on peripheral devices such as the workstation monitor, printer and server (if
applicable) at this time.
Turn on MiniCAT™ Hardware
To turn on the system, push the green ON button on the Main Control Box.
The Main Control Box should be located on the operator’s desk. The lights on the Main
Control Box represent the following:
POWER: The system is turned on.
READY:
The system is ready to perform a scan.
X-RAY
ON:
The X-ray source is on (emitting radiation).
© Xoran Technologies®, Inc. 2007
XoranForm SOP9.2
Part# 020009-03
Rev 002 DCO # 278
Rev date: 07/27/07
20
FAULT:
When lit, this light indicates that the X-ray has timed out. Please contact
Customer Service at 800-70-XORAN.
FAULT: When rapidly flashing, this light indicates a hardware initialization problem.
(flashing) Please follow the system shutdown procedure, followed by the system startup
procedure. If the problem persists, Please contact Xoran Customer Service for
assistance.
Note: The same light configuration is on the front overhead cover of the machine (except the
fault light).
Note: The Yellow OFF button on the Main Control Box can be used to turn off the
MiniCAT™ scanner hardware. It is recommended that the system be left on at all times.
Launch MiniCAT™ Software
Tip: Make sure the workstation monitor is turned on!
1. Double click on the MiniCAT™ icon on the desktop.
2. System users must log on to operate the system. Enter username and password.
3. Patient Database window will open.
3.3 User Management
User Management
Any person operating the MiniCAT™ system is called a user. User information can be
managed in the User Management window. To launch, select the User Management option
from the View menu in the application.
© Xoran Technologies®, Inc. 2007
XoranForm SOP9.2
Part# 020009-03
Rev 002 DCO # 278
Rev date: 07/27/07
21
The most common User Management action are listed below:
· New User: From the User menu select New User. Fill in the user information into the
fields.
· User Type: Users of the MiniCAT™ system are classified as either an “Ordering
Physician” or “Technologist”. Each patient study should be assigned to an ordering
physician.
Note: When using MiniPACS™ online service to view patient studies over the internet,
the ordering physician must be logged on to view studies assigned to him or her.
· Active: Active users have the ability to log onto the system and use the MiniCAT™
software. Clearing the Active check box "deactivates" the user. This prevents this user
from using the scanner but preserves the user data for record-keeping and/or future
reactivation purposes.
· Delete User: A user account can be deleted from the system by right-clicking a user's
name and clicking Delete. All information about that user is removed from the system.
© Xoran Technologies®, Inc. 2007
XoranForm SOP9.2
Part# 020009-03
Rev 002 DCO # 278
Rev date: 07/27/07
22
3.4 System Shutdown
Warning: It is recommend that the scanner remain on at all times. If the scanner
has been shut down for any reason, please allow one hour for the scanner to warm
up before scanning patients to ensure the best quality images.
User Logoff
The current user is shown in the upper right corner of the MiniCAT™ software. To log out,
click on the words Log Off.
© Xoran Technologies®, Inc. 2007
XoranForm SOP9.2
Part# 020009-03
Rev 002 DCO # 278
Rev date: 07/27/07
23
Exit Software
To close MiniCAT™ software, select the Exit option from the File menu.
Turn Off Workstation
Note: Most MiniCAT™ users keep the workstation powered on at all times. However, if the
installation site is subject to frequent power surges, we recommend that the computer be
turned off at night to protect the system and prevent data loss.
1. Click the Start icon on the bottom left of the main computer screen.
2. Click Turn off Computer.
Turn Off Scanner
To turn off the scanner, push the yellow OFF button on the Main Control Box
© Xoran Technologies®, Inc. 2007
XoranForm SOP9.2
Part# 020009-03
Rev 002 DCO # 278
Rev date: 07/27/07
24
3.5 UPS
Uninterruptible Power Supply
The MiniCAT™ system is installed with a UPS (Uninterruptible Power Supply) which
contains a backup battery with enough capacity to complete one scan. If the facility power
goes out while a scan is in progress:
· The system will continue to be powered by the UPS battery.
· The scan in progress will complete as usual.
· No information will be lost.
· The UPS will beep indicating that battery is being consumed.
Note: When the scan is complete, it is recommended that the system be shut down until
continuous power is restored.
© Xoran Technologies®, Inc. 2007
XoranForm SOP9.2
Part# 020009-03
Rev 002 DCO # 278
Rev date: 07/27/07
25
© Xoran Technologies®, Inc. 2007
XoranForm SOP9.2
Part# 020009-03
Rev 002 DCO # 278
Rev date: 07/27/07
26
4.0 DAILY CALIBRATION
For best image quality, the MiniCAT™ system should be calibrated daily. Calibration should
only be performed after the system has been powered on for at least one hour. We
recommend leaving the MiniCAT™ system on overnight and calibrating first thing each
morning.
Warning: X-rays will be emitted during daily calibration
Daily Calibration Procedure
1. The imaging area between the X-ray source and X-ray detector must be free of all objects.
Remove the head-holder, phantom holder and any phantom that might be present before
continuing.
Caution: The patient must not be in the scanner.
2a. Select the Daily Calibration option from the Tools menu.
NOTE: To calibrate with prior versions of MiniCAT™ software, select the
Calibration option from the View menu.
2b. Alternatively, you can push the F9/CAL key.
3. A message will appear, prompting to start the calibration process. Click Calibrate to
begin.
4. A message will appear, asking you if it is OK to turn on the X-ray source. Ensure that you
are behind the radiation barrier and click OK.
© Xoran Technologies®, Inc. 2007
XoranForm SOP9.2
Part# 020009-03
Rev 002 DCO # 278
Rev date: 07/27/07
27
Warning: It is the user's responsibility to ensure that proper radiation safety
procedures are in place before firing the X-ray source.
5. Remain behind the radiation barrier until a message appears, indicating the calibration is
complete. Click Close to finish the process.
© Xoran Technologies®, Inc. 2007
XoranForm SOP9.2
Part# 020009-03
Rev 002 DCO # 278
Rev date: 07/27/07
28
5.0 PATIENT DATABASE
The Patient Database is the user interface to patient records and studies.
5.1 Patient Database
Launch Patient Database
The Patient Database window is automatically opened when the MiniCAT™ software
application is launched.
Tip: The Patient Database can also be accessed at any time by pressing the F8 key or the icon
in the toolbar.
5.2 Enter New Patient
Enter New Patient
1. To enter a new patient, click the Start Over button in the lower-left portion of the Patient
© Xoran Technologies®, Inc. 2007
XoranForm SOP9.2
Part# 020009-03
Rev 002 DCO # 278
Rev date: 07/27/07
29
Database window.
2. Enter patient data in the fields. Required information is marked with an asterisk. Enter the
patient’s date of birth in mm-dd-yy or mm/dd/yy format.
Note: Do not enter anything in the Study Date and Study Title fields. This information will
be filled out automatically when the scan is performed.
3. After entering the information in the Patient Data box, save it by clicking Save on the
bottom left of the screen.
5.3 Find Existing Patient
Find Existing Patient
1. Click Start Over. The Find button will be enabled and the Patient Data fields will
become blank.
2. Patient records can be searched by name, number, birthdate or study date. Enter any
known information in the Patient Data fields. For example, type the first few letters of the
patient's last name.
© Xoran Technologies®, Inc. 2007
XoranForm SOP9.2
Part# 020009-03
Rev 002 DCO # 278
Rev date: 07/27/07
30
3. After you enter your search criteria, click Find. A list of matching patients will be
displayed.
4. Click on the [+] to view studies listed under this patient's name.
There are three types of study files. They are described below.
Study File
Type
Description
Scout
A Scout is a single X-ray image that is used to ensure that the patient is
positioned properly for the scan.
Raw
Raw data is a sequence of images collected by the MiniCAT™ system
© Xoran Technologies®, Inc. 2007
XoranForm SOP9.2
Part# 020009-03
Rev 002 DCO # 278
Rev date: 07/27/07
31
Study File
Type
Description
during an acquisition. This raw data is "reconstructed" using a
tomographic algorithm to create 3-D imagery.
Recon
The final result is known as the Reconstruction. This 3-D volume imagery
can be viewed as a series of coronal, sagittal or axial slices, as well as in
many other ways.
5. To open a study for viewing, double-click on its title.
Note: Refer to Chapter 7 for more information on viewing patient studies.
5.4 Advanced Search
Advanced Search
Patient studies may also be searched by ordering physician, imaging protocol, or a range of
dates when the studies were acquired.
1. Click Start Over in the Patient Database window.
2. Select the Advanced Search option from the Patient menu.
3. Enter search criteria into the Advanced Search window and click Find. A list of matching
patients will be displayed.
© Xoran Technologies®, Inc. 2007
XoranForm SOP9.2
Part# 020009-03
Rev 002 DCO # 278
Rev date: 07/27/07
32
3. Click on the [+] to view studies listed under this patient's name.
4. To open a study for viewing, double-click on its title.
Note: Refer to Chapter 7 for more information on viewing patient studies.
5.5 Delete Patient
Delete Patient
You can delete a patient by right-clicking on the patient’s name and choosing Delete Patient
from the drop-down menu.
Warning: This action permanently deletes files from your system. Be sure to
follow any required procedures for record retention and data backup before deleting
patients.
5.6 Purge Files
Purge Files
To purge unneeded patients and studies in your system, follow these steps:
© Xoran Technologies®, Inc. 2007
XoranForm SOP9.2
Part# 020009-03
Rev 002 DCO # 278
Rev date: 07/27/07
33
1. Select the Purge files option from the File menu.
2. Specify date interval to purge.
3. Select study type(s) to purge.
4. Press OK to remove the files permanently from your system.
Warning: This action permanently deletes files from your system. Be sure to
follow any required procedures for record retention and data backup before purging
files.
© Xoran Technologies®, Inc. 2007
XoranForm SOP9.2
Part# 020009-03
Rev 002 DCO # 278
Rev date: 07/27/07
34
6.0 ACQUIRING IMAGES
6.1 Select Imaging Protocol
Select Imaging Protocol
Important: Select protocol BEFORE seating the patient in the scanner
1. After entering new patient information or selecting an existing patient, click Acquire New
.
2. The Acquisition window will appear.
3. Select the appropriate protocol from the Protocol menu. The standard protocol options are
as follows:
© Xoran Technologies®, Inc. 2007
XoranForm SOP9.2
Part# 020009-03
Rev 002 DCO # 278
Rev date: 07/27/07
35
Protocol
Description
Sinus 40s (Adult)
40-second imaging protocol, used for most adult sinus scans.
Sinus 20s (Pediatric)
20-second imaging protocol can be used for pediatric sinus
scans or for adults where patient motion is an issue. Scan is
faster and lower dose, but image quality will be somewhat
reduced.
Sinus 10s (Follow-up)
10-second imaging protocol is a very low-dose scan which can
used for follow-up, if desired.
Temporal Bone
Temporal bone imaging protocol provides higher spatial
resolution than the Sinus 40s protocol, but field of view is
somewhat smaller.
Xoran Factory Test
Used by Xoran engineer to perform factory setup/testing.
Resolution Test
Used by Xoran engineer to perform quality assurance.
Note for IGS Users: Additional protocols are available for creating images compatible with
various image-guided surgery systems. If you have need for a protocol compatible with a
specific IGS system, please call 800-70-XORAN (800-709-6726). A Xoran Customer
Service representative will be happy to assist you.
4. Select the ordering physician.
· To add a new ordering physician, click the Add Physician icon to the right of the
Ordering Physician.
· To change the ordering physician on a study, right-click a patient's name in the Patient
Database and select Ordering Physician.
5. Position the patient (See section 6.3).
6.2 Educate Patient
For patient safety and to maximize the image quality of the CT scan, Xoran recommends the
following information be provided to the patient, in addition to any state regulation
requirements.
Prior to the scan:
© Xoran Technologies®, Inc. 2007
XoranForm SOP9.2
Part# 020009-03
Rev 002 DCO # 278
Rev date: 07/27/07
36
· Remove jewelry, hair accessories and glasses.
· Sit upright, relax and face straight ahead.
· Hold the Patient E-Stop control in lap or hands (see below).
· Small lasers will be used for positioning (close eyes).
· A Scout View X-ray image will be taken to verify position.
· A Dry Run can demonstrate scanner movement without emitting X-rays.
During the scan:
· Sit as still as possible for best image quality.
· Avoid talking, chewing, yawning, swallowing, coughing or slouching.
· Breathe naturally moving head as little as possible.
· The scan takes 40 seconds for adults, 20 seconds for children.
· The overhead gantry will rotate. Close eyes to avoid following this motion with the head
or eyes.
· The scanner makes a chirping sound as it performs the scan.
· In case of any problem, patient can stop the scan by pressing the PATIENT
EMERGENCY STOP (E-Stop) button on the Patient Control Box.
After the scan:
· The overhead gantry will rewind when the scan is complete.
· Please remain seated until the operator instructs you to exit the scanner.
Patient E-Stop Control:
· Below is a picture of the Patient Control Box which includes the PATIENT
EMERGENCY STOP (E-Stop) button.
· This can hang within easy reach of the patient or can be held in the patient’s hand
during the scan.
· Hit the big red button on the e-stop to stop the scanner if anything goes wrong.
· The gantry will stop moving and the X-rays will cease.
© Xoran Technologies®, Inc. 2007
XoranForm SOP9.2
Part# 020009-03
Rev 002 DCO # 278
Rev date: 07/27/07
37
6.3 Seat and Position Patient
Seat and Position Patient
Important: Select protocol BEFORE seating the patient in the scanner.
1. After selecting protocol and educating the patient, seat the patient in the scanner. Adjust
the chair so that the patient's head is positioned in the scanner as shown below.
Note: Xoran can provide you with a booster seat for pediatric patients upon request.
· Use the Patient Align arrows on the controller to move the chair up and down.
© Xoran Technologies®, Inc. 2007
XoranForm SOP9.2
Part# 020009-03
Rev 002 DCO # 278
Rev date: 07/27/07
38
2. Make sure that patient's ear is aligned as shown below.
3. Instruct patient to close his or her eyes.
4. Press the Alignment Light button to turn on the alignment lasers.
· Press button once to turn on the laser for a few seconds.
· Press and hold for 3 seconds to turn on the laser for 5 minutes.
· For a Sinus scan, the laser should project the crosshairs on the patient's high cheekbone
as shown below.
© Xoran Technologies®, Inc. 2007
XoranForm SOP9.2
Part# 020009-03
Rev 002 DCO # 278
Rev date: 07/27/07
39
· For a Temporal Bone scan, the laser should project the crosshairs on the patient's tragus
as shown below.
4. After the patient is properly positioned, secure forehead strap.
The new MK1 Carbon Fiber Head Holder ("MK1") was designed to control patient movement
to optimize spatial resolution and image quality. Follow the directions below if your scanner
© Xoran Technologies®, Inc. 2007
XoranForm SOP9.2
Part# 020009-03
Rev 002 DCO # 278
Rev date: 07/27/07
40
is equipped with the new MK1.
1. The neck pad in positioned in the bottom bracket for adults and the top bracket for
pediatric patients. See example below.
2. Seat the patient so the neck pad sits comfortably at the curve of their neck. The patient's
ears should be approximately .5 inches (1 cm) below the sides of the MK1.
3. Insert temple wedges squarely and securely on sides of head. Included with each MK1 are
three pairs of different-sized temple wedges to fit patients of varying head sizes.
© Xoran Technologies®, Inc. 2007
XoranForm SOP9.2
Part# 020009-03
Rev 002 DCO # 278
Rev date: 07/27/07
41
4. Secure forehead strap as shown below.
© Xoran Technologies®, Inc. 2007
XoranForm SOP9.2
Part# 020009-03
Rev 002 DCO # 278
Rev date: 07/27/07
42
5. Remind the patient to remain still and relax while positioned in the scanner.
6.4 Dry Run and Scout View
Perform Dry Run
The Dry Run function rotates the overhead gantry without activating the X-ray source. This
optional function allows the patient to become more familiar and comfortable with the
system. This can help to reduce patient motion during the actual CT scan.
Important: Select protocol BEFORE seating the patient in the scanner.
1. Check the Dry Run box, and the Acquisition button will change to Dummy Acquisition.
2. Make sure that nothing, including any part of the patient, is in the path of the rotating
overhead gantry.
3. Click Dummy Acquisition, and the gantry will rotate and rewind without firing the X-ray
source.
Acquire Scout View
A Scout View is a single lateral X-ray taken to verify that the patient is positioned properly.
Caution: Distances in Scout View image are not to scale. Scout View should not be
used for any purpose other than positioning patient.
© Xoran Technologies®, Inc. 2007
XoranForm SOP9.2
Part# 020009-03
Rev 002 DCO # 278
Rev date: 07/27/07
43
1. In the Acquisition window, click Scout View.
2. The following dialogue box will appear:
Important: Make sure that all required radiation safety procedures are complied
with before proceeding.
3. Stand behind the barrier and click OK. The Scout View image will be acquired.
4. Check the Scout View to make sure that the following criteria are met. If the Scout View
does not meet these criteria, the patient should be re-positioned.
· For Sinus Scans:
ØThe sinuses are within the window.
ØPatient head appears facing sideways.
ØHead is upright -- not tilting forward or back.
ØThere is space between the tip of nose and edge of the scout image.
© Xoran Technologies®, Inc. 2007
XoranForm SOP9.2
Part# 020009-03
Rev 002 DCO # 278
Rev date: 07/27/07
44
ØThe top part of the upper lip is included.
An example of a good sinus Scout View is shown below:
© Xoran Technologies®, Inc. 2007
XoranForm SOP9.2
Part# 020009-03
Rev 002 DCO # 278
Rev date: 07/27/07
45
An example of a poor sinus Scout View is shown below. Improper patient positioning is
indicated by the visibility of the maxilla and upper teeth, and no space in front of the nose.
· For temporal bone scans:
ØThe temporal bone area is centered in the scout view image.
Note: For temporal bone imaging, a Scout View may not be the best method to assess
a patient's positioning. Xoran recommends using the alignment laser lights.
6.5 Start Acquisition
Start Acquisition
1. After confirming that your patient is properly positioned, you are ready to acquire the CT
scan.
2. Stand behind the operators barrier.
3. Click Start Acquisition.
© Xoran Technologies®, Inc. 2007
XoranForm SOP9.2
Part# 020009-03
Rev 002 DCO # 278
Rev date: 07/27/07
46
The following message will appear:
Important: Make sure that all required radiation safety procedures are complied
with before proceeding.
4. Remind the patient not to move.
5. Stand behind the barrier and click OK. Scan acquisition will begin.
· The scan will take less than 1 minute.
· The overhead gantry will rotate around the patient and a series of X-ray images will be
acquired.
· While the X-ray source is turned on, the system will make a chirping sound.
· When the scan is completed, the overhead gantry will rewind to its original position.
© Xoran Technologies®, Inc. 2007
XoranForm SOP9.2
Part# 020009-03
Rev 002 DCO # 278
Rev date: 07/27/07
47
Important: To stop the scanner in case of any emergency, press the
EMERGENCY STOP (E-Stop) button.
6. Reconstruction will begin automatically. This takes approximately two minutes.
© Xoran Technologies®, Inc. 2007
XoranForm SOP9.2
Part# 020009-03
Rev 002 DCO # 278
Rev date: 07/27/07
48
7.0 VIEW IMAGES
This chapter explains how to open a study, view images using various viewing options and
tools, make annotations and select images for output.
7.1 Open Study
Open Study
1. In the Patient Database, click the [+] next to the patient's name to view studies listed under
that patient.
2. Double click on the Recon study you wish to view.
© Xoran Technologies®, Inc. 2007
XoranForm SOP9.2
Part# 020009-03
Rev 002 DCO # 278
Rev date: 07/27/07
49
3. The study will open in the Multi-planar Reconstruction (MPR) window. This is the default
setting for viewing and manipulating reconstructed images. Axial, coronal and sagittal
planes are all visible at once.
Tip: An overlay containing patient's name and other information appears in the upper left
corner. Press <Ctrl-O> to toggle this text on and off.
7.2 Viewing Options
The Navigation menu is located in the upper right corner. This menu contains several image
viewing options. They are described below.
Image Viewing
Option
Description
MPR
Three views are displayed at once. This is a powerful way to navigate
the 3D scan volume.
© Xoran Technologies®, Inc. 2007
XoranForm SOP9.2
Part# 020009-03
Rev 002 DCO # 278
Rev date: 07/27/07
50
Image Viewing
Option
Description
Axial
A series of axial slices are displayed.
Coronal
A series of coronal slices are displayed.
Sagittal
A series of sagittal slices are displayed.
Selected Slices
User-selected slices are displayed (see next section on how to select
slices).
Study Data
Auxiliary technical information is displayed here.
To change the view, click on the desired view option in the Navigation menu. For example,
clicking Coronal will present the coronal series of slices as shown below.
© Xoran Technologies®, Inc. 2007
XoranForm SOP9.2
Part# 020009-03
Rev 002 DCO # 278
Rev date: 07/27/07
51
7.3 Select Slices
Select Slices
The Selected Slices view option allows you to view slices which have been selected by the
user.
Note: Slices must be selected in order to be printed or exported.
1. Select a view option in the Navigation menu (Axial, Coronal, Sagittal, or MPR).
2. Click on the word SELECT in the lower-right corner of any image to select the image.
3. When an image is selected, the label will change to the word SELECTED.
4. Thumbnail views of Selected Images will appear in the Selected Images window.
5. Right-clicking on the Selected Image thumbnail will provide a menu of the following
options:
© Xoran Technologies®, Inc. 2007
XoranForm SOP9.2
Part# 020009-03
Rev 002 DCO # 278
Rev date: 07/27/07
52
Slice
Option
Description
Remove
Selected
Removes a single image from the Selected Images series.
Remove All
Removes all images in the Selected Images window.
Go To
Displays the selected slice in MPR view.
Autosort
Orders your selected slices from anterior to posterior.
Tip: Hold down the SHIFT key to operate on multiple selected images at once.
Range Indicator
The Range Indicator is a convenient way to select a series of slices. It appears as a green bar
with tick marks representing the locations of selected slices. The spacing between tick marks
represents the pitch.
© Xoran Technologies®, Inc. 2007
XoranForm SOP9.2
Part# 020009-03
Rev 002 DCO # 278
Rev date: 07/27/07
53
Click on the Range Indicator and drag it side to side to move the entire selected series all at
once.
7.4 Viewing Tools
Zoom
· Select the Pan/Zoom tool from the toolbar.
· Place the cursor anywhere in the image (except over the colored lines).
· Left-click to zoom in.
· Right-click to zoom out.
Pan
© Xoran Technologies®, Inc. 2007
XoranForm SOP9.2
Part# 020009-03
Rev 002 DCO # 278
Rev date: 07/27/07
54
· Select the Pan/Zoom tool from the toolbar.
· Place the cursor anywhere in the image (except over the colored lines).
· Click and hold down the left mouse button.
· Move the mouse to pan the image until desired position is achieved.
Scroll
There are 3 ways to scroll through the axial, coronal and sagittal slices:
· Using the mouse wheel.
· Using the slider.
© Xoran Technologies®, Inc. 2007
XoranForm SOP9.2
Part# 020009-03
Rev 002 DCO # 278
Rev date: 07/27/07
55
· Using cut-plane lines.
ØEach viewing window has colored vertical and horizontal lines called cut-plane lines.
The lines represent the location of the other two slices shown in MPR view.
ØFor example, in the Sagittal view shown below:
§
§
The green line represents the Coronal slice plane.
The red line represents the Axial slice plane.
© Xoran Technologies®, Inc. 2007
XoranForm SOP9.2
Part# 020009-03
Rev 002 DCO # 278
Rev date: 07/27/07
56
ØCut-plane lines can be moved by clicking and dragging. This causes the images in the
other view windows to change.
ØTwo cut-plane lines may be moved together simultaneously by grabbing the lines at
their intersection.
Slice Thickness
The slice thickness is displayed in the upper right corner of each image in MPR view, in a box
labeled ST.
© Xoran Technologies®, Inc. 2007
XoranForm SOP9.2
Part# 020009-03
Rev 002 DCO # 278
Rev date: 07/27/07
57
Slice thickness can be changed by clicking on the ST box and selecting from the list.
· Min. ST for Sinus: 0.4 mm
· Min. ST for Temporal Bone: 0.2 mm
Pitch
Pitch is the distance between slices (also called the inter-slice distance or the slice gap). The
pitch is only relevant in Axial, Coronal, or Sagittal views. To change the pitch, click on the
down arrow and select a new value from the list.
© Xoran Technologies®, Inc. 2007
XoranForm SOP9.2
Part# 020009-03
Rev 002 DCO # 278
Rev date: 07/27/07
58
Columns
The number of slice images displayed on the screen in Axial, Coronal, or Sagittal views can
be altered using the Columns pull-down menu. The following examples show 3 columns
(top) versus 6 columns (bottom) in Coronal view.
· 3 columns:
· 6 columns:
Window / Level
The Window / Level values determine the brightness and contrast of the displayed image. To
adjust:
1. Click on the Window / Level icon in the toolbar:
2. The cursor will change to show that you are using the W/L tool. Now click and drag
anywhere in the image.
· Window value increases as the mouse is moved to the left of the image, and decreases
© Xoran Technologies®, Inc. 2007
XoranForm SOP9.2
Part# 020009-03
Rev 002 DCO # 278
Rev date: 07/27/07
59
to the right.
· Level value increases as the mouse is moved towards the top of the image, and decrease
towards the bottom.
3. The Window / Level values appear in the patient information overlay, labeled W/L.
4. Preset options for W/L can be applied. Click on the down-arrow next to the
brightness/contrast icon, and a drop-down menu will appear.
· Select Bone to restore the window and level values to their default values.
· Select Set Window/Level to manually adjust the window and level values for an image
and save adjusted values as a new preset.
Rotate
The Rotate tool allows images to be rotated in MPR view.
· Find the double-ended arrow on the right side of the image.
· Click and drag the arrow up and down to rotate the image.
· Rotation angle adjustments are recorded in the patient information overlay, listed as alpha,
delta and gamma angles (values in degrees).
© Xoran Technologies®, Inc. 2007
XoranForm SOP9.2
Part# 020009-03
Rev 002 DCO # 278
Rev date: 07/27/07
60
· Images can be restored to their original non-rotated orientations by selecting the Restore
Original Tilt option from the View menu.
7.5 Annotation Tools
The tools below allow you to make distance measurements and create comment overlays on
images.
Note: All measurement and annotation tools can be used in any window where images are
displayed.
Line Tool
Using the Line Tool, measurements can be made between two points on an image (in
millimeters).
1. Click on the Line Tool icon in the toolbar
to activate the tool. (Looks like a ruler)
2. Left-click on the starting point of your desired measurement.
Note: Click once on each endpoint. Do not hold mouse button down.
3. Move the cursor to the end point of your desired measurement and left-click. A distance
© Xoran Technologies®, Inc. 2007
XoranForm SOP9.2
Part# 020009-03
Rev 002 DCO # 278
Rev date: 07/27/07
61
value will appear.
Note: The distance units are mm.
· Line objects can be moved by left-clicking the line and dragging it to the desired
location.
· Line objects can be modified by right-clicking the line. A drop-down menu will appear
with the following options:
Line Options
Description
Change Color
Changes the line color.
Visible
De-selecting this option makes the line disappear from view.
© Xoran Technologies®, Inc. 2007
XoranForm SOP9.2
Part# 020009-03
Rev 002 DCO # 278
Rev date: 07/27/07
62
Line Options
Description
Select
This makes the line active (when other lines or objects are available).
Go To
This allows you to move back to the MPR view (from the Oblique or
TMJ windows, for example).
Delete Region
This deletes the line object.
Shape Tool
The Shape Tool allows a region of any image to be selected and reports statistics of the image
region within the shape outline.
1. Click on the Shape Tool icon
in the toolbar to activate the tool.
2. Left-click on the center of the target region.
Note: Click once. Do not hold mouse button down.
3. Left-click again on the edge of the target region, and a shape object will appear. Mean and
standard deviation values will appear inside the ellipse.
Note: The units of these values are in Hounsfield units.
· Shape objects can be moved by left-clicking the line and dragging it to the desired
location.
· Shape objects can be modified by right-clicking the line. A drop-down menu will
appear with the following options:
© Xoran Technologies®, Inc. 2007
XoranForm SOP9.2
Part# 020009-03
Rev 002 DCO # 278
Rev date: 07/27/07
63
Shape
Options
Description
Change Color
This changes the color of the shape.
Visible
De-selecting this option makes the shape disappear from view.
Shape
This changes the shape from an ellipse to a rectangle.
Select
This makes the ellipse active (when other objects are available).
Go To
This allows you to go back to the MPR view (from the Oblique or TMJ
windows, for example).
Delete Region This deletes the shape object.
Text Tool
Text can be added to an image. This simple but flexible tool can be useful for labeling
anatomical features, or making notes.
1. Click on the Text Tool icon from the toolbar.
2. Left-click and drag the cursor diagonally on an area of the image where the text box should
be. Click again to release. Double-click on the word Text, and you can begin typing.
© Xoran Technologies®, Inc. 2007
XoranForm SOP9.2
Part# 020009-03
Rev 002 DCO # 278
Rev date: 07/27/07
64
· Text objects can be moved by left-clicking the line and dragging it to the desired
location.
· Text objects can be modified by right-clicking the line. A drop-down menu will appear
with the following options:
Text
Options
Description
Edit
Text can be edited.
Change
Color
Text color to be changed.
Visible
De-selecting this option makes the text object disappear from view.
© Xoran Technologies®, Inc. 2007
XoranForm SOP9.2
Part# 020009-03
Rev 002 DCO # 278
Rev date: 07/27/07
65
Text
Options
Description
Global
Text will be visible on all the other slices in the dataset (within the same
viewing window).
Select
Makes the text box active (when other objects are available).
Go To
Changes view to the MPR view (from Oblique or TMJ windows, for
example).
Delete
Region
Deletes the text box object.
Arrow Tool
Similar to the Text tool, but with an arrow to indicate a specific location on the image. Click
on the Arrow Tool icon to enable this tool.
7.6 Oblique and TMJ Tools
The following are specialized tools for working with images.
Oblique Tool
Two Points Oblique Tool
TMJ Tool
Oblique Tool
1. Click on the Oblique icon (outlined below in red). When this icon is active, you have the
ability to flatten oblique and curved objects into a two-dimensional view.
© Xoran Technologies®, Inc. 2007
XoranForm SOP9.2
Part# 020009-03
Rev 002 DCO # 278
Rev date: 07/27/07
66
2. Left-click to deposit points along the desired pathway and double click on the last point to
end the line. An example is shown below (an orange line with orange dots representing the
points).
© Xoran Technologies®, Inc. 2007
XoranForm SOP9.2
Part# 020009-03
Rev 002 DCO # 278
Rev date: 07/27/07
67
3. The following screen will appear:
· A new entry appears in the Navigation menu as "Oblique 1". You can toggle between
this view and others by selecting the desired view in the Navigation menu (top right
corner).
· The image on the left side shows the oblique pathway.
· The image at the top right shows the cut along the oblique pathway.
· The slice thickness is 0.4 mm and can be changed by left-clicking on the Slice
Thickness (ST) value in the top right corner of the image and selecting a new value.
· The thumbnail images in the bottom right frame are cuts that are perpendicular to the
oblique pathway. These are equally spaced along the length of the oblique pathway.
· You can move the oblique line by hovering over it with the cursor until it is active (it
will change color), grabbing it by holding down the left mouse button and dragging it to
the desired location.
· You can make changes to the oblique line by moving the cursor over it until the oblique
line changes color and then right-clicking the mouse. A drop-down menu will appear
with options. You can make similar changes by right-clicking the corresponding
oblique line in the Navigation menu and choosing from the menu options.
© Xoran Technologies®, Inc. 2007
XoranForm SOP9.2
Part# 020009-03
Rev 002 DCO # 278
Rev date: 07/27/07
68
Oblique Options
Description
Change Color
This changes the Oblique line color.
Visible
This makes the oblique line invisible. In order to make the oblique
line reappear, right click on the corresponding oblique line defined
in the Navigation menu and select Visible.
Panoramic Settings
This allows you to change the resolution of the oblique images.
Select
This makes the oblique line active (when other oblique lines or
objects are available).
Go To
Selecting this takes you to the Oblique window (the new screen that
appears after you define an oblique line).
Delete Region
This deletes the oblique line.
Insert Point
This inserts an additional point.
© Xoran Technologies®, Inc. 2007
XoranForm SOP9.2
Part# 020009-03
Rev 002 DCO # 278
Rev date: 07/27/07
69
Two Points Oblique Tool
1. Click on the Two Points Oblique icon (outlined below in red). When this icon is active,
you have the ability to flatten oblique and curved objects into a two-dimensional view.
2. Left-click to deposit two points along the desired pathway. An example is shown below
(an orange line with orange dots representing the click points).
© Xoran Technologies®, Inc. 2007
XoranForm SOP9.2
Part# 020009-03
Rev 002 DCO # 278
Rev date: 07/27/07
70
3. The following screen will appear:
· A new entry appears in the Navigation menu as "Two Points Oblique 1". You can
toggle between this view and others by selecting the desired view in the Navigation
menu (top right corner).
· The image on the left side shows the oblique pathway.
· The image on the lower right shows the cut along the oblique pathway.
· The slice thickness is 0.4 mm and can be changed by left-clicking on the Slice
Thickness (ST) value in the top right corner of the image and selecting a new value.
· You can move the oblique line by hovering over it with the cursor until it is active (it
will change color), grabbing it by holding down the left mouse button, and dragging it to
the desired location.
· You can make changes to the oblique line by moving the cursor over it until the oblique
line changes color and then right-clicking the mouse. A drop-down menu will appear
with options. You can make similar changes by right-clicking the corresponding
oblique line in the Navigation menu and choosing from the menu options.
© Xoran Technologies®, Inc. 2007
XoranForm SOP9.2
Part# 020009-03
Rev 002 DCO # 278
Rev date: 07/27/07
71
Two Points Oblique
Options
Description
Change Color
This changes the oblique line color.
Visible
This makes the oblique line invisible. To make the oblique line
reappear, right click the corresponding oblique line defined in
the Navigation menu and select "Visible".
Select
This makes the oblique line active (when other oblique lines or
objects are available).
Go To
Selecting this takes you to the Oblique window (the screen that
appears after you define an oblique line).
Delete Region
This deletes the oblique line.
© Xoran Technologies®, Inc. 2007
XoranForm SOP9.2
Part# 020009-03
Rev 002 DCO # 278
Rev date: 07/27/07
72
TMJ Tool
1. Click on the TMJ icon (outlined below in red). When this icon is active, you have the
ability to look at the temporal mandibular joints in a two-dimensional view.
2. Left-click below and to the right of the patient's left condyle (this is a radiological view, so
patient's left is the right side of the image). Alternatively, you could choose a point below
and to the left of the patient's right condyle. The point chosen for this example is
highlighted with the red arrow.
© Xoran Technologies®, Inc. 2007
XoranForm SOP9.2
Part# 020009-03
Rev 002 DCO # 278
Rev date: 07/27/07
73
3. Move the cursor up and to the left (patient's right) to deposit the second point. The line
that connects these two points should cross over the center of the joint. The second point
chosen for this example is highlighted with the red arrow.
As soon as this point is selected, the letter "L" appears over this line, indicating the
patient's left. A second line appears on the patient's right side that may or may not be over
the right condyle. You can move this line so that it is positioned properly.
© Xoran Technologies®, Inc. 2007
XoranForm SOP9.2
Part# 020009-03
Rev 002 DCO # 278
Rev date: 07/27/07
74
4. Double click on the second point and the following screen will appear:
· A new entry appears in the Navigation menu as "TMJ 1". You can toggle between this
view and others by selecting the desired view in the Navigation menu (top right corner).
· The two images in the upper right portion of the screen are the right and left image cuts
along the TMJ lines.
· The slice thickness is 5.2 mm and can be changed by left-clicking on the Slice
Thickness (ST) value in the top right corner of each image and selecting a new value.
· The two panes of small images are cuts that are perpendicular to the TMJ lines. These
are equally spaced along the length of each TMJ line.
· You can move the TMJ lines by hovering over them with the cursor until they are active
(they will change color), grabbing them by holding down the left mouse button, and
dragging them to the desired location.
· You can make changes to the TMJ lines by moving the cursor over them until the TMJ
lines change color and then right-clicking with the mouse. A drop-down menu will
appear with options. You can also make similar changes by right-clicking the
corresponding TMJ lines in the Navigation menu and choosing from the following
menu options:
© Xoran Technologies®, Inc. 2007
XoranForm SOP9.2
Part# 020009-03
Rev 002 DCO # 278
Rev date: 07/27/07
75
TMJ
Options
Description
Change
Color
This changes the TMJ line color.
Visible
This makes the TMJ lines invisible. To make the TMJ lines reappear, right
click on the corresponding TMJ lines defined in the Navigation menu and
select "Visible".
Select
This makes the TMJ lines active (when other TMJ lines or objects are
available).
Go To
Selecting this takes you to the TMJ window (the screen that appears after you
define a pair of TMJ lines).
Delete
Region
This deletes the pair of TMJ lines.
© Xoran Technologies®, Inc. 2007
XoranForm SOP9.2
Part# 020009-03
Rev 002 DCO # 278
Rev date: 07/27/07
76
8.0 OUTPUT IMAGES
MiniCAT™ makes an image output easy with preset protocols for printing, burning to
CD/USB drive and transferring images over a network.
1. If printing, ensure that the desired slices appear under Selected Slices view.
2. Click the Image Output menu (along the main toolbar of the screen) to view all output
protocols.
3. Left-click on the desired image output protocol. They are described below.
Output Protocol
Description
Print Selected Images
This option automatically prints the images in the Selected Images
window. The default image layout is 3 rows by 2 columns.
Export Xoran Study
This exports Xoran study data to either a CD or USB flash drive.
Burn DICOM CD
This burns a Xoran image data onto a CD in DICOM format, which
is compatible with most IGS systems.
Export to HTML
This exports a Xoran study in HTML format, viewable on any
computer with a browser such as Internet Explorer.
Export to DICOM
Axial
This exports the axial slices of a Xoran study onto a CD in DICOM
format.
Export to JPEG
This exports a Xoran study in JPEG picture format.
Modify Image Output
Image output protocols can be modified. Xoran support is available
to assist with creating custom output protocols.
© Xoran Technologies®, Inc. 2007
XoranForm SOP9.2
Part# 020009-03
Rev 002 DCO # 278
Rev date: 07/27/07
77
Output Protocol
Description
DICOM Push
Allows a study to be uploaded to a DICOM server such as a PACS
system. Call Xoran customer support to help set this up. (We will
need to contact your local IT person)
© Xoran Technologies®, Inc. 2007
XoranForm SOP9.2
Part# 020009-03
Rev 002 DCO # 278
Rev date: 07/27/07
78
9.0 TECHNICAL SPECIFICATIONS
9.1 General Information
MiniCAT Scanner
System Description
MiniCAT™ is a volume tomography X-ray machine for
medical applications. The system has been designed for low
radiation dose imaging of the sinuses, skull base and temporal
bone.
System Dimensions
46" x 49" x 72" tall
(117 x 119 x 183 cm)
46" x 49" x 67" effective August 2007
(117 x 119 x 170 cm)
Minimum Room Size
6' x 9'
Weight
450 lbs
Internet Connectivity
High speed connection is required for service/ maintenance.
© Xoran Technologies®, Inc. 2007
XoranForm SOP9.2
Part# 020009-03
Rev 002 DCO # 278
Rev date: 07/27/07
79
Patient Support Chair
Overall Dimensions
30.5"d x 29”w x 50.5”h
(77.5 cm x 73.7 cm x 128.3 cm)
Weight
115 lbs (52 kg)
Seat Height Adjustment
12.5” to 21.5
(31.8 cm to 54.6 cm)
Maximum Patient Weight
350 lbs (159 kg)
FRONT VIEW
TOP VIEW
9.2 Imaging Properties
Imaging Properties
Detector Data Channels
758
Detector Element Size
254 µm x 254 µm
© Xoran Technologies®, Inc. 2007
XoranForm SOP9.2
Part# 020009-03
Rev 002 DCO # 278
Rev date: 07/27/07
80
Reconstructed Voxel Size
0.2 mm minimum
Reconstruction Time
~60 sec for 200 slices
Field of View, Axial
12 cm max
Field of View, Cross-sectional
16.5 cm max
Views
MPR/Axial/Coronal/Sagittal/
Panoramic cross-section/
Raw data cine
Gray Scale Display
256 levels
Display Window
Adjustable level and width
Gantry Rotation Angle
360o
Workstation
Intel-based PC
Compatibility
DICOM 3.0
Standard Imaging Protocols
Imaging
Protocol
Scan
Time
Axial
Slices
Corona Sagittal
l Slices Slices
kVp
mA
mAs
Effective
Dose
Slice
Thicknes
s
Voxel
Size
Adult
Sinus
40 s
272
400
400
120
5
68
0.13 mSv
0.4 mm
0.4 mm
Pediatric
Sinus
20 s
272
400
400
120
5
34
0.07 mSv
0.4 mm
0.4 mm
Follow-up
Sinus
10 s
272
400
400
120
5
17
0.04 mSv
0.4 mm
0.4 mm
Temporal
Bone
40 s
228
600
600
125
7
76
0.14 mSv
0.3 mm
0.3 mm
9.3 X-Ray Specifications
X-Ray Specs
X-Ray Tube Head Assembly
© Xoran Technologies®, Inc. 2007
XoranForm SOP9.2
Part# 020009-03
Rev 002 DCO # 278
Rev date: 07/27/07
81
Manufacturer
Imaging Sciences International, Hatfield PA USA
Generator
High frequency, constant potential
Rating
125 kVp, 3-8 mA
Nominal Electric Power
1 kW
Total Filtration (at 120 kVp)
Nominal filtration 10 mm Al equivalent.
Additional filtration <= 3 mm Al equivalent.
Exposure
16-80 mAs
Scattered Radiation at 3’
<0.7 mR
Model Number
See tube head
Serial Number
See tube head
X-Ray Tube
Manufacturer
Superior X-Ray, Woodstock, IL USA
Model Number
SXR-130-15-0.5
Tube Type
Stationary anode
Max. Tube Voltage
130 kVp (full wave rectified) *
Max. Tube Current
8 mA
Max. Power
1.04 kW
Target Material
Tungsten
Target Angle
15 degrees
Focal Spot Size
~0.5 mm
* Actual tube voltage and current can be measured. See MiniCAT™ Installation Guide.
© Xoran Technologies®, Inc. 2007
XoranForm SOP9.2
Part# 020009-03
Rev 002 DCO # 278
Rev date: 07/27/07
82
© Xoran Technologies®, Inc. 2007
XoranForm SOP9.2
Part# 020009-03
Rev 002 DCO # 278
Rev date: 07/27/07
83
9.4 Scatter Map
Scatter Map
Xoran Technologies® MiniCAT™
Secondary Radiation Measurements
Secondary scatter radiation was measured on the MiniCAT™ using optically stimulated
luminescence (OSL) dosimeters provided and processed by Landauer®. The measurements
were taken at the 6 azimuthal locations A through F and at radii 1.0, 1.5, and 2.0 meters from
isocenter and in the same plane as the central slice (i.e. level with the focal spot) which was
approximately 120 centimeters above the floor.
The MiniCAT™ was operated at 120 kVp and 57 mAs per 40 second scan for all secondary
radiation measurements reported.
© Xoran Technologies®, Inc. 2007
XoranForm SOP9.2
Part# 020009-03
Rev 002 DCO # 278
Rev date: 07/27/07
84
The secondary radiation dose was recorded by the OSL dosimeters for 200 scans and read out
by Landauer®. The OSL dosimeters have a minimum reporting dose of 1 millirad. The
reported dose for each OSL dosimeter was divided by the number of scans and reported in the
following table.
Secondary Dose Measurements Per Scan Level with Central Slice
Azimuthal Location
A
B
C
D
E
F
© Xoran Technologies®, Inc. 2007
XoranForm SOP9.2
Part# 020009-03
Radius (meter)
Dose Per Scan (millirad)
1.0
0.94
1.5
0.47
2.0
0.28
1.0
0.99
1.5
0.45
2.0
0.28
1.0
1.13
1.5
0.52
2.0
0.28
1.0
1.18
1.5
0.47
2.0
0.28
1.0
1.17
1.5
0.52
2.0
0.29
1.0
0.87
Rev 002 DCO # 278
Rev date: 07/27/07
85
Secondary Dose Measurements Per Scan Level with Central Slice
Azimuthal Location
Radius (meter)
Dose Per Scan (millirad)
1.5
0.40
2.0
0.28
The secondary radiation doses were also recorded at 0.5 meters above and 0.5 meters below
the horizontal plane intersection the central slice at azimuthal locations A through F and at a
radius of 1.0 meter. These measurements are reported in the following tables.
Secondary dose measurements per scan 0.5 meters below central slice at
radius of 1 meter
Azimuthal Location
Dose Per Scan (millirad)
A
1.15
B
1.00
C
1.05
D
0.90
E
0.98
F
1.01
Secondary dose measurements per scan 0.5 meters above central slice at
radius of 1 meter
Azimuthal Location
Dose Per Scan (millirad)
A
0.64
B
0.75
C
0.81
© Xoran Technologies®, Inc. 2007
XoranForm SOP9.2
Part# 020009-03
Rev 002 DCO # 278
Rev date: 07/27/07
86
Secondary dose measurements per scan 0.5 meters above central slice at
radius of 1 meter
Azimuthal Location
Dose Per Scan (millirad)
D
0.03
E
0.84
F
1.89
9.5 Dose Information
CTDI Dose Measurements
The following dose measurements were made on a MiniCAT™ using a PMMA head
phantom with a diameter of 16 centimeters and a 10 cc ion chamber with an active length of
10 centimeters. The peripheral location was chosen to be the maximum CTDI100 obtainable
at that depth. The conditions of operation and the resulting CTDI measurements are
representative of the MiniCAT™ volume CT scanner and could vary for measurements made
on a particular unit.
Protocol
kVp
mA
mAs
Scan Time
(seconds)
Number of
Projections
Beam
Width at
Isocenter
(mm)
CTDI100, CTDI100, CTDIw CT
(mGy) DI
center
peripheral
(mGy)
(mGy)
vol
(m
Gy
)
Sinus 40s
120
5
45
40
602
133
3.74
3.57
3.57
3.5
7
Sinus 20s
120
5
22
20
302
133
1.86
1.72
1.77
1.7
7
Sinus 10s
120
5
11
10
152
133
0.93
0.86
0.89
0.8
9
Temporal
Bone
125
7
63
40
602
105
9.60
8.78
9.05
9.0
5
The conventional definition of CTDI100 was modified slightly to account for the large cone
angle and resulting beam width associated with the flat-panel detector CT geometry. The
dose was integrated over the active length of the detector along a line perpendicular to the
tomographic plane and divided by the width of the X-ray beam at isocenter (BW).
© Xoran Technologies®, Inc. 2007
XoranForm SOP9.2
Part# 020009-03
Rev 002 DCO # 278
Rev date: 07/27/07
87
CTDI 100 = ò
50 mm
-50 mm
D(z)
dz
BW
Once the CTDI100 was calculated for the center and peripheral location, the CTDIw was
calculated according to the following equation:
1
2
CTDI w = CTDI 100, center + CTDI 100, peripheral
3
3
The MiniCAT™ acquires data in one axial rotation and reconstructs into a volume of data
without any motion in the z-direction (i.e. helical or incremental scanning). Therefore, the
CTDIvol is equal to the CTDIw.
9.6 Installation Requirements
Installation Requirements
Room Requirements
Minimum Room Size
6' x 9'
Internet Connectivity
High speed connection is required for
service/maintenance.
Note: Room layout must be such that operator of equipment is able to make visual and
audio contact with patient being scanned while operating the equipment from behind
operator's barrier.
Electrical Power Requirements
Japan
Europe
USA
Line Voltage*
~100 V
~220-240 V
~115 V
Line Frequency
50 - 60 Hz
50 - 60 Hz
50 - 60 Hz
Line Current
5 A Standby
2.5 A Standby
5 A Standby
5 A Max.
10 A Max.
Main Circuit Breaker 10 A Max.
* Voltage must be held to within +- 10% of specified Line Voltage.
© Xoran Technologies®, Inc. 2007
XoranForm SOP9.2
Part# 020009-03
Rev 002 DCO # 278
Rev date: 07/27/07
88
Environmental Conditions
It is recommended that MiniCAT™ is operated in a climate-controlled clinical or hospital
environment. Changes in temperature may cause the system to require additional
calibration.
Operating Requirements
50 to 95 degrees Fahrenheit
(10 to 40 degrees Celsius)
45% to 75% humidity
Transportation and Storage Requirements
32 to 104 degrees Fahrenheit
(0 to 40 degrees Celsius)
30% to 80% humidity
Heat Dissipation
Approx. 500W / 1700 BTU/hr
Caution: Allow system temperature to adapt to room temperature before powering
up MiniCAT™ scanner hardware or workstation/server.
Installation/Relocation
MiniCAT™ can not be installed or relocated by the user. Proper and safe setup requires
specialized training and must be performed by a Xoran Technologies Customer Service
Engineer. Call Xoran 1-800-70-XORAN (800-709-6726) for assistance.
Apparent Resistance of Supply Mains
For the purpose of obtaining the apparent resistance of supply mains on the
MiniCAT™ CT system model# 010000-03, resistance is determined according to
the following formula
U0 – U1
R= –––––––––
I1
Where:
U0 is the no-load MAINS VOLTAGE.
U1 is the MAINS VOLTAGE under load.
I1 is the mains current under load.
MiniCAT™ CT system utilize single-phase power. Measurements were performed
between phase and neutral. Measured results:
© Xoran Technologies®, Inc. 2007
XoranForm SOP9.2
Part# 020009-03
Rev 002 DCO # 278
Rev date: 07/27/07
89
Apparent Resistance of Supply Mains
U0 = 121.1V AC
U1 = 120.7V AC
I1 = 8.3A
Result: Apparent Resistance of Supply Mains (R) = 0.048ohms
9.7 IGS Compatibility
IGS Compatibility
The following tables summarize the compatibility of MiniCAT™ with other image guided
systems.
GE
Platform
Compatible with Xoran
IT3500+, ENTrak+, ConneCTstat+
Yes
IT3500, ENTrak, ConneCTstat
No
IT3000
No
IT2000
No
Medtronic/LandmarX/Xomed
Platform
Compatible with Xoran
LandmarX Evolution, LandmarX Evolution Plus, LandmarX
Element
Yes
LandmarX gen1, LandmarX gen2
No
Medtronic Stealth, Treon, Ion, Tria
No
Medtronic Treon Plus (w/ ENT software), Tria Plus (w/ ENT
software)
Yes
© Xoran Technologies®, Inc. 2007
XoranForm SOP9.2
Part# 020009-03
Rev 002 DCO # 278
Rev date: 07/27/07
90
BrainLAB (Requires Pac Xfer Version 5.2 or Higher)
Platform
Compatible with Xoran
VectorVision
Yes
VectorVision2
Yes
VectorVision Compact (for ENT)
Yes
Kolibri
Yes
Stryker
Platform
Compatible with Xoran
Stryker Navigation System (original)
Yes
NavII
Yes
mNAV
Yes
© Xoran Technologies®, Inc. 2007
XoranForm SOP9.2
Part# 020009-03
Rev 002 DCO # 278
Rev date: 07/27/07
91
10.0 QUALITY CONTROL TESTS
Overview
Xoran encourages MiniCAT™ owners to develop a quality assurance program with the
assistance of a qualified medical physicist. In this section, we recommend some tests which
can be included in the program. Xoran recommends that these tests be performed and
interpreted by a qualified medical physicist or a state-authorized service technician in
accordance with local regulations.
Xoran recommends that quality control tests be performed once a year and as regularly as
required by state radiation safety regulations. MiniCAT™ owners participating in a
MiniCAT™ service agreement are eligible to receive assistance performing these test
procedures from Xoran Customer Service personnel. However, Xoran recommends (and
your state may require) that a medical physicist performs an independent evaluation. Xoran
provides a quality control phantom to use for these quality control tests. Xoran also provides
a QC Test Log Form as a template for recording these test procedures.
Xoran has developed these procedures based on the fact that the scanner is designed to scan
only the sinuses and temporal bones, which are high-contrast or ‘bone window’ imaging tasks
that require isotropic high spatial resolution and do not require the level of contrast resolution
needed for other imaging tasks, such as brain or muscle tissue scanning, etc. Xoran designed
the MiniCAT™ according to the ALARA (As Low As Reasonably Achievable) principle by
minimizing the radiation dose to the patient while providing the image quality necessary for
scanning the sinuses and temporal bones.
Should your MiniCAT™ system fail any of the following quality control tests, contact
XORAN AT (800) 70-XORAN for corrective action.
10.1 CT Number Accuracy Test
CT Number Accuracy Test
Equipment: Cylindrical water phantom
Procedure:
1. Perform a scan of the cylindrical water phantom using the “Sinus” protocol.
2. Use the “Shape Region” tool from the toolbar to draw a circular region of interest of
approximately 1 cm in diameter in the center of the phantom.
3. Read and record the mean value and standard deviation.
© Xoran Technologies®, Inc. 2007
XoranForm SOP9.2
Part# 020009-03
Rev 002 DCO # 278
Rev date: 07/27/07
92
Tolerance: The mean CT number of water is expected to be 0±100 units, while the standard
deviation is expected to be within 30±20 units.
10.2 CT Number Linearity Test
CT Number Linearity Test
Equipment: Quality control phantom
Procedure:
1. Perform a scan of the resolution phantom in “Resolution Protocol” scanning protocol.
2. Allow the MiniCAT™ software to reconstruct the image.
3. Use the “Shape Regions” tool to measure the average value within the four linearity inserts
on an axial cut in the reconstructed image.
4. Calculate and record the correlation coefficient between the measured values and the
expected values. The expected values are -1000, -100, 120, and 990. The calculation can
be done in a spreadsheet application using a correlation coefficient function.
Tolerance: The correlation coefficient should be between 0.95 and 1.
10.3 Artifact Test
Artifact Test
Equipment: Cylindrical water phantom
Procedure:
1. Using the scan from the CT Number Accuracy test, scroll through all the axial slices and
try to visually detect any potential image artifacts, such as rings from bad detector elements
or non-uniformity artifacts.
Tolerance: The images should be free from artifacts.
10.4 Spatial Resolution Test
Spatial Resolution Test
Equipment: Quality control phantom
© Xoran Technologies®, Inc. 2007
XoranForm SOP9.2
Part# 020009-03
Rev 002 DCO # 278
Rev date: 07/27/07
93
Procedure:
1. Use the reconstructed scan of the resolution phantom from the previous test.
2. Note the visibility of the highest frequency line pair pattern (15 lp/cm) on an axial slice in
the reconstructed image.
Tolerance: The highest frequency line pair pattern of 15 lp/cm should be visible.
10.5 QC Test Log Form
MiniCAT™ Quality Control Test Log Form
Date:
_______________________________________
Performed by:
_______________________________________
1. CT Number Accuracy Test
© Xoran Technologies®, Inc. 2007
XoranForm SOP9.2
Part# 020009-03
Rev 002 DCO # 278
Rev date: 07/27/07
94
Water Number:
______________________ (Should be 0±100 units)
Water STD:
______________________ (Should be 30±20 units)
2. Water Phantom Artifact Test
Circle one:
Yes / No
No ring artifacts should be visible.
3. CT Number Linearity Test
Linearity coefficient: _________ (Should be less than 1 and higher than
0.95)
4. Spatial Resolution Test
Highest visible line
(Should be 15
pairs per centimeter: _________ frequency pattern)
© Xoran Technologies®, Inc. 2007
XoranForm SOP9.2
Part# 020009-03
lp/cm,
the
highest
Rev 002 DCO # 278
Rev date: 07/27/07
95
Index
-Eellipse 62
emergency 18
ending 60
-[[PICTURE HELP button.JPG]
-Aacquire new 34
add 51
arrow 65
arrow head 65
axial 51
-Bbattery 24
brightness 58
-Cclose 22, 23
computer 18, 23
condyle 72
contrast 58
coronal 51
criteria 29
curved plane 69
curved viewing planes 65
cut plane indicator lines 54
-Ddatabase 32
date of birth 28
date range 31
degrees 59
delete 32, 51
desktop 18
distance 60
dry run 42
© Xoran Technologies®, Inc. 2007
XoranForm SOP9.2
Part# 020009-03
10
-Ffield
29
-Ggrey
62
-Iicon 20
image 53
image series 51
images 51
information 28
-Jjoints
72
-Llevel value 58
line 60, 65
log in 20
-Mmain control box 18, 23
fault 19
power 19
ready 19
x-ray on 19
mean 62
measurement 60
menu options 51
MiniCAT 20, 22, 23
MiniCAT software 28
Rev 002 DCO # 278
Rev date: 07/27/07
96
mouse 53
mouse wheel
move 53
MPR 48
-S-
54
-Nnavigation menu
51
-Ooblique 65, 69
off 23
older studies 32
on 18, 19
open study 48
operation of system 42
optional 42
ordering physician 20, 31
orientation 59
-Ppan 53
pathway 65, 72
patient 28, 29, 31, 32, 34, 37, 42, 45
patient control box 18
patient database 28, 34, 48
patient database window 31
patient record 28
point 60
position 37
power supply 24
purge files 32
-Rrange indicator 51, 52
Raw data 32
Recon. file 48
region 62
remove data files 32
rotate image 59
rotation 59
safety 45
saggital 51
scan 42, 45
scanner 19, 23, 34
scout view 42
screen 28
scroll 54
search 29, 31
select protocol 34
selected images window
shape 62
shutdown 18, 23
slices 51
software 20, 22, 23
spacing 52
standard deviation 62
start 18, 20
start acquisition 45
starting 60
study 32
study date 28
study title 28
-Ttechnologist 20
text 63, 65
text box 63, 65
tick marks 52
TMJ 72
tools 69
turn 19
two points 69
-UUPS 24
user management
20
-Vviewing pane slider
© Xoran Technologies®, Inc. 2007
XoranForm SOP9.2
Part# 020009-03
51
54
Rev 002 DCO # 278
Rev date: 07/27/07
97
-Wwindow value
58
-Xx-ray
42, 45
-Zzoom in 53
zoom out 53
© Xoran Technologies®, Inc. 2007
XoranForm SOP9.2
Part# 020009-03
Rev 002 DCO # 278
Rev date: 07/27/07
© Xoran Technologies®, Inc. 2007