1
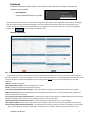
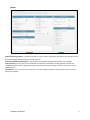
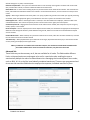
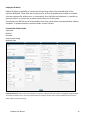
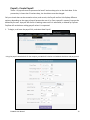
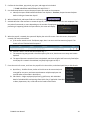
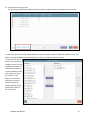
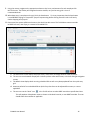
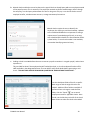
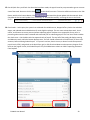
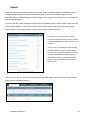
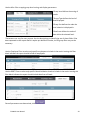
EvoWeb User Manual www.evolutionpayroll.com/webpayroll/paydata Initial Log-In – Company Selection Upon first log in, click to open the company, by clicking the name or number on screen. Company Dashboard evoWeb Dashboard defines the Client Service Representative and contact information. Also, the screen provides a calendar reference for the last and upcoming payroll dates. This screen is “read only”. Scroll over the link “Company” to view addition “Read Only” Company information o Address/Bank Accounts Company level data – No employee details o EIN/Rates Employer Federal and State EIN’s , unemployment and local taxation rates as applicable o ED Codes Earning (E) and Deduction (D) codes are used in payroll to enter wages and deductions. This screen displays all available E/D codes for the company. The fields can be sorted by any of the available headers. The E/D Code # and descriptions are unique to the selected company. Code type is a PayData description, identifying how the code works in the software. o DBDT (Division, Branch, Department, Team) This list identifies labor distribution fields applicable to the selected company. *Not all clients use labor distribution, and this list may be blank. To navigate, make a selection from the menu header along the top of the screen. Employee options include changing an existing employee profile, or adding new data for W2 employees or 1099 Subcontractors. Payroll options enable creation of a new payroll, or, the edit of an existing waiting payroll. The Task Queue refers the user to processes and reports that have already occurred. The Reports menu allows the user to run custom data reports from the website. Processed Reports are reflected if the user is a VMR client, with reports sent to the website, rather than email. The Services link allows the client to change their password, security questions, or calculate a manual check. EvoWeb User Manual 1 Employee Scroll over the Employee Menu Header – this will allow a new profile to be created, or a change to be made to an existing profile. o New Employee – Employee/New/W2 Employee (or 1099) Fields marked with a Red Asterisk (*) are mandatory. Begin by loading a SSN, or EIN as applicable. Use the Tab Key to navigate from field to field entering employee demographics. Be sure to populate all mandatory fields. The new employee wizard requires all steps be completed consecutively before a new employee can be saved in the system. As you move through the screens, click to move through the required screens. General Information SSN – Social Security Number If a SSN is not available, you do not continue. *If upon entering a social security number subsequent employee data populates the screen you must STOP. This indicates the person is already set up in the payroll software. Do not continue adding the employee. Click the HOME button find the person on the inactive employee list. Update the demographics on the existing person; do not set up a second employee/person. (See Edit Employee) EE Code – EvoWeb will populate. Name/Address/Phone/DOB – Primary demographics for all EEs. Gender – This field is required for valid quarterly reporting Current Status/DOH/Original DOH/Term Date – Active EEs will pull into payroll. Current Hire Date and Status are required. VMR Email and Password – (Virtual Mail Room) this is the address a stub will be sent to, and the password used to protect the document. Both fields are necessary. Pay Frequency/Salary Amount/Standard Hours – Company pay frequency. Salary amount is the PER PAYROLL gross for salary EE’s. Hourly EEs should NOT have an amount here. Standard hours are a memo line in payroll. Position/Status/Healthcare/Benefit Selections – Update these fields as applicable. If unsure, contact PayData. Labor Defaults / DBDT - Division, Branch, Department, Team. Assign the labor role for the EE. (Only applicable for some clients) Taxation Defaults/Marital Status/Dependents – Form W4 contains the primary settings. Overrides are available on the next page. *If any required fields are missed, the system does not allow the user to continue. Check the top of the screen for errors* EvoWeb User Manual 2 Details New Hire Reporting/ Options – EvoWeb will update all new hire reports. Subsequent radio buttons are informational only. All mandatory fields default to the most common response. Deductions/GTL/W2 Info/Exemptions – These buttons should NOT be changed without direction from PayData. Federal Taxation – EEs may elect to have additional taxes withheld. If indicated on the W4, populate overrides here. *1099 subcontractors will have different Exemptions for taxation than a W2 employee. For details, or questions, contact PayData directly. General Notes - This screen can be seen by the user, and other PayData employees. This data does not print, and is not seen by the employee. EvoWeb User Manual 3 States and Locals * Note, states and locals can only be added if they exist in the company. Contact PayData to add additional states, or locals as needed. States – Home state refers to the taxation, reporting and withholding, based on where work is performed. This can differ from the residential state, and must be set up separately. Click State – Choose the state from the available drop down. Marital Status – Select the employee setting from the drop down. Withholding Allowances – Enter the number of dependents from the state W4, or Federal W4. SDI/SUI/Imported Status/County/Tax Code – These fields will default, do not make changes. Reciprocal Amount / Method/State – These are only used if a single EE works/lives in separate states, or works in multiple states. Selections should not be made here unless direct by PayData. Override State Tax Type/Value –If an employee state W4 indicates additional withholding, make entries as applicable. Locals – Local tax refers to the taxation by a city or town, and may not be required. Vermont does not use local taxation. If applicable: Click Local – Choose the local from the available drop down, identify marital status, and dependents. Override State Tax Type/Value –If an employee state W4 indicates additional withholding, make entries as applicable. Exempt/Block – Indicate calculation inclusion as applicable. Contact PayData for direction. Misc. Amount – Enter the Local Tax Amount if applicable. Local Enabled – Click yes to activate, or no to deactivate the tax. County/Tax Code/Override Value/Deduct/Pretax Options – These fields will default, do not make changes. EvoWeb User Manual 4 Pay Rates *All employees must be set up with a primary rate of pay. For Salary EE’s this must be loaded as $0.00. To begin, click Rate Number – All employees must have a Rate 1 set up as a primary rate. Salary EE’s must have rate 1 set to $0.00 Rate Amount – Enter the hourly rate, or $0.00 rate for salary. Primary Rate - Mark as yes for Rate 1, and no for all subsequent rates. Position/Pay Grade/DBDT - If using HR/Departments, assign as applicable. Rate 1 should NOT have a DBDT override here. Time Off Accrual Time off Accrual rules must be set up with PayData prior to employee set up. Use this section to add, change or remove accrual rules for individual employees. If editing an employee, rather than adding new, be sure to check for inactive TOA by unchecking the “Show Active Only” button, to view prior buckets. For new employees, click Type – Use the drop down list to select the applicable Time Off Variety Reason – Populate a short description of the change being made Active – This will default to “yes” for new set ups. Change this field when removing TOA from an existing employee. Current Accrued – Accrued balance for the entire period. (Example – 40 hours/year) Current Used – Load hours used as of the date the change is made. If none, leave as zero. EvoWeb User Manual 5 Direct Deposit Direct Deposit is a two-step process to load the account number, and create a deduction code to take funds from the net check. Be sure to complete all the necessary steps to send money through ACH. Direct Deposit accounts should not be duplicated, or overwritten. Be sure to always click “Add Direct Deposit Account” for any additional data, and CHANGE the account on the scheduled ED as needed. Direct Deposit is a service provided by PayData, and must be enabled on an account before employee deduction codes are created. DD requires both a signed agreement between the client and PayData, as well as authorization from the employee, for the employer’s access to the account. Be sure to always utilize the PayData Direct Deposit Authorization Form available at the PayData Resource Center. For new accounts/employees click to begin ABA Number – The bank routing number must be used to identify the bank. This is always 9 digits. Account Number – The bank account number must be loaded. Be sure the employee has provided the full account number for ACH, not just a member ID, or account ID. Type – PayData can only facilitate ACH transactions to Checking, Savings, or Money Market accounts. Select one type per account number. In Prenote – PayData STRONGLY encourages the consistent use of the Pre-Note feature in our system. Authorization of the account via pre note greatly reduces the chance of mistaken entry, false account numbers, or lost funds. PayData is NOT liable for funds deposited to an invalid account. Pre note of the new account offers the employer the most protection. If the user declines to pre-note, they assume all risk, and liability associated with the incorrect entry. Actions – Check mark to save the account, red circle to cancel the entry. *Before Direct Deposit is “Active” a scheduled ED must be created, and linked to the account set up for each employee. See “Scheduled E/D’s for further instruction. EvoWeb User Manual 6 Child Support Child support deduction codes must be set up by PayData prior to initializing active deductions from employee checks. If this step has not been done, stop and contact PayData Payroll Services. Before an employee deduction can be taken, the child support case must be attached to the employee. This enables the system to assign the case ID, and employee demographics to any applicable agency checks, or reports. Click to begin Priority Number – When only 1 case exists, priority 1 should be used. When additional cases are defined, state, and federal law define the priority of deductions. Contact PayData for further details. Custom Case Number – Find this number on the Child Support Order sent by the state. If not available, use the employee SSN as a place holder. Origination State – Identify the state issuing the Child Support Order. Agency – EvoWeb can generate an Agency Check to a third party. When this service is used, the available agency will be in the drop down list. If no agency list exists, but is expected, contact PayData. *NOTE* the agency on this screen is informational only. The Agency MUST get attached on the Scheduled E/D for the check to be generated. Arrears – The Child Support Order will identify if the employee is in arrears for this withholding. This field is informational only. FIPS Code – If applicable, the Child Support Order will identify this code. This field is informational only. Custom – As needed, custom Child Support Order notes/details can be loaded in this field. This field is informational only. EvoWeb User Manual 7 Scheduled E/Ds Earning and Deduction codes must be added to the company prior to use in EvoWeb. If new codes are required, contact PayData to initiate the mandatory change forms before moving forward. Scheduled E/D’s allow a recurring payment or deduction to be made on a set schedule without having to override check lines. This function is available for all code types, but, is most commonly used for deductions. Existing Scheduled E/Ds: Employees already set up in the system may have scheduled E/D’s already loaded. When first viewing the employee ED list, there are items listed in the grid. Review the list to ensure the changes being made do not duplicate an existing code. Effective start, and end dates are used to identify if the scheduled ED is active, or inactive. As shown below, the employee has 5 active D codes, and 1 inactive. Use the “Pencil” icon to change an existing code. Changes can be made to the calculation, amount, frequency, effective dates, or destination of any existing code. A code type should never be changed from one code, to another. *An ED Code that has no payroll history can be deleted. Otherwise, any ED with history must be edited to include an effective end date. When editing an existing ED, verify all required fields, with special attention toward the amount, the frequency of deduction, effective start, and end dates, as well as any destination details for 3rd party payments, or direct deposit. EvoWeb User Manual 8 Adding New Scheduled E/Ds: Click to create a new scheduled ED Details Tab Calculation Method Amount or Percent – This list identifies options for calculating and earning or deduction. Most commonly used: Fixed, Percent of ED Group Amount, Percent of Net, None. Be sure to enter the dollar amount in the amount field, not the percent, and vice versa as applicable. ED Group – Some codes, like 401K, are calculated on eligible earnings. To identify some earnings, and not others, EvoWeb uses ED Groups to define eligible codes. To Add/Change these groups, contact PayData. Always Pay/Deduct – Deduction codes default, and should remain “no” for proper processing. Recurring earnings use “None” to include the E code, only when the employee receives other wages in payroll. Choosing “Current Payroll” will calculate the recurring earnings, regardless of other wages paid in payroll. Deductions to Zero – This field are marked yes if a deduction should be taken, even if the scheduled amount isn’t available in the net check. When using this field, request the Shortfalls Report to track deduction variances. Priority – This field is used when ED’s are processed concurrently, or in a specific process. The system knows to take Child Support and Federal Tax Levy’s ahead of voluntary deductions. Multiple Scheduled ED Group - Again, this field is used when multiple deductions should be combined toward a maximum deduction amount. For example, an employee with multiple child support cases will need the separate deductions combined, to ensure the total amount debited doesn’t exceed the allowable amount. Company Benefits – HR fields in evoWeb are used for some clients to build company health/dental benefit tables. When in use, the system can be used to update the rate on the table, rather than the rate on individual code. Contact PayData to discuss these options. Company Benefit Rate / Employee Benefit – When in use, the benefit levels and rates will be available to choose from. Frequency/Month/Which Payrolls – The user can select custom settings for each employee to identify How/When to take a deduction. The most common response to these fields can be pre-determined as the ‘default’ setting. To change the EvoWeb User Manual 9 default settings for any code, contact PayData. Effective Start/End Date – The system uses effective dates to start and stop recurring ED’s. The dates refer to the check date, and will either include, or exclude a deduction based on the dates used. Block Weeks 1-5 – In some cases a weekly payroll may choose to block certain weeks of the calendar. This automates the block, and excludes the deduction based on the calendar. Use this field with caution, as some months have unique week counts. rd Agency – When wages deducted need to be paid to a 3 party, PayData can generate a check with your payroll processing. As needed, attach the appropriate agency to the deduction code so the system can include funds as needed. Child Support Case – When a child support order is received, it must be loaded to the employee, and then linked to the scheduled deduction. This ensures the system prints the correct Case # on the agency check and reports. Garnishment/Loan ID – Wage garnishments and loans can be referenced as needed, with unique ID’s to print on agency checks, reports, or check stubs. EE Direct Deposit – Once an employee has a direct deposit account loaded, it is attached to the appropriate direct deposit deduction code through this field. Any funds deducted using this ED, will be sent via ACH to the attached Direct Deposit account number. Deduct Whole Check – When selected, the system will calculate the net check, after taxes and other deductions, and send the net result to the account number via ACH. Take Home Pay – When populated the system will send all net wages, beyond the take home pay to the account number via ACH, leaving the employee with a paper check. NOTE: If a deduction is scheduled to be a NET direct deposit, the calculation method MUST be NONE and the field “Deduct Whole Check” must be marked YES. Otherwise, this field must remain NO. Advanced Tab These fields may not be necessary at all, but are available for all codes. The fields enable different limits, minimums/maximums and targets to be set for a particular code, enabling the user to automatically babysit the rules of a code without micro-managing the records by hand. Some codes, such as 401K, H.S.A. or the like, have federally mandated maximums. These are pre-programmed and do not use the overrides field unless the employer has separate, individual overrides in place. EvoWeb User Manual 10 Annual Maximum Amounts Employee/Client – Maximum levels can be set by employee, or at the company level to restrict the amount taken by a calendar year. Contact PayData to create company level changes. Limits – Minimums/Maximums % and $ - Setting limits for ED’s can be done by employee, or company level. Contact PayData to create company level changes. Target Actions – Targets are most commonly used for employees repaying a loan or advance. Identify the action to take when the target is reached, the total target due through the deduction, and front load a balance already take. When used, the system will automatically take the last remaining amount from the final pay back, and stop the deduction with an end date when target is reached. Thresholds – Pension/Groups/Amounts – This field is used to identify a deduction that should begin, once a co-deduction has reached a set maximum. Typically, this is used for employee retirement deductions, and catch up contributions. **See PayData documentation regarding Pension Thresholds. Garnishment Overrides / Multiplier and % - When garnishment orders are issued, there are many ways to calculate the withholding. As needed, select calculation methods for each deduction. Contact PayData for direction of these override fields. NOTE: Scheduled Deductions with payroll history attached CANNOT be deleted. To restart a stopped deduction, be sure to edit the existing deduction, DO NOT set up the same deduction code more than once for any employee. EvoWeb User Manual 11 Employee HR Menu: Default HR fields are available to create basic HR reporting, without the extended detail of the PayData HR Module. These fields are entirely elective, and can be populated as needed or excluded from the employee file without error, or interruption. Once the fields are populated, it is possible to generate reports, or custom files to report the data back out of the system. Some fields in the HR Tab can be customized for each client, while others are populated with industry standards. To update the data in the below fields, contact PayData. Customizable fields include: Supervisor Referral Recruiter Performance Rating Wellness Rate Employee Self Serve – When evoPay is enabled on an account, employee self serve options are engaged though EvoWeb. This allows the client to set a user name and password for employee evoPay access. Contact PayData to find out more about evoPay services and pricing. EvoWeb User Manual 12 Payroll – Create Payroll *Note – All payrolls must be processed at least 2 business days prior to the check date. If the process day is closer than 2 business days, the check date must be changed. Only one check date can be created at a time, and as such, the Payroll tool bar link displays different options, depending on the stage of payroll process the user is in. Once a payroll is created, it cannot be deleted by the user. A payroll will remain in waiting status until it is submitted, or deleted by PayData. PayData will not delete a waiting payroll unless it is requested. 1. To begin, scroll over the payroll link, and select New Payroll Using the payroll calendar built for the company, evoWeb will calculate a scheduled check date and pay period. EvoWeb User Manual 13 2. Confirm the check date, pay period, pay types, and wages to be included. **IF NOT IMPORTING AN EXTERNAL FILE SKIP STEP 2 ** 3. Use the Browse button to access the payroll import file saved on the computer. a. Identify the import fields based on direction from PayData – If unsure; Stop and contact PayData before clicking to Create New Payroll. 4. When all date fields, and import fields are confirmed, click 5. evoWeb will take a few moments to create the payroll, checks and scheduled ED’s for each employee. This may take a few seconds, or more depending on the number of employees, and system use at the day/time processing is happening. While the system works, the screen will display 6. When the payroll is created, the system will display the main info screen. Once this occurs, the payroll is created, and ready to be edited. a. If the screen remains on the Task Queue page, there is an error with the creation of payroll. The Status will read “Finished with Exceptions” b. Click the “Pencil” icon to view the exception log. c. The exception log may provide a clear description of the error, but the user must stop, and contact PayData. d. The payroll that was created will have to be deleted, and the error/glitch will have to be fixed before a new payroll is created. Once deleted, and fixed, begin again at Step 1. 7. From the main info screen, scroll over the payroll link in the tool bar, and select Quick Entry or Edit Checks a. Quick Entry - Grid like format, similar to Excel that can be customized, and arranged for easy entry and movement between multiple employees. No override edits can be made in Quick Entry. b. Edit Checks – Single employee payroll entry, grid format, with individual detail of scheduled ED’s and earnings from Quick Entry if applicable. Overrides to Rate, Department, Job, or ED code can be made in Edit Checks. EvoWeb User Manual 14 8. Customize Quick Entry screens The Quick Entry grid defaults to display the Salary Amount, Regular Amount, and Regular Hours columns. In some cases, these are the only codes needed to process a payroll. If other ED codes are needed, use the “E/D Columns” button to add/remove/rearranged the columns to include the necessary codes. The available EDs will be shown on the left of the Configure screen. Use the Copy/Remove buttons to move EDs to the display. Use the Up/Down arrows on the right to arrange the columns on the display. Once finished, click Save, to return to Quick Entry with the changes updated. These settings will remain for the current user. EvoWeb User Manual 15 9. Using the mouse, navigate to the appropriate column to key hours, and amounts for each employee. DO NOT click enter. The Tab Key will navigate the entire window, not just the entry grid. It is not a recommended tool. 10. When data entry is complete on the grid, click the Save button. **It is very important that the Save button is used BEFORE clicking to “Preprocess” payroll. Preprocessing before clicking save will result in all hourly checks dropping off of payroll. 11. Once saved, the system will direct the user to the check line edit screen. This field allows custom overrides to DBDT structure, rate of pay, or removal of scheduled ED’s. a. The Edit Checks screen displays employee name, check detail, and wage detail for each employee. b. The user can move between employees via the drop down menu with names, or the left and right navigation arrows. c. The default view displays both recurring scheduled EDs as well as any data populated from the quick entry grid. d. Amounts pulled in from scheduled EDs or Quick Entry data lines can be adjusted for amount, or rate as applicable. e. The user can use the “Book” icon in the far left column to make DBDT overrides to specific data lines. This will populate 2 drop down menus to choose a Job detail override, or true DBDT overrides. The user should select the overrides as applicable. EvoWeb User Manual 16 The check mark and cancel icons are available to use once a selection is made. Using these overrides will generate more accurate job costing and labor distribution reports as needed. f. The user can apply an alternate rate number by updating the Rate # column to the applicable rate for the employee on screen. The default rate is listed with a “dash” – manual entry of rate numbers should NOT include the dash. If the employee on screen does not have a subsequent rate set up, the system will alert the user. EvoWeb User Manual 17 g. Check Lines can also be updated to include additional data lines. To do this, click at the bottom of the screen. The list of available company ED codes will display, allowing the user to select additional codes, one at a time. h. Additional checks can be created from the Check Lines window. Users can create regular live checks, manual checks, or void prior checks from this screen. Scroll over the Add Check button to make a selection 12. Adding a check to payroll is very simple – the User must choose regular, manual or void to begin. a. Regular Checks are live payrolls, to be direct deposited or printed for the employee to cash. This link can enable a second or third check for an existing employee, or allow the user to pay a terminated or inactive employee without reactivating them in the database. In the window, select the employee to pay, indicate wage preference and click save to see the new check on screen. All standard Edit Check line details are available for the new check. EvoWeb User Manual 18 b. Manual checks enable the user to key data to the payroll that has already been paid to an employee outside of the payroll process. This is necessary if an employee received any kind of taxable wages, either through the company, or a third party administrator for short or long term sick pay. It can also be used to record employer benefits, reimbursement amount s, or wage movements/corrections. Manual checks require the user to identify the employee, the check type, and check number. Updates to the scheduled ED Balance are important if issuing a replacement of a standard payroll check, or an entry with scheduled EDs included. The Check Number field is a place holder, if a true check number is not available, use another identifying numerical entry. c. Voiding a check in evoWeb allows the user to reverse a payroll transaction in a regular payroll, rather than a separate run. This can ONLY be done if the employee has NOT cashed the check, or, the direct deposit funds are STILL 100% available in the designated account. The user MUST verify these details before processing a void check. **DO NOT VOID CHECKS FROM PRIOR QUARTERS OR YEARS WITHOUT DIRECTION** Use the check date fields to filter for a specific date range to find the original check to be voided. Additional filter fields are available if preferred. Once a change is made the filter fields, click the “funnel” icon to search employee records for applicable checks. Once found, use the Plus Key to the left of the check date column to select the check to be voided. EvoWeb User Manual 19 13. One all Quick Entry and Check Line Overrides have been made, the payroll must be pre-processed to get an accurate view of the totals. Be sure to click to Save on the check line screen. This action will direct the user to the Task Queue, with the Pre-Process button. Click and watch the Queue update with the new task. Once complete the line item will update From “Executing” to “Finished Successfully” and bring the user to the Totals Screen. 14. Check totals – At this point, the system has calculated all available entries, dropped off any checks that excluded wages, and updated taxes and deductions for each eligible employee. The user must review these totals, check counts, and amounts to ensure accuracy before submitting payroll. PayData is not responsible for any error in processing when totals are NOT reviewed and confirmed prior to submitting payroll. This first line of totals includes the check count – this should match the expected result of payroll. The top half of the totals grid displays earning and deduction totals, while the bottom displays taxes. The user should review each of the ED totals, for hours and amounts, before selecting Submit Payroll. If any total is unclear, doesn’t tie out, or doesn’t match the expected payroll result, STOP, and go back to the Quick Entry grid, or Edit Checks window to make necessary chagnes. If the totals on the page all tie out, click Submit Payroll. Only click SB Review to submit on hold if requesting assistance from PayData. EvoWeb User Manual 20 Services – Tax Calculator evoWeb Tax Calculator enables the user to preview check calculations before processing a payroll check. This is tool can be used when an employee requests changes that effect the NET check, when a payroll item is missed in regular processing, or if wages are due between check dates. Calculating a manual check without creating a special payroll, or supplemental run, can save the employer both money, and time. Use the drop down menu to select the applicable employee. Once chosen, and scheduled EDs will populate in the check line grid of the calculator. Entering data for the manual calculation is much like editing check lines. Use the Add and Delete Check Line buttons to update the grid with applicable details. The data lines allow the user to override gross amounts, withholding state, SUI states, hours, and rates of pay. Once all necessary fields are populated, click Calculate Check to see the end result. If no overrides for withholding and SUI are populated, the system will use the employee primary settings. The Results tab displays the gross earnings, federally taxable wages, federal tax withholdings, and FICA withholding, and the final Net amount of the calculation. To see the state tax details, click on the States tab. EvoWeb User Manual 21 In some cases it will be necessary to calculate the appropriate gross amount based on a desired NET result. To do this using the calculator, click on the SUI, Locals, and Options tab. While Vermont doesn’t have override functions for the SUI and Local taxes, some states may have this option available. The Gross Up fields are located at the bottom of this screen. Populate the data box with the ideal NET payment, check the Net to Gross box, and click calculate Check to get the necessary gross taxable wage. This tool is most often used when calculating specific bonus amounts for individual employees. If the calculated check is true to data processed outside of payroll, the calculation can easily be copied to payroll, without requiring the user to rekey the same information when processing the next payroll. To do so, click Copy Manual Check Just like in the payroll check lines, enter the applicable check number, and scheduled ED response for this check. The Tax Calculator display will then indicated in Green that the addition of a manual check was successful. EvoWeb User Manual 22 Reports Reporting is an essential piece of payroll processing. There is a limited report list available through evoWeb. Additional reports can be provided each payroll, but not all available reports can be generated online. Contact PayData to make changes to the reports in the list online, or to update the payroll package reports. From the Tool Bar, select the Reports link to view the available reports. Select a report name from the list to view parameters. Generally, the report name will provide a brief description of the report output. If unsure of a report output, or which report to use, contact PayData. *The report list for some clients may not include all availabe reports at start up. Contact PayData to add additional report types to your company. *Once a report is selected there are mulitple parameter fields that can be used to define custom results, and display options. If running the report selected doesn’t display data as expected, try altering some of the available options in the parameters windows to yield better results. Use the “from” and “to” date fields to define the check date range, and then select the appropriate dates with the check box selector. EvoWeb User Manual 23 Use the Misc. filter to apply group level sorting, and display parameters. *Group Level defines the sorting of results * Group Type defines the level of detail displayed *Group Sort defines the order the Level selection is displayed in. *Detail sort defines the order of data within the selected level. *Parameters can vary for many reports. Use the descriptions to identify the use of these fields. If the data requested on the report doesn’t require pre-defined ED codes, the ED group filter may not be necessary. Use the Employee Filter to select only specific employees to include in the result. Leaving this filter blank indicates the report should include all employees. Use the DBDT Filter to select only specific labor distribution levels to include in the result. Leaving this filter blank indicates the report should include data from all levels. Once all parameters are determined, click EvoWeb User Manual 24 The evoWeb Task Queue will display with the working report on the top line. When finished, the queue will indicated “Finished Successfully” in the status line, and a Magnifying Glass Icon will be available to open the report on screen. Click the magnifying glass, and the report will open in a new browser window. Use the links on screen to save, print, or navigate the window. The options may display differently for different browser types. EvoWeb User Manual 25