1
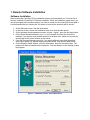
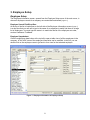
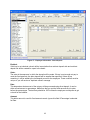
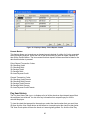
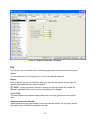
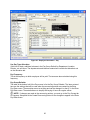
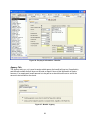
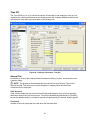
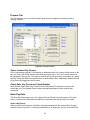
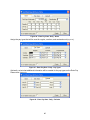
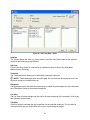
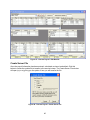
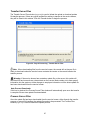
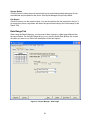
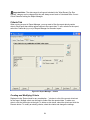
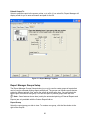
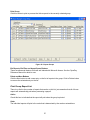
PC Remote
User Manual
User Manual................................................................................................................................... 1
1. Remote Software Installation .................................................................................................... 4
Software Installation ................................................................................................................................. 4
Company Setup......................................................................................................................................... 5
2. System Setup............................................................................................................................... 5
Company Information ............................................................................................................................... 5
Change Companies ................................................................................................................................... 6
Communication......................................................................................................................................... 6
User Setup................................................................................................................................................. 6
Change Password ...................................................................................................................................... 7
3. Employee Setup .......................................................................................................................... 8
Employee Setup ........................................................................................................................................ 8
Creating New Employees .....................................................................................................................................9
Employee List .....................................................................................................................................................12
Employee ............................................................................................................................................................13
HR Setup.............................................................................................................................................................14
HR Info ...............................................................................................................................................................14
Allocation ...........................................................................................................................................................15
Note, Misc...........................................................................................................................................................16
Direct Deposit .....................................................................................................................................................17
Pay Item History .................................................................................................................................................20
Taxes...................................................................................................................................................................21
Er Liability..........................................................................................................................................................23
Pay ......................................................................................................................................................................24
Deductions ..........................................................................................................................................................26
Benefits ...............................................................................................................................................................28
Time Off .............................................................................................................................................................30
Jobs ......................................................................................................................................................... 32
4. Payroll Processing.................................................................................................................... 32
Process Payroll........................................................................................................................................ 32
Options Tab ........................................................................................................................................................32
Process Tab.........................................................................................................................................................34
Enter Pay Data ....................................................................................................................................................34
Check Setup ........................................................................................................................................................43
Calculate/Re-Calculate .......................................................................................................................................44
Calc Report .........................................................................................................................................................44
Edit Results.........................................................................................................................................................44
Create Server File ...............................................................................................................................................45
Process Server File..............................................................................................................................................46
Run Reports ........................................................................................................................................................46
Next Pay Run ......................................................................................................................................................46
Change Year or Date............................................................................................................................... 46
Transfer Server Files............................................................................................................................... 47
Process Server Files ................................................................................................................................ 47
2
Reprint Checks........................................................................................................................................ 48
Manual File Handling ............................................................................................................................. 49
5. Payroll Inquiry ......................................................................................................................... 50
Report Manager ...................................................................................................................................... 50
Employee Balances ................................................................................................................................. 58
Direct Deposit Items ............................................................................................................................... 59
6. Utilities...................................................................................................................................... 60
3
1. Remote Software Installation
Software Installation
After inserting the CyberPay CD, the installation screen will automatically run. From the list of
buttons, choose the CyberPay PC Remote Installation. When the installation wizard starts, you
may be prompted with a question asking if you want to search for the correct MS Access path. It
is recommended that you choose the Yes option to insure all the shortcuts will be correct.
1.
2.
3.
4.
At the Welcome screen, click the Next button.
In the next screen, review the installation notes, then click the Next button.
On the software license agreement screen, choose “I Agree”, then click the Next button.
On the Select Directories screen (Figure 1), verify the path for where the files will be
installed. If you want to have the data stored on a network drive, make sure to point the
second path to the correct location on the server.
5. From the Program Manager group list, if you want a different group then the default,
select which group you want the shortcuts created within, then click the Next button.
6. On the Ready to Install window, verify the information, then click the Next button. The
program will then be installed on the computer. Click the shortcut on the desktop to open
the program.
Figure 1 - Installation Screen - Select Directories
4
Company Setup
After configuring the communications, the company must be created in the system prior to
transferring the update files down from the bureau server. From the program main menu,
choose System Setup on the left menu, then Company Information on the right menu. In the
Company Setup screen, click the New button at the bottom. This will open the Prepare a New
Company Directory screen (Figure 2). Enter the name of the company they will be processing
payrolls for. Enter the 4-digit company code for the data base. Enter the 4-digit location code.
Then click the create button.
Figure 2 - Create a New Company
NOTE: Do not try to change to the new company until after the first update file is
transferred down to the remote.
Initial Update File Transfer
Once the new company has be added to the system, none of the company information will be
available until after completing the initial transfer of the update file from the server (see Transfer
Server Files under Payroll Processing).
2. System Setup
Company Information
The Company tab displays the company name, federal ID number and address. This
information can only be changed at the service bureau. The defaults tab has the default general
ledger accounts for liabilities and expenses. The Delete button is used to delete a company
database from the system. The New button is used to create a new company in the system.
5
Figure 3 - System Setup - Company Setup
Change Companies
Since the program only allows you to view the company data for the company that is currently
loaded, you will need to use the Change Companies window to load another company. From
the drop list, select the company you wish to load then hit the Change button.
Figure 4 - System Setup - Change Companies
Communication
This utility is used to configure the program to communicate properly with the service bureau
server when transferring update files. These settings should not be changed unless you are
directed to by the service bureau. See the CyberPay Remote Reference Manual for more
details.
User Setup
To provide an added level of security to the information in the program, user accounts can be
created in the Users window (Figure 5) to limit access to the program and/or certain utilities and
processes within the program. Click the New button to create a new user, change the name and
password, then select the boxes for the areas in the program you want to allow access to for
this user.
NOTE: Until a password is set for the Administrator user account, the program will not
prompt at startup for a user login. See Change Password below.
6
Figure 5 - System Setup - User Setup
Change Password
To change the password for the logged in account, enter the old password and the new
password then click the OK button.
Figure 6 - System Setup - Change Password
7
3. Employee Setup
Employee Setup
The Employee Information screen, opened from the Employee Setup menu of the main menu, is
where all employee records for a company are created and maintained (Figure 7).
Employee Search Field/Drop Box:
At the top of the list of employees on the left side of the Employee Information screen (Figure 7)
is a drop box that you can use to type in the name of an employee to easily find them on a large
list of employees. You must type the name in to match the format of the employee sort order,
such as LastName, FirstName.
Employee Spreadsheet:
Click the magnifying glass button at the top left to open a table view of all the employees in the
company. In this view, some of the employee information can be modified. In this list, you can
double-click on the employee name to go back to form view for that selected employee.
Figure 7 - Employee Information of Employee Setup
8
Creating New Employees
Click the New button
to open the Create New Employee(s) form (Figure 8). Here you will be
able to create one or more employees.
Figure 8– Create New Employee
The employee Setup Template you select for a new employee determines most of the
employee’s setup information, however, this form allows you to enter data that is not specified
by the template. The wage you enter is assigned to all the pay types in the template (or the
overtime adjusted wage if the pay type is overtime). If you have taxes for more than one state
assigned to a setup template, CyberPay will only assign the state taxes that match the state
selected in "State Taxes."
Fill in the data for the new employee. (ID, SS#, Hire Date, First, Middle, Last, Address, City,
State, Zip, Template, Wage, Birth Date, Office Phone, Frequency, Gender, EEO Class,
Location, Department, Federal Filing Status, Exemptions, State Taxes and exemptions, and any
extra deductions).
NOTE: The SS# field is required and must be unique to the company. Additionally, the
First and Last names are require.
9
When the data is entered, click the New button to add more employees or click the Create
button when done to add all the new employees to the company.
Employee ID:
The Employee ID will be created for you if you have the Auto Employee ID box checked. If
utilizing Auto Employee ID, a numeric number will be generated, otherwise; you can utilize an
alpha entry when not using this option.
Wage:
Enter wage or salary. This amount will be applied to all pay types that are not linked to another
pay types defined in company setup.
Deduct 1 & 2 (Optional) and Fixed Amounts 1 & 2:
Click on the combo box if you want to add deductions to the new employee that are not already
included the template selected for the employee.
NOTE: Only deductions that are not set up in the selected template.
Exemptions:
The first Exemption field represents the federal exemption allowance to be withheld as noted on
the employees W-4. The second Exemption field represents the state amount.
NOTE: The state tax must be defined in the Employee Template Taxes Tab to allow for
selection here.
Data Sheet Button:
Click this button to toggle between datasheet and form view. The datasheet view allows you to
see many employee records at once.
Create and Close buttons:
If you enter data to create a new employee and click on the Close button prior to clicking the
Create or exit CyberPay, the data entered for the new employees will remain in this form as it
was entered until you later hit the Delete or Create buttons. If you click the Create button you
will get a confirmation screen prior to committing process of adding the new employee(s).
Figure 9 - Create New Employees - Confirmation
Import button:
There a few formats that can be used to import employee data from external export files to
simply the creation of new employees in CyberPay. However, all data conversion issues are
10
external to the system and are not supported under normal maintenance and support programs.
If you want assistance from AdaptaSoft to convert data from one system to another, you need to
make specific arrangements for that.
Click the Import button to open the Import Employee Data form (Figure 10). Select the Import
Data Type from the list of available options then enter the path to the file to import in the Enter
Import File Path field.
Figure 10 - Create New Employees - Import
The Standard Excel Spreadsheet Import
Following is the specifications for the Excel Spreadsheet that needs to be created with the
employee information to import correct.
Column Headings must be exactly as follows:
SSNum (Required) - This is the employee’s social security number
EmployeeID - Optional employee ID
FirstName (Required)
MiddleName
LastName (Required)
HomeAddress1
HomeAddress2
City
State
Country
ZipCode
EEOClass - Enter 1 as a default
Location (Required)
Department (Required)
Gender (Required)
HireDate (Required)
TmpID (Required)
DeductID1 - Enter 0
DeductID2 - Enter 0
DeductAmt1 - Enter 0
DeductAmt2 - Enter 0
FITFilingStatus (Required) - Enter 1
11
SITFilingStatus
FITExemptions (Required)
SITExemptions (Required)
Salary (Required)- Enter 0 for Hourly Employees
HourlyWage (Required) - Enter 0 for Salary Employees
BirthDate
Phone
Example Spreadsheet Layout:
The italic items in the first row are the column headers described above. The bottom row
contains the first data record.
SSNum
135132132
EmployeeID
FirstName MiddleName LastName HomeAddress1
Bob
Smith
123 First Street
city
state Country ZipCode EEOClass Location
Department
Somecity IN
25252
1
Default Location Default Department
HireDate TmpID DeductID1 DeductID2
8/26/1998 26
0
0
FITExemptions
2
SITExemptions
2
HomeAddress2
PO Box 345
Gender
M
DeductAmt1 DeductAmt2 FITFilingStatus SITFilingStatus
0
0
5
10
Salary
25,000
HourlyWage
0
Birthdate
1/17/1976
Phone
2195551213
Other Formats:
•
•
•
•
•
Standard Text File Import
PayChoice Employee Import – Custom import; not supported.
CBS Employee Master File – Custom import; not supported.
CBS Employee DD Info – Custom import; not supported.
PennSoft Employee Import – Custom import; not supported.
Employee List
After setting up the employee’s with the templates, some settings will still need to be
individualized for each of the employees. On the left side of the Employee Information screen
(Figure 12) is a list of the employees in the company. By default, the list only shows active
employees. To see both the active and inactive employees, uncheck the Hide Inactive EE box
at the bottom of the screen. The list of employees will be in order based on what has been set
for the company. To change the sort order, select the Emp Sort Order button at the bottom of
the screen. At the top of the employee list is search box in which the employee’s name can be
typed to quickly find an employee in a large list. Select an employee to view or modify the setup
information.
12
Employee
The Employee tab (Figure 12) of Employee Information has the employee’s name, address and
contact information. Additionally, the Active check box which determines if the employee is an
active employee or terminated employee is here.
When you uncheck the Active box, the termination will be confirmed with a pop up box where a
termination date can be entered (Figure 11).
Figure 11- Employee Setup - Enter Termination Date
Figure 12- Employee Information - Employee
NOTE: Entering a termination date first in the HR tab will not place a check mark in the
active field to terminate an employee. You cannot pay a terminated employee.
13
Time Clock ID:
If the company uses a time clock to import hours for payroll, this is the identification number for
the employee to match to the date from the time clock.
HR Setup
The majority of the HR Setup tab (Figure 13) has fields that are information purposes only for
Human Resources use. The only fields that will have an affect on other parts of the system and
are important to have correct are the Date of Birth, Date of Hire and if applicable the
Termination Date and Rehire Date.
NOTE: If the hire date is changed, the “time employed” will not re-calculate until the form is
closed and re-opened.
Figure 13 - Employee Information - HR Setup
HR Info
The HR Info tab (Figure 14) has six note fields for extra information on the employee. The pay
history field will automatically fill in when Pay tab information is changed, however this is the
only field that will do this automatically. These fields are not searchable.
14
Figure 14- Employee Information - HR Info
Allocation
The Allocation tab (Figure 15) is used to assign an employee’s pay to different departments,
locations, divisions, titles, and classes. The top line of drop lists above the table are the defaults
for the employee which will determine allocation of pay as well as where the employee is listed
on reports. The table is only used if the pay is to be allocated to more then the default items.
These defaults will apply to the combined total of all pay types.
Check Allocation button:
Click this button to make sure that the total allocated for each employee equals exactly 100%. If
an employee does not total 100%, CyberPay will correct it and notify you of the change.
Use Pay Level:
When this box is checked, the allocations on the Pay tab will be used instead of these values.
NOTE: When moving an employee from one department or location to another, you must
change on both the defaults and the allocations. If using allocations, please be aware that
rounding errors can occur, but are usually no more then a cent or two.
15
Figure 15- Employee Information – Allocation
Note, Misc.
The Notes, Misc. tab (Figure 16) is used for miscellaneous information.
Notes:
This field updates automatically when the employee is terminated, re-hired or accruals are
reset. Manual notes can also be added.
Pop-up Employee Memo:
Any message typed into this field will cause a pop-up message window to open any time the
employee is accessed either in Employee Setup or Enter Pay Data. This can be used to make
sure that things are checked per employee. Example: an employee should have a pay raise the
next pay period.
16
Figure 16 - Employee Information - Notes, Misc.
User Defined Fields:
The user defined fields can be used, however, to run reports for these fields you will need to
define the format and run the report under Utilities, Options and Layout Custom Report. Also the
titles of the user defined fields cannot be changed.
• If using a license # (other the drivers’ license), use the User Defined 3. (used for the
license/expiration report)
• If using a license expiration date, use the User Defined 4. (used for the license/expiration
report)
• If using a position code, use the User Defined 2. (used for the phone/position report and
the TB/Position report)
• If using a TB date, use the User Defined 5. (used for the TB/Position report)
Direct Deposit
The Direct Deposit tab (Figure 17) is used to set up all the necessary information to pay an
employee using direct deposit. More then one rule for direct deposit items can be set for each
employee. Example: if an employee would like 50% of their paycheck to be deposited in their
savings and 25% in their checking and the rest in the form of a check, you could enter two
different entries for the employee.
17
Figure 17 - Employee Information - Direct Deposit
Enabled:
If this box is not checked a check will be issued rather than a direct deposit stub and no direct
deposit file will be created for export in the batch.
Order:
The order is the sequence in which the deposits will be made. If there is not enough net pay to
meet the fixed amounts, the later deposits will be smaller than specified. If there is pay
remaining, it will be added to the last deposit record for the employee. These numbers must be
unique or you will receive a "duplicate values" message.
Rate:
This determines what amount of the net pay will be processed using direct deposit. It can be
either a fixed amount or percentage. Make sure that you put the fixed amounts first in order
before the percentages. The last entry should be 100% unless the employee would prefer to get
a check for the balance.
Amount:
This dollar amount is used for fixed amount records. Ignore this field if Percentage is selected
for Rate.
18
Percentage:
Enter what percentage of the remaining net pay is to be deposited in this account. Ignore this
field if Fixed is selected for Rate.
NOTE: You can have a portion of the net pay go to direct deposit and any remaining
portion go to a check. To do this, simply complete the direct deposit portion setup as noted
above and any remaining amount will automatically be paid by check.
Account Number:
Enter the employee’s account number that this portion of the net pay is to be deposited into.
There will be a confirmation screen that opens that you must re-enter the number to verify you
entered it correctly.
Type:
Select the type of account: checking, savings, or loan.
Bank Name:
Select the bank that the employee’s account is with. If you need does not already exist in the
list, click the Banks button below to add the bank to the list of banks in the system.
Prenote Cycles and Prenote Complete:
This number is automatically updated when payroll is run and a prenote is generated for the
employee. A prenote is a zero dollar direct deposit transaction that is created to confirm and
test the account information. Once this number reaches or exceeds the number required by the
setup for the bank, the Prenote Complete box will automatically check. After the Prenote
Complete box has been checked, then the next payroll will generate a live direct deposit
transaction to pay the employee.
Banks Button:
Click this button to setup and maintain employee direct deposit bank information (Figure 18): bank
ID, bank name and routing number and required prenote cycles. When the routing number is
changed, a confirmation window will open requiring you to re-enter the number to confirm it was
correctly entered.
19
Figure 18 - Employee Setup - Direct Deposit - Banks
Prenote Button:
This feature allows you to create an on-demand prenote instead of waiting for it to be generated
when processing a payroll. Select the line for the account that you want to create a prenote for
then hit the Prenote button. The item created for direct deposit will have an effective date for the
date that this button is pressed.
Direct Deposit Transaction Codes:
22=Checking Credit
27=Checking Debit
32=Savings Credit
37=Savings Debit
52=Loan Payment Credit
Prenote Transaction Codes:
23=Checking Credit Prenote
28=Checking Debit Prenote
33=Savings Credit Prenote
38=Savings Debit Prenote
53=Loan Payment Credit Prenote
Pay Item History
The Pay Item History tab (Figure 19) displays a list of all the checks or direct deposit payroll that
the employee has received. You can view any information from a specific pay run for the
selected employee.
To view the check that was paid to the employee, select the check number that you want (Item
ID) then click the View Check button at the bottom to view and/or print the check for that period.
The View Check option will have the check as it was originally printed. Or, click the View Pay
20
Stub button at the bottom to view and/or print a check stub for that period. The View Stub option
will void the checks routing and account information so that if the stub is printed the check
cannot be cashed.
Figure 19 - Employee Information - Pay Item History
Taxes
The Taxes tab (Figure 20) has all the employee taxes assigned based of the setup template with
all the defaults from Company Setup. Here you can customize the settings for the employee:
Filing Status, Exemptions, Extra Withholdings, etc. To modify this information, first select the tax
from the drop list.
Do not Apply Table:
Click this to calculate taxable wages but not use the tax table, such as for employee exempt
from this tax. For employee that have a flat amount instead of rate, use this then enter the
amount in the Extra Withholding field.
Do not Calculate Taxable Wages:
Click to not calculate taxable wages. This option is only available in conjunction with the do not
apply table option.
21
Begin Applying Table:
Enter the ending period date for which the do not apply table and (optionally) the do not
calculate taxable wages boxes applies.
Figure 20 - Employee Information – Taxes
Filing Status:
Select the filing status for the tax (i.e. married or Single). The filing status determines which Tax
Tables is to be used when calculating taxes of the selected type. This field may not apply to all
taxes.
For example, some taxes have only one filing status or tax table, such as Social Security. In that
case, you will have only one option for a filing status, which might be ‘not applicable.’
Exemptions:
Enter the number of personal exemptions for the tax. This number can be used for exemptions
of dependents depending on how the Tax Type has been setup. This field may be ignored for
some taxes such as Social Security or Unemployment.
Special Flat Tax Rate:
If the Tax Type calculation method is "Use Employee Flat Tax Option" CyberPay will use this
flat tax rate. This option is often used for local taxes which have many different tax rates and
jurisdictions. This option overrides the existing table. Also, under payroll processing options, you
can utilize the Flat Tax Option for your payroll run.
22
Extra Withholding Amt:
Enter any extra withholding for the tax the employee has requested. The amount will be added
to the tax on every pay run. An amount entered in this field will add to both the regular table or
the special flat rate if set.
Special Exempt Amt:
Enter any extra amount of taxable pay you want to have exempted from this tax. The amount
should be annualized.
NOTE: If you want to set Federal or State Taxes to a fixed amount, Set the number of
exemptions to 99, and put the fixed amount in the Extra Withholding field. If the W-4 has an
expiration, this can also be set up by using the ‘do not apply table’ in conjunction with the date.
You would still enter a fixed amount.
One Time Adjustment:
This amount will be deducted in addition to the calculated taxes during the next pay run then will
be set to 0 for all subsequent pay runs.
Uncollected Tax:
In the case that an employee doesn’t have enough wages to pay the full amount of the tax, the
remaining portion may be rolled into this field to be taken in future payrolls (this is optional
depending on the setting for the payroll options).
Year To Date Wages, Taxable Wages and Tax:
These three fields in yellow show the historical amount for the year that the employee has
related to this tax. These cannot be edited.
Er Liability
The Er Liability tab (Figure 21) has all the employer taxes assigned to the employees pay. These
are not as customizable as the employee taxes, so if they are wrong will need to be changed in
Company Setup.
Active:
When this is check, the employer liability will be calculated during payroll. If this is unchecked, it
will calculate taxable wages the tax amount will be zero.
Do not Calculate Taxable Wages:
Click to not calculate taxable wages. This option is only available when the Active box is not
checked.
One Time Adjustment:
This amount will be deducted in addition to the calculated taxes during the next pay run then will
be set to 0 for all subsequent pay runs.
Year To Date Wages, Taxable Wages and Tax:
These three fields in yellow show the historical amount for the year that the employee has
related to this tax. These cannot be edited.
23
Figure 21 - Employee Information - Er Liability
Pay
The Pay tab (Figure 22) is used to set up all the pay types and reoccurring entries for employee.
Active:
Use this check box to turn the pay type on or off for the selected employee.
Wages:
Enter or edit the wage for the employee. Other pay types that are linked to this pay type will
automatically update when the wage is changed.
NOTE: If a pay type linked to another is change, the amount entered will override the
automatic calculation until the next time the related pay type is changed.
Year To Date:
This field shows the accumulated wages paid for the current pay type for the current payroll
year.
Employee taxes to be withheld:
Wages made for this pay type will apply to the items selected in black. If a pay type is exempt
from certain taxes, unselect the appropriate tax item.
24
Figure 22 - Employee Information – Pay
Use Pay Type Allocation:
If this box is check, additional columns in the Pay Group Default for Department, Location,
Division, etc. will show. The departments and locations entered will override the allocations set
on the Allocation tab.
Pay Frequency:
This is the frequency at which employee will be paid. The taxes are also calculated using this
frequency.
Pay Group Defaults:
The table at the bottom half of the Pay screen is for the Pay Group Defaults. The items entered
here are the settings that will be used when the reoccurring entries are created for the Enter
Pay Data screen. These entries are not a set thing and can be changed “on-the-fly” in the Enter
Pay Data screen. These defaults are to simplify the keying of hours for regular values.
NOTE: If changes are made to the reoccurring entries, you must go to the Pay Groups tab
of Company Setup and hit the Create Reoccurring button for the changes to appear in the Enter
Pay Data screen.
25
Deductions
The Deductions tab (Figure 23) is used to customize the deductions for an employee. Initially,
these values will be pulled from the Company Setup, but most of the values can be customized.
Example: a 401K set for the company as a fixed amount could be changed to a % disposable
gross for the employee.
Figure 23 - Employee Information - Deductions
General, Rates and Shelter Tabs
For details on the fields and what information should go in them, see Deductions under
Company Setup.
YTD Deduct and Lifetime Deduct Amounts:
The numbers showing in the Actual column are the totals deduction amounts taken for the yearto-date and for the entire history in the system for the employee. The remaining balance is the
difference of the Actual amount and the Maximum amount fields.
One-time Adjustment:
The amount entered is this field will be added as an addition to the calculated amount for the
deduction for the next payroll. This number will zero out after the payroll.
26
Uncollected Deduction:
If an employee’s check doesn’t have sufficient money to take the entire deduction, the
remainder and be rolled over into the uncollected field to be taken from the next paycheck. This
is an optional feature that set under the payroll processing options.
Agency Tab
The Agency tab (Figure 24) is used to assign which agency the deduction will pay too (if
applicable) and what information will show on the stub or reports, such as case numbers. None
of this information is require, however, if an employee’s deduction amount is to be paid on a
check this will have to set for the amount to be included on the check.
Figure 24- Employee Information - Deductions – Agency
NOTE: If the only option you have for Assigned Agency is “No Agency Assigned” that
means that no agency under 3rd Party Pay in Company Setup has been setup as the default
agency for the deduction.
Garnishment Tab
If the deduction has been marked in Company Setup as a garnishment, the Garnishment Tab
(Figure 25) will appear here. In the case that you have multiple deductions for the employee that
are garnishments, there may be a situation where one garnishment has priority over another if
there is insufficient pay available to take the full amount. Here you have the option to determine
the order in which the deductions will have their amounts reduce. Also, if the combined amount
cannot exceed a percentage of the net pay, then this is also set here.
27
Figure 25 - Employee Setup - Deductions - Garnishment Tab
Reduce Garnishment Order:
The garnishment with the lowest Order number will have the amount of its deduction reduced
first in the event that there is not enough pay to allow the total amount of all garnishments. If no
garnishment has a priority over another, then all can have the same Order number which will
make them all reduce equally.
Benefits
The Benefits tab (Figure 26) is used to set up the benefits that the employer pays on the
employee’s behalf. This will initially have the company defaults added by the setup template, but
these benefit settings can be customized for the employee.
General Tab
For details on the fields and what information should go in them, see Benefits under Company
Setup.
Employee Taxes to be withheld:
Select the employee taxes that will be calculated to include the amount of the benefit.
Year To Date:
This is the total benefit amount for the year the employee has received.
28
Figure 26 - Employee Information – Benefits
Agency Tab
The Agency tab (Figure 27) is used to assign which agency the benefit will pay too (if applicable)
and the case number that will show on the stub or reports. None of this information is require,
however, if an employee’s benefit amount is to be paid on a check this will have to set for the
amount to be included on the check.
Figure 27 - Benefit - Agency
29
Time Off
The Time Off tab (Figure 28) is used to set up time off accruals for the employee. Here you can
customize the values and amounts for the employee from the company defaults as well as see
when they will next reach an accrual date or anniversary level.
Figure 28 - Employee Information - Time Off
General Tab
For details on some of the fields and what information should go in them, see Accruals under
Company Setup.
NOTE: The grayed-out box beneath the Active check box is the Accrual Type for the
selected accrual. This setting can only be changed in Company Setup and cannot be
customized for the employee.
Units Accrued:
Total units the employee has accrued since the last reset date plus any hours that optionally
have been carried over from the last year. This field is automatically maintained by CyberPay
but can be edited manually to include an amount not generated by the accrual during a payroll.
Total Used:
Number of hours an employee has used since the last reset date.
30
YTD Accrual:
Total units the employee has accrued since the last reset date.
NOTE: This field cannot be edited in this form. To make corrections to this value, click the
Data Sheet button at the bottom of the screen. In the table view, find the employee and accrual
then scroll to the column labeled “Units Accrued Since”. This value is the YTD Accrual amount.
Amount Available:
This is the total available for the employee to use, which is the Units Accrued minus the Total
Used.
Effective Date:
This is the date that the accrual will begin to accrue. Also, anniversary level may be based on
this date.
Available After:
This is the date that the accrual amount is available for use by the employee. In the case that
this date is later then the Effective Date, there will be hours accrued that are not usable until this
date.
Next Accrual Date and Next Reset Date:
These date are the when the accruals are scheduled to next accrue an amount or conduct the
annual reset. Once these dates are reached, they are automatically advanced to the next date
based on the frequency. The reset date is based on other dates in the system an can not be
changed here, but the next accrual date can be change by checking the Override check box and
entering the new date.
Anniversary Tab
The Anniversary tab (Figure 29) displays the levels for the accrual, on what date the employee
will reach the level, and what the values will be automatically changed too. These values cannot
be change here. If the items here are not correct, they need to be changed in Company Setup.
Figure 29- Employee Information - Time Off – Anniversary
31
Jobs
There is no limit on the number of jobs that can be created for the company. Click the new
button to add a new job. On this tab, enter the name or description for the job.
Jobs are required for companies doing Certified payrolls.
Before a job can be deleted, you must first remove the jobs from any templates or employees in
the Employee Setup. Once pay has been allocated to this job, it cannot be deleted. Uncheck the
Active box if you no longer want to have the job list on the drop lists for jobs throughout the
system.
Figure 30 - Employee Setup - Jobs
4. Payroll Processing
Process Payroll
The Process Payroll screen (Figure 32), opened from the Payroll Processing menu of the main
menu, is a step-by-step process for creating the company payroll.
Options Tab
The Options tab (Figure 31) of the Process Payroll screen has several options that can be set to
modify the payroll. These options must be set prior to calculating a payroll. Each option has two
check boxes. If the left box is checked, this option will apply to all future payrolls. If the box on
32
the right is checked, this option will apply to the current payroll. These options will effect all
employees and Pay Groups in the pay run.
•
•
•
•
•
Don’t include deductions – the option will not deduct any deductions from the
employees.
Don’t include benefits – the option will not include any benefits for the employees.
Print Checks for all Direct Deposit – this option will not create any direct deposit
items, it will print checks for all employees in the pay run.
Automatically advance pay period – this option will use the calendar and advance the
next dates set up in the calendar.
Don’t include zero pay checks – this will not allow zero dollar pay checks that also
have a zero gross amount.
Figure 31 - Process Payroll - Options
Checkbook
Select which bank account should be drafted from for the payroll.
Pay Run Frequency
This is used to determine the next pay period dates.
Check Note
Anything typed here will show on the pay stub for all employees in the payroll.
Overwrite
This button is used to back the payroll up after creating the server file. This requires a pass
code provided by the service bureau.
33
Process Tab
The Process tab (Figure 32) of the Process Payroll screen manages the overall process of
creating a payroll.
Figure 32 - Process Payroll
Select Included Pay Groups
Prior to processing a payroll, it is necessary to determine what Pay Groups will be include in the
pay run. On the list of Pay Groups, those with the Include set to “Yes” are currently marked to
be calculated in the pay run. To include or exclude a Pay Group from the current pay run, select
the Pay Group click either the Include button or the Exclude button. Additionally, double-clicking
a Pay Group will toggle the Yes/No value.
Check Date, Pay Period and Check Number
Verify that the Check Date, Pay Period From and Pay Period To dates are correct for the
current pay run. The Starting Check number automatically advances after a payroll has
completed.
Enter Pay Data
The Enter Pay Data screen (Figure 33), opened from the Payroll Processing menu of the main
menu, is used to enter the payroll information for the employees that are going to be paid.
Select a Pay Group:
When a payroll is processed in CyberPay, employees assigned to the selected Pay Group(s)
will be the ones to get paid. To enter pay information for an employee, first you must select the
34
Pay Group that the employee has been assigned too. From the drop list at the top right of the
Enter Pay Data screen, select the Pay Group.
Select an Employee:
From the drop list at the top left of the Enter Pay Data screen, select the employee you wish to
view or modify the pay information for. If a required employee is not is this list for the selected
Pay Group, click the new
button to choose from the employees in the company and add that
employee to the Pay Group.
NOTE: In order to insure that an employee will always be assigned to the correct Pay
Group, make certain they have Pay Group Defaults set up on the Pay tab of Error! Reference
source not found..
Figure 33 - Enter Pay Data
Employee Information
Displayed above the pay information tables are three grayed-out boxes (Figure 34) that list
information relevant to the selected employee. The left box shows the employee’s address and
tax filing status and exemptions. The middle box lists all the employee’s deductions – a one time
adjustment can be entered in the white field next to the deduction amount. The right box list all
the employee’s time-off accruals and the currently available amount.
35
Employee Information
and Tax Info
Employee Deduction
Information
Employee Accrual
Information
Figure 34 - Enter Pay Data Screen - Employee Information
NOTE: Double-click at the point indicated by the yellow arrow above will open the related
tab in Employee Setup for the selected employee.
Pay Frequency:
This is the pay frequency for which the selected employee gets paid. The pay frequency can be
change for this employee or all employees in the Pay Group for the current pay run or for all
future pay runs (Figure 35). Making this change will result is differences in the tax calculations.
Figure 35 - Enter Pay Data - Change Pay Frequency
Split Taxes over N Weeks:
This feature is for use with bonus and other infrequent, large-amount pay types. It taxes the pay
as it if were paid in smaller amounts over several pay periods to keep the pay inside the
employee’s normal tax bracket. This needs to be done for each of the pay types that have the
large-amount pay (Figure 36).
36
Figure 36 - Enter Pay Data - Split Taxes
Employee Sort Order:
Click this to change the way that employees are sorted in the Enter Pay Data screen, then
select the desired sort order (Figure 37).
Figure 37 - Enter Pay Data - Change Employee Sort Order
Entering Pay Information
All of the pay information for the selected employee is entered in the table (Figure 38) at the
middle of the Enter Pay Data screen. Each line of the table has a selected pay type with the
necessary pay information. There is no limit to the number of pay types that can be entered
here and each pay type can be listed an number of times.
Figure 38 - Enter Pay Data - Data Entry Portion
37
Pay:
Select the desired pay type from the list of active pay types that have been set up for the
employee.
Units:
CyberPay calculates pay by units. The number of units entered here will automatically enter the
appropriate number in the Hours field and a calculated amount in the Totals field.
Shift:
Enter a 1, 2, 3, etc. for the required shift differential. CyberPay will automatically adjust the pay
rate based on the shift differential set up for the selected pay type.
Job:
If the select pay type is required to be allocated to a Job, select the job from the drop list.
Hours:
CyberPay automatically calculates the number of hours of work based on the hours per unit of
pay specified on Pay Type tab of Company Setup. This amount can be changed after having
first entered the Units.
Wage:
This is the per Unit pay amount for the selected pay type that was entered in the Wage field on
the Pay tab of Employee Setup.
Override:
A per Unit pay amount can be used to override the amount in the Wage field.
Total:
This is the gross pay total for the selected pay type based on the number of Units multiplied by
the Wage or Override amount.
Ck:
If an employee’s pay is to be separated onto more then one check, enter the number for the
check that the selected pay type will be calculated on. Example: An employee’s Hourly and
Overtime pay can go on the first check – enter 1 – and a Bonus pay can go on a second check
– enter 2.
Manual Check Num:
If the employee has a pay amount that is being entered into the system but should not create a
live check because they have already received the pay, then enter a check number in this field.
All pay lines entered for the employee that have the same Ck number as the line with the
Manual Check Num will be included on the manual check. If the employee is also to receive
some pay on a live check, make certain to enter a different Ck number for those pay lines.
Location, Department, Division, Title, Classification:
To allocate the amount of the pay line, select the required item from the drop list. If this field is
left blank, the employee’s default allocation will be used.
38
User 1 and User 2:
These fields are user defined for tracking or reference. Enter numbers in these fields. Data input
can be summarized on the Expense Distribution in Report Manager. Example: Sales compared
to expenses for the week.
Note:
Anything typed into this field will show on the employee’s check stub.
Auxiliary Taxes and Liability:
Here you can enter up to two additional taxes and one employer liability that will calculate using
the amount for this pay line. This is useful for an employee who works in more than one location
per pay period and a local tax needs to be applied to each location. Additionally this will work for
an employee that has different Workers Comp rates that must apply to different pay types.
NOTE: For easier data entry, a tab stop can be placed on any column by placing the curser
in any field and pressing Ctrl+T. When using the tab key to move from field-to-field, this will
determine when it returns to the next line down. The tab stop can be removed by pressing
Ctrl+Shift+T.
Option Buttons and Totals
Along the bottom of the Enter Pay Data screen are some pay totals and several options button
for additional utilities to help with entering the pay information (Figure 39).
Figure 39 - Enter Pay Data – Option Buttons
Totals
The Totals button will display a report that lists the pay type total currently entered for the
selected Pay Group.
Daily
The Daily button opens a utility to assist with the creation of pay line entries each day of the pay
period required for certified payrolls. Select the date for the first day of the week then enter the
hours for each day for the selected Classification and Job (Figure 40). This will automatically
create the entries in the Enter Pay Data screen. If entering items for more then one week or for
multiple jobs, make certain to check the “Do not delete existing data” box.
39
Figure 40 - Enter Pay Data - Daily - Hours
Assign the pay types that will be used for regular, overtime, and weekend work (Figure 41).
Figure 41 - Enter Pay Data - Daily - Pay Types
Optionally, select what additional information will be created for the pay types on the Enter Pay
Data screen (Figure 42).
Figure 42 - Enter Pay Data - Daily – Defaults
40
Import
Click this button to import employee pay data for a Pay Group from an export file generated by a
time clock. This will open the Time Clock Data Import window (Figure 43). Depending on the time
clock import being used, there will be different fields to fill in on the bottom half of the screen.
Only fields that have labels need to be filled in with data. See the CyberPay Implementation
Manual for more details.
Figure 43 - Enter Pay Data - Import
Holds
In some cases, an employee may receive a check that will not have deductions or benefits or
taxes that need to be withheld. The Holds window (Figure 44) allows you to select items to place
a hold on for a selected Ck number. This hold can be for one employee or all employees and
can be made a permanent hold or set to only occur this pay run.
NOTE: The Save button must be clicked to apply the changes.
41
Figure 44 - Enter Pay Data – Holds
Initialize
The Initialize button will clear any entries made in the Enter Pay Data screen for the selected
employee and reset pay group defaults.
Hot Keys
Click the Hot Keys button to view the list of available hot keys for Enter Pay Data (Error!
Reference source not found.).
Terminate
The Terminate button allows you to terminate the selected employee.
NOTE: Terminated employees cannot be paid. Do not terminate the employee here if the
employee needs to be paid this pay run.
Reallocate
The Reallocate button will divide the entered pay to match the percentages set on the Allocation
tab of Employee Setup for the selected employee.
List View
The List View will show multiple pay line entries for each employee in the company. Units of pay
can optionally entered here.
Calculate
Click this button to calculate the pay information for the selected employee. This is useful for
viewing what the net pay of the check will be prior to processing the payroll.
42
Total Hours:
This is the total number of hours for the pay types entered for the selected employee.
Total Pay:
This is the total pay amount for the pay types entered for the selected employee.
Items Preserved:
This indicates that the employee pay information has been preserved after a calculation.
Process
This button will close the Enter Pay Data screen and open the Process Payroll screen.
Check Setup
Each time that a payroll is processed, every employee in the included Pay Groups has their
employee and employer tax setups compared to the list of available taxes Company Setup. For
each tax that is in the company that an employee does not have added in Employee Setup, an
error or warning may be generated. From the Process Payroll screen, click the Check EE Setup
button to open the Check Employee Setup screen (Figure 45). Here you can customize for each
tax item whether you want an Error, Warning or No Warning created for employees that don’t
have the tax setup.
• Error – an error message will pop-up if trying to calculate a payroll with an employee
missing a tax set to Error on the Check EE Setup. This will prevent the payroll from
being created.
• Warning – the payroll can be calculated and created, but any employees missing a tax
setup to Warning will be listed at the bottom of the Register Prior to Processing report.
• No Warning – there will be no indication that an employee is missing a tax.
NOTE: Prior to calculating a payroll, you can click the Check button on this screen to view
a report of any errors or warnings with employee setup.
Figure 45 - Process Payroll - Check Employee Setup
43
Calculate/Re-Calculate
Click this button to calculate or re-calculate the payroll. The Process Status window will open to
display the progress of the calculation (Figure 46).
Figure 46 - Process Payroll - Calculating
Calc Report
Click this button to view the Register Prior to Processing report. This report will display the
calculated totals that will be generated in the system after clicking the Create Checks button.
Use this report to insure that the payroll is correct before proceeding.
Edit Results
Click this button to open the Pay Run Detail Edit screen (Figure 47). Here you can edit the
calculated results prior to clicking the Create Checks button.
Ì Warning: Unless you have checked the Preserve box, if you click the Re-Calculate button
after closing this screen, your changes will be undone.
Note: When entering year-to-date information, you will need to use this screen to edit the
amounts for the taxes, deductions and benefits.
44
Figure 47 - Process Payroll - Edit Results
Create Server File
Once the payroll information has been entered, calculated, reviewed, and edited, Click this
button to create the update file to transfer to the service bureau. The Create Server File window
will open (Figure 48) giving you the option of how you will transfer the file.
Figure 48 - Process Payroll - Create Server File
45
Now:
This will generate the update file to send to the service bureau and open the Transfer Server
Files window to begin the transfer.
Later:
This will generate the update file to send to the service bureau, but you will be required to go to
the Transfer Server Files window later to begin the transfer.
Manually:
This will generate the update file and open the Manual File Handling window to create the
export file to send to the bureau.
E-mail:
This will generate the update file to the service bureau and attach the file in an email that will be
sent to the email address entered in the Address line.
Create:
Once this button is clicked, the file will be created and cannot be reversed without using the
Overwrite button on the Options tab of the Process Payroll window.
Process Server File
Click this button to open the Process Server Files window after receiving the update file from the
service bureau.
Run Reports
Click this button to open the Report Manager Group Setup window to print any required reports.
See Print Groups under Report Manager Group Setup below for more detail.
Next Pay Run
Click this button to advance the system to the next pay run date.
Change Year or Date
If you need to change the payroll year, such as to run reports for prior years, click the “Change
Year or Date” button on the Client side under Company Setup. Choose the year then hit OK.
Figure 49 - Payroll Processing - Change Payroll Year
46
Transfer Server Files
The Transfer Server Files window (Figure 50) is used to initiate the upload or download update
file transfer process. If there are payroll update files waiting to transfer to the service bureau,
they will be listed in this window. Click the Transfer button to begin the process.
Figure 50 - Payroll Processing - Transfer Server Files
Note: When downloading files from the service bureau, the remote will not know a file is
ready to download unless the service bureau contacts the remote or the remote initiates the
transfer process.
Ì Warning: If the service bureau has created an update file on the server, this update will
download first and overwrite any relevant data on the remote. Make certain not to enter payroll
information into the system or make changes to employee information until the latest update file
has been downloaded from the service bureau.
Auto Process Downloads:
If this box is checked, the Process Server Files window will automatically open once the transfer
is complete if there were update files downloaded.
Process Server Files
Once the update file has been downloaded from the service bureau, either through the transfer
process or manual file handling, the update file needs to be processed. The Process Files
window (Figure 51) is used to finalize the update process.
47
Figure 51 - Payroll Processing - Process Server Files
Current Company:
If the update files that have been downloaded are for the currently loaded company, choose this
option. In the Files to Process list, the update file should show.
Setup Files for Other Companies:
If the update files that have been downloaded are for a company that is not currently loaded,
choose this option. In the Files to Process list, the update file should show.
Files To Process:
This window will list all files waiting to be processed and will be labeled with the company code
for the file. To finalize the process, select the file from the list then hit the Process button below.
Ì Warning: Do not hit the Delete button unless instructed to do so by technical support or the
service bureau, otherwise a new update file will need to be created at the service bureau and
re-transferred.
Reprint Checks
Click Reprint Checks on the Payroll Processing menu of the main menu to open the
Print/Reprint Payroll Items screen (Figure 52). Here you can view or reprint payroll checks,
agency checks, direct deposit stubs or tax payment checks. On the appropriate tab, select the
individual check or range of checks then click either the View button or Reprint button.
Note: For payroll checks, there is the option “Change Check #” which will assign the same
check created in the system a new check number. This is useful for reprinting a check that an
employee has lost or damaged. Make certain the company contacts the bank to void the original
check number.
48
Figure 52 - Payroll Processing - Reprint Checks
Manual File Handling
When the remote is not configured to transfer files using Dial-Up Networking or VPN
connections, the Manual File Handling utility (Figure 53) needs to be used to prepare the update
file, both incoming and outgoing, for manual methods of transferring the file, such as email, CD,
or FTP upload.
Receiving File from Service Bureau
Select the Import option, enter the path to the file received from the service bureau, then click
the Process button. The Process Server Files window will then open for you to continue.
Sending File to Service Bureau
Select the Create option, select the desired company update file from the drop list, enter the
path to where on the computer you want the file created, then click the Process button. Once
this is done, you will need to send the file to service bureau.
Note: If there is not a file listed in the Select File drop list, the you need to do the Create
Server File step in the Process Payroll utility.
49
Figure 53 - Payroll Processing - Manual File Handling
5. Payroll Inquiry
Report Manager
The Report Manager has many different reports organized into several categories. Each report
has specific information that is prepared based on the date rage and criteria set by you to make
the report as informative and useful as possible. The Report Manager window is divided into two
sections on the screen for the categories and the reports (Figure 54).
Select Category
There are eighteen default categories in CyberPay, but custom categories can be created for
your use. Once a category is selected, all of the reports in that category will display at the right
in the Select Report Title window.
Select Report Title
From the list of reports for the chosen category, select the desired report. The Date Rate,
Criteria, Options and Report Setup are all customizable for the report and retain their individual
settings from other repots.
50
Figure 54 - Report Manager
Edit Report Title
The title of the report on the Select Report Title list can be edited here (this does not change the
actual title on the report).
Edit Report Formats
This is where you select the system report format that the Report Title above links too. The
report format consists of the layout of the report, its fields and descriptions, as well as the
database tables or queries. The report formats are managed in the Report Setup utility which
button at the bottom right. See
can be accessed by selecting the report then clicking the
Report Setup below.
Categories Button
Click this button to create new categories.
51
Groups Button
Click this button to setup groups of reports that can be printed automatically when payroll runs
are submitted and processed on the server. See Report Manager Groups Setup below.
Run Report
Click this button to run the selected report. You can also double-click the report title in the list. If
no reports print, there is a problem with either the report format setup or the criteria setup for the
Report Title.
Date Range Tab
When using the Report Manager, you may want to filter a report by a date range different then
the report default. On the Date Range tab (Figure 55), from the Select Date By drop list, choose
the option you want to use. Below are descriptions of the date options.
Figure 55 - Report Manager - Date Range
52
Specific Dates
This will filter the report to all data that has a check dates within the range set in the From and
To date fields.
Calendar Month
From the Period drop list, select the desired month. Only data within the selected month will be
on the report.
Quarter
From the Period drop list, select the desired quarter. Only data within the selected quarter will
be on the report.
Current Year
All report data within the current year will be on the report.
Calculated date
The report date will be related to the date of the last payroll date run for the company and the
range for filtering the data will be based on which of the following options are chosen for the
From and To fields:
• Today’s Date – the date you are running this report.
• Beg of Current Month – the first day of this month.
• End of Current Month – the last day of this month.
• Beg of Current Quarter – the first day of this quarter.
• End of Current Quarter – the last day of this quarter.
• Beg of Current Year – the first day of this year.
• End of Current Year – the last day of this year.
• Current Check Date – the check date of the most recent payroll.
• Beg of Previous Month – the first day of the previous month.
• End of Previous Month – the last day of the previous month.
• Beg of Previous Quarter – the first day of the previous quarter.
• End of Previous Quarter – the last day of the previous quarter.
• Beg of Previous Year – the first day of the previous year.
• End of Previous Year – the last day of the previous year.
• Day Before Current Check Date – the day prior to the check date of the most recent
payroll
• 1/1/1980 – this date.
• 1/1/2099 – this date.
• Day After Last Check Date – the day after the check date of the last payroll
• Day After Last Period End Date – the day after the period end date of the last payroll
• Beginning of Current Payroll Month – the first day of month for the check date of the
most recent payroll.
• End of Current Payroll Month – the last day of the month for the check date of the most
recent payroll.
• Current From Date – the period beginning date of the current payroll.
• Current To Date – the period end date of the current payroll.
53
ÌImportant Note:
The date range for all reports included in the "Most Recent Pay Run
Reports" category can be changed but they will always revert back to Calculated Date, Current
Check Date after exiting the Report Manager.
Criteria Tab
When running a report in Report Manager, you may want to filter the report data by certain
criteria. Each report has criteria options unique to the report data. To set a criteria for the report,
select the Criteria tab (Figure 56) of Report Manager for the select report.
Figure 56 - Report Manager – Criteria
Creating and Modifying Criteria
Displayed in the “Enter criteria for any combination…” window is a list of the current criteria set
for the report. Multiple criteria can be used to further filter the reported data. To add a new
criteria, click the Add button at the right. To delete an old criteria, select the criteria and click the
Remove button. To modify an existing criteria, select the criteria and change the settings.
54
Field Sector:
Select from the list box the field that you want to set a criteria. Example: RunID, Employee
Name, or Department.
Operator Selector:
Select how you would like the field you selected to be compared to the criteria you enter at right.
You have the options of "=, <, >, <=, >=, <>, Like, Is Null." The Like operator only applies to Text
fields. Operators for Yes/No fields are limited to "=,<,>, Is Null." The Is Null operator is used to
select fields that have been left empty.
Criteria Field/Selector:
This box is the criteria value for the filter. Depending on which field you in the Field Selector,
you may be given a drop list of options or be required to type in a values. In the case that you
are typing in a text criteria and using the Like operator, there are some options to narrow or
broaden the criteria.
• The ? symbol – any single character. Example: A?? could be Art or Add.
• The * symbol – a wild card that could be an number of characters before or after the
symbol. Exemple: Pay* could be Pay, Payroll, Pay Check or Payment.
• The # symbol – any single digit (0-9). Example: 1?? Could be 10, 100, 123, etc.
And/Or Selector:
If you have more than one criterion to enter, the report manager needs to know whether to
select records than meet all criteria or any one criteria. If you select AND, the report will only
include those records that meet all the criteria you enter. If you select OR, the report will include
all records that meet at least one of the criteria you set.
Options
Some reports have a detailed breakdown of all the information for check dates, departments,
pay types and so on, which can make the reports quite long. In the case that you don’t need to
see all the detail and would prefer a shorter report with just the sub-total or totals, you can use
the Options tab (Figure 57) of the Report Manager to hide different levels of detail.
Hide Sections
Since reports can have multiple sections or data groups, the report manager allows you to hide
sections if you don’t want the information to appear on the report. Check the box next to the
level of detail you want to hide.
NOTE: Every report has different levels of detail. You will have to experiment to get the
level of detail you want on the report.
Page Breaks
If you want the report to print with page breaks after a total (or footer) section, check the box
that corresponds to the correct footer. There are a few reports where you may need to check
the 2nd total level even though it appears that it should be the 1st level. This is because some
reports have a hidden section. Therefore, if checking the first box does not cause a page break,
try checking the second box also.
55
Default Output To
Select to send the report to the screen, printer, or to a file. If you select file, Report Manager will
display a field for you to enter a filename and path for the file.
Figure 57 - Report Manager - Options
Report Manager Groups Setup
The Report Manager Groups Setup window (Figure 58) is used to create groups of reports that
can be used to automate printing reports with payroll. The groups can include reports that are
printed to different printers, files, and to the screen all at the same time. You can include the
same report in more than one group. You can also print or process groups from this form.
Note: Some features shown here (mainly the automated printing of External Reports and
Exports) are only available with the Custom Report Add-on.
Report Group
Select the report group you wish to view. To create a new group, click the New button to the
right of the drop list.
56
Print Group
Click this button to print or process the Active reports in the currently selected group.
Figure 58 - Report Groups
Ext Reports, Ext Files and Import Specs Buttons
These are advanced features for those well trained with Microsoft Access. See the CyberPay
Reference Manual for detail on use.
Delete and New Buttons
Click the New button to add a new entry on the list of reports in the group. Click to Delete button
to remove the selected entry on the list.
Print Group Report List
There is no limit to the number of reports that can be on this list, just remember that all of these
reports will automatically print when processing a payroll.
Active
Check this box to indicate that the report will print when the group is printed.
Order
The individual reports will print in the order that is determined by the number entered here.
57
Type
This indicated whether the report will be an Internal report or an External report or file. Typically,
this will be an internal report.
Item Description
When a report is selected from the Internal Report drop list, this field will auto-populate, but you
can modify the name if you wish.
Internal Report
Select from the list of reports in the CyberPay system the report you want in the group. These
are listed in order by category and report title.
External Report or Export
These are used in conjunction with the Ext Reports and Ext Files buttons (see above).
Copies
Enter the number of copies you want printed for each report.
Frequency
This is the frequency in which you want the reports to automatically run with the payroll.
Exampleyou’re your payroll frequency is weekly but you want a particular report to only print
once per month, then you would select Monthly and enter the date it should run.
Next Print Date
When a payroll check date reaches or passes this date, the report will print when the group is
printed. For a report that you don’t want to print every payroll, you can set a future date that you
want it to print.
Report Setup
The Report Setup utility is used to configure the report format for the category reports, to include
which system report layout will be use, what query will be run to populate the report, and which
criteria are available for the selected report. This is an advance feature that should only be used
if you are well trained in Microsoft Access or with the assistance of an AdaptaSoft technician.
Employee Balances
The Employee Balances screen (Figure 59) opened from the Payroll Inquiry menu of the main
menu displays charts of quarter-to-date and year-to-date balances for employees for Pay,
Benefits, Taxes, Er Liabilities, Deductions and Hours. Select the tab for the information you wish
to review the scroll through the charts.
Note: The information in these charts can be selected and copied to an Excel
spreadsheet.
58
Figure 59 - Payroll Inquiry - Employee Balances
Direct Deposit Items
The Direct Deposit Items window (Figure 60) is accessed from the Payroll Inquiry menu on the
Client section main menu. Here you can view what direct deposit transactions have been
generated for an individual pay run. From the Select Run ID drop list, chose the pay run for a
particular check date or pay period that you want to review. After choosing this, the direct
deposit items will be listed below.
Figure 60 - Direct Deposit
59
6. Utilities
These are advanced options that should only be used with assistance from the service bureau
or technical support.
60