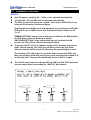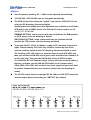
1
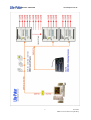
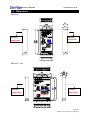
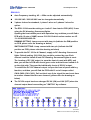
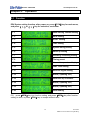
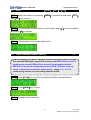
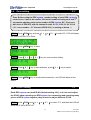
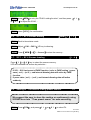
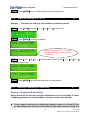
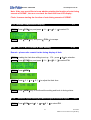
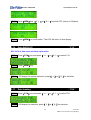
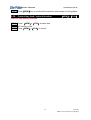
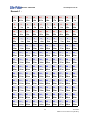
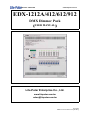
ISO 9001 CERTIFIED www.liteputer.com.tw EDX-1212A/412/612/912 DMX Dimmer Pack 【USER MANUAL】 Lite-Puter Enterprise Co., Ltd. www.liteputer.com.tw [email protected] Lite-Puter EDX-1212A/412/612/912 [EUM-C] ISO 9001 CERTIFIED www.liteputer.com.tw INDEX Chapter 1. Introduction 1-1 1-2 1-3 1-4 1-5 1-6 1-7 System Introduction ..................................................................2 Features ....................................................................................4 Specification .............................................................................4 The features of control pad .......................................................5 Dimensions ...............................................................................6 Definition of DMX signal connector ...........................................7 Attention of installation ...............................................................8 Chapter 2. Operation 2-1 Function ..................................................................................12 2-2 Reset ......................................................................................13 2-3 DMX starting channel setting ..................................................13 2-4 Zone setting..............................................................................15 2-5 ID NO.setting............................................................................15 2-6 SC 1 ~ SC 6 scenes storing .....................................................16 2-7 SC 1 ~ SC 6 scenes loading ....................................................16 2-8 Setting of the data of timing preset scenes ..............................16 2-9 System clock modify.................................................................18 2-10 Warm up setting 0%---6.0% .....................................................19 2-11 Setting of dimming & switching.................................................19 2-12 Switch on / off of timing preset. ................................................20 2-13 Internal temperature display.....................................................21 2-14 SC 1 ~ SC 6 scenes’ fade setting ............................................21 2-15 Receiver signal setting by DMX512 signal or external signal ............................................................................................................21 2-16 Data back up ............................................................................22 2-17 Data loading.............................................................................22 2-18 Control key lock / unlock function.............................................23 Remark.1............................................................................................24 1 Lite-Puter EDX-1212A/412/612/912 [EUM-C] ISO 9001 CERTIFIED Chapter 1. www.liteputer.com.tw Introduction 1-1 System introduction Lite-Puter newest design EDX series environmental lighting control system: Easy control and installation system, combined dimming and switching dual function pack at one complete unit lighting control system; EDX with dimmer control pad setting system and scenes memory data control by CPU. Wall hanger type and only 8.5 cm of thickness, 1/3 of space for wiring work, compressed space unit, available for any kind of ambiance, such as restaurant, hotel, museum, shopping mall and residential etc. ECP-101 / ECP-102 6 scenes easy control panel Lite-Puter also provide series of ECP control panel combine with EDX series system. ECP-101, 102 can easy control 6 set of scenes, and also can be connect with several EDX-128 by multiple connected control system, the control panel can be control by zones control or zones connected control. ( up to 8 zones setting control available ) ECP-103 All function setting control panel ECP-103 provide setting function control, all data change and setting control by signal cable connected to EDX. DMX signal control Provide standard DMX512 input, EDX received DMX-512 signal input, EDX will auto switch to DMX control. 2 Lite-Puter EDX-1212A/412/612/912 [EUM-C] ISO 9001 CERTIFIED www.liteputer.com.tw 3 Lite-Puter EDX-1212A/412/612/912 [EUM-C] ISO 9001 CERTIFIED www.liteputer.com.tw 1-2 Features Channel output: EDX-412 is 4 Channel; EDX-612 is 6 Channel; EDX-912 is 9 Channel; EDX-1212 is 12 Channel; Standard DMX-512 signal output Linear dimming curve. Dimming control as console system. Editing & Loading of 6 scenes. Setting of the data of timing preset scenes and auto execute. Fade in / Fade out setting of scenes and timing preset scenes. Switching & Dimming setting of individual or all channel. Warm-up setting of individual or all channels. Control key Lock / Unlock setting. Up to 99 set of EDX system of zone setting function, available in any ambiance. ECP-101/102/103 etc. variety control pad connectable, individual or multiple setting control. 1-3 Specification Power supply: AC 90---240V Load: 10A Max. output per channel. DMX signal in put: RS-485,DMX-512. Transmission: 250K BITS / Sec. DMX signal connector: 6P 4C Phone Jack connector. (external) 4-PIN Connector (internal) Dimension: EDX-412: 230(W) x 500(H) x 88(D)mm; EDX-612、EDX-912: 390(W) x 500(H) x 88(D)mm EDX-1212: 470(W) x 500(H) x 88(D)mm 4 Lite-Puter EDX-1212A/412/612/912 [EUM-C] ISO 9001 CERTIFIED www.liteputer.com.tw 1-4 The feature of control pad 1 LCD Display 3 Function key LED indicator Function key Control pad signal input (RJ11)--4 Connect ECP-101, ECP-102, ECP-103 Ex. 【1】 SC1 , 5 Power switch 【2】 SC2 , 2 6 Stand 【3】 SC3 7 Heat dispersion hole 【4】 SC4 8 1-6 Channel LED indication 【5】 SC5 , 9 1-6 Channel dimming VR 【6】 SC6 , " 10 NFB 11 Channel indication area 12 Heat dispersion hole 5 Lite-Puter EDX-1212A/412/612/912 [EUM-C] ISO 9001 CERTIFIED www.liteputer.com.tw 1-5 Dimensions EDX-412: 88 85 Danger! High Heat! Danger! High Heat! EDX-612、912: Danger! High Heat! Danger! High Heat! 6 Lite-Puter EDX-1212A/412/612/912 [EUM-C] ISO 9001 CERTIFIED www.liteputer.com.tw EDX-1212: 470 150 88 85 150 EDX-1212A DMX DIMMING/SWITCHING PACK EDX-1212A DMX DIMMING/SWITCHING PACK AC POWER INPUT : 100 -- 120V AC OR 200 -- 240V AC, 3 PHASES 4 WIRES (STANDARD). 3 PHASES 3 WIRES OR 1PHASE 3WIRES (SPECIAL ORDER). AC DIMMER OUTPUT : 12 CHANNELS, 10A PER CHANNEL. CIRCUIT BREAKERS : INPUT 63A 3POLES, OUTPUT 15A C-TYPE. CONTROL INPUT : DMX-512. DIMMING CURVE : C-3 LINEAR. EACH CHANNEL DIMMING OR SWITCHING MODE SELECTABLE. 6 SCENES MEMORY. TIMER CONTROL SETTING 128 POINTS. AUTOMATIC WARM-UP FUNCTION. FADE IN/OUT SETTING 0.1 SEC --- 99 MINUTES. PARTITION SETTING : 0 --- 99 ROOM. Danger! High Voltage! Isolated power source before remove this cover. 1 3 5 4 6 7 8 9 10 11 12 5 1 2 6 3 VR SET 4 FCN OFF MEM PROG RAM 2 487 500 Danger! High Heat! L1 L2 L3 N Danger! High Heat! Danger! High Voltage! Isolated power source before remove this cover. 1 2 3 4 5 6 7 8 9 10 11 12 LOAD OUTPUT POWER INPUT Danger! High Voltage! Isolated power source before remove this cover. 1-6 Definition of DMX signal connector The definition of DMX signal connector of series of ECP control panel and series of EDX wall mounting dimming pack as below. 7 Lite-Puter EDX-1212A/412/612/912 [EUM-C] ISO 9001 CERTIFIED www.liteputer.com.tw 1-7 Installation instruction EDX-412: Auto Frequency tracking: 45 --- 63Hz can be adjusted automatically. 100-120 VAC / 200-240 VAC can be changed automatically. The EDX-412 must be setting on “switch” from interior PCB (ACV) if user using the DC dimming- fluorescent lights. Opening the front middle panel with operation key, and then you will find a PCB with 4 sets of JUMP, means CH1-CH4 which series number are JP 13~16. DIMMING SETTING: Jump connect with two pin (indicate the DIM position on PCB, please refer the drawing as below) SWITCHING SETTING: Jump connect with two pin (indicate the SW position on PCB, please refer the drawing as below) To provide the DC 10V for 4 Channel, supply to DC dimming- fluorescent lights. Default setting: CH1-CH4, they could be revised by user. Each channel could be install 40 sets DC dimming- fluorescent lights at most. The location of DC 10V output: to open the front of panel with NFB, and then you will find a PCB with 4 sets green color terminal board called A~D on the right side. They provide individually 4 sets of DC10V output. The DC10V output has been changed DC 0V (ON) and 10V (OFF) when the channel output have been setting on” SWITCH” by software. 8 Lite-Puter EDX-1212A/412/612/912 [EUM-C] ISO 9001 CERTIFIED www.liteputer.com.tw EDX-612: 45-63HZ,110-120 VAC / 200-240 VAC auto-switch is available . Interior wire distribution is 3 phases 4 wires . Power distribution by single phase 3 wires or 3 phases 3 wires can be required . When you use AC switch fluorescent lamps, it is necessary to set the fixture output (ACV) in the mode of SWITCH. ( Setting manual : Open the control pad with buttons, you’ll find a PCB. Below this circuit board, there are 6 parts with no. JP 13、14、16、18、19、20 against CH 1 ~ 6 respectively . Put the short circuit of the above mentioned parts around the upper pin, this fixture is in the mode of DIMMING ; put the short circuit around the lower pin, the fixture is in the mode of SWITCH.) This unit provides 4 CH DC 10V , it is available for DC dimming fluorescent lamps. The original installation is at CH1 ~ CH4 , it is allowed to change the output channel as required. Each channel is allowed to connect with MAX. 40 lamps . 1. DC 10V output position : Open the control pad with N.F.B. , you’ll find a PCB. A ~ D 4 sets of terminal board under the right bottom of this circuit board, which are against 4 sets of DC 10V output respectively 2. Change DC 10V output channel :Open the control pad with buttons, you’ll find a PCB. Below this circuit board, there are 6 parts with no. CN 18, 19, 20, 21, 22, 23 against DC 10V of CH 1 ~ 6 respectively . Put the 2 pin wire of above mentioned A~D 4 sets of DC 10V output around the required channels against 6 parts with no. CN 18, 19, 20, 21, 22, 23. 3. While the channel output is set in the mode of SWITCH , the DC 10V output of the relative channel is changed to the mode of DC 0 V and 10 V ( in the mode of OFF & ON) . 9 Lite-Puter EDX-1212A/412/612/912 [EUM-C] ISO 9001 CERTIFIED www.liteputer.com.tw EDX-912: Auto Frequency tracking: 45 --- 63Hz can be adjusted automatically. 100-120 VAC / 200-240 VAC can be changed automatically. The EDX-912 must be setting on “switch” from interior PCB (ACV) if user using the DC dimming- fluorescent lights. Opening the front middle panel with operation key, and then you will find a PCB with 9 sets of JUMP, means CH1-CH9 which series number are JP 13~15 / 17 / 19 / 21~24. DIMMING SETTING: Jump connect with two pin (indicate the DIM position on PCB, please refer the drawing as below) SWITCHING SETTING: Jump connect with two pin (indicate the SW position on PCB, please refer the drawing as below) To provide the DC 10V for 4 Channel, supply to DC dimming- fluorescent lights. Default setting: CH1-CH4, they could be revised by user. Each channel could be install 40 sets DC dimming- fluorescent lights at most. The location of DC 10V output: to open the front of panel with NFB, and then you will find a PCB with 4 sets green color terminal board called A~D on the right side. They provide individually 4 sets of DC10V output. To revised the DC 10V channel output: to open the front of panel with key function, and then you will find the PCB with 9 set of Jumper called CN18-CN26 (CH1-CH9), Pull out the 4 sets 2 pin signal line and reset them to another channel that the user demand. (please refer the drawing as below) The DC10V output has been changed DC 0V (ON) and 10V (OFF) when the channel output have been setting on” SWITCH” by software. 10 Lite-Puter EDX-1212A/412/612/912 [EUM-C] ISO 9001 CERTIFIED www.liteputer.com.tw EDX-1212: Auto Frequency tracking: 45 --- 63Hz can be adjusted automatically. 100-120 VAC / 200-240 VAC can be changed automatically. 3 phase 4 wires for standard; 1 phase 3 wires or 3 phases 3 wires for option. The EDX-1212A must be setting on “switch” from interior PCB (ACV) if user using the DC dimming- fluorescent lights. Opening the front middle panel with operation key, and then you will find a PCB with 12 sets of JUMP, means CH1-CH12 which series number are JP 13~16/18/20/22/24/25~28. DIMMING SETTING: Jump connect with two pin (indicate the DIM position on PCB, please refer the drawing as below) SWITCHING SETTING: Jump connect with two pin (indicate the SW position on PCB, please refer the drawing as below) To provide the DC 10V for 4 Channel, supply to DC dimming- fluorescent lights. Default setting: CH1-CH4, they could be revised by user. Each channel could be install 40 sets DC dimming- fluorescent lights at most. The location of DC 10V output: to open the front of panel with NFB, and then you will find a PCB with 4 sets green color terminal board called A~D on the right side. They provide individually 4 sets of DC10V output. To revised the DC 10V channel output: to open the front of panel with key function, and then you will find the PCB with 12 set of Jumper called CN18-CN29 (CH1-CH12), Pull out the 4 sets 2 pin signal line and reset them to another channel that the user demand. (please refer the drawing as below) The DC10V output has been changed DC 0V (ON) and 10V (OFF) when the channel output have been setting on” SWITCH” by software. 11 Lite-Puter EDX-1212A/412/612/912 [EUM-C] ISO 9001 CERTIFIED Chapter 2. www.liteputer.com.tw Operation 2-1 Function EDX Systen setting function, after power on, press【FCN】key for main menu, and press【 】or【 】key for selection, see below: F1 DMX starting channel setting F2 Zone setting F3 ID NO. setting F4 Time setting F5 System timing modify F6 Warm up setting F7 Dimming / switching setting F8 Timing preset F9 Internal temperature display F10 Fade Time setting F11 Receiver signal setting F12 Blank ( updating use ) F15 Data back up of scenes F16 Blank ( updating use ) F19 Blank ( updating use ) F20 Data loading P.S. press【MEM】key into function setting, and press【MEM】key after function setting to save, or press【FCN】key to escape without save. 12 Lite-Puter EDX-1212A/412/612/912 [EUM-C] ISO 9001 CERTIFIED 2-2. Reset www.liteputer.com.tw 【MEM】+【OFF】+【VR】 STEP-1 Switch the power on, and press【MEM】key and hold, and press【OFF】 and【VR】key to reset. STEP-2 LCD will display the selection for reset function, select【1】to reset for default, and select【2】to escape. STEP-3 LCD will back to timing status after reset. 2-3. DMX starting channel setting “ F1 ” The standard DMX signal output 512 channel, And EDX-412 set up each 4 continuously channel; EDX-612 set up each 6 continuously channel; EDX-912 set up each 9 continuously channel; EDX-1212 have to set up each 6 continuously channel for output using, these 4、6、9 or 12 continuously channel, we call starting channel of EDX. STEP-1 Press【FCN】key, and LCD will display the DMX channel address. STEP-2 Press【MEM】key to reset. STEP-3 Starting channel selection. 13 Lite-Puter EDX-1212A/412/612/912 [EUM-C] ISO 9001 CERTIFIED www.liteputer.com.tw Press【 5 】key: to forward 1 address. Press【 6 " 】key: to back 1 address. Press【 1 】key: EX: Start DMX ADR: 001 Æ 002 EX: Start DMX ADR: 002 Æ 001 EDX-412 to plus 4 address. EX: Start DMX ADR: 001 Æ 005 EDX-612 to plus 6 address. EX: Start DMX ADR: 001 Æ 007 EDX-912 to plus 9 address. EX: Start DMX ADR: 001 Æ 010 EDX-1212 to plus 12 address. EX: Start DMX ADR: 001 Æ 013 Press【 2 】key: back to Start DMX ADR: 001 STEP-4 Press【MEM】key after setting to escape, LCD will back to timing status 1. There are 512 starting channel setting available for DMX . ( Each EDX-412 can be continuously output 4 channel ) EX:If starting address set as Start DMX ADR:001 can be output DMX from 1st ---4th channel If starting address set as Start DMX ADR:005 can be output DMX from 5th ---8th channel. ( Each EDX-612 can be continuously output 6 channel ) EX:If starting address set as Start DMX ADR:001 can be output DMX from 1st ---6th channel If starting address set as Start DMX ADR:007 can be output DMX from 7th ---12th channel. ( Each EDX-912 can be continuously output 9 channel ) EX:If starting address set as Start DMX ADR:001 can be output DMX from 1st ---9th channel If starting address set as Start DMX ADR:010 can be output DMX from 10th ---18th channel. ( Each EDX-1212 can be continuously output 12 channel ) EX:If starting address set as Start DMX ADR:001 can be output DMX from 1st ---12th channel If starting address set as Start DMX ADR:013 can be output DMX from 13th ---24th channel. 2. Repeatable setting, 2 or more EDX System can be setting at 14 Lite-Puter EDX-1212A/412/612/912 [EUM-C] ISO 9001 CERTIFIED 2-4. www.liteputer.com.tw Zone setting “ F2 ” Zone: Before using the EDX system, number setting of each EDX system in control zone, 2 part to be number, first set of number showing zone and 2nd set number showing each series number of EDX system, EX : First zone with 4 set of EDX-612, with 24 channel in total, 01-01, 01-02, 01-03, 01-04. ( 01 * zone number – 01* first set of EDX-612 ), to setting as below : STEP-1 Press【FCN】key and use【 1 】or【 2 】to select F2, LCD will display the status of EDX-612 in Zone. STEP-2 Press【MEM】key to reset. STEP-3 Press【 1 】or【 2 】key for zone number setting. STEP-4 Press【 5 】key to next selection, press【 1 】key to select. STEP-5 Press【MEM】key to confirmed the selection, and LCD will back to time status. 2-5. ID NO. setting “ F3 ” Each EDX system own itself ID NO.(default setting: 001), it do not need adjust the ID NO when operating one EDX system, but connecting and operating many pieces of EDX system together, they all need to adjust different ID. NO. STEP-1 press【FCN】and【 1 】or【 2 】to select “F3”, and then the LCD will show the ID NO of EDX-612 15 Lite-Puter EDX-1212A/412/612/912 [EUM-C] ISO 9001 CERTIFIED www.liteputer.com.tw STEP-2 press【MEM】to entry the ”ID NO. setting function”, and then press 【 1 】 or【 2 】to adjust the ID NO.。 STEP-3 press【MEM】for confirmation. 2-6. SC 1 ~ SC 6 Scenes storing 【 MEM 】+【 1…6 】 STEP-1 Back to time status mode. STEP-2 Adjust【 CH1…CH12 】VR key to dimming . STEP-3 Press【 MEM 】+【1… 6 scene】to store the memory . 2-7. SC 1 ~ SC 6 Scenes loading 【 1…6 】 Press【 1 】~【 6 】key to select the scenes memory. LED will indicated the scenes key selection。 If SC1 ~ SC6 had preset of FADE function ( refer to FADE setting ), press once ( sc-1) ~ (sc-6 ) , and internal dimming data will active by FADE function. If press twice ( sc1 ) ~ ( sc6 ), and internal dimming data will active suddenly. 2-8. Setting of ”The data of timing preset scenes” “ F4 ” We suggest the user to store the routine or continuously using SCENE store into “ Time preset scene” for auto executing. STEP-1 Press【FCN】, and press【 1 】or【 2 16 】to select F4. Lite-Puter EDX-1212A/412/612/912 [EUM-C] ISO 9001 CERTIFIED www.liteputer.com.tw STEP-2 Press【MEM】key for ” Time preset scene”, LED will display the status of timing preset scene. 2:to delete 3:to add 4:to edit 5, 6 press【 】【 " 】 to review the data EX: To set first scene on auto execute at 06:30, and fade time at 2.0 sec, the operation as below ; STEP-3 Press【 3 】to add. STEP-4 Press【 1 】or【 2 】to adjust the hour. STEP-5 Press【 5 】key for next selection, press【 1 】or【 2 】to adjust STEP-6 Press【 5 】for scene selection. STEP-7 Press【 5 】for scene selection, press【 1 】or【 2 】to adjust fade time. STEP-8 Press【 5 】for date adjustment, press【 1 】or【 2 17 】for setting. Lite-Puter EDX-1212A/412/612/912 [EUM-C] ISO 9001 CERTIFIED www.liteputer.com.tw diary execution Monday ~ Friday execution Saturday ~ Sunday execution Sunday execution STEP-10 Press【MEM】to confirmed the selection and memory saved. STEP-11 Please refer STEP-2 ~STEP-10 for further setting. Note: If the user would like to know whether starting the function of auto timing execute of SCENE, the user can check the flash line from LCD display. Flash: It means starting the function of auto timing execute of SCENE 2-9. System clock modify “ F5 ” STEP-1 Press【FCN】key and press【 1 】or【 2 】key to select F5. STEP-2 Press【MEM】key for clock modify. STEP-3 Press【 1 】or【 2 】for selection, press【 5 】to confirmed and go to next selection【 6 " 】back to previous selection. 18 Lite-Puter EDX-1212A/412/612/912 [EUM-C] ISO 9001 CERTIFIED www.liteputer.com.tw STEP-4 Press【MEM】key to confirmed the selection and saved. 2-10. Warm up setting 0%---6.0% “ F6 ” Warning :The warm up setting is not available on switching mode. STEP-1 Press【FCN】key and【 1 】or【 2 】to select F6. STEP-2 Press【MEM】to warm up setting. When LCD display ”??” , It mean that the setting of each channel is different . STEP-3 Press【 5 】or【 6 " 】to select the channel, press【 1 】or【 2 】 to adjust the warm up. STEP-4 Press【MEM】to confirmed and back to timing status. 2-11. Setting of dimming & switching “ F7 ” Setting of Dimming & switching Before power on, be sure and verify all equipment are correct settings, If some of lighting equipment is not dimmable, or it may caused some damage. If any channel had preset as switching function, must set as least 51% to be full loading, less than 20% will be full off, this delay function setting it is 19 Lite-Puter EDX-1212A/412/612/912 [EUM-C] ISO 9001 CERTIFIED www.liteputer.com.tw prevent any unstable caused. If any channel had preset to switching function, then the warm up and the voltage output limit function are not available in this setting function. STEP-1 Press【FCN】key and press 【 1 】or【 2 】to select F6. STEP-2 Press【MEM】key. When LCD display ”??” , It mean that the setting of each channel is different . STEP-3 Press【 5 】or【 6 " 】for channel setting, and press【 1 】or【 2 】 to select switching or dimming. STEP-4 Press【MEM】key to confirmed and back to timing status. 2-12. Switch ON/OFF of timing preset scenes STEP-1 Press【FCN】key and press【 1 】or【 2 “ F8 ” 】to select F8. STEP-2 Press【MEM】key and press 【 5 】or【 6 " 】to select ON or OFF STEP-4 Press【MEM】key to confirmed the selection. 20 Lite-Puter EDX-1212A/412/612/912 [EUM-C] ISO 9001 CERTIFIED www.liteputer.com.tw Note: If the user would like to know whether starting the function of auto timing execute of SCENE , the user can check the flash line from LCD display . Flash: It means starting the function of auto timing execute of SCENE . 2-13. Internal temperature display “ F9 ” STEP-1 Press【FCN】key and press【 1 】or【 2 】to select F9. STEP-2 Press【MEM】key and press【 FCN 】to escape. 2-14. SC 1 ~ SC 6 Scene’s fade setting “ F10 ” Remark : please refer remark1 to the timing display of fade. STEP-1 Loading the fade time willing to set up. EX:press【 6 】for selection. STEP-2 Press【FCN】key and press【 1 】or【 2 】to select F10. STEP-3 Press【MEM】 STEP-4 Press【 1 】or【 2 】to adjust the fade time. STEP-5 Press【MEM】key to confirmed the setting and back to timing status. 2-15. Receiver signal setting by DMX512 signal or external signal STEP-1 Press【FCN】and【 1 】or【 2 21 “ F11 ” 】to select F11 . Lite-Puter EDX-1212A/412/612/912 [EUM-C] ISO 9001 CERTIFIED www.liteputer.com.tw STEP-2 Press【MEM】and 【 1 】or【 2 】to select OFF (close) or ON(start) . STEP-3 Press【MEM】for confirmation. The LCD will return to time dispay. 2-16. Data BACK UP “ F15 ” SC1~SC6 of data save and back up function STEP-1 Press【FCN】key and press【 1 】or【 2 】to select F15. STEP-2 Press【MEM】key. STEP-3 LCD display for backup selection, press【 1 】or【 2 】for selection 2-17. Data loading “ F20 ” STEP-1 Press【FCN】key and press【 1 】or【 2 】to select F20. STEP-2 LCD display for selection, press【 1 】or【 2 】for selection. 22 Lite-Puter EDX-1212A/412/612/912 [EUM-C] ISO 9001 CERTIFIED www.liteputer.com.tw STEP-3 Press【MEM】key to confirmed the selection and escape to timing status. 2-18. Control key lock / unlock function 【MEM】+【FCN】 Function key memory function STEP-1 Press 【MEM】+【FCN】at same time. STEP-2 All function is lock. STEP-3 Press【MEM】+【FCN】to unlock. 23 Lite-Puter EDX-1212A/412/612/912 [EUM-C] ISO 9001 CERTIFIED www.liteputer.com.tw Remark 1 : 0.1 0.2 0.3 0.4 0.5 0.6 0.7 0.8 0.9 1 0.1 s 0.2 s 0.3 s 0.4 s 0.5 s 0.6 s 0.7 s 0.8 s 0.9 s 1s 2 3 4 5 6 7 8 9 10 12 2s 3s 4s 5s 6s 7s 8s 9s 10 s 12 s 14 16 18 20 25 30 35 40 45 50 14 s 16 s 18 s 20 s 25 s 30 s 35 s 40 s 45 s 50 s 55 1﹒ 2﹒ 3﹒ 4﹒ 5﹒ 6﹒ 7﹒ 8﹒ 9﹒ 55 s 1m 2m 3m 4m 5m 6m 7m 8m 9m 10 ﹒ 11 ﹒ 12 ﹒ 13 ﹒ 14 ﹒ 15 ﹒ 16 ﹒ 17 ﹒ 18 ﹒ 19 ﹒ 10 m 11 m 12 m 13 m 14 m 15 m 16 m 17 m 18 m 19 m 20 ﹒ 21 ﹒ 22 ﹒ 23 ﹒ 24 ﹒ 25 ﹒ 26 ﹒ 27 ﹒ 28 ﹒ 29 ﹒ 20 m 21 m 22 m 23 m 24 m 25 m 26 m 27 m 28 m 29 m 30 ﹒ 31 ﹒ 32 ﹒ 33 ﹒ 34 ﹒ 35 ﹒ 36 ﹒ 37 ﹒ 38 ﹒ 39 ﹒ 30 m 31 m 32 m 33 m 34 m 35 m 36 m 37 m 38 m 39 m 40 ﹒ 41 ﹒ 42 ﹒ 43 ﹒ 44 ﹒ 45 ﹒ 46 ﹒ 47 ﹒ 48 ﹒ 49 ﹒ 40 m 41 m 42 m 43 m 44 m 45 m 46 m 47 m 48 m 49 m 50 ﹒ 51 ﹒ 52 ﹒ 53 ﹒ 54 ﹒ 55 ﹒ 56 ﹒ 57 ﹒ 58 ﹒ 59 ﹒ 50 m 51 m 52 m 53 m 54 m 55 m 56 m 57 m 58 m 59 m 60 ﹒ 61 ﹒ 62 ﹒ 63 ﹒ 64 ﹒ 65 ﹒ 66 ﹒ 67 ﹒ 68 ﹒ 69 ﹒ 60 m 61 m 62 m 63 m 64 m 65 m 66 m 67 m 68 m 69 m 70 ﹒ 71 ﹒ 72 ﹒ 73 ﹒ 74 ﹒ 75 ﹒ 76 ﹒ 77 ﹒ 78 ﹒ 79 ﹒ 70 m 71 m 72 m 73 m 74 m 75 m 76 m 77 m 78 m 79 m 80 ﹒ 81 ﹒ 82 ﹒ 83 ﹒ 84 ﹒ 85 ﹒ 86 ﹒ 87 ﹒ 88 ﹒ 89 ﹒ 80 m 81 m 82 m 83 m 84 m 85 m 86 m 87 m 88 m 89 m 90 ﹒ 91 ﹒ 92 ﹒ 93 ﹒ 94 ﹒ 95 ﹒ 96 ﹒ 97 ﹒ 98 ﹒ 99 ﹒ 90 m 91 m 92 m 93 m 94 m 95 m 96 m 97 m 98 m 99 m 24 Lite-Puter EDX-1212A/412/612/912 [EUM-C]