1
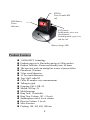
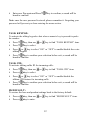
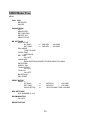
Emergency Phone with 2-Way Speech SOS Pendant Model: 1225 CONTENTS Product Features……………………………………………………………….4 Instructions for use……………………………………………………….……5 6 Menu Settings………………………………………………………………..…. CALL LOG…………………………………………..……………………...… 6 PHONE BOOK…………….………………………………………………….. 7 9 Base (BS) Settings………….…………………………..…………………….… Pendant(PENDT) Set-up…………………………………………………….…13 SOS SETTINGS ……………………..………………………………….....… 15 ROOM MONITOR-ECI special function……….…………….................... 15 REGISTRATION…….……………………………………..……………...… 16 Operations .…………………………………….………………..................… 16 Hands free operation & volume control……………….………................... 16 Mute the mouthpiece…….………………………………….……………...… 16 Caller ID-type I & II………………………………….....……..................... 17 Edit and copy incoming calls to phonebook…….....………….................... 18 Auto timer...…………………………………………………......................… 18 Flash(R) …………………………………………………………..…..........… 18 18 On-screen dialing……………...............................................................… Namematching…....................................................................... ..........… 18 View and dial phone numbers from phonebook........………………………... 19 Review last 20 numbers, redial and dial out…………………………………..19 Memory programming,dial out and delete ………………………………....... 19 Memory full ……………………………………………..………………..….. 21 Intercom………………………………………………………………….…... 21 Call transfer…………………………………………………………...……....21 3 Party conference call ……………………………………………………..... 22 SOS(Emergency calls)operation:SOS ……………………………………......22 Room Monitor Operation: …………………………………..…………..…....23 Pendant power on/off operation………………………………...…………..... 24 Pendant battery alert………………………………………...........…….….... 24 END button function on pendant ……………………………………....... 25 Handset on base unit works on an analogue line during power failure……... 25 How to recall pin code………………………………………………….…..... 25 MMI/Menu Tree………………………………………………....................... 26 Battery Replacement………………………………………………………..... 27 2 Flash / Delete / Intercom Line entry Power supply 7.5V DC Lighted LED LCD display SOS key MENU/SELECT key and MUTE key UP / DOWN keys Speakerphone mode Direct memories Keyboard 3 SOS key Press to make SOS call LED Battery Power Indicator END button In idle mode, press it to check battery In talking mode, press it to end the call Battery charge LED Product Features 1.8GHz DECT technology Pendant range up to 50m indoor and up to 300m outdoor Pendant Talk time: 4 hours and Standby time: 80 hours The base unit works on analog line in case of power failure Phonebook: 80 names 2 One touch Memories 10 Two touch Memories Type I & II caller ID Caller ID number voice announcement Talking keypad Outgoing Call / LNR: 20 Missed Call log: 29 Multi-language Ring Tone: 12 melodies Ring Tone Volume: Off + 5 levels Speakerphone with 6 levels volume Receiver Volume: 5 levels Mute Function Flashing: 100, 300, 600, 1000 ms 4 Can page up to 4 pendants Internal Call 3 way Conference Call-transfer Emergency Numbers (SOS): 5 groups Room Monitor Hearing Aid Compatible Function : Handset of the base unit Pendant and Base Low battery alarm ON/OFF key tone selection Out of range tone ON/OFF pendant power selection Instructions for use Plan your product location It is important that you consider carefully in advance where your product will be situated and make sure that it is: - On a flat and stable surface - Within 2 metres of an adapter line and telephone socket - At least 1 metre away from other electrical appliances to avoid any interference - Not in a humid or very damp place such as a bathroom. Setting up 1. Connect curly cord to phone base on the side of the unit near the handset cradle and the other end to the handset. 2. Connect the adapter lead and telephone cable to the back of the base unit. Plug the power adapter into the mains power wall socket and switch on. 3. On the charger, connect the charger power adapter to the mains power socket and switch on. 4. Place the pendant handset in the charger and charge for a minimum of 12 hours before first use. 5. Plug the telephone line cord into the telephone wall socket. 5 Menu Settings A. In the standby mode, press key. Under call log or when reviewing the phonebook, you can enter the menu setting without entering a pin code. B. Base setting/pendant setting/SOS setting/room monitor/registration, require entering “0000” code and then press key to enter the menu settings. There are seven (7) sub-menus as below: 1) CALL LOG 2) PHONE BOOK 3) BS SETTINGS 4) PENDT SETUP 5) SOS SETTINGS 6) ROOM MONITOR 7) REGISTRATION Press or key to navigate up and down through the menu’s and submenu’s. Press key to enter menu and also then to select sections and to confirm changes. Details of each section are shown in next part of the user manual. Use the R/C key to delete characters, for example when entering names or numbers in the phonebook. CALL LOG The first menu is CALL LOG. There are two sections in this menu, RECEIVED calls and DIALED calls Use or key to select. Press key to enter received call list or dialed call list. The LCD will show the last record. If no entries are available in the list the LCD will be shown empty. Press or key once to view other records. When the record is shown Press key to access and or to scroll through options below: ** ADD TO PB: This allows the user to add an entry from the caller list to the phonebook 6 ** DELETE: This allows the user to delete the current selected entry from caller list ** DELETE ALL: This allows the user to delete all entries in the caller list During standby state, the LCD will show 01/02 call, 01 indicates missed calls, 02 indicates no. of calls. **In the on-hook state, review the most recent 29 incoming calls. In the case of missed calls, LCD will display records eg.02/04, 02 indicates amount of missed calls and 04 indicates the total amount. **If you have missed calls, press UP key and the LCD displays the missed calls, it will return to standby mode. Then press UP key again to review all missed calls. PHONE BOOK The phonebook allows 80 entries with name and number. Each name has maximum 12 characters and each number has maximum 20 digits. LIST: This function allows the user to review the phonebook list and make a call directly from the phonebook list. Press key. Use or key to find PHONE BOOK. Press key to enter. Then LCD first will show: LIST ** The function allows the user to review the phone book record lists by using or key. If no entries are available in the list the LCD will be shown empty. NEW ENTRY: To add a new entry to the phonebook: Press or key to find “NEW ENTRY” item. ** The display shows “NAME?”, enter the name by using the alphanumeric keys on the phone base unit. ** If you make a mistake, quickly press “R/C” key to correct. ** Once your have completed your entry Press key to confirm. 7 Now enter the telephone number and select the melody to be stored & press key to confirm, a sound will be heard to confirm the entry has been saved. Note: If the phonebook memory is full and you wish to add one more record, an appropriate message will be presented to the user : “MEM IS FULL”. EDIT RECORD: To modify a stored phonebook record: Press ** Press displayed. ** Press ** Press or key to select “EDIT RECORD” item. key to enter and the first record in the phone book will be or to find the stored record which you want to change. key to select the record you want to change. ** Press or to move from letter to letter, R/C to delete and to confirm once amendments are complete. ** Once a stored record has been selected, the user will have the option to edit each of the names/number and or change the melody as well. A sound will be heard to confirm the changes are saved. DEL RECORD: To delete a stored phonebook entry: Press Press key to select, and use or to find the stored record which you want to delete. Press key to delete. key to confirm, a sound will be heard to confirm. Press or key to find “DEL RECORD” item. DELETE ALL: To delete all stored phonebook entries: Press Press Press or key to find “DELETE ALL” item. key to delete all entries. key to confirm, a sound will be heard to confirm 8 MEM STATUS: To view how many records are stored in the phonebook and the total records available: Press or key to find “MEM Status” item. ** If showing 10/80, that means there are 10 records stored from a total of 80 records available. BASE (BS) SETTINGS To change the base settings: Press key and use or key to find “BS SETTINGS” menu. key to enter. Enter default PIN “0000” then Then you can proceed as below: RING SET UP: To change the base ring melody on Internal and External calls. There are 12 melodies and 6 different volume levels (for Volume 1, 2, 3, 4, 5, off). Press Press Press Press Press or key to select the MELODY and VOLUME setup. After selection, press key to confirm. Press or key to select the desired melody, the corresponding melody can be heard during selection. If selecting VOLUME, press key to confirm. key, then use key to enter. or or key to find “RING SETUP” item. key to find the INT RING or EXT RING setup. key to confirm. Press or key to select desired ringer volume 1-5 or OFF, if you want to switch the volume OFF, the corresponding volume sound can be heard during selection. Press key to confirm your selection before exit, a sound will be heard to confirm. 9 DIAL MODE: To change the base dial mode: Press Press Press or key to select TONE or PULSE dial mode. Press key to confirm your selection before exit, a sound will be heard to confirm changes. key, then use key to enter. or key to find “DIAL MODE” item. FLASH TIME: To select the flash time (100ms, 300ms, 600ms and 1000ms): Press Press Press or key to select the 100ms, 300ms, 600ms and 1000ms. Press key to confirm your selection before exit, a sound will be heard to confirm. key, then use key to enter. or key to find “FLASH TIME” section. KEY TONE: To change the base key tone settings: When key tone is selected, a beep will sound when a key is pressed on the base. Press Press Press or key to select the “ON” or “OFF” to enable/disable the sound of the beep respectively. Press key to confirm your selection before exit, a sound will be heard to confirm. key, then use key to enter. or key to find “KEY TONE” item. LANGUAGE: The base unit supports a total of 8 languages. English, Dutch, French, German, Spanish, Italian, Danish, Swedish. Press key, then use or key to find “LANGUAGE” item. 10 Press Press or key to select the language. Press key to confirm your selection before exit, a sound will be heard to confirm. Each language will be displayed in its own native translation. key to enter. First display is English. DATE & TIME: To set the date and time on the base: Press key and use or key to find “DATE & TIME”, Press key to enter. The last two digits of the Year will be blinking on LCD showing as “20_ _”. Press or key to enter the desired year. key to confirm. Press Then DATE & TIME will show on the LCD, enter the desired DATE/TIME by scrolling or until the correct date/time is shown. key, a sound will be heard to confirm. To save press Note: The time and date will be automatically set when the first Caller ID message is received. This function depends on the local Telecom operator supporting the service. MODIFY PIN: To change the pin code (this code is used only for entering MENU section). The Ex-factory default value will be (0000) 4 digit codes Press key, then use or key to find “MODIFY PIN” item. key to enter. Press The user will be invited to enter the current pin code. Enter “0000” and Press key to confirm. The user will then be invited to enter a new pin code Enter new PIN and Press key to confirm. The user will be invited to repeat the new pin code. 11 Enter new Pin again and Press heard to confirm. key to confirm, a sound will be Note: once the new password is stored, please remember it. Forgetting your password will prevent you from entering the menu section. TALK KEYPAD: To activate the talking keypad so that when a numeric key is pressed it speaks the number: Press Press Press or key to select “ON” or “OFF” to enable/disable the voice talking keypad. Press key to confirm your selection before exit, a sound will be heard to confirm. key, then use key to select. or key to find “TALK KEYPAD” item. TALK CID: To activate talking caller ID for incoming calls: Press Press Press or key to select “ON” or “OFF” to enable/disable the talking CID feature for incoming calls. Press key to confirm your selection before exit, a sound will be heard to confirm. key, then use key to select. or key to find “TALK CID” item. BS DEFAULT: To restore the base and pendant settings back to the factory default: Press Press key, then use key to enter. or key to find “BS DEFAULT” item. 12 The user will be invited to press key to confirm, a sound will be heard once the setting is confirmed. Base unit will activate after several seconds with LCD flashing once and then connect the pendant. Note: After ex-factory setting succeeds, room monitor password will be cleared away. Phonebook/One touch memory/Two touch memory and SOS number will all be saved to avoid being erased. The volumes settings for Ring, Microphone and Receiver will restore to ex-factory. DEL PENDT: To delete a pendant registration from the base: If the pendant has been deleted, it will not work and needs to be registered with the base again. Press Press Press or key to scroll through the pendant names list to find the pendant you want to delete. Press key to confirm. The pendant will be deleted from the list of registered pendants on the base and the pendant will behave according to the out of range conditions together with an alert sound. key, then use key to enter. or key to find “DEL PENDT” item. PENDANT (PENDT) SET UP To change pendant settings: Press the key and use or key to find “PENDT SETUP" item. Press key to enter. The LCD will show the registered pendant. Example: PENDT1. Press key to confirm. Then proceed as below: INT RING: To change the pendant ring tone or volume for internal calls: 13 There are 12 ringer melodies and 6 different volume levels (For volume 1, 2, 3, 4, 5 & OFF). Press key, LCD will show “INT RING” item. key to enter. Press Press or key to select the MELODY and VOLUME setup. key to enter. After selecting MELODY, press Press or key to find desired melody. key to confirm, a sound will be heard to confirm. Press If selecting VOLUME, press key to enter. Press or key to select desired ringer volume 1-5, if you want to switch off, select “OFF”, Press key to confirm, a sound will be heard once the setting succeeds. Because key is in the base unit, pendant has no ringer and volume displays. EXT RING: Kindly follow the same instructions for internal ring (as above). As the key is in the base unit, pendant has no ringer and volume displays. AUDIO SETUP: To adjust the pendant audio settings: Press Press Press or key to select the “SPK VOLUME” or “EAR VOLUME”. If selecting “SPK VOLUME”, press key to enter. Press or key to find desired volume 1-5. Press key to confirm, a sound will be heard to confirm. key to enter. If selecting “EAR VOLUME”, press key, then use key to enter. or key to find “AUDIO SETUP” item. 14 Press Press or key to select desired volume 1-5. key to confirm, a sound will be heard to confirm. SOS SETTINGS To change SOS settings: Press Press key and use key to enter. or key to find “SOS SETTINGS” item. Press or key to find the position where the SOS number is to be stored (from “SOS NUMBER 1” to “SOS NUMBER 5”). Press key to confirm position. Enter the SOS number to be stored by using the alphanumeric keys Press key to confirm number, a sound will be heard to confirm the SOS number is saved. For more details refer to the SOS operation introductions. ROOM MONITOR – ECI special function To change the base room monitor settings. Press item. Press key, then use or keys to find “ROOM MONITOR” key to enter. Press or key to select “ON” or “OFF” to enable/disable the function of the ROOM MONITOR respectively. If you select “ON” you will be asked for PIN number, enter default PIN number “9999” (please refer to Page 23, Room Monitoring Operation for more info. on PIN numbers and options). Press key to confirm your selection, a sound will be heard to confirm. 15 REGISTRATION To register a pendant to a specified base: Press key, then use or key to find “REGISTRATION” section. Press key to confirm, “SEARCHING’’ will flash on the display. Press the red button on the pendant for 7seconds, to register to the base. The white light will flash on the top of the pendant during registration. If the base is found and the pendant is successfully registered, a tone will be sounded, the white light on the pendant will stop and the base will turn back to standby mode. The Base assigns a number to the Pendant such as “PENDT 1”. If the base isn’t found or the pendant fails to register, “SEARCHING” will keep flashing on the display and white light will keep flashing on the top of the pendant till exit of registration menu. Operations Hands free operation & volume control Press key once to obtain a dial tone, dial your number, or to answer a caller, you can begin your conversation without picking up the handset. During the hands free mode, the user can adjust the hands free volume level by pressing 6. or key. There are 6 different volume levels; 1, 2, 3, 4, 5, Mute the mouthpiece x key once to mute the mouthpiece and the call muted word will be showed on LCD. Press x key again to get During a call (off-hook), press back to the talk mode and the call muted will disappear. 16 Caller ID – type I & II Support is provided for DTMF, FSK type I and FSK type II. CID will only be displayed if it is both supported by the network and also if the user has subscribed to the network operator for this service. CID is displayed: During an incoming call. When reviewing the “CID BOOK” from the menu options. When review the caller list from standby mode. On redial options Unless otherwise stated, for each of the above features, matching the entries to the phonebook is performed. The unit can store up to 29 records of incoming caller list which can be viewed and dialed out. For each call, a maximum of 20 digits can be stored for each number and 12 digits for the name (if available). Each entry will be stored: If the phonebook name does not match and the caller name is provided, then the caller name will not be displayed. If there are no items in the CID list, it will display “EMPTY’’. The following special network names are also handled and displayed as shown below: INTERNATIONAL – International number NETWORK OP - Network operator UNAVAILABLE - the number is not provided WITHHELD - the called has disabled CID forwarding PUBLIC - caller from network public phone CALLBACK - ring-back service to initiate call when line is free The CID list is accessed from the MENU or by pressing key. The date and time of the call will also be displayed by pressing “*” key if available. Whilst viewing the CID entry, the user can make a call by pressing or picking up the handset. key On selecting the CID entry (through MENU or by pressing the key in on-hook state), the user can add the entry to the phonebook, delete CID entry and can also delete all CID entries. 17 Edit and copy incoming calls to phonebook To store incoming numbers to the phone book: Press key once. The LCD will show the last received records. Press Press key and use or key to select “ADD TO PB”. Press key to edit details. The user can delete the character by quickly pressing “R/C” key. key to confirm and the record will If there are no changes, press be copied from caller list to phone book. or key to find the desired number. Auto timer The timer is displayed approximately 6 seconds from the time the line is engaged. Flash (R) In off-hook state, Press “R/C” key quickly to flash. For PABX mode, this key can be used for the internal call transfer. On-screen dialing The unit has an on-screen dialing function for when you want to enter and edit the number before dialing it out. The following procedure describes how to use this function: In standby mode. Enter the number you want to dial. (You can quickly press “R/C” key to correct the number) Press key once or pick up the handle. The number dialed out will show on the LCD automatically. Name matching If the CID is name is forwarded by the exchange, the name will be displayed on the LCD instead of the name stored in the Phonebook. If the CID is forwarded without a name by the exchange, the name stored in the Phonebook will be displayed. 18 View and dial phone numbers from phonebook There are 80 phonebook memories; each memory can store 12 characters and 20 digits. Enter on the Menu: Press key. Use or and find “PHONEBOOK’’ Then press key and “LIST’’ will display. Press the entry and the number shown on LCD. Press When the required number is shown on the LCD, press or pick up the handset to dial the selected number. or to confirm key to find desired number. key once Review last 20 numbers redial and dial out The unit can recall the last 20 numbers dialed. Press key once in the stand-by mode and use display last 20 dialed numbers. When the required phone number is shown, press up the handset to dial the selected number. or key to key once or pick Memory programming, dial out and delete There are 2 one-touch memories (M1 & M2) and 10 two-touch memories (From key buttons 0-9): Memory programming: ** How to store one-touch memory: In standby mode: Enter the number you wish to store (In case of mistake, quickly press “R/C” key to correct the number) Press M1 for 3 seconds, a sound will be heard to confirm. Same procedure for M2 ** How to store two-touch memories: In standby mode: Enter the number you wish to store (In case of mistake, quickly press “R/C” key to correct the number) 19 Press for 3 seconds, “TOP NUMBER _” is displayed. Select a key to designate the telephone number to. Enter the key button and a sound will be heard to confirm. Note: Keys 0-9 on the phone base (a total of 10) can be used as two-touch memories. View & Dial out: ** View M1 / M2 direct memory & dial out: In standby mode: Press one touch memory key, such as M1. The number will show on the display and will be dialed out automatically. In speakerphone mode or when you pick up the handset: Press one touch memory key, such as M1 The number will show on the display and dial out directly. ** View two touch memories & dial out: In standby mode: Press two-touch memories key for 3 seconds, such as “0”. The number will show on the display and will be dialed out automatically. Delete: ** Delete M1/M2 direct memory: In standby mode. Press twice and press M1 for 3 seconds. A sound will be heard to confirm deletion. Same procedure to delete for M2 ** Delete two touch memories: In standby mode. Press twice and press for 3 seconds, “TOP NUMBER _” is displayed. Select the key for the number you want to delete. Enter the key and a sound will be heard to confirm deletion.. 20 Memory full There are 80 phone book memories. When all memories have been used in the phone the LCD will show memory full. The user will need to delete entries in order to enter new contacts. Intercom The intercom feature is activated by pressing and holding the “R/C” key for 3 seconds: In standby mode: Press “R/C” key for 3 seconds and the numbers of all registered pendants will show on the display as well as an invitation to enter the pendant number you wish to call. The destination pendant will ring with the melody defined for internal call. Press the red button on the pendant to accept the call. Once the internal call is connected, the white light will shine on the top of the pendant. To end intercom mode, either hang up the base unit or pendant. Call transfer To transfer the call from the base to the pendant. Press “R/C” key for 3 seconds during conversation and you will be invited to enter the pendant number you want the call to be transferred to. The chosen pendant will ring with the melody defined for internal call. Press the red button on the pendant to accept the call. The call will be connected to the pendant. To complete the transfer of the call, hang up on the base unit. The call will transfer back to the base unit if there is no answer on the pendant within 1minute, you can press key once on the base unit or pick up the handset to resume the conversation. 21 3 Party conference call During a phone call to the base unit. Press “R/C” key for 3 seconds during conversation and you will be invited to enter the pendant number you want to be connected to. The chosen pendant will ring with the melody defined for internal calls. Press the red button on the pendant to accept the call. Once the pendant accepts the call, press key in the base to all talk together. SOS (Emergency calls) operation: SOS Emergency SOS button (both on pendant and base unit). ** Press “SOS” button once on the base unit to call the emergency numbers preset in the menu (Hands free mode in maximum sound level). During the emergency call, the SOS numbers will be displayed on the LCD as well as bright visual indication on the base. The unit will announce the voice prompt IN THE LANGUAGE SELECTED (Hello! This is an emergency call, please press 5 to confirm) every 8 seconds for 40 seconds. The unit will end that call and dial out the next SOS number automatically if no “5’’ DTMF tone or a busy tone is detected within 40 seconds. A total of 5 SOS number calls can be repeated 15 times. During an emergency call, the phone will be locked. The base unit will end the emergency call in conditions as set out below **One of SOS number answers the call. **No answer after 15 attempts of the 5 numbers called. **The user presses the red button for 7 seconds on the base unit. During an emergency call, the base unit will hold every incoming call through call waiting and display the number/s on the base unit display (call waiting function can be used only based on the register and approval from local telecom service provider), but there will be no sound disturbance on the pendant during the emergency conversation. ** Press the red button once on the pendant to call emergency numbers preset in the menu, the SOS numbers will be displayed on the LCD as well as lighted LED on the top of the pendant, also loud alarm sound and bright visual indication on the base. 22 Other SOS operations in the pendant are the same as in the base. Room Monitor Operation: A. When the room monitor function is set “ON” and external line calls in, a ring sound can be heard in the base. 1. When the pin code is “9999”, the caller can pick up the line automatically without a code to monitor the end user in both base and pendant 1, in the hands free mode. 2. When the pin code is any other 4 digits except “9999”, the voice prompt announcement is activated “Please enter the PIN code” and the call party must enter the code. **After entering the correct code the external call party can monitor the end user via both the base and pendant 1, in the hands free mode. **After entering the wrong code or without entering the code, the unit will end the call and go into “off mode” after 10 seconds. 3. The end user can use the phone when room monitor set “ON”, but when the external call party monitors the end user, other phone buttons will be locked, only SOS function, off-hook and hands free are still active. B. During ECI function (Emergency Call Interruption): 1. The external call party can control the unit with DTMF tone as below: ** Mute the microphone– with digit / number 6 ** Speaker volume off – with digit / number 4 ** Normal hands free – with digit / number 5(This one is default mode 2. 0nly the external call party can end the call; cancellation by end user side can be done only through: 1) pressing SOS button to exit room monitor mode and dial out SOS. 2) Picking up handle to talk under room monitor mode. 3) on-hook or pressing hands free key to exit from room monitor mode. 4) Removing the power line and phone line. 3. When room monitor is activated, press SOS button on the unit: the SOS number will be dialed out automatically after disconnecting the ECI call. The owner of the SOS number can control the unit by pressing digit/number 4/5/6. The operation then continues as above. 23 When room monitor is activated, if the end user presses the red button from the pendant, the pendant will exit room monitor mode, pressing the red button again it will dial out automatically after disconnecting the ECI call. The owner of the SOS number can control the unit by press digit/number 4/5/6. The operation is as above. Note: When room monitor is activated, press red key on base or pendant and the owner of the SOS number cannot control the phone by pressing digital number 4/5/6 4. It will make a howling noise if the pendant is within 1 metre away from the base, pressing the red button on the pendant can stop the noise because the pendant has exited room monitor mode, but the base is still in ECI mode. In ECI mode, when external line calls in, pick up the receiver to receive ECI phone call, hang up the handset or press hands free key to terminate ECI function. Pendant power on/off operation The pendant power is preset to OFF ex-factory, to switch it ON, just press the red button once 1. To set the pendant (OFF), press the red button for 10 seconds to switch the pendants power off. A sound can be heard to confirm. 2. When Pendant is off, press the red SOS button once to switch on. A sound can be heard to confirm. Note: The pendant will come ON automatically when put on the charger. Pendant battery alert To check the battery capacity, you just need to press END button on the pendent and the pendant will say “BATTERY IS OK”, to indicate the battery capacity is running ok. When battery is almost depleted, a voice alert saying "CHARGE BATTERY NOW" will automatically speak at 1 minute intervals until returned to the charging unit When the battery is running low, a voice alert says “CHARGE BATTERY SOON” this will automatically speak every 1 minute. 24 END button function on pendant During TALKING MODE and/or SOS CALLING MODE, press the END button on pendant to disable the TALKING/CALLING activity. In idle mode, press the END button to check the battery capacity, it will emit a voice saying “BATTERY IS OK”, or a low battery alert tone will emit automatically at 1 minute intervals Handset on base unit works on an analogue line during power failure Only the base unit will work on an analog line in case of power failure and no batteries. 1. When the external party calls the unit, the normal melody sounds, pick up the handset to answer the call. 2. Make a call from the base by picking up the handset; the dialed number will be displayed on the LCD. 3. Mute function is available. 4. In case of power failure, the speaker, pendant, M1/M2 direct memory, SOS function and 0~9 two touch memory on base will stop working. 5. If power fails when talking with the pendant, the pendant will be automatically switched off and it will put on hold by the base for 30 seconds while displaying “LINE IN USE”. You can resume the conversation by picking up the handset within 30 seconds, otherwise the external line will automatically disconnect after 30 seconds. How to recall pin code While the base is in Standby mode: button once, LCD displays “CALL LOG”, then input 1. Press “*1006“, LCD displays “SW VERSION” 2. Then press “UP” or “Down” button to select“ EEPROM SET” button to confirm, LCD displays“B01 O 01D=0000” 3. Then press 4. Then input digit button“0”, then press“0”again for a little longer. LCD displays “A”, then input “1” and“2”, LCD displays“B0A O 12D=XXXX” (XXXX stands for the pin code you have stored, but had forgotten). 25 MMI/Menu Tree MENU CALL LOG RECEIVED DIALED PHONE BOOK LIST NEW ENTRY EDIT RECORD DELETE ALL MEM STATUS BS SETTINGS RING SETUP INT RING >> MELODY / VOLUME EXT RING >> MELODY / VOLUME DIAL MODE TONE / PULSE FLASH TIME 100/300/600 KEY TONE ON / OFF LANGUAGE ENGLISH/FRANÇAIS/DEUTCH/ESPANOL/ITALIANO/ DATE&TIME MODIFY PIN TALK KEYPAD ON / OFF TALK CID ON / OFF BS DEFAULT DEL PENDT PENDT SETUP PENDT x INT RING EXT RING AUDIO SETUP >> >> >> MELODY / VOLUME MELODY / VOLUME SPK VOLUME / EAR VOLUME SOS SETTINGS SOS NUMBER (1 to 5) ROOM MONITOR ON / OFF REGISTRATION 26 Battery Replacement This product is mains operated and uses 4 x AAA size rechargeable batteries 1.2V/400Ni-Mh (not included) for optional backup. Use designated re-chargeable batteries only. Do not use non-rechargeable batteries. To fit or replace the batteries: 1. Undo the cross-headed screw on the battery door of the main base unit with a suitable screwdriver and open the battery compartment. 2. Remove the old batteries and replace with 4 new AAA size rechargeable batteries. 3. Close the battery compartment and tighten the cross-headed screw. • Use only the designated battery type. Do not mix battery types. • Read instructions carefully and install batteries correctly observing the polarity (+ -) signs to avoid leakage. • Always replace sets of batteries at the same time. Do not mix old and new batteries. • Remove batteries from the product when it will not be used for an extended period of time to avoid leakage. • Remove exhausted battery to avoid leakage. • Do not short out battery contacts. • Do not dispose of batteries in fire. • Do not immerse electrically operated products in water or other liquid. Follow the cleaning instructions above. 27 Protect our environment: do not dispose of electrical equipment in your domestic waste. Please return any electrical equipment that you will no longer use to the collection points provided for their disposal. These simple steps can help to avoid the potential effects that incorrect waste disposal can cause on the environment and human health. This will contribute to recycling and other forms of re-use of electrical and electronic equipment. Information concerning where the equipment can be disposed of can be obtained from your local authorities. MADE IN CHINA Lifemax Ltd 1 Pipers Court, Thatcham, Berkshire, RG19 4ER, England www.lifemaxuk.co.uk Please retain this information for future reference. 28