1
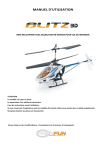
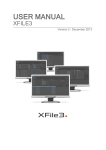
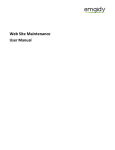
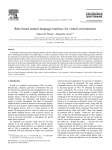
USER DOCUMENTATION
MENU Module v1.0
2
Contents
1.
View Nodes ....................................................................................................................... 3
1.1. Menu Node Options........................................................................................................ 5
1.1.1.
Active .................................................................................................................. 5
1.1.2.
On Menu ............................................................................................................. 5
1.1.3.
Banners (Standard, Professional, Enterprise) ..................................................... 5
1.1.4.
Homepage ........................................................................................................... 6
1.1.5.
Required Tokens (Standard, Professional, Enterprise) ....................................... 6
1.2. Add Node ........................................................................................................................ 7
1.3.1.
Node Name ......................................................................................................... 8
1.3.2.
Node Title ............................................................................................................ 8
1.3.3.
Node Description ................................................................................................ 8
1.3.4.
Node Expiry ......................................................................................................... 8
1.3.5.
Node Parent ........................................................................................................ 9
1.3.6.
Link to this Page .................................................................................................. 9
1.3.7.
Node Header ....................................................................................................... 9
1.3.8.
Specify Location .................................................................................................. 9
1.3.8.1.
Location........................................................................................................... 9
1.3.8.2.
Own Location .................................................................................................. 9
1.3.9.
Specify Content ................................................................................................... 9
1.3.10.
Content Editor ................................................................................................... 10
1.3.11.
Meta Title .......................................................................................................... 23
1.3.12.
Meta Keywords ................................................................................................. 23
1.3.13.
Meta Description .............................................................................................. 23
1.3.14.
Printable ............................................................................................................ 23
1.3.15.
Convert to PDF .................................................................................................. 23
1.3.16.
Tell a Friend ....................................................................................................... 24
1.4. Delete Node .................................................................................................................. 24
2.
Footer Config................................................................................................................... 24
3.
Module Configuration ..................................................................................................... 25
www.itsquared.co.za
MENU Module v1.0
1.3. Edit Node......................................................................................................................... 8
3
MENU Module v1.0
1. View Nodes
The entire structure of the Infiniti system can be viewed here. The structure comprises of nodes
which are organised into a logical tree structure.
The entire structure of the Infiniti system can be viewed here. The structure comprises of nodes which
represent pages on your website. These are organised into a logical tree structure.
Node Organisation
Nodes can be moved up or down by clicking on the up or down arrows next to each node name.
This will re-arrange the order of your pages in the menu in the front end. Nodes can also be assigned
parents. This means that a node will be placed under its selected parent. Nodes with children are
represented by a white circle with either a plus or a minus symbol. Clicking on the plus symbol will
www.itsquared.co.za
MENU Module v1.0
The Menu Module is the core module of your Infiniti System and is used to manage the
general layout of content on your system.
The content is arranged in a logical manner using parent-child relationships (nodes).
4
MENU Module v1.0
display the node’s children while clicking on the minus symbol will hide a node’s children. Please see
section 1.3.5. to find out how to assign a parent node.
www.itsquared.co.za
Each Node has its own set of options. These are represented by 5 icons placed next to
each node. Clicking on any one of the five options will bring up the Menu Node Options
dialog box. As seen above.
The options are as follows:
1.1.1.
Active
A green square indicates that the node is active and will be displayed in the
frontend of the system. A red square indicates that the node is inactive and will
not be displayed in the frontend at all. Please note that any children of an
inactive node will automatically be inactive. Any links pointing to an inactive
node will automatically be redirected to the homepage.
To toggle a node between active and inactive, click the red or green square in
the Menu Node Options dialog box.
1.1.2.
On Menu
A blue symbol indicates that the node is displayed on the frontend menu while a
greyed out symbol indicates that the node is not displayed on the frontend
menu. This option is available because the user might want to have pages
(nodes) on the site which are not able to be reached through the frontend menu.
Eg. A thank you page which users are taken to once they have submitted a
contact form.
Toggle a node between being on the menu or not being on the menu by clicking
the blue or greyed out symbol in the Menu Node Options dialog box.
1.1.3.
Banners (Standard, Professional, Enterprise)
You are able to assign custom vertical banners per banner group per page
(node). (For more information on banners, see the Banner Module User
www.itsquared.co.za
MENU Module v1.0
5
1.1. Menu Node Options
Manual). Pages (nodes) with custom banners have an active banner icon while
pages (nodes) without custom banners have a greyed out banner icon.
6
To configure a page’s (node’s) custom vertical banners, click on either the active
or greyed out banner icon. For more information on configuring custom vertical
banners per node, see the Banner Module User Manual.
1.1.4.
Homepage
Every Infiniti System has a page (node) which is by default the home or landing
page of the system. This is the page which users will be taken to when they first
arrive at the Infiniti System domain (website or intranet address). Only one page
can be set as the homepage at a time.
1.1.5.
Required Tokens (Standard, Professional, Enterprise)
Every node can be protected by requiring that anyone wanting to view the page
(node) in the frontend must be in possession of one or more tokens. (For more
information on tokens, see the Token Module User Manual)
To add a required token to a node, select an existing token from the Required
Tokens Drop Down Menu and click the Add Button.
To remove a required token from a node click on any existing required token
name.
NB: Save any Menu Node Options changes by clicking the Update Button.
www.itsquared.co.za
MENU Module v1.0
Set a node to as the homepage (default landing page) by clicking on the house
icon in the Menu Node Options dialog box.
Complete the Node Name field.
The node name will be used to identify the node and will appear in the menu in the frontend as well as on the menu breadcrumb (see section 3)
Complete the Node Title field.
The node title will appear in the frontend as the actual title of the page. The Node Title
will usually be the same as the Node Name but can be longer in certain cases. The Node
Title is used by search engines when indexing the page and proper naming of the Node
Title will result in a better search engine ranking.
Click the Add button.
The new node will then appear at the bottom of the current tree.
www.itsquared.co.za
MENU Module v1.0
7
1.2. Add Node
To edit a node, click on the Node Name of the node you want to edit.
Each node has the following attributes:
1.3.1.
Node Name
The node name will be used to identify the node and will appear in the menu in
the front-end as well as on the menu breadcrumb (see section 3).
1.3.2.
Node Title
The node title will appear in the frontend as the actual title of the page. The
Node Title will usually be the same as the Node Name but can be longer in
certain cases. The Node Title is used by search engines when indexing the page
and proper naming of the Node Title will result in a better search engine ranking.
1.3.3.
Node Description
The node description will not be displayed in the frontend and is purely for
backend use. This field can be used by Infiniti Administrators to add notes to a
node. Eg. Who created the node, what date the node was created and why it
was created.
1.3.4.
Node Expiry
The node expiry field allows the user to select a date when the node will
automatically be set to inactive. A value of 0000-00-00 indicates that the node
expiry is not in use.
To select a node expiry date, click on the calendar icon next to the Node Expiry
field and select the desired date.
www.itsquared.co.za
MENU Module v1.0
8
1.3. Edit Node
1.3.5.
Node Parent
This is where you are able to set a node’s parent. A field value of Parent Node
indicates that the node has no parent and is currently sitting in the root of the
tree.
9
To select a node parent, click the select parent link next to the Node Parent field.
The current Infiniti System tree will slide out from below the field.
1.3.6.
Link to this Page
Each Node has its own unique identity number or link. The system uses this link
to identify the node. This link will automatically be generated by the Infiniti
System and cannot be overwritten. This link can be copied and used throughout
the Infiniti System to link to this page (node).
1.3.7.
Node Header
A header is the graphic image situated at the top of the page in the frontend. An
Infiniti system can have multiple headers which can be added, updated or
deleted in the Graphics Module. (For more information on headers, see the
Graphic Module User Manual) A header can be selected at random each time
the page (node) loads or a specific header can be assigned to a page (node).
To set a random header, select the random option in the Node Header drop
down field.
To set a specific header, select the specific header from the Node Header drop
down field.
1.3.8.
Specify Location
A node can be pointed to a location. There are two options when pointing a
node to a location.
1.3.8.1. Location
A node can be pointed to a special page within the Infiniti system. Eg.
User Registration page, News Module page, Products page etc.
1.3.8.2. Own Location
A node can be pointed to a user defined location. This can be either an
external website address (http://www.externalsite.com) or another
node within the Infiniti System using the other node’s “Link to this
page” link (see section 1.3.6).
1.3.9.
Specify Content
www.itsquared.co.za
MENU Module v1.0
Click on the node name of the node you wish to select as the parent. The Infiniti
System tree will slide back up into the field and the Node Parent field will
automatically be completed by the selected node’s name.
MENU Module v1.0
10
A user is able to specify custom content for each node. This option will be used
in most cases.
1.3.10.
Content Editor
www.itsquared.co.za
The content editor is used to place and manage custom content (text, images,
files and links) within a node (page).
! IMPORTANT TIP !
•
Pressing Enter will result in a new paragraph. For a line break, press
SHIFT + Enter.
•
When pasting copied text or content from an external source, be sure
to use the Paste as plain text or Paste from Word buttons (see section
1.3.10.1 Interface Description).
1.3.10.1. Interface Description
Button
Source
Document
Properties
Image
Description
Used to toggle between formatted HTML
(Hyper Text Mark-Up Language) and
unformatted HTML.
This feature can be used by users with
knowledge of HTML programming to directly
edit the HTML code.
Not used in current Infiniti System Version.
www.itsquared.co.za
MENU Module v1.0
11
12
New Page
Preview
Used to clear the content editor of any existing
content.
Used to preview the content in the content
editor before any changes are saved.
Used to insert a pre-defined formatting
template which can be edited by a user
Templates
USAGE:
1. Press the Templates button.
Used to remove selected content from the
content editor and store it on the system
clipboard for future use.
Cut
USAGE:
1. Select text using mouse or keyboard.
2. Press Cut button.
Used to make a copy of selected content from
the content editor and store it on the system
clipboard for future use.
Copy
USAGE:
1. Select text using mouse or keyboard.
2. Press Copy button.
Used to retrieve the most recent content that
has been cut or copied onto the system
clipboard.
Paste
USAGE:
1. Position cursor at desired location.
2. Press Paste button.
www.itsquared.co.za
MENU Module v1.0
2. Select a template.
Used to retrieve the most recent content that
has been cut or copied onto the system
clipboard.
Paste as plain text
13
All text-formatting, images and tables will be
removed.
USAGE:
1. Position cursor at desired location.
2. Press Paste as plain text button.
Used to retrieve the most recent content that
has been cut or copied onto the system
clipboard.
USAGE:
1. Position cursor at desired location.
2. Press Paste from word button.
Insert Page Break
Print
Check Spelling
Undo
Not used in current Infiniti System Version.
Used to print the contents of the content
editor.
Used to check the spelling of all or selected
text within the content editor.
Used to undo the user’s last action.
Redo
Used to redo any action previously undone by
the user.
Find
Used to search for cases of a user defined
string in the content editor content.
Replace
Used to search for cases of a user defined
string in the content editor content and
replace them with a secondary user defined
string.
www.itsquared.co.za
MENU Module v1.0
Paste from Word
Will bring up a dialog box which will enable the
user to clean up formatting tags used in Word
content.
14
Select All
Used to select or all content in the content
editor.
Used to remove all text formatting (size,
colour, font, bold, italic, underline) on selected
text.
Remove
Formatting
USAGE:
1. Select text using mouse or keyboard.
2. Press Remove Formatting button.
Bold
USAGE:
1. Select text using mouse or keyboard.
2. Press Bold button.
Used to italicise selected text.
Italic
USAGE:
1. Select text using mouse or keyboard.
2. Press Italic button.
Used to underline selected text.
Underline
USAGE:
1. Select text using mouse or keyboard.
2. Press Underline button.
Used to draw a line (cross out) selected text.
Strike Through
USAGE:
1. Select text using mouse or keyboard.
2. Press Strike Through button.
Used to convert selected text to subscript
text.
Subscript
USAGE:
1. Select text using mouse or keyboard.
2. Press Subscript button.
www.itsquared.co.za
MENU Module v1.0
Used to bold selected text.
Used to convert selected text to superscript
text.
Superscript
15
USAGE:
1. Select text using mouse or keyboard.
2. Press Superscript button.
Used to change the format of selected text.
Users are able to use predefined font formats.
Font Format
USAGE:
1. Select text using mouse or keyboard.
Used to change the font of selected text.
Font
USAGE:
1. Select text using mouse or keyboard.
2. Select preferred font from font drop down.
Used to change the font size of selected text.
USAGE:
Font Size
1. Select text using mouse or keyboard.
2. Select preferred font size from font size
drop down.
Used to change the colour of new or selected
text.
USAGE:
Font Colour
1. Position cursor at desired location.
or
Select text using mouse or keyboard.
2. Press Font Colour button.
3. Select desired colour from the colour
palette.
www.itsquared.co.za
MENU Module v1.0
2. Select preferred font format from font
format drop down.
Used to change the background colour of new
or selected text.
16
USAGE:
Background Colour
1. Position cursor at desired location.
or
Select text using mouse or keyboard.
2. Press Background Colour button.
3. Select desired colour from colour palette.
Used to insert or remove a numbered bullet.
Insert/Remove
Numbered List
1. Position cursor at desired location.
or
Select text using mouse or keyboard.
2. Press Insert/Remove Numbered List
button.
Used to insert or remove a bullet.
USAGE:
Insert/Remove
Bulleted List
1. Position cursor at desired location.
or
Select text using mouse or keyboard.
2. Press Insert/Remove Bulleted List button.
Used to decrease the indent of a line of
content.
Decrease Indent
USAGE:
1. Position cursor at desired location.
2. Press Decrease Indent button.
Used to increase the indent of a line of
content.
Increase Indent
USAGE:
1. Position cursor at desired location.
2. Press Increase Indent button.
www.itsquared.co.za
MENU Module v1.0
USAGE:
Used to left align selected content in the
content editor.
17
Please note: content is aligned in paragraphs.
Left Justify
USAGE:
1. Position cursor at desired location.
or
Select text using mouse or keyboard.
2. Press Left Justify button.
Used to centre align selected content in the
content editor.
Please note: content is aligned in paragraphs.
USAGE:
1. Position cursor at desired location.
or
Select text using mouse or keyboard.
2. Press Centre Justify button.
Used to right align selected content in the
content editor.
Please note: content is aligned in paragraphs.
Right Justify
USAGE:
1. Position cursor at desired location.
or
Select text using mouse or keyboard.
2. Press Right Justify button.
Used to block justify selected content in the
content editor.
Please note: content is aligned in paragraphs.
Block Justify
USAGE:
1. Position cursor at desired location.
or
Select text using mouse or keyboard.
2. Press Block Justify button.
Used to insert or edit a hyperlink in the
content editor.
Insert/Edit Link
USAGE:
1. Select text or content using mouse or
keyboard.
www.itsquared.co.za
MENU Module v1.0
Centre Justify
2. Press Insert/Edit Link button.
18
3. A Dialog Box will appear.
4. Under the Link Info tab:
Select the Link Type:
4.1. Url
Enter the website address of any
external site or paste the link of any
other node (see section 1.3.6) in the
Url field.
Alternatively, to link to a file from the
Uploads module, press the Browse
Uploads button.
4.1.2. Select the required file.
4.2. E-mail
Users are able to create a link which
when clicked will send an e-mail
using the default e-mail client of the
user clicking the link.
4.3. Anchor
Users are able to create a link which
when clicked will take a user to an
inserted anchor.
5.
Under the Target tab:
Select whether the link will open in the
same window (recommended for internal
links) or a new window (recommended for
external links).
6.
Under the Advanced tab:
This tab is for experienced HTML users
only and will not normally be used.
7.
Once all settings have been configured,
click the OK button.
Used to remove a hyperlink in the content.
USAGE:
Remove Link
1. Select existing hyperlink using mouse or
keyboard.
2. Press Remove Link button.
www.itsquared.co.za
MENU Module v1.0
4.1.1. Select the starting letter of the
filename or type the filename
in the search field.
Used to insert or edit an anchor in the content.
19
USAGE:
Insert/Edit Anchor
1. Select text or content using mouse or
keyboard.
2. Give the anchor a name.
3. Click the OK button.
Used to insert or edit an image in the content
editor.
USAGE:
2. Press Insert/Edit Image button.
3. A Dialog Box will appear.
4. Under the Image Info tab:
4.1. Click the Browse Images button.
Alternatively, to link to an external
image, paste the url of the external
image into the url field.
4.1.1. Select the starting letter of the
image or type the image name
in the search field.
4.1.2. Select the required image.
Insert/Edit Image
4.2. Complete the Alternative Text field.
This text will be displayed when a
mouse pointer is hovered over the
image in the frontend. The
Alternative Text field is also used to
label the image by search engines.
I.e. Google
4.3. Set the border width in pixels. E.g.
1,2,3 etc.
4.4. Set the horizontal and vertical space
in pixels. E.g. 1,2,3 etc. This space will
be used as padding around the
image.
4.5. Set the Alignment of the text
wrapping by using the Align
dropdown box. This field will control
the alignment of the image with
regards to its surrounding text
(word wrapping).
5. Under the Link tab:
www.itsquared.co.za
MENU Module v1.0
1. Position cursor at desired location.
Images are able to be linked to files or
locations.
20
5.1. Click the Browse Uploads button.
Alternatively, to link to an external
file or location, paste the url of the
external file or location into the url
field.
5.1.1. Select the starting letter of the
image or type the image name
in the search field.
5.1.2. Select the required image.
6. Under the Advanced tab:
This tab is for experienced HTML users only
and will not normally be used.
Used to insert or edit tables into the content
editor.
USAGE:
1. Position cursor at desired location.
Insert/Edit Table
2. Click the Insert/Edit Table button.
3. A Dialog Box will appear.
4. Complete the necessary fields.
5. Click the OK button.
Used to insert a horizontal line.
Insert Horizontal
Line
USAGE:
1. Position cursor at desired location.
2. Click the Insert Horizontal Line button.
Used to insert any special characters into the
content.
Insert Special
Character
USAGE:
1. Position cursor at desired location.
2. Click the Insert Special Character button.
3. Select the desired character.
Insert Infiniti
Component
Used to insert any specialised Infiniti
Components into the content editor such as:
•
www.itsquared.co.za
Banners (Standard, Professional,
Enterprise Edition)
MENU Module v1.0
7. Click the OK button.
See Banner Module User
Documentation for more information
•
21
Forms (Standard, Professional,
Enterprise Edition)
See Forms Module User
Documentation for more information
•
Media Galleries
See Media Module User
Documentation for more information
•
Products (Professional, Enterprise
Edition)
•
Product Searches (Professional,
Enterprise Edition)
See Product Module User
Documentation for more information
•
Files
See Upload Module User
Documentation for more information
USAGE:
1. Position cursor at desired location.
2. Click the Insert Infiniti Component button.
3. A Dialog Box will appear
4. Select an Infiniti Picker:
4.1. Banner Picker
4.1.1. Select a banner orientation.
Either Vertical or Horizontal.
4.1.2. Select the starting letter of
the banner to be inserted.
4.1.3. Select a banner.
4.1.4. Select whether the banner
will be opened in the same
window or in a new window
when clicked.
4.1.5. Click the Insert button.
4.2. Form Picker
4.2.1. Select a form.
www.itsquared.co.za
MENU Module v1.0
See Product Module User
Documentation for more information
4.2.2. Click the Insert Button.
22
4.3. Media Gallery Picker
4.3.1. Select a media gallery.
4.3.2. To insert the entire media
gallery click the Insert button
for the library tag.
4.3.3. To insert a text link which will
play a slideshow of the
gallery click the Insert button
for ‘Play Slideshow' text.
4.3.5. To insert a particular image
from a gallery, first select an
image type, then select an
image and click the Insert
button for Image Link.
4.3.6. To insert a thumbnail of a
particular image from a
gallery, first select an image
type, then select an image
and click the Insert button for
Image Flightbox Tag.
4.4. Click the Insert button.
4.5. Product Picker
4.5.1. Select a product category.
4.5.2. Select the starting letter of
the product to be inserted.
4.5.3. Select a product.
4.5.4. Select whether the product
will be opened in the same
window or in a new window
when clicked.
4.5.5. Click the Insert button.
4.6. Product Search Forms Picker
4.6.1. Select a product search form.
4.6.2. Click the Insert Button.
4.7.
File Picker
4.7.1. Select a file type.
4.7.2. Select the starting letter of
www.itsquared.co.za
MENU Module v1.0
4.3.4. To insert a preview of the
gallery which links to the
gallery click the Insert button
for ‘Play Slideshow' strip.
the file to be inserted.
23
4.7.3. Select a file.
4.7.4. Click the Insert button.
5.
1.3.11.
Click the OK button.
Meta Title
Every node (page) can be given its own meta title. A meta title tag is read by
search engine crawlers when indexing a website. This tag is used for SEO (Search
Engine Optimisation).
1.3.12.
Meta Keywords
Every node (page) can be given its own meta keywords. A meta keywords tag is
read by search engine crawlers when indexing a website. This tag is used for SEO
(Search Engine Optimisation). Add keywords which you would like users to find
your site on when using a search engine. It is not recommended using more
than 20 keywords per node.
Usage: keyword1, keyword2, keyword3...
Please note: If this field is left blank, the node will use the default site meta
keywords which are configured in the config module. (See the Config Module
User Manual)
1.3.13.
Meta Description
Every node (page) can be given its own meta description. A meta description tag
is read by search engine crawlers when indexing a website. This tag is used for
SEO (Search Engine Optimisation). The Meta Description tag is used by search
engines to give a brief description of the page (node). It is recommended that
the description is not more than two sentences long.
Please note: If this field is left blank, the node will use the default site meta
description which is configured in the config module. (See the Config Module
User Manual)
1.3.14.
Printable
A node can be made printable by checking the Printable checkbox. Users will be
able to click on a small printer icon in the frontend which will enable them to
easily print the node (page).
1.3.15.
Convert to PDF
A node can be made convertible to PDF by checking the Convert to PDF
checkbox. Users will be able to click on a small PDF icon in the frontend which
will convert the node (page) to a PDF file.
www.itsquared.co.za
MENU Module v1.0
Please note: If this field is left blank, the node will use the default site meta title
which is configured in the config module. (See the Config Module User Manual)
1.3.16.
Tell a Friend
A node can be e-mailed to a user’s friends by the system by checking the Tell a
Friend checkbox. Users will be able to click on a small e-mail icon in the frontend
which will enable them to send an e-mail to their friends with a link to the node
(page).
24
1.4. Delete Node
To delete a node, first edit the node by clicking on the node name and then click the delete
button at the bottom of the edit page.
You will be asked to confirm the delete command. Click the OK button.
Please note: Any children of the deleted node will automatically be deleted.
MENU Module v1.0
2. Footer Config
The footer config is where the content for the footer of the frontend of the Infiniti System is updated.
Change the footer content as required and then click the update button.
www.itsquared.co.za
25
The Infiniti System has a menu breadcrumb which assists with the frontend navigation of the Infiniti
System. This function can be turned on and off by checking or unchecking the Display Menu
Breadcrumb checkbox.
The Menu Breadcrumb will be displayed in the frontend on each node just below the Node Title.
The Breadcrumb is used to trace the user’s route.
Eg. Section >> Sub-Section >> Sub-Sub-Section.
www.itsquared.co.za
MENU Module v1.0
3. Module Configuration