1
SM version 1.10
Smooth Moves User Manual
2D Skeletal animation editor for Unity3D
echo17
Table of Contents
Table of Contents . . . . . . . . . . . . . . . . . . . . . . . . . . . . . . . . . . . . . . . . . . . . . . . . . . . . . . . . . . . . . . .
iii
..................................................................
1
.............................................................
1
...................................................................
2
..........................................
3
.........................................................................
3
2.2 Folder Structure . . . . . . . . . . . . . . . . . . . . . . . . . . . . . . . . . . . . . . . . . . . . . . . . . . . . . . . . . . . . . . . . . .
4
............................................................................
4
......................................................................
4
...............................................................
4
.........................................................................
4
Scenes . . . . . . . . . . . . . . . . . . . . . . . . . . . . . . . . . . . . . . . . . . . . . . . . . . . . . . . . . . . . . . . . . . . . . . . . . .
5
Scripts . . . . . . . . . . . . . . . . . . . . . . . . . . . . . . . . . . . . . . . . . . . . . . . . . . . . . . . . . . . . . . . . . . . . . . . . . .
5
.........................................................................
5
.....................................................................
5
............................................................................
5
..................................................................
6
...........................................................................
6
Atlas Editor
................................................................
7
3.1 Overview
.......................................................................
8
..................................................................
8
.............................................................................
9
1.
Overview
1.1 System Requirements
1.2 Compatibility
2.
Setting Up The Unity3D Environment
2.1 Import
Demo
Animations
Atlas Base Textures
Atlases
Sounds
Documentation
Editor
Playmaker Scripts
Plugins
3.
3.2 Create an Atlas
Input
iv | Table of Contents
Output . . . . . . . . . . . . . . . . . . . . . . . . . . . . . . . . . . . . . . . . . . . . . . . . . . . . . . . . . . . . . . . . . . . . . . . . . . . .
9
...................................................................
10
Padding . . . . . . . . . . . . . . . . . . . . . . . . . . . . . . . . . . . . . . . . . . . . . . . . . . . . . . . . . . . . . . . . . . . . . . . . . . .
10
.....................................................................
12
Force Square
......................................................................
12
Rebuild Atlas
......................................................................
13
.....................................................
14
.....................................................................
16
.................................................................
17
Common Pivot Points
...............................................................
18
Pivot Editor Window
................................................................
19
Pivot Layout Controls
...............................................................
20
Sprites . . . . . . . . . . . . . . . . . . . . . . . . . . . . . . . . . . . . . . . . . . . . . . . . . . . . . . . . . . . . . . . . . . . . .
21
.................................................................
22
...............................................
22
.................................................
22
..................................................................
25
................................................................
26
..........................................................................
26
........................................................................
28
....................................................................
28
......................................................
29
Relative Scale . . . . . . . . . . . . . . . . . . . . . . . . . . . . . . . . . . . . . . . . . . . . . . . . . . . . . . . . . . . . . . . . . . . .
29
....................................................................
30
.........................................................................
30
....................................................................
30
...........................................................
33
.......................................................................
34
...............................................
34
......................................................
35
.........................................................................
36
3.3 Atlas Settings
Max Atlas Size
3.4 Source Texture Editor Window
3.5 Pivot Editor
Manual Pivot Offset
4.
4.1 Creating a Sprite
Creating a Sprite Through the Unity Menu
Adding a Sprite Script to a GameObject
Other Components
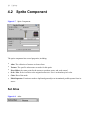
4.2 Sprite Component
Set Atlas
Set Texture
Set Pivot Offset
Set Relative Scale / Absolute Size
Absolute Size
Set Color
Mesh Seperator
5.
Animation Editor
5.1 Overview
5.2 Creating a Bone Animation Data Asset
5.3 Opening the Animation Editor
5.4 Layout
| v
...............................................................
38
Adding Bones . . . . . . . . . . . . . . . . . . . . . . . . . . . . . . . . . . . . . . . . . . . . . . . . . . . . . . . . . . . . . . . . . . . . . .
38
.....................................................................
39
...................................................................
40
Reordering Bones . . . . . . . . . . . . . . . . . . . . . . . . . . . . . . . . . . . . . . . . . . . . . . . . . . . . . . . . . . . . . . . . . . .
41
...............................................................
42
.....................................................................
44
........................................................................
46
......................................................................
47
Scrolling the Bone Hierarchy . . . . . . . . . . . . . . . . . . . . . . . . . . . . . . . . . . . . . . . . . . . . . . . . . . . . . . . . . .
48
...............................................................
49
Adding an Animation Clip
............................................................
49
Deleting an Animation Clip
...........................................................
49
Renaming a Clip . . . . . . . . . . . . . . . . . . . . . . . . . . . . . . . . . . . . . . . . . . . . . . . . . . . . . . . . . . . . . . . . . . . .
50
Duplicating a Clip
..................................................................
51
Reordering Clips
...................................................................
52
............................................................
52
.....................................................................
53
Frames and Keyframes . . . . . . . . . . . . . . . . . . . . . . . . . . . . . . . . . . . . . . . . . . . . . . . . . . . . . . . . . . . . . . .
54
...................................................................
55
Setting a Keyframe . . . . . . . . . . . . . . . . . . . . . . . . . . . . . . . . . . . . . . . . . . . . . . . . . . . . . . . . . . . . . . . . . .
56
................................................................
58
....................................................................
59
.....................................................................
60
..............................................................
61
.......................................................
61
Inserting Frames . . . . . . . . . . . . . . . . . . . . . . . . . . . . . . . . . . . . . . . . . . . . . . . . . . . . . . . . . . . . . . . . . . . .
63
....................................................................
65
.................................................................
66
........................................................
68
.......................................................................
69
.........................................................................
69
5.5 A: Bone Hierarchy
Deleting Bones
Renaming a Bone
Making Bone the Base
Bone Visibility
Bone Color
Mixing Bones
5.6 B: Animation Clips
Scrolling Animation Clips
5.7 C: Timeline
Selecting Frames
Deleting a Keyframe
Reset Transform
Setting Atlases
Duplicating Keyframes
Copying and Pasting Keyframes
Deleting Frames
Shifting Keyframes
Scrolling the Timeline Window
Cleaning Up
Scrubbing
vi | Table of Contents
...........................................................
70
...............................................................
71
.......................................................................
71
Type
.............................................................................
72
Atlas
.............................................................................
72
...........................................................................
73
Pivot
.............................................................................
75
Depth
............................................................................
77
Collider . . . . . . . . . . . . . . . . . . . . . . . . . . . . . . . . . . . . . . . . . . . . . . . . . . . . . . . . . . . . . . . . . . . . . . . . . . .
78
None Collider
....................................................................
78
Box Collider
.....................................................................
79
..................................................................
80
Local Position
.....................................................................
80
Local Rotation
.....................................................................
82
Local Scale
........................................................................
82
Image Scale
.......................................................................
83
Color . . . . . . . . . . . . . . . . . . . . . . . . . . . . . . . . . . . . . . . . . . . . . . . . . . . . . . . . . . . . . . . . . . . . . . . . . . . . .
83
............................................................
85
......................................................................
85
........................................................................
86
........................................................
86
...........................................................................
88
Move Gizmo
....................................................................
88
Rotate Gizmo
....................................................................
89
.................................................
89
....................................................................
91
..........................................................
91
........................................................
92
...........................................................
93
Previewing an Animation . . . . . . . . . . . . . . . . . . . . . . . . . . . . . . . . . . . . . . . . . . . . . . . . . . . . . . . . . . . . .
93
.................................................
94
............................................................
95
5.8 D: Keyframe Properties
Keyframe Information
User Trigger
Texture
Sphere Collider
5.9 E: Animation Window
Axis and Grid
Navigating
Selected Keyframe Information
Gizmos
Local Scale and Image Scale Gizmos
Depth Gizmo
Adding a Keyframe Visually
5.10 F: Animation Clip Settings
5.11 G: Animation Controls
Animation Editor Settings and Controls
Animation Window Zoom
| vii
Mesh Color . . . . . . . . . . . . . . . . . . . . . . . . . . . . . . . . . . . . . . . . . . . . . . . . . . . . . . . . . . . . . . . . . . . . . . . .
95
...................................................................
96
Show Gizmo Labels
...............................................................
96
Show Bone Bounds
...............................................................
96
......................................................................
97
.........................................................
97
...................................................................
97
...................................................
97
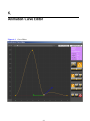
Animation Curve Editor . . . . . . . . . . . . . . . . . . . . . . . . . . . . . . . . . . . . . . . . . . . . . . . . . . . . . .
99
Settings Window
Show Grid
Non-Selected Bone Darken
Axis Thickness
Copy and Paste Property Selection
6.
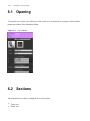
6.1 Opening
. . . . . . . . . . . . . . . . . . . . . . . . . . . . . . . . . . . . . . . . . . . . . . . . . . . . . . . . . . . . . . . . . . . . . . . . 100
6.2 Sections
. . . . . . . . . . . . . . . . . . . . . . . . . . . . . . . . . . . . . . . . . . . . . . . . . . . . . . . . . . . . . . . . . . . . . . . . 100
Value Axis
. . . . . . . . . . . . . . . . . . . . . . . . . . . . . . . . . . . . . . . . . . . . . . . . . . . . . . . . . . . . . . . . . . . . . . . . 101
Frame Axis
. . . . . . . . . . . . . . . . . . . . . . . . . . . . . . . . . . . . . . . . . . . . . . . . . . . . . . . . . . . . . . . . . . . . . . . . 102
Scale Settings
. . . . . . . . . . . . . . . . . . . . . . . . . . . . . . . . . . . . . . . . . . . . . . . . . . . . . . . . . . . . . . . . . . . . . . 102
. . . . . . . . . . . . . . . . . . . . . . . . . . . . . . . . . . . . . . . . . . . . . . . . . . . . . . . . . . . . . . . . 103
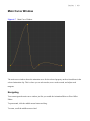
Main Curve Window
Navigating
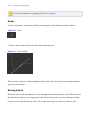
Nodes
. . . . . . . . . . . . . . . . . . . . . . . . . . . . . . . . . . . . . . . . . . . . . . . . . . . . . . . . . . . . . . . . . . . . . . 103
. . . . . . . . . . . . . . . . . . . . . . . . . . . . . . . . . . . . . . . . . . . . . . . . . . . . . . . . . . . . . . . . . . . . . . . . . . 104
Moving a Node . . . . . . . . . . . . . . . . . . . . . . . . . . . . . . . . . . . . . . . . . . . . . . . . . . . . . . . . . . . . . . . . . . . 104
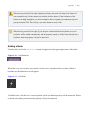
Adding a Node
. . . . . . . . . . . . . . . . . . . . . . . . . . . . . . . . . . . . . . . . . . . . . . . . . . . . . . . . . . . . . . . . . . . 105
Deleting a Node
. . . . . . . . . . . . . . . . . . . . . . . . . . . . . . . . . . . . . . . . . . . . . . . . . . . . . . . . . . . . . . . . . . 106
. . . . . . . . . . . . . . . . . . . . . . . . . . . . . . . . . . . . . . . . . . . . . . . . . . . . . . . . . . . . . . . 106
Adjusting a Tangent
Node Properties
. . . . . . . . . . . . . . . . . . . . . . . . . . . . . . . . . . . . . . . . . . . . . . . . . . . . . . . . . . . . . . . . . . . . 108
Smoothness
. . . . . . . . . . . . . . . . . . . . . . . . . . . . . . . . . . . . . . . . . . . . . . . . . . . . . . . . . . . . . . . . . . . . . 108
Special Tangent Types
Free Tangent
. . . . . . . . . . . . . . . . . . . . . . . . . . . . . . . . . . . . . . . . . . . . . . . . . . . . . . . . . . . . . . . . . . 109
Linear Tangent
Constant Tangent
Node Values
. . . . . . . . . . . . . . . . . . . . . . . . . . . . . . . . . . . . . . . . . . . . . . . . . . . . . . . . . . . . . 109
. . . . . . . . . . . . . . . . . . . . . . . . . . . . . . . . . . . . . . . . . . . . . . . . . . . . . . . . . . . . . . . . . 109
. . . . . . . . . . . . . . . . . . . . . . . . . . . . . . . . . . . . . . . . . . . . . . . . . . . . . . . . . . . . . . . 111
. . . . . . . . . . . . . . . . . . . . . . . . . . . . . . . . . . . . . . . . . . . . . . . . . . . . . . . . . . . . . . . . . . . . . 111
6.3 Adjusting Animation Curve While Previewing
7.
. . . . . . . . . . . . . . . . . . . . . . . . . . . . . . . . . . . . . . . . . 112
Color And Lighting . . . . . . . . . . . . . . . . . . . . . . . . . . . . . . . . . . . . . . . . . . . . . . . . . . . . . . . . . . 113
7.1 Colors
. . . . . . . . . . . . . . . . . . . . . . . . . . . . . . . . . . . . . . . . . . . . . . . . . . . . . . . . . . . . . . . . . . . . . . . . . 113
viii | Table of Contents
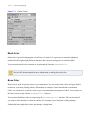
Mesh Color . . . . . . . . . . . . . . . . . . . . . . . . . . . . . . . . . . . . . . . . . . . . . . . . . . . . . . . . . . . . . . . . . . . . . . 114
. . . . . . . . . . . . . . . . . . . . . . . . . . . . . . . . . . . . . . . . . . . . . . . . . . . . . . . . . . . . . . . . . . . . . . 114
Bone Color
. . . . . . . . . . . . . . . . . . . . . . . . . . . . . . . . . . . . . . . . . . . . . . . . . . . . . . . . . . . . . . . . . . 115
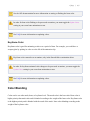
Keyframe Color
Color Blending
. . . . . . . . . . . . . . . . . . . . . . . . . . . . . . . . . . . . . . . . . . . . . . . . . . . . . . . . . . . . . . . . . . . . . 115
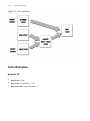
Color Examples
. . . . . . . . . . . . . . . . . . . . . . . . . . . . . . . . . . . . . . . . . . . . . . . . . . . . . . . . . . . . . . . . . . . . 116
Example #1
. . . . . . . . . . . . . . . . . . . . . . . . . . . . . . . . . . . . . . . . . . . . . . . . . . . . . . . . . . . . . . . . . . . . . 116
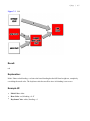
Example #2
. . . . . . . . . . . . . . . . . . . . . . . . . . . . . . . . . . . . . . . . . . . . . . . . . . . . . . . . . . . . . . . . . . . . . 117
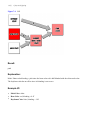
Example #3
. . . . . . . . . . . . . . . . . . . . . . . . . . . . . . . . . . . . . . . . . . . . . . . . . . . . . . . . . . . . . . . . . . . . . 118
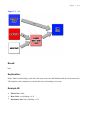
Example #4
. . . . . . . . . . . . . . . . . . . . . . . . . . . . . . . . . . . . . . . . . . . . . . . . . . . . . . . . . . . . . . . . . . . . . 119
7.2 Lighting
8.
. . . . . . . . . . . . . . . . . . . . . . . . . . . . . . . . . . . . . . . . . . . . . . . . . . . . . . . . . . . . . . . . . . . . . . . . 121
Optimization and Tips
8.1 Sprite Size
. . . . . . . . . . . . . . . . . . . . . . . . . . . . . . . . . . . . . . . . . . . . . . . . . . . . . . . 123
. . . . . . . . . . . . . . . . . . . . . . . . . . . . . . . . . . . . . . . . . . . . . . . . . . . . . . . . . . . . . . . . . . . . . . 123
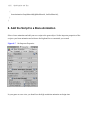
8.2 Skinned Mesh Draw Calls . . . . . . . . . . . . . . . . . . . . . . . . . . . . . . . . . . . . . . . . . . . . . . . . . . . . . . . . . . 123
. . . . . . . . . . . . . . . . . . . . . . . . . . . . . . . . . . . . . . . . . . . . . . . . . . . 124
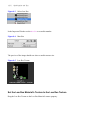
8.3 Creating Assets for Older Devices
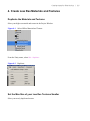
4. Create Low Res Materials and Textures
Duplicate the Materials and Textures
. . . . . . . . . . . . . . . . . . . . . . . . . . . . . . . . . . . . . . . . . . . . . . . 125
. . . . . . . . . . . . . . . . . . . . . . . . . . . . . . . . . . . . . . . . . . . . . . . . . 125
Set the Max Size of your Low Res Textures Smaller
. . . . . . . . . . . . . . . . . . . . . . . . . . . . . . . . . . . . . 125
Set the Low Res Material's Texture to the Low Res Texture
. . . . . . . . . . . . . . . . . . . . . . . . . . . . . . . . . . . . . . . . . . . . . . . . . . . . . . . 127
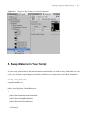
5. Swap Material in Your Script
6. Add the Script to a Bone Animation
9.
. . . . . . . . . . . . . . . . . . . . . . . . . . . . . . . . . . . . . . . . . . . . . . . . . . 128
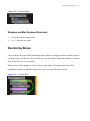
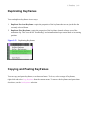
Redistributing Your Work . . . . . . . . . . . . . . . . . . . . . . . . . . . . . . . . . . . . . . . . . . . . . . . . . . . . 131
9.1 Share Your Work!
9.2 What to Export
. . . . . . . . . . . . . . . . . . . . . . . . . . . . . . . . . . . . . . . . . . . . . . . . . . . . . . . . . . . . . . . . 131
. . . . . . . . . . . . . . . . . . . . . . . . . . . . . . . . . . . . . . . . . . . . . . . . . . . . . . . . . . . . . . . . . . 131
9.3 What you MAY NOT EXPORT
10.
. . . . . . . . . . . . . . . . . . . . . . . . . . . . . . . 126
. . . . . . . . . . . . . . . . . . . . . . . . . . . . . . . . . . . . . . . . . . . . . . . . . . . . . 132
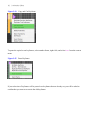
9.4 Export Process:
. . . . . . . . . . . . . . . . . . . . . . . . . . . . . . . . . . . . . . . . . . . . . . . . . . . . . . . . . . . . . . . . . . 132
9.5 Import Process:
. . . . . . . . . . . . . . . . . . . . . . . . . . . . . . . . . . . . . . . . . . . . . . . . . . . . . . . . . . . . . . . . . . 133
FAQ and Troubleshooting
. . . . . . . . . . . . . . . . . . . . . . . . . . . . . . . . . . . . . . . . . . . . . . . . . . . 135
10.1 Questions . . . . . . . . . . . . . . . . . . . . . . . . . . . . . . . . . . . . . . . . . . . . . . . . . . . . . . . . . . . . . . . . . . . . . . 135
10.2 Answers . . . . . . . . . . . . . . . . . . . . . . . . . . . . . . . . . . . . . . . . . . . . . . . . . . . . . . . . . . . . . . . . . . . . . . . 136
Q: Why are each of my animations taking at least one draw call?
Q: Why aren't my sprites dynamically batching?
. . . . . . . . . . . . . . . . . . . . . . . . . . . . . 136
. . . . . . . . . . . . . . . . . . . . . . . . . . . . . . . . . . . . . . . . . . 136
| ix
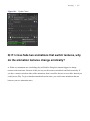
Q: I have set colors on my bones or keyframes, so why is the color not updating when I run the scene?
136
Q: If I cross fade two animations that switch textures, why do the animation textures change
erratically?
. . . . . . . . . . . . . . . . . . . . . . . . . . . . . . . . . . . . . . . . . . . . . . . . . . . . . . . . . . . . . . . . . . . . . . . . 137
Q: I call Play or CrossFade using the Animation component, but my textures are not switching, my
colliders are not turning on / off, and the animation is playing at the wrong speed. What am I doing
wrong?
. . . . . . . . . . . . . . . . . . . . . . . . . . . . . . . . . . . . . . . . . . . . . . . . . . . . . . . . . . . . . . . . . . . . . . . . . . . 138
Q: How can I make a lower resolution animation for older devices without having to create a whole
new animation?
. . . . . . . . . . . . . . . . . . . . . . . . . . . . . . . . . . . . . . . . . . . . . . . . . . . . . . . . . . . . . . . . . . . . 138
Q: Why do my animations and sprites have artifacts in them?
11.
Guide Version History
. . . . . . . . . . . . . . . . . . . . . . . . . . . . . . . . 138
. . . . . . . . . . . . . . . . . . . . . . . . . . . . . . . . . . . . . . . . . . . . . . . . . . . . . . 141
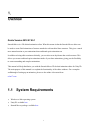
1.
Overview
Guide Version 2012.07.09.1
Smooth Moves is a 2D skeletal animation editor. What this means is that the Smooth Moves editor can
be used to create fluid animations of textures attached to a hierarchical bone structure. This gives a much
more natural motion to your animations than traditional sprite animation can.
In addition to being able to animate skeletally, you can also create keyframes that switch textures. This
allows you to run traditional sprite animations inside of your bone animations, giving you the flexibility
to create astounding and complex animations.
This manual will help familiarize you with the Smooth Moves 2D skeletal animation editor for Unity3D.
The main purpose of this manual is to explain the functionality of the editor windows. For a complete
walkthrough of setting up an animation, please see the online video tutorials at:
echo17.com
1.1
System Requirements
●
Windows or Mac operating system
●
Unity3D: available here
●
Smooth Moves package: available here
2 | Overview
1.2
Compatibility
Smooth Moves works on the following Unity3D platforms:
●
PC Standalone
●
Mac Standalone
●
Web Player
●
iOS
●
Andriod
Smooth Moves does NOT work on the following Unity3D platforms:
●
Flash
2.
Setting Up The Unity3D Environment
2.1
Import
To install Smooth Moves:
1.
Open Unity3D
2.
Create a new project (or open an existing one)
3.
Open the Asset Store by going to the menu Window > Asset Store
4.
Search for Smooth Moves
5.
Purchase by clicking on the Buy button on the left
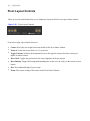
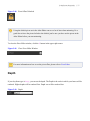
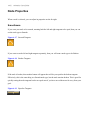
Figure 2-1
Buy
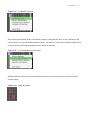
If you have already purchased, but have not downloaded, you will see the download button.
Figure 2-2
Download
4 | Setting Up The Unity3D Environment
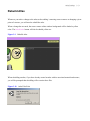
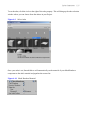
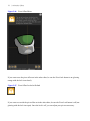
If you have already purchased and downloaded, you will see the import button.
Figure 2-3
2.2
Import
Folder Structure
Smooth Moves is organized into the following folders under the Smooth Moves root folder
Demo
This folder contains all the files used in the demonstration of Smooth Moves.
Animations
This folder contains the bone animation data used in the demo.
Atlas Base Textures
This folder contains the textures that are used to create the atlases. These textures are only used in the
Animation Editor and not at runtime.
Atlases
This folder contains the atlases that the bone animations use for the demo. The atlases are created from
the textures in the Atlas Base Textures folder.
Folder Structure | 5
Scenes
This folder contains the scenes for the demo. This should be the first place you go to see how the
animations work in Smooth Moves.
Scripts
This folder contains scripts used on scene objects in the demo scenes.
Sounds
This folder contains sound files used in the demo.
Documentation
This folder contains the API documentation and the User Guide (this manual).
Editor
This folder contains the Smooth Moves compiled dll library and the editor scripts used to for setting up
swapping of textures.
Please do not distribute the SmoothMoves_Editor.dll file. This file is proprietary and is only
valid with a purchased Smooth Moves license.
See the Redistributing Your Work chapter for more information.
6 | Setting Up The Unity3D Environment
Playmaker Scripts
This folder is empty except for a readme file that redirects you to the support website for downloading
the Playmaker scripts. These scripts can be updated at any time, so they are not included in the Smooth
Moves package.
Plugins
This folder contains the SmoothMoves_Runtime.dll file. This file handles the animating of bone
animations at runtime.
You can redistribute the runtime dll with your work.
See Redistributing Your Work for more information.
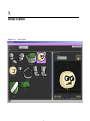
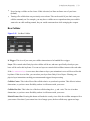
3.
Atlas Editor
Figure 3-1
Atlas Editor
8 | Atlas Editor
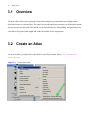
3.1
Overview
The atlas editor allows you to group the textures that comprise your animation into a single texture
sheet, also known as a texture atlas. The editor lets you add and remove textures, set default pivot points
for your textures to rotate and scale around, set the overall atlas size, atlas padding, and optionally force
your atlas to be square (same length and width) for mobile device compression.
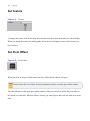
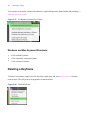
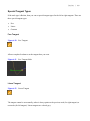
3.2
Create an Atlas
To create an atlas, you right click on the folder in your Project panel, select Create > Smooth Moves
Texture Atlas Data .
Figure 3-2
Create Atlas Asset
Create an Atlas | 9
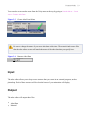
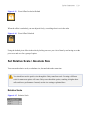
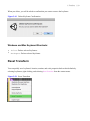
You can also create an atlas asset from the Unity menu at the top by going to Smooth Moves > Create
Asset > Texture Atlas Data.
Figure 3-3
Create Atlas From Menu
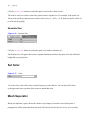
Be sure to change the name of your new atlas data at this time. The material and texture files
that the atlas editor creates will match the name of the atlas data that you specify here.
Figure 3-4
Rename Atlas Data
Input
The atlas editor allows you to drop source textures that you create in an external program, such as
photoshop. Each of these textures will be what the bones of your animation will display.
Output
The atlas editor will output three files
●
Atlas Data
●
Material
10 | Atlas Editor
●
Texture
The atlas data file will contain all the necessary information for Smooth Moves to do its magic. The
material file tells Unity how to render the texture file. You can set the shader of the material for different
effects such as transparency, glow, etc. The texture file is the actual texture atlas which will contain all
your source textures packed into a single file.
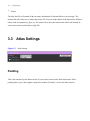
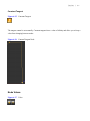
3.3
Figure 3-5
Atlas Settings
Atlas Settings
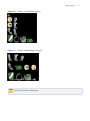
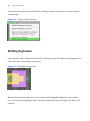
Padding
This is the amount of pixels between each of your source textures in the final atlas texture. More
padding allows you to have higher compression without "bleeding" of color into other textures.
Atlas Settings | 11
Figure 3-6
Texture - Low Padding (1 pixel)
Figure 3-7
Texture - High Padding (30 pixels)
See the FAQ for more information.
12 | Atlas Editor
Max Atlas Size
This lets you set the maximum size of the final atlas texture. Limiting your atlas to a certain size will
force the image generator to keep your atlas below this limit. This can be useful if the total size of your
source textures exceeds the limitations of an atlas, such as on a mobile device.
You can also keep this value very high in the atlas editor and control the maximum size directly in
Unity's texture inspector if you prefer.
Figure 3-8
Unity Texture Max Size
Force Square
Forcing an atlas texture to be square means that the image generator will fill the atlas with empty space
if the length and width are not equal. Having a square image is a requirement in some mobile
development tools, such as iOS, if you are wanting to use PVRTC compression.
Atlas Settings | 13
Rebuild Atlas
Whenever you make a change to the atlas such as adding / removing source textures or changing a pivot
point of a texture, you will need to rebuild the atlas.
When a change has occurred, the source texture editor window background will be shaded a yellow
color. The Rebuild Atlas button will also be shaded yellow too.
Figure 3-9
Rebuild Atlas
When rebuilding an atlas, if you have already created an atlas with its associated material and texture,
you will be prompted that rebuilding will overwrite these files.
Figure 3-10
Atlas Files Exist
14 | Atlas Editor
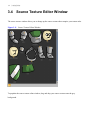
3.4
Source Texture Editor Window
The source texture window allows you to change up the source textures that comprise your texture atlas.
Figure 3-11
Source Texture Editor Window
To populate the source texture editor window, drag and drop your source textures onto the grey
background.
Source Texture Editor Window | 15
Figure 3-12
Drag and Drop Source Textures
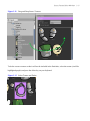
To delete a source texture so that it will not be included in the final atlas, select the texture (it will be
highlighted purple) and press the delete key on your keyboard.
Figure 3-13
Select Texture and Delete
16 | Atlas Editor
To show or hide the default pivot points of each texture, toggle the pivot button. When the default pivots
are visible, you will see small orange boxes centered at each texture's pivot point.
Figure 3-14
3.5
Pivot Toggle
Pivot Editor
Each texture can have a default pivot point. A pivot point is the position that the texture will rotate and
scale around in your animations.
The default pivot can be overridden in your animations, but by setting it here in the atlas editor, you will
save a lot of time by not having to set it over and over in the animation editor. A lot of your textures'
pivots will probably not move around much in the animation, so having a default pivot point can
increase your workflow.
Pivot Editor | 17
Figure 3-15
Default Pivot Editor
Manual Pivot Offset
Figure 3-16
Manual Pivot Offset
You can set the pivot offset manually by typing in values in the X and Y boxes. The pivot offset is
relative to the texture width and is centered around the middle of the texture.
For example, the lower left corner is: x = -0.5, y = -0.5 because it is half of the texture width toward the
18 | Atlas Editor
left and half of the texture height toward the bottom.
The upper right corner, incidentally, is x = 0.5, y = 0.5 since it is half the width toward the right and half
the height toward the top.
The center of the image is x = 0, y = 0 since there is no offset.
Figure 3-17
Pivot Texture Coordinates
Common Pivot Points
Figure 3-18
Common Pivot Points
You can set commonly used pivot points quickly by pressing one of the nine buttons in the upper right
corner. These will jump your pivot point to:
●
upper left
●
upper center
Pivot Editor | 19
●
upper right
●
middle left
●
middle center
●
middle right
●
lower left
●
lower center
●
lower right
Pivot Editor Window
The Pivot Editor Window lets you move your pivot point around with your mouse.
Figure 3-19
Pivot Graphical Editor
To move the pivot point, left click with your mouse where you'd like to set the pivot point.
To move the image around, drag your mouse while holding down the middle mouse button.
Alternatively you can move the image by holding the Windows button (or Command button on a Mac)
and the left mouse button down while dragging.
To zoom from this window, scroll the middle mouse wheel.
20 | Atlas Editor
Pivot Layout Controls
There are several controls that allow you to change the layout and look of your pivot editor window.
Figure 3-20
Pivot Layout Controls
From left to right, top to bottom, these are:
●
Center: Moves the axis origin back to the middle of the Pivot Editor window
●
Zoom x1: Scales the texture back to a 1:1 pixel ratio
●
Toggle Contrast: Switches the background color to the opposite contrast for better viewing of
lighter or darker textures
●
Show Grid: Toggles the grid and axis for easier alignment of the pivot point
●
Show Bounds: Toggles the background bounding box so that you can easily see the extents of your
texture
●
Size: The width and height of your texture
●
Zoom: The current scaling of the texture in the Pivot Editor Window.
4.
Sprites
Figure 4-1
Sprite
Sprites are just four vertices making up a quad mesh. They are tied to an atlas so that they can
22 | Sprites
dynamically batch to reduce draw calls. Sprites are not used in animations in Smooth Moves, but are
more for background elements or decoration.
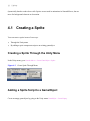
4.1
Creating a Sprite
You can create a sprite in one of two ways:
●
Through the Unity menu
●
By adding a sprite component script to an existing gameobject
Creating a Sprite Through the Unity Menu
In the Unity menu, go to Smooth Moves > Create GameObject > Sprite.
Figure 4-2
Create Sprite Through Menu
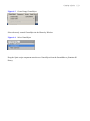
Adding a Sprite Script to a GameObject
Create an empty gameobject by going to the Unity menu GameObject > Create Empty.
Creating a Sprite | 23
Figure 4-3
Create Empty GameObject
Select the newly created GameObject in the Hierarchy Window.
Figure 4-4
Select GameObject
Drag the Sprite script component onto the new GameObject from the SmoothMoves_Runtime.dll
library.
24 | Sprites
Figure 4-5
Drag Sprite Script to GameObject
Alternatively, you can add the sprite component through the Unity menu by going to Component > Scripts
> Sprite.
Creating a Sprite | 25
Figure 4-6
Add Sprite Component Through Menu
Other Components
When you create a sprite, Smooth Moves will automatically add other components for the sprite to
work, including:
●
Mesh Filter: Used to store the actual mesh vertex data
●
Mesh Renderer: Used to render the mesh in the game window
You don't need to adjust these components since they are handled automatically and modified behind the
scenes.
26 | Sprites
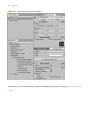
4.2
Figure 4-7
Sprite Component
Sprite Component
The sprite component has several properties, including:
●
Atlas: The collection of textures to choose from
●
Texture: The specific atlas texture to render for this sprite
●
Pivot Offset: the center point for the texture to position, rotate, and scale around
●
Scale / Size: Scale is relative to the original texture size. Size is an absolute pixel value.
●
Color: Hue of the mesh
●
Mesh Seperator: Function to make a duplicated gameobject or instantiated prefab seperate from its
source
Set Atlas
Figure 4-8
Atlas
Sprite Component | 27
To set the atlas, click the circle to the right of the atlas property. This will bring up the atlas selection
window where you can choose from the atlases in your Project.
Figure 4-9
Select Atlas
Once your atlas is set, Smooth Moves will automatically set the material of your Mesh Renderer
component to the atlas' material and populate the texture list.
Figure 4-10
Mesh Renderer Material
28 | Sprites
Set Texture
Figure 4-11
Texture
To change the texture, click on the drop down list and select the texture name that you want to display.
When you change the texture, the small graphic below the list will update to show which texture you
have selected.
Set Pivot Offset
Figure 4-12
Pivot Offset
When you click on the pivot offset button, the Pivot Offset Editor window will open.
Please refer to the Pivot Editor for more information on how to use the pivot offset window.
The only difference in the sprite pivot offset window is that you can lock or unlock the pivot offset to
the default set in the atlas. When the offset is locked, you can't adjust it and it will use what is set in the
atlas.
Sprite Component | 29
Figure 4-13
Pivot Offset Locked to Default
When the offset is unlocked, you can adjust it freely, overriding what is set in the atlas.
Figure 4-14
Pivot Offset Unlocked
Using the default pivot offset in the atlas by locking can save you a lot of time by not having to set the
pivot over and over for a group of sprites.
Set Relative Scale / Absolute Size
You can set the relative scale, or absolute size, but not both at the same time.
You should not set the sprite's size through the Unity transform scale. Creating a different
scale for numerous sprites will cause Unity to not batch the sprites, resulting in higher draw
calls and lower performance. Instead, use the size settings explained here.
Relative Scale
Figure 4-15
Relative Scale
30 | Sprites
Click the Relative Scale button to switch the sprite's size mode to relative scale.
The relative scale is a relative value to the sprite texture's original size. For example, if the sprite was
100 px wide and 40 px high and your relative scale is set to x = 0.5f, y = 0.5f, then your sprite will be 50
px wide and 20 px high.
Absolute Size
Figure 4-16
Absolute Size
Click the Absolute Size button to switch the sprite's size mode to absolute size.
The absolute size will ignore the texture's original dimensions and force the sprite to be the width and
height that you specify here.
Set Color
Figure 4-17
Color
To set the color, click on the color swatch to bring up a color chooser. You can also click on the
eyedropper and select a portion of the screen to match that color.
Mesh Seperator
When you duplicate a sprite, the mesh is shared. Any changes you make to one of the sprites is
propagated to all the sprites that share the mesh. This may be desired, but if it is not, you can easily
Sprite Component | 31
separate the mesh for any sprite by clicking on the Create Separate Mesh button.
Figure 4-18
Create Seperate Mesh
If a sprite is cloned from a prefab, then a different button will appear that has the same functionality. To
separate this sprite's mesh from the prefab, click on the Disconnect From Prefab button.
Figure 4-19
Disconnect From Prefab
5.
Animation Editor
Figure 5-1
Animation Editor Settings
34 | Animation Editor
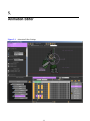
5.1
Overview
The Animation Editor is where you will create your animations. Smooth Moves uses the data created
here to generate a skinned mesh and animation component that Unity will use just like any other mesh
imported from an FBX file created in a third party animation package.
5.2
Creating a Bone Animation Data Asset
To create an animation asset, right-click in your project window and select Create > Smooth Moves Bone
Animation Data.
Figure 5-2
Create Bone Animation Data Asset Through Project Context Menu
Opening the Animation Editor | 35
You can also create an asset through the Unity menu by selecting Smooth Moves > Create Asset > Bone
Animation Data.
Figure 5-3
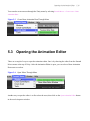
5.3
Create Bone Animation Data Through Menu
Opening the Animation Editor
There are a couple of ways to open the animation editor. One is by choosing the editor from the Smooth
Moves menu at the top of Unity. After the Animation Editor is open, you can select a Bone Animation
Data asset to work on.
Figure 5-4
Open Editor Through Menu
Another way to open the editor is to first select the asset, then click on the Open Animation Editor button
in the asset's inspector window.
36 | Animation Editor
Figure 5-5
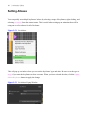
5.4
Open Editor Through Inspector
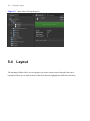
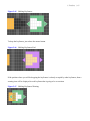
Layout
The Animation Editor allows you to organize your source textures into a hierarchy that can be
keyframed. There are six main sections of the editor that are highlighted in different colors here:
Layout | 37
Figure 5-6
Layout
●
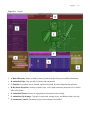
A: Bone Hierarchy: Bones are added, removed, and reorganized into parent-child relationships
●
B: Animation Clips: clips are added, deleted, and reorganized
●
C: Timeline: Keyframes are set, deleted, and moved around for each animation clip and bone
●
D: Keyframe Properites: position, rotation, scale, color, depth, and other properties are set for the
selected keyframe
●
E: Animation Window: Bones are repositioned, rotated and scaled visually
●
F: Animation Clip Settings: Clip speed, wrap mode, mixing, layers, and blend weight is set here
●
G: Animation Controls: Animation is played and settings are modified
38 | Animation Editor
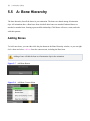
5.5
A: Bone Hierarchy
The bone hierarchy lists all the bones in your animation. The bones are shared among all animation
clips. All animations have a Root bone from which all other bones are attached. Indented bones are
attached to another bone, forming a parent-child relationship. Child bones will move, rotate, and scale
with their parents.
Adding Bones
To Add a new bone, you can either click the plus button in the Bone Hierarchy window, or you can right
click a bone and select Add Bone from the context menu, including the Root bone.
Adding a bone will add the bone to all animation clips in the animation.
Figure 5-7
Add Bone Button
Figure 5-8
Add Bone Context Menu
A: Bone Hierarchy | 39
Windows Keyboard Shortcuts:
●
Ctrl + A: Adds a bone to the Root bone
●
Ctrl + Shift + A: Adds a bone to the currently selected bone
Mac Keyboard Shortcuts:
●
Cmd + A: Adds a bone to the Root bone
●
Cmd + Shift + A: Adds a bone to the currently selected bone
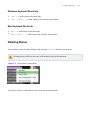
Deleting Bones
You can delete a bone by right-clicking it and selecting Delete Bone from the context menu.
Deleting a bone will delete the bone in all animation clips in the animation.
Figure 5-9
Delete Bone Context Menu
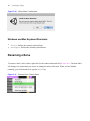
You will be asked to confirm that you want to delete the selected bone.
40 | Animation Editor
Figure 5-10
Delete Bone Confirmation
Windows and Mac Keyboard Shortcuts:
●
Delete: Deletes the currently selected bone
●
Backspace: Deletes the currently selected bone
Renaming a Bone
To rename a bone, select a bone, right-click for the context menu and click Rename Bone. The bone label
will change to a textbox that you can use to change the name of the bone. When you are finished
renaming, just click elsewhere or type the Enter key.
Figure 5-11
Rename Bone Context Menu
A: Bone Hierarchy | 41
Figure 5-12
Renaming Bone
Windows and Mac Keyboard Shortcuts:
●
R: Switches bone to rename mode
●
Enter: Finalizes new name
Reordering Bones
You can change the parent-child relationships between bones by dragging a bone to another parent. If
you drag a bone to the Root, the bone will not have any parents other than the Root bone. You cannot
drag a bone to one of its own children.
When a bone is being dragged, it will be colored a light orange. The parent target bone will be
highlighted a light green indicating which bone will receive the child when released.
Figure 5-13
Reorder Bone
42 | Animation Editor
Figure 5-14
New Bone Hierarchy
Windows and Mac Keyboard Shortcuts:
●
Esc: Cancel the bone reordering and return to the previous hierarchy state
Making Bone the Base
You can quickly shift your hierarchy to make a selected bone the new base bone. This bone is parented
directly under the Root bone and all other bones become children of the selected bone. This can be
useful if you decide to add a bone that should be at the top of the hierarchy. Instead of dragging each
bone to the new base, this shortcut does it in one step.
To make a selected bone the base, right-click for the context menu and select Make Bone the Base.
Figure 5-15
Make Bone the Base
A: Bone Hierarchy | 43
Figure 5-16
Before Bone is Base
Figure 5-17
After Bone is Base
44 | Animation Editor
Bone Visibility
You can toggle the visible state of a bone both in the editor and in your project. To change a bone's
visibility, click on the eyeball next to the bone. The bone can be in one of three states:
1.
Eyeball Open: The bone is visible in the editor and the project
2.
Eyeball Closed: The bone is not visible in the editor, but will show up in the project
3.
X: The bone will not show up in the editor or the project
Figure 5-18
Bone Visible In Editor
Figure 5-19
Bone Visible In Editor
Figure 5-20
Bone Hidden In Editor
A: Bone Hierarchy | 45
Figure 5-21
Bone Hidden In Editor
Figure 5-22
Bone Hidden In Editor and Project
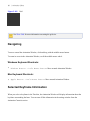
Figure 5-23
Bone Hidden In Editor and Project
You change the bone's visibility at runtime with the function HideBone. You can also get the
visibility state of a bone at runtime with the function IsBoneHidden. The bone will continue
to be moved, rotated, scaled, and switched while it is hidden.
46 | Animation Editor
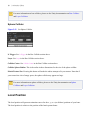
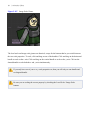
Bone Color
You can set the color of a bone, which will affect the color of the textures of the bone in all animation
clips. To set the color, click on the checkered area on the right side of the bone.
Figure 5-24
Bone Color Click
This will open up a popup window that allows you to change the mesh color, the bone color, and the
bone color's weight. The weight of the color is how much of the color to apply. The higher the weight,
the more the bone will reflect the color that you set here. The lower the weight, the more the bone will
reflect the mesh color.
See the chapter on Color And Lighting for more information.
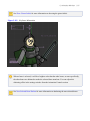
Note that you can also set the mesh color in the animation controls window.
Figure 5-25
Set Bone Color
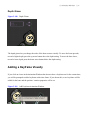
After a bone color is set, you will see the color show up over the checkered area on the left. The color
will cover the checkered area depending on how much blending weight is applied. For example, a
blending weight of 50% (half / half) will show the color bar covering half the checkered area.
A: Bone Hierarchy | 47
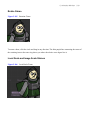
Figure 5-26
Bone Color Set
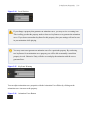
For any color changes to be processed by Smooth Moves at runtime, you will need to be sure
the Update Colors checkbox is set on the bone animation's inspector window (not the asset's
inspector window). This is turned off by default to improve performance for animations not
using color.
See the FAQ for more information.
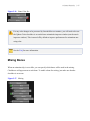
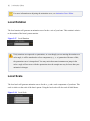
Mixing Bones
When an animation clip is set to Mix, you can specify which bones will be used in the mixing.
Checkboxes will appear next to each bone. To enable a bone for mixing, just make sure that the
checkbox is set to true.
Figure 5-27
Mixing
48 | Animation Editor
If a bone is not selected when mixing, then its animation curves will not be processed by Unity when
playing the animation. Whatever animation is playing on a lower layer will handle these non-mixed
bones instead.
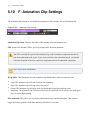
For more information see F: Animation Clip Settings or Unity's documentation on Character
Animation or Animation Scripting.
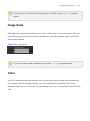
Scrolling the Bone Hierarchy
You can scroll the bone hierarchy by using the vertical slider on the far left. This will also scroll the
timeline vertically as well.
Figure 5-28
Scroll Bones
Windows and Mac Mouse Shortcuts:
●
Middle Mouse Wheel: Scrolls the bone hierarchy vertically
B: Animation Clips | 49
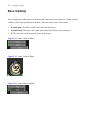
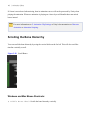
5.6
B: Animation Clips
Your animated character can have multiple clips. These clips can later be set up to play separately, or
mix and blend together just like you would with a mesh imported from a third party animation tool.
Adding an Animation Clip
To add an animation clip, click the plus button in the animation window.
Figure 5-29
Add Animation
Deleting an Animation Clip
To delete an animation clip, right-click on the clip you want to delete and then select Delete Clip
Figure 5-30
Delete Clip
50 | Animation Editor
You will be asked to confirm that you wish to delete this clip.
Figure 5-31
Confirm Delete Clip
Windows and Mac Keyboard Shortcuts:
●
Delete: Deletes the currently selected clip
●
Backspace: Deletes the currently selected clip
Renaming a Clip
To rename a clip, select it then right-click for the context menu. Select Rename. The clip label will turn
into a textbox that will allow you to update the name. To finalize, just click elsewhere or press the
Enter key.
Figure 5-32
Rename Clip Context Menu
B: Animation Clips | 51
Figure 5-33
Renaming Clip
Windows and Mac Keyboard Shortcuts:
●
R: Switches the currently selected clip to rename mode
●
Enter: Finishes renaming the clip
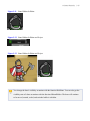
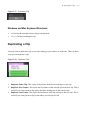
Duplicating a Clip
You may want to duplicate a clip to save time setting up your textures on each bone. There are three
ways you can duplicate a clip:
Figure 5-34
Duplicate Clips
1.
Duplicate Entire Clip: This copies all keyframes from the selected clip to a new clip.
2.
Duplicate First Frames: This copies the first frames of the selected clip to the new clip. This is
useful if you want your new clip to have the same starting pose as the selected clip.
3.
Duplicate Last Frames: This copies the last frames of the selected clip to the new clip. This is
useful if you want your new clip to start where your last clip left off.
52 | Animation Editor
Reordering Clips
You can move your clips up and down to better organize them. The first clip in the list is the default
clip, used by Unity when referencing the default.
Figure 5-35
Move Clip Up
Figure 5-36
Move Clip Down
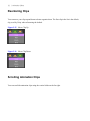
Scrolling Animation Clips
You can scroll the animation clips using the vertical slider on the far right.
C: Timeline | 53
Figure 5-37
Scroll Clips
Windows and Mac Mouse Shortcuts:
●
Middle Mouse Wheel: Scrolls the animation clip list vertically
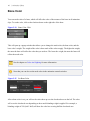
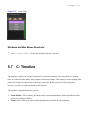
5.7
C: Timeline
The timeline is where you set your keyframes for a selected animation clip. A keyframe is a point in
time on a particular bone where some property of the bone changes. This property can be anything from
position or rotation to what texture is showing on the bone. Before you can set these properties,
however, you have to set the keyframes in the timeline.
The timeline is organized into two sections:
●
Frame Header: This is where you can move the current animation time forward and backward as
well as set columns of frames
●
Frames: this is where you will set and manipulate the keyframes for the animation
54 | Animation Editor
Figure 5-38
Timeline Frame Header
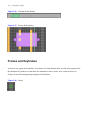
Figure 5-39
Frames & Keyframes
Frames and Keyframes
A frame is any square in the timeline. A keyframe is a frame that has been set with some properties for
the animation. Keyframes are what drive the animation to move, rotate, scale, switch textures, etc.
Frames are used for timing and spacing between keyframes.
Figure 5-40
Frame
C: Timeline | 55
Figure 5-41
Keyframe
Selecting Frames
To select a frame or keyframe in the timeline, simple click with the mouse, drag to highlight your
selection, then release the mouse button. Purple frames are selected frames without keys. Light orange
frames are selected keyframes.
Figure 5-42
Select Frames
You can also select a column of frames by double-clicking the frame header section.
56 | Animation Editor
Figure 5-43
Select Column of Frames
Windows and Mac Keyboard Shortcuts:
●
Left Arrow: Selects the frame to the left of the current selection
●
Right Arrow: Selects the frame to the right of the current selection
●
Up Arrow: Selects the frame above the current selection
●
Down Arrow: Selects the frame below the current selection
Setting a Keyframe
To set a keyframe, right-click the frame you want, then select Set Blank Keyframe. This adds a keyframe
without any properties set. You can see this in the properties inspector.
You can also set multiple frames if you have selected a group of frames.
C: Timeline | 57
Figure 5-44
Set Blank Keyframe
Since moving and rotating bones is the primary purpose of the timeline, there is also a shortcut in the
context menu to set a position and rotation keyframe. All this does is first create a blank keyframe, then
it sets the position and rotation properties to be used all in one step.
Figure 5-45
Set Position Rotation Keyframe
Blank keyframes will be colored red. Keyframes that have at least one property set on them will be
colored orange.
Figure 5-46
Blank Keyframes
58 | Animation Editor
You can also set an entire column of keyframes by right-clicking on the frame header and selecting Set
Blank Keyframes for Column.
Figure 5-47
Set Blank Keyframes For Column
Windows and Mac Keyboard Shortcuts:
●
B: Sets a blank keyframe
●
P: Sets a position / rotation keyframe
●
T: Sets a texture keyframe
Deleting a Keyframe
To remove a keyframe, simple select the keyframe, right-click, and select Delete Keyframe from the
context menu. This will remove all properties for that keyframe.
Figure 5-48
Delete Keyframe
C: Timeline | 59
When you delete, you will be asked to confirm that you want to remove the keyframe.
Figure 5-49
Delete Keyframe Confirmation
Windows and Mac Keyboard Shortcuts:
●
Delete: Deletes selected keyframes
●
Backspace: Deletes selected keyframes
Reset Transform
You can quickly set a keyframe's location, rotation, and scale properties back to their defaults by
selecting keyframes, right-clicking, and selecting Reset Transform from the context menu.
Figure 5-50
Reset Transform
60 | Animation Editor
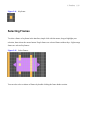
Setting Atlases
You can quickly set multiple keyframes' atlases by selecting a range of keyframes, right-clicking, and
selecting Set Atlases from the context menu. This is useful when setting up an animation that will be
using one or a few atlases for all of its bones.
Figure 5-51
Set Atlases
This will pop up a window where you can set the keyframes' type and atlas. Be sure to set the type to
Image if you want the keyframes to show a texture. When you have selected the atlas, click the Update
Selected Keyframes button to apply the change.
Figure 5-52
Set Atlases Popup Window
C: Timeline | 61
Duplicating Keyframes
You can duplicate keyframes in two ways:
1.
Duplicate Previous Keyframe: copies the properties of the keyframe that occurs just before the
currently selected frame.
2.
Duplicate First Keyframe: copies the properties of the keyframe located at frame zero of the
animation clip. This is useful for "bookending" and animation that loops around back to its starting
position.
Figure 5-53
Duplicating Keyframes
Copying and Pasting Keyframes
You can copy and paste keyframes, even between bones. To do so, select a range of keyframes,
right-click and select Copy Keyframe from the context menu. To remove the keyframes and paste them
elsewhere, use the Cut Keyframe selection.
62 | Animation Editor
Figure 5-54
Copy and Cut Keyframe
To paste the copied or cut keyframes, select another frame, right-click, and select Paste from the context
menu.
Figure 5-55
Paste Keyframe
If your selection of keyframes will be pasted over keyframes that are already set, you will be asked to
confirm that you want to overwrite the old keyframes.
C: Timeline | 63
Figure 5-56
Paste Confirmation
Windows Keyboard Shortcuts:
●
Ctrl + C: Copy keyframes
●
Ctrl + X: Cut keyframes
●
Ctrl + V: Paste keyframes
Mac Keyboard Shortcuts:
●
Cmd + C: Copy keyframes
●
Cmd + X: Cut keyframes
●
Cmd + V: Paste keyframes
You can set which properties are copied and pasted for each keyframe in the Settings
Window. Refer to Copy and Paste Property Selection for more information.
Inserting Frames
You can insert frames anywhere in the timeline to shift keyframes forward in time. All keyframes to the
right of where you insert will be moved to the right. If you select multiple frames, then the keyframes
will be moved multiple frames forward.
64 | Animation Editor
Figure 5-57
Inserting Frame
Figure 5-58
Before Insert
Figure 5-59
After Insert
You can also insert an entire column of frames, shifting keyframes in every bone forward in time. To
insert a column of frames, right-click on the timeline's frame header section and select Insert Column of
C: Timeline | 65
Frames.
Figure 5-60
Insert Column of Frames
Deleting Frames
You can also shift keyframes backward, to the left by deleting frames. The number of frames shifted
will be the number of frames selected.
Figure 5-61
Before Delete Frames
Figure 5-62
After Delete Frames
66 | Animation Editor
You can also delete an entire column of frames, shifting keyframes backward in every bone within an
animation clip.
Figure 5-63
Delete Column of Frames
Shifting Keyframes
You can quickly shift keyframes back and forth by selecting a range of keyframes, then dragging left or
right on the arrows surrounding your selection.
Figure 5-64
Shifting Keyframes Start
While shifting keyframes, the frames you've selected will be highlighted light green. The keyframes
you've selected will be highlighted white. The frames that the keyframes are being moved from will be
darkened.
C: Timeline | 67
Figure 5-65
Shifting Keyframes
To drop the keyframes, just release the mouse button.
Figure 5-66
Shifting Keyframes End
If the position where you will be dropping the keyframes is already occupied by other keyframes, then a
warning icon will be displayed in each keyframe that is going to be overwritten.
Figure 5-67
Shifting Keyframes Warning
68 | Animation Editor
If you decide to overwrite the keyframes, you will be asked to confirm that action.
Figure 5-68
Shifting Keyframes Confirm
Windows and Mac Keyboard Shortcuts:
●
Esc: Stops the shifting and returns the keyframes back to where they started
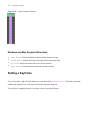
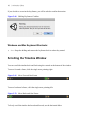
Scrolling the Timeline Window
You can scroll the timeline back and forth using the controls at the bottom of the window.
To move forward a frame, click the single arrow pointing right:
Figure 5-69
Move Forward One Frame
To move backward a frame, click the single arrow pointing left:
Figure 5-70
Move Backward One Frame
To freely scroll the timeline backward and forward, use the horizontal slider:
C: Timeline | 69
Figure 5-71
Freely Scroll Timeline
To skip to the last keyframe that is set for an animation clip, click the double arrow pointing right:
Figure 5-72
Skip To Last Used Keyframe
To skip to the first frame in the animation clip, click the double arrow pointing left:
Figure 5-73
Skip To Beginning Frame
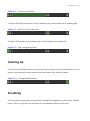
Cleaning Up
If you have a lot of blank keyframes set and want to remove them to keep a clean workspace, you can
quickly remove them all with the trashcan icon at the bottom of the Timeline window.
Figure 5-74
Cleanup Blank Keyframes
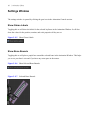
Scrubbing
You can scrub your animation back and forth by clicking and dragging the green box in the Timeline
header. This lets you quickly see the motion of your animation backward and forward.
70 | Animation Editor
Figure 5-75
5.8
Scrubbing
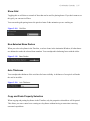
D: Keyframe Properties
The Keyframe Properties window is where you will set all the properties for a single keyframe, such as
position, rotation, scale, texture, depth, colliders, etc.
Keyframes do not need all of their properties set. You can choose which properties of a keyframe to use
by toggling the checkbox to the left of each property.
Figure 5-76
Choose Keyframe Properties
The only exception to this is that frame zero for all animations, all bones needs to have all of its
properties set.
D: Keyframe Properties | 71
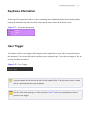
Keyframe Information
At the top of the properties window is a box containing some information about the selected keyframe,
namely the animation clip name, the bone name, and the frame where the keyframe exists.
Figure 5-77
Keyframe Information
User Trigger
A keyframe can fire a user trigger which simply sends a signal back to your code at a specific point in
the animation. You can use this signal to perform your own game logic. To set the user trigger to fire, be
sure the checkbox is checked.
Figure 5-78
User Trigger
A good example of how this can be used is with sound effects. You may want to have a sound
play at a particular point in your animation.
Check out the demo package or video tutorials at echo17.com for an explanation on how to
process a user trigger.
72 | Animation Editor
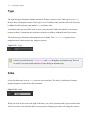
Type
The keyframe type determines whether the bone will show a texture or not. If the type is set to Image,
then the bone will display a texture. If the type is set to Transform Only, then the bone will effectively
be hidden for this keyframe until another Image keyframe is hit.
A transform only type can still be used to move, rotate and scale child bones that do or do not have
textures on them. A transform only keyframe can also use colliders without the need for a texture.
The keyframe type determines what properties are available. The Transform Only type has fewer
properties since it does not have any images to process.
Figure 5-79
Type
A bone can switch between Transform Only and Image throughout an animation clip. This can
be useful if you want to hide and show a bone during an animation clip.
Atlas
If your keyframe type is set to Image, then you can set an atlas. The atlas is a collection of textures
grouped together to reduce draw calls at runtime.
Figure 5-80
Atlas
When you click on the circle to the right of the atlas, you will be presented with a pop up window that
will let you select your atlas from those in your project. Changing your atlas, will change the textures
D: Keyframe Properties | 73
that are available for the bone's keyframe.
Figure 5-81
Select Atlas
For more information on Atlases, please see Atlas Editor.
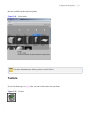
Texture
If your keyframe type is Image, then you can set the texture for your bone.
Figure 5-82
Texture
74 | Animation Editor
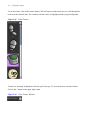
To set the texture, click on the texture button. This will open a window that lets you scroll through the
textures in the selected atlas. The currently selected texture is highlighted with a purple background.
Figure 5-83
Select Texture
Textures are arranged in alphabetic order for quick look ups. To close the texture selection window,
click on the X button in the upper right corner.
Figure 5-84
Close Texture Window
D: Keyframe Properties | 75
You can create traditional sprite animations by setting a different texture on multiple
keyframes for a bone. A traditional sprite animation is just a sequence of images played over
time to give the illusion of movement, similar to a motion picture film. These sprite
animations can be played in conjunction with the motion, rotation, and scale of the bone
animation for interesting effects.
Pivot
If your keyframe is type Image, you can set the pivot offset of the texture.
Figure 5-85
Pivot
To set the pivot, press the Pivot button. This will open up the pivot editor window.
76 | Animation Editor
Figure 5-86
Pivot Offset Editor
If you want to use the pivot offset set in the atlas editor, be sure the Pivot Lock button is on (glowing
orange with the lock icon closed).
Figure 5-87
Pivot Offset Locked to Default
If you want to override the pivot offset set in the atlas editor, be sure the Pivot Lock button is off (not
glowing with the lock icon open). Once the lock is off, you can adjust your pivot as necessary.
D: Keyframe Properties | 77
Figure 5-88
Pivot Offset Unlocked
Using the default pivots set in the Atlas Editor can save a lot of time when animating. It's a
good idea to leave the pivots locked to the default, just be sure you have set the pivots in the
Atlas Editor before you start animating.
To close the Pivot Offset window, click the X button in the upper right corner.
Figure 5-89
Close Pivot Offset Window
For more information on how to set the pivot offset, please refer to Pivot Editor.
Depth
If your keyframe type is Image, you can set the depth. The Depth is the order in which your bones will be
rendered. Higher depths will be rendered first. Depth zero will be rendered last.
Figure 5-90
Depth
78 | Animation Editor
You can change your bone's depth throughout an animation to shift bones to the foreground
and background dynamically.
Depth will work even when your animation is rotated in the opposite direction, rendering
your bones in order. This allows you to save on the number of animations by not needing to
animate a forward and backward pose.
Collider
You can set colliders on both Image and Transform Only keyframes. A collider lets your bones interact
with other colliders in your scene. This can be good for weapons or other interactions.
Figure 5-91
Collider
Colliders will appear in the Animation Window as a light green wireframe box or sphere.
There are three collider types:
●
None: Collider is turned off. This is useful if you don't want your bone to have a collider or you are
wanting to turn a collider off on a keyframe after it has been turned on earlier.
●
Box: A standard Unity box collider with center and size in three dimensions.
●
Sphere: A standard Unity sphere collider with center and radius in three dimensions.
None Collider
Having no collider is useful for:
D: Keyframe Properties | 79
●
Never having a collider set for a bone. If this is desired, set None on frame zero of your bone
(default).
●
Turning off a collider that was perviously set on a bone. This can be useful if you don't want your
collider constantly on. For example, you may have a collider on a weapon bone that you wouldn't
want to be on while walking around, but you would want turned on while swinging the weapon.
Box Collider
Figure 5-92
Set Box Collider
Is Trigger: This is set if you want your collider interactions to be handled like a trigger.
Layer: This controls what Unity layer the collider will be on, and more specifically what layer your
bone will be on for this keyframe. You can use layers to control which colliders interact with each other.
If the Use Animation Layer is set to true, then whatever layer your animation is set to will be used for this
keyframe. If this is set to false, you can select your layer from Unity's list of layers. Filtering your
physics layer interactions can help prevent unwanted triggers from processing.
Collider Center: This is the offset of the collider relative to your bone's position. This offset is in three
dimensions, so you have more flexibility on how it will interact with your scene.
Collider Box Size: This is the size of the box collider along the x, y, and z axis. The size is in three
dimensions, so you have more flexibility on how it will interact with your scene.
Match Texture Size: Pressing this button will make the x and y sizes of the box collider attempt to fit to
your texture. Note that if your texture has a lot of empty space, the box collider may appear too large.
80 | Animation Editor
For more information on box colliders, please see the Unity documentation on Box Colliders
and Layer Collision.
Sphere Collider
Figure 5-93
Set Sphere Collider
Is Trigger: See Is Trigger in the Box Collider section above.
Layer: See Layer in the Box Collider section above.
Collider Center: See Collider Center in the Box Collider section above.
Collider Sphere Radius: This is the radius in three dimensions for the size of the sphere collider.
Match Texture Size: Pressing this button will make the radius attempt to fit your texture. Note that if
your texture has a lot of empty space, the sphere collider may appear too large.
For more information on sphere colliders, please see the Unity documentation on Sphere
Colliders and Layer Collision.
Local Position
The local position will generate animation curves for the x, y, or z (or all three) positions of your bone.
The local position is relative to the position of the bone's parent bones.
D: Keyframe Properties | 81
Figure 5-94
Local Position
If you change a property that generates an animation curve, you may receive a warning icon.
This is telling you that the property needs at least two keyframes set to generate the animation
curve. If you do not set another keyframe for this property, then your settings will not be seen
in your animation while playing.
You may want to not generate an animation curve for a particular property. By not having
two keyframes for an animation curve property you will be able to manually control that
property in code. Otherwise Unity will take over and play the animation with the curves
generated here.
Figure 5-95
Keyframe Warning
You can adjust animation curve properties with the Animation Curve Editor by clicking on the
animation curve icon next to the property.
Figure 5-96
Animation Curve Button
82 | Animation Editor
For more information on adjusting the animation curve, see Animation Curve Editor.
Local Rotation
The local rotation will generate an animation curve for the z axis of your bone. This rotation is relative
to the rotation of the bone's parent rotation.
Figure 5-97
Local Rotation
Unity rotations are expressed as quaternions, so even though you are entering the rotation as a
euler angle, it will be translated to a four component (x, y, z, w) quaternion. Because of this,
the quaternion curve is interpolated. You may notice that some instantaneous jumps in the
euler z angle will not occur with the quaternion since the sample rate may be lower than your
animation's changes.
Local Scale
The local scale will generate animation curves for the x, y, and z scale components of your bone. This
scale is relative to the scale of the bone's parent. Using the local scale will also scale all child bones.
Figure 5-98
Local Scale
D: Keyframe Properties | 83
If you just want to scale the bone's image and not its children, use the Image Scale properties
instead.
Image Scale
The image scale will generate animation curves for the x and y scale of your bone's texture. This scale
can be affected by the local scale of the bone and the scale of the bone's parents. Image scale will not
affect a bone's children.
Figure 5-99
Image Scale
If you want to scale a bone's children as well, use the Local Scale properties instead.
Color
As well as setting the mesh color and bone color, you can set the color of a bone on a keyframe basis.
The keyframe color has the highest priority, so it will override the mesh and bone colors if your
blending weight is set to 1.0f. Inversely, if your blending is set to zero, your keyframe color will not be
used.
84 | Animation Editor
Figure 5-100
Color
You can set your color using the color dropper, color selector, or by sliding the red, green, blue, and
alpha colors individually. If you want to enter the float values of the rgba values, you can open the color
selector and set them there. Unlike the other animation curve properties, the color property has to have
animation curves for all the color elements. For example, you cannot just have a red color curve, but
instead you have to have all four components set.
The blend property tells your animation how much weight to assign this color. A full blend of 1.0f will
make this keyframe color override the bone and mesh colors completely. A blend of 0.5f will make this
keyframe color blend halfway with the mesh and bone colors. Three shortcut buttons exist for setting
often-used blend settings: None, Half/Half, and Full.
In order for the keyframe colors to show while animating, be sure the Update Colors toggle is
set to true on your bone animations in the scene.
See the FAQ for more information.
For more information on color blending, please see Color And Lighting.
E: Animation Window | 85
5.9
E: Animation Window
The animation window allows you to visually change your keyframe properties. It also lets you preview
the selected animation clip.
Axis and Grid
The Animation Window shows the x and y axis. The z axis cannot be shown in the 2D editor. The x axis
is colored red and the y axis colored green. You can set the thickness of the axis in the settings window
from the Animation Controls section.
Figure 5-101
Axis
See Axis Thickness for more information on setting the axis thickness.
The grid gives you a reference for your animating. You can change the grid interval or turn it off
completely in the settings window from the Animation Controls section.
86 | Animation Editor
Figure 5-102
Grid
See Show Grid for more information on setting the grid size.
Navigating
To move around the Animation Window, click and drag with the middle mouse button.
To zoom in or out in the Animation Window, scroll the middle mouse wheel.
Windows Keyboard Shortcuts:
●
Windows Button + Left Mouse Button: Move around Animation Window
Mac Keyboard Shortcuts:
●
Apple Button + Left Mouse Button: Move around Animation Window
Selected Keyframe Information
When you select a keyframe in the Timeline, the Animation Window will display information about the
keyframe surrounding the bone. You can turn off this information in the settings window from the
Animation Controls section.
E: Animation Window | 87
See Show Gizmo Labels for more information on showing the gizmo labels.
Figure 5-103
Keyframe Information
When a bone is selected, it will be a brighter color than the other bones, or more specifically,
the other bones are darkened to make the selected bone stand out. You can adjust this
darkening effect in the settings window from the Animation Controls section.
See Non-Selected Bone Darken for more information on darkening the non-selected bones.
88 | Animation Editor
Gizmos
There are a few gizmos for the Animation Window that will allow you to manipulate your bones. These
gizmos are similar to the Unity gizmos used in the scene editor and allow you to move, rotate, scale, and
change your bone depth.
Move Gizmo
Figure 5-104
Move Gizmo
To move a bone in the Animation Window, click and drag either the move arrows or the move box. If
you drag the vertical arrow, you will move the bone along the y axis. If you drag the horizontal arrow,
you will move the bone along the x axis. If you drag the box, you will simultaneously move the bone
along the x and y axis freely.
If you only have one of the x or y position properties set, then you will only see one arrow
and no box. The z position cannot be set in the Animation Window.
E: Animation Window | 89
Rotate Gizmo
Figure 5-105
Rotation Gizmo
To rotate a bone, click the circle and drag in any direction. The faint purple line connecting the center of
the rotation gizmo to the outer ring shows you where the relative zero degree line is.
Local Scale and Image Scale Gizmos
Figure 5-106
Local Scale Gizmo
90 | Animation Editor
Figure 5-107
Image Scale Gizmo
The local scale and image scale gizmos are identical, except for the buttons that let you switch between
the two scale properties. To scale, click and drag on one of the handles. Click and drag on the horizontal
handle to scale on the x axis. Click and drag on the vertical handle to scale on the y axis. Click on the
slanted handle to scale both the x and y axis simultaneously.
If you only have one of your x or y scale properties set, then you will only see one handle and
no diagonal handle.
Be sure you are scaling the correct property by checking the Local Scale / Image Scale
buttons.
E: Animation Window | 91
Depth Gizmo
Figure 5-108
Depth Gizmo
The depth gizmo lets you change the order of the bone textures visually. To move the bone upwards,
toward a higher depth, press the up arrow button above the depth setting. To move the bone lower,
toward a lower depth, press the down arrow button below the depth setting.
Adding a Keyframe Visually
If you click on a bone in the Animation Window that does not have a keyframe set for the current time,
you will be prompted to add a keyframe at this time frame. If you choose this, a new keyframe will be
added for the bone and the position / rotation properties will be set.
Figure 5-109
Add Keyframe Animation Window
92 | Animation Editor
5.10 F: Animation Clip Settings
The animation clip settings let you modify the properties of the currently selected animation clip.
Figure 5-110
Animation Clip Settings
Animation Clip Name: Displays the name of the currently selected animation clip.
FPS: (Frames Per Second) Allows you to speed up or slow down an animation.
The FPS is actually the speed of the animation clip in the Animation component attached to
your bone animation in the scene. If you want to reference the normalized speed, you should
reference the speed of the bone animation component and not the animation component.
See FAQ for more information.
Wrap Mode: This determines how the animation clip should behave when it reaches the end.
●
Loop: The animation clip will start over from the beginning.
●
Once: The animation clip will stop once it has played.
●
Clamp: The animation clip will play to the last frame and keep playing the last frame.
●
Ping Pong: The animation clip will reverse itself once it reaches the end. It will reverse itself again
once it reaches the beginning.
Mix Animation: This allows you to play the animation on top of another animation. This will also
toggle the mixing switches on the bone hierarchy when this is set to true.
G: Animation Controls | 93
For more information on setting bone mixing, see Mixing Bones.
Blend Mode: This tells Unity how to blend this animation with other animations.
●
Blend: Sets the animation to blend evenly with other animations, determined by the blend weight.
●
Additive: Sets the animation to add its curve property values to other animations, determined by the
blend weight.
Layer: The animation layer determines priority when blending and mixing. If the animation clip is to
play on top of another clip, the layer should be set higher.
Blend Weight: The blend weight determines how much of an animation's curve properties should be
used when blending and mixing animations. Higher blend weights give more priority to this animation
clip.
For more information on blending and mixing animations, layers, and blend weight, refer to
Unity's documentation on Character Animation and Animation Scripting.
5.11 G: Animation Controls
The animation controls allow you to preview an animation and toggle settings for the editor.
Previewing an Animation
You can use the Play / Stop button to start and stop an animation preview. While the animation is being
previewed, all other functions are disabled to prevent changing the animation.
94 | Animation Editor
To advance one frame backward or forward, use the arrow buttons to the left or right, respectively.
Figure 5-111
Preview Animation
The real time of an animation is displayed to the right of the animation preview buttons. This shows you
how many seconds will have elapsed at the current frame in the animation clip, taking into consideration
the FPS.
Figure 5-112
Animation Preview Time
You can leave the Animation Curve Editor window open and adjust its curves while
previewing an animation. This allows you to adjust an animation curve and quickly get
feedback on the effect.
Animation Editor Settings and Controls
Figure 5-113
Animation Editor Settings
Center Animation: Brings the x and y axis back to the center of the Animation Window.
Zoom x 1: Zooms the Animation Window back to its default setting where one texture pixel equals one
pixel in the Animation Window.
Settings: Opens the settings window.
G: Animation Controls | 95
See Settings Window for the different options that can be changed.
Toggle Contrast: Switches the background and gizmo label colors from light to dark so that you can
better see your light or dark animation textures.
Update Mesh in Scene: Clicking this button will update all the bone animations in your current scene
that are using this bone animation data. This button is optional since the update process occurs
automatically when you play the scene. Clicking the update, just lets you see an updated version of the
mesh in your scene editor immediately.
Animation Window Zoom
Figure 5-114
Animation Window Zoom Slider
Sliding the zoom will adjust the zoom setting in the Animation Window. You can also zoom in the
Animation Window with the middle mouse wheel.
Mesh Color
To set the overall mesh color, click on the color swatch or select a color with the eyedropper.
Mesh color is the base color and can be overridden or blended with bone colors and keyframe
colors. See Color And Lighting for more information.
96 | Animation Editor
Settings Window
The settings window is opened by clicking the gear icon in the Animation Controls section.
Show Gizmo Labels
Toggling this on will show the labels for the selected keyframe in the Animation Window. It will also
show the values for the position, rotation, and scale properties if they are set.
Figure 5-115
Show Gizmo Labels
Show Bone Bounds
Toggling this on will place a purple box around the selected bone in the Animation Window. This helps
you to see your bone's size and if you have any extra space in the texture.
Figure 5-116
Show Selected Bone Bounds
Figure 5-117
Selected Bone Bounds
G: Animation Controls | 97
Show Grid
Toggling this on will show a network of lines that can be used for placing bones. If you don't want to see
this grid, you can turn it off here.
You can set the grid spacing interval in pixels to better fit the animation you are working on.
Figure 5-118
Grid Size
Non-Selected Bone Darken
When you select a keyframe in the Timeline, or select a bone in the Animation Window, all other bones
are darkened to make the selected bone standout. You can adjust this darkening factor with the slider.
Figure 5-119
Bone Darken
Axis Thickness
You can adjust the thickness of the axis lines for better visibility. A thickness of zero pixels will make
the axis be invisible.
Figure 5-120
Axis Thickness
Copy and Paste Property Selection
When copying and pasting keyframes in the Timeline, only the properties selected here will be pasted.
This allows you more control over creating new keyframes without having to waste time removing
unwanted copied data.
98 | Animation Editor
Figure 5-121
Copy Paste
Figure 5-122
Copy Paste Properties
6.
Animation Curve Editor
Figure 6-1
Curve Editor
100 | Animation Curve Editor
6.1
Opening
To open the curve editor, you will need to click on the curve swatch next to a property in the keyframe
properties window of the Animation Editor.
Figure 6-2
6.2
Curve Button
Sections
The animation curve editor is composed of several sections:
●
Value Axis
●
Frame Axis
Sections | 101
●
Scale Settings
●
Main curve window
●
Node Settings
Value Axis
The value axis runs horizontally on the left side of the editor. It shows the value range that the nodes of
your curve contain.
Figure 6-3
Values
These values can vary widely, depending on the type of property you are editing. For instance, if you are
editing a color curve, then the values will probably range from zero to one. Rotation curves may have
102 | Animation Curve Editor
something like -120 to 560, or any number possible.
Frame Axis
The frame axis runs vertically along the bottom of the editor. It shows the range of the frames used by
this animation curve.
Figure 6-4
Frames
When you move your mouse over the main curve window, you will see the frames highlight green to
show you where you are in the timeline.
Scale Settings
You can Zoom the animation window by sliding the zoom vertical bar at the top of the editor.
Figure 6-5
Zoom
If you want to quickly show all of the curve in the main curve window, you can click the Fit To Window
button to jump to this zoom level.
Figure 6-6
Fit To Window
Sections | 103
Main Curve Window
Figure 6-7
Main Curve Window
The main curve window shows the animation curve for the selected property on the selected bone in the
selected animation clip. This is where you can select nodes, move nodes around, and adjust node
tangents.
Navigating
You can navigate the main curve window just like you would the Animation Editor or Pivot Offset
Editor.
To pan around, click the middle mouse button and drag.
To zoom, scroll the middle mouse wheel.
104 | Animation Curve Editor
For more information on navigating, please see Navigating.
Nodes
A node is a keyframe, and more specifically it is the property of the keyframe you have chosen.
Figure 6-8
Node
To select a node, simply click on the circle representing the node.
Figure 6-9
Selected Node
When a node is selected, it will be highlighted with a white ring. You will also see its tangent handles
appear for you to adjust.
Moving a Node
When you move a node up and down, you are changing the keyframe property's value. When you move
the node left and right, you are changing the frame where the property is set, thus adjusting its timing.
To move a node, drag the node up, down, left, or right, then release to set the new frame or value.
Sections | 105
When moving a node left or right, adjusting its frame, the node will snap to the frames of
your animation clip. Nodes cannot exist outside of these frames. If the resolution of the
frames is not high enough for you, then it might be best to expand your animation clip and
just speed up the FPS. This will give you more frames to work with.
When moving a node left or right, if you drop on a frame that has no keyframe set, a new
keyframe will be added automatically and the property turned on. If the frame already has a
keyframe, then the property will just be turned on.
Adding a Node
To add a node, be sure the Add Points On button is toggled on in the upper right corner of the editor.
Figure 6-10
Add Points On
When this is on, you can move your mouse over the curve. Anywhere there is a frame without a
keyframe set, the add node icon will appear.
Figure 6-11
Add Node
To add the node, click the icon. A new keyframe will be set and this property will be turned on. If there
is already a keyframe present, then the property will just be turned on.
106 | Animation Curve Editor
Deleting a Node
To delete an existing node, click on the node and press delete node button in the bottom right corner of
the editor.
Figure 6-12
Delete Node
Figure 6-13
Delete Node Confirmation
Windows and Mac Keyboard Shortcuts
●
Delete: Deletes the selected node
●
Backspace: Deletes the selected node
Adjusting a Tangent
To alter a tangent of a node, click on the handle's circle and drag the mouse up and down. Adjusting the
tangent will steepen or smooth a node's curve so that an animation will be more or less exagerated.
Sections | 107
Figure 6-14
Adjust Tangent
If a node is set to smooth, then both the left and right tangents will move together. Tangent handles of
this type are colored purple.
Figure 6-15
Smooth Tangents
A broken tangent allows you to adjust the left and right tangents separately. Tangents of this type are
colored green for the left tangent, blue for the right tangent.
Figure 6-16
Separate Tangents
108 | Animation Curve Editor
Node Properties
When a node is selected, you can adjust its properties on the far right.
Smoothness
If you want your node to be smooth, meaning both the left and right tangents to be equal, then you can
set the node type to Smooth.
Figure 6-17
Smooth Tangents
If you want to set the left and right tangents separately, then you will want a node type to be Broken.
Figure 6-18
Broken Tangents
If the node is broken, then another button will appear that will let you equalize the broken tangents.
Effectively, this is the same thing as a Smooth node type, but the node remains broken. This is good for
quickly setting the node tangents back to an equal state if you have moved them too far away from your
goal.
Figure 6-19
Equalize Tangents
Sections | 109
Special Tangent Types
If the node type is Broken, then you can set special tangent types for the left or right tangents. There are
three special tangent types:
●
Free
●
Linear
●
Constant
Free Tangent
Figure 6-20
Free Tangent
Allows complete freedom to set the tangent how you want.
Figure 6-21
Free Tangent Node
Linear Tangent
Figure 6-22
Linear Tangent
The tangent cannot be set manually, rather it always points to the previous node (for right tangent) or
next node (for left tangent). Linear tangents are colored grey.
110 | Animation Curve Editor
Figure 6-23
Linear Tangent Node
If the right tangent of one node is set to linear and the left tangent of the next node is set to linear, then
the curve between the nodes will be a straight line.
Figure 6-24
Two Linear Tangent Nodes
Sections | 111
Constant Tangent
Figure 6-25
Constant Tangent
The tangent cannot be set manually. Constant tangents have a value of infinity and allow you to keep a
value from changing between nodes.
Figure 6-26
Contant Tangent Node
Node Values
Figure 6-27
Value
112 | Animation Curve Editor
At the bottom of the node properties section are some value shortcuts. These allow you to quickly set
your node value to zero or one, two very common property values. Obviously, these values aren't useful
for all curve types, but for others like scale or color they can come in handy.
6.3
Adjusting Animation Curve While
Previewing
You can leave the Animation Curve Editor open while previewing an animation. This allows
you to adjust an animation curve while watching the animation play, giving you a lot of
feedback on how your changes will impact the overall flow.
7.
Color And Lighting
7.1
Colors
You can add lots of variety to an animation by using colors. There are three types of colors that can be
set in a Smooth Moves animation:
●
Mesh Color
●
Bone Color
●
Keyframe Color
In order for color changes to be processed at runtime, you must toggle the Update Colors
setting in your scene bone animations to true.
See FAQ for more information on updating colors.
Update Colors is turned off by default to improve performance of animations that do not need
their colors changed at runtime. If you do not need color updates at runtime, it is best to leave
this option off.
114 | Color And Lighting
Figure 7-1
Update Colors
Mesh Color
Mesh color is good for changing the overall look of a mesh. It is a great way to simulate lighting on
mobile and other lightweight platforms that don't have the processing power to calculate lights.
You can set the mesh color at runtime in script using the function SetMeshColor.
See the API documentation for more information on setting the mesh color.
Bone Color
Bone color is good for giving variety to your animations. You can create black, white, and grey shaded
textures in your image editing software (Photoshop for example). In the Smooth Moves animation
editor, you can then set your bone colors to give your animations a uniqueness to them. You can also set
the bone color in script with the SetBoneColor function.
You can also flash bone colors in script using the FlashBoneColor function. This can be useful if
you want to draw attention to a bone at runtime. For example if your character is taking damage,
flashing the bone might show where the damage is being taken.
Colors | 115
See the API documentation for more information on setting or flashing the bone color.
In order for bone color flashing to be processed at runtime, you must toggle the Update Colors
setting in your scene bone animations to true.
See FAQ for more information on updating colors.
Keyframe Color
Keyframe color is good for animating a color over a period of time. For example, you could have a
weapon glow by pulsing its color over the life of the animation clip.
Keyframe color cannot be set at runtime, only in the Smooth Moves animation editor.
In order for keyframe animated color changes to be processed at runtime, you must toggle the
Update Colors setting in your scene bone animations to true.
See FAQ for more information on updating colors.
Color Blending
Colors can be set at the mesh, bone, or keyframe level. The mesh color is the base color. Bone color is
higher priority than mesh color and is blended according to the weight of the bone color. Keyframe color
is the highest priority and is blended with the result of the mesh / bone color blending according to the
weight of the keyframe color.
116 | Color And Lighting
Figure 7-2
Color Explanation
Color Examples
Example #1
●
Mesh Color: white
●
Bone Color: red, blending = 1.0f
●
Keyframe Color: white, blending = 0
Colors | 117
Figure 7-3
Ex1
Result:
red
Explanation:
Mesh / Bone color blending = red since the bone blending has the full blend weight set, completely
overriding the mesh color. The keyframe color has no effect since its blending is set to zero.
Example #2
●
Mesh Color: white
●
Bone Color: red, blending = 0.5f
●
Keyframe Color: white, blending = 0
118 | Color And Lighting
Figure 7-4
Ex2
Result:
pink
Explanation:
Mesh / Bone color blending = pink since the bone color red is half blended with the white mesh color.
The keyframe color has no effect since its blending is set to zero.
Example #3
●
Mesh Color: white
●
Bone Color: red, blending = 0.5f
●
Keyframe Color: blue, blending = 1.0f
Colors | 119
Figure 7-5
Ex3
Result:
blue
Explanation:
Mesh / Bone color blending = pink since the bone color red is half blended with the white mesh color.
The keyframe color completely overrides this since its blending is set to one.
Example #4
●
Mesh Color: white
●
Bone Color: red, blending = 0.5f
●
Keyframe Color: blue, blending = 0.5f
120 | Color And Lighting
Figure 7-6
Ex4
Result:
purple
Explanation:
Mesh / bone color blending = pink since the bone color red is half blended with the white mesh color.
The keyframe color of blue is half blended with pink which yields a shade of purple.
Lighting | 121
7.2
Lighting
Smooth Moves animation meshes have normals embedded in them, so you can light them just like you
would a 3D mesh.
In order to have a mesh be lit, you must be using a shader that can process light. By default
Smooth Moves atlas materials are set with the Alpha Blended particle shader. This shader
cannot process lighting and is good for scenes where no lighting is being used.
8.
Optimization and Tips
8.1
Sprite Size
If you want your sprites to dynamically batch so that there are fewer draw calls, be sure that:
●
All have a transform local scale of 1.0f, 1.0f, 1.0f. The sprite's relative scale and absolute size can be
set to anything, just be sure the transform scale is 1.0f.
●
All have the same material, which means the same atlas.
8.2
Skinned Mesh Draw Calls
Currently, Unity will not dynamically batch skinned meshes. This means that each of your bone
animations will take at least one draw call. If your bone animation contains more than one atlas, then
each of your bone animations will take more than one draw call.
124 | Optimization and Tips
Smooth Moves is primarily a skinned mesh skeletal animator. It can be used to generate sprite
animations, but if you are only interested in sprite animation, it is recommended that you seek
out a plugin that is more appropriate for that. There are numerous sprite packages in the Asset
Store that cater to 2D sprite animators. These plugins won't give you the smooth motions that
a skeletal animator will, but you will see better performance due to batching.
If you only have a couple of atlases in your animation, but you are seeing many draw calls,
that is probably because your bones depths are set up in a way that causes Unity to alternate
between your atlases several times to completely draw the character. If possible, try to put
your bones with the same atlases near each other in depth. This will create much fewer draw
calls per animation.
8.3
Creating Assets for Older Devices
You may want to create your game so that older devices will utilize smaller atlas textures. The following
process is the best way to accomplish this:
1.
Create your source textures in the highest resolution your game will use.
2.
Create your high res atlases (which will create the materials and textures).
3.
Create your Animations using the high resolution atlases.
4.
Duplicate the materials and textures created by your high res atlases. Set the max size of these new
textures to a smaller size. These will be your low res textures. Set the low res materials' textures to
the low res textures.
5.
In your scripts, swap out the high res materials with the low res materials.
6.
Add the script to a bone animation, set the properties in the inspector, and Run the game.
The first three steps are covered in this user guide, so only the last three steps will be highlighted here.
Creating Assets for Older Devices | 125
4. Create Low Res Materials and Textures
Duplicate the Materials and Textures
Select your high res material and texture in the Project Window.
Figure 8-1
Select Hi Res Material and Texture
From the Unity menu, select Edit > Duplicate.
Figure 8-2
Duplicate
Set the Max Size of your Low Res Textures Smaller
Select your newly duplicated texture.
126 | Optimization and Tips
Figure 8-3
Select Low Res
In the Inspector Window set the Max Size to a smaller number.
Figure 8-4
Max Size
The preview of the image should now show a smaller texture size.
Figure 8-5
Low Res Texture
Set the Low Res Material's Texture to the Low Res Texture
Drag the Low Res Texture to the Low Res Material's texture property.
Creating Assets for Older Devices | 127
Figure 8-6
Drag Low Res Texture to Low Res Material
5. Swap Material in Your Script
In your script, add references the bone animation and materials you wish to swap. Somewhere in your
code, you can then swap the high res materials with the low res materials on your Bone Animation.
using UnityEngine;
using SmoothMoves;
public class MyScript : MonoBehaviour
{
public BoneAnimation boneAnimation;
public Material highResMaterial;
public Material lowResMaterial;
void Start ()
128 | Optimization and Tips
{
boneAnimation.SwapMaterial(highResMaterial, lowResMaterial);
}
}
6. Add the Script to a Bone Animation
Select a bone animation and add your new script to the game object. Set the inspector properties of the
script to your bone animation and reference the high and low res materials you created.
Figure 8-7
Set Inspector Properties
In your game or scene view you should see the high resolution animation at design time.
Creating Assets for Older Devices | 129
Figure 8-8
High Res
When you run the game, your low resolution materials will be swapped in.
Figure 8-9
Low Res
Note that the weapon in this example did not change. This is because it is in a different atlas
from the knight. If you want to swap the weapon material as well, you'll need to follow this
process for the weapons atlas, material, and texture.
9.
Redistributing Your Work
9.1
Share Your Work!
Smooth Moves is designed so that you can export your work to be used in other projects. You may also
sell your work by exporting the animations and their support files.
Care must be taken so that you don't export too much or you will be violating the license
terms of Smooth Moves.
9.2
What to Export
You may export the following files to users without a Smooth Moves license:
●
Atlases
●
Materials created by the atlases
●
Textures created by the atlases
132 | Redistributing Your Work
●
Bone Animation Data (assets)
●
Bone Animations (gameobjects in the scene that use Bone Animation Data)
●
SmoothMoves_Runtime.dll (found in the Plugins folder)
You may export your source textures, but it is not necessary. The source textures are only
used by the Animation Editor and are not used at runtime. If you are sharing your work with
someone that will be modifying the animation, then you should include the source textures in
your export.
9.3
What you MAY NOT EXPORT
Exporting the following will be in violation of Smooth Moves license:
●
SmoothMoves_Editor.dll (found in the Editor folder)
9.4
Export Process:
To export your work for sale or just to share, you can do the following:
1) Select the items you want to include in your package. This can include any of the following in the list
from the What to Export section of this chapter. If you are exporting bone animation data, then you will
likely need to also export materials, atlases, and atlas textures used by the bone animation data.
2) Package the items by going to the Unity menu Assets > Export Package.
This creates a Unity package that can be imported into another Unity project.
Import Process: | 133
9.5
Import Process:
To bring a package into Unity:
1) Go to the Unity menu Assets > Import Package > Custom Package.
2) Choose the files you wish to import, most likely this will be all files.
10.
FAQ and Troubleshooting
10.1 Questions
●
Q: Why are each of my animations taking at least one draw call?
●
Q: Why aren't my sprites dynamically batching?
●
Q: I have set colors on my bones or keyframes, so why is the color not updating when I run the
scene?
●
Q: If I cross fade two animations that switch textures, why do the animation textures change
erratically?
●
Q: I call Play or CrossFade using the Animation component, but my textures are not switching, my
colliders are not turning on / off, and the animation is playing at the wrong speed. What am I doing
wrong?
●
Q: How can I make a lower resolution animation for older devices without having to create a whole
new animation?
●
Q: Why do my animations and sprites have artifacts in them?
136 | FAQ and Troubleshooting
10.2 Answers
Q: Why are each of my animations taking at least one draw
call?
A: Smooth Moves creates skinned meshes. Unity currently does not batch skinned meshes, so each of
your animations will require at least one draw call. If you are using multiple materials in your animation,
then each animation will require several draw calls.
Q: Why aren't my sprites dynamically batching?
Sprites will not batch if either their transform's local scale is different or they are using different
materials. If you want your sprites to be different sizes, use the sprite properties Relative Size or Absolute
Size instead of the transform scale.
Q: I have set colors on my bones or keyframes, so why is
the color not updating when I run the scene?
A: Be sure the Update Colors checkbox is set to true on your bone animations in the scene. This is set to
false by default to improve processing on animations that do not need their color updated.
Answers | 137
Figure 10-1
Update Colors
Q: If I cross fade two animations that switch textures, why
do the animation textures change erratically?
A: When two animations are crossfading, they will both be firing their internal triggers to change
textures at the same time. Because of this you may see the textures switch back and forth erratically. If
you have a texture switch on either of the animations, then it would be best not to cross fade. Instead you
could just use Play. To get a smoother transition between states, you could create animations that run
between your two animation states.
138 | FAQ and Troubleshooting
Q: I call Play or CrossFade using the Animation
component, but my textures are not switching, my
colliders are not turning on / off, and the animation is
playing at the wrong speed. What am I doing wrong?
A: Instead of calling your play functions through the Animation component, call them through the
BoneAnimation component. The BoneAnimation component ensures the animations play at the right
speed and handles the texture switching, collider changes, user triggers, and other events that happen
throughout an animation.
Check out the demo files in the Smooth Moves package, read the API documentation, or view
the video tutorials for examples of how to use the BoneAnimation component.
Q: How can I make a lower resolution animation for older
devices without having to create a whole new animation?
See the workflow at Creating Assets for Older Devices
Q: Why do my animations and sprites have artifacts in
them?
Depending on your atlas texture compression and the atlas padding, your animations may show bits of
texture that should not be there, such as this:
Answers | 139
Figure 10-2
Artifacts
You can fix this by either changing the compression level of the atlas texture or by increasing the
padding of the atlas and rebuilding.
Figure 10-3
Increase Quality
Figure 10-4
Increase Padding
See Padding for more information on atlas padding.
11.
Guide Version History
2012.06.14.1
●
Added Guide Version History.
●
Skinned Mesh Draw Calls - Added tip on how to improve draw call performance by keeping atlases
near each other in depth.
2012.07.09.1
●
Bone Visibility - Changed the bone visibility toggle to show the new deactivate bone feature.