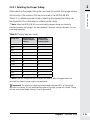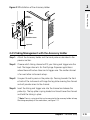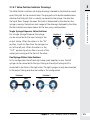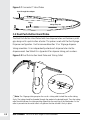
1
MICROLAB® 600 Series – Basic Manual BASIC ML600 BASIC MANUAL Hardware Installation and Basic Operation Hamilton Company Toll Free 800-648-5950 Phone +1-775-858-3000 Fax +1-775-856-7259 www.hamiltoncompany.com Hamilton Bonaduz AG Via Crusch 8 CH-7402 Bonaduz/Switzerland Toll Free 00800-660-660-60 Phone +41- (0)81-660-60-60 Fax +41- (0)81-660-60-70 www.hamiltoncompany.com Hardware Installation and Basic Operation 4970 Energy Way Reno, Nevada 89502 USA Warranty Information Warranty Information i Hamilton Company warrants this equipment1 to be free of defects in material and workmanship for 12 months from the date of receipt. The warranty does not cover normal wear and tear of the syringes, valves, or equipment. The warranty is extended to the buyer of record on the original purchase order to Hamilton Company. Hamilton Company or an authorized Hamilton representative agrees to repair or replace, at its option and free of charge to the buyer at a normal place of business or at a Hamilton repair facility, any part or parts that under proper and normal use prove to be defective during the warranty period.2 Abuse, unauthorized replacement of parts, modifications, or adjustments made by other than Hamilton Company or its assigned representative voids this warranty. This warranty gives you specific rights. No other warranties, expressed or implied, including implications of warranties of merchantability and fitness for a particular product, are made. Hamilton Company’s liability on the sale of all products shall be limited to repair, replacement, or refund of price of any defective product.2 Hamilton Company endeavors to provide prompt and satisfactory service. 1- All Hamilton Company valves are warranted to be free of defects in material and workmanship at the time of delivery. 2- Hamilton Company reserves the right to refuse to accept the return of any instrument or valve that has been used with radioactive or microbiological substances, or any other material that may be deemed hazardous to employees of Hamilton Company. ©April 2010 by Hamilton Company GASTIGHT® and MICROLAB® are registered trademarks of Hamilton Company. Copyright © 1994–2008 Lua.org, PUC-Rio. Warranty Information i Instruction to the User iii Instruction to User This equipment has been tested and found to comply with the limits for a class B digital device, pursuant to Part 15, Federal Communication Commission (FCC) Rules. These limits are designed to provide reasonable protection against harmful interference in an installation. This equipment generates, uses, and can radiate radio frequency energy, and if not installed and used in accordance with the instructions, may cause harmful interference to radio communications. However, there is no guarantee that interference will not occur in a particular installation. If this equipment does cause harmful interference to radio or television reception, which can be determined by turning the equipment off and on, the user is encouraged to try to correct the interference by one or more of the following measures: ``Turn the MICROLAB 600 OFF and ON to determine whether it is generating interference. ``Reorient or relocate the receiving antenna. ``Increase the separation between the equipment and receiver. ``Connect the equipment into an outlet on a circuit different from that to which the receiver is connected. ``Consult the dealer or an experienced radio/TV technician for help. This equipment has been verified to comply with the limits for a class B computing device, pursuant to FCC Rules. In order to maintain compliance with the FCC regulations, shielded cables must be used with this equipment. Operation with non-approved equipment or unshielded cables is likely to result in interference to radio and TV reception. The user is cautioned that changes and modifications made to the equipment without the approval of the manufacturer could void the user’s authority to operate this equipment. Instruction to User iii Table of Contents Preface i Welcome 1 Intended Use 3 About the MICROLAB 600 Manuals 5 Basic MICROLAB 600 Manual 5 Advanced MICROLAB 600 Manual 5 Computer Controlled MICROLAB 600 Manual 5 Conventions Used in this Manual 7 Chapter 1 Introduction 1-1 1.1 Introduction of the MICROLAB 600 1-2 1.2 MICROLAB 600 Part Number Nomenclature 1-2 1.3 MICROLAB 600 Hardware Setups 1-3 1.3.1 Single Syringe Dispenser Setup 1-3 1.3.2 Dual Syringe Diluter Setup 1-4 1.3.3 Dual Syringe Dispenser Setup 1-4 1.3.4 Continuous Dispenser Setup 1-5 1.4 Safety Precautions 1.4.1 General Safety Information 1-5 1.4.2 Operating the MICROLAB 600 1-6 1.4.3 Electrical 1-6 1.4.4 Radioactive, Biohazardous, or Harsh Chemicals 1-5 1-7 Chapter 2 Hardware Setup 2-1 2.1 Overview of MICROLAB 600 Parts List 2-2 2.2 Selecting the Proper Location 2-3 2.3 Description of Drive Unit Components 2-3 2.3.1 Description of the Front View of the Drive Units 2-4 2.3.2 Description of the Rear View of the Drive Units 2-7 2.4 Installation of Drive Unit Parts 2-9 2-9 2.4.1 Installation of the Valve Assembly Table of Contents v Table of Contents v 2.4.1.1 Mounting a Valve on the ML600 2.4.1.2 Mounting Two Valves with Cross Tube on the ML600 2.4.2 Installation of Syringes 2-10 2-11 2.4.2.1 Preparing Syringes for Installation 2-13 2.4.2.2 Installing the Syringes 2-13 2.4.3 Installation of the Tubing 2-14 2.4.3.1 Selecting the Proper Tubing 2-15 2.4.3.2 Installing the Tubing 2-16 2.4.4 Installation of the Accessory Holder 2-18 2.4.5 Tubing Management with the Accessory Holder 2-19 2.4.6 Installation of the Hand Probe 2.5 Controller Unit 2-20 Chapter 3 Basic Controller Setup 3-1 3.1 Overview of Screens & Buttons 3-2 3.1.1 Splash Screen 3-2 3.1.2 Configuration Screen 3-2 3.1.3 Data Entry Screen 3-3 3.1.4 Run Screen 3-3 3.1.4.1 Valve Position Indicator Drawings 2-20 3-5 3.2 Instrument Configuration Options 3-7 3.2.1 Syringe Setup 3-7 3.2.2 Valve Setup 3-8 3.2.3 Triggering 3-8 3.2.4 System 3-8 3.2.4.1 Setting the Date and Time 3-8 3.2.4.2 SD Card Capacity & System Memory 3-9 3.2.4.3 Calibration of the Controller Touch Screen 3-9 3.2.4.4 Screen Power Off 3-10 3.2.4.5 Firmware/Software Versions 3-10 3.2.4.6 Update the Firmware/Software 3-10 3.2.4.7 DHCP and IP Address 3-10 3.2.4.8 Syringe Cycle Count 3-10 3.2.4.9 Language 3-11 vi 2-9 3.3 Priming the Instrument User's Manual MICROLAB 600 Single & Dual Instrument 3-11 3.4 Basic Controller Methods 3-12 3.4.1 Single Syringe Dispenser 3-12 3.4.2 Dual Syringe Diluter 3-13 3.4.3 Dual Syringe Dispenser 3-13 3.4.4 Continuous Dispenser 3-13 Chapter 4 Care & Maintenance 4-1 4.1 Yearly Maintenance 4-2 4.2 Instrument Calibration 4-2 4.3 Deciding When to Clean the MICROLAB 600 4-3 4.4 Cleaning the Fluid Path 4-4 4.5 Cleaning the Exterior of the MICROLAB 600 4-5 4.6 Storing the MICROLAB 600 4-6 4.7 Replacing Batteries 4-7 Chapter 5 Troubleshooting 5-1 5.1 Error Message Code Guide 5-2 5.2 Troubleshooting Guide 5-2 5.3 Getting Technical Support 5-4 5.4 Returning Instruments for Repair 5-4 vii Table of Contents Appendices Appendix A – Technical Specifications A-1 Appendix B – Replacement Parts & Accessories B-1 Appendix C – Hand Probes & Foot Switch C-1 Appendix D – Chemical Compatibility D-1 Appendix E – Instrument Performance Test Reports E-1 Glossary GL-1 Index IN-1 Table of Contents vii Welcome 1 Welcome Welcome to the World of Hamilton Precision Instruments Congratulations on your purchase of a Hamilton MICROLAB 600 instrument. The Hamilton MICROLAB 600 is a versatile, semi-automatic, precision liquid handler. This family of instruments offers single or dual syringe units that function as dispensers, diluters, and continuous dispensers. The MICROLAB 600 functions on the principle of liquid/liquid displacement. At the heart of each MICROLAB 600 is a precise stepper drive motor combined with our uniquely designed GASTIGHT syringes. The result is a precise and accurate instrument that is very easy to set up and operate. Proper handling and maintenance of your new MICROLAB 600 will increase the lifespan of your instrument. To learn about proper care and maintenance of your investment, please take the time to read this manual, including the warranty information. Hamilton Company would like to thank you for your purchase of the MICROLAB 600. Welcome 1 Intended Use Intended Use 3 The MICROLAB 600 family of instruments are bench top devices designed for precision liquid handling. These units are intended for indoor laboratory use by technician grade personnel. These units are also designed for industrial purposes with an emphasis on continuous dispensing in an unattended mode. Intended Use 3 About the MICROLAB 600 Manuals About the ML600 Manuals 5 Basic MICROLAB 600 Manual This manual contains information on installation of the hardware, care and maintenance, and troubleshooting the MICROLAB 600. This manual also contains instructions needed to operate the Basic series controller. Advanced MICROLAB 600 Manual This manual contains information on operating the Advanced controller software. Users of this manual may need to refer back to the Basic Manual for hardware installation, care and maintenance, and troubleshooting the MICROLAB 600. Computer Controlled MICROLAB 600 Manual This manual contains information on communicating with the pump through third party software. Users of this manual may need to refer back to the Basic Manual for hardware installation, care and maintenance, and troubleshooting the MICROLAB 600. Note: This manual will be on the Software CD as a help file that comes with the appropriate ML600 instrument. After reading these manuals you should be able to properly operate your MICROLAB 600. About the ML600 Manuals 5 Conventions Used in this Manual Conventions Used in this Manual 7 Throughout this manual symbols are used to call your attention to various kinds of information. WARNING! Information that is essential for avoiding personal injury is flagged with the International Warning Symbol. Biohazard: Information that is relating to interactions with biohazards. Important! Information that is essential for avoiding damage to equipment. Note: Interesting information or information that can help improve system performance. Conventions Used in this Manual 7 Chapter 1 Introduction This chapter provides a brief overview of the MICROLAB 600 instruments including the following discussions: ``1.1 Introduction of the MICROLAB 600 ``1.2 MICROLAB 600 Part Number Nomenclature ``1.3 MICROLAB 600 Hardware Setups ``1.4 Safety Precautions Chapter 1 Introduction 1.1 Introduction of the MICROLAB 600 The ML600 Series is a family of high precision syringe pumps that are designed to simplify common dispensing and diluting tasks in a variety of research environments. Common components of an ML600 pump include a controller, a syringe pump base unit, and an application specific fluid path. 1.2 MICROLAB 600 Part Number Nomenclature Each ML600 Series part number describes the type of controller, type of syringe pump base unit, and type of application specific fluid path. Below is a discussion of how an ML600 part number is created. ML600 Series Part Number: ML6X1X2-XXX3 X1 This digit defines the controller type. There are three standard controller types. 1 This system includes a Basic Controller. 2 This system includes a Basic Controller plus the Advanced upgrade kit. The upgrade kit comes with a proprietary SD card that adds memory to the controller and unlocks the wizard and custom method functionality. 3 This system does not include a controller. This system must be connected to a PC running custom developed software. A CD containing the Application Programming Interface (API) is provided along with a programming manual and example programs in LabView, VB, and C#. X2 This digit defines the syringe pump base unit. There are two pump types. Each pump comes with the appropriate valves pre-installed. 0 This system includes a single syringe base unit with a standard input and output valve. 5 This system includes a dual syringe base unit with a Universal Valve installed. XXX3 These letters define the tubing and hand probes that are shipped with the system to accomplish a defined application. For detailed information on the products included for each application please see Chapter 2.1. 1-2 User's Manual MICROLAB 600 Single & Dual Instrument 1 Table 1-1 MICROLAB 600 Application Packages Application DIS Single or Dual Syringe Dispenser package DIL Dual Syringe Diluter Package CNT Continuous Dispensing Package New Application Packages New packages will be created on occasion. Details about these packages can be found at www.hamiltoncompany.com Introduction XXX3 1.3 MICROLAB 600 Hardware Setups There are four major hardware setups possible with the ML600. Below is a brief description of each setup describing the intended use for each configuration. Note: The ML600 is compatible with syringes from 10 µL to 50 mL. To achieve the highest level of accuracy the proper syringe should be selected for the range of dispense volumes to be performed (See Section 2.4.2). For example, the proper syringe size to use for dispensing 250 µL, 500 µL, 750 µL, and 1 mL from a single instrument setup would be a 1 mL syringe. This is the smallest syringe that can be programmed to accomplish all four desired dispense volumes. When selecting a syringe the volumes to be dispensed should fall between 10% and 100% of the nominal syringe volume for a 1 mL syringe that would be between 100 µL and 1 mL. Smaller volumes are possible with a slight loss in accuracy and precision (See Section 2.4.2). 1.3.1 Single Syringe Dispenser Setup The Single Syringe Dispenser Setup is designed to dispense precise volumes of liquid from a reservoir out through a hand probe. There is a single valve that connects the syringe to tubing. When the valve rotates it connects the syringe to the input or the output tubing. The input tubing connects the syringe to a reservoir of liquid. The output tubing connects the syringe to a hand probe. At the press of a button the valve will position to the input so the syringe can fill with a user defined volume of liquid from the reservoir. A second push of a button will dispense the user defined volume from the tip of the hand probe. A brief animation of “How an ML600 Dispenser Works” can be found at www.hamiltoncompany.com/microlab600. Chapter 1 Introduction 1-3 1.3.2 Dual Syringe Diluter Setup The Dual Syringe Diluter Setup is ideally designed to perform dilutions. The two syringes operate as one to accurately draw the sample (right syringe) and diluent (left syringe) into the system before dispensing the two liquids into a final container where they mix to complete the dilution. This application could be accomplished with a single syringe system but the dilution range would be limited to the volume range of a single syringe. With two syringes it is possible to use a 50 mL syringe for diluent and a 10 µL syringe to draw up the sample. With this setup it is possible to perform a 50,000 fold dilution in a single step. When compared to Class A Glassware this is an incredible savings in buffers and time. The basic dilution method involves priming the entire system with diluent. Next the right syringe draws sample into the hand probe. The sample is completely contained in the dispense tubing and never comes into contact with the right syringe. At the same time the sample is drawn the left syringe fills with diluent from the reservoir. Next the two syringes dispense their entire volume out through the hand probe. The sample is dispensed from the tubing first followed by the diluent which washes out the tubing and prepares the system for the next dilution. A brief animation of “How an ML600 Diluter Works” can be found at www.hamiltoncompany.com/microlab600. 1.3.3 Dual Syringe Dispenser Setup The Dual Syringe Dispenser Setup has the same capabilities as two Single Syringe Dispensers that receive commands from a single controller. Instead of one valve and one syringe like the Single Syringe Dispenser there are two pairs of syringes and valves. Each pair works independently of the other meaning that each can setup with a different volume syringe and can be programmed to dispense a different volume of liquid. The fluid paths are maintained completely separate so liquid in the left syringe will not mix with liquid in the right syringe until the two liquids are dispensed out the end of the hand probe. This setup is ideal for applications like epoxy dispensing where no mixing should occur until the proper quantities of each liquid have been dispensed. 1-4 User's Manual MICROLAB 600 Single & Dual Instrument 1 Introduction A brief animation of “How an ML600 Dispenser Works” can be found at www.hamiltoncompany.com/microlab600. 1.3.4 Continuous Dispenser Setup The Continuous Dispenser Setup is designed to eliminate the time wasted waiting for the syringe to refill between dispenses. This dual syringe system automatically fills one syringe while the other syringe is dispensing. Since there is always one full syringe the wait time is eliminated. This setup effectively cuts the work time of the Single Syringe Dispenser Setup in half without sacrificing accuracy and precision by increasing the syringe speed. This setup requires that both the left and the right syringe are the same size. A brief animation of “How an ML600 Dispenser Works” can be found at www.hamiltoncompany.com/microlab600. 1.4 Safety Precautions For proper handling and care of the MICROLAB 600 it is essential that operating and service personnel follow general safety procedures and safety instructions described in this manual. Service maintenance must only be performed by an authorized service technician. 1.4.1 General Safety Information The MICROLAB 600 should be placed in a location where personnel have easy access to the front, back, and sides for ease of operation and maintenance. Before operating the instrument determine the amount of space you will need for your MICROLAB 600. Cleaning, dismantling, and/or performing maintenance on the MICROLAB 600 should only be performed by properly trained personnel who are aware of possible dangers. Only certified repair technicians are authorized to perform mechanical maintenance on the MICROLAB 600. When transporting the MICROLAB 600 for repair or shipment it should be properly packaged inside the original shipping container. All MICROLAB 600 instruments that are sent back to Hamilton Company for repair must be decontaminated before they are shipped. Chapter 1 Introduction 1-5 Only the original approved parts and accessories may be used with the MICROLAB 600. Any alterations or modifications to the instrument may be dangerous and will void the warranty. 1.4.2 Operating the MICROLAB 600 When using the MICROLAB 600, Good Laboratory Practices (GLP) should be observed. Users should wear protective clothing, safety glasses, and protective gloves, especially if working with radioactive, biohazardous, or harsh chemicals. During the operation of a MICROLAB 600, stand clear of moving parts. Never try to remove valves, syringes, or tubing when the MICROLAB 600 syringe drive mechanism is moving. Never move the MICROLAB 600 while it is in operation. If an accidental spill occurs, turn the instrument OFF and wipe it down with the appropriate disinfectant or chemical. Remember to take into account the nature of the spill and the necessary safety precautions. 1.4.3 Electrical The MICROLAB 600 must be turned OFF and disconnected from the power source when removing any mechanical or electrical components. Do not connect the unit to a power source of any other voltage (See Appendix B for appropriate power cords) or frequency beyond the range stated on the power rating. Check to make sure the appropriate power cord for your country was received. Try to avoid damaging the power cord while operating the instrument. Do not bend excessively, step on, or place heavy objects on the power cord. A damaged power cord may easily become a shock or fire hazard. Never use a damaged power cord. Only connect the MICROLAB 600 to a grounded outlet. 1-6 User's Manual MICROLAB 600 Single & Dual Instrument 1 1.4.4 Radioactive, Biohazardous, or Harsh Chemicals Introduction Biohazard: The MICROLAB 600 does not provide any user protection against radioactivity, biohazardous, or harsh chemicals. When operating the MICROLAB 600 wear the appropriate laboratory clothing. Operators must be trained to handle hazardous materials before working with them in conjunction with the ML600 pump. If the MICROLAB 600 becomes contaminated with radioactive, biohazardous, or harsh chemicals, it should be cleaned immediately, see Chapter 4 for maintenance procedures. Failure to observe and carry out the procedures may impair or damage the MICROLAB 600. Materials consumed or produced during use of this devise should be disposed of in accordance with local, state and federal laws. Chapter 1 Introduction 1-7 Chapter 2 Hardware Setup This chapter provides detailed information on the features and installation of the MICROLAB 600 hardware. Information in this chapter includes: ``2.1 Overview of MICROLAB 600 Parts List ``2.2 Selecting the Proper Location ``2.3 Description of Drive Unit Components ``2.4 Installation of Drive Unit Parts ``2.5 Controller Unit Chapter 2 Hardware Setup 2.1 Overview of MICROLAB 600 Parts List The MICROLAB 600 instruments come complete with everything needed to get started. For replacement parts, please refer to Appendix B Replacement Parts & Accessories. Optional hand probes are also available and can be found in Appendix C. Unpack the MICROLAB 600 and verify that all parts have been received. The parts list for each family of instruments is displayed in the tables below. Table 2-1 MICROLAB 600 System Descriptions Instrument Part Number Drive Unit Part Number Controller Part Number Controller Upgrade Kit Part Number (See Table 2-2 for details) Probe & Tubing Kit Description (See Table 2-3 for details) ML610-DIS Single Syringe 61501-01 61500-01 N/A Single Dispense Kit ML615-DIL Dual Syringe 61502-01 61500-01 N/A Diluter Kit ML615-DIS Dual Syringe 61502-01 61500-01 N/A Dual Dispense Kit ML615-CNT Dual Syringe 61502-01 61500-01 N/A Continuous Dispense Kit ML620-DIS Single Syringe 61501-01 61500-01 61500-02 Single Dispense Kit ML625-DIL Dual Syringe 61502-01 61500-01 61500-02 Diluter Kit ML625-DIS Dual Syringe 61502-01 61500-01 61500-02 Dual Dispense Kit ML625-CNT Dual Syringe 61502-01 61500-01 61500-02 Continuous Dispense Kit ML630 Single Syringe 61501-01 N/A 61500-03 N/A ML635 Dual Syringe 61502-01 N/A 61500-03 N/A Note: Each unit will come with the basic series controller manual (p/n 61440-01), the power supply (p/n 61092-01), and user selected power cord (See Appendix B). The system will also ship with one syringe per syringe drive which can be user selected at the time the instrument is purchased. 2-2 User's Manual MICROLAB 600 Single & Dual Instrument 2 Upgrade Kit Part Number Software CD Part Number SD Card Part Number USB Adapter Part Number Advanced Controller Manual Part Number 61500-02 61495-01 61496-01 61497-01 61441-01 61500-03 61495-01 N/A N/A N/A Hardware Setup Table 2-2 Upgrade Kits Table 2-3 Probe & Tubing Kits Probe & Tubing Kit Description Hand Probe Part Number Fill Tubing 12 gauge 61614-01 18 gauge 61615-01 Dispense Tubing 12 gauge 240133 18 gauge 240134 Continuous Fill Tubing 12 gauge 61491-01 18 gauge 61491-02 Single Dispense Kit Concorde CT Probe 61401-01 User Defined 12 or 18 gauge 1 piece User Defined 12 or 18 gauge 1 piece N/A Diluter Kit Concorde CT Probe 61401-01 User Defined 12 or 18 gauge 1 piece User Defined 12 or 18 gauge 1 piece N/A Dual Dispense Kit Dual Push Button Probe 62541-01 User Defined 12 or 18 gauge 2 pieces User Defined 12 or 18 gauge 2 pieces N/A Continuous Dispense Kit Concorde CT Probe 61401-01 User Defined 12 or 18 gauge 1 piece User Defined 12 or 18 gauge 1 piece User Defined 12 or 18 gauge 1 piece If components are missing please contact Hamilton Customer Service at (888) 525-2123. Note: The shipping container should be saved in case the MICROLAB 600 needs to be returned to Hamilton Company for service. 2.2 Selecting the Proper Location When selecting a location for your MICROLAB 600, choose an area that is clean, dry, level, and away from hazardous chemicals, radiation, and/or hazardous biological substances. Leave enough space around the unit for ventilation. Make sure there is a power source nearby to connect the power cord. 2.3 Description of Drive Unit Components The drive unit is the heart of the MICROLAB 600. The drive unit contains a precision drive motor, the syringe drive mechanism, the valve assembly, syringe selection button, prime button, power button, and hand probe receptacles. Chapter 2 Hardware Setup 2-3 This section will show a detailed diagram of the front and back of the MICROLAB 600 single and dual syringe drive units and provide a description of the buttons and port receptacles required to operate the MICROLAB 600. 2.3.1 Description of the Front View of the Drive Units Figure 2-1 Front View of the Single Syringe Drive Unit Valve Actuator Left Probe Receptacle Right Probe Receptacle Ready Status LED Alarm Status LED Prime Button Power ON/OFF Button Syringe Drive 2-4 User's Manual MICROLAB 600 Single & Dual Instrument 2 Left Valve Actuator Left Probe Receptacle Hardware Setup Figure 2-2 Front View of the Dual Syringe Drive Unit Right Valve Actuator Right Probe Receptacle Ready Status LED Alarm Status LED Syringe Selector Button Prime Button Power ON/OFF Button Left Syringe Drive Right Syringe Drive Valve Actuator The valve actuator turns the valve at the appropriate time to fill and dispense solutions. A variety of valves can be mounted to the valve actuator. See section 2.4.1 for valve installation instructions. Probe Receptacle There are two probe receptacles for this unit and they are located on the upper left and upper right side of the instrument. You may insert a hand probe or foot switch to either probe receptacle. When a signal is received by the pump through the probe receptacle it is triggered to perform the next action in the current method. Syringe Drive The syringe drive mechanism positions Hamilton precision syringes with highresolution stepper motors. The syringes are threaded into the valve and the plunger is attached to the syringe drive with a thumb screw. See section 2.4.2 for installing the syringes. Chapter 2 Hardware Setup 2-5 Ready LED The Ready LED is used to indicate the status of the pump. Below are the different types of indication: ``Rapid Blinking – This indicates the pump is in DHCP mode. It is requesting an IP address from the network server. ``Slow Blinking – Blinking about once per second indicates the pump is ready but not initialized. ``Solid Green – This indicates the pump is initialized and ready. Alarm LED If a problem arises, for example a syringe stall, the red LED light will be turned on behind the Alarm symbol to let the user know that there is a problem. See section 5.2 for troubleshooting guidelines. Syringe Selector Button This button is only found on dual syringe systems and allows the user to select which side of the pump to prime. There is a setting for the left side only, right side only, or both. The setting is indicated by a blue LED light above each syringe. When a syringe is selected the blue LED will be turned on. When the instrument is first turned on, both syringes will be selected by default. Note: When the diluter setup primes, only the left syringe moves so the Syringe Selector button is not functional with the valve configuration. Prime Button This button is used to lower the syringe drive allowing replacement of the syringes or to prime the instrument prior to use. To lower the syringe drives press and hold the Prime button. After 3 seconds the drive will begin to lower. Continue to press the button until the drives are half way down. To prime the instrument see section 3.3 for details. Power ON/OFF Button The Power ON/OFF button is located on the front center of the drive unit. When the MICROLAB 600 is turned on a blue LED light will illuminate the Power button. 2-6 User's Manual MICROLAB 600 Single & Dual Instrument 2 Hardware Setup Note: To reset the pump back to factory settings the pump must be turned OFF. Press and hold the Prime button and power the instrument on, continue to hold the Prime button for 3 seconds. The power LED light will flash 5 times to indicate that you have correctly reset the to factory default settings. 2.3.2 Description of the Rear View of the Drive Units Figure 2-3 Rear View of the MICROLAB 600 Accessory Holder Anchor CAN OUT (RJ-12) Power Cord Jack CAN IN (RJ-12) Accessory Holder Anchor TTL IN/OUT Ports (DB9 male) Ethernet (RJ-45a) Serial RS-232 (DB9 female) a-Please read the WARNING before connecting anything but the controller to this receptacle. Ethernet (RJ-45) The Ethernet receptacle is located on the back of the drive unit. This port is used to connect to the controller or a network. WARNING! The MICROLAB 600 controller is powered using Power Over Ethernet (POE) supplied from the MICROLAB 600 pump. When connecting the MICROLAB 600 pump to a computer, the POE MUST be turned OFF to avoid damage to the computer. To turn the POE OFF or ON the ML600 must first be turned OFF. Next toggle the POE setting by pressing and holding the Power button for 3 seconds during power up. The green Ready light will flicker when POE has been turned ON or will illuminate solid when POE is turned OFF. The POE state will be stored in memory so the setting will remain when the instrument is turned OFF and back ON. Chapter 2 Hardware Setup 2-7 Accessory Holder Anchor The Accessory Holder Anchors are located on the upper left and right sides of the instrument. This is the location where the accessory holder is to be installed. For detailed installation instructions please see section 2.4.4. Power Cord Jack The Power Cord Jack is located on the back of the drive unit and accepts the output of a 24 VDC power supply. The universal power supply accepts power from 110 – 240V and connects to a power outlet using a standard computer power cable. CAN IN and OUT (RJ-12) The CAN IN and OUT receptacles are located on the back of the drive unit. These two ports are used for daisy chaining instruments together. Daisy chaining functionality is not supported by the basic controller. TTL IN/OUT (DB9 male) The TTL IN/OUT is located on the back of the drive unit. This port is designed to allow the user to wire other devices to the MICROLAB 600. TTL communication is not supported by the basic controller. Table 2-4 TTL Pin Configuration Pin Function 1 Output 1 (O0) 2 Output 2 (O1) 3 Output 3 (O2) 4 Output 4 (O3) 5 Input 1 (O0) 6 Input 2 (O1) 7 Input 3 (O2) 8 Input 4 (O3) 9 Ground Output Pins (O0 O1 O2 O3 ) Input Pin I 0 Input Pins (I 1 I 2 I 3) Grounding Pin Serial RS-232 (DB9 female) The RS-232 COM port is located on the back of the drive unit. This port is used as a consol port to troubleshoot connection issues encountered by the Ethernet port. 2-8 User's Manual MICROLAB 600 Single & Dual Instrument 2 2.4 Installation of Drive Unit Parts ``2.4.1 Installation of the Valve Assembly ``2.4.2 Installation of the Syringes ``2.4.3 Installation of the Tubing ``2.4.4 Installation of the Accessory Holder ``2.4.5 Installation of the Hand Probe Hardware Setup In this section the user will learn how to properly install the valve assembly, syringes, tubing, accessory holder, and the hand probe. 2.4.1 Installation of the Valve Assembly The ML600 uses a universal valve that can support single dispensing, dual dispensing, diluting, and continuous dispensing. Each configuration requires unique plumbing, described in section 2.4.3. 2.4.1.1 Mounting a Valve on the ML600 Figure 2-4 MICROLAB 600 Valve Parts Side VIEW REAR VIEW (Side of Pump) Valve Shaft Screw Hole Pin Valve Stem (Insert) Alignment Pins Threaded Syringe Port (inside) Valve Stem Valve Actuator Note: The valve assembly will be installed on the MICROLAB 600 before it leaves Hamilton Company. For single syringe dispensers the plug configuration will be as depicted in Figure 2-8. For dual syringe units the valve assembly will be set as a diluter configuration. Chapter 2 Hardware Setup 2-9 Step 1. Insert the valve shaft into the valve actuator and rotate the valve until the valve stem engages with the valve drive. See Figure 2-5a. Step 2. With the valve stem and valve drive engaged, rotate the valve until the alignment pins slip into the front of the instrument. The threaded syringe port should point down toward the syringe drive mechanism. See Figure 2-5b. Step 3. Install the valve screws to complete the valve mounting. The final assembly of the valve is depicted in Figure 2-5c. Figure 2-5 Valve Assembly Diagram 2.4.1.2 Mounting Two Valves with Cross Tube on the ML600 A. Valve Stem B. Valve Drive Stem C. Screws Step 1. Take the left valve and engage the valve stem with the valve actuator and then rotate to engage the alignment pins as described in Steps 1 and 2 of section 2.4.1.1. Step 2. Repeat step 1 with the right valve. Step 3. Remove both valves from the instrument. Step 4. Screw the cross tube into the port on the left valve that is marked with an “L”. Do not completely tighten. 2-10 User's Manual MICROLAB 600 Single & Dual Instrument Step 6. Place the valve assembly onto the instrument as one assembled unit. Step 7. Install two screws into each valve to secure the assembly to the instrument. 2 Hardware Setup Step 5. Screw the cross tube into the valve port on the right valve marked by an “R”. The valve shaft for the left and right valve should both point in the same direction, so they can be slipped into the valve actuator. Do not completely tighten the tubing. Step 8. Completely tighten the cross tube on both valves. 2.4.2 Installation of Syringes In this section the user will learn how to properly prepare and install the syringes onto the MICROLAB 600. Before the syringes are installed on the MICROLAB 600, you must first decide which syringes to use. Use Table 2-5 to select the best syringe for your application. Table 2-5 BubbleFreePrime (BFP) Syringe Sizes Flow Rate (µL/sec) Syringe Volume (µL) Part Number Optimal Range (µL) Recommended Minimum Maximum 10 59000-05 1.0–10 5 0.003 6.5 25 59000-10 2.5–25 12.5 0.007 16.5 50 59000-15 5–50 25 0.014 33 100 59000-20 10–100 50 0.03 66.5 250 59000-25 25–250 125 0.07 166.5 500 59000-30 50–500 250 0.14 333 1,000 59000-35 100–1,000 500 0.3 665 2,500 59000-40 250–2,500 625 0.7 1,250 5,000 59000-45 500–5,000 1250 1.4 2,500 10,000 59000-50 1,000–10,000 2500 3 5,000 25,000 59000-55 2,500–25,000 3125 7 6,000 50,000 59000-60 5,000–50,000 3125 14 6,000 The BFP Syringes are specifically designed for the MICROLAB 600. They are GASTIGHT syringes with a unique plunger tip. The plunger tip extends through the top of the syringe and slightly into the valve. These syringes are designed to reduce dead volume, improve priming, and limit sample carry-over. Chapter 2 Hardware Setup 2-11 Note: When using the Continuous Dispenser setup with the basic controller, the left and right syringe must be the same size. With the upgraded controller it is possible to create a custom method using syringes of differing sizes. Table 2-6 Syringe Accuracy and Precision Syringe Size (µL) Percent Stroke Accuracy (±) Precision 10 5% ≤ Stroke < 30% 3.0% 2.0% 30% ≤ Stroke 2.0% 0.2% 25 5% ≤ Stroke < 30% 3.0% 2.0% 50 100 250 500 1000 & larger 2-12 Stroke = 30% 1.5% 0.2% Stroke = 100% 1.0% 0.2% 5% ≤ Stroke < 30% 2.0% 1.0% Stroke = 30% 1.0% 0.2% Stroke = 100% 1.0% 0.2% 5% ≤ Stroke < 30% 3.0% 1.5% Stroke = 30% 1.2% 0.5% Stroke = 100% 1.0% 0.2% 5% ≤ Stroke < 30% 3.0% 1.5% Stroke = 30% 1.2% 0.5% Stroke = 100% 1.0% 0.2% 1% ≤ Stoke < 5% 3.0% 1.5% 5% ≤ Stroke < 30% 1.2% 0.5% Stroke = 30% 1.0% 0.2% Stroke = 100% 1.0% 0.2% 1% ≤ Stoke < 5% 3.0% 1.5% 5% ≤ Stroke < 30% 1.2% 0.5% Stroke = 30% 1.0% 0.2% Stroke = 100% 1.0% 0.2% User's Manual MICROLAB 600 Single & Dual Instrument Before inserting the plunger into the syringe barrel the plunger tip will need to be conditioned. To condition the plunger tip first wet the tip and insert into the glass barrel, stroke the syringe 10 times while applying steady and even pressure; avoid twisting movements. Important! To condition the tip and barrel, wet the plunger tip with distilled water or a solvent. Do NOT use viscous oils to lubricate plunger tips. Hardware Setup 2 2.4.2.1 Preparing Syringes for Installation 2.4.2.2 Installing the Syringes Step 1. Condition the syringes as described above in Section 2.4.2.1. Step 2. Power ON the MICROLAB 600 using the Power ON/OFF button. Step 3. Press and hold the Prime button for 3 seconds. After 3 seconds the syringe drives will initialize and then both drives will move downward. Continue to hold the Prime button until the syringe drive has moved down approximately half way. Release the Prime button and the syringes will stop. Step 4. Insert the syringe into the valve and turn the glass barrel clockwise until it is finger tight. Note: For 10, 25, 50, and 100 µL syringes a small PTFE washer is provided. This washer should be placed on the top of the syringe to seal between the valve and the syringe termination. When the plunger is at the zero line a small piece of the plunger tip will stick out the top of the syringe to align the washer while the syringe is tightened into the valve. Step 5. Pull the plunger down to the drive stem and fasten the thumbscrew to the plunger. Hold the plunger and thumbscrew; gently screw the thumbscrew into the threaded plunger end. Make sure this is finger tight. The syringe should now be properly attached to the MICROLAB 600. Note: For the Universal Valve attach the syringe plunger to the outer most hole on the syringe drive. Chapter 2 Hardware Setup 2-13 Figure 2-6 Installing the Syringe First, mount the threaded connection Then, mount the Thumbscrew (Installed) Important! Always tighten syringes so that they are “finger-tight.” Syringes that are over- or under- tightened can cause problems with your MICROLAB 600. ``Syringes that are over-tightened may cause leaks or damage to the valve. ``Syringes that are under-tightened may cause leaks. WARNING! Use extreme caution when removing cracked or broken syringes. Always wear protective gloves and eye wear. Note: When installing syringes for a dilution application the diluent syringe should be placed on the left side of the instrument, while the sample syringe should be placed on the right side of the instrument. 2.4.3 Installation of the Tubing The MICROLAB 600 instrument uses 12 and 18 gauge tubing for dispensing applications. The tubing comes in two different types, fill and dispense. The fill tubing has a blunt end and is designed to go into a reservoir of liquid. The dispense tubing has a tapered tip and is designed to minimize droplet formation. 2-14 User's Manual MICROLAB 600 Single & Dual Instrument When selecting the proper tubing the user needs to consider the syringe volume and viscosity of the solutions that are to be used in the MICROLAB 600. Table 2-7 is a reference guide to help in selecting the appropriate tubing size. See Appendix B for information on ordering extra tubing. Note: When the MICROLAB 600 was purchased the proper tubing was chosen by Hamilton based on the syringe(s) that were ordered. If alternate tubing is desired it must be purchased separately. Hardware Setup 2 2.4.3.1 Selecting the Proper Tubing Table 2-7 Tubing Selection Guide Syringe Size Tubing Gauge for Standard Aqueous Solutions Tubing Gauge for Viscous and Foaming Liquids 10 μL 18 18 25 μL 18 18 50 μL 18 18 100 μL 18 18 250 μL 18 18 500 μL 18 18 1.0 mL 18 18 2.5 mL 18 12 5.0 mL 12 12 10 mL 12 12 25 mL 12 12 50 mL 12 12 Note: If you are using the diluter setup you will need to select tubing based on the volume of the largest syringe used in the application. Important! The volume of sample aspirated should not exceed 80% of the internal volume of the tubing. This will avoid contamination of the right syringe with sample. Tubing volumes and custom length tubing is listed in Appendix B. Chapter 2 Hardware Setup 2-15 2.4.3.2 Installing the Tubing Step 1. Before installing the tubing, wet the tubing fittings. Step 2. Make sure the tubing is free of crimps or blockages. Crimping or blocking within the tubing may cause leaks or air bubbles. If the tubing is damaged, do not use it and replace with new tubing. Step 3. Determine which type of valve configuration is to be used. See Figures 2-7 through 2-10 for details. Step 4. Insert the wetted tubing fitting into the appropriate threaded valve port and tighten the fitting “finger tight.” Important! Never over tighten the tubing. Over tightening may result in damage to the valve and/or the tubing. Use the following figures as a guide for final assembly of the valves with the appropriate tubing and plug configuration: ``Figure 2-7 Single Syringe Dispenser Valve and Tubing Assembly ``Figure 2-8 Dual Syringe Diluter Valve and Tubing Assembly ``Figure 2-9 Dual Syringe Dispenser Valve and Tubing Assembly ``Figure 2-10 Dual Syringe Continuous Dispenser Valve and Tubing Assembly Figure 2-7 Single Syringe Dispenser Valve Assembly Plug Fill Tubing Dispense Tubing 2-16 User's Manual MICROLAB 600 Single & Dual Instrument Plug Fill Tubing Cross Tube Plug Hardware Setup 2 Figure 2-8 Dual Syringe Diluter Valve Assembly Dispense Tubing Figure 2-9 Dual Syringe Dispenser Valve Assembly Fill Tubing Cross Tube Dispense Tubing Fill Tubing OR Fill Tubing Plug Dispense Tubing In a dispensing application there are two configurations possible. Use the top configuration if you plan to switch between diluting and dispensing applications. Use the bottom configuration if you are only dispensing and are concerned about sample carryover. Fill Tubing Chapter 2 Hardware Setup 2-17 Figure 2-10 Dual Syringe Continuous Dispenser Valve Assembly Fill Tubing Cross Tube Plug Dispense Tubing Continuous Tubing 2.4.4 Installation of the Accessory Holder The accessory holder is capable of holding the Concorde CT and Dual Push button hand probes. It also has a tubing management system to eliminate unnecessary cord clutter on the bench top or workstation. The accessory holder may attach to the left or right accessory holder anchor of the instrument. Step 1. Select the side of the instrument that you would like the accessory holder to be attached and remove the plastic screw plugs. Step 2. Place a washer and then a spacer onto each of the installation screws. Step 3. Insert each screw assembly into the screw holes on the side of the instrument and tighten with a screwdriver. Important! Be careful not to over-tighten the screws connecting the accessory holder to the MICROLAB 600. Step 4. Attach the accessory holder panel onto the screw assembly. There are cutouts on the back of the accessory holder panel. Place the rounded portion of the cutout on the screws and push the assembly down for final assembly. See Figure 2-11 for details. 2-18 User's Manual MICROLAB 600 Single & Dual Instrument 2 Hardware Setup Figure 2-11 Installation of the Accessory Holder Tubing Channels Probe Clip Spacer Washer Installation Screw Top Panel 2.4.5 Tubing Management with the Accessory Holder Step 1. Attach the Accessory Holder and the hand probe as described in the previous section. Step 2. Choose which tubing channel will fit your tubing and trigger wire the best. The larger channel is for Dual Syringe Dispenser applications where there will be two tubes and a trigger wire. The smaller channel is for most other instrument setups. Step 3. Use your thumb to press on the probe clip. Pressing towards the front or back of the instrument will hinge the top plate covering the channel and will provide access to the channel. Step 4. Insert the tubing and trigger wire into the channel and release the probe clip. The top plate is spring loaded and should cover the channel and hold the tubing in place. Note: There is a wire stand that can be mounted to the accessory holder to keep the tubing completely off the workstation, see Figure 2.12. Chapter 2 Hardware Setup 2-19 Figure 2-12 Final Assembly of the Tubing Management System Tubing Wire Stand Accessory Holder 2.4.6 Installation of the Hand Probe Hand Probe receptacles are located on the left and right side of the drive unit; see Figure 2-3 for details. The trigger wire for the hand probe or foot switch may be inserted into either of these receptacles. The dispense tubing (12 or 18 gauge) may be threaded through the hand probe. See Appendix C for optional hand probes and foot switch. 2.5 Controller Unit The controller unit is the final piece that is connected to the drive unit. It will connect from the Ethernet port on the controller via the controller cord into the Ethernet port on the pump, see Figure 2-3. The controller unit will send instructions to the drive unit via a touch screen interface. 2-20 User's Manual MICROLAB 600 Single & Dual Instrument 2 Hardware Setup Figure 2-13 Controller Unit Front Screen As shown above, the controller can tilt at different angles for user comfort and preference, in addition this controller may also be hung on a wall. Figure 2-14 Rear View of the Controller Power Cord Jack Ethernet RJ-45 Hardware Key OTG USB Power Cord Jack This port will only be used when the controller is not attached to the MICROLAB 600 drive unit. A controller power supply is not shipped with the MICROLAB 600 as the controller receives power through the Ethernet port when connected to the pump. Hardware Key This slot accepts Hamilton specific SD cards for upgrading from the Basic to Advanced unit. Other manufacturer SD cards will fit into the controller but are not compatible with the ML600. Chapter 2 Hardware Setup 2-21 OTG USB The OTG USB port is located on the back of the controller. This port is used for diagnostics and testing at Hamilton prior to shipment. Ethernet (RJ-45) The Ethernet receptacle is located on the back of the controller. This port is used to connect to the drive unit. The controller receives power from the pump via Power Over Ethernet. Figure 2-15 Final Assembly of the MICROLAB 600 Instruments Single Syringe Dispenser 2-22 Dual Syringe Diluter User's Manual MICROLAB 600 Single & Dual Instrument Dual Syringe Continuous Dispenser 2 Hardware Setup Dual Syringe Dispenser Once the controller unit is installed onto the MICROLAB 600 the hardware installation is complete and the unit is now ready for operation. Chapter 2 Hardware Setup 2-23 Chapter 3 Basic Controller Setup & Operation The Basic ML600 Controller features a touch screen with a custom designed user interface (UI). The UI will enable simple dispensing and diluting operations, for more advanced applications and custom method programming purchase the Controller Upgrade Kit (p/n 61500-02). This chapter will demonstrate how to navigate through the Basic Controller screens as well as a description of the simple dispense and diluting operations. The following topics will be discussed: ``3.1 Overview of Screens & Buttons ``3.2 Instrument Configuration Options ``3.3 Priming the Instrument ``3.4 Basic Controller Methods Chapter 3 Basic Controller Setup & Operation 3.1 Overview of Screens & Buttons 3.1.1 Splash Screen This is the boot up screen that will appear when the pump is powered ON. The boot up will take approximately 30 seconds. Activity will be indicated by green lights that move across the bottom of the screen. After the system loads it will start on the Configuration Screen. After confirming that the configuration stored in the controller matches the current hardware setup press the Back button to proceed to the Run Screen. 3.1.2 Configuration Screen The Configuration Screen is used to setup the instrument. The configuration information must match the actual hardware attached to the ML600 pump. Once established, the settings will be stored in memory and retained after the power is cycled. Clicking the “Icon buttons” navigates the user to a “Data Entry Screen”. Clicking the “Back button” on the bottom left navigates to the “Run Screen”. 3-2 Icon Buttons Back Button User's Manual MICROLAB 600 Single & Dual Instrument 3 3.1.3 Data Entry Screen Basic Controller Setup & Operation Use the “Toggle buttons” to highlight the setting that needs to be changed. Press the “Change button” to enter a new value for the selected setting. Press the “Back button” to navigate back to the Configuration screen. All changes are saved when the Back button is pressed. Change Button Toggle Buttons Back Button 3.1.4 Run Screen This screen enables control and monitoring of all aspects of the pump's activities. Buttons and Icons are used to change parameters and Indicators are designed to give current and future status of the pump. Valve Move Indicator Valve Position Indicator Parameter Adjustment Button Syringe Direction Indicator Auto Refill Icon Syringe Position Indicator Run/Pause Icon Back Button Chapter 3 Basic Controller Setup & Operation 3-3 Valve Position Indicator This indicator shows the current valve position and the fluid path. See section 3.1.4.1 below for more details. Parameter Adjustment Button This button shows the current dispense setting. Press this button to change the dispense setting. Back Button This button takes the user back to the previous screen which is the “Configuration Screen” for the basic controller. Syringe Position Indicator This indicator shows the current syringe position graphically and in a numeric volume. Auto Refill Icon This icon can be toggled “ON” and “OFF”. When the icon is labeled “ON” the syringes will automatically refill when they are empty. When the icon is labeled “OFF” the syringes will not refill until they are triggered by the hand probe or the “Run Icon”. Run/Pause Icon This button serves a similar purpose to the trigger button on a hand probe. When the Run button is pressed the pump will begin to perform the programmed action. The Run button will convert to a Pause button until the action is completed and then will turn back into a Run button. If the Pause button is pressed in the middle of an action, the pump will stop after the current action is completed. To stop the pump immediately press the Back button on the bottom left of the screen. Syringe Direction Indicator This indicator shows the direction the syringe will move in the next step. No arrow indicates the syringe will not be moving in the next step. Valve Move Indicator This indicator shows the current valve position and the position where the valve will move in the next step. If the indicator says “Ready” the valve will not move. 3-4 User's Manual MICROLAB 600 Single & Dual Instrument 3 3.1.4.1 Valve Position Indicator Drawings Single Syringe Dispenser Valve Positions For a Single Syringe Dispenser the syringe can be connected to the input tubing or the output tubing. When the valve is in the “IN” position, liquid can flow from the syringe in or out of the left port. When the valve is in the “OUT” position liquid can flow in or out of the center port coming out the front of the valve. Position 1 Position 2 IN OUT Basic Controller Setup & Operation The Valve Position Indicator will display drawings intended to illustrate the current open fluid path for the universal valve. The gray path with double headed arrows indicates the fluid path that is currently connected to the syringe. The direction the liquid flows through the open fluid path is determined by the direction the syringe is moving. Descriptions and images of the drawings displayed by the Valve Position Indicator are shown below for the four pump configurations. Dual Syringe Diluter Valve Positions In this configuration the left and right valves work together as one. The left syringe can be connected to the input tubing or the output tubing which is connected to the front of the right valve. The right syringe can only be connected to the output tubing and does not rotate in this configuration. Position 1 LEFT IN Position 2 RIGHT OUT LEFT OUT RIGHT OUT Chapter 3 Basic Controller Setup & Operation 3-5 Dual Syringe Dispenser Valve Positions The left valve on a Dual Syringe Dispenser is the same as the Single Syringe Dispenser and uses the same drawings and position names. The right valve is a mirror image of the left valve. The “IN” position connects the right syringe to the reservoir through the right valve port. Left Valve Positions Position 1 IN Right Valve Positions Position 2 Position 1 Position 2 OUT IN OUT Note: The Left and Right Valves can move independently of each other, as indicated in the diagram to the left. Continuous Dispenser Valve Positions In this configuration the left and right valves work together as one. The left syringe can be connected to the input tubing or the output tubing which is connected to the front of the right valve. The right syringe can be connected to the input tubing or the output tubing. It is important to note that when the left valve is rotated to the “OUT” position the right syringe must be rotated to the “IN” position before the left syringe can aspirate or dispense liquid. Position 1 3-6 Position 2 LEFT RIGHT LEFT RIGHT OUT IN IN OUT User's Manual MICROLAB 600 Single & Dual Instrument 3 3.2 Instrument Configuration Options Basic Controller Setup & Operation 3.2.1 Syringe Setup Refer to Section 3.1 for general screen navigation. Syringe Size This option allows for selection of syringes between 10 µL and 50 mL. Once a syringe size is selected the controller will automatically set the Syringe Speed, Return Steps, and Back-off steps to the recommend value. Syringe Speed The syringe speed is programmed in flow rate (µL/sec). The default setting for speed will be automatically selected when the “Syringe Size” is changed. When changing the syringe speed the system will recommend 2 alternative speeds in addition to the default speed. If none of the speeds are desirable, select the custom option to define a new flow rate. There are no restrictions on allowable flow rates, however if the speed selected is faster than the default it may cause the instrument to stall. The allowable flow rates are displayed in Table 2-5. Return Steps Return steps are used to take the mechanical slack out of the syringe drive. The defaults should be used unless otherwise instructed by a representative of Hamilton Company or an authorized distributor for Hamilton Company. Back-off Steps When the pump initializes it drives the syringes to the top of their stroke until resistance is felt. Then the pump moves back from that resistance a defined distance dictated by the “Back-off Steps”. This new position is set as the zero point. Some syringes have more material at the tip of their plunger so they require more “Back-off Steps”. The defaults should be used unless otherwise instructed by a representative of Hamilton Company or an authorized distributor for Hamilton Company. Chapter 3 Basic Controller Setup & Operation 3-7 3.2.2 Valve Setup Valve Type The valve type must match the actual valve and tubing that is connected to the front of the syringe pump. The valve type is used to properly position the valve for a given application. A mismatched configuration can result in the syringe dispensing to a blocked port which has the potential to destroy the valve and/or the syringe. 3.2.3 Triggering The ML600 has two Probe Receptacles, one on the left and one on the right side of the instrument. The default is to accept trigger signals from “either” the left or the right trigger port. If desired it is possible to set the instrument to only accept triggers from the “Left” or “Right” side of the instrument. When a side is selected, trigger signals from the opposite side will be ignored. 3.2.4 System The System Icon allows the user to review and modify the following settings in the ML600 software. ``3.2.4.1 Setting the Date and Time ``3.2.4.2 SD Card Capacity & System Memory ``3.2.4.3 Calibrating the Controller Touch Screen ``3.2.4.4 Screen Power OFF ``3.2.4.5 Firmware/Software Versions ``3.2.4.6 DHCP and IP Address ``3.2.4.7 Syringe Cycle Count ``3.2.4.8 Language 3.2.4.1 Setting the Date and Time Using the toggle buttons the user can highlight and select Date and then use the change buttons to set the appropriate date. Likewise the user can repeat this process for the time. 3-8 User's Manual MICROLAB 600 Single & Dual Instrument 3 3.2.4.2 SD Card Capacity & System Memory (Advanced Controller Only) Basic Controller Setup & Operation These are indicators for the percent memory used for the SD card and the system memory. 3.2.4.3 Calibration of the Controller Touch Screen The controller touch screen is calibrated before it leaves Hamilton Company. If the clicked area on the touch screen does not seem to be aligned with the image on the screen it is probably time to recalibrate the screen. Step 1. To re-set the instrument calibration, select the System Icon from the Configuration Screen. Toggle down to the Screen Calibration option and press the Calibrate Change button. The screen to the right should appear. Carefully press and briefly hold stylus on the center of the target. Repeat as the target moves around the screen. Step 2. Press the center of the cross. Step 3. The cross will move to different locations on the screen. Each time the cross stops moving press the center. Step 4. Once all 5 positions have been recorded press anywhere on the screen to store the calibration values. If the calibration is so far off that it is impossible to navigate to Screen Calibration, as described in Step 1, it is possible to get to the calibration program during system start up. Turn the instrument OFF and then ON. The initial splash screen will display followed by a completely black screen. After a few seconds the splash screen will appear again. Double-Click the screen as indicated to enter the calibration program. Chapter 3 Basic Controller Setup & Operation 3-9 3.2.4.4 Screen Power Off The ML600 Touch Screen is designed to turn off after an extended period of inactivity. The default setting for the power off is 10 minutes. If desired the power off time can be increased through this selection. 3.2.4.5 Firmware/Software Versions The ML600 system is controlled by a combination of three different programs. There is firmware on the pump which is controlled by software that is running on an operating system installed on the controller. The version information for all three of these programs can be viewed on the System Screen. 3.2.4.6 Update the Firmware/Software The most current version of the ML600 Firmware/Software will be posted at www.hamiltoncompany.com/microlab600 under the Technical Information menu. This file can be used to update an older ML600 to the current revision of Firmware/Software. Download the file and transfer it to an SD card. Insert the SD card into the back of the controller. With the controller navigate to the System Screen. When a Firmware/Software file is located on the SD card there will be a small icon button called Update System on the System Screen. Press the icon and then press Start to begin the update. Follow the on screen instructions to complete the update. 3.2.4.7 DHCP and IP Address (Advanced Controller Only) The ML600 controller communicates with the pump using a static IP address. A static IP address is also used when connecting the ML600 to a PC. To connect the ML600 to most corporate networks it is required to change the ML600 to Dynamic Host Configuration Protocol (DHCP). When in DHCP mode the ML600 will obtain a dynamic IP address from the corporate server. During this time it will not be able to connect to the ML600 controller. If the corporate server does not return a valid IP address after a few seconds the ML600 will automatically switch back to a static IP address until the power is cycled again. 3.2.4.8 Syringe Cycle Count This option displays a running total of the number of syringe strokes the pump 3-10 User's Manual MICROLAB 600 Single & Dual Instrument 3.2.4.9 Language To select the appropriate language use the toggle buttons to scroll down to the language option. Then use the choice buttons to select the correct language. The default language will be English. 3 Basic Controller Setup & Operation has accumulated over its entire life. A complete stroke is recorded when the syringe drive has traveled a distance of 60 mm or the equivalent of completely filling or emptying a syringe. This is done so that a series of small movements does not artificially increase the cycle count. For a dual syringe system the cycle count is displayed as two numbers separated by a colon. The number on the left corresponds to the left syringe and the number on the right corresponds to the right syringe. 3.3 Priming the Instrument This section will describe how to properly prime the MICROLAB 600 before running a method. Step 1. Decide which side or sides of the instrument are to be primed. Use the “Syringe Selector” button to select the syringes to prime as described in section 2.3.1. The selected syringes will have a blue LED illuminated above them. The “Syringe Selector” button is not present on single syringe instruments. Note: When the diluter setup primes only the left syringe moves so the syringe selector button is not functional with this valve configuration. Step 2. Make sure your fill tubing is in the reservoir and dispense tubing is directed towards a waste container. Tubing clips may be required to secure the tubing to the vessel. Step 3. Press and release the “Prime” button. The syringes that were selected using the “Syringe Selector” button should move to the top of their stroke and then continuously prime until the “Prime” button is pressed again. Note: If the valves were not already initialized, they will initialize before the syringe(s) move which could result in a slight delay before the syringe(s) begin moving. Chapter 3 Basic Controller Setup & Operation 3-11 Note: Each Dual Syringe Setup will prime differently to optimize the priming and minimize waste. ``The Dual Syringe Diluter will fill and dispense the left syringe only. This is sufficient to prime the right side. A minimum of two cycles must be run to ensure liquid has been primed through all ports on the valve. ``The Continuous Dispenser will oscillate syringes so one syringe will fill while the other is dispensing. Step 4. Once all the air is flushed from the system it is fully primed. Press the “Prime” button when the syringes are near the top of their stroke to stop the priming. 3.4 Basic Controller Methods Prior to running a method the instrument must be properly configured and primed. For information on how to do this review sections 3.2 and 3.3. There are four basic instrument configurations including Single Syringe Dispenser, Dual Syringe Diluter, Dual Syringe Dispenser, and Continuous Dispenser. Reference Figures 2-7 through 2-10 for more details. Below is a discussion of the steps each of the configurations will perform. 3.4.1 Single Syringe Dispenser Step 1. The syringe will fill from the input reservoir to the volume specified by the “Parameter Adjustment” button (See 3.1.4). This step will execute when the “Run/Pause” icon is pressed on the controller or the trigger is pressed on the hand probe. Step 2. Position the dispense tubing over the destination container. Trigger the next step with the “Run/Pause” icon or the trigger on the hand probe. Step 3. The syringe will dispense the volume specified by the “Parameter Adjustment” button (See 3.1.4) to the output tubing through the hand probe. Step 4. Step one will be repeated. If the “Auto Refill” icon (See 3.1.4) is set to “ON” this step will execute automatically. If the icon is set to “OFF” then the ML600 will wait for a trigger. 3-12 User's Manual MICROLAB 600 Single & Dual Instrument 3.4.2 Dual Syringe Diluter Step 1. Place the tip of the hand probe into the sample and press the trigger. Step 2. The left syringe will fill with diluent from the input reservoir, to the volume specified by the left “Parameter Adjustment” button (See 3.1.4). The right syringe will aspirate sample into the hand probe according to the right “Parameter Adjustment” button. Important! The volume of sample aspirated should not exceed the 80% of the internal volume of the dispense tubing. This will avoid contamination of the right syringe with sample. Tubing volumes and custom length tubing is listed in Appendix B. 3 Basic Controller Setup & Operation Important! The dispense volume can be changed at any time. The pump will automatically recalculate to bring in more liquid if needed. Step 3. The hand probe should be positioned over the destination container. Trigger the next step with the “Run/Pause” icon or the trigger on the hand probe. Step 4. The left and right syringe will dispense their entire volume through the dispense tubing and out the hand probe. The sample will be dispensed followed by the diluent which washes out the tubing for the next sample. Step 5. If the “Auto Refill” icon (See 3.1.4) is set to “ON” the left syringe will automatically refill with diluent. If the icon is set to “OFF” then the ML600 will wait for a trigger at which time Step 1 will be repeated. 3.4.3 Dual Syringe Dispenser The steps described in 3.4.1 will be the same with this configuration. The only difference is that both the left and right syringes will fill and dispense according to the values entered on the “Parameter Adjustment” buttons. 3.4.4 Continuous Dispenser The steps described in 3.4.1 will be the same with this configuration. The only difference is that the left syringe will fill while the right syringe is dispensing or the right syringe will fill while the left syringe is dispensing. This setup will ensure that one syringe is always filled with reagent, resulting in decreased time between dispenses. Chapter 3 Basic Controller Setup & Operation 3-13 Chapter 4 Care & Maintenance This chapter contains instructions for routine maintenance procedures for the MICROLAB 600, which includes the following topics: ``4.1 Yearly Maintenance ``4.2 Instrument Calibration ``4.3 Deciding When to Clean the MICROLAB 600 ``4.4 Cleaning the Fluid Path ``4.5 Cleaning the Exterior of the MICROLAB 600 ``4.6 Storing the MICROLAB 600 ``4.7 Replacing Batteries Chapter 4 Care & Maintenance 4.1 Yearly Maintenance It is recommended that the MICROLAB 600 be sent to a service center for cleaning and lubrication on an annual basis. Upon receiving the instrument a technician will evaluate the instrument to make sure it is in good working order. The belts will be replaced and the lead screw and shaft will be cleaned and replaced if necessary. The lead screw and shaft will be lubricated. Finally, the instrument will be retested and recertified for calibration. 4.2 Instrument Calibration The design and programming of the MICROLAB 600 eliminates the need for adjustment of the instrument’s calibration. When the syringes and valves are installed the instrument performs an initialization. This initialization orients the valves and the syringes with the optical encoders that are permanently mounted to each drive motor. The valve initialization consists of rotating the valve more than 360 degrees to identify a calibration location on the optical encoder. When this location is identified the exact valve location is known. The syringe initialization consists of driving the syringe to the top of its stroke. Top of stroke is determined when the syringe drive stalls due to the force of the plunger pressing against the end of the barrel. The pump then backs off a defined distance and sets that point as the zero volume. This method of initialization accommodates for tolerances in the length of the syringe and eliminates the need for manual adjustment. Many companies require that instrumentation, including the MICROLAB 600, be validated on a monthly, semi-annual, or annual basis. The instrument can be sent to Hamilton Company for recertification at any time. Simply contact Hamilton Customer Service to obtain a Return Materials Authorization (RMA) number. Hamilton’s validation procedure for accuracy and precision are performed according to the ANSI standard XY. There are instructions on validating the ML600 on our website at www.hamiltoncompany.com/microlab600/techInfo/calibration.php Note: Sending the MICROLAB 600 in for Non-Warranty Service will be charged to the customer. 4-2 User's Manual MICROLAB 600 Single & Dual Instrument 4 4.3 Deciding When to Clean the MICROLAB 600 Care & Maintenance Cleaning the MICROLAB 600 is dependent on how the instrument is used with respect to the duration of use and types of chemicals entering the system. We recommend that you clean the instrument daily. The tubing and syringes should be purged and primed at the end of each experiment and/or each work shift. To clean the MICROLAB 600 flush the system with Hamilton Syringe Cleaning Concentrate (p/n 18311), ethanol, or with 10% chlorine bleach and deionized water solution. Avoid using caustic or acidic cleaning solutions. Important! Leave the syringe and tubing filled with deionized water during prolonged inactivity. This is important if you are using buffers or other salt solutions which could accumulate or crystallize in the system. If buffers or other salt solutions are left in the fluid path overnight, crystals may form and damage the syringe plunger tip. 4.4 Cleaning the Fluid Path For highly critical applications the MICROLAB 600 should be cleaned on a regular basis. Use Hamilton Syringe Cleaning Concentrate or ethanol to clean the fluid path. Steps on cleaning the fluid path are listed below. When the tubing and syringes come in contact with contaminated or hazardous samples, follow safe laboratory practices in selecting and using a cleaning fluid to flush out the tubing and syringes. WARNING! Follow laboratory safety procedures if the MICROLAB 600 instrument comes in contact with hazardous materials. Use a cleaner that is compatible with the fluids previously run through the system. Depending on the sample that is being run, deionized water, urea, ethanol, or 10% chlorine bleach and deionized water solution may be used as a cleaning fluid. See Appendix D for chemical compatibility with the MICROLAB 600. Step 1. Prepare a reservoir of cleaning fluid and place the fill tubing in the cleaning fluid reservoir. Use a tubing clip to secure the tubing in the reservoir vessel. Step 2. Place the hand probe over the cleaning fluid reservoir. Chapter 4 Care & Maintenance 4-3 Step 3. Press the Prime button to begin the prime cycle. Step 4. Continue priming the system until the fluid path is clean. The number of cycles required to clean the fluid path will depend on the size of the syringes and the level of contamination present in the system. A good estimate is 5-10 cycles of the syringe or 5-10 times the internal volume of the fill and dispense tubing. Step 5. When the fluid path is clean, press the Prime button to stop the priming cycle. Step 6. Move the fill tubing from the cleaning fluid reservoir and place it into a reservoir of deionized water. Step 7. Press the Prime button to continue the prime cycle. Step 8. Continue priming the system until the fluid path is free of all cleaning fluid. Press the Prime button to stop the priming cycle. Dispense the rinse fluid into a waste container. The system is now clean and ready for use. 4.5 Cleaning the Exterior of the MICROLAB 600 The MICROLAB 600 housing is moderately inert to chemical exposure. However, some chemicals may discolor the surface of the unit. If a spill occurs on the exterior of the instrument, wipe the surface immediately. Wash the surface using a damp cloth with soap and water. Then dry the area. Make sure liquids do not enter the interior of the MICROLAB 600. To disinfect the exterior surface, wipe it down with 10% chlorine bleach and deionized water solution. Then dry the area. Note: The cleaning guidelines presented here are meant as guide only. If applications require different cleaning solutions, contact Hamilton Company for more information. 4-4 User's Manual MICROLAB 600 Single & Dual Instrument 4 4.6 Storing the MICROLAB 600 Care & Maintenance For long-term storage, prime and purge the system with methanol to facilitate drying. Remove the tubing and syringes. Place the syringes in their original boxes. Cover the instrument to protect it from damage. 4.7 Replacing Batteries In the controller there is a battery to maintain the date and time in the event that power is lost to the instrument. This battery is located within the controller; if it should fail the controller will need to be sent in for service. The battery should have a life of 10+ years. Chapter 4 Care & Maintenance 4-5 Chapter 5 Troubleshooting This chapter includes information on troubleshooting the MICROLAB 600, which includes the following topics: ``5.1 Error Message Code Guide ``5.2 Troubleshooting Guide ``5.3 Getting Technical Support ``5.4 Returning Instruments for Repair Chapter 5 Troubleshooting 5.1 Error Message Code Guide The controller will display an error code and description. For more details on the error received go to our website at www.hamiltoncompany.com/errorguide and search using the error code description. 5.2 Troubleshooting Guide This section contains information on troubleshooting the MICROLAB 600 instrument. Table 5-1 Troubleshooting Guide Problem Possible Causes Corrective Action Instrument does not power ON ``Disconnected power cord or ``Connect power cord and faulty power outlet ``Faulty power supply check power source ``Check the power supply to see if the light is on when plugged in. Instrument functions normally, but display screen fails to illuminate ``Controller unit not plugged in drive unit ``Faulty LCD ``Check to see that the controller unit is plugged into the drive unit ``Call the Hamilton Service Department ``The POE may be turned OFF Instrument does not fill or dispense ``Faulty or blocked tubing; blocked or leaky fluid path ``Incorrect tubing or syringe connections ``Faulty controller ``Check tubing, valve, and syringes for blockage, crimps, or loose fittings; replace tubing; either replace valve and syringes or tighten valve and syringes ``Check that appropriate tubing, fittings, and syringes are used and that they are finger-tight ``Call the Hamilton Service Department ``Non-functional syringe drive(s) ``Valves do not rotate (valve drives are not engaged or valve is faulty) 5-2 User's Manual MICROLAB 600 Single & Dual Instrument ``Call the Hamilton Service Department ``Remove and reinstall valve or replace valve Problem Possible Causes Corrective Action Instrument gives inaccurate or imprecise results ``Air exists in the fluid path ``Check to see that tubing 5 Troubleshooting ends are totally submerged in reagent bottles ``Check to see that tubing connections are tight; replace if necessary ``Check to see that the syringe is installed correctly and that it is not leaking ``Replace worn or leaking valves or tubing ``Reduce the syringe drive speed to eliminate cavitation problems ``Incorrect size of dispense tubing used with syringe ``Check for correct tubing and fittings ``Use small tapered tubing (18 gauge) for small dispense volumes Small air gap appears at tip of probe tubing after final aspiration ``Dirty tubing ``Change or clean the tubing ``Improper aspiration ``Lower the aspiration speed Persistent air or leaks in the fluid path ``Caviatation is occurring; ``Reduce syringe drive speed, syringe drive speed is too high for the current liquid ``Loose, worn, or incorrect tubing fittings Unit is overheated use lower drive speeds for viscous liquids ``Hand-tighten the fittings or replace old tubing with new or correct-size tubing ``Damaged syringe plunger tip ``Replace plunger or syringe ``Damaged valve ``Replace valve ``Inadequate ventilation, ``The unit is overheated, room temperature too high, or duty cycle too high power it OFF and allow it to cool down ``Resume use at a lower duty cycle ``See Appendix A Technical Specifications Chapter 5 Troubleshooting 5-3 5.3 Getting Technical Support If a problem persists even after attempts to correct it, contact Hamilton Company Technical Support or Service Department. To expedite service, please have the instrument part number and serial number ready and available. Please be able to provide application specific information (syringe sizes, drive speeds, and liquids). In the United States & Canada: ``Hamilton Company, AG 4970 Energy Way Reno, Nevada 89502 ``Customer Service +1 (888) 525-2123 ``Technical Support/Service +1 (800) 648-5950 ``Outside the U.S. +1 (775) 858-3000 In Switzerland: ``Hamilton Bonaduz AG Via Crusch 8 Ch-7402 Bonaduz, GR, Switzerland ``Customer Service +41 81-660-60-60 Fax +41 81-660-60-70 5.4 Returning Instruments for Repair Before returning an instrument to Hamilton please contact Hamilton Company and request a Returned Materials Authorization Number (RMA). Note: Do not return instruments to Hamilton Company without an RMA number. This number assures proper tracking of your instrument. Instruments that are returned without an RMA number will be sent back to the customer without being repaired. Biohazard: The MICROLAB 600 instrument MUST be decontaminated before it is returned to Hamilton Company. To decontaminate the instrument remove health hazards, such as radiation, infectious diseases, corrosive agents, etc. Provide a complete description of any hazardous materials that have been used with the instrument. 5-4 User's Manual MICROLAB 600 Single & Dual Instrument 5 Troubleshooting Biohazard: Hamilton Company reserves the right to refuse a return shipment of any Hamilton product that has been used with radioactive, microbiological substances, or any other material that could be hazardous to Hamilton employees. Important! Do not return syringes, tubing, or valves with your instrument. Hamilton Company will assume that they pose a health hazard and will destroy them. Chapter 5 Troubleshooting 5-5 Appendix A - Technical Specifications Technical Specifications A Technical Specifications Accuracy Refer to Table 2-6 Precision Refer to Table 2-6 Syringe drive mechanism 1.8° Stepper motor with variable volumetric flow rate Speed Refer to Table 2-5 Syringe size 10 µL–50 mL Volume range 1.0 µL–50 mL Fluid path Borosilicate, PTFE, CTFE Program memory 2GB (only with purchase of controller Upgrade Kit #1) Communication type Ethernet, 10/100 BASE-T Power requirements 100–240 V 1.5A max 50/60 Hz Power rating 24 VDC, 2.5A Certifications CE, CSA Installation category I and Pollution degree 21 Dimensions 7 x 5.5 x 10.5 inch (177.8 x 139.7 x 266.7 mm) Excluding Controller Weight 13 lbs (5.9 kg) Shipping dimensions 15.25 x 14.5 x 15.25 inches (387.4 x 368.3 x 387.4 mm) Excluding Controller Shipping weight 17 lbs (7.7 kg) Operating temperature 41–104°F (5–40°C) Storage temperature -4–158°F (-20–70°C) Humidity range 20–90% non-condensing Compliance FCC Part 15, Class B EMC: EN 61326-1, Class B Indoor Operation and Use Only 1 – Per Section 3.6.6.2 “pollution degree 2” is defined as “normally only non-conductive pollution occurs (addition of foreign matter, solid, liquid, or gaseous (ionized gasses), that may produce a reduction of dielectric strength or surface resistivity).” Occasionally, however a temporary conductivity caused by condensation must be expected. Appendix A Technical Specifications A-1 Appendix B - Replacement Parts & Accessories Replacement Parts & Accessories B Table B-1 Controller Upgrade Kits Upgrade Kit Part Number Upgrade Kit #1 (Basic to Advanced) 61500-02 Upgrade Kit #2 (Computer Controlled) 61500-03 The controller upgrade kit consists of the following parts: ``SD Card – Installs into the controller to add memory to the controller and to enable the advanced functionality of the pump (not in Upgrade Kit #2). ``USB Adapter – The SD Card installs into this adapter allowing the contents of the card to be accessed through a standard USB port (not in Upgrade Kit #2). ``Software CD – This CD contains an Application Programming Interface (API) in the form of several .DLL files. These files can be used to control the pump in most Windows based programming languages that are compatible with Microsoft’s Dot Net 2.0 framework. The CD also contains a programmer manual that defines the commands contained in the API. Finally the CD contains example programs written in LabView, C# and VB. These programs are intended to give an experienced programmer a quick example of how to connect to the pump and call a few commands. Table B-2 Replacement Syringes Syringe Size Part Number 10 μL 59000-05 25 μL 59000-10 50 μL 59000-15 100 μL 59000-20 250 μL 59000-25 500 μL 59000-30 1.0 mL 59000-35 2.5 mL 59000-40 5.0 mL 59000-45 10.0 mL 59000-50 25.0 mL 59000-55 50.0 mL 59000-60 Appendix B Replacement Parts & Accessories B-1 Table B-3 Syringe Cleaning Concentrate Cleaning Concentrate Volume Part Number 70 mL 18310 500 mL 18311 To use the cleaning concentrate dilute to 25% with deionized water to clean the fluid path. To clean the exterior of the instrument dilute the cleaning concentrate to 10% with deionized water. Table B-4 Replacement Valve Parts Valve Assembly Description Part Number Left Valve Assembly 60676-01 Right Valve Assembly 60675-01 Valve Cross Tube Assembly 61498-01 Valve Plug 61729-01 Table B-5 Replacement Fill and Dispense Tubing Assemblies for Concorde CT and Dual Push Button Hand probes Gauge Type Length Internal Volume Part Number 18 Fill Tubing 48" (1219 mm) 1.15 mL 61615-01 18 Dispense Tubing 54" (1372 mm) 1.29 mL 240134 18 Fill Tubing Custom Length 0.94 µL/mm 1174-02 18 Dispense Tubing Custom Length 0.94 µL/mm 1173-02 12 Fill Tubing 48" (1219 mm) 4.57 mL 61614-01 12 Dispense Tubing 54" (1372 mm) 5.15 mL 240133 12 Fill Tubing Custom Length 3.75 µL/mm 1172-02 12 Dispense Tubing Custom Length 3.75 µL/mm 1171-02 Table B-6 Continuous Fill Tubing Assemblies B-2 Gauge Type Internal Volume Part Number 18 Continuous Fill Tubing 0.94 µL/mm 61491-02 12 Continuous Fill Tubing 3.75 µL/mm 61491-01 User's Manual MICROLAB 600 Single & Dual Instrument Table B-7 Accessories B Part Number Tubing Clips (5/pk) 88990 Accessory Holder 61710-01 Replacement Parts & Accessories Description Table B-8 Basic User Manuals Description Part Number Basic User Manual English 61440-01 Advanced User Manual English 61441-01 Note: Foreign language manuals will be available for download at www.hamiltoncompany.com/microlab600. Figure B-1 Power Supply and Power Cord Assembly Diagram Power Supply (p/n 61092-01) Power Cord (User Defined) The ML600 uses an external power supply like a computer laptop. The power supply is common to all ML600 instruments and handles 110-220 VAC. When the ML600 is purchased the correct power cord must be selected for the country where the instrument will be used. Table B-9 Power Supply Description Country Part Number Power Supply Universal 61092-01 Appendix B Replacement Parts & Accessories B-3 Table B-10 Replacement Power Cords Power Cord Type Country Diagram of Plug CH Switzerland 355008 Standard CEE 7/7 Continental Europe, Russia, Schuko 3892-01 Standard AS 3112 Australia, New Zealand, Argentina, China 3892-02 Standard BS 1363 UK, Ireland, Malaysia, Middle East 3892-03 Standard JIS 8303 Japan 3892-04 Standard NEMA 5-15p USA, Canada, Mexico, Central America, Brazil 3892-05 Figure B-2 Thumbscrew Assembly Parts O-Ring (p/n 16108) Thumbscrew (p/n 35684) B-4 User's Manual MICROLAB 600 Single & Dual Instrument Part Number Appendix C - Hand Probes & Foot Switch Hand Probes & Foot Switch C Table C-1 Hand Probes and Foot Switch Parts Description Part Number Concorde CT Hand Probe 61401-01 Dual Push Button Hand Probe 62541-01 Disposable Tip Hand Probe 1-35 μL 62539-01 Disposable Tip Hand Probe 1-125 μL 62540-01 200 μL Disposable Tips Bulk 11008-21 300 μL Disposable Tips Racked (5 racks of 96) 9766-01 Large Volume Disposable Tip Hand Probe (5 mL) 62575-01 5 mL Disposable Tips (250/pk) 75702 Foot Switch 62576-01 C-1 Concorde CT Hand Probe The Concorde CT hand probe is a single dispense tube pipette probe that features a slim, comfortable design. This probe is used with single syringe dispensers, dual syringe diluters, and continuous dispensers. Dispense tubing will connect to the pump and run through the Concorde CT hand probe. The probe jack will fit into the probe receptacle on the drive unit. This probe accommodates either 12 or 18 gauge dispense tubing. See Table B-5 in Appendix B for dispense tubing part numbers. If there are applications where needles are required for use with the MICROLAB 600 the tip of the Concorde CT hand probe may be converted to a luer lock termination using the luer lock conversion kit (p/n 58381-01). Appendix C Hand Probes & Foot Switch C-1 Figure C-1 Concorde CT Hand Probe 1/4-28 Through Tube Adapter Tubing Tubing Clamp Nut C-2 Dual Push-Button Hand Probe The Dual Push-Button Hand Probe holds two dispense tubes and features a pistol grip design with a push-button actuator. This probe is used with the Dual Syringe Dispenser configuration. It will accommodate either 12 or 18 gauge dispense tubing assemblies. It can independently extend each dispense tube into the dispense vessel. See Table B-5 in Appendix B for dispense tubing part numbers. Figure C-2 Dual Push-button Hand Probe and Tubing Collet Collets Note: The 18 gauge tubing requires the use of a tubing collet to hold the smaller tubing firmly. The tubing should be threaded through the probe to the desired length. Then the tubing collet should slide over the tubing and be slipped into the metal tip of the hand probe. As the collet is pressed into the metal tube it will grab on the tube to hold it firmly in place. C-2 User's Manual MICROLAB 600 Single & Dual Instrument C-3 Disposable Tip Push-button Hand Probe C Hand Probes & Foot Switch The Disposable Tip Push-button hand probe is a single dispense tube pipette that features disposable tips and a push-button tip ejector. This is an optional hand probe and should be used when there is concern about sample carryover. Figure C-3 Disposable Tip Push-button Hand Probe C-4 Large Volume Disposable Tip Hand Probe This is an optional hand probe with a single dispense tube designed to accommodate highly viscous samples, such as motor oil, and also large volume samples from 1-5 mL. This probe features a 5 mL disposable tip that will minimize sample carryover. Figure C-4 Large Volume Disposable Tip Hand Probe Appendix C Hand Probes & Hand Switch C-3 C-5 Foot Switch The Foot Switch allows you to operate the MICROLAB 600 via a foot-activated control pedal. This is useful when you need to keep both hands free, for applications like hand sampling or animal dosing. Figure C-5 Foot Switch C-4 User's Manual MICROLAB 600 Single & Dual Instrument Appendix D - Chemical Compatibility D Chemical Compatibility This section contains information about chemical compatibility with the MICROLAB 600 instrument at room temperature. The fluid path consists of the inside syringe barrel which is made of borosilicate glass, the tip of the syringe plunger which is made of PTFE, and the internal valve components which are made of PTFE and CTFE. Table D-1 Chemical Compatibility Legend 0 = No data available A = No effect, excellent B = Minor effect, good C = Moderate effect, fair D = Severe effect, not recommended Chemical PTFE Borosilicate Glass CTFE (Kel-F) Acetaldehyde A A A Acetates A B A Acetic acid A A A Acetic anhydride A 0 A Acetone A A A Acetyl bromide A 0 0 Ammonia A A A Ammonium hydroxide A 0 A Ammonium phosphate A 0 A Ammonium sulfate A 0 A Amyl acetate A A A Aniline A A A Benzene A A B-C Benzyl alcohol A A A Boric acid A 0 A Bromine A A-B A Butyl acetate A A A Butyl alcohol A A B Carbon sulfide A A A Carbon tetrachloride A A B-C Appendix D Chemical Compatibility D-1 Chemical D-2 PTFE Borosilicate Glass CTFE (Kel-F) Chloracetic acid A A A Chlorine, liquid A A B Chlorobenzene A 0 B Chloroform A A B Chromic acid A A A Cresol A A A Cyclohexane A A B Ethers A A B Ethyl acetate A A B-C Ethyl alcohol A A 0 Ethyl chromide A 0 B Ethyl ether A 0 A-B Formaldehyde A A A Formic acid A A A Freon 11, 12, 22 A A B-C Gasoline A A A Glycerin A A A Hydrochloric acid A A A Hydrochloric acid (conc) A A A Hydrofluoric acid A D B Hydrogen peroxide A A B Hydrogen peroxide (conc) A A B Hydrogen sulfide A 0 A-B Kerosene A A A Methyl alcohol A A A Methyl ethyl ketone (MEK) A A A-B Methylene chloride A A B Naptha B 0 A Nitric acid A A A Nitric acid (conc) A A-B A-B Nitrobenzene A A A-B Phenol A A B Pyridine A 0 A User's Manual MICROLAB 600 Single & Dual Instrument PTFE Borosilicate Glass D CTFE (Kel-F) Silver nitrate A A B Soap solutions A A A Stearic acid A A 0 Sulfuric acid A A A Sulfuric acid (conc) A A A Sulturous acid A 0 A-B Tannic acid A 0 A-B Tanning extracts 0 0 0 Tartartic acid A 0 B Toluene A A B Trichlorethane A A B Trichlorethylene A A B-C Turpentine A A A Water A A A Xylene A A B-C Appendix D Chemical Compatibility Chemical Compatibility Chemical D-3 Appendix E - Instrument Performance Test Reports Instrument Performance Test Reports E The ML600 is shipped with calibration certificates that validate the positional accuracy of the valve motors and syringe drives. The positional accuracy is then compared to the allowable tolerance of a 1 mL syringe to determine the resulting dispense volumes. This method has been proven to correlate to dispense accuracy through extensive testing. A white paper describing this testing can be found at www.hamiltoncompany.com/microlab600. Figure E-1 Example Calibration Certificate C ERTIFICATE OF C ALIBRATION Model: Part #: Serial #: Description: Device Under Test ML-600 60413-01 ML632413 ML-600 Universal Syringe Pump Name: Model: Serial No.: N.I.S.T. No: Accuracy: Calibration Due: Accuracy Specifications: +/- 1% Of Reading @ ≥ 30% of Full Stroke Dispense (60mm) +/- 1.2% Of Reading @ ≥ 5% to < 30% of Full Stroke Dispense (60mm) +/- 3.0% Of Reading @ ≥ 1% to < 5% of Full Stroke Dispense (60mm) Calibration Device Mitutoyo 543-564A ID-H0560 001501 123456789 +/-0.0025mm 1/15/2011 Left Syringe Drive Calibration Result: PASS Left Syringe Drive Test Data Summary Command Instance Actual 1% Stroke 0.600 mm Command Actual 5% Stroke 3.000 mm Command Actual 30% Stroke 18.000 mm Command 1 2 3 4 5 6 7 8 9 10 % Allowable Precision / % Actual Precision % Allowable Accuracy / Actual Accuracy Result 0.6095 0.6095 0.6100 0.6100 0.6100 0.6095 0.6095 0.6100 0.6100 0.6100 1.5% / 0.098% +/- 3% / 1.607% PASS 3.0030 3.0030 3.0020 3.0025 3.0020 3.0030 3.0030 3.0020 3.0025 3.0020 0.5% / 0.120% +/- 1.2% / 0.083% PASS 18.0018 18.0025 18.0030 18.0025 18.0030 18.0018 18.0025 18.0030 18.0025 18.0030 0.2% / 0.009% +/- 1% / 0.014% PASS Representative Dispensed Volume, 1mL Syringe* Description Maximum Average Dispense (uL) Minimum Average Dispense (uL) %Allowable Accuracy / %Dispense Accuracy @ Maximum Allowable Syringe Diameter %Allowable Accuracy / %Dispense Accuracy @ Minimum Allowable Syringe Diameter Actual 1% Stroke 10.000 uL Command Actual 5% Stroke 50.000 uL Command Actual 30% Stroke 300.000 uL Command 10.224 10.134 50.339 49.897 301.826 299.177 +/- 3% / 2.189% +/- 1.2% / 0.674% +/- 1% / 0.605% +/-3% / 1.322% +/-1.2% / -0.206% +/- 1% / -0.275% *Representative Dispensed Volume Table is intended to extrapolate measured linear displacement data to the representative dispensed volume from a Hamilton 1mL syringe. Maximum and minimum volumes are calculated from specified syringe barrel inside diameter limits. Accuracy is shown for barrel maximum and minimum inside diameters. Complete data set for each device is on file at Hamilton Company and available upon request. Inspector:____________________________ CAROLE S. Date of Calibration: 01/21/2010 The product specified above has been calibrated at ambient pressure. The calibration is performed pursuant to ANSI/NCSL Z-540-1-1994, with an unbroken chain of calibrations traceable to N.I.S.T. THE MEASURE OF EXCELLENCE. SM Hamilton Company 4970 Energy Way Reno, Nevada 89502 USA Toll-Free 800-648-5950 Fax +1-775-856-7259 Telephone +1-775-858-3000 Hamilton Bonaduz AG P.O. Box 26 CH-7402 Bonaduz/Switzerland Fax +41-81-660-60-70 Telephone +41-81-660-60-60 C E R T I 9 0 01 F I E D P/N 2297-01 (REV. C) Appendix E Instrument Performance Test Reports E-1 Glossary Accessory holder This is the component that attaches to either side of the MICROLAB 600 that holds the hand probe. See section 2.4.4 on functionality and assembly of the accessory holder. Glossary GL Alarm indicator LED light This light will illuminate on the front panel of the drive unit if a stall or other problem has occurred. See section 2.3.1 for details. Aspirate To pick up a defined volume of sample or air from the valve output port into a probe or tubing. CAN IN and OUT (RJ-12) The CAN IN and OUT receptacles are located on the back of the drive unit. These two ports are used for daisy chaining instruments together. Daisy chaining functionality is not supported by the basic controller. Cavitation An occurrence caused by applying a high vacuum to a liquid (gas dissolved in liquid can be pulled out of solution). It generally occurs when large syringes (5.0 to 50 mL) are driven at high speeds. Concorde CT hand probe The Concorde CT hand probe is the standard single tube hand-activated probe. The tip of the probe is adjustable and allows the user to set the dispense tubing to an angle that is comfortable for use. See Appendix C. Configuration screen This is the screen in the controller where the user can select the syringe parameters, valve type, triggering, and language for the unit. See section 3.1.2. Continuous dispenser An instrument that has two syringes. While one syringe is filling the other is dispensing. Controller unit The device that allows the user to send operating instructions to the drive unit. Cycle A series of two stokes that comprise both the up and down movements of the syringe drive arm. Glossary GL-1 Daisy chain A string of instruments connected in a serial configuration. Default A factory setting, for example for each syringe size there is a default syringe speed. Diluent A liquid that is added to a sample to lessen the sample’s concentration. Dilute To reduce the concentration of solutes in a sample by adding another fluid. The fluid that is added is called a “diluent” and may be deionized water, for example. Diluter An instrument used to reduce the concentration of a liquid. The MICROLAB 615-DIL and MICROLAB 625-DIL are dual syringe diluters. Dispense To distribute fluid from a syringe in a single portion or in several increments out through the valve output port and attached tubing. Diluent is dispensed during a dilution. Reagents and buffers can be dispensed for sample preparation. Dispense tubing Tapered tubing that allows delivery of precise amounts of liquid. Dispenser An instrument used to distribute liquid. The MICROLAB 610-DIS and MICROLAB 620-DIS are single syringe dispensers. The MICROLAB 615-DIS and MICROLAB 625-DIS are dual syringe dispensers. Display screen This is the touch screen on the controller that allows the user to program and operate the instrument. Disposable tip A plastic tip used to transfer liquid which can be thrown away to avoid cross-contamination between samples. Down Describes the movement of the syringe drive arm as it moves away from the Home position and toward the bottom of the stroke. Down position This is the position of the syringe drive arms when they are fully extended away from the valve or Home position. GL-2 User's Manual MICROLAB 600 Single & Dual Instrument Drive unit The heart of the MICROLAB 600 that contains the valves, syringes, tubing, and the syringe drive mechanism. GL Glossary Dribbling Describes the formation of drops at the tip of tubing as liquids are dispensed. This generally occurs when small volumes are dispensed at low flow rates or when there is an air leak in the tubing lines. Dual dispenser A two syringe instrument that can dispense two different liquids at the same time. The volumes of the liquids do not have to be equal. The MICROLAB 615-DIS and MICROLAB 625-DIS are dual syringe dispensers. Duty cycle The amount of time that the valve and syringe drive is active and functioning versus the time they are inactive. Ethernet This is a standard communication that facilitates communication between the pump and a control device, the communication language is TCP/IP. WARNING! The MICROLAB 600 controller is powered using Power Over Ethernet (POE) supplied from the MICROLAB 600 pump. When connecting the MICROLAB 600 pump to a computer, the POE MUST be turned OFF to avoid damage to the computer. To turn the POE OFF or ON the ML600 must first be turned OFF. Next toggle the POE setting by pressing and holding the Power button for 3 seconds during power up. The green Ready light will flicker when POE has been turned ON or will illuminate solid when POE is turned OFF. The POE state will be stored in memory so the setting will remain when the instrument is turned OFF and back ON. Fill A syringe with a volume of liquid that is pulled in from a reservoir via fill tubing through the valve input port. Drive arms move the syringes down, pulling liquid through the tubing and into the syringe. Fill tubing A tubing line that connects the liquid reservoir to the valve inlet port. Fluid path The inside surfaces of the valve, syringes, and tubing that contact liquid. Foot switch A foot activated device used to trigger the MICROLAB 600 via the probe receptacle. Glossary GL-3 Hand probe See Probe Hardware key This is a Hamilton specific SD Card that unlocks the advanced functionality of the pump see the Advanced Manual. Home position See Syringe initialization LED Light Emitting Diode used as an indicator light on the MICROLAB 600. Menu A list of options or commands displayed on the display screen or a computer. Numeric keypad A group of keys on the controller display that are used to enter numeric data. Overload A stall of the syringe drive that may be caused by excess mechanical friction, excess syringe speed, or a blockage in the valve, tubing, or syringes. Pipette To measure a fixed amount of liquid with a probe and then dispense that same volume of liquid into a vessel. Power cycle To turn the MICROLAB 600 OFF and then back ON. Power down To turn OFF an electrical device. Power indicator light An LED on the drive unit that shows whether or not the MICROLAB 600 system is powered on. Power jack This is the port where the power cord connects the drive unit or controller. Power ON/OFF button A button to turn the MICROLAB 600 ON and OFF. Prime The act of making the MICROLAB 600 ready for operation by running fluid through the fluid path (tubing, valves, syringes) to remove all bubbles. The system must be primed prior to use and between fluid changes. GL-4 User's Manual MICROLAB 600 Single & Dual Instrument Probe receptacle This is the port where the hand probe or foot switch connects. GL Glossary Probe A hand-held device that enables the user to direct the fluid being moved by the MICROLAB 600. The probe also provides a button to trigger the operation of the pump. Ready indicator light When the instrument is turned ON and ready for use a green Ready indicator light is illuminated. Refill The syringe fill mode can be set to automatic or manual. When the Refill button is set to ON then the refill option is automatic. Likewise if the Refill button is set to OFF then the refill option is manual. ``Automatic fill mode means that the instrument will perform the fill function automatically when the method is run. ``Manual fill mode means that the instrument must be triggered using the hand probe to activate the fill function when a method is run. Reservoir A container that holds system fluid (diluent or dispense solution). Returned Materials Authorization Number (RMA #) A number, assigned by Hamilton Company, which is used to trace an instrument in the event it is returned for repair. Run screen This screen enables control and monitoring of all aspects of the pump's activities. Buttons and Icons are used to change parameters and Indicators are designed to give current and future status of the pump. Serial RS-232 (DB9 female) The RS-232 COM port is located on the back of the drive unit. This port is used as a consol port to troubleshoot connection issues encountered by the Ethernet port. Stall A stall of the syringe drive that may be caused by excess mechanical friction, excess syringe speed, or a blockage in the valve, tubing, or syringes. Step The smallest unit of a method, it defines what the syringes and valves will do. Glossary GL-5 Stroke Movement of the syringe drive mechanism in one direction only; half of the drive arm’s cycle. See also cycle. Syringe drive arm mechanism The arms to which syringe plungers connect. The movement of the syringe drive arms moves the plunger which displaces fluid, drawing it through the system. Syringe initialization Driving the syringe to the top of stroke or Home position. Syringe setup screen This is the screen where the user selects the size, speed, return steps, and back-off steps. Syringe speed The rate the drive unit drives the syringe plunger, which is displayed as µL/sec. System fluid Refers to the fluid originating from a reservoir, pumped through the entire system. Trigger screen This is the screen where the user selects whether the pump is to be triggered from the left side, right side, or either. Tubing clip A device that attaches to the side of the reservoir that holds tubing lines in place. Valve The device that directs the flow of liquid through the system. Valve drive motor The valve drive motor is part of the drive unit that controls valve rotation. Valve initialization Valves rotate more than 360 degrees to identify a calibration location on the optical encoder. When this location is identified the exact valve location is known Valve port Openings in the valve assembly through which liquid flows. As the valve turns, ports are opened or closed, directing the flow of liquid through the system. Valve setup screen This is the screen where the user selects what type of valve is on the left and right side of the instrument. GL-6 User's Manual MICROLAB 600 Single & Dual Instrument Index Index IN A Accessory holder............................................................................2-8, 2-18–2-20, GL-1 Auto-Refill option.........................................................................3-4, 3-12, 3-13, GL-5 B Batteries.................................................................................................................... 4-5 C CAN IN/OUT..................................................................................................... 2-8, GL-1 Chemical compatibility............................................................................. 4-3, D-1–D-3 Cleaning Exterior........................................................................................................... 4-4–4-5 Fluid Path...................................................................................................... 4-3, GL-3 Concorde CT hand probe....................................... 2-3, 2-18, 2-20, B-2, C-1–C-2, GL-1 Configuration screen............................................................................... 3-2–3-4, GL-1 Continuous dispense kit.................................................................................... 2-2–2-3 Continuous Dispenser.............................................1-3, 1-5, 2-18, 3-13, B-2, C-1, GL-1 Continuous fill tubing.............................................................................................. 2-3 Controller Unit Connector receptacle............................................................................................. 2-7 Description....................................................1-2, 2-1, 2-20–2-21, 5-2, A-1, B-1, GL-1 D Daisy chaining................................................................................................. 2-8, GL-2 Data entry screen.............................................................................................. 3-2–3-3 Diluter............................................................................................1-4, 2-16, 3-13, GL-2 Diluter kit.................................................................................................... 1-3, 2-2–2-3 Dispense kit................................................................................................ 1-3, 2-2–2-3 Dispensers Dual Syringe..................................................... 1-4–1-5, 2-16–2-17, 3-13, GL-2–GL-3 Single Syringe.............................................................................1-3, 2-16, 3-12, GL-2 Disposable tip hand probe.....................................................2-5, 2-20, C-1, C-3, GL-2 Drive Unit Description............................................................................................ 2-2–2-8, GL-3 Installation of components............................................................................ 2-9–2-20 Dual push button probe........................................................... 2-3, 2-5, 2-20, C-1–C-2 Dual Syringe Continuous Dispenser................................... See Continuous Dispenser Index IN-1 Dual Syringe Diluter..................................................................................... See Diluter Dual Syringe Dispenser.......................................................................... See Dispensers E Error code guide....................................................................................................... 5-2 Ethernet................................................................................. 2-7, 2-20–2-21, A-1, GL-3 F Foot switch..............................................................................2-5, 2-20, C-1, C-4, GL-3 H Hand probe receptacle........................................................... 2-3, 2-5, 2-20, 3-8, GL-5 Hardware Key................................................................................................ 2-21, GL-4 I Initialize........................................................................................................... 4-2, GL-6 Installation Accessory holder......................................................................................... 2-18–2-20 Electrical connections.................................................................................. 2-20–2-21 Hand probe.......................................................................................................... 2-20 Syringes...................................................................................................... 2-11–2-14 Tubing........................................................................................................ 2-14–2-17 Valve assemblies........................................................................................... 2-9–2-11 Instrument configuration............................................... 1-3–1-5, 2-16–2-17, 3-7–3-11 L Language................................................................................................................ 3-11 Large volume disposable tip hand probe....................................... 2-5, 2-20, C-1, C-3 LED lights................................................................................................................ GL-4 Alarm........................................................................................................... 2-6, GL-1 Power........................................................................................................... 2-6, GL-4 Ready.................................................................................................................... 2-6 Syringe selector............................................................................................. 2-6, 3-11 M Manual conventions.....................................................................................................7 Methods......................................................................................................... 3-12–3-14 O Operation............................................................................................... 1-6, 3-12–3-14 Operational buttons......................................................................................... 3-1–3-4 IN-2 User's Manual MICROLAB 600 Single & Dual Instrument Ordering information.............................................................................................. 5-4 Overview of the MICROLAB 600...................................................................... 1-2–1-7 IN Index P Pausing a method.................................................................................................... 3-4 Performance test reports..........................................................................................E-1 Power cord Description............................................................................2-8, 2-21, B-3–B-4, GL-4 Safety.................................................................................................................... 1-6 Power ON/OFF.................................................................................. 2-6–2-7, A-1, GL-4 Power over Ethernet....................................................................................... 2-7, GL-3 Preparing the syringes........................................................................................... 2-13 Prime button..................................................................................................... 2-3, 2-6 Priming the instrument................................................................................. 3-11–3-12 Probe receptacle.....................................................................................2-5, 2-20, GL-5 Probes......................................................................................2-3, 2-20, C-1–C-4, GL-5 R Replacement parts Hand probes...................................................................................................C-1–C-4 Power cords........................................................................................................... B-4 Power supply......................................................................................................... B-3 Syringes................................................................................................................. B-1 Tubing................................................................................................................... B-2 Valves.................................................................................................................... B-2 Return Materials Authorization (RMA) number........................................... 4-2, GL-5 Run screen....................................................................................................... 3-3, GL-5 S SD card.............................................................................................. See Hardware key Selecting Instrument location......................................................................................... 1-5, 2-3 Language............................................................................................................. 3-11 Syringes...................................................................................................... 2-11–2-12 Tubing................................................................................................................. 2-15 Serial RS-232.................................................................................................... 2-8, GL-5 Servicing the instrument............................................................................ 4-2, 5-4–5-5 Setting syringe volumes................................................ See Instrument configuration Single Syringe Dispenser........................................................................ See Dispensers Software CD....................................................................................................... 2-3, B-1 Speed........................................................................................................................ 5-3 Index IN-3 Splash screen............................................................................................................ 3-2 Storing the instrument............................................................................................ 4-5 Syringe drive............................................................................................ See Drive unit Syringes Cleaning.................................................................................................. 4-3–4-4, B-2 Installing..................................................................................................... 2-11–2-14 Preparation for installation................................................................................... 2-13 Selecting..................................................................................................... 2-11–2-12 Syringe selector button................................................................................... 2-6, 3-11 System Description..................................................................................................... 2-3–2-8 Overview.......................................................................................... 1-2–1-7, 2-2–2-3 System Icon...................................................................................................... 3-8–3-11 T Technical specifications............................................................................................ A-1 Technical support..................................................................................................... 5-4 Touch screen interface....................................................................See Controller unit Triggering the pump................................................................................................ 3-8 Troubleshooting................................................................................................ 5-2–5-5 TTL IN/OUT................................................................................................................ 2-8 Tubing Cleaning......................................................................................................... 4-3–4-4 Continuous dispense.............................................................................................. 2-3 Dispense.............................................................................................................. GL-2 Fill........................................................................................................................ GL-3 Installing..................................................................................................... 2-14–2-17 Replacing............................................................................................................... B-2 Selecting.............................................................................................................. 2-15 Tubing Management System........................................................................ 2-19–2-20 U Universal power supply..................................................................................... 2-8, B-3 Universal valve Installation.................................................................................................... 2-9–2-11 Replacement.......................................................................................................... B-2 Upgrade kits...............................................................................................2-3, A-1, B-1 USB adapter....................................................................................................... 2-3, B-1 V Valve................................................................................................See Universal valve Valve Position.................................................................................................... 3-5–3-6 IN-4 User's Manual MICROLAB 600 Single & Dual Instrument Part Number 61440-01 (Rev. C) MICROLAB® 600 Series – Basic Manual BASIC ML600 BASIC MANUAL Hardware Installation and Basic Operation Hamilton Company Toll Free 800-648-5950 Phone +1-775-858-3000 Fax +1-775-856-7259 www.hamiltoncompany.com Hamilton Bonaduz AG Via Crusch 8 CH-7402 Bonaduz/Switzerland Toll Free 00800-660-660-60 Phone +41- (0)81-660-60-60 Fax +41- (0)81-660-60-70 www.hamiltoncompany.com Hardware Installation and Basic Operation 4970 Energy Way Reno, Nevada 89502 USA