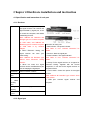
1
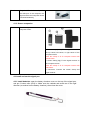
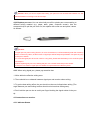
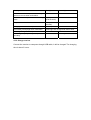
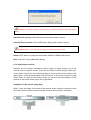
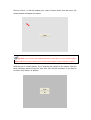
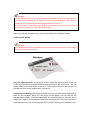
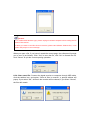
IQBoard MI
User Manual
Copyright(C) 2003-2008 Returnstar Technology Co., Ltd.
Web: www.recoverystar.com; www.iqboard.net
Tel: +86-591-83385086, 87274373
Fax: +86-591-87274383
E-mail: [email protected]
Important Statements
This manual is for IQBoard MI.
Use this product strictly according to detailed operation instruction in this manual so
as to ensure proper use. Before you install this product, please read this manual
carefully to save your time.
Opening the package means you have agreed to purchase this product, Returnstar
will not accept returns of opened packages.
The product specification may be subject to change without prior notice. The sample
pictures in this User Manual may differ from the real product.
Returnstar reserves all rights to charge the fee at anytime for product replacement,
revision and update. The content in this manual will be regularly revised without prior
notice, and the printed manual will be updated when new version is released.
Returnstar will make no guarantee for this product, both explicit and implicit, including
the salability and the adaptability to certain purpose, and will deny all guarantees
alike.
Copyright
Returnstar, IQBoard are registered trademarks of Returnstar Technology Co., Ltd.
Window is a registered trademark of Microsoft.
Environment Protection
When discarding this electronic device, please don’t treat it as normal trash. To
minimize the pollution and protect the environment, please recycle it.
Working Temperature and Humidity
Storage: Temperature: -40 degrees to 60 degrees; Humidity: 0% to 95%
Operation: Temperature: 0 degrees to 40 degrees; Humidity: 15% to 85%
Chapter 1 Product Introduction:
IQBoard MI is a portable mini interactive whiteboard of adopting ultrasonic technology.
The system is mainly composed of receiver, signal pen and wireless adapter (special
for wireless type).
When writing/ operating on the flat screen (such as LCD or laptop), the signal pen will
send out wireless signal so that the receiver can detect its location, then send the
information to the computer connected through USB line or 2.4GHz radio frequency
wireless connection (special for wireless type). The user can use the signal pen
instead of mouse to achieve single-click, double-click and right-click functions.
IQBoard MI is provided with powerful IQBoard Software, which makes your operation
on interactive whiteboard more convenient. Its powerful functions include writing,
erasing, text editing, hand-writing recognition, on-screen keyboard, line, graph and
table editing, graph recognition, video and sound playing, dimension and angle label,
digital teaching tools, slide playing, operation review, dragging, revolving, hyperlink,
reveal screen, spotlight, screen capture, screen record and replay, hand-writing
saving in MS Office, page and file editing, printing and saving, etc.
IQBoard Software also includes 500M IQBoard Resource Library covering more than
30 subjects, such as math, physics, chemistry, biology, gymnasium, etc. User can
customize the installation by selecting subjects. Also provide common line, shape,
character, symbol, decoration graph, background template, Flash courseware, and
other resources. Support importing various picture files and DOC, PPT, XLS files. The
page and file created by IQBoard Software can be save as and freely converted to
various picture files as well as DOC, PPT, XLS, PDF, HTML files, etc.
We provide continuous upgrading service for IQBoard Software. For more information
and detailed operation about IQBoard Software, please refer to “IQBoard Software
V4.3 User Manual” in the installation CD.
Chapter 2 Features:
2.1. Integrate various powerful functions such as screen touch and write,
electron note (record), document draft, table make & fill, drawing design, instant
text-image communication, electronic teaching and demonstration, can
complete replace PC touch screen, writing screen, electronic whiteboard,
electronic drawing board, writing board, mouse and so on, realizing the perfect
combination of traditional writing custom and modern computer usage.
2.1.1 Screen touch and write: By mounting the receiver on the top of screen, users
can use the signal pen instead of mouse to click, double click and right click, thus
operate and control the computer. Working with electronic whiteboard software, direct
writing and various teaching and demonstration effects can be achieved. So only a set
of IQBoard MI can transform a normal computer to a Tablet PC or a electronic
whiteboard.
2.1.2 Digital noting and document drafting: Without changing their writing style,
IQBoard MI can help many kinds of people (such as student, minute-taker, officer, doctor,
document drafter, and writer, etc) to write directly on any paper material and other material,
and save the writing content both in paper and as computer file. Moreover, through the
text recognition technology, IQBoard MI can convert the writing content to text file, thus
save enormous time and keep the consistency of your thinking when you are taking note
or writing. It can completely replace the noting and handwriting functions of writing board,
scanner, copier and digital camera. Even elder leaders with little computer knowledge will
find operating computer is as simple as mobile phone. The IQBoard MI accelerates the
process of educational informationization and office automatization, presents the coming
of e-ear, and let us say goodbye to the age of using paper and pen for noting.
2.1.3 Form filling: You can use IQBoard MI to fill various form and keep the filling
custom in traditional industries, such as filling the Bank Bill and Tax Report Form, it
can save these forms both in the original signed document and electronic signed file.
The real-time data inputting and text converting also greatly improves the working
effect and service quality.
2.1.4 Electronic comment and signature: IQBoard MI can keep the traditional
writing and commenting habit, it supports writing, text editing, marking, picture
inserting, drawing, and various special demo effects and assistant functions in PPT
(include Slide Playing Mode), WORD, EXCEL and other software, the file can be
saved without changing its format, thus greatly improves the commenting efficiency. It
also provides electronic signature function for Webpage and OA system, safe and
reliable.
2.1.5 Direct Drawing and Instant Text-image communication: Also support any
special effect tool attached in software. E.g., you can use drawing software like
PHOTOSHOP and Paint for direct drawing; you also can directly write in some
messagers (MSN, ICQ, QQ) and e-mail; and send the autographical message and
e-mail.
2.1.6 Electronic education and demonstration: Not only preserves the custom of
traditional demo and teaching – lecturing and writing at the same while, but also
presents the demo and teaching contents in digitalized multi-media. Its capability of
saving and recycling make these contents not meteoric any more. The abundant and
powerful resource library well enhances information communication among teachers
and students and the overall learning effect. And because any class content can be
saved as PC file, the student are not required to take note, thus they can pay more
attention to lecture, understand its meaning, share their ideas, and bring more
pleasure and interest in their study and conference.
Another feature that should not be forgotten is that it prevents teachers or speakers
from the eyesight damage due to their long time lecturing in front of the projector
spotlight.
2.2. Simple operation, convenient to carry, the storage version and wireless
version also support offline operation and mobile storage function.
2.2.1 Considerate design, ergonomical pen body, the signal pen can be put in to the
small and exquisite receiver, which makes it more portable and more comfortable to
use.
2.2.2 Build-in AI recognition core can learn personal handwriting, and become a
personal handwriting system.
2.2.3 The gross weight is no more than one kilogram, and it is easy to put into a laptop
bag or a brief case so as to bring to anywhere.
2.2.4 Data transmission and power are obtained from the computer directly though
USB cable. The wireless type adopts 2.4GHz Radio Frequency Wireless connection
for connecting computer, with the connecting distance more than 10m, flexible in
usage.
2.2.5 Easy to assemble or disassemble within 2 minutes, and it can be used properly
after fix the receiver on table or screen. So long as you are skilled in operating the
computer, you will find the operation of this product is as easy as using mouse and
pen, and can be mastered in 10minutes.
2.2.6 IQBoard MI is provided with the function of offline operation. Without connecting
computer, it can save the text and drawing written on normal paper into the receiver,
with the store capacity more than 100 pages. The writing content also can be saved in
different documents and pages. This product is especially fit for student, businessman,
and reporter, who have trouble in carrying computer but also need digital file for
saving.
2.3. Precise Orientation, High Resolution and Super Large Writing Area, can use
on any material, any medium and computer screen.
2.3.1 Supports all projectors in the market of any resolution and screens made of any
material. You don’t need to worry about equipment compatibility problems.
2.3.2 Rapid reaction and sensitive for operation.
2.3.3 Adopts high precision orientation technologies, in order to ensure the accuracy
of writing and operation, and active writing area.
2.3.4 Supports screen size up to 17 inch, the normal effective area on paper or other
materials is A4 size.
2.3.5 IQBoard MI follows natural writing habits, you can write and draw on any paper,
material and computer screen, the save your autograph both in paper and computer.
2.4. Environmental protective, reasonable price of accessories, free software
upgrade
IQBoard MI integrates most functions of touch screen, writing screen, writing board,
drawing pad, mouse, and keyboard while the price is only a small part of their total
price. Other than the battery of signal pen and the ball pen refill, there is no
consumable part. Moreover, we offer a life-time free update for driver, orientation
program, and relevant electronic whiteboard software.
Chapter 3 Specification and Parameter
3.1 Product Specification
Model
1-E001
1-E002
1-E003
Type
Standard
Storage
Wireless
PC connection
USB
USB
2.4GHz Radio Frequency Wireless
Connection/ USB
Storage Capacity
None
100 pages (A4 size)
100 pages (A4 size)
3.2 Standard Configuration:
1 receiver, 1 signal pen, 6 AG3 batteries (3 for Standard Version), 2 plastic pen cores,
2 gel pen refills, 1 pen refill clamp, 1 USB cable, 1 screen companion suite (screen
clamp for receiver), 1 installation CD (include the latest drivers, IQBoard Software,
and relevant user manuals), 1 wireless adapter (for Wireless Version), 1 plastic box.
3.3 Optional fittings: signal pen.
3.4 Technical Parameter:
3.4.1 Support Windows 2000/XP/2003/Vista32
3.4.2 Power Consumption: less than 0.5W
3.4.3 Sensing Height of writing or clicking: 1.5cm,
Processing Speed of writing or clicking: 240dots/s,
Signal tracking speed: 3m/s.
3.4.4 Effective resolution: 9600×4800, 300dpi. Screen area can be up to 17 inches,
and the normal effective area on paper or other materials is A4 size.
3.4.5 Working hours of signal pen battery: more than 52 hours,
Pressure Induction: >10g.
3.4.6 Adopt USB interface for PC connection, plug and play, external power is not
required. The wireless type adopts 2.4GHz Radio Frequency Wireless Connection to
connect computer, the transfer distance is above 10m.
3.4.7 Power supply: signal pen use 3 button cells, the receiver is powered by USB.
3.5 System Requirement:
CPU: Based on X86 CPU pentium166 or above
Memory: 64 MB RAM (recommend 128 MB RAM)
Hard Disk: 1GB free space for full installation
USB Port: at least one available USB port
Projector: unlimited
Projection medium: Paper material or other material, flat screen (LCD or laptop).
Chapter 4 Hardware installation and instruction
4.1 Specification and instruction of each part
4.1.1 Receiver
Function
1. When connecting with computer,
the signal receiver can receive the
signal emitted by signal pen, so as
to control the computer, and realize
handwriting function.
Note: IQBoard MI Standard and
Storage type can connect computer
by USB cable, and IQBoard MI
Wireless type can connect computer
Instruction for each part.
by USB cable or by wireless
1. Red indicator: The power indicator
adapter.
Note: Refer to “4.3.1 Indicator instruction” for
2. When Electronic Noting, the
details.
signal
2. Pen box: Store the signal pen.
receiver
can
save
your
hand-writing.
3. Green indicator: The signal indicator
Note: IQBoard MI Standard type
Note: Refer to “4.3.1 Indicator instruction” for
doesn’t
details.
have
Electronic
Noting
function.
4. Clamp: Fix the signal receiver on A4 paper for
3. When not used, the signal
Electronic Noting. Together with the Screen
receiver can be considered as a pen
Companion, it can also fix the signal receiver on
box for keeping the signal pen.
computer screen.
Dimension
175mm x 25mm x 20mm
5. Power switch: Control the power of the signal
Charging
< 3 hours
receiver.
Note: IQBoard MI Standard type doesn’t have
time
Continuou
s
8 hours
6. USB port: Connect signal receiver and
offline
computer.
working
time
Storage
About 100 A4 pages
capacity
Connectin
power switch
USB 1.1
g port
4.1.2 Signal pen
Function
Handwriting or mouse operating, the
button near to the pen tip is used as
mouse left key, the other button is
mouse right key.
Weight
17g
Length
128mm
Diameter
12mm
Effective
Support 17 inch screen for Screen
writing
Writing, support A4 size paper for
area
Electronic Noting.
Note:
IQBoard
MI
can
be
customized to support 19 inch
screen for Screen Writing.
Power
source
3 AG3 button cells, can be used for
6 months.
Instruction for each part:
1. Battery chamber cover: Seal the battery
chamber.
2. Pen core: the plastic pen core can be used for
Screen Writing to avoid scratching the screen, the
ball pen refill can be used for Electronic Noting.
Note: Refer to “4.2.2 Replace pen core” for the
details of replacing the pen core.
3. Signal emitter: press the pen tip, it will emit
signal.
4. Operations:
Double-click: Suspend the pen, click the left-key
twice.
Right-click: Suspend the pen, click the right-key
once.
Move: Suspend the pen and move.
Drag: Hold the right-key, suspend the pen and
move.
Note The signal pen must be suspended when
using its mouse functions.
4.1.3 USB cable
Function
Connect the receiver and computer,
transmit signal and read data for
signal receiver.
Note: The signal receiver will be
charged if being connected with
computer.
4.1.4 USB wireless adapter (Only for IQBoard MI Wireless type)
Function
Plug the USB wireless adaptor in
the USB port of the computer, the
signal receiver and computer can be
connected wirelessly.
4.1.5 Screen companion
Function
Fix the signal receiver on the
computer screen.
1. Screen clamp (small): Fix the signal receiver on
the top center, left center, or right center of the
computer screen.
Note: this clamp is fit for computer screen with
narrow frame.
2. Screen clamp (big): Fix the signal receiver on
the computer screen.
Note: this clamp is fit for computer screen with
wide frame.
3. Connector: Connect the screen clamp and
signal receiver.
4.2 Install and use the signal pen
4.2.1 Install batteries: open the battery chamber cover on the top of the signal pen,
and put 3 button cells (AG3) in. Make sure the cathode and anode are in the right
direction (as marked on the battery chamber), then close the cover.
Caution: When you want to replace the battery, just open the cover and take the batteries out, and
install the batteries according to the above steps.
4.2.2 Replace pen core: You can select ball pen refill or plastic pen core according to
different writing material (e.g. paper, table, glass, computer screen). Use the
accessorial clip to pull the pen core out, the replace with a new one and press it down.
As follows:
Caution:
1. Signal pen has power saving function, in some circumstance, it will automatically enter the dormancy
status. In dormancy status, all the function of signal pen will be temporarily disabled. Just press any key
on the pen to awake.
2. In case the signal pen will not be used for a long time, please take the battery out to avoid the power
consumption.
3. When replacing the pen core, twisting the pen core a bit will make the process easier.
4. The pen core used for signal pen is available in supermarket and stationary store.
4.2.3 When using signal pen, please pay attention that:
1. Write within the effective writing area.
2. There should be no obstacle between signal pen and receiver when writing.
3. To get the best writing effect, the pen should not be over-inclined when writing (The
angle between pen and writing surface should not be less than 60 degrees).
4. Don’t hold the pen too low to avoid your finger blocking the signal emitter in the pen
tip.
4.3 Instructions on receiver
4.3.1 Indicator Status
Working status
Red light
Green light
Fail to connect the computer, or the voltage of
Off
Off
receiver is too low when used offline.
The receiver battery is under low-voltage
Rapidly
flash
alarm.
(0.25 seconds)
The power source of receiver is normal.
Slowly flash (3
seconds)
Charging the receiver battery.
Normally on
Successfully saved page when used offline.
Green light and red light both flash 3 times.
Receiving the signal normally
On
The storage capacity is fully occupied when
Normally on
recording.
4.3.2 Charge receiver
Connect the receiver to computer through USB cable, it will be charged. The charging
time is about 3 hours.
Chapter 5 Install and uninstall drivers
5.1 Install: When you first use IQBoard MI, you must install its drivers. Put the
enclosed CD in your CD-ROM, double click “IQBoard MI Drivers V4.3” in the CD and
install drivers according to the prompt.
5.2 Uninstall: Select Start > Programs > IQBoard MI Drivers >Uninstall to uninstall.
You also can open Control Panel, select Add/Remove Programs, and in the list of
currently installed Programs, select IQBoard MI Drivers V4.3, then press the Remove
button to remove the drivers
Caution: You must quit IQBoard Software and IQBoard MI Drivers before uninstall, or
the system will prompt an error message.
Chapter 6 Operations
Caution: Please use IQBoard Software V4.1 above as the accessorial software for
IQBoard MI.
6.1 Screen Writing
6.1.1 Start
After installing the drivers, IQBoard MI Drivers will be automatically started every time
you start your computer. Otherwise, you can select “Start > Programs > IQBoard MI
Drivers> Start” to start the IQBoard MI. A taskbar icon will appear on the right bottom
of the screen, as follows:
Screen Orient: Orient the screen to control the computer.
Prompt: Refer to “6.1.4 Screen Orient” for detailed operation steps.
Autorun Setting: you can decide whether to run IQBoard MI automatically when
starting the computer. Click “Autorun Setting” and enter the setting window (as
follows). If you select “Autorun IQBoard MI Drivers when the system starts”, IQBoard
MI Drivers will be automatically started every time you start your computer. Otherwise,
you have to start IQBoard MI Drivers manually.
Caution: the system defaults to automatically run IQBoard MI Drivers when the system
starts.
Read file from receiver: Read Electronic Noting file saved in receiver.
Clear all files in receiver: Clear all Electronic Noting files saved in receiver.
Prompt: Refer to “6.2.2 Electronic Noting” for detailed operation steps.
About: Click “About” to popup the information window of IQBoard MI Drivers
Exit: Click “Exit” to quit IQBoard MI Drivers
6.1.2 Install signal receiver
Normally we use Screen Companion (screen clamp of signal receiver) to fix the
receiver on the computer screen. There are two kinds of screen clamps. When your
screen frame is wide, you can use the big clamp to fix the receiver on the center of the
upper frame, or use the small clamp to fix the receiver on the center of the left or right
frame. When you have a small screen frame, you can use the small clamp to fix the
receiver on the center of the upper, left or right frame.
Installation of the screen clamp (big)
Step 1. Press the clamp on the back of the receiver down, insert the connector, loose
the clamp, then the signal receiver and the connector will be jointed, as follows.
Step 2. Insert the pin of the connector into the screen clamp (big). The side with
double sided tape on the screen clamp should be downward, as follows.
Step 3. Tear out the protection layer of the double sided tape, then stick the screen
clamp on the center of the screen upper frame, as follows.
Installation of the screen clamp (small)
Step 1. Press the clamp on the back of the receiver down, insert the connector, loose
the clamp, then the signal receiver and the connector will be jointed, as follows.
Step 2. turn over the signal receiver to the façade, and turn up the pin, make it vertical
to the signal receiver.
Step 3. Insert the pin of the connector into the screen clamp (small), then the signal
receiver and the connector will be jointed, as follows.
Step 4. Tear out the protection layer of the double sided tape, then stick the screen
clamp on the center of the screen upper frame, left frame, or right frame, as follows.
Caution:
1. Since we are accustomed to operate in right hand, if you fix the signal receiver on the right
frame, the signal may be blocked, so we suggest you fix the receiver on the center of the
upper frame
2. When fixing the signal receiver, face the receiver to the screen, and keep them parallel.
6.1.3 Connect the signal receiver with computer
There are two ways for connecting the signal receiver (pen box) with computer
First: use USB cable to connect. Connect one side of the USB cable to the USB port
of the computer, the other side to the USB port of signal receiver, then the red
indicator of receiver will light up or flash. If you move the signal pen or press the keys
on the signal pen within the receiving range, the cursor on will follow your move, and
the green indicator on the receiver will be normally on, it means the connection is
successful. After you move the signal pen away, the green indicator will off.
Caution:
1. All types of IQBoard MI (Standard, Storage, and Wireless) can use USB cable connecting
the signal receiver and computer.
2. When using USB cable for connection, it doesn’t matter whether the power switch on the
back of receiver is at “ON” or “OFF” position, because now the signal receiver is powered by
USB cable.
Second: Use wireless adapter to connect. Plug the wireless adapter into the USB port
on computer, turn power switch on the back of the signal receiver at “ON” position,
now the receiver is under wireless connecting mode, the red indicator on the receiver
flashes once per four seconds. If you move the signal pen or press the keys on the
signal pen within the receiving range, the cursor on will follow your move, and the
green indicator on the receiver will be normally on, it means the connection is
successful. If the connection failed, you can try to turn the power switch several times,
until you succeed.
Caution:
1. The wireless adapter is only fit for IQBoard MI Wireless type.
2. If the connection still fails after you have turned the power switch on the back of the
receiver several times, you can try to charge the receiver before connection.
3. When you want to switch IQBoard MI Wireless type from Electronic Noting to Screen
Writing, you can turn the power switch on the back of the receiver to “OFF” position first, then
turn to “ON” position to switch.
6.1.4 Screen Orient: When you fix the signal receiver on the computer screen and
intend to write on the screen, you need to orient the IQBoard MI in order to make it
work normally. So the moving track of signal pen can match the cursor, and you don’t
need to re-orient at the same environment. Select “Start > Programs > IQBoard MI
Drivers> Orient”, or click the taskbar icon, select “Screen Orient” from the menu, the
Orient window will appear, as follows:
Caution: If you haven’t start IQBoard MI Drivers, then after you click “Screen Orient”,
IQBoard MI Drivers will be started, click “Screen Orient” again to start orientation program.
Hold the pen in normal gesture, try to keep the pen vertical to the screen, click the
three orientation points one by one, then click “OK” to finish orientation. If you want to
re-orient, click “Reset”, as follows:
Caution:
1. When orienting, after you click one orientation point on the screen, if the next point does
not appear, or the system does not respond, you can click “Cancel” button on the orientation
interface to exit, and start the orientation program again to re-orient.
2. If you use CRT or LCD display, you can place a glass screen or a screen filter in front of
the computer screen, the you can start Screen Writing.
After you finish the orientation, you can use the signal pen for Screen Writing.
6.2 Electronic Noting
Prompt:
Only IQBoard MI Storage and Wireless type have Electronic Noting function, the Standard
type does not include this function.
6.2.1 Fix signal receiver: As the above picture, clamp the signal receiver on the top
center of the A4 paper, the signal and A4 paper should be in the same plane. Turn the
power switch on the back of the receiver to “ON” position. Now you can see the red
indicator on the receiver flashes every 3 seconds.
6.2.2 Electronic Noting: After fixing the signal receiver, you can use the signal pen to
write on the A4 paper. When you are writing on the paper, you can see the red
indicator flashes every 3 seconds. Meanwhile, the green indicator on the right will be
normally on when it is receiving the signal from the signal pen. Only when you move
the signal pen out of the receiving range of the receiver will the green indicator be off.
Caution:
1. If you want to switch IQBoard MI Wireless type to Electronic Noting mode, you must first
use signal pen to click B Zone, and release after half a second. If the greed indicator flashes
six times rapidly, it means the receiver has been switched into Electronic Noting mode. If you
haven’t clicked the B Zone, the receiver will be under “Wireless connecting” status instead of
“Electronic Noting” mode.
2. You don’t need to orient for Electronic Noting, just directly write on the paper.
Change page: When you finish one page and want to change to a new one, use the
signal pen to click the B Zone, and release after half a second. If the green indicator
and red indicator both flash 3 times, it means the page changing is successful, then
you can replace the paper with a new one.
Save writing content: In case you want to save your writing content in a file and
continue your writing on another file, or in case you have finished your writing and
want to save in a file, use the signal pen to click the A Zone, and release after half a
second. If the green indicator and red indicator both flash 3 times, it means the saving
is successful, the system will automatically create the file (File 1, File 2, etc) to save
your writing. When you want to continue your writing, the system will create a new file.
Caution:
1. When using the signal pen offline, the effective writing area is A4 size (but the area within
15 mm from the receiver is non-writing area).
2. After you finished noting, do remember to click the A Zone, and make sure the saving is
successful (the indicators flash correctly), otherwise your handwriting may not be saved.
3. After you finished using IQBoard MI, please turn the power switch to “OFF” position to
save the power.
6.2.3 Read saved file: Connect the signal receiver to computer through USB cable,
click the taskbar icon, and select “Read files from receiver” from the menu, the system
will popup a window displaying all files saved on receiver. Select a file and click
“Open” to see its detailed content.
Caution:
1. For IQBoard MI Wireless type, please unplug the wireless adapter before reading the file
saved in the receiver.
2. When you want to read files from the receiver, please start IQBoard Software first, or the
system will prompt an error message.
When you open a file, if you haven’t saved the current page, the software will prompt
you to save it (as follows). Click “Yes” to save the file, click “No” to discard the file,
click “Cancel” to quit the current opening operation.
6.2.4 Clear saved file: Connect the signal receiver to computer through USB cable,
click the taskbar icon, and select “Clear all files in receiver”, a prompt window will
popup. If you select “OK”, all files in the receiver will be cleared, if you select “Cancel”,
the files will remain.
Caution:
1. When you want to clear the files, please make sure the signal receiver and the computer
are well connected, or the system will prompt a failure message.
2. When you want to clear the files, please quit the current file reading operation, otherwise,
the system will prompt an error message if you read the file again after all files have been
cleared.
Chapter 7 Cautions
1. Keep away from water, dust, shock, bending, and strong light.
2. Fix the signal receiver on a certain position, and do not move during the writing
process, to avoid the deviation when computer is displaying your handwriting.
3. The signal pen should be kept in the receiver when not using.
4. During the writing process, there should be no obstacle between the signal pen and
signal receiver.
5. Promptly replace the button cell and pen core when they run out.
6. Do not use the IQBoard MI in places having severe electromagnetic interference
7. Avoid the receiver and signal pen falling from high altitude.
Chapter 8 FAQ
1. When moving signal pen, the cursor doesn’t follow, the computer doesn’t
display the writing, the indicator doesn’t light.
1. The writing is not within the effective writing area. Please write within the effective
writing area (A4 size paper or 17 inch screen).
2. The batteries of signal pen are low. Please replace the batteries.
3. The USB port is damaged or not well connected, please try another one. When you
adopt wireless connection, please make sure you have turned the switch on the
receiver to “ON” position, and plug the wireless adaptor on a USB port of your
computer.
4. IQBoard Software hasn’t been started, please start IQBoard Software first.
2. The line is dithering or intermittent.
1. There are obstacles between the pen and receiver. Please make sure that there is
no obstacle between the pen and receiver.
2. The pen is held too low, so the finger blocks the signal emitter in the pen tip. Please
hold the pen in right position, so that the finger won’t block the signal emitter in the
pen tip.
3. The batteries of signal pen are low. Please replace the batteries.
4. The optical mouse is so close to the digital pen that it affects the operation. Please
move the optical mouse away from the screen a little bit, or use non-optical mouse.
3. When writing with signal pen, the green indicator and red indicator do not
flash alternately when writing.
1. The batteries of signal pen are low. Please replace the batteries.
2. The USB port is damaged or not well connected, please try another one.
3. When you adopt wireless connection, please make sure you have turned the switch
on the receiver to “ON” position, and plug the wireless adaptor on a USB port of your
computer.
4. The movement of the signal pen does not correspond to the track of the
cursor.
1. The orientation is not precise. Please re-orient.
2. The writing is not within the effective writing area. Please write within the effective
writing area (A4 size paper or 17 inch screen).
Other questions, please consult our service center or local dealer.