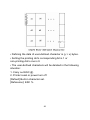
1
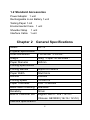
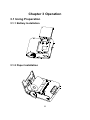
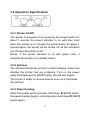
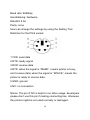
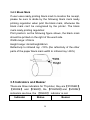
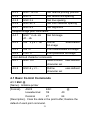
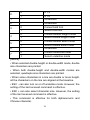
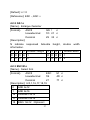
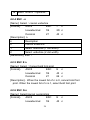
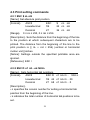
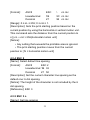
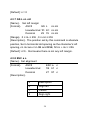
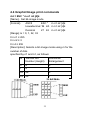
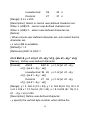
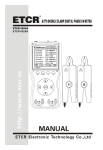
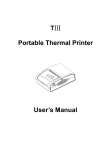
R
SPRT
SP-T5
Portable Dot Matrix
Printer
User’s Manual
1
Content
Content .................................................................................. 2
Operating Precautions........................................................... 5
Notes on Safety.............................................................. 5
Notes on Using............................................................... 6
Notes on Handling.......................................................... 7
Chapter 1 Outer Appearance and Accessories .................. 7
1.1 Outer Appearance.................................................... 7
1.2 Standard Accessories .............................................. 8
Chapter 2 General Specifications ....................................... 8
Chapter 3 Operation ............................................................ 10
3.1 Using Preparation................................................... 10
3.1.1 Battery Installation ....................................... 10
3.1.2 Paper Installation ......................................... 10
3.2 Operation Specification .......................................... 11
3.2.1 Printer On/Off ............................................... 11
3.2.2 Self-test ........................................................ 11
3.2.3 Paper Feeding ............................................. 11
3.2.4 Paper Tearing............................................... 12
3.2.5 Battery Using and Charging......................... 12
3.3 Printer Interface Connection .................................. 13
3.3.1 RS-232 Serial Interface ............................... 13
3.3.2 IrDA Interface ............................................... 15
3.3.3 Bluetooth Interface....................................... 16
3.4 Other Functions...................................................... 17
2
3.4.1 Sleeping Mode ............................................. 17
3.4.2 Paper End Alarming ..................................... 17
3.4.3 Black Mark ................................................... 18
3.5 Indicators and Buzzer ............................................ 18
3.6 Printer setting ......................................................... 19
Chapter 4 Printing Control Command ................................. 19
4.1 Summary ................................................................ 19
4.1 Basic Control Commands ...................................... 21
4.1.1 ESC @ ......................................................... 21
4.1.2 NULL ............................................................ 22
4.1.3 FF................................................................. 22
4.1.4 LF ................................................................. 23
4.1.5 CR ................................................................ 24
4.1.6 ESC J n ........................................................ 24
4.1.7 ESC d n........................................................ 24
4.1.8 HT ................................................................ 25
4.2 Character Setting Commands................................ 25
4.2.1 ESC ! n......................................................... 25
4.2.2 GS ! n ........................................................... 27
4.2.3 ESC M n....................................................... 27
4.2.4 ESC - n......................................................... 28
4.2.5 ESC E n ....................................................... 28
4.2.6 ESC G n ....................................................... 28
4.2.7 GS B n.......................................................... 29
4.2.8 ESC V n ....................................................... 29
4.3 Print setting commands.......................................... 30
3
4.3.1 ESC $ nL nH ................................................ 30
4.3.2 ESC D n1 n2…nk NULL .............................. 30
4.3.3 ESC \ nL nH ................................................. 31
4.3.4 ESC 2........................................................... 32
4.3.5 ESC 3 n........................................................ 32
4.3.6 ESC SP n ..................................................... 33
4.3.7 GS L nL nH .................................................. 34
4.3.8 ESC a n........................................................ 34
4.4 Graphic/Image print commands............................. 35
4.4.1 ESC * m n1 n2 [d]k ...................................... 35
4.4.2 GS * x y d[] ................................................... 36
4.4.3 GS / n ........................................................... 36
4.4.4 FS P n .......................................................... 37
4.5 User-defined character commands........................ 37
4.5.1 ESC % n....................................................... 37
4.5.2 ESC & y c1 c2 [x1 d1...d(y *x1)]...[xk d1...d(y *
xk)]......................................................................... 38
4
Operating Precautions
This section presents important information intended to
ensure safe and effective use of the printer. Please read the
following carefully.
Notes on Safety
Be sure to use the specified battery and power source
provided by our company. Connection to an improper power
source may cause fire, explosion or damage to the printer.
Don’t put the battery into the fire or water, don’t disassemble
or modify the battery, don’t be short circuit, otherwise may
result in injury or fire even explosion.
If the printer would not be used for a long time, be sure to
take off the battery, otherwise the battery may leak liquid
which is corrosive, if improper operation causes battery leak,
and the liquid is spattered on the skin or clothes, please wash
it with water, if spattered in the eyes, please rinse them with
water thoroughly and see a doctor.
Please do not open the paper case cover when it is printing
or just when printing is over, do not touch the print head with
hand or body, overheat may cause scald.
5
Notes on Using
Be sure not to print continuously over 1 meter, otherwise may
cause damage to the print head.
Water or other liquid should not spill into the printer, also the
printer should not be appeared in the rain, or else may cause
printer damage.
Please do not open the paper case cover when it is printing,
otherwise the printer may work improperly.
If print with serial interface, should not unplug the interface
cable in the course of printing, or else some printing data may
be lost.
When print in Ir or IrDA mode, be sure the Ir window of the
host equipment face rightly the Ir window of the printer, the
distance should be within the range of 80mm, and the angle
should be within the range of 30o.
When print with Bluetooth interface, the communication
distance should be within 10 meters, otherwise the printer
doesn’t print or prints rubbish codes.
Too high(45℃)or too low(5℃) temperature and too high
(85%)or too low (20%) relative humidity both effect the print
quality.
The print paper in poor quality or stored for too long time also
may reduce the print quality even damage the printer.
6
Be sure to use up the electricity of the battery before charge it,
as it can ensure the using life of the battery.
Notes on Handling
The printer should be placed in such an environment that the
temperature is between -20℃ and 60℃, and the relative
humidity is between 5% and 95%.
If the printer will be stored for a long time, pleas be sure to
take out the battery, otherwise may damage the battery and
printer.
Chapter 1
Outer Appearance and
Accessories
1.1 Outer Appearance
7
1.2 Standard Accessories
Power Adaptor 1 unit
Rechargeable Li-ion Battery 1 unit
Testing Paper 1 roll
Environmental Case 1 unit
Shoulder Strap 1 unit
Interface Cable 1 unit
Chapter 2
Model
General Specifications
SP-T5
Physical Specification
Outer Dimension
112×98×66(L×W×H)
Weight
306g(Paper roll excluded)
Paper Diameter
≤60mm
Printing Specification
Printing Method
Impact Dot Matrix
Paper Width
58±0.5mm
Dot/line
240dots
Printing Speed
>5.5mm /s
Paper Thickness
0.06~0.085mm
Black Mark Checking
Available
Reliability
50 km
Built-in Character Set
English: ASCII(8×8 / 12×12)
Chinese: GB18030 (16×16 / 12×12)
Interface Specification
8
Wire
RS-232
Wireless
IrDA / Bluetooth
Power Specification
Battery
1500mAh/7.4V
Power Adaptor
12V/1.5A
Battery Duration
30m
continuous
(25%density)
Environment Specification
Operation
Temperature/Humidity
-10℃~50℃/20%~80%
Charging
Temperature/Humidity
5℃~35℃/20%~80%
Storage
Temperature/Humidity
-20℃~60℃/5%~95%
9
printing
Chapter 3 Operation
3.1 Using Preparation
3.1.1 Battery Installation
3.1.2 Paper Installation
10
3.2 Operation Specification
3.2.1 Printer On/Off
The printer is powered on by pressing the power button for
about 1 second; the power indicator is on with blue color
when the printer is on. If press the power button for about 1
second again, the printer will be turned off, all the indicators
are off when the printer is off.
Notice: If the power indicator is on with green color, it
indicates the printer is in standby status.
3.2.2 Self-test
The self-test checks the printer’s current settings, status and
whether the printer has any problems. Turn on the power
while holding down the FEED button, the self-test begins.
The printer is ready to receive data as soon as it completes
the self-test.
3.2.3 Paper Feeding
When the printer works normally, hold down【FEED】button,
the paper feeding begins, and stops when hold down【FEED】
button again.
11
3.2.4 Paper Tearing
After each receipts is finished printing, it needs to tear off the
paper along the tear bar. Please don’t use too much strength.
Otherwise the paper will be pulled out from the paper case.
3.2.5 Battery Using and Charging
When the battery is low, the power indicator blinks with red
color and the buzzer rings 3 times; if the printer is in sleeping
mode, the printer will cut off power after the buzzer rings 3
times. In this case, you must charge the battery by using the
adaptor.
The charging method is as following: turn off the printer,
connect the adapter to the power socket with 220V, 50HZ,
then plug the power charging cable to the power socket of the
printer, so the power charging begins, during the course of
power charging, the 【FEED】indicator goes green, and
becomes dark when the charging is over.
Notice: it would better not turn on the printer during the
course of charging power, lest the charging time goes longer,
moreover, be sure not to use the printer to print when the
battery is charging.
Charging battery method:
The T5 uses a Lithium rechargeable battery pack. Before first
use, the battery pack should be charged for at least 4 hours.
To prevent electrical damage to the printer and/or battery
12
pack, please use approved AC/DC adapter only. During
charging, the【FEED】indicator is green, and when the battery
is charged fully, the 【 FEED 】 indicator is turned off
automatically.
3.3 Printer Interface Connection
3.3.1 RS-232 Serial Interface
The standard accessories for T5 printer include: DB-9 serial
interface cable (one end is D model standard serial interface
socket, connected to host computer, the other end is PS/2
socket, connected to printer).
When connect the serial interface, if it works normally, then
the printer stops to received data from Bluetooth, or IrDA
interface.
The specification of serial interface of T5 as below:
Data Transfer: Serial
Synchro Mode: asynchronous
Handshaking: Hardware RST/CTS or Xon/Xoff optional
Signal Level: RS-232
Baud Rate:1200, 2400, 4800, 9600, 19200, 38400, 57600,
115200bps optional
Data Bit: 7 bit, 8 bit optional
Parity: Odd, Even, None optional
Stop Bit: 1 bit
The ex-factory default setting is:
13
Baud rate: 9600bps
Handshaking: hardware
Data Bit: 8 bit
Parity: none
User can change the settings by using the Setting Tool.
Definition for the PS/2 socket:
1.TXD: send data
2.DTR: ready signal
3.RXD: receive data
4.RTS: when the signal is “MARK”, means printer is busy,
can’t receive data; when the signal is “SPACE”, means the
printer is ready to receive data.
5.GND: ground
6.NC: no connection
Notice: The pin of NC is kept for our other usage, developers
please don’t use this pin if making connecting line, otherwise
the printer might be not used normally or damaged.
14
When prints large quantities of data, the handshaking need to
be used. When using Bluetooth and IrCOMM, developers
need not to consider handshaking. When use Raw-Ir can not
use hardware control.
When the printer was controlled by hardware, follow below
method to connect the host and the printer:
Printer
Host
RXD
TXD
RTS
CTS
GND
GND
When the printer was controlled by software, follow below
method to connect the host and the printer:
Printer
Host
RXD
TXD
TXD
RXD
GND
GND
3.3.2 IrDA Interface
The hardware of T5 with infrared port printer is compatible
with IrDA1.1. IrCOMM protocol is one of the sub-protocol of
IrDA and widely used in portable devices. RAW-Ir data
transmission mode can be connected to the devices with raw
infrared port for printing, while IrCOMM mode can be
connected to the devices with IrCOMM protocol for printing.
RAW-Ir can work under 9600bps, 19200bps, 38400bps,
57600bps, 115200bps, the baud rate of RAW-Ir is same to
15
that of serial interface.
Notice:
1) To use the T5’s infrared port, a computer or Personal
Digital Assistant (PDA) with IR port is required.
2) Position a PDA conforming to the specifications in point
not more than 50 centimeter away from the printer’s infrared
port. Make sure the two ports are in front of each other with
an angle of not more than 30° on the four side.
3.3.3 (Bluetooth)
)Interface
PDA, Laptop and other communication devices with
Bluetooth can drive T5-BT to print by the Bluetooth interface.
T5-BT is compatible with Bluetooth 2.0 protocol. Power grade
is CLASS 2; effective communication distance is 10 meters.
The name of the printer is T5 Bluetooth Printer, the initial
password is “1234”; users can change the printer name and
password by using Setting Tools.
3.3.3.1 Bluetooth Pairing:
The method for the pairing between T5-BT with the host
device is:
1. Turn on the printer;
2. Host device searches for the outer Bluetooth device;
3. If there are other Bluetooth devices, please select T5
Bluetooth Printer;
16
4. Put in password “1234”
5. Pairing finished.
Notice: If the printer name has been changed, please be sure
not turn on more than one printer, otherwise it will be difficult
to justify which printer been paired.
3.3.3.2 Binding of Address:
Binding: once the printer remembers the device’s address, it
only can connect with the device and can’t connect with
others. So in this case, if the printer needs to connect with
other device, user can delete the remembered address.
No binding: in this case, the printer can be searched or paired
by any other device. So when the printer needs to connect
with a fixed device, it would be better bind address.
3.4 Other Functions
3.4.1 Sleeping Mode
Sleeping: the printer will fall after at least 3 seconds without
usage into sleep, and the status indication becomes green;
also the printer can be awaken by sending command 0x00,
then send data, the time spacing is about 2ms.
3.4.2 Paper End Alarming
When the paper is run out, the buzzer of the printer will ring 2
times, informs the user to load paper.
17
3.4.3 Black Mark
If user uses ready printing black mark to localize the receipt,
please be sure to abide by the following black mark ready
printing regulation when print the black mark, otherwise the
black mark can’t be recognized by the printer. The black
mark ready printing regulation:
Print position: as the following figure shows, the black mark
should be printed on the right of the word side.
Width range: ≥18mm
Height range: 4mm≤height≤6mm
Reflectivity to infrared ray: <10% (the reflectivity of the other
parts of the paper black mark width to infrared ray >65%)
3.5 Indicators and Buzzer
There are three indicators for T5 printer, they are【POWER】,
【MODE】 and 【FEED】, the 【POWER】and 【MODE】
indicators are blue, the 【FEED】 indicator is red.
Indicator
Status
18
Buzzer
Solid blue (right)
Working order
Beep when power on/off
Solid blue (right)
Sleep mode
-
Blue blinking
(right)
Battery low
power
-
Red blinking
(left)
Out of paper
Beep once every two
seconds
Solid blue
(middle)
Charging
-
3.6 Printer setting
Users can set the printer by using the〈T5 Setting Tools〉
software provided by us. The settings include: serial baud
rate, RAW-IR baud rate, Bluetooth device name and
password etc. Regard to the setting method please refer to
the〈T5 Setting Tools〉
Chapter 4 Printing Control Command
4.1 Summary
T5 offers ESC/POS print command set, FS Chinese print
commands. Each command is described in following format:
Section
Commands
Description
Printer printing commands
4.1.1
ESC @
Initialize printer
4.1.2
NULL
Awaken printer
19
4.1.3
FF
Print and return to standard
mode in
page mode
4.1.4
LF
Print and feed line
4.1.5
CR
Print and carriage return
4.1.6
ESC J n
Print and feed paper for n
lines
4.1.7
ESC d n
Print and feed paper for n
lines
4.1.8
HT
Horizontal tab
4.1.9
FS U nL nH
Print Unicode Character
Character setting commands
4.2.1
ESC ! n
Set print mode
4.2.2
GS ! n
Set character size
4.2.3
ESC M n
Set character font
4.2.4
ESC - n
Select/cancel underline print
4.2.5
ESC E n
Select/cancel bold font print
4.2.6
ESC G n
Select/cancel overprinting
4.2.7
GS B n
Select/cancel reverse print
4.2.8
ESC V n
Select/cancel
rotation
character
Print setting commands
4.3.1
ESC $ nL nH
Set absolute print position
4.3.2
ESC D n1 n2…nk
NULL
Set horizontal tab position
20
4.3.3
ESC \ nL nH
Set relative printing position
4.3.4
ESC 2
Set default line spacing
4.3.5
ESC 3 n
Set line spacing
4.3.6
ESC SP n
Set line character spacing
4.3.7
ESC a n
Set alignment
Graphic/Image print commands
4.4.1
ESC * m nL nH
d1…dk
Set bit-image
4.4.2
GS * x y d1…dk
Define
bit-image
4.4.3
GS / n
Print downloaded bit-image
4.4.4
FS P n
Print prestored bit-image
downloaded
User-defined character commands
4.5.1
ESC % n
Select/cancel
character set
user-defined
4.5.2
ESC & y c1…
Define
character set
user-defined
4.1 Basic Control Commands
4.1.1 ESC @
[Name]:Initialize printer
[Format]: ASCII
ESC
@
Hexadecimal
1B
40
Decimal
27
64
[Description]:Clear the data in the print buffer; Restore the
default of each print command.
21
[Notice]: If not restore to ex-factory setting, the default setting
won’t be changed.
4.1.2 NULL
[Name]:Awaken printer
[Format]: ASCII
Null
Hexadecimal
00
Decimal
0
[Description]:Awaken printer.
[Notice]:
• After use this command to awaken the printer, it needs at
least 20 milliseconds to send data to printer, otherwise printer
may print wrong data.
• If printer is not in standby mode when received this
command, the command would be ignored.
• We suggest users to send this command before print data
at anytime.
• After the printer awakened, the printing commands are
according with the commands before the printer standby.
4.1.3 FF
[Name]: Print and return to standard mode in page mode
[Format]:
ASCII
FF
Hexadecimal
0C
Decimal
12
[Description]:Prints the data in the print buffer collectively and
22
returns to standard mode.
[Notes]:
• The buffer data is deleted after being printed.
• The printing area set by ESC W is reset to the default
setting.
• This command sets the print position to the beginning of the
line.
• If the printer is in black mark mode, the printer will feed line
to the position of black mark after the buffer data printed. If
there isn’t black mark, the printer will feed line 30cm then
stop.
• If the printer is not in black mark mode, it will only pint buffer
data, won’t feed line.
[Reference]: LF, CR, ESC d, ESC J
4.1.4 LF
[Name]: Print and feed line
[Format]:
ASCII
LF
Hexadecimal
0A
Decimal
10
[Description]: Prints the data in the print buffer and feeds one
line based on the current line spacing.
[Notice]: This command sets the print position to the
beginning of the line.
23
4.1.5 CR
[Name]: Print and carriage return
[Format]:
ASCII
CR
Hexadecimal
0D
Decimal
13
[Description]: The command functions the same as LF.
[Notice]: Sets the print starting position to the beginning of
the line.
4.1.6 ESC J n
[Name]: Print and feed paper
[Format]:
ASCII
ESC
J n
Hexadecimal
1B
4A n
Decimal
27
74 n
[Description]: Feed paper for n vertical dot spacing.
[Range]: 0 ≤ n ≤ 255.
• one vertical dot spacing is 0.125mm, below is the same.
[Reference]: ESC d
4.1.7 ESC d n
[Name]: Print and feed paper n lines
[Format]:
ASCII
ESC
d n
Hexadecimal 1B
64 n
Decimal
27
100 n
[Range]: 0 ≤ n ≤ 255.
[Description]:Print the data in the buffer and feed paper for n
24
lines.
[Notice]: Set the beginning of the line as the printing position
by this command.
[Reference]: ESC J
4.1.8 HT
[Name]: Horizontal tab
[Format]:
ASCII
HT
Hexadecimal
09
Decimal
9
[Description]: Moves the print position to the next horizontal
tab position.
[Notice]:
• Horizontal tab positions are set with ESC D.
• This command is ignored unless the next horizontal tab
position has been set.
[Reference]: ESC D
4.2 Character Setting Commands
4.2.1 ESC ! n
[Name]: Select print mode
[Format]:
ASCII
ESC
!
n
Hexadecimal
1B
21 n
Decimal
27
33 n
[Description]: Select print mode(s) using n as follows:
Bit
Value
Description
25
0
6*12
1
8*16
1
-
Undefined
2
-
Undefined
0
Cancel bold font
1
Select bold font
0
Cancel double height mode
1
Select double height mode
0
Cancel double width mode
1
Select double width mode
-
Undefined
0
Cancel underline mode
1
Select underline mode
0
3
4
5
6
7
[Notice]:
• When selected double-height or double-width mode, double
size characters are printed
• When both double-height and double-width modes are
selected, quadruple size characters are printed.
• When some characters in a line are double or more height,
all the characters on the line are aligned at the baseline.
• ESC - can also turn on or off underline mode. However, the
setting of the last received command is effective.
• ESC + can also select character size. However, the setting
of the last received command is effective.
• This command is effective for both alphanumeric and
Chinese character.
26
[Default]: n = 0
[Reference]: ESC -, ESC +
4.2.2 GS ! n
[Name]:Enlarge character
[Format]: ASCII
GS !
n
Hexadecimal
1D 21 n
Decimal
29 33 n
[Description]:
N indicate responsed bdouble height,
information.
double
width
0
1
2
3
Double -height
4
5
6
7
Double-width
0
0
0
0
1
0
0
0
0
1
1
0
0
0
2
1
0
0
0
2
4.2.3 ESC M n
[Name]:Select font
[Format]: ASCII
ESC
Hexadecimal
1B
Decimal
27
[Description]: n=0,1,16,17,18,19
0
ANK 6x12
1
ANK 8x16
16
Chinese 12x12
17
Chinese 16x16
18
BIG5 12x12(Optional)
27
M n
4D n
77 n
19
BIG5 161x16(Optional)
4.2.4 ESC - n
[Name]: Select/cancel underline
[Format]:
ASCII
ESC
Hexadecimal
1B
Decimal
27
[Description]: n
– n
2D n
45 n
n
Description
0
Cancel underline
1
Select underline (1 dot width)
2
Select underline (2 dot width)
[Reference]: ESC !
4.2.5 ESC E n
[Name]: Select/Cancel bold font print
[Format]: ASCII
ESC
E n
Hexadecimal
1B
45 n
Decimal
27
69 n
[Description]:When the lowest bit of n is 0, cancel bold font
print. When the lowest bit of n is 1, select bold font print
4.2.6 ESC G n
[Name]: Select/cancel overprinting
[Format]: ASCII
ESC
Hexadecimal
1B
28
E n
45 n
Decimal
27
69 n
[Description]:When the lowest bit of n is 0, Select
overprinting. When the lowest bit of n is 1, cancel overprinting
4.2.7 GS B n
[Name]:Select/cancel reverse print
[Format]: ASCII
ESC
B n
Hexadecimal
1D
42 n
Decimal
29
66 n
[Description]: If n=1,select reverse print;n=0,cancel reverse
print。Default set n=0。
4.2.8 ESC V n
[Name]:Select/cancel character rotation
[Format]: ASCII
ESC
c n
Hexadecimal
1B
56 n
Decimal
27
86 n
[Description]: n.
n
Description
0
Cancel rotation
1
90 clockwise
2
180 clockwise
3
270 clockwise
29
4.3 Print setting commands
4.3.1 ESC $ nL nH
[Name]: Set absolute print position
[Format]: ASCII
ESC
$ nL nH
Hexadecimal
1B
24 nL nH
Decimal
27
36 nL nH
[Range]: 0 ≤ nL ≤ 255, 0 ≤ nH ≤ 256
[Description]:Sets the distance from the beginning of the line
to the position at which subsequent characters are to be
printed. The distance from the beginning of the line to the
print position is [( nL + nH × 256) (vertical or horizontal
motion unit)] inches.
[Notice]: Settings outside the specified printable area are
ignored.
[Reference]: ESC \
4.3.2 ESC D n1 n2…nk NULL
[Name]:Sets horizontal tab positions.
[Format]: ASCII
ESC D n1 n2 n3… NULL
Hexadecimal
1B 44 n1 n2 n3… 00
Decimal
27 68 n1 n2 n3… 0
[Description]:
• n specifies the column number for setting a horizontal tab
position from the beginning of the line.
• k indicates the total number of horizontal tab positions to be
set.
30
• The horizontal tab position is stored as a value of [character
width × n] measured from the beginning of the line. The
character width includes the right-side character spacing, and
double-width characters are set with twice the width of
normal characters.
• This command cancels the previous horizontal tab settings.
• When setting n = 8, the print position is moved to column 9
by sending HT.
• Up to 32 tab positions ( k = 32) can be set. Data exceeding
32 tab positions is processed as normal data.
• Transmit [ n] k in ascending order and place a NUL code 0
at the end.
• When [ n] k is less than or equal to the preceding value [ n]
k-1, tab setting is finished and the following data is processed
as normal data.
• ESC D NUL cancels all horizontal tab positions.
• The previously specified horizontal tab positions do not
change, even if the character width changes.
• The character width is memorized for each standard and
page mode. [Default] The default tab positions are at
intervals of 8 characters (columns 9, 17, 25,...) for font A (12 ´
24).
[Reference] HT
4.3.3 ESC \ nL nH
[Name]: Set relative printing position
31
[Format]:
ASCII
ESC
\
nL nH
Hexadecimal
1B
5C nL nH
Decimal
27
92 nL nH
[Range]: 0 ≤ nL ≤ 255; 0 ≤ nH ≤ 1.
[Description]: Sets the print starting position based on the
current position by using the horizontal or vertical motion unit.
This command sets the distance from the current position to
n [( nL + nH × 256)horizontal motion unit]
[Notice]:
• Any setting that exceeds the printable area is ignored.
• The print starting position moves from the current
position to [ N × horizontal motion unit]
4.3.4 ESC 2
[Name]: Select default line spacing
[Format]:
ASCII
ESC 2
Hexadecimal 1B 32
Decimal
27 50
[Description]: Set the current character line spacing as the
default one: 6 dot spacing.
[Notice]: The height of the character is not included by the 6
dot spacing.
[Reference]: ESC 3
4.3.5 ESC 3 n
[Name]: Set line spacing
32
[Format]:
ASCII
ESC 3 n
Hexadecimal 1B 33 n
Decimal
27 51 n
[Range]: 0 ≤ n ≤ 255
[Description]: Set n vertical dot spacing as the character line
spacing.
[Default]: n = 30
[Reference]: ESC 2
[Example]:
Should input the command:1B 33 1E
4.3.6 ESC SP n
[Name]: Set character spacing
[Format]:
ASCII
ESC SP n
Hexadecimal 1B 20 n
Decimal
27 32 n
[Range]:0 ≤ n ≤ 255
[Description]:Set n horizontal dot spacing as the character’s
right spacing (exclude the character’s height).
[Notice]: When in the double width mode, the character’s
right spacing is two times to the normal spacing. When the
characters are enlarged, their right spacing also will be
enlarged accordingly.
33
[Default]: n = 0
4.3.7 GS L nL nH
[Name]: Set left margin
[Format]: ASCII
GS L nL nH
Hexadecimal 1D 4C nL nH
Decimal
29 76 nL nH
[Range]:0 ≤ nL ≤ 255 , 0 ≤ nH ≤ 255
[Description]:The position set by this command is absolute
position, Set n horizontal dot spacing as the character’s left
spacing, nL nH are n’s LSB and MSB, N=nL + nH × 256.
[Default]: n=0,that means there is not any left margin.
4.3.8 ESC a n
[Name]:Set alignment
[Format]: ASCII
Hexadecimal
Decimal
[Description]:
ESC a n
1B 61 n
27 97 n
n
Description
0
Align left
1
Center
2
Align right
34
4.4 Graphic/Image print commands
4.4.1 ESC * m n1 n2 [d]k
[Name]:Set bit-image mode
[Format]: ASCII
ESC * m n1 n2 [d]k
Hexadecimal 1B 2A m n1 n2 [d]k
Decimal
27 42 m n1 n2 [d]k
[Range] m = 0, 1, 32, 33
0 ≤ n1 ≤ 255
0 ≤ n2 ≤ 3
0 ≤ d ≤ 255
[Description]: Selects a bit-image mode using m for the
number of dots
specified by n1 and n1, as follows:
m
Vertical Dot
Number (Height)
Horizontal
Enlargement
0
8
2
1
8
1
32
24
2
33
24
1
35
4.4.2 GS * x y d[]
[Name]: Define downloaded bit-image
[Format]: ASCII
GS *
x y d[]
Hexadecimal
1D 2A …
Decimal
29 42 …
[Description]:Use appointed bit number by x and y to define
the downloaded bit-image。
• x*8 is the dot number of horizontal.
• y*8 is the dot number of vertical.
[Note]
• If x*y is off-limit, then the command is forbidden.
• d means the image data. 1 print, 0 not print
• use this command to define the downloaded bit-image, use
command GS/n to print the downloaded bit-image.
• In the following circumstances , clear the definition of
downloaded bit-image.
1. run ESC @ command
2. printer is reset and the power is off.
4.4.3 GS / n
[Name]: Print downloaded bit-image
[Format]: ASCII
GS /
n
Hexadecimal 1D 2F n
Decimal
29 47 n
[Description]:n
n
Description
36
0
normal
1
Double height
2
Double width
3
Double height & width
4.4.4 FS P n
[Name]: Print prestored bit-image
[Format]: ASCII
FS P n
Hexadecimal
1D 50 n
Decimal
29 80 n
[Description]:0<=n<=9.Print prestored bit-image, the number
of image is 1<=n<=9
[Note]:
• The command is invalid when the number of bit-image has
not been defined.
• The command is not affected by the print mode (bold font,
overlapping, underline, etc.).
• If the width of bit-image is more than one line, the content
which is outside the line will not be printed.
• Upload the bit-image should use specified tool, thus the
bit-image will not be lost unless it is covered by new image.
4.5 User-defined character commands
4.5.1 ESC % n
[Name]: Select/cancel user-defined character set
[Format]:
ASCII
ESC
% n
37
Hexadecimal
1B
25 n
Decimal
27
37 n
[Range]: 0 ≤ n ≤ 255
[Description]: Select or cancel user-defined character set.
When n (LSB)=0,cancel user-defined character set.
When n (LSB)=1,select user-defined character set.
[Notice]:
• When cancel user-defined character set, auto select built-in
character set.
• n only LSB is available.
[Default] n = 0
[Reference] ESC &, ESC ?
4.5.2 ESC & y c1 c2 [x1 d1...d(y *x1)]...[xk d1...d(y * xk)]
[Name]:Define user-defined character
[Format]:
ASCII
ESC & y c1 c2 [x1 d1...d(y ´
x1)]...[xk d1...d(y ´ xk)]
Hexadecimal 1B 26 y c1 c2 [x1 d1...d(y ´
x1)]...[xk d1...d(y ´ xk)]
Decimal
27 38 y c1 c2 [x1 d1...d(y ´
x1)]...[xk d1...d(y ´ xk)]
[Range]: y = 3, font A (12 × 24), y = 2, font B (8× 16), 32 ≤ c1
≤ c2 ≤ 126 x = 12, font A (12 × 24), x = 8, font B (8× 16), 0 ≤
d1 ... d(y × xk) ≤ 255
[Description]: Define user-defined character.
• y specify the vertical byte number, when define the
38
characters of font A, y=3; when define the characters of font
B, y=2
• c1 specify the code of initial character, c2 specify the code
of terminal character.
• x specify the vertical byte number, when define the
characters of font A, x≤12; when define the characters of font
B, x≤8
• k=c2-c1+1
[Notice]
• The code range of defined character: from <20>H to
<7E>H.
• Can define the continuous codes for several characters.
When only one character is needed, c1 = c2.
• d is the dot data of the character.
Please refer to the following:
39
• Defining the data of user-defined character is (y × x) bytes.
• Setting the printing dot’s corresponding bit is 1 or
non-printing dot’s one is 0.
• The user-defined characters will be deleted in the following
situation:
1. Carry out ESC @.
2. Printer reset or power turn off.
[Default] Built-in character set.
[Reference]: ESC %.
40