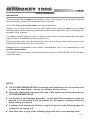
1
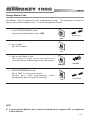
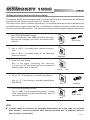
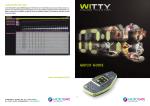
SISTEMAS
MEMOKEY 100C
PORTADA
PROGRAMMER
MANUAL
Pag 1
SISTEMAS
MEMOKEY 100C
FERMAX 100C MEMOKEY KIT INSTRUCTIONS.
Edition: V05/07.
This technical document of an informative nature is issued by FERMAX ELECTRONICA
S.A.E. The company reserves the right to modify any of the product features referred to
herein at any time without prior notice. Said changes will be reflected in subsequent
editions of the same.
ENGLISH
Pag 2
SISTEMAS
MEMOKEY 100C
PROGRAMMING MANUAL
Index
Default codes ...................................................................................................... 4
Total reset all codes ........................................................................................... 5
Set up user code length ..................................................................................... 6
Add or edit user codes ...................................................................................... 7
Delete user codes ............................................................................................... 8
Change Master codes ........................................................................................ 9
Enable user own code change ....................................................................... 10
Change free access code ............................................................................... 11
Set indoor pushbuttons ................................................................................... 12
Set electrical device activation timings ......................................................... 13
Set wildcard output ......................................................................................... 14
Reset MASTER code (if previous code forgotten) ......................................... 15
Troubleshooting table ..................................................................................... 16
USER MANUAL
Index
Introduction ....................................................................................................... 17
Keyboard function ............................................................................................. 18
Controls ............................................................................................................. 19
Entry system operation ..................................................................................... 20
Video entry system operation ........................................................................... 21
Cod. 94908IFc V05/07
Pag 3
SISTEMAS
MEMOKEY 100C
Default codes
For their use, codes are stored in the memory in the following sequence:
POSITION - CODE -ACTION
POSITION: Number assigned to each code in memory (del 00 al 99)
CODE: Number to enter through keypad to carry out the indicated action.
ACTION: What happens after code is entered correctly.
So that the system is up and running, with no need to set any codes, it leaves the factory with
three pre-programmed codes, as shown in the table:
POSITION
(*)
CODE
ACTION
00
CODE 1 (*)
OPEN DOOR
01
CODE 2 (*)
ACTIVATE AUXILIARY DEVICE (if present)
02
CODE 3 (*)
OPEN DOOR AND ACTIVATE AUXILIARY DEVICE
These codes are indicated by a label on the back of the keypad module.
NOTES:
9 Preset codes are exclusive to each set of equipment, so only you will know them.
However, you can change them if you wish.
9 Initially, user codes have 4 digits. For enhanced security, they may be set to 5 or
6 digits length. In this case, the preset codes will no longer be valid.
Pag 4
SISTEMAS
MEMOKEY 100C
Total reset - all codes
This operation is useful to ensure that any codes previously stored in the system are
deleted.
The operation should be carried out as a first step before starting to program the users.
The sequence is as follows:
1. Enter PROGRAMMING mode
Key in the Master code, 1480 by default, although
this may be changed if you wish, as explained in
this manual.
beep-beep
1480
2. Key in “A 9 “.
A9
3. Key in “B“.
beep
B
4. Wait 3 seconds for memory to delete.
A “long beep” is heard.
beeeeep
5. Exit PROGRAMMING mode
Key in “A A” to exit programming.
The system also exits this mode automatically after
20 seconds inactivity.
beep-beep
AA
NOTE:
9 Reset is an irreversible operation, so the codes stored previously cannot be
recovered.
Pag 5
SISTEMAS
MEMOKEY 100C
Set user codes length
Initially, user codes have 4 digits, including the MASTER code.
For enhanced security, they may be changed to 5 or 6 digits, or 3 digits for greater ease.
(See NOTES below).
The steps are as follows:
1. Enter PROGRAMMING mode
Key in the Master code, 1480 by default, although
this can be changed if you wish, as shown in this
manual.
beep-beep
1480
2. Key in “ A 4”.
A4
3. Indicate the new length (3, 4, 5 or 6).
beeeep
3, 4, 5 or 6
4. Key in “ A A” to exit PROGRAMMING
System also exits programming
automatically after 20 seconds inactivity.
mode
beep-beep
AA
NOTES:
9 If user code length is changed after programming to a higher number of digits,
the existing codes will have extra zeros appended at the end to adapt to the new
length. This will also affect the MASTER Code and the Free Access Code.
9 If user code length is changed after programming to a lower number of digits,
existing codes will have their final digits truncated.
Pag 6
SISTEMAS
MEMOKEY 100C
Add or edit user codes
Codes are stored in memory in this order: position - code - action, as follows:
1. Enter PROGRAMMING mode
Key in the Master code, 1480 by default, although
this can be changed if you wish, as shown in this
manual.
beep-beep
1480
2. Key in the position.
This can be any number from 00 to 99.
See NOTE
below.
00...99
3. Key in the new code
Number of digits must coincide with digit number
length set in the system.
CCCC
4. Key
in
the
associated
action.
1: Door will open.
2: Auxiliary device activates if present.
3: Door opens and auxiliary device activates
simultaneously.
1, 2 or 3
5. Exit PROGRAMMING mode
If you want to enter more codes go straight to step
2, if not simply key in “AA” to exit programming
mode.
System also exits programming
automatically after 20 seconds inactivity.
mode
beeeeep
beep-beep
AA
NOTES:
9 If the position to be set is already taken up, the new code cancels the previous
one. This is also valid for the factory preset codes, in positions 00, 01 and 02.
9 It is very important to make a list of the codes with their position and action.
Pag 7
SISTEMAS
MEMOKEY 100C
Delete user codes
You may want to cancel a given user code. To do so, proceed as follows:
1. Enter PROGRAMMING mode
Key in the Master code, 1480 by default, although
this may be changed if you wish, as shown in this
manual.
beep-beep
1480
2. Key in position of code to be erased.
See NOTE below.
00...99
3. Key in “B “
B
beeeep
4. Exit PROGRAMMING mode
If you want to remove more codes go straight to
step 2, otherwise key in “AA” to exit programming
mode.
System also exits program mode automatically
after 20 seconds inactivity.
AA
beep-beep
NOTES:
9 A code can only be erased if you know the associated position, which is why we
again emphasise the importance of making a list of all codes and their position
and action programmed in the system.
9 The code deletion action is irreversible, so once they are erased they cannot be
retrieved.
Pag 8
SISTEMAS
MEMOKEY 100C
Change Master Code
The Master Code is needed to enter programming mode. The equipment leaves the
factory with a default Master Code. It can be changed as follows.
1. Enter PROGRAMMING mode
Key in the default Master code, 1480
beep-beep
1480
2. Key in “A 0 “
See NOTE below
A0
3. Key in new Master Code
The number of digits in the new code must
coincide with the number length set in the system.
MMMM
beeeep
4. Exit PROGRAMMING mode
Key in “AA” to exit program mode.
System also exits programming
automatically after 20 seconds inactivity.
mode
AA
beep-beep
NOTE:
9 If you forget the Master code, it can be replaced by the original 1480, as explained
in this manual.
Pag 9
SISTEMAS
MEMOKEY 100C
Enable user own code change
It is possible to allow the users to change the access code assigned to them for another
personal code. To do this the feature must be enabled.
Here is how to do it:
1. Enter PROGRAMMING mode
Key in the Master code, 1480 by default, although
this may be changed if you wish, as shown in this
manual.
beep-beep
1480
2. Key in “A 7 “
A7
3. Key in “1” to enable permit or
Key in “0” to disable it.
1 or 0
beeeep
4. Exit PROGRAMMING mode
Key in “AA” to exit programming mode. System
exits programming mode automatically after 20
seconds inactivity.
AA
beep-beep
NOTE:
9 Instructions for users to set their own code are given in the User Manual.
Pag 10
SISTEMAS
MEMOKEY 100C
Change free access code
Key in the free access code on the keypad to enable or disable an optional outdoor
pushbutton, which may be used, for example, to open the door from the pushbutton without
entering a personal code.
Initially, this free access code is 1593 (see NOTE at foot of page) and may be changed as
shown in the following sequence:
1. Enter PROGRAMMING mode
Key in the Master code, 1480 by default, although
this may be changed if you wish, as shown in this
manual.
beep-beep
1480
2. Key in “A 1 “
A1
3. Key in the new free access code
The number of digits in the new code must
coincide with the digit number set in the system.
LLLL
4. Key in the action associated to the pushbutton
1: Open the door
2: Trigger an auxiliary device if present
3: Open door and trigger auxiliary device
simultaneously
beeeep
1, 2 or 3
5. Exit PROGRAMMING mode
Key in “AA” to exit programming mode. System
exits programming mode automatically after 20
seconds inactivity.
beep-beep
AA
NOTE:
9 If the code length has been changed to a longer number, the free access code will
be completed with zeros at the end. If the length of the codes has been changed
to a shorter number, the final code digits will have gone.
Pag 11
SISTEMAS
MEMOKEY 100C
Programming indoor pushbuttons
The system may also be equipped with one or two pushbuttons (PI1, PI2) which, installed
inside the premises, allow the door to be opened from the inside or set off any additional
electrical device that has been installed.
These pushbuttons can be enabled or disabled, as follows:
1. Enter PROGRAMMING mode
Key in the Master code, 1480 by default, although
this may be changed if you wish, as shown in this
manual.
beep-beep
1480
2. Key in “A 5 “ to select PI1 or:
Key in “A 6 “ to select PI2
A5orA6
3.
Key in “1“ to enable pushbutton selected or
Key in“0“ to disable it
0 or 1
beeeep
4. Exit PROGRAMMING mode
Key in “AA” to exit programming mode. System
exits programming mode automatically after 20
seconds inactivity.
Pag 12
beep-beep
AA
SISTEMAS
MEMOKEY 100C
Setting electrical device activation timing
The system initially comes programmed to activate both the door release and the additional
electrical device (where present) with a 1-second timing.
This may be too short for certain applications ( for example because the door release is not
activated long enough to push the door, or because the additional device is a light you want
to stay on for several seconds). The activation timing can be changed using this sequence:
1. Enter PROGRAMMING mode
Key in the Master code, 1480 by default, although
this may be changed if you wish, as shown in this
manual.
2. Key in “A 2 “ to modify door release timing or
else:
Key in “A 3 “ to modify timing of an additional
electrical device
beep-beep
1480
A2orA3
3. Enter the new timing.
Key in the digits indicating the seconds.
If you key in “00” the device will stay activated till
another valid code is entered.
00, 01, ... ,99
4. Key in “0 “ if the device is normally activated or
Key in “1” if the device is normally deactivated.
See NOTE.
0 or 1
beeeep
5. Exit PROGRAMMING mode
Key in “AA” to exit programming mode. System
exits programming mode automatically after 20
seconds inactivity.
beep-beep
AA
NOTE:
9 In most cases the devices are normally deactivated, as in the case of a normal
door release. Inverse operation door release systems are, in contrast, devices
that usually run activated.
Pag 13
SISTEMAS
MEMOKEY 100C
Programming wildcard output
This equipment has a free contact auxiliary output to which a 6 Vdc device may be connected
with a maximum current of 300 mA to carry out several functions. If the equipment to be
connected does not comply with these specifications, a relay must be used (Ref. 2013).
See Installer’s Manual.
The utility of this wildcard output can be defined in the following steps:
1. Enter PROGRAMMING mode
Key in the Master code, 1480 by default, although
this may be changed if you wish, as shown in this
manual.
beep-beep
1480
2. Key in “A 8 “
A8
3. Select the utility desired.
0: Wildcard output not used (by default)
1: Every time a valid code is entered a 1-second
pulse is generated.
2: Each time a valid code is entered the wildcard
output is activated, staying on for 5 seconds
longer than the associated device.
3: The wildcard output switches every time a valid
code is entered.
4. The wildcard output is activated and stays on
every time “A” is pressed along with another
keypad code (valid or not).
5. The wildcard output is activated after 3
consecutive wrong codes are entered, and stays
active for 4 minutes or until a valid code is
entered.
0,...,6
beeeep
6. The wildcard output is activated when any key is
pressed and switches off after 15 seconds
inactivity.
4. Exit PROGRAMMING mode
Key in “AA” to exit programming mode. System
exits programming mode automatically after 20
seconds inactivity.
Pag 14
beep-beep
AA
SISTEMAS
MEMOKEY 100C
Reset MASTER code (if previous code forgotten)
This operation is done by electrical manipulation of the equipment, to ensure that it cannot
be modified by anyone without physical access to it.
1. Disconnect the system power source.
2. Make a short circuit between terminals “S1” and “-” of the equipment.
If the system has an exit pushbutton, simply keep it pressed.
DL1
CN4
MEMOKEY 100 CODIGOS
MEMOKEY 100 CODES
REF. 2520
SW1
REMOTE
F - Pl Ck So Bz
C1 R1 S1 - S2 C2 R2 A
C1 R1 S1 - S2 C2
3. Reconnect the system power source and remove the short circuit (or release the exit
button). You have 20 seconds to enter a new MASTER code.
NOTE:
9 Replacing the MASTER code does not erase the rest of the information programmed
in the system.
Pag 15
SISTEMAS
MEMOKEY 100C
Troubleshooting table
SYMPTOM
CHECKS
1. DISCONNECT the POWER SOURCE and enter the
sequence again.
2. Make sure the codes entered have the programmed
length. To check this, press a number key repeatedly
•
If the equipment does not
respond to programming.
until the confirmation sound (
maaawc )
error sound (
beeeep
) or
is heard. The
number of digits will correspond to the number of
times it had to be pressed.
SOUND
ACTION
Enter PROGRAMMING or
beep-beep
Exit PROGRAMMING MODE
CONFIRMATION
beeeep
Wrong data
maaawc
Pag 16
SISTEMAS
MEMOKEY 100C
Introduction
USER MANUAL
This equipment has a keypad that enables a door to be opened, or an auxiliary electrical
device activated, when a personalised code is entered.
Up to 100 different personal codes can be programmed.
Usually, one of these codes is given to each system user, taking as users not only those
habitually entering the building or premises but also those who do so only occasionally (for
example office workers).
The users use their personal code or codes to carry out the functions associated with them
(open the door, activate/deactivate an alarm, etc.).
Being personal codes, you can prevent the use of any of them at any time by a given user
simply by deleting the code from the system.
Management of all personal codes (startup, cancellations, etc.) is the responsibility of the
system administrator.
The ENTRY KITS also carry out door entry function and the VIDEO ENTRY KITS also have
audio and video.
NOTES:
9 The SYSTEM ADMINISTRATOR can assign each authorised user a personal code
to open the door and/or activate an auxiliary electric device.
9 Users can change their own personal code, if this option has been enabled by the
SYSTEM ADMINISTRATOR.
9 The system is anti-sabotage protected, so that after three erroneous codes are
entered in the keyboard it will be blocked for 20 seconds, emitting disuasory
beeps during this period.
9 If setting up the emergency function, copy in the space on the following page the
function to be carried out.
9 Give each user a copy of the following page with their corresponding code.
Pag 17
SISTEMAS
MEMOKEY 100C
Keypad Operation
• Emergencies:
• Free Access: Where there is a door release button, it may be enabled/disabled by
entering this code.
• Change Code: Users can change their own personal code, if this option has been
enabled by the SYSTEM ADMINISTRATOR.
User:
Code:
Panic (*):
'A' + CODE
Free Access (*):
Change code (*):
'AB' + CODE to change + NEW CODE
(*)This option must be enabled. Contact your Tech support.
Pag 18
Cut out and give a copy of this section to each user.
SISTEMAS
MEMOKEY 100C
CONTROLES
MONITOR LOFT
TELEPHONE
LED
OPEN DOOR
Pushbutton
F1
F2
BOTONES - BUTTONS - BOUTON - TASTE - BOTÃO
- Botón de ABREPUERTAS. (Pulsar para abrir la puerta).
- DOOR RELEASE button. (Press to open the door).
- Bouton-poussoir de la GACHE ELECTRIQUE. (Appuyez pour ouvrir la porte).
- TÜRÖFFNUNGSTASTE. (Drücken Sie um die Tür zu öffnen).
- Botão de TRINCO. (Carregar para abrir a porta).
F1
F2
E
EN
F
D
P
-
Autoencendido y Selección Cámara Principal/Secundaria (1)
Manual On Switch and Main/Secondary Camera Selection (1)
Autoinsertion et sélection caméra principale/secondaire (1)
Eigenstart Auswahl Hauptkamera/Nebenkamera (1)
Ligar automaticamente e Selecção Câmara Principal/Secundária
-
Funciones Adicionales. (Asignadas por el instalador).
Additional Functions. (Assigned by Installer).
Fonctions supplémentaires. (Assignées par l’installateur)
Zusatzfunktionen. (Festgelegt durch den Installateur).
Funções Adicionais. (Atribuídas pelo instalador).
Apagado
Off
Arrêt
Ausgeschaltet
Apagado
Encendido con volumen Medio
On, low call volume
Marche, volume d’appel moyen
Eingeschaltet/ mittlere Lautstärke
Aceso com volume Medio
(1)
Encendido con volumen Alto
On, full volume
Marche volume complet
Eingeschaltet/ maximale Lautstärke
Aceso com volume Alto
LED
E
Brillo
Brightness
Luminosité
Helligkeit
Brilho
Led Indicador monitor encendido
Powered monitor indicator LED
Voyant lumineux moniteur en marche
LED-Anzeige Monitor eingeschaltet
Led Indicador monitor aceso.
Contraste
Contrast
Contraste
D
Kontrast
P
Contraste.
función disponible según tipo de instalación - function available depending on the installation’s type - fonction disponible
selon le type d’installation - Funktion verfügbar je nach Installationstyp - função disponível segundo o tipo de instalação
EN
F
(1)
Color (sólo en monitor color).
Colour (only in colour monitor).
Couleur (uniquement sur écran couleur).
Farbe (nur bei Farbbildschirm).
Cor (só em monitor a cores).
Pag 19
SISTEMAS
MEMOKEY 100C
FUNCIONAMIENTO - OPERATION - FONCTIONNEMENT - BETRIEB - FUNCIONAMENTO
• Llamada - Call - Appel - Ruf - Chamada
• Atender la llamada - Answer the call - Réception de l’appel
Rufbeantwortung - Atender a chamada
bla bla
bla ...
bla bla
bla ...
• Abrir la puerta al visitante - Open the door to the visitor
Ouverture de la porte au visiteur - Türöffnung für Besucher - Abrir a porta ao visitante
1
4
Pag 20
2
5
3
6
7
8
9
A
0
B
SISTEMAS
MEMOKEY 100C
E•
EN
F
D
P
Llamada
Call
Appel
Ruf
Chamada
HIG
H
CCDRESO
CAMELUTIO
PAN
RA N
&
TILT
30
¸ max.
Seg./Sec./Sek.
•E Atender la llamada
EN Answer
F
D
P
the call
Réception de l’appel
Rufbeantwortung
Atender a chamada
bla bla
bla ...
HIG
H
CC RESO
D CA LU
ME TIO
RA
PAN
¸
E•
EN
F
D
P
E
•
EN
F
D
P
& TILT
N
bla bla
bla ...
max. 90 Seg./Sec./Sek.
Abrir la puerta al visitante
Open the door to the visitor
Ouverture de la porte au visiteur
Türöffnung für Besucher
Abrir a porta ao visitante
HIGH RESOLUTION
CCD CAMERA
PAN &TILT
Activación manual del monitor (autoencendido)
Manual monitor activation (auto-on)
Activation manuelle du moniteur (auto-insertion)
Manuelle Aktivierung des Monitors
Activação manual do monitor (ligar automático)
¸ 30 Seg./Sec./Sek.
bla bla
bla ...
90
¸ max.
Seg./Sec./Sek.
¸ 1 Seg./Sec./Sek.
E•
CAM 1
Autoencendido CAM2
EN CAM2 activation
F Auto insertion CAM2
D CAM 2 Aktivierung
P Activação CAM2
HIGH RESOLUTION
CCD CAMERA
PAN &TILT
CAM 2
HIGH RESOLUTION
CCD CAMERA
PAN &TILT
HIGH RESOLUTION
CCD CAMERA
PAN &TILT
HIGH RESOLUTION
CCD CAMERA
PAN &TILT
CAM 1
CAM 2
2º
1º
CAM 1
¸ 1 Seg./Sec./Sek.
3º
CAM 2
¸ 1 Seg./Sec./Sek.
4º
CAM 1
¸ 1 Seg./Sec./Sek.
CAM 2
¸ 1 Seg./Sec./Sek.
Pag 21
...