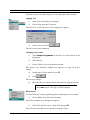
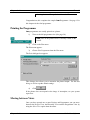
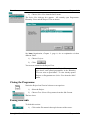
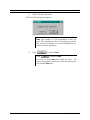
1
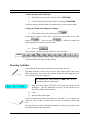
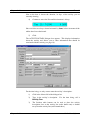
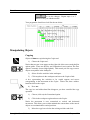
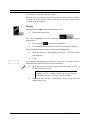
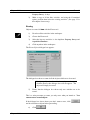
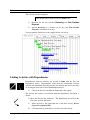
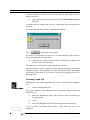
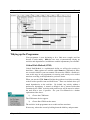
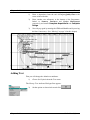
Project Scheduling System
Quick Start Guide
McLachlan Software
Quick Start Guide
Project Management Software
McLachlan Software
ivan Quick Start Guide
McLachlan Software
ivan Quick Start Guide
User support (Australia):
Telephone: + 61 2 9251 6511
Facsimile: + 61 2 9251 7343
Information in this document is subject to change without notice and does not represent
a commitment on the part of McLachlan Software. The software and/or databases
described in this document are furnished under a license agreement or non-disclosure
agreement. The software and/or databases may be used or copied only in accordance
with the terms of the agreement. It is against the law to copy the software on any
medium except as specifically allowed in the license or non-disclosure agreement. The
purchaser may make one copy of the software for backup purposes. No part of this
manual and/or databases may be reproduced or transmitted in any form or by any
means, electronic or mechanical, including photocopying, recording, or information
storage and retrieval systems, for any purpose, other than the purchaser's personal use,
without the express permission of McLachlan Software.
©2014 McLachlan Software, A.C.N. 001557384. All rights reserved. Printed in
Australia.
Published by:
McLachlan Software Pty Limited.
PO Box N859
Grosvenor Place
New South Wales, 1220
AUSTRALIA
Telephone: + 61 2 9251 6511
Facsimile: + 61 2 9251 7343
UNIX is a trademark of AT&T
VAX and DEC are trademarks of Digital Equipment Corporation.
Microsoft and MS-DOS are registered trademarks of Microsoft Corporation.
McLachlan Software
McLachlan Software
Table of Contents
TABLE OF CONTENTS
I
CHAPTER 1
1
GETTING STARTED
1
About this material
What to read first
1
1
Conventions and Definitions
1
CHAPTER 2
3
ABOUT IVAN
3
Overview - What is ivan
3
The ivan Screen
Top
Middle
Bottom
3
4
4
5
Tools, Pen Options and Pallets
Tools
Pen Options
Palettes
5
5
6
6
Communicating with ivan
The Mouse
The Keyboard
Dialogue Boxes
7
7
7
7
ivan Quick Start Guide
Contents i
ivan Organisation
Project View
Hierarchy View
Programme View
8
9
9
9
CHAPTER 3
11
TUTORIAL
11
About the Tutorial
11
Starting ivan
11
Creating a new Project
Set the Project Calendar
Selecting Objects
Method One - Clicking
Method Two - Selection Rectangle
Open the Project
13
14
14
14
14
15
Create a new Programme
Open the Programme
Setting the Programme Grid and Time Scale
Change the Start and Finish Dates
Change the Width of the Displayed Columns
15
15
16
17
17
Drawing Activities
Create Two more Activities
Refreshing the Screen
Changing Activity Attributes
Details
Colour
Line Style and Thickness
Changing Activity Graphics
17
19
19
19
19
20
21
21
Manipulating Objects
Copying
Moving
Stretching
Erasing
23
23
24
25
26
Linking Activities with Dependencies
Zooming In and Out
Dependency Details
Automatically Linked Activities
27
28
29
30
Contents ii
McLachlan Software
Mid-Activity Dependencies
31
Tidying up the Programme
Critical Path Method (CPM)
Shuffle
Reshaping Dependencies
Drawing Lines
32
32
33
34
34
Drawing Milestones
35
Adding Text
Editing Text
To re-edit the text you have just typed:
Aligning Text
Changing the Text Size
Blank Spaces
Further Text Editing
36
37
37
38
38
38
39
Printing the Programme
40
Moving between Views
40
Closing the Programme
41
Exiting from ivan
41
CHAPTER 4
44
IVAN STYLE GUIDE
44
Example Programmes
44
ivan Quick Start Guide
Contents iii
Contents iv
McLachlan Software
Chapter 1
Getting Started
About this material
Welcome to the ivan Quick-Start manual. This manual is designed to
help you start working with ivan. See the ivan User Manual for a
comprehensive description of ivan functions.
What to read first
If you are new to computerised programming, you will find it most useful
to begin here and continue consecutively through the manual. If you have
some experience, you may decide to skip the general introductory
material, skim through the description of ivan’s tools and working
environment and go directly to Chapter 3 - “Tutorial”, for hands-on
experience. Chapter 4 - “ivan Style Guide” contains several examples of
ivan programmes for different work environments.
You can quickly find the relevant chapter in the contents and then flick
through to the page you want, using the chapter/page references at the top
and bottom of each page.
Conventions and Definitions
Throughout this manual, the following conventions will be observed:
•
General comments and tips, not necessarily directly related to the
ongoing discussion, are shown as follows:
•
Click means press and quickly release the left-most mouse button.
•
ClickRight means press and quickly release the right-most mouse
button.
•
ESC means press and release the keyboard’s escape key.
•
Select - means the selection of an object in the workspace using one
of the selection methods described in Chapter 3, page 14. An object
ivan Quick Start Guide
Chapter 1 - 1
Chapter 1 - 2
Getting Started
is selected when it is grey. Selected objects are shown in the manual
as follows.
Chapter 1 - 2
•
Choose - means to move the mouse cursor over a tool, tool-option or
an item from a menu and click the left button of the mouse.
•
Italics are used to denote text read from the ivan screen i.e. menu
items, button and field names in dialogue boxes and the names of
projects, programmes and activities e.g. Open Selected
Programmes.
•
Numbered lists indicate a step by step procedure you should carry
out e.g.
1)
Do this first
2)
Do this second.
•
Anything you should type on the keyboard is denoted by a typeface
that looks like this.
•
The names of tools and tool-options begin with a capital letter to
distinguish them from ordinary text e.g. the Pen, the Box.
•
Menu, tool and tool-option icons are shown in the left margin of the
page, like the Pen icon shown here.
•
Programme - means a network of activities, drawn as horizontal
lines on a time-scale grid, which are linked together by
dependencies in a manner which represents the sequence of the
activities. See example Chapter 3, page 12. (Represented in ivan
by the icon shown in the left margin).
•
Project - means a collection of Programmes associated with a
particular project. These programmes may be associated in a
hierarchical sub-programme group or be independent. (Represented
in ivan by the icon shown in the left margin).
McLachlan Software
Chapter 2
About ivan
Overview - What is ivan
ivan is a computer software package which is used to design, draw,
analyse, monitor, plan, control, re-plan and present management
programmes for complex projects.
ivan allows the user to:
•
Draw programmes or schedules
•
Create dependencies between activities and milestones on
programmes
•
Perform Critical Path Analysis
•
Allocate resources to activities and view these graphically
•
Monitor progress against schedules
•
Create hierarchies of linked programmes
ivan is easy to learn and yet allows very complex and sophisticated
programmes to be quickly and accurately created and updated.
ivan programmes are drawn on screen using computer tools that emulate
the natural drawing process with pen and paper.
The ivan Screen
The following page shows a sample of the ivan screen.
ivan Quick Start Guide
Chapter 2-3
About ivan
Chapter 2 - 4
Menu Bar
Scroll Bars
Pen with Box Option
Version Number
Tools Pallet
Pen Options Pallet
Colour Pallet
Line Style Pallet
The ivan screen is divided into three areas. Each of these areas has
clearly defined functions as explained below.
Top
The top of the ivan screen has:
•
The menu-bar - pull-down menu that allows the user to invoke all
functions not directly available via the tools (see below). This
includes exiting from ivan, plotting setting options and running
processes such as Critical Path analysis.
Middle
The middle section of the screen is referred to as the Workspace.
Depending on the current View (see page 8 in this chapter), this area
shows either:
Chapter 2-4
•
Projects stored within the ivan database.
•
Programmes stored within a particular Project and the hierarchical
links between them.
McLachlan Software
About ivan
Chapter 2-5
•
The contents of a particular Programme; a time-scaled network of
activities and dependencies, lines and text.
Bottom
At the bottom of the ivan screen, the tools, pen options and style pallets
are found with:
•
The date and duration display showing the current date position of
the tool. When drawing or stretching an activity the duration of the
activity is also displayed here.
Tools, Pen Options and Pallets
Tools
Magnifier
Pen
Hand
Eraser
Scissors
Copier
The tools act like their counterparts in the real world, allowing you to
create and manipulate objects simply. When you choose (click on) one of
the tools (pictured above), the cursor, moved by the mouse on screen,
changes to represent the active tool. These different cursors are pictured
next to the explanations below.
The Pen is for drawing objects, projects, programs,
activities, lines or text depending on the Pen option chosen.
(See below).
The Scissors are for moving and stretching objects. (See
Tutorial Chapter 3, page 24).
The Copier is for making copies of existing objects. (See
Tutorial Chapter 3, page 23).
The Eraser is for erasing objects. (See Tutorial Chapter 3,
page 26).
The Hand is for changing the attributes of objects. (See
Tutorial Chapter 3, page 19).
The Magnifier is for enlarging and shrinking the view of
areas of the Workspace. (See Tutorial Chapter 3, page 28).
ivan Quick Start Guide
Chapter 2-5
About ivan
Chapter 2 - 6
Pen Options
Activity
Line
Dependency
Box
Text
Resource
The Pen options are for use when the Pen tool is active. The option
selected defines the type of object that will be created when using the Pen
tool.
When an option is chosen it is represented by a template which follows
the Pen cursor. These are pictured next to the explanations below.
The Activity for drawing activities. (See Tutorial Chapter
3, page 17).
The Dependency for creating dependency links between
activities. (See Tutorial Chapter 3, page 27).
The Box is for creating projects or programs. (See Tutorial
Chapter 3, page 13).
The Text option for typing text, explanations and
headings. (See Tutorial Chapter 3, page 36).
The Line option for drawing lines on the Programme. (See
Tutorial Chapter 3, page 34).
Palettes
The colour and line style palettes allow the user to quickly and easily set
or change the colour, thickness or line style of objects. (See Tutorial
Chapter 3, page 20 & 21).
Chapter 2-6
McLachlan Software
About ivan
Chapter 2-7
Communicating with ivan
The Mouse
Most interaction with ivan is with the computer mouse. Used in
combination with the different tools the mouse allows you to draw directly
onto the computer screen. Its buttons are used consistently throughout
ivan:
•
The left button is ivan’s choose button. It initiates actions in ivan,
for example, choosing points on a programme, menus, tools, pallets
and options.
•
The right button is the select button, used to select objects for
subsequent processing or actions.
The Keyboard
The Keyboard is used for entering text and numbers in ivan and for some
functions using special key combinations.
•
The ESC key is used to cancel an action. Use it for any action you
wish to discontinue.
Dialogue Boxes
ivan presents the user with a variety of dialogue boxes. These are used
for the entry of text and numbers and to present the user with information
on different elements of the Programme. An example is presented below:
ivan Quick Start Guide
Chapter 2-7
About ivan
Chapter 2 - 8
Dialogue boxes require one or more of the following:
•
Text or number entry into a dialogue box field.
•
Choosing an option via a radio-button.
•
Choosing an option via a check-box.
•
Clicking on a button to perform an action.
If an error or some form of inappropriate user action occurs, an alert box
will appear with an explanation, for example:
The alert message will disappear when you click on
you press ESC.
or if
ivan Organisation
There are three levels of workspace hierarchy in ivan.
Project View
Hierarchy View
Programme View
Chapter 2-8
McLachlan Software
About ivan
Chapter 2-9
Project View
The Project View is where you can create and modify the Projects that are
stored in the ivan database. It is the workspace you first see when you
start ivan. Each Project contains all the programmes belonging to that
Project. The Project View may contain as many Projects as you like
(limited only by available disk space.)
When you open a Project, you enter the Hierarchy View.
Hierarchy View
This is where Programmes and their hierarchical relationships are seen.
The Hierarchy View may contain as many Programmes as you like
(limited only by available disk space) and shows the parent-child
relationships between programmes where these exist.
When you open a Programme, you enter the Programme View.
Programme View
This is where the actual Programme is created and displayed. The
programme is the time-scaled network of activities and dependencies.
ivan Quick Start Guide
Chapter 2-9
Chapter 2 - 10
Chapter 2-10
About ivan
McLachlan Software
Chapter 3
Tutorial
About the Tutorial
The Tutorial provides a quick introduction to ivan. Most of the important
features of ivan will be demonstrated as we construct the programme shown
on the next page.
The tutorial does not describe project planning theory or method and the
more complex features of ivan are not covered here. See your User Manual
for these functions.
For a first-time user, it is recommended that the sections be followed in the
order presented. However, to assist users already familiar with ivan, the
tutorial is divided according to functionality, enabling quick reference to
relevant ivan functions.
You may find it useful to use the procedures outlined here to construct your
own programme. The tutorial has been written so that you can interpret its
contents and apply them to your own programme.
Starting ivan
Starting ivan will be slightly different for different computing environments.
Consult your User Manual to find the methods required on your computer
environment.
Starting ivan may take a few seconds; while this is happening, an hour-glass
icon appears. This icon will appear whenever ivan is engaged in some
operation that takes time.
When the hour-glass disappears, you will see ivan in Project View. (See
Chapter 2, page 8 for an explanation of Views). Along the top of the screen
are menu icons and along the bottom of the screen are the tools and other
palettes. (See Chapter 2, page 4 for an illustration).
ivan Quick Start Guide
Chapter 3-11
Chapter 3-12
Tutorial
Chapter 3-12
McLachlan Software
Tutorial
Chapter 3-13
In the centre of the screen is the workspace. If you are starting ivan for the
first time, this space will be blank.
Otherwise there may be one or more Projects visible in the workspace.
If at any time you wish to discontinue the tutorial, see
Closing the Programme on page 41 to leave ivan
running, or Exiting from ivan ivan on page 41 to shut
down ivan.
Creating a new Project
1)
Move the mouse and notice that the active tool is the Pen and the
active Pen option, represented by the rectangle attached to the Pen,
which is the Box.
The Pen is the left most tool on the tool pallet, and is “highlighted” (shown in
white on black) to show that it is active. The Box is the third Pen option and
is also highlighted.
Pen Options Pallet
Tools Pallet
Pen options that appear grey are not available in the
current View.
2)
Click anywhere in the workspace.
The PROJECT DETAILS dialogue box appears.
3)
Click in the field named Name and type Ivan Tutorial.
If you make an error typing you can use the delete or backspace keys on the
keyboard to delete and then re-type the name.
ivan Quick Start Guide
Chapter 3-13
Chapter 3-14
Tutorial
Set the Project Calendar
It is possible to create special purpose calendars for use in ivan. See the ivan
manual for more detail. For now we will use the pre-defined default calendar
in which every day is a working day.
Using the default calender should require no action on your part. Check that
the drop down menu next to the words Calendar looks like:
4)
Click on
A new Project appears in the workspace bearing the name Ivan Tutorial.
If you click on
, you will be returned to the
workspace and no changes will be made. This is
consistent in all ivan dialogue boxes.
Selecting Objects
Select this new Project:
Method One - Clicking
1)
Move the Pen over the Project.
2)
Click Right.
Notice the Project turns grey. This indicates a selected object.
Now de-select the Project by repeating the steps above i.e.
1)
Move the Pen over the Project.
2)
Click Right
The Project returns to its own colour.
Method Two - Selection Rectangle
To select the Project again, use the alternative method.
1)
Move the Pen above and to the left of the Project.
2)
Click Right
3)
Move the Pen to below the bottom-right of the Project.
A selection rectangle is drawn completely surrounding the Project.
4)
Click Right again to select the Project.
This alternative method of selecting objects will be useful later when selecting
more than one object at once.
Chapter 3-14
McLachlan Software
Tutorial
Chapter 3-15
For a method of de-selecting all selected objects at once, see “Refreshing the
Screen” on page 19 in this chapter.
Open the Project
Now that the Project has been selected;
1)
Move the Pen to the Sub-P menu.
2)
Click and move the Pen down the menu to Open Selected
Programmes.
Notice that the menu item becomes highlighted as you move the Pen over it.
3)
Click.
Another blank workspace appears. This is the Hierarchy View, where
Programmes contained within the Project Ivan Tutorial will reside.
Create a new Programme
1)
Click anywhere in the Hierarchy View workspace.
The Programme Details dialogue box appears.
2)
Click in the field labelled Name and type the new programme name,
Sample Programme.
3)
Click on
A new programme icon appears.
Open the Programme
1)
Select the programme using the same method as you used to select
the Project above (see page 14 in this chapter).
Note that the object turns to grey to indicate it is selected.
ivan Quick Start Guide
Chapter 3-15
Chapter 3-16
Tutorial
2)
Open the programme using Open Selected Programmes from the
Sub-P menu as before.
A new programme appears. As before, there is a workspace between the
menu icons above and the pallets below. The programme grid appears in this
workspace.
Setting the Programme Grid and Time Scale
When a programme is first created the grid begins at today’s date. You will
change this to set the programme up for the whole of the year 1998. Notice
that the top of the workspace displays monthly columns by default.
You will change this also to show the months and weeks of the year.
1)
Click on the Grid menu.
2)
Move the Pen to the first menu item, Grid Dates.
Notice that the item is highlighted.
3)
Click.
The Grid Properties Dialogue Box appears.
Chapter 3-16
McLachlan Software
Tutorial
Chapter 3-17
Change the Start and Finish Dates
1)
The field next to Start Date should contain 13/07/1998.
2)
Click in the field next to the Finish Date and type 31/05/1999.
Use the arrow keys and the delete or backspace key to correct any mistakes.
Change the Width of the Displayed Columns
3)
Click on the open circle (radio button),
.
Notice that it becomes filled with a black dot to show that it has been
chosen,
. Note also that
dates displayed are for the start of the week.
4)
Click on
is chosen to ensure the
.
The workspace calender and grid should now look as follows:
You are now ready to draw your first activity.
Drawing Activities
Notice that the Pen option has changed to represent the Activity.
The Date indicator is above the tool icons at the bottom left of the screen.
This indicates the exact date at the position of the Pen and changes as you
move the Pen across the workspace.
As activities are easily moved in ivan, don’t be too
concerned with exact placement.
1)
Move the Pen to Mon 13/07/1998 on the grid, near the top of the
workspace. (See the illustration on page 4 in this chapter for an
indication of where this should be).
2)
Click
3)
Move the Pen to the right.
A line will follow the Pen, connecting it to the point it was at when you
clicked it. We call this a “rubber-band” line since it stretches to follow the
Pen.
If at this point you wish to discontinue drawing an activity, press
keyboard to return to the step before.
ivan Quick Start Guide
ESC
on the
Chapter 3-17
Chapter 3-18
Tutorial
Next to the date is shown the duration, in days, of the activity you are
currently drawing.
4)
Continue to move the Pen until this duration is 8 days.
Since activities are always drawn horizontal by ivan, it does not matter if the
rubber-band is not horizontal.
5)
Click.
The ACTIVITY DETAILS dialogue box appears. This displays information
about the activity and allows you to enter information that should be
associated with the Activity (see page 19).
For the time being, we only want to enter the activity’s description.
Chapter 3-18
1)
Click in the Name field of the dialogue box
2)
Type in the activity’s description.
Activity One.
3)
The Position radio buttons can be used to place the activity
description close to the activity line (radio button one) or further
away from the activity line (radio button three)
For the time being, call it
McLachlan Software
Tutorial
Chapter 3-19
4)
Click
The activity will be drawn horizontally with the description written above it.
ivan will automatically begin new activities on the beginning of the chosen
day and end activities on the end of the chosen day.
Create Two more Activities
1)
Draw two more short activities under the first, calling them
Activity Two and Activity Three.
Your programme should now look roughly like the one below.
Refreshing the Screen
Occasionally it is useful to have the screen re-drawn by the computer. This
will re-display the workspace, remove extraneous lines and reform objects.
This will also de-select any selected objects in the workspace.
1)
Hold down the Ctrl key on the keyboard while you press the D key
(Ctrl+D).
For old time ivan users, you can achieve the same effect
by holding down the shift key on the keyboard while you
press the ESC key..
You can also achieve the same effect without de-selecting
objects by holding down the control key (Ctrl) on the
keyboard and pressing the “R” key (Ctrl+R). This will
also re-draw the menu, tool and Pen option icons.
Changing Activity Attributes
Once you have drawn a series of activities, it is a simple matter to change
them.
Details
To change the activity details, you must first choose the Hand tool.
1)
ivan Quick Start Guide
Click on the Hand tool icon.
Chapter 3-19
Chapter 3-20
Tutorial
Notice that the Pen option icons all become grey, showing that they are not
available with this tool and no Pen option follows the Hand.
2)
Click on Activity One.
The Activity Attributes menu pops-up.
3)
Choose Activity Attributes from the menu.
The Activity Details dialogue box appears, the same one you used to create
the activities (see page 18 in this chapter).
4)
Click in Name and, using the arrow keys and the delete (or
backspace) key, delete the words Activity One.
5)
Type Decide Implementation Strategy.
6)
Click on
7)
Do the same for the other two activities, renaming them: Project
Team Survey and Review Project Development Plan
respectively.
Colour
To distinguish the current activities from those you will be drawing later, we
will colour these ones light green.
Below the Tool pallet is the Colour pallet.
1)
Using the Hand tool, select all three activities. (Use the selection
rectangle, as this is easier, see page 14 in this chapter. Note that the
rectangle must surround all of the activities and their names).
2)
Click on the light green square on the Colour pallet.
3)
De-select the activities.
The selected activities turn green.
Any object may be coloured in this fashion using the Hand Tool.
To draw a new green activity
Chapter 3-20
1)
Choose the Pen tool.
2)
Click on the green square, as before.
3)
Draw a new activity beginning under the end of Review Project
Development Team and with a duration of 30 days. Name it
Project Quality Plan.
McLachlan Software
Tutorial
Chapter 3-21
Line Style and Thickness
To further distinguish activities from one another, it is possible to change the
line to a dashed line and to change the line thickness.
Below the Pen option pallet is the Line Style pallet.
1)
De-select all selected activities by holding down the shift key and
pressing ESC.
2)
Select the last activity you drew and with the Hand tool, click on the
dotted line in the Line Style pallet.
The activity changes to a dotted line. Four different line styles are available
and four different line thicknesses. To change line thickness use the Hand to
click on the desired thickness.
3)
As we will be further adjusting the graphic style of the activities
next, return the selected activity to its former attributes. Click on the
smallest thickness line and on the un-dotted line.
When drawing new activities, use the Pen to select the
line style you want first. The same as you did to select a
different colour for new activities.
Changing Activity Graphics
1)
Click on the Drafting menu and move the Hand over Activity
Graphics.
Notice that a sub-menu pops-up, allowing you to choose between Default and
Selected. If you change the default values for the activity graphics, then each
new activity you draw will have those default characteristics. If you change
the selected values, only those activities you have selected will be changed.
2)
Choose Activity Graphics - Default.
The Change Activity Graphics dialogue box appears.
ivan Quick Start Guide
Chapter 3-21
Chapter 3-22
Tutorial
3)
Set the values as shown above.
Standard activities may be dashed and have their
thickness changed using the Line Style pallet as
described on page 21 in this chapter. Filled and Hollow
Bar activities are always solid and their thickness is
determined by the Size option in the Change Activity
Graphics dialogue box above.
4)
Click on
.
The activities in the workspace do not change as setting the default only
affects new activities. To change the existing activities:
1)
Select all the activities in the workspace with a selection rectangle.
2)
Choose Activity Graphics - Selected from the Drafting menu.
The Change Activity Graphics dialogue box re-appears.
Notice that the values of the various options are the same as the values of the
selected activities.
Choosing the Activity Graphics Attributes dialogue in
this way provides a simple method of checking the
current attribute settings of a particular activity.
3)
Click on
.
The selected activities are changed to the new style.
You may wish at this point to experiment with the
different options available from the Change Activity
Graphics dialogue box. Do so by choosing the Selected
sub-menu, changing the options and clicking
Chapter 3-22
McLachlan Software
Tutorial
Chapter 3-23
to see the changes. Repeat steps 1 to 3
above to carry on with the tutorial.
Your programme should now look like the one below.
Manipulating Objects
Copying
Objects in ivan are copied using the Copier tool.
1)
Choose the Copier tool.
Notice that two new icons appear on the right side of the screen under the Pen
options pallet. These are the Free and Constrained (cross) options. The Free
option is currently chosen (high-lighted). This means you can copy or move
objects to anywhere in the workspace.
2)
Select all of the activities in the workspace.
3)
Click anywhere in the workspace and move the Copier a little.
A box, representing the activities to be copied appears and moves
corresponding to the movement of the Copier. Notice also, that a rubberband line follows the copier.
4)
Press ESC
The copy box and rubber-band line disappear, you have cancelled the copy
operation.
1)
Choose (click on) the Constrained option.
2)
Click in the workspace again and move the Copier.
Notice the movement is now constrained to vertical and horizontal
movement. This allows you to either maintain the current dates of the moved
objects or to maintain their vertical positions.
3)
ivan Quick Start Guide
Move the copy box to below the existing activities and click.
Chapter 3-23
Chapter 3-24
Tutorial
The activities are copied to the new location.
Before moving on to the next step, de-select all the activities in the workspace
(see page 19 in this chapter) and re-colour the newly created activities blue
(see page 20 in this chapter).
Moving
Moving objects in ivan is done with the Scissors tool.
1)
Choose the Scissors tool.
The icon is highlighted and the sub-menu
underneath it.
appears
2)
Ensure that the
sub-menu is high-lighted.
3)
Check that the blue activities are still all selected in the workspace.
Notice that the Constrained option is still chosen (highlighted).
4)
Move the Scissors to the beginning of the grid, 13/07/1998 on the
date indicator.
5)
Click.
A box appears surrounding the activities to be moved. As for the Copier, a
rubber-band line follows the Scissors in the workspace.
6)
Move the activities until they begin on the 7th August, as seen on
the date indicator and click.
Accurate placement is not important here, as the
activities will be re-aligned when you run the Critical
Path Method analysis (see page 32 in this chapter).
1)
Chapter 3-24
Rename the blue activities as shown below. Refer to page 19 in this
chapter if necessary.
McLachlan Software
Tutorial
Chapter 3-25
Stretching
Activities may be directly lengthened or shortened using the Scissors in
stretch mode.
1)
Choose the Scissors tool.
2)
Click on the
3)
Click on the activity Acquisition/Purchase.
sub-menu.
A rubber-band line appears, similar to when you were drawing new activities.
Note that if you click on the first half of the activity the rubber-band line will
extend to the left (backward in time); if you click on the second half, the line
extends to the right (forward in time).
4)
If the rubber-band line is extending backwards in time, press
and click in the second half of the activity.
5)
Stretch the activity until its duration (see the date and duration
indicator underneath the workspace) is 100 days.
6)
Click
ESC
You can also change an activity’s duration via a dialogue
box using the Hand tool (see page 19 in this chapter).
The activity reappears with the new length.
1)
Now stretch the other activities as follows:
Geotechnical Survey - 42 days.
Survey 15 days.
ivan Quick Start Guide
Chapter 3-25
Chapter 3-26
Tutorial
Property Survey - 8 days.
2)
Make a copy of all the blue activities, and using the Constrained
option, position them below the existing activities. (See page 23 in
this chapter if necessary).
Erasing
Objects are erased in ivan with the Eraser tool.
1)
De-select all the activities in the workspace.
2)
Choose the Eraser tool.
3)
Select the last two activities i.e. the duplicate Property Survey and
Acquisition/Purchase.
4)
Click anywhere in the workspace.
The Erase Objects dialogue box appears.
The dialogue box shows a count of all the objects which are to be erased.
If only one object is selected in the workspace when you
click the Eraser, this dialogue box will not appear. The
object will simply be erased.
5)
Ensure that the dialogue box shows only two activities are to be
erased.
This is a safety measure to ensure you only erase what you intend to. You
cannot restore erased objects.
If the dialogue box shows items you don’t want to erase, click
and de-select those objects before proceeding.
6)
Chapter 3-26
Click
.
McLachlan Software
Tutorial
Chapter 3-27
The selected activities disappear.
This method can be used to erase any ivan object.
1)
Re-name the last two activities Rezoning and Plan Residue
Disposal.
2)
Stretch Rezoning to a duration of 90 days and Plan Residue
Disposal to a duration of 18 days.
Your programme should now look roughly like the one below.
Linking Activities with Dependencies
Dependencies between activities are created in ivan with the Pen and
Dependency option. Dependencies ensure that the relationships between
activities are maintained when the activities are adjusted and moved, and they
are an integral part of the Critical Path Method analysis.
1)
Choose the Pen tool and then the Dependency Pen option.
The Activity Pen option is de-selected when the Dependency Pen option is
chosen.
2) Move the Pen into the workspace. The Dependency now follows the
Pen as the Activity did before.
ivan Quick Start Guide
3)
Move the Pen to the right-hand end of the third activity, Review
Project Development Plan.
4)
Click when the tip of the Pen is over the end of the activity.
Chapter 3-27
Chapter 3-28
Tutorial
A rubber-band line will follow the Pen in the same way it did when you were
drawing activities.
5)
Move the Pen to the start of the last activity, Plan Residue Disposal
and click.
A rubber-band arc connects the activities. Moving the Pen changes the size
of the arc.
If you miss the end of the activity, a dialogue box appears.
Click
or press ESC and try again.
It is easier to control the size of the arc if you move the Pen to the centre of
the arc and adjust the size from there.
6)
Adjust the arc so that it curves to the left. When you are happy with
the size of the arc, click again.
The dependency will be drawn connecting the two activities.
Note that activities can have dependencies beginning and ending at any point
along their length. The dependency you have just drawn should attach right
at the ends of the activities. It is easier to see this if you enlarge the view of
the programme.
Zooming In and Out
Enlarging the view of the programme on screen is done with the Magnifier
tool.
1)
Choose the Magnifier tool.
The cursor changes to the Magnifier and a sub-menu appears below the
Magnifier icon.
2)
Move the Magnifier to above and to the left of the first activity on
the programme.
3)
Click.
4)
Move the Magnifier to below and to the right of the last activity.
A box is drawn surrounding the activities.
magnified.
Chapter 3-28
This shows the area to be
McLachlan Software
Tutorial
Chapter 3-29
The rectangle that is drawn as you move the mouse
shows the area that will be displayed on the screen - not
just the items you wish to enlarge.
5)
Click.
An enlarged view of the activity appears.
To return to the full programme view:
1)
Press ESC or click the
sub-menu.
Notice that the other four sub-menu choices,
four quarters of the ivan screen.
2)
Enlarge the view again using one of these choices.
3)
Now click on the
, enlarge the
sub-menu.
The view reduces again.
Dependency Details
Check now that the dependency you drew attaches at the very beginning and
very end of the relevant activities. If this is not so , or you are unsure:
1)
Choose the Hand tool.
2)
Click on the dependency.
The Dependency Details dialogue box appears. (See page 30).
Predecessor Activity and Successor Activity should show a lag of 0 days from
activity finish and activity start respectively, as in the illustration below.
ivan Quick Start Guide
3)
If this is not so, click in the appropriate box and change the number
to 0.
4)
Click
.
Chapter 3-29
Chapter 3-30
Tutorial
The dependency now begins and ends at the very ends of the relevant
activities.
1)
Using the Pen and Dependency option, draw dependencies
connecting the remaining activities as shown below.
Automatically Linked Activities
Activities drawn end-to-end will be automatically linked.
1)
Choose the Pen and the Activity option.
2)
Click on the red square in the colour pallet in order to produce a red
activity.
3)
Click on the very end of the activity Acquisition/Purchase.
If you clicked inside the activity a message box appears. Click
or press ESC and try again.
Chapter 3-30
McLachlan Software
Tutorial
Chapter 3-31
4)
Draw the activity with a duration of 46 days and name it Statutory
Purchases.
The activity is drawn linked to Acquisition/Purchase. Although the
dependency is not visible, if at some later stage either activity is moved away,
the dependency will be maintained.
1)
Draw a red activity with a duration of 85 days below and to the right
of Plan Residue Disposal. Name it Perform Design.
2)
Draw a dependency from the end of Geotechnical Study to the
beginning of Perform Design.
3)
Draw another dependency from the end of Survey to the beginning
of Perform Design.
As you see, multiple dependencies can be drawn to a single activity.
1)
Draw another red activity beginning next to Plan Residue Disposal
(around the 9th of October) and with a duration of 202 days. Name
it Design Management.
Mid-Activity Dependencies
1)
Draw a dependency from mid-way along Perform Design, to the
beginning of Design Management.
2)
Choose the Hand tool and click on the dependency.
The Dependency Details dialogue box appears (see page 30 in this chapter
for illustration).
3)
Change the Predecessor Activity lag to 30 days from activity start
and check that the Successor Activity lag is 0.
4)
Click
.
The dependency is moved to begin 30 days along Perform Design.
There are another five activities and dependencies to be drawn on the sample
programme. See below.
1)
Draw them now as red activities with duration as follows:
Public Liaison
ivan Quick Start Guide
32 days
Utility Adjustments
110 days
Review Traffic Data
25 days
Complete Design
40 days
Preconstruction Activity Schedule
32 days
Chapter 3-31
Chapter 3-32
Tutorial
Tidying up the Programme
Your programme is now beginning to be a little more complex and has
become a touch untidy. ivan has two ways of automatically tidying up
activities and dependencies, in addition to manual adjustments you can make.
Critical Path Method (CPM)
Critical Path Method is a sophisticated facility we will not be covering in
detail here. Many options are available within ivan for CPM analysis, these
are covered in detail in your user manual. However the CPM is a useful tool,
even at this stage in our programme, for moving each activity to its earliest
start date according to the dependencies you have drawn.
When you run the CPM, ivan will adjust the position of activities according
to their earliest possible start and finish dates. These are defined when you
attach dependencies to the activities. By default, any activity without a
predecessor dependency is treated as though it has a start-no-earlier-than
constraint by the CPM. Activities with predecessors will be moved to reduce
the total float to zero, if possible. See your User Manual for a further
explanation of the above.
1)
Choose the CPM menu.
The CPM menu choices appear.
2)
Choose Run CPM from the menu.
The activities in the programme move to their earliest start dates.
If necessary, redraw the screen by holding down the shift key and press ESC.
Chapter 3-32
McLachlan Software
Tutorial
Chapter 3-33
If one or more activities has not ended up as shown, check the Dependency
Details dialogue box of the relevant dependency. The options in the dialogue
box should read the same as those pictured on page 30 in this chapter.
Change the options if necessary and run the CPM again.
This has moved the activities to their earliest start and finish dates. Now you
need to realign the vertical spacing. To do this you will use the Shuffler.
Shuffle
1)
Select all the activities in the programme using the selection
rectangle.
2)
Click on the Drafting menu and choose Shuffle Options from the
menu.
The Shuffle Options dialogue box appears. For now you will leave the
options set as they are.
ivan Quick Start Guide
Chapter 3-33
Chapter 3-34
Tutorial
3)
Click
4)
Click on the Drafting menu and choose Run Shuffler from the
menu.
The activities in the programme are re-aligned evenly spaced.
Several of the dependencies you have drawn from Review Project
Development Plan may overlap, or otherwise need adjusting for neatness. It
may be convenient to enlarge the view using the Magnifier while adjusting
dependencies.
Reshaping Dependencies
Dependencies are reshaped using the scissors.
1)
Choose the Scissors tool, with the
sub-menu.
2)
Click on one of the dependencies to be adjusted.
3)
Move the dependency until its shape is acceptable.
4)
Click.
Dependencies can be adjusted in this way so that they do not overlap and so
that their curves are all approximately the same dimension. (See last
example programme above).
Drawing Lines
Lines can be drawn to divide the programme into sections for easier
comprehension.
1)
Chapter 3-34
Choose the Pen and the Line Pen option.
McLachlan Software
Tutorial
Chapter 3-35
2)
Choose the Constrained option.
A rubber-band line (crossed lines) follows the Pen in the workspace.
1)
Click on the left-most edge of the programme between the green
and blue activities.
2)
Draw a line across the Programme to the far right-hand edge.
A rubber-band line indicates where the line will be drawn.
3)
Click.
The line is drawn onto the Programme.
4)
Draw two more lines, one under Rezoning and the other under
Utility Adjustments.
This should leave some empty space along the bottom of the programme for
Milestones. See the next example programme below.
Drawing Milestones
Milestones represent the end of a programme, or a significant point in the
programme. They are created by making activities with duration of zero
days.
1)
Choose the Pen with the Activity Pen option.
2)
Click on the black square on the colour pallet.
3)
Click in the space at the bottom of the programme, roughly under
the end of Project Quality Plan.
4)
Without moving the Pen (or move the Pen to the left - backwards in
time), click again.
The Activity Details dialogue box appears as before.
5)
Check that the number shown in the Activity Duration is 0. If it is
not (if you moved the pen slightly to the right between clicks), click
in the box and change it to 0.
6)
Click in the Name field and type Complete Establishment.
7)
Click
to exit from the dialogue box.
The milestone appears.
You set the default characteristics for Milestones in the
Change Activity Graphics dialogue box (see page 22 in
this chapter).
ivan Quick Start Guide
Chapter 3-35
Chapter 3-36
Tutorial
1)
Draw a dependency from the end of Project Quality Plan to the
centre of the milestone.
2)
Draw another two milestones at the bottom of the Programme,
linked to Statutory Purchases and Design Management
respectively and named Complete Acquisitions and Complete
Design.
3)
Now tidy up again by running the CPM and Shuffler and by moving
the lines if necessary. (See “Moving” on page 24 in this chapter)
Adding Text
First you will change the default text attributes.
1)
Choose Set Defaults from the Text menu.
The Change Text Attributes Dialogue Box appears.
2)
Chapter 3-36
Set the options as shown below and click
.
McLachlan Software
Tutorial
Chapter 3-37
.
3)
Choose the Pen and then the Text option.
4)
Click in the left margin of the programme, next to the green
activities.
5)
Type Establishment.
If you make an error typing, use the delete key to delete the mistake and
retype the text.
6)
To finish typing, click again.
The word as typed probably needs to be moved to be in the correct position.
1)
Choose the Scissors and the
sub-menu.
2)
Select the word Establishment and move it to the centre of the
margin space.
3)
Repeat the above process to add four more headings in the margin:
Investigations
Acquisitions
Detailed Design
Milestones.
Editing Text
To re-edit the text you have just typed:
1)
Choose the Pen and Text option.
2)
Move the Pen over the text you wish to edit and click.
3)
Use the delete key to delete unwanted text and type the new text in
place.
If you should miss the text you wish to edit, simply press ESC and continue.
ivan Quick Start Guide
Chapter 3-37
Chapter 3-38
Tutorial
Now that you have four titles in place you can align them with each other.
Aligning Text
1)
Select all four titles that you just typed.
2)
Choose Align from the Text menu.
The Align Text To The Top Line Of Text dialogue box appears.
3)
Choose Centre and click
.
The text is moved into alignment.
Changing the Text Size
1)
Type Sample Programme in the title box at the bottom of the
programme.
2)
Select the text.
3)
Choose Change Selected from the text menu.
The Change Text Attributes dialogue box appears, see page 36 in this
chapter.
4)
Set the font to Gothic and the size to 15
5)
Click
.
The text style changes.
6)
Move the title to a central position in the title bar using the scissors.
Text colour can be changed using the hand tool as for
other ivan objects. (See page 19 in this chapter).
Blank Spaces
To add a blank area on the programme grid for explanatory text or a legend:
1)
Choose Blank Areas from the Grid menu.
The Calender Blank Areas dialogue box appears.
2)
Click in the first box (Area 1, Start %X) and type 60.
This will cause the blank area to begin 60% along the X-axis.
Chapter 3-38
McLachlan Software
Tutorial
Chapter 3-39
3) Type 55 in the Area 1, Start %Y box
4) Type 95 in the Area 1, End %X box
5) Type 92 in the Area 1, End %Y box.
6) Click
.
The blank area appears in the programme grid. Notice that only the grid is
blanked out and thus line you drew earlier still passes through this area.
1)
Shorten the band line using the Scissors and
edge of the blank area.
sub-menu to the
2)
Type IVAN in the blank area using the Pen and Text option.
3)
Select the text IVAN and use Change Selected from the Text menu
to change it to Times font, size 60.
4)
Using the Scissors, move the text IVAN to the centre of the blank
area.
Further Text Editing
The Scissor tool can be used to stretch text on the screen and also to rotate it.
Try it out with the IVAN title.
1)
Choose the Scissors and the
2)
Click on the text IVAN
sub-menu.
A box appears showing the size of the text and it’s angle of rotation.
3)
Move the mouse until you are happy with the position and size.
4)
Click
The text can still be edited by selecting it and then
ivan Quick Start Guide
Chapter 3-39
Chapter 3-40
Tutorial
choosing the item Change Selected from the Text menu.
Congratulations, this completes the sample ivan Programme. See page 12 in
this chapter for the final programme.
Printing the Programme
ivan programmes are usually printed on a plotter.
1)
Zoom to the full programme view (See page 28).
ivan plots on the printer what is currently visible on the
screen.
2)
Click on the Plot menu.
The Plot menu appears.
3)
Choose Plot Programme from the Plot menu
The Print dialogue box appears.
This dialogue box allows you to customise the plotted output. For the time
being, we will accept the default settings.
4)
Click
.
If the plotter does not respond or the image is incomplete, see your system
supervisor.
Moving between Views
Once you have opened one or more Projects and Programmes you can move
between the Project View, the Hierarchy View and the Programme View by
using the Select View option from the menu.
Chapter 3-40
McLachlan Software
Tutorial
Chapter 3-41
1)
Choose Select View from the Sub-P menu.
The Select View dialogue box appears. All currently open Programmes,
Hierarchy Views and the Project View are shown.
See ivan Organisation, Chapter 2, page 8, for an explanation of these
different Views.
1)
Choose Projects.
2)
Click
.
You are now returned to the Project View.
Note that opened projects in the Project View are seen as
open boxes, and opened programmes in the Hierarchy
View are seen as open folders. To view already opened
Projects or Programmes use Select View from the Sub-P
menu.
Closing the Programme
Notice the Project Ivan Tutorial is shown as an open box.
1)
Select the Project.
2)
Choose Close Selected Programmes from the Sub-P menu.
The box closes.
Exiting from ivan
To finish this session:
1)
ivan Quick Start Guide
Click on the Exit menu in the top-left corner of the screen.
Chapter 3-41
Chapter 3-42
Tutorial
2)
Choose Exit from the menu.
The Exit IVAN dialogue box appears.
There is no need to save your work when using ivan.
ivan saves changes to your programmes as they are
made. The dialogue box above is just letting you know
that your data is already saved and confirming that you
want to leave the application.
1)
to exit from ivan.
Click
Click
to return to ivan.
You can exit from ivan from within any View. All
opened Programmes and Projects will automatically be
closed before ivan exits.
Chapter 3-42
McLachlan Software
Tutorial
Chapter 3-43
ivan Quick Start Guide
Chapter 3-43
Chapter 4
ivan Style Guide
Presentation style is a critical part of any programming endeavour. The
nature of a particular programme will depend on several factors:
•
Who or what the programme is for; for example, a programme for use by
a sub-contractor will have different requirements to one intended for an
arbitration case or higher management.
•
In what way each programme is related to other programmes.
•
The personal style requirements of the programmer.
ivan has been designed so the user can present each programme in the way
that is most appropriate to the requirements of the job at hand.
Example Programmes
The following pages contain examples of different ivan programmes
designed for varying uses and with different design elements and ideas. You
can use elements of these programmes to assist in the development of your
own programmes.
ivan Quick Start Guide
Chapter 4-44