1
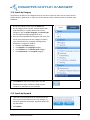
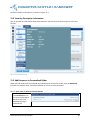
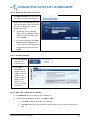
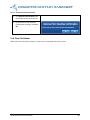
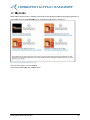
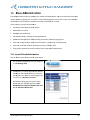
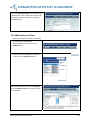
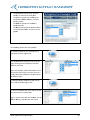
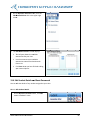
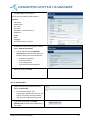
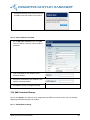
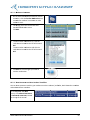
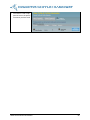
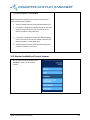
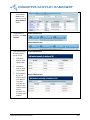
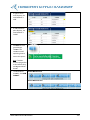
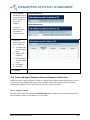
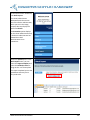
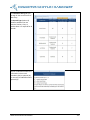
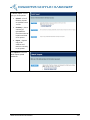
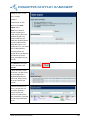
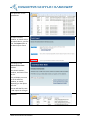
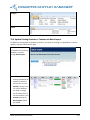
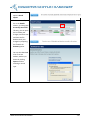
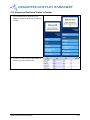
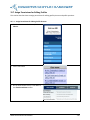
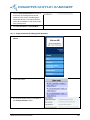
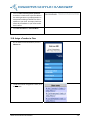
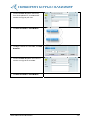
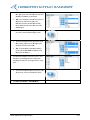
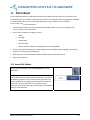
11. File Cabinet
The File Cabinet provides a comprehensive library of printable resources that you can customize into
lesson packets for your students. Thousands of resources for each grade level are organized and indexed
in the File Cabinet, and you can easily locate documents using a variety of search methods.
In this section, you will find out how to:
Launch the File Cabinet to access thousands of printable teacher resources, including practice
sheets, activities, and assessments.
Search the File Cabinet by category, such as:
o
Grade
o
Language
o
Content type
o
Resource type
o
State or national standards, including Common Core Standards
View key descriptive information, including alignment to standards, grade, language, content type,
purpose, resource type, and media type.
Add resources to a personalized File Cabinet folder and/or download resources.
Close the File Cabinet.
11.1 Launch File Cabinet
To launch the File Cabinet, click the File Cabinet icon on the
dashboard.
The File Cabinet has two tabs, Search and Favorites. The Search
tab displays by default. You can also search by keyword, or by
using a combination of categories and keyword. The Favorites
tab is where you can add items that you need to access
frequently. It works the same way as the Favorites or Bookmark
features in web browsers.
Write Source Online User Manual
76
11.2 Search by Category
The panel on the left lists the categories that you can use to search for files. You can search the File
Cabinet by topic, grade level, or type. You can also search the File Cabinet by State or Common Core
Standards.
1. On the File Cabinet screen, click the Search tab.
2. On the category list on the left, click the expand icon
(represented by a + symbol) beside one or more
categories, such as Grade, Language, or Content Type.
You can expand multiple categories at once.
3. Once you have expanded the categories you want, click
one or more check boxes in each category to specify
your search criteria. For example, to find grammar
assessment in English for Grade 2:
Click 2 in the Grade category.
Click English in the Language category.
Click Grammar in the Content Type category.
Click Assessment in the Purpose category.
4. Click Submit to view your search results. You can
download your search results to a folder on your
computer, or add them to your Favorites.
11.3 Search by Keyword
1. Type one or more keywords in the search box on the
lower left of the File Cabinet screen. For example, to
search for grammar assessment, type both words into
the search box.
2. Click Submit.
Write Source Online User Manual
77
The Search Result screen appears, as shown in Figure 11 1.
11.4 View Key Descriptive Information
You can preview key information about each resource in the search results by moving your cursor over
the title.
Figure 11 1. Search Results screen
11.5 Add Resources to Personalized Folder
When you find resources that you would like to download or easily retrieve later, click the Download
link next to a resource name, and choose whether to save or print the document.
11.5.1 Open, Save, or Print from Search Results
Click Download next to
the item on your Search
Results screen. Your
download will begin
automatically.
Write Source Online User Manual
78
11.5.2 Add Search Result Item to Favorites
1. Click Add to Favorites next to the item
you want on your Search Results list.
2. On the Add a Favorite dialog box, you
can select a folder in which to save the
file you have selected, or you can
create a new folder.
To add your file to an existing
folder, click the dropdown on the
folder list, select the folder, and
then click Add.
To create a new folder, click New
Folder below the dropdown list.
Type a name for your folder in the
Folder Name box, and then click
Create.
11.5.3 View Your Favorites
1. Click the Favorites
tab in the File
Cabinet screen.
2. On the My
Favorites list on
the left, click any
folder to view its
contents. The
folder’s contents
appear on the
right. You can
remove an item or
download it.
11.5.4 Open, Save, or Print Item on Favorites
1. Click Download next to the item on your Favorites list.
2. If a File Download dialog box appears, click Open or Save.
Click Open to view or print the file immediately.
Click Save to save the file to a folder on your local drive, where you can view or print it
later.
Write Source Online User Manual
79
11.5.5 Remove Item from Favorites
1. Click Remove from Favorites next
to the item on your Favorites list.
2. On the Remove from Favorites
Confirmation message, click Yes or
No.
11.6 Close File Cabinet
When you finish with the File Cabinet, click any icon on the upper left of your screen.
Write Source Online User Manual
80
12. My
M Linkss
Write Sou
urce Online includes a selecction of third party links to
o support teaaching writingg and grammaar. To
access theese links, clickk the My Linkks icon on thee dashboard as
a shown in Figure 13 1.
Figure 12 1. The
T links available
e in Write Source Online
Click any link to open it in a new window.
t sample aud
dio, click a meedia player.
To listen to
Write Sou
urce Online Usser Manual
81
13. Class
C
Ad
dministration
Class Adm
ministration helps you man
nage your classses and the students.
s
You
u can providee instruction and
a
monitor student
s
progrress at a class level or with
hin defined groups. You can also control your studen
nts’
network access,
a
their Profiles,
P
and their
t
commen
nts individuallly or by classs.
In this secction, you will find out how
w to:
Launcch the Class Administration
A
n feature.
Add students to a class.
Manaage class conn
nections.
Edit sttudent details, including resetting passswords.
Add customized
c
grroups for diffeerentiating in
nstruction or monitoring
m
progress.
View and change students’
s
perm
missions for Avatar,
A
comm
menting, and networking.
n
View and moderatte students’ comments
c
on other studen
nts’ work.
View profile questions that other teachers have
h
reported
d as inappropriate.
13.1 Launch Classs Administtration
You can laaunch Class Administration
A
n in two wayss:
1. On the teacher dasshboard, the first option iss
to clicck Manage Class.
2. Altern
natively, in th
he left panel on
o the teacheer
dashb
board, the seccond option is to click the
world
d globe icon, where
w
a smarrt tag pops up
p
to tell you it is My Class: List View.
Both options
o
bringg you to the next
n screen,
wheree you have clickable options to Edit
Netw
work Places, Edit Class Detaails, Edit Classs
List, or
o Edit Class Permissions.
P
Write Sou
urce Online Usser Manual
82
If you click Edit Class Details, you reach the Class
Administration screen, where you can edit your
Class Details, Students, Products, Groups, or
Profile Questions.
13.2 Add Students to a Class
You can add students to a class in two ways:
1. In the first way, on the Class
Administration screen, you click the
Students tab.
2. Alternatively, on the My Class: List View
screen, click the Edit Class List link.
Both options, whether you click the Students
tab or the Edit Class List link, bring you to the
list of Students.
Write Source Online User Manual
83
3. To add students to
o your class, click
c
the
namee(s) on the listt in the left paane.
To sellect more thaan one studen
nt, press
and hold the Shift or Ctrl key, and then
click the
t names.
The Shift key seleccts the studen
nts in
sequeential order.
The Ctrl
C key allowss you to selecct students
in non
n sequential order
o
as you see in the
graph
hic.
wing options are also available:
The follow
To move the
t names to
o your class lisst in the
right panee, click the rigght arrow.
The selectted names display on the list to the
right, showing that the
e students have been
added to your class.
Tip: In this example, so
ome of the naames in the
pane on the left are grray. This tells you that a
student iss already in an
nother class and
a cannot
be added to yours.
To add alll available stu
udents to you
ur class at
once, clickk the double right arrow.
To remove a student frrom your classs, first click
the name on the list on
n the right.
Tip: To remove more than
t
one stud
dent, use the
Shift or Cttrl key, and th
hen click the names.
Write Sou
urce Online Usser Manual
84
Then clickk the left arro
ow to move th
he student
back to th
he Available Students
S
list.
The namees of the remo
oved studentts display
again in th
he left pane, not highlighted, so you
know thatt the move haas occurred.
To remove all the students from your class at
once, clickk the double left arrow. Th
hey do not
need to be selected an
nd highlighted
d first.
Click Save
e and Close or Save and Next.
This bringgs you back to
o the previouss screen.
13.3 Maanage Classs Connecttions
You can manage
m
conne
ections betweeen your class and other classes.
c
1. On the teacher dasshboard, clickk the My Classs:
List View
V
icon.
Write Sou
urce Online Usser Manual
85
2. On the My Class: List
L View screeen, click the
Edit Network
N
Places link in the upper right
corneer.
3. The Edit Network Places screen
n displays.
Th
he left pane shows
s
the avaailable
co
onnections fo
or your class.
Use the arrows to move avaailable
co
onnections to
o and from th
he Network
Places List.
en you have finished editin
ng
Click Save whe
yo
our network places.
13.4 Edit Studentt Details an
nd Reset Passwords
P
You can edit
e the details of any student assigned to your class.
13.4.1 Ed
dit Student Details
D
1. On the My Class: List View scrreen, click Ediit
nextt to a student’s name.
Write Sou
urce Online Usser Manual
86
2. The Edit a User screen appears.
You can edit the following student details:
User Role
First name
Middle initial
Last name
Username
Password / Confirm password
Student ID
Grade
Class
Language
User Status: Active / Inactive
3. Scroll down to see the next group of student
details, Student Permissions.
You can edit the following Student
Permissions to either allow or block the
student’s ability to use certain features:
o
o
o
o
Exclude from network
Block commenting
Lock profile picture
Clear and lock profile questions
4. When you finish, click Save.
13.4.2 Delete Student
1. Scroll to the end of the screen to see the
option to Delete User.
The instruction states, “This
permanently removes this user from the
system. This action cannot be undone
and any class assignments will be lost.
1. If you want to proceed, click Delete
[Student] now to remove the student from
the system.
Write Source Online User Manual
87
2. Click Yes to delete the user from the system.
Click No to keep the student in the system.
13.4.3 Reset a Student’s Password
1. On the My Class: List View screen, click Edit
next to a student’s name to reset a student’s
password.
2. Type a password for your student in the
Password textbox.
3. Retype the password for your student in the
Confirm Password textbox.
4. Click Save to save any changes you made.
13.5 Add Customized Groups
You can use Groups if you want to create assignments for different sections of your class, for example
beginning and advanced groups of students.
13.5.1 Add Students to Group
Write Source Online User Manual
88
1) You can add group
ps in two ways:
On the Claass Administraation
screen, clicck the Groups tab.
On the Myy Class: List Viiew
screen, clicck Edit Class Details,
Edit Class List, or Edit Class
C
Permission
ns. Then, clickk the
Groups tab
b.
,
,
3. Click Add
A a Group..
On the Cre
eate a group screen,
the namess in the list ap
ppear in
alphabeticcal order.
4. Type a Group Title.
5. Click the
t student’s name on thee list in
the leeft pane.
To select more
m
than one student,
press and hold the Shiftt or Ctrl
key, and th
hen click the names.
6. Click the
t right arro
ow.
Write Sou
urce Online Usser Manual
89
The moved
d students are
highlighted
d in the right pane
labeled Grroup List. Thiss shows
they have been added to
t the
group.
A gray stud
dent name in
n the left
pane tells you that you have
added the student to th
he group
and do nott need to agaain.
13.5.2 Remove Stude
ents from Gro
oup
t student’s name on thee list in
1. Click the
the rigght pane.
o select more
e than one stu
udent,
To
press and hold
d the Shift or Ctrl
keey, and then click the nam
mes.
2. Click the
t left arrow
w.
3. The seelected stude
ents move fro
om the
list on
n the right to the list to thee left.
This shows you the
ey are removed
from the group.
Write Sou
urce Online Usser Manual
90
4. Give the
t group a name and then click
Done to save the group
g
you havve
n to the Groups tab.
createed and return
5. Back on
o the Group
ps tab of the
Admin
nistration scrreen, you will see a
list off your class grroups, including the
new group
g
you havve just added
d.
13.6 Vie
ew and Ch
hange Stud
dents’ Perm
missions
You can control yo
our students’ access to thee network, theeir commentss, their profilee pictures, an
nd
any fu
urther editingg by changingg permissions.
1. Click Edit
E beside a student’s name in the Myy
Class:: List View scrreen. This brin
ngs you to the
Edit a User screen..
missions
2. Scroll down to the Student Perm
sectio
on.
Write Sou
urce Online Usser Manual
91
Exclude frrom networkk:
A check mark
m
blocks th
he student’s access
a
to the
class netw
work.
An emptyy check box alllows the stud
dent to access
the class network.
n
mmenting:
Block com
A check mark
m
blocks th
he student fro
om
commentting on another student’s Portfolio.
P
An emptyy check box alllows the stud
dent to
commentt on another student’s
s
Porrtfolio.
Lock Profile Picture:
m
preventss the student from editing
A check mark
his or her profile picture.
dent to edit his
h
An emptyy check box alllows the stud
or her pro
ofile picture.
d lock profile questions:
Clear and
A check mark
m
deletes the
t existing answers to
profile qu
uestions and prevents
p
a stu
udent from
editing hiss or her Profile.
An emptyy check box alllows the stud
dent to edit his
h
or her Pro
ofile.
e to save any changes you made to the
Click Save
Student Permissions
P
se
ection.
13.7 Vie
ew and Mo
oderate Sttudents’ Co
omments
You can view and co
ontrol your sttudents’ perm
mission to maake commentts each other’’s Portfolios.
Write Sou
urce Online Usser Manual
92
13.7.1 Moderate
M
Com
mments
1. On the teacher dasshboard in th
he left vertical
u bar, click the
e Teacher Mo
oderation ico
on
menu
to mo
oderate stude
ents’ commen
nts on other
studeents’ work.
2. This brings
b
you to the Class Profile and
Portfo
olio Moderatiion screen.
Click Edit.
E
3. To turrn teacher mo
oderation on, click the
radio button locate
ed to the left of the word
ON.
To turrn teacher mo
oderation offf, click the
radio button locate
ed to the left of the word
OFF.
4. Click Save
S
to save changes you made to
teacher moderatio
on.
13.7.2 View
V
Commen
nts on Other Students’ Portfolios
You can view
v
comments made by your students on other students’ portfo
olios, both inb
bound to a stu
udent
and outbo
ound from a student.
s
On the My Class: List View
V
screen, click Inbound comments
c
or Outbou
und commen
nts, located
on the top
p of the scree
en.
Write Sou
urce Online Usser Manual
93
13.7.3 Accept or Reject Comments Left on Your Students’ Portfolios
This brings you to the
teacher’s Moderation
screen. When Teacher
Moderation is ON, the
screen shows
comments that have
been made on your
students’ portfolios.
You can click Accepted
by you or Rejected by
you, or you can click
Reported as
inappropriate.
If you accept the
comment, the student
can see the comment
and decide to accept or
reject it.
13.8 View Comments Reported by Other Teachers
You can view Profile comments that other teachers have reported as inappropriate regarding students
in your class.
1. On the My Class: List
View screen, click Profiles
Reported to view Profile
comments that other
teachers have reported as
inappropriate.
Write Source Online User Manual
94
2. Click the student’s name
to view the student’s
profile.
3. In the profile screen, click
an assignment that
contains comments to
view them.
4. Leave feedback for the
student in the white
comments box and click
Send to [student’s name].
5. To go back to the Class
Profile & Portfolio
Moderation screen, click
the My Class: List View
icon and navigate to the
profiles reported.
Write Source Online User Manual
95
6. Click Mark as read or Edit
permissions on the profile
comments you have read.
Write Source Online User Manual
96
14. Access and Entitlements
Access and Entitlements helps you manage your product licenses. You can assign products to a class,
search entitlements by school or district, monitor product license details, and request additional
licenses.
In this section, you will find out how to:
Allocate products to a class so that the teacher can create assignments with it.
Monitor the availability of product licenses, including the number of available licenses, the level at
which the licenses can be distributed, and approaching expiration of any licenses.
Request additional licenses.
14.1 Allocate Products to Class
Before a teacher can create assignments for his or her class, products need to be allocated to that class.
Licenses are added and removed at a class level.
To edit class to change its product allocations:
1. On the administrator dashboard, click Classes to view a list
of classes.
Write Source Online User Manual
97
2. Click a class name.
3. Click the Products tab.
4. You can allocate or remove products from a class to make the
best use of available licenses. The availability of products
depends on the license status of the school and district.
Teacher:
o
A check mark allocates the teacher edition of the
product to a class.
o
An empty check box removes the teacher edition of
the product from a class.
Student:
o
A check mark allocates the student edition of the
product to a class.
o
An empty check box removes the student edition of
the product from a class.
Green check mark: All products of that type are allocated.
Red X and blue triangle with a warning icon: The product is
unable to be allocated; the popup message displays when you
roll your mouse pointer over the product or blue triangle.
Note: Teacher managed products must be allocated to teachers
before they can be allocated to students.
Green box without a check mark: Some products of that type
are allocated.
Write Source Online User Manual
98
5. Click Save and Close or Save and Next.
Note: Once product allocations are saved, overall product
licenses will be used as follows:
Teacher product licenses will be decremented by one.
If a teacher is assigned to multiple classes for the same
grade, the teacher will only use one license for the
teacher products in the grade level.
If a teacher is assigned to classes with different grade
levels, the teacher will use one teacher license for the
teacher products in each grade level.
Student product licenses will be decremented by the
number of students in the class.
14.2 Monitor Availability of Product Licenses
1. On the administrator dashboard, click
Products to view a list of product
licenses.
Write Source Online User Manual
99
2. The Products page shows you the
following details for each product license
assigned to your school.
Products may be listed multiple times if
you have made multiple orders. Multiple
orders of the same product should
display in the order of their license
expiration.
Product Name: name of product
Product Type: for example, Ebook
ISBN: product’s unique identifier
Grade: grade associated with the
product
Level: level at which the licenses can
be distributed
Expires In: the period of time the
product license is available to use
Remaining Licenses: the number of
available licenses
Write Source Online User Manual
100
15. System Administration
System Administration helps you manage your teachers, students, classes, and products. It also helps
you retrieve data.
In this section, you will find out how to:
Launch the Administrator wizard.
Manually register individual teachers or students.
Create teacher or student batch lists and import them to register teachers and students in batches.
Create new classes via batch lists.
Deactivate a student or teacher.
Add a new class.
Assign a teacher to a class.
Add or remove students from a class.
Allocate products and student and teacher editions to a class.
Print or email class details.
Delete a class.
Assign a school site administrator to a school.
15.1 Administrator Wizard
This Administrator Wizard displays when the data for the school has not yet been set up. It helps you to
complete the setup by walking you through the steps. The dialog box opens after you log onto the
system for the first time. It determines that there are either no teacher records, student records, or
class records set up for the school. It helps you to set up the teacher, student, and class records.
The Administrator Wizard enables you to perform the following tasks:
Initiate the manual entry of user records.
Initiate the importation of a batch file of user records.
Initiate the creation of a class record.
You can access the Administrator Wizard through one of the following methods:
If you are a school administrator and no data has been created for your school, log onto Write Source
Online and the system will display the Administrator Wizard Teacher Creation screen.
The system checks to see if there is at least one teacher record for the school. If there is no teacher
record, the Teacher Wizard appears. This takes you through the steps to set up teachers for your
school. You can register teachers by manual entry or by batch import.
If there are one or more teacher records, the system checks to see if there is at least one student
record for the school. If there is no student record, the Student Wizard appears. This takes you
Write Source Online User Manual
101
through the steps to set up students for your school. You can register students by manual entry or
by batch import.
If there are one or more student records, the system checks to see if at least one class record exists
for the school. If there is no class record, the Class Wizard appears. This takes you through the steps
to set up a class for your school.
Note: You can skip any of these wizards and go back to the administrator home page.
15.2 Manually Create Teachers or Students in Batches of Ten
1.
On the
administrator
dashboard, click
Users to manually
register teachers or
students in batches
of 10.
2.
The Add screen
displays.
Write Source Online User Manual
102
On the district
administrator
Users screen,
you can use the
Move Students
option.
3.
To add teachers
manually, click Add
Teachers.
School Administrator
District Administrator
4.
Type the following
for each teacher,
one at a time:
School Administrator
First Name
with an initial
capital letter
Last Name
with an initial
capital letter
Email address
District Administrator
Be sure to
enter a valid e
mail address.
This value
must also be
unique in the
system so that
no user
accounts use
the same email
address.
Write Source Online User Manual
103
5.
If a grreen check
mark displays, the
email address is
valid.
6.
If an exclamation
e
point displays, the
email address is
invalid
d.
7.
Click Save
S
to save
your changes.
c
Teach
hers will
receivve an email
explaining how to
access the system..
Note: Teachers
must be assigned to
t
a class before theyy
can lo
og onto Writee
Sourcce.
8.
To add students
manu
ually, click Add
d
Stude
ents.
A
r
School Administrator
r
District Administrato
A
Write Sou
urce Online Usser Manual
104
9.
Click the Grade
dropdown menu to
choose the grade in
which you want to
create your
students.
School Administrator
District Administrator
The district
administrator has
the option to
choose a school.
10. Type in the
following for each
of your students:
First Name with
an initial capital
letter
Middle Initial
(optional)
Last Name with
an initial capital
letter
User Name
Password
11. Click Save.
15.3 Create and Import Teachers, Classes or Students in Batch Lists
Before you import a batch of teachers, classes, or students into the Write Source Online system, you first
create a list in a spreadsheet and save it to your computer. Write Source assists you with an import
template and validation rules so that you make your list in the correct format.
15.3.1 Creating a .csv File
Both the district and school administrator Batch Import option enables you to create and import batch
lists of teachers, classes, and students in a .csv file easily.
Write Source Online User Manual
105
On the administrator dashboard,
click Batch Import.
The school administrator
dashboard looks the same as
that of the district administrator,
which you see in the image,
except it does not display the
option for Schools.
The Promotion option displays
for the school administrator only
if the district administrator has
allowed the school
administrators to run
promotions.
Beside the Upload option in the
Batch Import menu, you can
access the import template and
access the validation rules for
filling out the .csv file template.
The import template lays out the
spreadsheet columns just as
they need to be.
Write Source Online User Manual
106
The validation rules guide you
through all the correct forms of
data entry.
The Record Type (column B)
identifies whether the row
contains Teacher, Class, or
Student data. It is required for all
records.
Column C indicates whether the
information in that row is
mandatory (M) or optional (O).
For instance, the Middle Initial is
optional (O).
Write Source Online User Manual
107
Column E gives the actual rules
for entering data.
Not all record types are
required. The table to the right
notes which fields are
mandatory and optional for
teachers, classes, and students.
15.3.2 Import a Batch of Teachers, Students or Classes
On the administrator
dashboard, click Batch
Import to register
teachers, students, or
classes in batches.
Write Source Online User Manual
108
The Batch Import window
gives you three options.
Upload – a list of
teachers, classes
or students from a
.csv file
Summary – view a
summary of
uploaded files.
Check the status of
imports and view
error reports.
Export – Export a
copy of all
students and
teachers currently
in the system.
Click Upload and use the
Batch Import Upload
window to:
Write Source Online User Manual
109
Browse for your .csv file
Give it a name
Upload it.
Create a new .csv file.
Return to the Batch
Import menu.
Note: The maximum
number of teachers is
5,000, classes 5,000, and
students 65,000. For a
mixed record file, you
could have 65,000 student
records, 5,000 teachers,
and 5,000 classes. For a
student only file, you could
have 75,000 students.
Processing times are
quicker when you add new
records but less quick
when you update existing
records.
Click Browse to find your
.csv file, and then click
Upload.
If there are errors in the
file format, you will see an
error message with a
detailed explanation of
each error. When you fix
the errors, the file will
process.
If the file format has no
errors, you are taken to
the Import Summary
screen. The file will
process and you will see
both successfully imported
records and records with
errors.
Write Source Online User Manual
110
You can review a summary
of all your imports by
clicking the Summary tab
on the main Batch Import
menu. This displays an
Import Summary window,
where you can review your
imports.
To delete an import, click
the delete box beside the
entry in the Delete
column.
Click Delete Selected.
A warning message gives
you the option to continue
or cancel..
In the Results column, you
can open your imported
list by clicking either the
error(s) or the record(s)
successful option.
Write Source Online User Manual
111
This opens the .csv file
spreadsheet.
To export teachers,
students, or classes within
the school district, you first
click The Export option in
the Batch Import menu.
This brings up the
Download User Data
window.
You choose teachers,
students, and classes from
the list.
This will display a current
list of the teachers,
students, or classes,
depending on the option
you click.
You can edit the file, save
it and import the changes.
Teachers
Write Source Online User Manual
112
Students
Classes
15.4 Update Existing Students or Teachers via Batch Import
To update an existing batch of students or teachers, you open the existing .csv spreadsheet, make the
updates, and then upload the file again.
There are two ways you
can update a list of existing
students or teachers
through Batch Import.
A. You first update your
existing spreadsheet of
students or teachers
stored. Then you use
Upload to bring it into
the system. Whether
you keep or change
the file name, you will
see the list twice in the
Summary section of
Batch Import. Delete
the old file.
Write Source Online User Manual
113
B. Click the Summary
option in Batch
Import.
Find the name of your
list. In the Results
column, click the green
# record(s) successful.
This way, you can open
the list. Make your
changes, and then save
and close the file.
Double check your
changes by reopening
the file with the
Summary option.
You can also download
a list of current
student, teachers, or
classes by clicking
Export and then
selecting a record
type.
Write Source Online User Manual
114
15.5 Activate and Deactivate Student or Teacher
1. On the administrator dashboard, click
Users to activate or deactivate a student or
teacher.
2. In the list, click the name of the student or
teacher you want to deactivate.
Write Source Online User Manual
115
3. To activate or deactivate a student or
teacher, click the radio button next to
Active or Inactive, and then click Save.
Note: When you deactivate a student, all data is retained, but the student is unable to log onto Write
Source and view the information.
When you deactivate a teacher, he or she can no longer access the class information. All information
about assignments remains with the class, so it is not lost. It is best practice to assign another teacher to
an active class at the same time you deactivate the original teacher.
Write Source Online User Manual
116
15.6 Add New Class
1. On the administrator dashboard, click
Classes to add a new class.
2. Click Add New Class.
3. Enter your class details:
Type the name of your class in the
Class name textbox.
Choose a teacher for your class from
the Teacher dropdown list.
Choose a grade for your class from
the Grade dropdown list.
Type the period of your class in the
Period box. This is optional.
Type the description of your class in
the Description textbox. This is
optional.
4. On the Class Details screen, scroll down
to the Class Permissions section, and
select the options you want.
Write Source Online User Manual
117
A check mark in the box blocks access
to the class network for all the
students in your class. An empty
check box allows access to the class
network for all the students in your
class.
A check mark in the box blocks all the
students in your class from
commenting on other students’
Portfolios. An empty check box allows
all the students in your class to
comment on other students’
Portfolios.
A check mark in the box prevents all
the students in your class from
editing their profile picture. An empty
check box allows all the students in
your class to edit their profile picture.
A check mark in the box deletes the
existing answers to profile questions
and prevents editing of Profiles for all
the students in your class. An empty
check box allows all the students in
your class to edit their Profiles.
5. Click Save and Close or Save and Next.
Note: To add and remove students,
see Section 15.10 below: Add or
Remove Students from a Class.
Write Source Online User Manual
118
15.7 Assign Permissions for Editing Profiles
This section describes how to assign permissions for editing profile pictures and profile questions.
15.7.1 Assign Permissions for Editing Profile Pictures
1. On the administrator dashboard, click
Classes.
2. Click a class name.
3. On the Class Details screen, scroll down to
the Class Permissions section.
Write Source Online User Manual
119
4. Click the Lock profile pictures check box. A
check mark in the box prevents all the
students in your class from editing their
own profile picture. An empty check box
allows all the students in your class to edit
their profile picture.
5. Click Save and Close or Save and Next.
15.7.2 Assign Permissions for Editing Profile Questions
1. On the administrator dashboard, click
Classes.
2. Click a class name.
3. On the Class Details screen, scroll down to
the Class Permissions section.
Write Source Online User Manual
120
4. Click the Clear and lock profile questions
check box. A check mark in the box deletes
the existing answers to profile questions. It
also prevents editing of Profiles for all the
students in your class. An empty check box
allows all the students in your class to edit
their Profiles.
5. Click Save and Close or Save and Next.
15.8 Assign a Teacher to Class
1.
On the administrator dashboard, click the
Classes tab.
2.
To edit the teacher assigned to a class, click
a class name.
Write Source Online User Manual
121
3.
Click the
t Teacher dropdown
d
arrrow and,
from the dropdow
wn list, choosee another
t your class.
teacher to assign to
4.
Click Save
S
and Closse or Save an
nd Next.
5.
To asssign a teacher to a new claass, click Add
New Class.
C
6.
Click the
t Teacher dropdown
d
and choose a
teacher to assign to
t the new claass.
7.
Click Save
S
and Closse or Save an
nd Next.
Write Sou
urce Online Usser Manual
122
15.9 Add or Remove Students from Class
1.
On the administrator dashboard, click Classes.
2.
Click the Students tab, and then click the
number that corresponds to the row of the
correct Class name.
3.
When you click the number under the
Students tab, the Students screen appears.
4.
To add students to your class, first click the
name(s) on the list in the left pane, and then
click the right arrow.
Tip: To select more than one student,
press and hold the Shift or Ctrl key, and
then click the names.
Write Source Online User Manual
123
Th
he selected names
n
displayy on the list in
n
th
he right pane,, which show
ws that you haave
ad
dded the stud
dents to yourr class.
Tiip: In this exaample, some of
o the names in
th
he pane on th
he left are graay. This
in
ndicates that the student has
h already
beeen added to
o your class an
nd cannot be
ad
dded again.
To
o add all the students to your
y
class at
one time, clickk the double right
r
arrow.
To
o remove students from your
y
class, clicck
th
he name(s) on
n the list in th
he right pane,,
an
nd then click the left arrow
w..
Tiip: To remove
e more than one
o student,
press and hold
d the Shift or Ctrl key, and
th
hen click the names.
n
The seelected stude
ents move to the list in thee
left paane, not highlighted yet in
n black text,
showiing that they are no longer listed in you
ur
class.
To
o remove all the
t students from your claass
att one time, click the doublle left arrow.
5.
Click Save
S
and Closse or Save an
nd Next.
Write Sou
urce Online Usser Manual
124