1
Features of your new air conditioner
2-step cooling
2-step cooling function will quickly cool the room to reach the desired temperature and then it
will adjust the fan speed and air flow direction automatically to help you stay comfortable and
refreshing.
Fast cooling/heating
If you want the strong and cool/warm air, just select Fast function! It will get you the strongest air!
Comfort cooling/heating
If you want the comfortable and refreshing air, Comfort function will spread the cool/warm air
indirectly to you, so that you can stay comfortable.
Easy Filter
There is no grille to remove before separating the filter from the air conditioner! Therefore, filter can
be cleaned easily, more frequently! Frequent filter cleaning will prevent dust from entering into the
product or accumulating on the filter.
function
function will allow you to have deep, good night’s sleep by adjusting the
temperature, fan speed and air flow direction.
Easy Installation
It’s so easy to install! You can easily hang the product on the wall and connect the pipes and wires
by opening the cover on the bottom of the product. Now you won’t have to tilt the product to
connect the pipe and the wires!
English-2
Contents
Preparation
Safety precautions . . . . . . . . . . . . . . . . . . . . . . . . . . . . . . . . . . . . . . . . . . . . . . . . . . . . . . . . . . . . . . . . . . . . . . . . . . . . . . . . . . . . . . . . . . . . . . . . . . . . . . . . . .4
Checking before use . . . . . . . . . . . . . . . . . . . . . . . . . . . . . . . . . . . . . . . . . . . . . . . . . . . . . . . . . . . . . . . . . . . . . . . . . . . . . . . . . . . . . . . . . . . . . . . . . . . . . . 10
Basic function
Checking the name of the parts . . . . . . . . . . . . . . . . . . . . . . . . . . . . . . . . . . . . . . . . . . . . . . . . . . . . . . . . . . . . . . . . . . . . . . . . . . . . . . . . . . . . . . . . . . . 11
Checking the remote controller . . . . . . . . . . . . . . . . . . . . . . . . . . . . . . . . . . . . . . . . . . . . . . . . . . . . . . . . . . . . . . . . . . . . . . . . . . . . . . . . . . . . . . . . . . . 12
Basic function. . . . . . . . . . . . . . . . . . . . . . . . . . . . . . . . . . . . . . . . . . . . . . . . . . . . . . . . . . . . . . . . . . . . . . . . . . . . . . . . . . . . . . . . . . . . . . . . . . . . . . . . . . . . . 14
Adjusting the air flow direction. . . . . . . . . . . . . . . . . . . . . . . . . . . . . . . . . . . . . . . . . . . . . . . . . . . . . . . . . . . . . . . . . . . . . . . . . . . . . . . . . . . . . . . . . . . . 16
Timer
Setting the On/Off timer . . . . . . . . . . . . . . . . . . . . . . . . . . . . . . . . . . . . . . . . . . . . . . . . . . . . . . . . . . . . . . . . . . . . . . . . . . . . . . . . . . . . . . . . . . . . . . . . . . 17
mode . . . . . . . . . . . . . . . . . . . . . . . . . . . . . . . . . . . . . . . . . . . . . . . . . . . . . . . . . . . . . . . . . . . . . . . . . . . . . . . . . . . . . . . . . . . . . . . . . . . . . . . . . 19
Options
2-Step cooling function . . . . . . . . . . . . . . . . . . . . . . . . . . . . . . . . . . . . . . . . . . . . . . . . . . . . . . . . . . . . . . . . . . . . . . . . . . . . . . . . . . . . . . . . . . . . . . . . . . . 20
Using the Fast function. . . . . . . . . . . . . . . . . . . . . . . . . . . . . . . . . . . . . . . . . . . . . . . . . . . . . . . . . . . . . . . . . . . . . . . . . . . . . . . . . . . . . . . . . . . . . . . . . . . . 20
Using the Comfort function . . . . . . . . . . . . . . . . . . . . . . . . . . . . . . . . . . . . . . . . . . . . . . . . . . . . . . . . . . . . . . . . . . . . . . . . . . . . . . . . . . . . . . . . . . . . . . . 21
Using the Quiet function . . . . . . . . . . . . . . . . . . . . . . . . . . . . . . . . . . . . . . . . . . . . . . . . . . . . . . . . . . . . . . . . . . . . . . . . . . . . . . . . . . . . . . . . . . . . . . . . . . 22
Settings
Using the Auto clean function . . . . . . . . . . . . . . . . . . . . . . . . . . . . . . . . . . . . . . . . . . . . . . . . . . . . . . . . . . . . . . . . . . . . . . . . . . . . . . . . . . . . . . . . . . . . . 23
Setting the Beep sound . . . . . . . . . . . . . . . . . . . . . . . . . . . . . . . . . . . . . . . . . . . . . . . . . . . . . . . . . . . . . . . . . . . . . . . . . . . . . . . . . . . . . . . . . . . . . . . . . . . 23
Others
Cleaning the air conditioner. . . . . . . . . . . . . . . . . . . . . . . . . . . . . . . . . . . . . . . . . . . . . . . . . . . . . . . . . . . . . . . . . . . . . . . . . . . . . . . . . . . . . . . . . . . . . . . 24
Maintaining the air conditioner. . . . . . . . . . . . . . . . . . . . . . . . . . . . . . . . . . . . . . . . . . . . . . . . . . . . . . . . . . . . . . . . . . . . . . . . . . . . . . . . . . . . . . . . . . . . 27
Troubleshooting . . . . . . . . . . . . . . . . . . . . . . . . . . . . . . . . . . . . . . . . . . . . . . . . . . . . . . . . . . . . . . . . . . . . . . . . . . . . . . . . . . . . . . . . . . . . . . . . . . . . . . . . . . 28
English-3
Safety precautions
Before using your new air conditioner, please read this manual thoroughly to ensure
that you know how to safely and efficiently operate the extensive features and
functions of your new appliance.
Because the following operating instructions cover various models, the
characteristics of your air conditioner may differ slightly from those described in this
manual. If you have any questions, call your nearest contact center or find help and
information online at www.samsung.com.
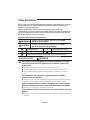
Important safety symbols and precautions:
WARNING
CAUTION
Hazards or unsafe practices that may result in severe
personal injury or death.
Hazards or unsafe practices that may result in minor
personal injury or property damage.
Follow directions.
Cut-off the power supply.
Do NOT attempt.
Do NOT disassemble.
Make sure the machine is grounded to prevent electric shock.
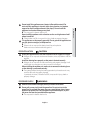
FOR INSTALLATION
WARNING
Use the power line with the power specifications of the product or higher
and use the power line for this appliance only. In addition, do not use an
extension line.
X Extending the power line may result in electric shock or fire.
X Do not use an electric transformer. It may result in electric shock or fire.
X If the voltage/frequency/rated current condition is different, it may cause
fire.
The installation of this appliance must be performed by a qualified
technician or service company.
X Failing to do so may result in electric shock, fire, explosion, problems with the
product, or injury and may also void warranty on the installed product.
Install a Isolation Switch next to the Air Conditioner (but not on the panels
of the Air Conditioner)and circuit breaker dedicated to the air conditioner.
X Failing to do so may result in electric shock or fire.
Fix the outdoor unit firmly so that the electric part of the outdoor unit is not
exposed.
X Failing to do so may result in electric shock, fire, explosion, problems with the
product.
English-4
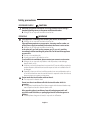
FOR INSTALLATION
CAUTION
Install your appliance on a level and hard floor that can support its weight.
X Failing to do so may result in abnormal vibrations, noise, or problems with the
product.
Install the draining hose properly so that water is drained correctly.
X Failing to do so may result in water overflowing and property damage. Avoid
adding drain to waste pipes as odours may arise in the future.
When installing the outdoor unit, make sure to connect the draining hose
so that draining is performed correctly.
X The water generated during the heating operation by the outdoor unit may
overflow and result in property damage.
In particular, in winter, if a block of ice falls, it may result in injury, death or
property damage.
FOR POWER SUPPLY
WARNING
When the circuit breaker is damaged, contact your nearest service center.
Do not pull or excessively bend the power line. Do not twist or tie the
power line. Do not hook the power line over a metal object, place a heavy
object on the power line, insert the power line between objects, or push
the power line into the space behind the appliance.
X This may result in electric shock or fire.
English-5
01 PREPARATION
Do not install this appliance near a heater, inflammable material. Do
not install this appliance in a humid, oily or dusty location, in a location
exposed to direct sunlight and water (rain drops). Do not install this
appliance in a location where gas may leak.
X This may result in electric shock or fire.
Never install the outdoor unit in a location such as on a high external wall
where it could fall.
X If the outdoor unit falls, it may result in injury, death or property damage.
This appliance must be properly grounded. Do not ground the appliance to a
gas pipe, plastic water pipe, or telephone line.
X Failure to do so may result in electric shock, fire, and explosion.
X Make sure to use a socket-outlet with ground.
Safety precautions
FOR POWER SUPPLY
CAUTION
When not using the air conditioner for a long period of time or during a
thunder/lightning storm, cut the power at the circuit breaker.
X Failing to do so may result in electric shock or fire.
FOR USING
WARNING
If the appliance is flooded, please contact your nearest service center.
X Failing to do so may result in electric shock or fire.
If the appliance generates a strange noise, a burning smell or smoke, cutoff the power supply immediately and contact the nearest service center.
X Failing to do so may result in electric shock or fire.
In the event of a gas leak (such as propane gas, LP gas, etc.), ventilate
immediately without touching the power line. Do not touch the appliance
or power line.
X Do not use a ventilating fan.
X A spark may result in an explosion or fire.
To reinstall the air conditioner, please contact your nearest service center.
X Failing to do so may result in problems with the product, water leakage,
electric shock, or fire.
X A delivery service for the product is not provided. If you reinstall the product in
another location, additional construction expenses and an installation fee will
be charged.
X Especially, when you wish to install the product in an unusual location such as
in an industrial area or near the seaside where it is exposed to the salt in the air,
please contact your nearest service center.
Do not touch the circuit breaker with wet hands.
X This may result in electric shock.
Do not turn the air conditioner off with the circuit breaker while it is
operating.
X Turning the air conditioner off and then on again with the circuit breaker may
cause a spark and result in electric shock or fire.
After unpacking the air conditioner, keep all packaging materials well
out of the reach of children, as packaging materials can be dangerous to
children.
X If a child places a bag over its head, it may result in suffocation.
English-6
FOR USING
WARNING
Do not place an object near the outdoor unit that allows children to climb
onto the machine.
X This may result in children seriously injuring themselves.
Do not use this air conditioner for long periods of time in badly ventilated
locations or near infirm people.
X Since this may be dangerous due to a lack of oxygen, Open a window at least
once an hour.
If any foreign substance such as water has entered the appliance, cut-off
the power supply and contact the nearest service center.
X Failing to do so may result in electric shock or fire.
Do not attempt to repair, disassemble, or modify the appliance yourself.
X Do not use any fuse (such as cooper, steel wire, etc.)other than the standard
fuse.
X Failing to do so may result in electric shock, fire, problems with the product, or
injury.
English-7
01 PREPARATION
Do not insert your fingers or foreign substances into the outlet when the air
conditioner is operating.
X Take special care that children do not injure themselves by inserting their
fingers into the product.
Do not touch the air flow blade with your hands or fingers during the
heating operation.
X This may result in electric shock or burns.
Do not insert your fingers or foreign substances into the air inlet/outlet of
the air conditioner.
X Take special care that children do not injure themselves by inserting their
fingers into the product.
Do not strike or pull the air conditioner with excessive force.
X This may result in fire, injury, or problems with the product.
Safety precautions
FOR USING
CAUTION
Do not place objects or devices under the indoor unit.
X Water dripping from the indoor unit may result in fire or property damage.
(example electrical appliances)
Check that the installation frame of the outdoor unit is not broken at least
once a year.
X Failing to do so may result in injury, death or property damage.
Max current is measured according to IEC standard for safety and current is
measured according to ISO standard for energy efficiency.
Do not stand on top of the appliance or place objects (such as laundry,
lighted candles, lighted cigarettes, dishes, chemicals, metal objects, etc.) on
the appliance.
X This may result in electric shock, fire, problems with the product, or injury.
Do not operate the appliance with wet hands.
X This may result in electric shock.
Do not spray volatile material such as insecticide onto the surface of the
appliance.
X As well as being harmful to humans, it may also result in electric shock, fire or
problems with the product.
Do not drink the water from the air conditioner.
X The water may be harmful to humans.
Do not apply a strong impact to the remote controller and do not
disassemble the remote controller.
Do not touch the pipes connected with the product.
X This may result in burns or injury.
Do not use this air conditioner to preserve precision equipment, food,
animals, plants or cosmetics, or for any other unusual purposes.
X This may result in property damage.
Avoid directly exposing humans, animals or plants from the air flow from
the air conditioner for long periods of time.
X This may result in harm to humans, animals or plants.
English-8
FOR CLEANING
WARNING
Do not clean the appliance by spraying water directly onto it. Do not use
benzene, thinner or alcohol to clean the appliance.
X This may result in discoloration, deformation, damage, electric shock or fire.
Before cleaning or performing maintenance, cut-off the power supply and
wait until the fan stops.
X Failing to do so may result in electric shock or fire.
FOR CLEANING
CAUTION
Take care when cleaning the surface of the heat exchanger of the outdoor
unit since it has sharp edges.
X This should be done by a qualified technician please contact your installer or
service center.
Do not clean the inside of the air conditioner by yourself.
X For cleaning inside the appliance, contact your nearest service center.
X When cleaning the internal filter, refer to the descriptions in the ‘Cleaning the
air conditioner’ section.
X Failure to do may result in damage, electric shock or fire.
WARNING
State of California Proposition 65 Warning (US only)
t This product contains chemicals known to the State of California to cause cancer
and reproductive toxicity.
English-9
01 PREPARATION
This appliance is not intended for use by persons (including children) with
reduced physical, sensory or mental capabilities, or lack of experience
and knowledge, unless they have been given supervision or instruction
concerning use of the appliance by a person responsible for their safety.
Children should be supervised to ensure that they do not play with the
appliance.
Checking before use
Operation ranges
The table below indicates the temperature and humidity ranges the air
conditioner can be operated within. Refer to the table for efficient use.
Mode
Indoor temperature
Outdoor temperature
Indoor humidity
Cooling
61 °F~90 °F
(16 °C~32 °C)
23 °F~115 °F
(-5 °C~46 °C)
80% or less
Heating
81 °F or less
(27 °C or less)
5 °F~76 °F
(-15 °C~24 °C)
-
Dry
65 °F~90 °F
(18 °C~32 °C)
23 °F~115 °F
(-5 °C~46 °C)
-
X If the air conditioner operates in cooling mode for long period of time in high humidity area, condensate may form.
X If the outdoor temperature goes down to 23˚F(-5°C), heating capacity may decrease as much as 60 %~70 % of
specified capacity according to the using conditions.
Maintaining your air conditioner
Internal protections via the unit control system
X This internal protection operates if an internal fault occurs in the air conditioner.
Type
Against cold air
Defrost cycle
Protect compressor
Description
The internal fan will be off to prevent cold air when the heat pump is heating.
The internal fan will be off to defrost ice when the heat pump is heating.
Vertical air flow blade will be closed during defrost cycle and it will open again during
heating operation after defrost cycle.
The air conditioner does not start operating immediately to help protect the compressor
of the outdoor unit after it has been started.
t *GUIFIFBUQVNQJTPQFSBUJOHJO)FBUNPEFEFGSPTUDZDMFJTBDUVBUFEUPIFMQSFNPWFGSPTUGSPNBOPVUEPPSVOJUUIBU
may have deposited at low temperatures.
The internal fan is switched off automatically and restarted only after the defrost cycle is completed.
English-10
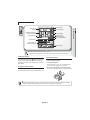
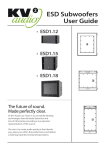
Checking the name of the parts
Your air conditioner may slightly look different from illustration shown below depending on your model.
Main parts
Air filter
Air intake
Air flow blade
(up and down)
Air flow blade
(left and right)
Display
Power indicator
Timer/Auto clean indicator
Single user indicator(Has no this function.)
Power button/
Remote controller receiver
English-11
02 BASIC FUNCTION
Room
temperature
sensor
Checking the remote controller
t 1PJOUUIFSFNPUFDPOUSPMMFSUPXBSETUIFSFNPUFDPOUSPMMFSSFDFJWFSPGUIFJOEPPSVOJU
t 8IFOZPVQSPQFSMZQSFTTUIFCVUUPOPOUIFSFNPUFDPOUSPMMFSZPVXJMMIFBSCFFQTPVOEGSPNUIFJOEPPSVOJUBOEBUSBOTNJU
indicator( ) appears on the remote controller display.
Remote controller buttons
Vertical air swing
Activate/Deactivate vertical air flow
blade movement automatically.
Power
Mode
Turn on/off the air
conditioner.
Set one of the 5 operating modes.
Temp + –
h
h
Fan
Increase/Decrease the
temperature by 1 ˚F.
Adjust the fan speed.
Horizontal air swing
Options
Has no this function.
Select options during operation.
Timer
Select Timer option.
Settings
Select settings.
SET
Set/Cancel the selected option or
setting.
Directional < >
Move through the Timer,
Options or Settings menu to
make a selection.
t*ODBTFZPVXJTIUPDBODFMUIFPQUJPOTPSTFUUJOHTUIBUZPVIBWFKVTUTFUQSFTTUIFOptions or Settings button again,
then the most recently selected item will blink and you may simply cancel it by pressing the SET button while
selected item is blinking.
English-12
Remote controller display
Transmit indicator
Low battery indicator
Set temperature/ Time (for
Timer option) indicator
Fan speed indicator
This function is not
available in this model.
Vertical air swing indicator
good'sleep indicator
Options indicator
This function is not
available in this model.
Settings indicator
t & OTVSFSFNPUFDPOUSPMMFSJTOPUFYQPTFEUPXBUFS
t E
hMJHIU$PPMGVODUJPOJTEJTQMBZFEPOUIFSFNPUFDPOUSPMMFSEJTQMBZCVUOPUTVQQPSUFEJOUIJTNPEFM
Low Battery warning
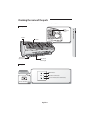
Inserting the batteries
8IFOUIFCBUUFSZJTFYIBVTUFE ) will be displayed in the
SFNPUFDPOUSPMMFSEJTQMBZ8IFOUIFJDPOBQQFBSTDIBOHF
the batteries. The remote controller requires two 1.5 V AAA
type batteries.
1. Push the lever as arrow indicates on the rear side of the
remote controller and pull up.
2. Insert two AAA batteries.
Storing the remote controller
Check and match the “+” and “-” signs accordingly. Make sure
you have inserted the batteries in correct position.
3. Close the cover by place it back to its original position.
8IFOZPVEPOPUVTFUIFSFNPUFDPOUSPMMFSGPSMPOHUJNF
remove the batteries from the remote controller and store it.
You should hear click sound when the cover is locked properly.
t 8JSFMFTTSFNPUFTJHOBMNBZFYQFSJFODFTPNFJOUFSGFSFODFGSPNUIFDMPTFQSPYJNJUZPGJOWFSUFSøVPSFTDFOUMBNQT
t *GPUIFSFMFDUSJDBMQSPEVDUTPQFSBUFCZUIFSFNPUFDPOUSPMMFSDBMMZPVSOFBSFTUDPOUBDUDFOUFS
English-13
02 BASIC FUNCTION
Operation mode
indicator
Basic function
Basic operation is an operation mode that can be selected by pressing the Mode button.
Auto(2-Step Cooling or Heat)
In Auto mode, the air conditioner will automatically set the temperature and fan speed depending on the room
temperature detected by the room temperature sensor.
t 2-Step Cooling mode sets the air conditioner to operate in Fast + Cool mode when set temperature is lower than indoor
temperature, and then the air conditioner will automatically operate in Dry mode when indoor temperature reaches set
temperature.
Cool
In Cool mode, the air conditioner will cool your room. You can adjust the temperature and the fan speed to feel cooler in hot
season.
t If current outside temperature is much higher than the selected indoor temperature, it may take time to bring the inner
temperature to the desired coolness.
t Quiet mode makes the unit quieter during the operation of the indoor unit in the Cool mode.
Dry
The air conditioner in Dry mode acts like a dehumidifier by removing moisture from the indoor air.
Dry mode makes the air feel refreshing in a humid climate.
To activate the Dry mode, set temperature on the remote controller should be lower than indoor room temperature.
Fan
Fan mode can be selected to circulate your room. Fan mode will be helpful to refresh the stale air in your room.
Heat
The air conditioner heats as well as cools. Warm your room with this versatile appliance in the cold of winter.
t Fan may not operate for about 3~5 minutes at the beginning to prevent any cold blasts while the air conditioner is
warming up.
t Quiet mode makes the noise quieter during the operation of the indoor unit in the Heat mode.
t Since the air conditioner heats the room by taking heat energy from outdoor air, the heating capacity may decrease when
outdoor temperature is extremely low.
Use an additional heating appliance in combination with the air conditioner if you feel the air conditioner heats
insufficiently.
English-14
button to turn on the air conditioner.
Press the
button to set the operating mode.
t &BDIUJNFZPVQSFTTUIFMode button, the mode will change in order of Auto, Cool, Dry, Fan and Heat.
8IFOUIF"VUPNPEFJTTFMFDUFEBJSDPOEJUJPOFSXJMMPQFSBUFJO4UFQ$PPMJOHGPSDPPMJOHDPOEJUJPOPSJO"VUP)FBUGPS
heating condition.
Press the
button to set the desired fan speed.
Auto
Cool
Dry
Fan
Heat
Press the
(Auto)
(Auto),
(Low),
(Med),
(High),
(Low),
(Med),
(High),
(Turbo)
(Auto),
(Low),
(Med),
(High),
(Turbo)
(Auto)
(Turbo)
button to adjust the temperature.
Auto(2-Step Cooling or Heat)
You can adjust the desired temperature by 1 °F within the range of 61°F~86°F(16°C~30°C).
Cool
You can adjust the desired temperature by 1 °F within the range of 61°F~86°F(16°C~30°C).
Dry
You can adjust the desired temperature by 1 °F within the range of 65°F~86°F(18°C~30°C).
Fan
Temperature adjustment is not possible.
Heat
You can adjust the desired temperature by 1 °F within the range of 61°F~86°F(16°C~30°C).
t %SZNPEFDBOOPUQSPWJEFIFBUJOHPOMZDPPMJOHPQFSBUJPO
English-15
02 BASIC FUNCTION
Press the
Adjusting the air flow direction
This function will allow you to adjust the air flow direction vertically.
Press the
button to make air flow blades vertically.
Vertical air flow
fTo keep the air flow direction in a constant direction, press the button again.
The air flow blade(s) will stop the movement.
X If you adjust the vertical air flow blade manually, it may not close completely when
you turn off the air conditioner.
t "
EKVTUJOHUIFBJSøPXEJSFDUJPOJTOPUBWBJMBCMFJOHPPEhTMFFQNPEFXIJMF
it is in cool mode.
t )PXFWFSZPVDBOBEKVTUUIFBJSøPXEJSFDUJPOJOHPPEhTMFFQNPEFXIJMF
it is in heat mode.
Remote controller display
Horizontal air flow
Make sure the blade pin levers that stick out of the air flow blades are not broken.
Move the blade pin lever left or right to keep the air flow direction in a constant
position you prefer.
t # FFYUSFNFMZDBSFGVMXJUIZPVSöOHFSTXIJMFBEKVTUJOHUIF)PSJ[POUBM
air flow direction.
There is a potential risk of personal injury when the unit is
mishandled.
Blade pin lever
English-16
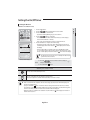
Setting the On/Off timer
Setting the On timer
When the air conditioner is off;
button until (On) indicator starts to blink.
2. Press the
3. Press the SET button to set the On timer.
- (On) indicator will keep blinking and you can set the time.
4. Press the
button to set the time.
- You can set the time in half hour unit from 30 minutes (0.5 on the display) ~
3 hours and hour unit from 3~24 hours.
- Time can be set from minimum 30 minutes to maximum 24 hours.
5. Press the SET button to complete the On timer setting.
- (On) indicator and the set time of the timer will be displayed on the remote
controller display and the Timer indicator ( ) will be displayed on the indoor
unit display.
- On timer setting will be cancelled if you don't press the SET button within
10 seconds after setting the time. Therefore, check for the (On) indicator on the
remote controller display and the Timer indicator ( ) on the indoor unit display.
t 5 IJT5JNFSGVODUJPOPOMZPQFSBUFTPODF'PSNVMUJQMFTDIFEVMFTJOTUBMM
optional wired remote controller.
Remote controller display
Cancel
fPress the
button to make the set time to display as
and press the SET button.
fPress the Power ( ) button.
,
Additional options available in On time
You can select from Auto/Cool/Dry/Fan /Heat.
You can set the temperature after selecting the operation mode.
Temperature adjustment is available when Auto/Cool/Dry /Heat mode is selected.
t After 10 seconds from the completion of the On timer setting, only (On) indicator will remain displayed on
the remote controller display.
t If you press the Power button on the indoor unit after setting the On timer from the remote controller,
Timer indicator on the indoor unit display will disappear and the On timer will be cancelled. Even though the
On timer is cancelled, (On) indicator on the remote controller will remain displayed.
t When the On timer is set while the air conditioner is off, Timer indicator ( ) will be displayed and remain on
until the On timer turns on.
English-17
03 TIMER
1. Press the Timer button.
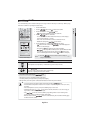
Setting the On/Off timer
Setting the Off timer
When the air conditioner is on;
1. Press the Timer button.
button until (Off ) indicator starts to blink.
2. Press the
3. Press the SET button to set the Off timer.
- (Off ) indicator will keep blinking and you can set the time.
button to set the time.
4. Press the
- You can set the time in half hour unit from 30 minutes (0.5 on the display) ~
3 hours and hour unit from 3~24 hours.
- Time can be set from minimum 30 minutes to maximum 24 hours.
5. Press the SET button to complete the Off timer setting.
- (Off ) indicator and the set time of the timer will be displayed on the remote
controller display and the Timer indicator ( ) will be displayed on the indoor
unit display.
- Off timer setting will be cancelled if you don't press the SET button within
10 seconds after setting the time. Therefore, check for the (Off ) indicator on the
remote controller display and the Timer indicator ( ) on the indoor unit display.
Cancel
fPress the
button to make the set time to display as
and press the SET button.
fPress the Power ( ) button.
,
Remote controller display
t Off timer may not work depending on the On/Off status of the indoor
unit and the On/Off status of the indicator on the remote controller
display.
t 0OMZUIFMBUFTUTFUUJOHUJNFSXJMMCFBQQMJFECFUXFFOUIF0O5JNFS0ò
Timer and
Off timer functions.
t "GUFSTFUUJOHUIFUJNFSUIFTFUUJNFXJMMCFEJTQMBZFEGPSTFDPOET
before it disappears.
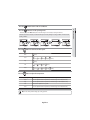
Combining On Timer and Off Timer
When the air conditioner is off
When the air conditioner is on
When set time on On timer is shorter than Off timer
When set time on On timer is longer than Off timer
Ex) On timer : 3 hours, Off timer : 5 hours
- The air conditioner will turn on after 3 hours from the
moment you have set the timer and the air conditioner will
remain on for 2 hours and then turn off automatically.
Ex) On timer : 3 hours, Off timer : 1 hour
- The air conditioner will turn off after 1 hour from the
moment you have set the timer and turn on after 2 hours
from the moment it was turned off.
t Set time for the On timer and the Off timer should be different from each other.
English-18
mode
For a comfortable sleep, the air conditioner will operate in 3 stages in order of Fall asleep Z Sound sleep Z Wake up stage.
When the air conditioner is operating in Cool/Heat mode;
1. Press the Timer button.
03 TIMER
button until ( ) indicator starts to blink.
2. Press the
3. Press the SET button to set the
mode.
- ( ) indicator will keep blinking and you can set the time.
4. Press the
button to set the time.
- You can set the time in half hour unit from 30 minutes (0.5 on the display) ~
3 hours and hour unit from 3~12 hours.
- Time can be set from minimum 30 minutes to maximum 12 hours.
- Default time setting for the
mode is 8 hours.
5. Press the SET button to complete the
mode setting.
- ( ) indicator and the set time of the
mode will be displayed on
the remote controller display.
- Timer indicator ( ) will be displayed on the indoor unit display.
mode setting will be cancelled if you don't press the SET button within
10 seconds after setting the time. Therefore, check for the ( ) indicator on the
remote controller display and the Timer indicator ( ) on the indoor unit display.
Cancel fPress the
button to make the set time to display as
and press the SET button.
Remote controller display
Additional options available in
,
mode
You can adjust the set temperature by 1 °F within the range of 61°F~86°F(16°C~30°C).
8IFOUIF
mode is on.
In Cool mode : Air flow direction will be adjusted automatically.
In Heat mode : Adjusting air flow direction is available.
Temperature and fan speed change in
mode
t Fall asleep: Eases you into sleep by dropping the temperature.
t Sound sleep: Relaxes your body and raises your temperature slightly.
t Wake up: Allows you to wake up from comfortable intermittent air and it makes you feel refreshed.
t Fan speed and the air flow direction will be adjusted automatically in
mode.
t Recommended set temperature is between 77˚F~81˚F (25˚C~27˚C) for cooling and 70˚F~73˚F (21˚C~23˚C)
for heating.
t If the set temperature is too low, you may feel cold during sleep or catch a cold.
t Optimal operation hour of
mode is 8 hours. Therefore, if the time is set too short or long, you
may not feel as comfortable as you would expect.
t If the
mode is set over 5 hours, Wake up stage will begin when 1 hour is remaining in the
operation time and the air conditioner will stop automatically.
t When the On timer and the
function is set simultaneously, the air conditioner will only apply
the function that was set later.
English-19
2-Step cooling function
2-Step Cooling function will set the air conditioner to cool the room quickly to reach the set temperature when the indoor
temperature is higher than the set temperature, and then the air conditioner will automatically operate in Dry mode when
indoor temperature reaches set temperature.
When the air conditioner is operating in Cool mode;
1. Press the Options button.
button until (2-Step) indicator starts to blink.
2. Press the
3. Press the SET button to set the 2-Step Cooling function.
- (2-Step) will blink first, then remain on the display as (2-Step) and 2-Step
Cooling function will begin.
Cancel
fPress the Options button again to make the (2-Step) indicator blink
and press the SET button.
Remote controller display
Using the Fast function
You can set the Fast function to provide fast and powerful cooling/heating.
When the air conditioner is operating in Cool/Heat mode;
1. Press the Options button.
button until (Fast) indicator starts to blink.
2. Press the
3. Press the SET button to set the Fast function.
- (Fast) will blink first, then remain on the display as (Fast) and Fast function will
begin.
Cancel
fPress the Options button again to make the (Fast) indicator blink and
press the SET button.
t Fast function is only available in Cool/Heat mode.
t Vertical/Horizontal air swing can be adjusted.
t Set temperature and fan speed cannot be adjusted.
t If the Fast function is selected while Quiet/
function is on,
corresponding function will be cancelled.
t When you select Fast function in Heat mode, you may not be able to
increase fan speed.
Remote controller display
English-20
Using the Comfort function
You can set the Comfort function to provide mild cooling/heating.
When the air conditioner is operating in Cool/Heat mode;
Cancel
fPress the Options button again to make the (Comfort) indicator blink
and press the SET button.
t Comfort function is only available in Cool/Heat mode.
t Vertical/Horizontal air swing can be adjusted.
t Set temperature can be adjusted, but fan speed cannot be adjusted.
t If the Comfort function is selected while Quiet/
function is
on, corresponding function will be cancelled.
Remote controller display
English-21
04 OPTIONS
1. Press the Options button.
2. Press the
button until (Comfort) indicator starts to blink.
3. Press the SET button to set the Comfort function.
- (Comfort) will blink first, then remain on the display as (Comfort) and Comfort
function will begin.
Using the Quiet function
You can reduce the noise generated from the indoor unit during Cool/Heat mode.
When the air conditioner is operating in Cool/Heat mode;
1. Press the Options button.
2. Press the
button until (Quiet) indicator starts to blink.
3. Press the SET button to set the Quiet function.
- (Quiet) will blink first, then remain on the display as (Quiet) and Quiet function
will begin.
Cancel
fPress the Options button again to make the (Quiet) indicator blink and
press the SET button.
Additional options available in Quiet function
You can adjust the set temperature by 1 °F within the range of
61°F~86°F (16°C~30°C).
Fan speed is set to
Remote controller display
(Auto).
Vertical/Horizontal air swing can be selected.
t Quiet function is only available in Cool/Heat mode.
t If the Quiet function is selected while Fast/
corresponding function will be cancelled.
English-22
function is on,
Using the Auto clean function
Auto clean function will minimise the moisture inside of the indoor unit. Activate this function to help provide you with clean air.
When the air conditioner is operating;
Cancel
fPress the Settings button again to make the (Clean) indicator blink and
press the SET button.
t 8IFOUIFPQFSBUJPONPEFJTTFUEVSJOH"VUPDMFBOGVODUJPOJTBDUJWBUFE
the air conditioner will operate in chosen operation mode and the Auto
clean function will be re-activated when the operation stops.
t %VSJOHUIFBVUPDMFBOGVODUJPOJOEPPSGBOXJMMDPOUJOVFUPSVOBOEBJS
flow blade will remain open to allow the indoor coil to dry.
Indoor unit display
Setting the Beep sound
Beep sound from the indoor unit can be muted.
1. Press the Settings button.
button until (Beep) indicator starts to blink.
2. Press the
3. Press the SET button to mute the beep sound.
English-23
05 SETTINGS
1. Press the Settings button.
2. Press the
button until (Clean) indicator starts to blink.
3. Press the SET button to set the Auto clean function.
- (Clean) indicator will be displayed on the remote controller display and Timer (
) indicator will turn on the indoor unit display. Auto clean function will be
activated after the air conditioner stops operating.
- Duration of the Auto clean function can be different depending on the previous
operation mode used.
Auto(cool), Cool, Dry mode : 30 minutes.
Auto(heat), Heat, Fan mode: 15 minutes.
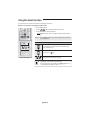
Cleaning the air conditioner
CAUTION
t Make sure to turn off the power of the indoor unit and cut-off
the power supply before cleaning the air conditioner.
Cleaning the indoor unit
X
8JQFUIFTVSGBDFPGUIFVOJUXJUIBTMJHIUMZEBNQNJDSPöCFSDMPUIXIFO
needed.
t $
POUBDUUIFTFSWJDFDFOUFSXIFOZPVDMFBOUIFJOEPPSVOJU
heat exchanger because it needs to be disassembled.
t 4JODFUIFQBOFMPGUIFJOEPPSVOJUJTFBTJMZTDSBUDIFEZPV
should use a micro fiber cloth to clean the panel.
8IFOZPVVTFUIFNJDSPöCFSDMPUITMJHIUMZEBNQFOUIFDMPUI
and remove any debris on the cloth to avoid scratches.
t%POPUDMFBOUIFEJTQMBZVTJOHBMLBMJOFEFUFSHFOU
CAUTION t%POPUVTFTVMGVSJDBDJEIZESPDIMPSJDBDJEPSHBOJDTPMWFOUT
(such as thinner, kerosene and acetone etc.) to clean the
surface of the product or put any stickers on it.
They may damage the surface of the air conditioner.
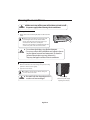
Cleaning the outdoor unit heat exchanger
X
8IFOEVTUBDDVNVMBUFTPOUIFIFBUFYDIBOHFSJUNBZEFDSFBTFDPPMJOH
performance. Therefore, clean it regularly.
X
Spray water to clean the dust.
t *GJUJTEJóDVMUUPDMFBOUIFPVUEPPSVOJUIFBUFYDIBOHFSPO
your own, contact service center.
CAUTION
t#FDBSFGVMXJUIUIFTIBSQFEHFTPOUIF
outdoor unit heat exchanger.
English-24
Heat exchanger
(Illustration may differ slightly
depending on the models)
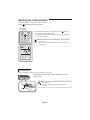
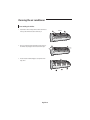
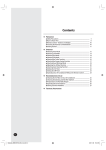
Removing the Air filter
Air filter
06 OTHERS
There is a hole on the bottom right side of the filter. Put your
finger in that hole to get a grip on the filter and slightly push
it up to release the hooks from the bottom side. Then, pull it
down to remove the filter from the main body.
Cleaning the air filter
8BTIBCMFGPBNCBTFEBJSöMUFSDBQUVSFTMBSHFQBSUJDMFTGSPNUIFBJS5IFöMUFSJTDMFBOFEXJUIBWBDVVNPSCZIBOEXBTIJOH
Remove the Air filter from the main body.
Clean the Air filter with a vacuum cleaner or soft brush.
If dust is too heavy, rinse it with running water.
Insert the Air filter back in its original position.
Dry the Air filter in a ventilated area.
t $
MFBOUIF"JSöMUFSFWFSZXFFLT$MFBOJOHUFSNNBZEJòFSEFQFOEJOHPOUIFVTBHFBOEFOWJSPONFOUBMDPOEJUJPOT
In dusty area, clean it once a week.
t *GUIF"JSöMUFSESJFTJOBDPOöOFEPSIVNJE
BSFBPEPSTNBZHFOFSBUF*GJUPDDVSTSFDMFBOBOEESZJUJOB
well-ventilated area.
English-25
Cleaning the air conditioner
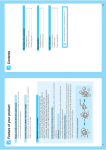
Reassembling the Air filter
1. Put the filter on the main body and insert the hooks which are
in the top of the Air filter into the the main body. {
2. There’s one hook in both side of the filter, press the surface of
the Air filter softly and get the hooks into the main body. |
3. Press the bottom of the filter lightly to securely fix the main
body. }~
English-26
Air filter
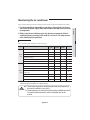
Maintaining the air conditioner
If the air conditioner will not be used for an extended period of time, dry the air conditioner to maintain it in best condition.
Periodical checks
Refer to the following chart to maintain the air conditioner properly.
Type
Every 2
weeks
Description
Every 4
months
Clean the condensate drain pan (2)
O
Thoroughly clean the heat exchanger (2)
O
Clean the cross fan (2)
O
Clean the condensate drain pipe (2)
O
O
Replace the remote controller batteries (1)
Clean the heat exchanger on the outside of the unit (2)
Outdoor
unit
Once a year
O
Clean the air filter (1)
Indoor
unit
Every 3
months
O
Clean the heat exchanger on the inside of the unit (2)
O
Clean the electric components with jets of air (2)
O
Verify that all the electric components are firmly
tightened (2)
O
Clean the fan (2)
O
Verify that all the fan assembly is firmly tightened (2)
O
Clean the condensate drain pan (2)
O
O: This check mark requires checking the indoor/outdoor unit periodically.
Follow the description to maintain the air conditioner properly.
(1) The described operations should be performed more frequently if
the area of installation is very dusty.
CAUTION
(2) These operations must always be performed by qualified personnel.
For more detailed information, see the installation part in the
manual.
English-27
06 OTHERS
1. Dry the air conditioner thoroughly by operating in Fan mode for 3 to 4 hours
and cut-off the power supply. There may be internal damage if moisture is left
in components.
2. Before using the air conditioner again, dry the inner components of the air
conditioner again by running in Fan mode for 3 to 4 hours. This helps remove
odors which may have generated.
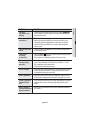
Troubleshooting
Refer to the following chart if the air conditioner operates abnormally. This may save
time and unnecessary expense.
PROBLEM
SOLUTION
The air conditioner
does not work at all.
t $IFDLQPXFSTUBUVTBOEUIFOPQFSBUFUIFBJSDPOEJUJPOFSBHBJO
t 1MVHJOPSTXJUDIPOUIFDJSDVJUCSFBLFSBOEUIFOPQFSBUFUIFBJS
conditioner again.
t &OTVSFBMMCSFBLFSTBSFPO
t $IFDLJGZPVIBWFTFUUIF0ò5JNFS0QFSBUFUIFBJSDPOEJUJPOFS
again by pressing the Power button.
The temperature
adjustment is not
working.
t $IFDLJGZPVIBWFTFMFDUFE'BO'BTUNPEF*OUIFTFNPEFTEFTJSFE
temperature is set to auto and you cannot adjust the temperature.
Cool/Warm air does
not come out of the
air conditioner.
t $IFDLJGUIFTFUUFNQFSBUVSFJTIJHIFSEVSJOH$PPMNPEF
lower(during Heat mode) than the current temperature. Press the
Temp + or - button on the remote controller to change the set
temperature.
t $IFDLJGUIF"JSöMUFSJTCMPDLFE*GUIFSFJTBMPUPGEVTUPOUIF"JS
filter, cooling(heating) performance may decrease. Clean them
frequently.
t $IFDLJGUIFPVUEPPSVOJUJTDPWFSFEPSJOTUBMMFEOFBSUIFPCTUBDMF
Take the cover off and take the obstacle away.
t $IFDLJGUIFBJSDPOEJUJPOFSJTPQFSBUJOHJOEFGSPTUNPEF8IFOUIF
ice formed in winter or the outdoor temperature is too low, the
air conditioner operates in defrost mode automatically. In defrost
mode, indoor fan stops and warm air does not come out.
t *GUIFEPPSTPSXJOEPXTBSFPQFOJUNBZDBVTFQPPSDPPMJOH
(heating) performance.
Close the doors and windows.
t $IFDLJGUIFBJSDPOEJUJPOFSIBTKVTUCFFOUVSOFEPOBGUFSTUPQQJOH
cooling or heating operation. In this case, just fan will run to
protect the outdoor unit compressor.
t $IFDLJGUIFQJQFMFOHUIJTUPPMPOH8IFOUIFQJQFMFOHUIFYDFFET
maximum allowable pipe length, cooling (heating) performance
may decrease.
Air flow adjustment
is not working.
mode. In cool mode, you
t $IFDLJGZPVIBWFTFMFDUFE
mode is
cannot adjust the air flow direction. (If the
operating in Heat mode, you can adjust the air flow direction.)
English-28
SOLUTION
Fan speed
adjustment is not
working.
t $IFDLJGZPVIBWFTFMFDUFE"VUP%SZ'BTU$PNGPSU
mode. In these mode, fan speed is set to Auto and you cannot
adjust the fan speed.
Remote controller is
not working.
t $IFDLJGZPVSCBUUFSJFTBSFHPPE
t .BLFTVSFOPUIJOHJTCMPDLJOHZPVSSFNPUFDPOUSPMMFSTFOTPS
t $IFDLUIBUUIFSFBSFMJHIUJOHöYUVSFTOFBSUIFBJSDPOEJUJPOFS
Light from fluorescent bulbs or neon signs may interrupt the
remote signal.
Timer function does
not set.
t $IFDLJGZPVQSFTTUIFSet button on the remote controller after
you have set the time.
The indicator
is blinking
continuously.
t 1SFTTUIFPower button or disconnect the power plug/switch
off the auxiliary power switch.
If the indicator is still blinking, contact the service center.
Odors permeate in
the room during
operation.
t $IFDLJGUIFBQQMJBODFJTSVOOJOHJOBTNPLZBSFB7FOUJMBUFUIF
room or operate the air conditioner in Fan mode for 1~2 hours.
(No component in unit create odors.)
t $IFDLUIF%SBJOTIBWFCFFODMFBOFE
Error is indicated.
t 8IFOBOJOEPPSVOJUJOEJDBUPSCMJOLTDPOUBDUUIFOFBSFTUTFSWJDF
center. Please ensure the error code is passed onto the service
center when booking the service call.
Noise is generated.
t %FQFOEJOHPOUIFTUBUVTPGUIFBJSDPOEJUJPOFSVTBHFOPJTFDBO
be heard when refrigerant flow movement changes. It is normal.
Smoke is generated
from the outdoor
unit.
t *GNBZOPUCFBöSFCVUJUDBOCFBTUFBNHFOFSBUFECZUIFEFGSPTU
operation from outdoor heat exchanger during Heat mode in
winter.
Water is dropping
t 8BUFSNBZCFHFOFSBUFECFDBVTFPGUIFUFNQFSBUVSFEJòFSFODF
from the outdoor unit
It is normal.
piping connection.
English-29
06 OTHERS
PROBLEM
QUESTIONS OR COMMENTS?
COUNTRY
CALL
OR VISIT US ONLINE AT
U.S.A
- Consumer Electronics
1-800-SAMSUNG(726-7864)
www.samsung.com/us/support
U.S.A
- Mobile Phones
1-800-SAMSUNG(726-7864)
[HHP] 1-888-987-HELP(4357)
www.samsung.com/us/support
CANADA
1-800-SAMSUNG(726-7864)
www.samsung.com/ca/support (English)
www.samsung.com/ca_fr/support (French)
AR77FSSSBWK Series
AR77FSSSCUR
AJ777JNADCHSeries
Series
Air Conditioner
user &user
installation
manualmanual
This manual is made with 100% recycled paper.
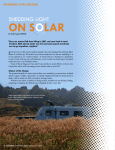
imagine the possibilities
Thank you for purchasing this Samsung product.
To receive more complete service, please
register your product at
www.samsung.com/register
EN ES FR DB68-04992A-00