1
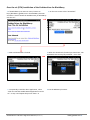
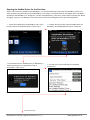
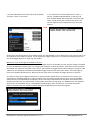
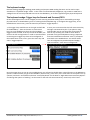
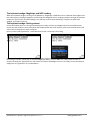
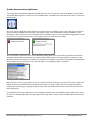
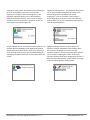
Grabba International Pty Ltd A.B.N 73 105 756 107
1/12 Selhurst Street, Coopers Plains QLD 4108, Australia
Phone: +61 (7) 3344-6599
Fax: +61 (7) 3344-5076
www.grabba.com
Grabba Driver and Demo App User Manual Version 1.2 Contents Over the air (OTA) Installation of the Grabba driver for BlackBerry PC installation of the Grabba driver for BlackBerry Running the Grabba Driver for the first time The keyboard wedge The keyboard wedge: Trigger keys for Barcode and Proxcard/RFID The keyboard wedge: MagStripe and MRZ reading The keyboard wedge: Getting started Grabba Demonstration Application Demonstration Screen Examples Tips to remember Page # 2 3 4 6 6 7 7 8 9 11 1
Over the air (OTA) Installation of the Grabba driver for BlackBerry 1. If the BlackBerry has internet access, browse to 2. On the next screen select “Download”. http://BlackBerry.grabba.com in the BlackBerry browser and select “Click to install the Grabba Driver for BlackBerry over the air”. 3. Wait until download is finished. 4. When the download is finished you should see “The application was successfully installed”. Press “OK”. 5. To optionally install the demo application, select “Click to install the Grabba Demo Application over the air” in Step 1 and repeat the process from 1‐4. 6. Exit the BlackBerry browser. Grabba Driver and Demo App User Manual (Version 1.2) www.grabba.com 2 PC installation of the Grabba driver for BlackBerry If the BlackBerry does not have internet access you will need a PC with the BlackBerry desktop manager installed. (Get desktop manager here: http://na.BlackBerry.com/eng/services/desktop/) 1. (On the PC) Download the driver file http://BlackBerry.grabba.com to your PC 2. To optionally install the demo application, download the demo at http://BlackBerry.grabba.com to your PC. 3 3. Unzip the zip file(s) to a new folder on your hard drive ‐ ensure all the files are unzipped together. 4. Connect the BlackBerry to the PC with a USB cable. 5. Run the BlackBerry desktop manager software. 6. Select “Application loader” then under “Add / Remove Applications”, click “Start”. 7. Click “Browse...” and browse to the “Grabba driver for BlackBerry.alx” file which you unzipped earlier. Select it and press open. 8. To optionally install the demo application, Click “Browse...” again, this time select “Grabba Demo.alx” and click open. 9. Click “next”. The next screen should say “Your BlackBerry device will be updated to include the following software: Grabba Demo App, Grabba driver for BlackBerry”. 10. Press “finish” and wait for the load operation to complete Grabba Driver and Demo App User Manual (Version 1.2) www.grabba.com 3 Running the Grabba Driver for the first time Before you connect the Grabba to the BlackBerry, it is recommended you ensure that the BlackBerry clock is not setup to display automatically when the BlackBerry is on charge – otherwise the clock will appear when a Grabba is attached to the BlackBerry. To change this, run the clock application, press menu, select options. Change the “When Charging:” option to “Do Nothing”. Press back, select save. Press back again to close the clock application. 1. Locate the Grabba driver for BlackBerry icon, this is 2. If asked "Would you like to grant Grabba driver for usually under the Downloads folder. Click to run it. BlackBerry Trusted Application status?" select Yes. 3. You should now see "Grabba driver for BlackBerry is requesting changes to its application control permissions." Click "View". 4. You will see a screen outlining the requested permissions. Continued Next Page
Grabba Driver and Demo App User Manual (Version 1.2) www.grabba.com 4 5. Press the BlackBerry menu key (left of the trackball) and select "Save" on the menu. 6. You should now see the Grabba driver screen ‐ it will say "Grabba Keyboard Wedge" at the top, and then "Grabba Model: Not Connected". The lower right corner shows the version number of the driver, this version number may be requested if ever you need support. At this point you should connect your Grabba device with the BlackBerry. Once attached you may need to wait up to 10 seconds for the Grabba to connect. If your Grabba has trigger buttons then you need to momentarily press the one of the trigger buttons to “wake up” the Grabba. What to do if you cannot get the Grabba to connect: If the Grabba does not connect after 10 seconds (no lights flash on the Grabba) you may need to charge the Grabba or reset the BlackBerry (battery pull). Try charging the Grabba for at least 30 minutes. If these don't fix the problem the Grabba may require a reset (this is very rare). If your Grabba has trigger buttons then unplug any charge or USB cables from the Grabba and simultaneous hold both trigger buttons down for at least 30secs. The Green light on front of the Grabba should come on. When this Green Light comes on release the trigger buttons to continue. If it does not have these trigger buttons then on the back of the Grabba there is a small hole in the centre, you should use an unfolded paperclip or similar to depress the reset button inside this hole. Once reset, the Grabba should connect to the BlackBerry immediately. Once connected, the Grabba Driver will show some details of the Grabba on screen such as model number, serial number and battery charge level. The Grabba driver may upgrade the firmware in the Grabba device – this upgrade will only happen when a new driver is used which contains different firmware than the Grabba. Do NOT unplug the Grabba during this firmware upgrade. Grabba Driver and Demo App User Manual (Version 1.2) www.grabba.com 5 The keyboard wedge Barcode reading, MagStripe reading, RFID reading and passport MRZ reading functions can be used in input simulation or "keyboard wedge" mode ‐ in this mode a scanned barcode, MagStripe, tag number or MRZ text is ‘wedged’ into the currently selected text area on the BlackBerry, as if it were typed using the physical keyboard. The keyboard wedge: Trigger keys for Barcode and Proxcard/RFID Of the technologies which can be wedged, barcode scanning and RFID reading can be activated by pressing a physical button on the BlackBerry prior to scanning the barcode/RFID tag. To configure the trigger keys, in the Grabba driver main screen, press the menu key and select "Trigger Options". 1. The trigger keys available are on the right and left side 2. Here you can choose what the left convenience key and right convenience key do. If you plan on using of the BlackBerry – these are known as convenience only barcode you can set them both to barcode for keys. On some Grabba units there are also hardware trigger buttons located at the top end of the Grabba, one ease of use, similarly you could set them both to each on the left and right sides. In order to scan barcodes proxcard if only proxcard/RFID scanning is required. Press the back button and select "Save" if prompted. or RFID tags the trigger keys have to be configured. In Press back in the Grabba driver. You will be asked the Grabba driver main screen, press the menu key and "Run in background to provide keyboard wedge / select "Trigger Options". input simulation?" Click "Run in background". Once the trigger keys are set up in the Grabba driver you will need to disable their normal function in the BlackBerry options. Press back until you get to the BlackBerry home screen, press menu, then scroll down to the options icon (a spanner) and click it. Scroll down and select "Screen/Keyboard". Scroll down to "Right Side Convenience Key Opens:" and change the option to "Nothing". Do the same for the Left side convenience key. Press back, select "Save". Grabba Driver and Demo App User Manual (Version 1.2) www.grabba.com 6 The keyboard wedge: MagStripe and MRZ reading While the keyboard wedge is running on the BlackBerry, MagStripe or MRZ data can be collected and wedged into a text field simply by swiping a MagStripe card through the MagStripe slot or swiping a passport through the passport reader slot. (Please note: for MRZ reading it may take up to two seconds following a swipe for the data to be wedged, so please be patient). The keyboard wedge: Getting started Ensure the Grabba driver is running in the background, ready to collect and wedge data. Run the Grabba driver, ensure that the Grabba is connected (shows the Grabba model and serial number), then press the back button and select “Run in background” when prompted. Open up memo pad (applications ‐> MemoPad) and create a new memo for testing. You can now scan a barcode or RFID tag by pressing the trigger button assigned to the appropriate technology and presenting a barcode or RFID tag. Or to read a MagStripe card or passport MRZ text simply swipe the card or passport through the appropriate slot and wait for the data to be wedged. You are now ready to use the keyboard wedge with any application on your BlackBerry. Grabba Driver and Demo App User Manual (Version 1.2) www.grabba.com 7 Grabba Demonstration Application If you optionally installed the Grabba Demo application then you are able to test the technologies in your Grabba. The Grabba Demo App has a similar icon to the Grabba Driver. The difference is that the word “Demo” is below the Grabba Logo. Once you start the Application then you will see a Screen like the one below. If the screen is like the left hand one below (showing Grabba Disconnected) then you should connect your Grabba device with the BlackBerry. Once attached you may need to wait up to 10 seconds for the Grabba to connect. If your Grabba has trigger buttons then you need to momentarily press the one of the trigger buttons to “wake up” the Grabba. Once the Grabba is Connected, then use the BlackBerry Menu button and a menu will pop up like the one below. The Menu will look different depending on which model Grabba you have. The only selections visible to you will depend on which technologies your Grabba has included. For example if your Grabba has 1D Barcode and Magnetic Stripe readers then you will only see the “Barcode Demo” and “Magstripe Demo” selections. When a demo screen is selected then you can test that particular technology. On all screens the Green “Light” will change to Red if the Grabba becomes disconnected or goes into “Sleep” mode. With some of the technologies, usage of that technology e.g. swiping a magnetic stripe card, will automatically switch the selected screen to that technology demo. The Grabba demonstration application is only designed to demonstrate the capabilities of the Grabba and is not to be used as a working application. The demo app is constantly under revision as new Grabbas and features become available.
Grabba Driver and Demo App User Manual (Version 1.2) www.grabba.com 8 Demo screen examples: Barcode Scanner Demo: You can use the “Scan” button, your associated trigger button or the Grabba Trigger button (if fitted) to scan a barcode. The result will be shown in the lower half of the screen. Proxcard Scanner Demo: This is the demo screen for all the RFID Grabba devices. Typically the result returned will be the serial number of the RFID chip. MagStripe Reader Demo: Just swipe the card through the reader slot and the results will show on the lower half of the screen. Smartcard Reader Demo: Depending on the Smartcard you insert you will only certain data from the card. Imager Demo: This screen demonstrates the capability of the x400 series 2D barcode engine to capture images. Press “Capture Image” to begin. The image is shown on the screen. Fingerprint Image Demo: This demonstration shows an image of the fingerprint captured. Press “Scan Finger” to begin and follow any onscreen instructions. The “Image” drop down allows you to select from different quality image formats. Grabba Driver and Demo App User Manual (Version 1.2) www.grabba.com 9 Fingerprint Verify Demo: This demonstration allows you to store one fingerprint and then verify another fingerprint scan against the stored fingerprint. The Template dropdown allows you to select between different template standards. Press “Enrol” to begin, follow any onscreen instructions and then “Verify” to verify against the stored fingerprint. Fingerprint Identity Demo: This demonstration allows you to store multiple fingerprints and then verify another fingerprint scan against the stored fingerprints. You can associate a User ID with a stored fingerprint to identify it later. The “Identify” button allows you to scan a fingerprint and show the User ID associated with it. Passport Reader Demo: This demonstration allows you to read the Machine Readable Zone (MRZ) of documents like Passports and some Identity Cards (e.g. German ID Card). Passing the document thru the MRZ reading slot will display the MRZ information on the lower half of the screen. Signature Capture Demo: This demo shows the signature capture capabilities of the Grabba. Once this screen is showing then you can start the signature capture in 2 ways. Using the “Start” button on the screen or tapping the “Start” area on the signature capture panel itself. Stopping the process is done the same way with the “Stop” button. An image of the resulting signature will be shown. Grabba Driver and Demo App User Manual (Version 1.2) www.grabba.com 10 Tips to remember Be sure to keep the Grabba charged between uses. You should get a full day’s work out of a fully charged Grabba so be sure to charge it at the end of the day. The Grabba and the BlackBerry can be charged together (while the BlackBerry is docked in the Grabba) – simply connect the Grabba DC charger to the Grabba and both devices will charge. When not on charge and not in use, keep the Grabba and the BlackBerry disconnected as this will conserve battery power. The Grabba may take from 1 second to 10 seconds to connect to the BlackBerry upon docking, depending upon how long the Grabba has been idle, so please be patient when you connect the Grabba to the BlackBerry. If you have trouble with this refer to: What to do if you cannot get the Grabba to connect‐ on Page 5. Grabba is always available to help if you have trouble. You can submit a support request through our website at www.grabba.com/supportrequest User Notes Area:
Grabba Driver and Demo App User Manual (Version 1.2) www.grabba.com 11