1
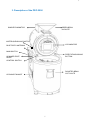
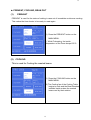
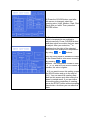
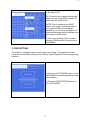
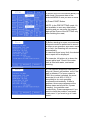
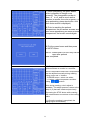
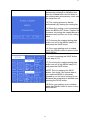
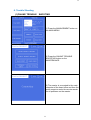
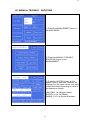
1
DIGIROSTO
PRO 2500 OWNER’S MANUAL
IMEX CORPRATION LTD.
1
2
Dear Customers.
Thank you very much for purchasing of coffee roaster DIGIROSTO PRO2500
which is adapted totally new idea and new technology you have never
experienced.
Since 1999 when we started manufacturing of new technology coffee roaster,
we have continued research & development with all our strength. Now we are
manufacturing 4th and 5th generation coffee roaster adapted high IT technology
that is analyzed 100 years traditional roasting technology, and we expect
PRO2500 digital coffee roaster to lead coffee roasting technology.
Even though PRO2500 is adapted advanced high-technology, PRO2500 is
designed so that anybody can roast green beans simply just by mastering this
user manual. Just read this user manual before you roast, and then you can roast
gourmet coffee beans without prior skills and experiences.
We recommend you use a machine according to the direction in this manual to
use a machine safely for a long time.
To keep a superior performance and to operate a machine accurately, please
follow an installation method and keep machine’s condition in this manual.
We are doing our best so that all our customers are satisfied with our machines.
Thank you for your support and purchase again.
IMEX CORPORATION LTD.
Quality Control Team
www.digirosto.com
<Technologies of IMEX are patented both in Korea and the U.S.A.>
2
3
Important Safeguards
1. Read all instructions carefully before use of PRO2500.
2. Do not touch top side of machine (around smoke eliminator) and
air outlet (cooling table’s right top side) as they get very hot
during roasting.
3. Be careful when you take out chaff drawer and clean up right after roasting as
chaff drawer and knob may be very hot.
4. While a machine is operated, please run a fan or change the room air.
5. If the temperature around machine is over 35C, there’s might be operating
error. Secure more than 50cm space at least around the machine so that
auto-cooling is smooth.
6. Keep water tank clean, and fill water more than 1/3. Use purified drinking
water only.
7. Before starting work, preheat a drum for auto cleaning and roasting.
8. Do not use wet duster around monitor.
9. Do not operate a machine more than 3 times continuously. After 1 hour’s rest,
machine can be operated again.
<Keep this user manual near a machine.>
3
4
TABLE OF CONTENTS
1. Installation ----------------------------------------------------- 5 page
2. Check points --------------------------------------------------- 6 page
3. Description of the PRO 2500 ----------------------------- 7 page
4. Functions ------------------------------------------------------- 8 page
5. How to Roasting
(1) New Setting ---------------------------------------------- 12 page
(2) Pre Setting ----------------------------------------------- 18 page
6. Trouble Shooting
(1) Online Trouble Shooting ------------------------------ 22 page
(2) Manual Trouble Shooting ----------------------------- 23 page
7. Management
(1)
(2)
(3)
(4)
Bean Report --------------------------------------------- 25 page
Daily Report --------------------------------------------- 26 page
Download Mode ----------------------------------------- 27 page
Time Set -------------------------------------------------- 28 page
8. Q & A ------------------------------------------------------------ 29 page
4
5
1. Notice for Installation
Electrical Circuit
1) Please confirm voltage AC220V or 385V, phase (single or Ø3 or 4 wire) and Hz
(50Hz or 60Hz).
2) For power line, use 5.5m/m2 if the machine is in 5~10m and 8.0m/m2 above 10m
from cabinet panel. (5.5m/㎡ can be used for AC385V in 15m)
3) Distribution switch should be 40A circuit breaker switch, and .its voltage leakage
switch should not be under 5W.
4) Please connect earth wire with a machine without fail.
5) If voltage difference is more than 6V between initial and operating, check power
line connection and switch.
Location of Installation
1) Secure more than 50cm space at least around the machine.
2) Furnish with a fan in 1~2m around machine.
About 30cmX30cm fan on ceiling or top side of wall is ideal.
3) Be careful not to splash water around a machine in 1m.
4) Do not use gas around a machine in 1 meter.
5) The machine can be used connected with personal computer. In this case, set the
machine in communication mode with blue tooth antenna. - Blue Tooth Antenna is
for separate purchase. Maximum distance between computer and blue tooth is about
50m (4~5 floors’ distance).
6) Install a machine where the room temperature is around 25℃ and air circulation is
smooth.
Installation
1) Locate a machine where you want and fix it adjusting wheel on machine’s bottom.
Keep machine horizontally using horizontal gauze if possible.
2) Confirm ‘electric source line’, ‘neutral line’ and ‘earth wire’ correctly before
connecting a machine with cable breaker that should be 50A and with no leakage
breaker.
5
6
2. Check points
1. For the first Roast
Fill up water tank with purified water, and press fire-extinguishing button around 15
seconds, and then check water spread in the chaff drawer.
2. Check points before Roasting
1) Check if there is enough water in water tank.
2) Check if water quenching switch is on.
3) Check if water hose is full with water.
Or pump up by pressing fire extinguishing button.
4) Check if there are remained coffee beans in a drum.
5) Check if a chaff drawer is cleaned and both locking knobs are tight to clockwise till
180 degrees of angle.
6) Check if bean peel or bean fragments are remained in cooling outlet.
3. Regular Check Points and Cleaning
1) Chaff Drawer Cleaning : After every roasting, clean chaff drawer and inside of
chaff drawer located place after taking out a chaff drawer.
(Vacuum cleaning is recommended)
2) Check and clean filtering net which is located left bottom of cooling table.
3) Check water in water tank, and keep water more than half of tank. Use purified
drinking water only.
4) Check operating of water pump and water spray by pressing fire extinguishing
switch after replenishment of water.
5) Check battery (12V+2) every month.
6) Cooling exhaust wire mesh cover should be cleaned everyday.
7) Check Charcoal in Charcoal Filter Tray once in 6 months, and replace them if it is
needed.
6
7
3. Description of the PRO 2500
SMOKE ELIMINATOR
GREEN BEAN
IN CHUTE
WATER QUENCHING SWITCH
LCD MONITOR
BLUETOOTH ANTENNA
MAIN SWITCH
FIRE EXTINGUISHING
BUTTON
SCANNER PORT
RS232
CONTROL SWITCH
ROASTED BEAN
OUT CHUTE
COOLING EXHAUST
7
8
4. Function
▲ Roasting Mode
(1) SCAN MODE
When scanning a barcode with a scanner or inputting barcode manually,
SCAN MODE is used. The roaster is enabled to recognize the bean’s data for
roasting by reading a barcode, and this mode is mainly useful for Franchise
Business.
1) Press the SCAN MODE button on the
MAIN MENU.
2) Scan the barcode that sticks on the
pack of the green bean by using a
scanner. Otherwise manual barcode’s
input is available. After touching the
barcode, namely “Touch-Screen”, press
the ENTER button.
If pressing a wrong barcode number,
delete it by using the
button.
`
NOTE: To turn back to previous process
from the present one, press the
button.
8
9
(2) AUTO MODE
1) PRE SETTING: Preset Roasting
Data.User can use already set
roasting data by selecting one
program that is stored each bean’s
data. (When the roaster is factory
out, kinds of bean’s data stored
initially. Basic data is Costa Rica,
3Kg, MEDIUM, MEDIUM).
2) NEW SETTING: User can create
new roasting data, and then it can
be saved into the program for next
use.
▲ MANAGEMENT & SETTING
Self-Diagnostic of a fault on the machine or seeking it through network connection
with the main computer of the head office.
There are five modes in the
MANAGEMENT as below.
1) ONLINE TROUBLE SHOOTING:
Finding a fault by the Internet connection
between the roaster and the main
computer of the head office.
2) MANUAL TROUBLE SHOOTING:
User’s direct checking of a fault on the
main components such as Heater, Motor,
Solenoid etc.
3) REPORTING REPORT: Display of the
Green Bean’s data that the user has
roasted, the roasting number and the
beans weight up to present.
4) AGING CHECK: Checking water
quenching function after roasting.
5) DOWNLOAD MODE: On-line program’s
upgrade is supported by connecting to the
main computer of the head office.
9
10
▲ PREHEAT, COOLING, BEAN OUT
(1)
PREHEAT
PREHEAT is used for the status of waiting in case not of immediate continuous roasting.
This makes the time shorter to be ready to roast again.
1) Press the PREHEAT button on the
MAIN MENU.
2) While Preheating, the inside
temperature of the Drum keeps 150°C.
(2) COOLING
This is used for Cooling the roasted beans.
1) Press the COOLING button on the
MAIN MENU.
2) The Cooling fan of the Cooling Table
begins to work and the Bean Brushes
installed inside makes the roasted
beans cool by their rotation.
10
11
(3) BEAN OUT1
This is used for the roasted beans out from in the roaster drum.
1) Press the BEAN OUT1 button on
the MAIN MENU.
2) Then the roasted bean is
discharged from roaster drum by
working the BEAN DISCHARGE
SOLENOID of the Cooling Table.
(When you want to stop the
operating, press BEAN OUT1
again.)
(4) BEAN OUT2
This is used for the roasted beans out from the Cooling Table.
1) Press the BEAN OUT2 button on the
MAIN MENU. Before pressing button,
prepare coffee bean container.
2) Then the roasted bean is discharged
from Cooling Table to out. (When you
want to stop the operating, press BEAN
OUT2 again.)
11
12
5. How to ROASTING
1. New Setting
User can roast bean upon its species by selection of a program among categories in
the roaster. After this new setting, user can save roasting information and use this for
next roasting by selection of this pre-setting.
※ For the first use, the basic data is
stored into the PRE SETTING , of which
the factory preset. If user wants to save a
new setting, user has to start NEW
SETTING mode and save the new
roasting information on menu.
1) Press the AUTO MODE on the MAIN
MENU.
2) Press the NEW SETTING button on the
AUTO MODE.
12
13
3) Press the BEAN button on the bottom
column and then select the bean’s origin.
(among 20 choices)
4) Press the WEIGHT button, and input
the bean’s weight after the screen is
changed, (ex. 1.5kg, 2kg, 2.5kg, 3kg)
According to the bean’s weight, the
drum’s temperature will be adjusted
differently. The heavier the bean’s weight
is, the higher the drum’s temperature will
be.
5) Select Bean Category (among Dark
Green, Light Brown, Green, Brown, Light
Green, Wet Green).
<Generally, first cropped and water
processed bean color changes Light
Green to Medium-Light Brown, and sun
dried bean changes to Light Brown upon
the preserving period. Wet green color
might be in the beans from South
Eastern Asia, some of Pacific Coast Line
Area, For these wet green beans, drum
temperature setting is higher than others.
>
* The drum’s temperature, roasting time
and crack temperature is established
according to the bean’s color. The darker
the bean’s color is, the higher the drum’s
temperature will be.
13
14
6) Press the COLOR button, and after
the screen is changed, select the
roasting color (Light, Medium, Dark, Pitch
Dark) that you want. Then press the
ENTER button.
7) The drum’s temperature and the
crack’s temperature are enabled to
adjust manually. Press CURSOR button
and then select one article that you want
to adjust. After your selection, * is
displayed on the right of the selected
article and then change the temperature
by using
or
buttons.
Also the color adjust is available to match
to the Green Bean’s color more correctly
by pressing
or
buttons. The changeable number is from
–2 to +2, and as much as the number is
smaller, the color is lighter.
8) If you want to save this setting, press
the SAVE button and go to the step of
(9-1). You can save this roasting data
both on this screen and after seeing the
bean’s roasted result. If you want save
this setting after completion of roasting,
press the START button without pressing
save button. And then you can save this
data.
14
15
※ Once pressing the SAVE button:
9-1) Select one among the MENU
bars(0~9) and press the SAVE button.
NOTE: Prior to pressing the SAVE
button, first check if the preset data is
needed for future roasting or not because
the preset data is deleted once pressing
the SAVE button.
However if pressing the MODIFY button,
it would be back to the previous setting
data.
9-2) Press the START button for
pre-heat.
10) Before you start roasting, the
automatic diagnosis would be performed
to search a defect of the machine, and
then if there is no fault, the Roasting will
go to next step automatically.
For example, left picture is the message
to alarm the vacant water tank. In this
case, check the water tank and fill it. And
then press ‘roasting’ for start.
11) The machine diagnoses each part. If
there’s no problem it says ok, if the part is
defected, error is shown. The more nearer
to 100% indicated, the more accurate the
status.(Normally 80%~120% is safe.) If
every part is ok, next operating commence
automatically. If there’s problem, three
menus appears at the bottom same as left
picture. If press ‘roasting’, the machine
roast continuously. Press management if
you want to check the problem, and press
‘main menu’ if you want to go to ‘main
menu’.
15
16
※ This screen is displayed, step (12), in
case of not pressing the SAVE button at
the step of (8) described above.
12) When in preheat, the green bean’s
color is available to change more
correctly. The changeable number is
from –2 to +2, and as much as the
number is smaller, the color is lighter.
NOTE: If stop preheating, press the
STOP button and then the roasting
completed screen is displayed.
13) Prior to reaching the preheat
temperature, the pre-buzzer sounds, and
then once approaching the exact preheat
temperature, the buzzer sounds again
with message as left picture. While this
buzzer sounds, do not input green
beans.
WAIT A MOMENT FOR
POURING BEAN
14) Put the green beans and then press
the NEXT button, and roasting is started.
NOTE: After pressing NEXT button,
Green Bean Put Door is closed.
16
17
15) The present status of the roasting
process monitors in a real time.
While roasting, you can adjust the drum’s
temperature or the crack’s temperature
manually. Press CURSOR button and
then select one article that you wish to
adjust. * would be displayed on the right
side of the selected article’s number and
then change the temperature by using
or
buttons.
Also during roasting, the color’s adjust is
available. This adjust process is same to
the step of (12) as above that was
introduced previously.
If pressing the STOP button while
roasting, the roasted beans move down
to the cooling table.
16) Once the roasting is completed, the
aging begins automatically.
17) When the aging is finished, the
announcing message is displayed and
then the roasted beans moves down to
the cooling table automatically. After that,
the lamp turns off.
18) The cooling process is started
automatically by rotating the cooling fan.
19) When the cooling cycle is completed,
press the BEAN OUT button. Prepare the
container for putting the roasted beans in
advance and pull them out of the cooling
table.
20) If saving the setting data of the roast
up to this step, press the SAVE button.
21) Once one roasting cycle is ended,
press the FINISH button to return to the
MAIN MENU.
NOTE: if not pressing the SAVE button,
the roasted data up to this step would
disappear.
17
18
※ In case of pressing the SAVE button
on the step of (20):
22) For saving the roasted setting data,
select one out of the MENU bars(0~9)
and press the SAVE button.
NOTE: Prior to pressing the SAVE
button, first check if the preset data of
your selected MENU is necessary
needed to you for future roasting or not.
Because the preset date is deleted once
pressing the SAVE button.
23) Since one roasting cycle is ended,
press the FINISH button to return to the
MAIN MENU.
2. PRE SETTING
Pre setting is roasting program made using new setting. (10 programs of initial
menu are saved before shipment from factory. Basic Program is for Nicaragua, 5kg,
medium.)
1) Press the AUTO MODE button on the
MAIN MENU and then preheating begins
automatically.
2) Press the PRE SETTING button on
the AUTO MODE.
18
19
3) Select one out of the MENU Bars(0~9)
and check if the preset data of the
selected MENU is that you wish to roast.
4) Press START Button.
NOTE: In the PRE SETTING mode, it’s
not available to save any data before
roasting and you can save the roasted
data on the Scene of the SETTING only
after finishing the roast,
5) Before starting to Roast, the automatic
diagnosis would be performed to search
a defect of the machine, and then if there
is no fault, the Roasting will commence
automatically.
In case that there is any fault, the related
error report will be displayed.
For example, left picture is to alarm the
vacant water tank. Check if the water
tank is filled with water, and restart
roasting.
6) The machine diagnoses each part. it
says ok if there’s no problem, error if the
part is defected. The more nearer to
100% the number indicated, the more
accurate.(it is ok 80%~120%) If
everything is ok, next operating
commence automatically. If there’s
problem, three menus appears at the
bottom same as left picture. If press
‘roasting’, the machine roast
continuously. Press management if you
want to check the problem, and press
‘main menu’ if you want to go to ‘main
menu’.
19
20
7) While preheating, the green bean’s
color is possible to change more
correctly. The changeable number is
from –2 to +2, and as much as the
number is smaller, the color is lighter. (To
stop preheating, press stop button. And
then main screen is displayed).
8) Prior to reaching the preheat
temperature, the pre-buzzer sounds, and
then once approaching the exact preheat
temperature, the buzzer sounds again.
9) Put the green beans and then press
the NEXT button.
NOTE: Green Bean Put Door only can be
open after preheat
was completed.
10) The present status of the roasting
process shows on monitor in a real time.
Drum’s temperature and crack’s temperature
can be adjusted manually during roasting
using cursor and +/- buttons.
- CURSOR button : select one article.
- +/- button : adjust temperature and time
using
buttons.
Also during roasting, color’s adjust is
available. This adjust process is same to the
step of (5) that was introduced previously.
If pressing the STOP button while roasting,
the roasted beans move down to the cooling
table.
11) Once the roasting is completed, the
aging begins automatically.
20
21
12) When completing the aging, the
announcing message is displayed and
then the roasted beans moves down to
the cooling table automatically. After that,
the lamp turns off.
13) The cooling process is started
automatically by rotating the cooling fan.
14) When the cooling cycle is completed,
press the BEAN OUT button. Prepare the
container for putting the roasted beans in
advance and pull them out of the cooling
table.
15) For saving the roasted setting data,
select one out of the MENU bars(0~9)
and press the SAVE button.
16) Once one roasting cycle is ended,
press the FINISH button to return to the
MAIN MENU.
※ In case of pressing the SAVE button
on the step of (15):
17) For saving the roasted setting data,
select one out of the MENU bars(0~9)
and press the SAVE button.
NOTE: Prior to pressing the SAVE
button, first check if the preset data of
your selected MENU is necessary
needed to you for future roasting or not.
Because the preset date is deleted once
pressing the SAVE button.
18) Since one roasting cycle is ended,
press the FINISH button to return to the
MAIN MENU.
21
22
6. Trouble Shooting
(1) ONLINE TROUBLE SHOOTING
1) Press the MANAGEMENT button on
the MAIN MENU.
2) Press the ONLINE TROUBLE
SHOOTING button on the
MAINTENANCE.
3) The roaster is connected to the main
computer of the head office and then the
main computer would do remote search
for all problems on the roaster.
22
23
(2) MANUAL TROUBLE SHOOTING
1) Press the MANAGEMENT button on
the MAIN MENU.
2) Press the MANAUL TROUBLE
SHOOTING button on the
MANAGEMENT.
3) Press the HEATER button on the
bottom column, and then 6 buttons are
displayed on the upper column and each
related test button according to a kind of
the heaters as follows:
HALOGEN : for Halogen Heater
SHEATH 1 & 2: for Sheath
SMOKE 1 & 2: for Smoke Eliminator
23
24
4) Press the PART1 button on the bottom
column, and then the machine test below
parts.
DOOR OPEN : for checking Opening
DOOR CLOSE : for checking Closing
PRE LAMP : for Blue color Lamp
ROAST LAMP :for Red color Lamp
5) Press PART2 button on the bottom
column, and then the machine tests
below parts.
MOTOR IN & MOTOR OUT : for main
motor’s operating check.
WATER PUMP : for test water motor
operating.
SCREEN+, SCREEN- : Adjust Screen’s
Light and Shade.
6) Press PART3 button on the bottom
column, and then the machine tests
below parts.
FILTER MOT : Check Filter Motor.
COOL MOT : Check Cooling Motor.
STEAM : Check Steam.
FILTER PUMP : Check Filter Pump.
24
25
7. Management
(1) BEAN REPORT
1) Press the MANAGEMENT Button on
the MAIN MENU.
2) Press the BEAN REPORT Button on
the MANAGEMENT.
3) BEAN REPORT is displayed the data
of the roasted numbers, the kinds of the
roasted beans and the weight how much
the beans roasted up to the present
when the user inquires and etc.
25
26
4) To go to the next step, press <,>. Total
is sum of every item.
(2) AGING CHECK
1) Press the MANAGEMENT Button on
the MAIN MENU.
2) Press the AGING CHECK Button on
the MANAGEMENT.
26
27
3) It would be operated with P.O.S.
(2) DOWNLOAD MODE
1) Press the MANAGEMENT Button on the
MAIN MENU.
2) Press the DOWNLOAD MODE Button on the
MANAGEMENT
3) The roaster is connected with the main
computer of the head office and then on-line
upgrade to the new program.
27
28
(3) TIME SET
※ This is for setting the present time.
1) Press the TIME SET button on the
MAIN MENU.
2) Press the YEAR button and input the
number of the present year
3) As for Month, Day, Hour, Minute,
setting methods are same to the YEAR.
1) Press ‘Year’ and press the year and
set the number.
2) Set ‘Month’, ‘Day’, ‘Hour’, “Minutes in
the same way with ‘Year’ setting.
3) After input of number, press OK. If
OK is not pressed, input data is not
saved.
28
29
8. Q&A
(1) Error Message
Q : It says ‘NO WATER POUR
WATER AND THEN ROAST’ on the
screen.
A: It is message the water tank is
without water. Please fill water with
water tank, and roast.
Q : It says ‘Signal Test : Error’ on the
screen.
A : There’s problem in flat cable 20pin,
40pin which connect touch screen and
PCB.
Please check this connection and correct
if it is connected improperly.
Q : It says ‘Volt Check : Very High or Very
Low.
A : Voltage connected with roaster is too
high or too low. Please check if power
line is well connected and connect proper
voltage with roaster.
29
30
Q : It says ‘Heater: Error’ or ‘Smoke
Error’ on the screen.
A : Error is displayed when there’s
problem in power supply. First please
check each part if it is proper in power
supply.
(2)
Q. The temperature is displayed too high suddenly.
A. Check if temperature sensor connected with PCB is proper, and plug in
correctly. Check if the roaster is hot after pre-heating.
(3)
Q. Started roasting without checking and filling up water tank.
A. If there’s no water in the water tank, it is possible roasting is not good and
there’s also possibility of bean fire. Stop the roasting and fill the water tank or
connect water supplying hose, and then re-start roasting.
30