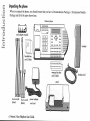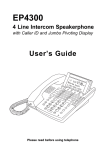
1
800-336-4864
www.tele-movers.com
THREE–LINE
TELEPHONE
User Guide
Venture
Multiline Communications System
Getting started .................................................5
Preparing for the installation ................................................. 5
Installing the phone ............................................................... 7
Installing a phone on a wall................................................. 11
Setting up your phone ......................................................... 12
Your Phone list.................................................................... 13
Checking the installation..................................................... 13
What’s next?........................................................................ 13
Making and receiving calls.............................14
Dialing calls......................................................................... 14
Answering calls ................................................................... 15
Answering second calls ....................................................... 15
Answering Call Waiting calls ............................................. 15
Adjusting the receiver volume ............................................ 16
Using the Handsfree and Mute features during calls .......... 16
Transferring calls................................................................. 16
Making conference calls...................................................... 17
Paging all phones ................................................................ 17
Venture 3-Line Telephone User Guide i
Contents
Introduction .....................................................1
Your Venture phone .............................................................. 2
Key descriptions................................................................... 3
Unpacking the phone............................................................. 4
Contents
Paging one phone.................................................................18
To answer a page .................................................................18
Setting up a Room monitor ..................................................18
Programming your phone ............................. 20
To set an option....................................................................20
Using the memory keys ................................. 26
To save information .............................................................26
To change information.........................................................26
To delete information...........................................................27
To make a call using a memory key ....................................27
To activate an option or feature using a memory key..........27
To page one phone ...............................................................27
To view call duration information .......................................27
To save an option to a memory key .....................................27
To turn a feature on or off....................................................28
To turn a feature and light on or off.....................................28
Using the list keys ......................................... 29
To retrieve an item ...............................................................29
To make a call or activate a feature .....................................29
To change information.........................................................29
To save information .............................................................30
ii Venture 3-Line Telephone User Guide
Status messages ............................................36
Status message descriptions ................................................ 36
Troubleshooting .............................................37
Blank display....................................................................... 37
Display language error ........................................................ 37
No dial tone ......................................................................... 37
Communication problems ................................................... 37
Duplicate ID is displayed for unexplained reason .............. 39
You can’t hear ..................................................................... 39
You forgot your password................................................... 39
Your caller can’t hear you ................................................... 39
You can’t dial from the Callers list ..................................... 39
Venture 3-Line Telephone User Guide iii
Contents
To save information from another list or a memory key..... 31
To delete information .......................................................... 31
To turn a feature on or off in the Services list..................... 32
To turn a feature and light on or off .................................... 32
To name a Private Directory ............................................... 32
To delete a Directory........................................................... 33
To set up your Callers lists.................................................. 33
Callers list display information ........................................... 33
To delete a Callers list ......................................................... 33
List descriptions .................................................................. 34
Contents
You can’t turn off the message waiting light.......................39
Maintenance and repair ................................ 41
Warranty and repairs............................................................41
Cleaning the display.............................................................41
General inquiries..................................................................41
Glossary........................................................ 42
Appendix ...................................................... 45
Running cable to phone jacks ..............................................45
Wiring the jacks ...................................................................45
Connecting the cord adapter module (CAM).......................45
Regulatory .................................................... 49
Canadian regulatory information .........................................49
U.S. regulatory information .................................................51
Index ............................................................ 57
iv Venture 3-Line Telephone User Guide
•
eight memory keys
line phone/system that you can
customize to function the way you
want.
Up to eight Venture phones can be
linked to form a system by wiring
them so that
•
a Redial list of the last 10
numbers called from your phone
•
a Services list used to activate 20
services and features to which
you subscribe from your
telephone service provider
•
the same telephone line appears
as line 1 on all other phones
•
there can be up to 500 feet of
wiring between two phones
Individual Venture phones have
access to the following features:
•
the display of telephone service
provider caller ID
•
full duplex Handsfree
speakerphone
•
a Directory of 200 names and
numbers
•
a log of the name and number of
your last 200 callers
•
call Hold and Conference
information you need to use your
Venture phone right away, including
a description of the functionality of
each key on the phone. Detailed
information about features and using
your Venture phone is available in
this user guide.
Venture phones linked together in a
system have these additional
features:
•
calling and paging between
Venture phones
•
Call Transfer
•
an automatically generated list
that includes the user name and
ID number for every phone in
your system
•
shared Directory
•
line and phone status indication
on all phones sharing lines
The Quick Start Card enclosed with
your phone provides the basic
Venture 3-Line Telephone User Guide 1
Introduction
Welcome to Venture, the three-
Introduction
Your Venture phone
˙ ≈ © telephone light
∆
¥
display
†
navigational keys
action key
™
¡
ç
∞
£
ß
⁄
ø
Handsfree
speaker
¶
volume bar
8 memory keys with
indicator lights
2 Venture 3-Line Telephone User Guide
3 line keys with
indicator lights
Û
intercom
Handsfree/Mute
key with indicator light
in your system.
ø creates and controls a
releases calls from hold.
≈ or Link connects you to
conference call using the other lines or
other phones in your Venture system.
telephone service provider features such
as Three-way Calling.
Û used to answer or initiate
calls between Venture phones.
© always ends an active call.
¥ lets you access the Options
∞ erases items from a list or
memory key.
list to customize your Venture phone.
¡ changes an item within the
In addition, pressing the ’ key when
your phone is at idle opens the Phone list.
ç lets you access information
Directory, Callers or Services lists, or
information stored to a memory key.
Action key enables you to dial a number
on the last 200 callers–when they called
and how many times they called–when
you subscribe to calling line
identification from your telephone
service provider.
™ stops what you’re doing with
the phone and clears the display, but does
not end a call.
† displays the last 10 numbers
£ lets you have easy access to
you dialed.
a list you create for services your phone
service provider provides, such as Call
Forward.
∆ stores and provides access to
up to 200 names and numbers.
ß stores numbers and names in
speaker and ringer volume.
the Directory, the Services list or a
memory key. It may also be used to
activate or deactivate an option while in
the Options list.
⁄ transfers a call from your
Venture phone to another Venture phone
¶ adjusts the receiver,
Telephone light lights when you have
an incoming call, message waiting (if you
have telephone service provider voice
mail or message waiting on your
telephone line), features turned on, or
when an extension is in use.
Display gives you instructions and
information about calls and features.
Navigational keys (”, ’, ‘, “)
enable you to travel through the Options,
Directory, Callers, Redial, Phone and
Services lists. They also let you
backspace and erase when entering or
changing names and numbers in lists.
or activate a feature shown on the display.
Memory keys store information that
can be used to make calls or activate
features. Memory key lights also provide
a visual indication when features are
activated using a memory key and when
another Venture phone is busy when its
phone ID is stored to a memory key.
Line keys are used to initiate or answer
calls on your phone’s three lines.
Handsfree/Mute key activates the
speaker and microphone so you can listen
and talk without lifting the handset, or it
mutes the microphone.
Venture 3-Line Telephone User Guide 3
Introduction
Key descriptions
˙ put calls on hold and
venture6-13 Page 5 Sunday, August 20, 2000 12:51 PM
easy. Simply connect your phone
lines, assemble the phone and follow
the instructions on your display.
If you are installing one phone and all
of your phone lines are terminated on
one phone jack, you can “get started”
by following the instructions on the
Quick Start Card. If you are installing
more than one phone or have lines
terminated on more than one jack,
follow the instructions in this chapter
to get started.
Preparing for the installation
Preparing to install your phone
includes locating the existing phone
jacks in your home or office,
deciding where you want your
phone(s) located, determining how
your telephone lines are connected to
the jacks you plan to use, and
deciding how you want the telephone
lines to appear on your phone(s).
The same telephone line must appear
as line one on all of your Venture
phones. If you cannot tell in what
order your telephone lines are
terminated on the jacks you plan to
use, call your telephone service
provider to assist you.
There should be an electrical outlet
within 10 feet of where you locate
your phone. In addition, if you are
installing more than one Venture
phone, there should be no more than
500 feet of wire connecting any two
phones in the system.
In a building with existing wiring,
you may find phone lines terminated
on one, two or three phone jacks. If
you are installing new wiring and
phone jacks, see “Appendix” on
page 45.
Installation planning worksheet
Use the worksheet on page 6 to
determine how to set up your system.
In column one fill in the unique twodigit phone ID and the name that will
identify the phone on the system. In
columns two, three and four record
the phone number and the jack on
which it appears for Venture line 1, 2
or 3. In column five record the room
or area where the phone will be
located.
Installation planning worksheet
Example
Your first phone is located in the
reception area and has access to
telephone lines 555-4443, 555-4444
and 555-4445 through one jack. The
user’s name is Michael. The second
phone is located in the service area
and has access to telephone lines
555-4443, 555-4444 and 555-4446
through one jack. The user’s name is
Gord. The third line is in the lab and
has access to lines 555-4443 and
555-4447 through two jacks. The
user’s name is Dave.
Venture 3-Line Telephone User Guide 5
Getting started
Installing your Venture phone is
Getting started
venture6-13 Page 6 Sunday, August 20, 2000 12:51 PM
Installation planning worksheet example
Phone ID/Name
Line 1/Jack
Line 2/Jack
Line 3/Jack
Location
01– Michael
555-4443/ jack 1
555-4444/ jack 1
555-4445/ jack 1
reception
02– Gord
555-4443/ jack 1
555-4444/ jack 1
555-4446/ jack 1
service
03– Dave
555-4443/ jack 1
555-4447/ jack 2
lab
Installation planning worksheet
Phone ID/Name
Line 1/Jack
Line 2/Jack
Line 3/Jack
Location
☞ Note: The same telephone line must be used as line 1 on every phone in your system so that the phones can
communicate with each other.
6 Venture 3-Line Telephone User Guide
venture6-13 Page 7 Sunday, August 20, 2000 12:51 PM
2.
3.
4.
5.
Plug one end of the handset cord
into the handset.
installation of your Venture
phones. (See step 2 on page 13.)
6.
Determine which telephone line
configuration, shown in the
following three examples, is like
your configuration.
•
“One or more lines, one phone
jack” on page 8
•
“Two lines, two phone jacks” on
page 9
•
“Two lines, two phone jacks” on
page 9
Plug the other end of the handset
cord into the handset port on the
back of your phone.
☞ Note: For more complex
Press the cord into the channel
provided.
If the phone will be mounted on
a wall, skip to “Installing a
phone on a wall” on page 11.
Disconnect all other equipment
(such as phones or faxes) that
share the phone lines used in the
Venture system. This equipment
will be reconnected after the
the power adapter to the phone
through one cord.
configurations see “Appendix”
on page 45
7.
Connect the cords to the cord
adapter module (CAM) and to
the phone as shown in the
example you identified in step 6.
☞ Note: The CAM is a cord
management device that
connects the telephone lines and
Venture 3-Line Telephone User Guide 7
Getting started
Installing the phone
1.
Getting started
venture6-13 Page 8 Sunday, August 20, 2000 12:51 PM
One or more lines, one phone jack
1. Plug one end of a silver 6-wire
cord into the phone jack and the
other end into port 1 of the
CAM.
2.
3.
line 1 line 2 line 3
CAM
Plug one end of a black 8-wire
cord into the phone port of the
CAM, run the cord through the
stand and plug the other end into
the CAM port on the back of
phone.
1
Plug the power adapter cord into
the power adapter port on the top
of the CAM and the other end
into an electrical outlet.
2
3
8 Venture 3-Line Telephone User Guide
3
venture6-13 Page 9 Sunday, August 20, 2000 12:51 PM
2.
3.
4.
Plug one end of another silver 6wire cord to the line 2 phone
jack and the other end to port 2
on the CAM.
Plug one end of a black 8-wire
cord into the phone port of the
CAM, run the cord through the
stand and plug the other end into
the CAM port on the back of the
phone.
line 1
line 2
CAM
1
2
3
4
Plug the power adapter cord into
the power adapter port on the top
of the CAM and the other end
into an electrical outlet.
Venture 3-Line Telephone User Guide 9
Getting started
Two lines, two phone jacks
1. Plug one end of a silver 6-wire
cord to the line 1 phone jack and
the other end to port 1 on the
CAM.
Getting started
venture6-13 Page 10 Sunday, August 20, 2000 12:51 PM
Three lines, three phone jacks
1. Connect one end of a silver 6wire cord to the line 1 phone
jack and the other end to port 1
on the CAM.
2.
Connect one end of another
silver 6-wire cord to the line 2
phone jack and the other end to
port 2 on the CAM.
3.
Connect one end of another
silver 6-wire cord to the line 3
phone jack and the other end to
port 3 on the CAM.
4.
Plug one end of a black 8-wire
cord into the phone port on the
CAM, run the cord through the
stand and plug the other end into
the CAM port on the back of the
phone.
5.
Plug the power adapter cord into
the power adapter port on the top
of the CAM and the other end
into an electrical outlet.
10 Venture 3-Line Telephone User Guide
line 1
line 3
line 2
CAM
1
2
3
5
4
venture6-13 Page 11 Sunday, August 20, 2000 12:51 PM
☞
Note: You can adjust the
phone to sit at a higher or lower
angle by choosing between the
two sets of holes on the stand.
Removing the stand
1. Firmly grasp the stand and the
phone.
2.
☞ Note: You will hear a loud
cracking sound as the units
separate.
If you want to install a Venture phone
on the wall, you must terminate all
the telephone lines you want to
appear on it on one phone jack. In
addition, you may need to purchase a
wall-mount plate from a telephone
service provider or from an
electronics store.
Lower the tabs into the holes that
you have chosen.
3.
Push the stand against the phone
until the side tabs click into the
locking holes.
4.
Press the cord into the channels
on the bottom of the stand.
Press the CAM into the cavity in
the back of your phone.
2.
Plug one end of the black short
8-wire cord to the phone port of
your CAM.
3.
Plug the other end of the black
short 8-wire cord into the CAM
port on the back of your phone.
4.
Plug the power adapter cord into
the power adapter port on the
CAM.
5.
Plug the power adapter into an
electrical outlet.
6.
Plug one end of the silver short
6-wire cord into CAM port 1.
7.
Plug the other end of the silver
short 6-wire cord into the wallmount plate jack.
8.
Align the slots on the back of the
phone with the studs on the wallmount plate.
9.
Slide the phone down until it
locks into place.
Pull hard until the units separate.
Installing a phone on a wall
2.
1.
Venture 3-Line Telephone User Guide 11
Getting started
Attaching the stand
1. Align the tabs on the edge of the
stand with the holes on the back
of the phone.
venture6-13 Page 13 Sunday, August 20, 2000 12:51 PM
Your Phone list
When the phone ID and name of each
new phone is entered by the owner of
that phone, this information is
automatically added to your Public
Directory as part of the Phone list. If
you have more than one phone in
your Venture system, you can use the
Phone list to call the other phones.
For more information on using the
information in a list see “Using the
list keys” on page 29.
Checking the installation
When you have installed more than
one Venture phone, you should
verify that all of your phones in your
system are communicating.
3.
1.
•
begin making calls see “Making
and receiving calls” on page Left
•
program your options (such as
Don’t disturb or Receive page)
see “Programming your phone”
on page 20.
•
learn more about, or program,
your memory keys, see “Using
the memory keys” on page 26.
•
learn more about, or program,
your Venture lists, see “Using
the list keys” on page 29.
Phone list changes
When anyone changes the name or
ID of any phone in your Phone list,
the phone list of every phone in your
system is automatically updated.
When you delete a phone or move a
phone from one location to another
location in your home or office, the
Phone lists on all phones in your
telephone lines used by your
Venture phones. (This
equipment was disconnected
before the installation of your
Venture phones. See step 5 on
page 7.)
system include the old phone name
and ID. To delete a phone ID and
name from the Phone list, see “To
delete information” on page 31.
On each Venture phone, press
to review each phone in your
system as shown in your phone
list. If the user of phone 01 is
named Jane and she is not using
the phone, the display will show
Jane
Phone 01 idle
If Jane is on the phone, the word
idle will be replaced by busy. If
neither idle nor busy shows, see
“Communication problems” on
page 37.
2.
Repeat step 1.
What’s next?
At this point if you want to
Reconnect any non-Venture
equipment that shares the
Venture 3-Line Telephone User Guide 13
Getting started
the I/C key and listen for dial
tone. If you hear no dial tone see
“No dial tone” on page 37.
☞ Note: If more than one
☞ Note: You can switch
conference call using the telephone
service provider Three-way Calling
feature, you must use ≈ to
connect each participant in the call.
Until you have connected all the
conference call participants, no one
else in your system can be on the
telephone line used to set up the
conference.
incoming call is ringing, your
phone automatically selects
either your prime line or the line
that has been ringing the longest
based on the way you have set
“12 Answer line” on page 22.
back and forth between the two
calls by pressing these two line
keys in turn.
Answering calls
If you subscribe to the telephone
service provider Calling Line ID
feature, your phone displays the
information provided by the
telephone service provider (usually
the caller’s name and number) when
you receive a call.
1.
Pick up the handset, or press the
Handsfree/Mute key, the
flashing Û key, the
flashing line key, or the flashing
memory key.
Answering second calls
When you are on a call and second
call comes in on another line, your
phone beeps, the indicator light for
the line on which the second call is
coming blinks, and if you subscribe
to the telephone service provider
Calling Line ID feature, “ appears on
your display.
Answering Call Waiting calls
When you subscribe to the telephone
service provider Call Waiting or Call
Waiting ID feature, you can answer a
second incoming call on a line that is
already in use. When a second call
comes in, you hear a tone in the
receiver of your phone. If you have
Call Waiting ID, the caller
information appears automatically on
your display.
•
1.
Press “ to see information about
the second call.
2.
If you want to interrupt your
current call to answer this new
call, press the line key with the
blinking indicator light. You are
connected to the second call and
your first call is on hold.
If you want to interrupt your
current call to answer this new
call, press ≈. You are
connected to the second call and
your first call is on hold.
☞ Note: You can switch
back and forth between the two
calls by pressing ≈.
Venture 3-Line Telephone User Guide 15
Making and receiving calls
☞ Note: When you make a
Making and receiving calls
Adjusting the receiver volume When Handsfree is activated, you
While making or receiving calls, you
may want to adjust the volume of the
Handsfree speaker or handset
receiver.
•
Press the right side of
¶ to increase the
volume level.
2.
☞ Note: The Handsfree speaker
Transferring calls
Press the left side of
¶ to reduce the
volume level.
☞ Note: If you want to
change the volume of the
handset receiver permanently,
see Option “14 Hndset deflt”
on page 23.
Using the Handsfree and
Mute features during calls
When making or receiving calls you
can use the Handsfree speaker and
microphone instead of the handset.
16 Venture 3-Line Telephone User Guide
When you want to be heard by
the caller again, press the
Handsfree/Mute key again. The
light stays on.
and receiver work most
effectively when set at moderate
volume levels.
You can answer a call and then send
(or transfer) it to another phone in
your Venture system.
To activate Handsfree
1. Press the Handsfree/Mute key.
The Handsfree light turns on and
you will hear your caller or dial
tone through the Handsfree
speaker on your phone.
To transfer a call
1. When you have answered a call
that you want to transfer, press
⁄. The display shows
Transfer to? ’.
OR
•
display shows Microphone
muted. You can hear the caller,
but the caller cannot hear you.
can speak and be heard on a call
without lifting the handset. When
you are on a Handsfree call you can
activate Mute so that you can talk
privately to someone else in the room
without the caller hearing you.
2.
Leave or place the handset on
the phone.
To activate Mute
1. When Handsfree is activated,
press the Handsfree/Mute key
again. The light flashes and the
2.
Press ’ until the display shows
the phone to which you want to
transfer the call, then press
⁄ or —.
OR
If you have programmed a
memory key for the phone that
than two lines on hold or
connected, the display shows
Select line key. Press the line
keys you want to include in your
conference call.
☞ Note: If the destination
phone is busy, the transferred
call rings back to the sending
phone and the display shows
Phone busy.
5.
Press © to end the call.
Making conference calls
☞ Note: When you hang up
You can make a conference call that
includes any two phone lines or one
phone line and another phone in your
Venture system.
everyone on the call is
disconnected.
To make a conference call
1. Make a call.
To put a conference call on hold
1. Press ˙. All the
conferenced lines are put on
hold.
To consult privately during a
conference call
1. Press the line key for the person
with whom you want to speak
privately. The other line will
automatically be put on hold.
2.
To reestablish the conference
call, press ø.
Paging all phones
1.
Hold down Û for two
seconds. The page tone is heard
on all phones in the system,
unless they are in use.
2.
Wait for the tone to end.
3.
Speak into the handset or
Handsfree microphone.
Hang up or press © to
end the page.
☞ Note: If you press
☞ Note: When a conference
∫Conference without placing your
calls first, the display shows,
Make calls first.
call is on hold, the conferees
cannot speak to each other.
4.
To reestablish the call, press
ø.
Paging one phone
2.
Press ˙.
3.
Make your second call.
4.
Press ∫Conference .
2.
1.
Press ’ repeatedly until the
display shows the phone you
Venture 3-Line Telephone User Guide 17
Making and receiving calls
☞ Note: If you have more
you want to transfer the call to,
press the memory key.
Making and receiving calls
2.
3.
4.
Wait for the tone to end.
To answer a page
Speak into the handset or
Handsfree microphone.
When all phones in the system are
paged, you will hear two short tones
before the initiator begins speaking.
You can listen but you can not
respond.
Hang up or press © to
end the page.
Paging one phone
1.
Press ’ repeatedly until the
display shows the phone you
want to page. Hold down the
intercom key for two seconds.
OR
If you have saved that phone ID
to a memory key, hold down the
memory key for two seconds.
2.
Wait for the tone to end.
3.
Speak into the handset or the
Handsfree microphone.
4.
Hang up or press © to
end the page.
When only your phone has been
paged, you will hear a tone at 15
second intervals until you pick up the
phone or press the Handsfree key. If
you have Handsfree answer turned
on (see Option “03 Hndfree ansr”
on page 21), you can answer the page
by talking into the Handsfree
microphone without picking up your
handset.
Setting up a Room monitor
Room monitor is used to listen to the
sounds in a room such as an
unattended lobby, or a baby’s room.
To set up Room monitor on the
phone being monitored
1. Press Options.
18 Venture 3-Line Telephone User Guide
2.
Press ’ until the display shows,
07 Room monitor OFF.
3.
Press ¥ . The display shows
Room monitor ON.
To set up Room monitor on the
monitoring phone
1. Press Options
2.
Press ’ until the display shows,
08 Memory keys prog.
3.
Press ¥ . The display shows,
Don t disturb.
4.
Press ’ until the display shows,
Room monitor.
5.
Press ¥ . The display shows,
Press memory key.
6.
Press the memory key you want
to use. The display shows,
Saved: Memory key Room
Monitor.
To activate Room monitor
1. Go to the monitoring phone.
Making and receiving calls
Room monitor ON
Transmitter.
Venture 3-Line Telephone User Guide 19
Programming your phone
Your Venture phone is programmed to operate as simply as possible. As you begin using your phone you may decide
that you want to change the way your phone operates. You can do this by setting the options in the Option list.
☞ Note: In addition to programming your options, you can also program the way your phone operates by setting
up your memory keys and lists, see “Using the memory keys” on page 26 or “Using the list keys” on page 29.
To set an option
1.
Press ¥.
2.
Press ’ or ” repeatedly until your display shows the option you want to set.
or
Use the dial pad to enter the two digit option number.
3.
Follow the display prompts to select the setting you prefer.
The following table explains each option that you can set. Options are listed in the order in which they appear in the
Options list. The first column shows the option number and name. The second column shows the possible settings for
each option. An * indicates the default setting of an option. The last column explains how the settings for each option
affects the way your phone works.
Options chart
Number and Option
01 Don t dsturb
Settings
(*=default)
Option function
OFF*
Allows the phone to ring for internal and external calls.
ON
Stops the phone from ringing for external and internal calls. The telephone light still
flashes for incoming calls from outside your Venture system.
20 Venture 3-Line Telephone User Guide
Number and Option
Settings (*=default)
Option function
02 Receive
ON *
Allows the phone to receive pages.
OFF
Stops the phone from receiving pages.
ON *
When one phone is paged, this setting lets you answer the page automatically, without lifting the handset or pressing the Handsfree/Mute key.
OFF
When one phone is paged, this setting lets you answer the page by lifting the handset
or by pressing the Handsfree/Mute key.
level 4 *
Increases or decreases the contrast of the display on a scale from 1 (the lightest) to
8 (the darkest).
03 Hndfree
page
ansr
04 Contrast
(levels 1 - 8)
05 Headset
06 Call
timer
07 Room
monitor
ON
Enables you to make or answer calls through a headset plugged into the handset port
on the back of the phone when you press the Handsfree key.
OFF*
Provides dial tone through the Handsfree speaker or the handset.
OFF*
Turns off the Call timer.
ON
Activates the Call timer so that call duration information replaces the date and time
usually shown on the third line of your display. Call duration information is saved for
the last call received on each line on your phone and for the last t 10 calls you
placed. See also “To view call duration information” on page 27.
OFF*
Disables the Room monitor function.
ON
Enables one phone to monitor the sounds in an area near another phone (such as a
baby’s room, or a reception area that is unattended) without ringing the phone. This
option allows you to listen only. You cannot be heard when you speak. See also “Setting up a Room monitor” on page 18.
Venture 3-Line Telephone User Guide 21
Programming your phone
Options chart
Programming your phone
Options chart
Number and Option
Settings (*=default)
Option function
08 Memory keys prog
Stores Don’t disturb, Page, Room monitor, or Call timer option to a memory key. For
additional information, see “To save an option to a memory key” on page 27.
09 Secure
When you secure a number, the private numbers (such as passwords, PINs [personal
identification numbers], and access codes) that follow it are replaced with * to keep
them from showing on your display. You can secure up to five 12-digit numbers.
number
For example if your bank PIN is 3333 and your bank phone number is 555-4444,
make 555-4444 a secure number. Then when you call your bank your display will
show 555-4444 and when you dial the PIN (3333) the display will show ****.
10 Clear
11
12
13
If you subscribe to the telephone service provider voice messaging service feature,
and the Message waiting prompt and telephone light remain on after you have retrieved your messages, this options turns them off. If this does not work, see “You
can’t turn off the message waiting light” on page 39.
Msg. Wtg.
Prime is
Answer line
Live dialpad
Line 1 *
(Line 2 or 3)
Sets up a line to be automatically selected each time you pick up the handset or press
the Handsfree/Mute key. You can select line 1, 2 or 3 for your Prime line.
No Prime line
If you do not choose a Prime line, you will have to select a line to complete a call.
Answer Prime
The Prime line is automatically selected when more than one line is ringing at the
same time and you pick up the handset or press Handsfree without selecting a line.
Answer Longest*
The line that has been ringing the longest is automatically answered when more than
one line is ringing at the same time.
ON
OFF*
The numbers entered using the dial pad are automatically sent on the Prime line to
make a call.
The numbers entered using the dial pad are displayed. You must manually select a
line to make the call.
22 Venture 3-Line Telephone User Guide
Number and Option
Settings (*=default)
Option function
14 Hndset
ON *
When you change your phone’s handset volume while you are on a call, the change
lasts for the duration of that call only.
OFF
When you change your phone’s handset volume while you are on a call, the volume
change is saved.
All calls*
All calls are logged.
Unanswered calls
Unanswered calls are logged.
No calls
No calls are logged.
15
deflt
Callers log
(This option is set for each line on your phone.)
16 Repeat caller
Combine calls *
Separate calls
This is available when you subscribe to Calling Line ID from your telephone service
provider. The information for the same caller is displayed once and the number of
times they called is listed beside it.
This is available when you subscribe to Calling Line ID from your telephone service
provider. The information for each call is listed separately, regardless of how many
times the same caller calls.
17 Area codes
Prevents selected area code information (received from incoming calls) from being
dialed from your phone. The selected area codes will appear in parentheses on the
display when incoming call information is viewed. You can select up to three 3- to 7digit area codes.
18
Stops certain numbers (such as 1-900-555-3333) or numbers beginning with certain
digits (such as long-distance calls starting with 0 or 1) from being called from your
phone. You can restrict up to five 12-digit numbers.
Restrictions
Venture 3-Line Telephone User Guide 23
Programming your phone
Options chart
Programming your phone
Options chart
Number and Option
Settings (*=default)
Allows numbers that have been restricted through Option 18 to be called from your
phone. For example, if you have restricted long-distance calls beginning with 1 or 0
from being dialed, you can allow 1-800 calls to go through. You can override up to
five 12-digit numbers.
19 Overrides
20 Ring
tone
4*
(1,2,3)
lists
Enables you to select one of four styles of rings for each telephone line and intercom
line on your phone.
Creates an up to four-digit password that must then be used to view or modify the
settings in the Options list. To delete a password, delete the numbers used. If you forget your password, see “You forgot your password” on page 39.
21 Password
22 Lock
Option function
ON
OFF*
Disables the save, delete and change keys so that no one can change or delete the
contents of a list or memory key. You can still erase all items in a Directory using Option 25.
Allows the contents of a list or memory key to be changed or deleted.
23 Phone
ID
Enables you to change the two-digit number used to identify your phone to the system
or to dial your phone from other phones in the system.
24 Phone
name
Enables you to change the name used to identify a Venture phone in the Phone list.
25 Directory
Enables you to erase all items in either the Public Directory or one of the three Private
Directories. This can be done even when Option 22, Lock lists is on.
26 Reset
Enables you to reset all the options on your phone to the factory settings.
options
24 Venture 3-Line Telephone User Guide
Number and Option
Settings (*=default)
Option function
27 Time/Date
(automatic)
If you subscribe to Calling Line ID from your telephone service provider, your first
incoming call will set the time and date automatically.
(manual)
Enables you to manually set the time and date on the display. If you subscribe to Calling Line ID, your first incoming call will reset the time and date.
English*
Enables you to change the language used on the display to English, French or Spanish.
28 Language choice
French, Spanish
Displays the software versions used by your phone. This information is necessary
when calling a telephone service provider or the Nortel help desk.
29 Versions
30 System test
Key test
When each key is pressed, this test displays a number to indicate that the key is functioning. Fifteen seconds after you stop pressing keys, this test will automatically end.
LCD test
The display is filled to show that each information display area is functioning.
LED test
Illuminates the lights on the phone to show that they are working.
Venture 3-Line Telephone User Guide 25
Programming your phone
Options chart
Using the memor y keys
Each of the eight memory keys
can be used to store a phone number,
phone ID, telephone service provider
feature or Venture option for quick
and direct access. You can make
calls, page other Venture phones and
activate features using these keys.
3.
Enter a number using the dial
pad.
☞ Note: To insert a two4.
Press ß. The display
shows Press 1st letter to
enter name. If the name is
already on your display, skip to
step 6.
want to save is in one of your Venture
lists, retrieve the item first. See “To
retrieve an item” on page 29.
5.
1.
Repeatedly press the dial pad
key that has the letter or symbol
that you want to use, until the
display shows that letter or
symbol.
Press ß. Your display
will show Save to?
☞ Note: If your display
shows Memory key is locked,
see option “22 Lock lists” on
page 24.
2.
Press a memory key. Your
display shows Enter number. If
the number is already on your
display, skip to step 4. If both the
26 Venture 3-Line Telephone User Guide
capital or lowercase letter press
”.
6.
If the next letter or symbol is on
the same key as the last one, or if
you want to insert a space, press
“ to advance the cursor.
7.
Repeat steps 1 and 2 until you
have entered the name.
8.
Press ß.
second pause in the dialing
sequence press ˙.
To save information
☞ Note: If the information you
☞ Note: To change to a
name and the number are already
on the display, you are finished.
,-‘&.( ) 1
ABC2
DEF3
GHI4
JKL5
MNO6
PQRS7
¥ *
¡ TUV8
0
Æ
To change information
1.
Press the memory key.
2.
Press ¡ to change the
information shown on the
display.
☞ Note: If your display
shows Key is locked, see
option “22 Lock lists” on
page 24.
WXYZ9
£ #
3.
Use ‘ to backspace over the
numbers or letters you want to
4.
Press ß.
To delete information
☞ Note: When a phone ID is
3.
stored to a memory key, the light for
that memory key lights when that
phone is already in use.
Speak into the handset or the
Handsfree microphone.
4.
Hang up or press © to
end the page session.
To view call duration
information
1.
Press the memory key.
2.
Press ∞ twice.
To activate an option or
feature using a memory key
☞ Note: If your display
•
shows Key is locked , see
option “22 Lock lists ” on
page 24.
☞
Note: You cannot delete
an option saved to a memory
key. To reuse the memory key,
save new information over the
option.
To make a call using a
memory key
1.
Lift the handset or press the
Handsfree key.
2.
Press the memory key for the
number that you want to call.
Press the memory key on which
the option or feature that you
want is stored. The option is
activated and the memory key
light is on.
1.
Press †.
☞ Note: When you have
2.
saved Call timer to a memory
key, you can display the duration
of a call while it is in progress.
Press ’ repeatedly until the
display shows the list item you
want to see.
3.
Press the memory key to which
you stored the Call timer option.
To page one phone
1.
2.
When you use the Call timer option
to time calls, the call duration
information on the last 10 calls you
made is stored in the Redial list.
Press the memory key for the
Venture ID number you want to
call for two seconds.
Wait for the tone to end.
To save an option to a
memory key
You can save the Don’t disturb, Page,
Room monitor or Call timer options
to a memory key. This will enable
you to turn these options on or off by
Venture 3-Line Telephone User Guide 27
Using the memory keys
change and enter the correct
information using the dial pad.
Using the memor y keys
pressing the memory key. When one
of these options is saved to a memory
key, the light beside it will light when
the option is activated.
1.
Press ¥.
2.
Press ’ repeatedly until the
display shows Memory keys
prog.
3.
Press ¥ .
4.
Press ’ repeatedly until the
display shows the option you
want to save.
5.
6.
Press ¥ . The display shows
Press memory key.
Press the memory key you want
to use. The display shows
Saved: Memory key and the
name of the option you saved.
To turn a feature on or off
Some telephone service provider
features have two codes–one to turn
the feature on and one to turn the
28 Venture 3-Line Telephone User Guide
feature off. You must save each code
to a separate memory key.
The feature and the light must be
turned on together.
For each memory key
1. Press ß.
For each memory key
1. Press ß.
2.
Press a memory key.
2.
3.
Use the dial pad to enter the
telephone service provider code
to turn the feature on or the code
to turn the feature off.
Press
to turn the light on or‚
to turn the light off. The display
shows Save feature ON (or
OFF) to.
3.
Press a memory key.
4.
Press ß.
4.
5.
Use the dial pad to enter the
feature name.
Use the dial pad to enter the
telephone service provider code
to turn the feature on or the code
to turn the feature off.
6.
Press ß.
5.
Press ß. The display
shows Press 1st letter to
enter a name.
6.
Use the dial pad to enter the
feature name.
7.
Press ß. The display
shows Saved: Memory key and
the name of the feature.
To turn a feature and light
on or off
The telephone light on your phone
can be programmed to turn on or off
with one of the telephone service
provider features (such as Call
Forward) that you program to a
memory key or to the Services list.
list, Redial list, Callers list and
Services list are information storage
and access areas. You can use the
information stored in these lists to
place calls and activate features.
•
The Phone list stores the name
and ID of every phone in a
Venture system.
•
The Directory stores 200 names
and phone numbers.
•
The Redial list stores
information on the last 10 calls
dialed from a Venture phone.
•
The Callers list stores
information on the last 200 calls
received by a Venture phone.
•
☞ Note: For more specific
information about size and
characteristics of these storage areas,
see “List descriptions” on page 34.
☞ Note: You can press
™ at any time to exit a
list.
To retrieve an item
To make a call or activate a
feature
1.
1.
Press ∆, †,
ç or £ to
access the list. If the number is in
the Phone list, skip to step 3.
☞ Note: If the phone number on
the display is not exactly what
you would dial (for example a
required area code is missing, or
an area code that you do not need
is included) see, “To change
information” on page 29.
☞ Note: If you receive an
incoming call while you are in
any list, you will be bumped out
of the list.
2.
To go to a Directory or Callers
sublist, press “ to locate the
sublist that you want.
☞ Note: To locate a name in
The Services List stores
information on up to 20
telephone service provider
features.
3.
Retrieve the item.
2.
Press —.
3.
If you are activating a feature,
follow the instructions provided
by your telephone service
provider.
the Directory quickly, press the
key with the first letter of the
name until the letter appears on
your display.
☞ Note: Phone list information
Press ” or ’ to find the item.
can only be changed by the owner of
To change information
Venture 3-Line Telephone User Guide 29
Using the list keys
The Venture Directory, Phone
Using the list keys
the correct information using the
dial pad.
a phone using options “23 Phone ID”
or “24 Phone name” on page 24.
1.
Retrieve the item. If you are in
the Redial list skip to step 4.
2.
Press ¡.
6.
3.
Follow the display prompts to
locate the information you want
to change.
☞ Note: For the Callers list
enter the numbers you wish to
dial before the number on the
display or use “ to delete
numbers you do not wish to dial.
You can now press — to dial.
4.
Press ¥ .
5.
Use ‘ to backspace over the
letters you want to change. Enter
30 Venture 3-Line Telephone User Guide
Press ∆ or £.
Your Directory display shows
Enter number. Your Services
display shows Enter feature
code.
3.
Enter the number you want to
save using the dial pad.
Press ß.
☞ Note: If Lock lists is
turned on, your display will
show List is locked No
changes made. To turn Lock
lists off, see Option “22
Lock lists” on page 24.
☞ Note: If your display
shows List is locked, see
option “22 Lock lists” on
page 24.
2.
To save information
☞ Note: If the information you
☞ Note: To insert a twosecond pause in the dialing
sequence press ˙.
4.
Press ß. The display
shows
Press 1st letter
to enter name. If you do not
want to enter a name, go on to
step 8.
5.
Repeatedly press the dial pad
key that has the letter or symbol
that you want to use, until the
display shows that letter or
symbol.
want is in another list, see “To save
information from another list or a
memory key” on page 31.
1.
Press ß. Your display
shows Save to?
☞
Note: If your display
shows List is locked, see
option “22 Lock lists” on
page 24.
,-‘ & .( ) 1
ABC2
DEF3
GHI4
JKL5
MNO6
¡ TUV8
0
Æ WXYZ9
£ #
☞ Note: To change to a
capital or lowercase letter press
”.
6.
7.
8.
Repeat steps 1 and 2 until you
have entered the name.
Press ß. If you are
saving to the Directory, the
display shows Save to? Use “
to choose.
5.
To save information from
another list or a memory
key
1.
If the next letter or symbol is on
the same key as the last one, or if
you want to insert a space, press
“ to advance the cursor.
☞ Note: If you are saving to
9.
10. Press ß.
Press ∆, †,
ç, £ or a
memory key where the
information is stored. If the
number is in the Phone list, skip
to step 3.
2.
If you are in a list with sublists
(such as the Directory), press ‘
or “ to locate the sublist you
want.
3.
Press ” or ’ to find the phone
number you want to save.
4.
Press ß. The display
shows Save to?
the Services list, you are
finished.
☞ Note: If your display
Press “ to locate the directory to
which you want to save the
information.
shows List is locked, see
option “22 Lock lists” on
page 24.
Press £ or ∆.
If you are saving to the
Directory, the display shows
Save to? Use “ to choose.
☞
Note: If you are saving to
the Services list, you are
finished.
6.
Press “ to locate the directory to
which you want to save the
information.
☞
Note: If you have saved
information to a new location
and no longer want it in the
original location, you must
delete it from the original
location.
To delete information
1.
Retrieve the item.
2.
Press ∞ twice. The
display shows Item erased.
Venture 3-Line Telephone User Guide 31
Using the list keys
PQRS7
¥ *
Using the list keys
☞ Note: If your display
shows List is locked, see
option “22 Lock lists” on
page 24.
3.
Follow the prompts on the
display to complete the action.
To turn a feature on or off
in the Services list
Some telephone service provider
features have two codes–one to turn
the feature on and one to turn the
feature off. You must save each code
to a space in the Services list or to a
memory key. For more information
on saving to a memory key, see “To
turn a feature on or off” on page 28.
To save each code
1. Press ß.
2.
3.
Press £. The display
shows Enter feature code.
Use the dial pad to enter the
telephone service provider code
32 Venture 3-Line Telephone User Guide
to turn the feature on or the code
to turn the feature off.
4.
Press ß. The display
shows Press 1st letter to
enter name.
3.
Press
to turn the light on or‚
to turn the light off. The display
shows Save feature ON (or
off) to?
4.
Press £.
5.
Use the dial pad to enter the
telephone service provider code
to turn the feature on or the code
to turn the feature off.
5.
Use the dial pad to enter the
feature name.
6.
Press ß. The display
shows Saved: Services and
the name of the feature.
6.
To turn a feature and light
on or off
Press ß. The display
shows Press 1st letter to
enter a name.
7.
Use the dial pad to enter the
feature name.
8.
Press ß. The display
shows Saved: Services and
the name of the feature.
The telephone light on your phone
can be programmed to turn on or off
with one of the telephone service
provider features (such as Call
Forward) that you program to a
memory key or to the Services list.
To save a code and a light
setting
1. Press £.
2.
Press ß.
To name a Private
Directory
1.
Press ∆.
2.
Press ‘ or “ to locate the Private
Directory (Directory A, B, or C).
Press ¡.
4.
Enter the name. (See step 5 in
“To save information” on
page 30.)
5.
service provider, when your phone
rings your display looks like this.
You answered this
incoming call.
You did not answer this
incoming call.
Press ß.
To delete a Directory
1.
Press ¥.
2.
Press ’ repeatedly until the
display shows 25 Directory.
’=Next *=Erase
3.
You were on another call
when this call came in on the line
you were using.
The first line shows the list number
(001 to 200) and the name of the
caller.
Follow the display prompts.
To set up your Callers lists
To control the type of call
information you want to record and
the way it is recorded in your Callers
list, see Option “15 Callers log” on
page 23 and Option “16 Repeat
caller” on page 23.
Callers list display
information
When you subscribe to Calling Line
Identification from your telephone
☞ Note: If the phone number of a
call received matches one that you
have programmed on a memory key
or in the Directory, the Callers list
displays the name as listed in the
Directory or on the memory key.
The second line shows the type of
call, the phone number of the caller
and ˆ if you have returned the call.
Type of call icons
The third line indicates if the call
displayed is new, the date and time of
the most recent call, whether the call
was long-distance, and how many
times the caller has called.
Icons on the third line
N The call is new.
The call is long distance.
The caller called four times.
To delete a Callers list
1.
Press ç.
2.
Press ∞ twice.
Venture 3-Line Telephone User Guide 33
Using the list keys
3.
Using the list keys
List descriptions
The Phone list includes the phone ID
and name of each phone in a Venture
system. As new Venture phones are
added to your system this
information is automatically added to
your Phone list.
The information in the Phone list is
stored in your Public Directory. The
Phone list can also be accessed by
pressing ’ when the phone is not in
use.
The Redial list stores the last 10
numbers you have dialed from your
phone. It also stores the time each
call was made and the duration of the
call. Numbers in the Redial list can
be modified for use in dialing;
however, changed numbers can only
be saved into the Directory or to a
memory key.
The Callers list records call
information for up to 200 incoming
calls provided by the telephone
34 Venture 3-Line Telephone User Guide
service provider when you subscribe
to Calling Line ID.
The Callers list can be set to record
information on all calls, unanswered
calls or no calls. In addition, call
information can be grouped so that a
caller’s name appears only once with
the number of times he or she tried to
reach you, or so that each call is listed
separately.
includes five sections: a main list,
which includes all shared and private
directory information for this phone;
the Public Directory which includes
all phones in your system and all
numbers shared by all telephones in
the system; and three Private
Directories, which are unique to each
phone. Each Private directory can be
named, and each Directory indicates
how many items it currently contains.
If you do not subscribe to Calling
Line ID and Callers list is activated,
only internal calls will be logged.
You can save information directly to
any of your Directories and view
information in either one of your
Directories or the main list. Entries
saved to each Directory that includes
only a phone number are listed first
in the Directory and are sorted by
first digit. For example, 555-4111
appears before 555-8989. Entries that
include a name and a number are
listed after the numeric listings and
are sorted by name alphabetically.
The Directory stores up to 200
numbers and names. The Directory
The number of items in a shared
Public Directory affects the number
The Callers list consists of a main
list, which includes all call
information stored, and four sublists,
one for each telephone line in your
system and one for the intercom line.
If a line is shared with other phones,
the Callers list for that line appears
on every phone with that line.
Using the list keys
of items that can be stored in the three
Private Directories of each phone in
the system. For example, if the Public
Directory has 50 items in it, each user
has 150 spaces for use in Private
Directories.
The Services list can store the feature
codes and names of up to 20
telephone service provider features
(such as Call Forward or Call
Return).
Telephone service provider features
are offered by subscription or on a
pay-per-use basis. For more
information about features offered in
your area, contact your telephone
service provider.
Venture 3-Line Telephone User Guide 35
Status messages
The following status messages
may be displayed when the handset is
on hook.
If you have more than one status
message, you can view additional
messages using “. When you clear
one status message from the display,
the next one appears.
Status message descriptions
Check line cord
A line cord may be damaged, not
plugged in, or otherwise disabled.
Copying.. .
directory
The Public Directory in the existing
Venture system is being copied to
this phone.
Don’t disturb ON
The Don’t disturb option is on and
your phone will not ring aloud for
incoming calls.
36 Venture 3-Line Telephone User Guide
Feature ON
When you program Feature On to
your Services list or to a memory
key, this message reminds you that a
telephone service provider feature
(such as Call Forward) has been
activated.
Line x Reserved
This message means that you have
reserved line 1, 2 or 3.
Message Waiting on line X
If you subscribe to voice message
services from your telephone service
provider, your phone display
indicates when you have a message
waiting, and on which line the
message is stored.
xxx New Callers
Indicates the number of new callers
that have been added to your Callers
list since you last reviewed it.
xx New Phone(s)
Indicates the number of new phones
that have been added to your Venture
system.
xx New Services
Indicates the number of new services
that have been added to your Services
list.
Ringer is OFF
The ringer for a line or intercom is
turned off on your phone.
xx Calls Bumped
Indicates the number of calls that
have been dropped from your Callers
List.
4.
help you overcome difficulties that
may occur when installing and using
a new Venture 3-line phone.
Press ’ repeatedly until your
display shows the language you
want.
5.
Press ¥ .
Blank display
No dial tone
Your display is blank and the lights
on your phone are not working.
1.
1.
2.
Check that the power adapter is
plugged into a working power
outlet and that proper
connections have been made to
the CAM.
Be certain that you have an 8wire cord connected from the
CAM to your Venture phone.
2.
Ensure that working telephone
lines are connected to the wall
jack(s).
3.
If you have a dial tone on the
handset but not when you are
using the Handsfree speaker,
turn off the headset using option
05. If Headset is on, the
Handsfree speaker is disabled.
Display language error
1.
Press ¥.
2.
Press 28.
3.
Press ¥ .
Check the connections of line
cords from the phone jack to the
CAM and from the CAM to your
Venture phone.
4.
If you have dial tone on the
Handsfree speaker but not when
you are using the handset, ensure
that the handset cord is firmly
plugged into the handset and the
handset jack on the back of your
phone.
Communication problems
You have more than one Venture
phone linked together, and you
experience any of the following:
•
Other phones do not appear on
your phone list.
•
Your display shows ...as the
status of other phones in your
system.
•
Public directory information is
not shared.
•
You experience difficulty
calling other Venture phones.
Your display shows Phone not
responding when you try to
place an intercom call or page
other phones.
•
You hear clicking noises when
calling other Venture phones.
Venture 3-Line Telephone User Guide 37
Troubleshooting
Troubleshooting is designed to
Troubleshooting
In order to communicate, all Venture
phones must share the same
telephone line as line 1.
1.
display should show the Name
assigned to the phone, Phone xx
and one of four possible status
messages:
To ensure that the same
telephone line is connected to
line 1 on all Venture phones you
can
• idle — the phone is not in use
• busy — the phone is in use
• owner — this is the phone you
are using
• Press „.
• If you do not hear dial tone, see
“No dial tone” on page 37.
• If you hear dial tone, check
every Venture phone — the
„ indicator light
should be turned on.
• If the „ indicator light
is not turned on, verify that the
jacks are wired correctly and
the line cords are connected
correctly, see “Appendix” on
page 45.
2.
Press ©.
3.
Press ’. For every Venture
phone in your system, the
38 Venture 3-Line Telephone User Guide
shows, Phone not responding
or you hear clicking noises, see
“Interference caused by nonVenture phones or unused
telephone jacks” on page 38.
• ... — the phones aren’t
communicating or that phone
has been removed from the
system
4.
Call your phone from any
Venture phone that does not
appear in the Phone list.
5.
If the call was placed
successfully, the phone will now
appear in the Phone list. Repeat
step 3 to verify.
6.
If all the phones appear in the
Phone list, call each phone. If
you don’t encounter problems,
you are finished. If your display
Interference caused by non-Venture
phones or unused telephone jacks
Some non-Venture equipment
connected to the telephone line that is
used as line 1 on your Venture
system can cause interference.
Follow these steps to eliminate those
problems:
1.
Following the installation
instructions included with the
termination module, plug a
termination module into every
phone jack in your home or
office that is not used for a
Venture phone.
☞ Note: Do not plug your
Venture phones into a
termination module.
termination modules than those
supplied with your phones, call
1-800-574-1611 to order
additional modules.
You forgot your password
1.
Press ¥. The display
reads
Please enter password “.
2.
Enter the month, date and hour
(in 24 hour format) displayed on
the phone.
Duplicate ID is displayed
for unexplained reason
1.
Press ¥.
2.
Enter 23. The display shows,
Phone Id
’ = next * = change
3.
Press ¥ .
4.
Enter your two-digit ID.
5.
Press ¥ .
6.
If the display shows Duplicate
ID again, repeat steps 1 to 5
using a different number.
You can’t hear
Use ¶ to adjust the
volume of the handset, the Handsfree
speaker or both.
2.
You can’t enter the Options list
because you have forgotten the
password.
If your phone is displaying
FEB 21 3:45pm, the password
would be 02211545.
3.
Press ’ repeatedly until your
display shows 21 Password.
4.
Press ¥ . The display shows
Password > and the number.
Your caller can’t hear you
1.
If you are using the handset,
check the handset cord
connections.
If you are using the Handsfree
speaker, make sure that you have
not muted it. The light beside the
Handsfree/Mute key flashes
when mute is turned on.
You can’t dial from the
Callers list
You can dial a number in the Callers
list, but the call does not connect or
you get a recorded announcement.
•
You may need to add or delete a
long-distance prefix or an area
code. See “To change
information” on page 29.
You can’t turn off the
message waiting light
Your message waiting light cannot
be turned off using Option, “10
Clear Msg. Wtg.” on page 22.
The problem is related to the type of
message waiting signalling provided
by your telephone service provider,
and not with your Venture phone.
Venture 3-Line Telephone User Guide 39
Troubleshooting
☞ Note: If you require more
Troubleshooting
•
Report the problem to your
telephone service provider.
40 Venture 3-Line Telephone User Guide
Maintenance and repair
The Venture phone is fully
supported by Aastra Telecom.
Warranty and repairs
If you have a problem with your
phone, return it to where it was
acquired.
Cleaning the display
Use only a soft cloth soaked in
isopropyl alcohol to clean the
display.
Warning: Do not use a dry cloth—
it might scratch the surface. Do not
use ketone, acetone, toluene or
xylene. They may damage the
coating.
General inquiries
If you have read this guide and have
questions, visit our web site at
http://www.aastra.com, or call
1-800-574-1611.
Venture 3-Line Telephone User Guide 41
Glossary
Action key This key (—) is
located in the center of the arrow
keys on the right side of your Venture
phone. It is used to dial anything on
your display or to change options.
Call log This is another name for
the Callers list.
Call Waiting This is a telephone
service provider feature to which you
can subscribe. The phone beeps,
letting you know that a call is
waiting. If you also have Calling
Line ID, the display shows who is
calling. You can choose to take the
second call or to continue with the
first call.
Calling Line ID (CLID) This is a
telephone service provider feature to
which you can subscribe. It provides
information (usually the name and
phone number of the caller) on
incoming calls. This information is
shown on your Venture phone
42 Venture 3-Line Telephone User Guide
display and stored in your Callers
list.
Conference calling A three-way
call between you and callers on two
other lines. On your Venture phone
you can conference two separate
phone lines or one phone line and an
intercom line.
Connecting block A plastic
block containing metal wiring
terminals that connect one group of
wires to another. Each wire is usually
connected to several other wires in a
bus (an electrical connection that
allows two or more wires or lines to
be connected together) or in a
common arrangement.
Daisychain A method of
connecting devices in a series. The
phone signal is passed through the
chain from one device to the next.
Differentiated ring This is a
telephone service provider feature to
which you can subscribe. It enables
you to have a second phone number
with a unique ring on a single phone
line.
Display prompts Instructions
shown on your display.
Flash This Venture feature works
like a break in the phone line
connection. For example, if you
subscribe to Call Waiting or Calling
Line ID from your telephone service
provider, when you are on a call and
second call comes in on the same
line, you can press ≈ to
answer the other call.
Home run (Star) Phone system
wiring in which the individual cables
run from each phone to a connecting
block where your phone lines are
brought into your building.
KSU-less systems Systems, like
Venture, that include only phones
directly linked to each other so that
your display when a message has
been left for you.
Lists Information storage areas from
which information can be used to
place calls and activate features.
Navigational keys The four
arrow keys that surround the action
key (—): ”, ’, “ and ‘. With these
keys you can move up, down, and
sideways through the Callers list,
Directory, Phone list, Redial list and
Services list.
Lock lists A security feature that
prevents unauthorized users from
deleting or changing items in lists,
such as your Directory or Callers list.
Memory key Eight memory keys
are located on the lower right side of
your Venture phone. When
programmed with a number, a
memory key enables you to dial
frequently called numbers by
pressing the memory key twice.
Memory keys can also be used to
activate telephone service provider
and Venture features.
Message Waiting If you
subscribe to a call messaging service
from your telephone service
provider, you will see this prompt on
Non-square In the Venture
system, a system configuration in
which the first line must be the same
on all the phones, but the other lines
can be arranged in any order.
Phone list The name and
identification number of all phones in
a Venture system are automatically
stored in this list. You can view
Phone list information by pressing ’
when your phone isn’t busy, or by
accessing your Public Directory.
failure. You can receive and make
calls on line 1, but you cannot use
any other lines or features. The
display on your phone is blank when
your phone is operating in POTS
mode.
Square system A system
configuration in which the same lines
in the same order appear on each
phone.
Star See Home run.
Teledapt jack A wall jack that is
the termination point for the
telephone lines being connected to
phones or other communications
equipment in a building.
Termination module An Aastra
solution to problems that sometimes
occur when analog phones share
lines with phones in any KSU-less
system.
POTS Plain Old Telephone Service
is what you receive during a power
Venture 3-Line Telephone User Guide 43
Glossary
they can call each other and share
information and lines.
Glossary
Tip and ring The pair of wires
provided for each telephone line
from the telephone service provider’s
central office.
Twisted pair Two insulated
copper wires twisted around each
other to reduce interference.
44 Venture 3-Line Telephone User Guide
by installers or individuals with
system wiring experience. It provides
in-depth information required to
complete the wiring of a Venture
system, from the connecting blocks
through the jacks and the Venture
cord adapter module (CAM) to a
Venture phone. It also provides
information relevant to new
installations and previously wired
facilities.
•
•
•
Running cable to phone jacks
The following factors should be
considered when new wiring is
required for new installations or to
provide additional phone lines.
•
The same telephone service
provider line must appear as line
1 on each phone so that the
phones in the system can
communicate.
•
Three (or more) twisted-pair
cable is recommended.
Running cable from the
connecting blocks to each
telephone (a home run
configuration) is recommended.
Running a cable from one phone
to the next (a daisychain
configuration) is also supported,
although it may cause more
work if the system is modified
later.
Individual cables for each phone
line can also be run; however,
there is no advantage in
incurring the additional expense.
☞ Note: Wire color may
vary from region to region.
Connecting the cord adapter
module (CAM)
The CAM connects the phone lines
and the power adapter to the Venture
phone through one 8-wire cord. The
CAM has three line ports, labeled as
port 1, port 2 and port 3.
•
Port 1 provides a connection to
Venture lines 1,2 and 3.
•
Port 2 provides a connection to
Venture lines 2 and 3 only.
•
Port 3 provides a connection to
Venture line 3 only.
Wiring the jacks
•
One jack for each telephone is
recommended.
•
On a standard 6-pin teledapt
jack, the lines terminate on the
tip and ring pins as follows:
line 1—green and red pins,
line 2—black and yellow pins,
line 3—white and blue pins.
Venture 3-Line Telephone User Guide 45
Appendix
This appendix is intended for use
Appendix
The phone port, located next to port
1, is used to connect the CAM to the
phone. The power port, located on
the top of the CAM, is used to
connect the CAM through the power
adapter to an electrical outlet.
Two jack examples
The following two examples explain
how to connect three telephone
service provider lines terminated on
two jacks to a CAM. Other more
simple configurations, shown only
from the jack to the phone, are
explained in “Getting started” on
page 5.
Applying the instructions presented
in these two examples should enable
you to connect telephone service
provider lines from the connecting
blocks in a building to the CAM for
any configuration. If you require
more information, call 1-800-5741611.
46 Venture 3-Line Telephone User Guide
2.
3.
connecting block
line 1
Connect one end of a 6-wire
cord to the first teledapt jack and
the other end to port 1 on the
CAM.
Connect line 2 to the red and
green pins of the second teledapt
jack.
4.
Connect line 3 to the black and
yellow pins of the second
teledapt jack.
5.
Connect one end of the 6-wire
cord to the second teledapt jack
and the other end to port 2 on the
CAM.
line 2
line 3
1
1
3
4
2
CAM
3
4
5
Venture 3-Line Telephone User Guide 47
Appendix
Line 1 on a separate jack and lines
2 and 3 on one jack
1. Connect line 1 to the red and
green pins of the first teledapt
jack.
Appendix
Lines 1 and 2 on one jack and line
3 on a separate jack
1. Connect phone line 1 to the red
and green pins of the first
teledapt jack
2.
3.
connecting block
line 1
Connect phone line 2 to the
black and yellow pins of the first
teledapt jack.
Connect one end of the 6-wire
cord to the first teledapt jack and
the other end to port 1 on the
CAM.
4.
Connect line 3 to the red and
green pins of the second teledapt
jack.
5.
Connect one end of the 6-wire
cord to the second teledapt jack
and the other end of the line cord
to port 3 on the CAM.
48 Venture 3-Line Telephone User Guide
line 2
line 3
1
2
1
4
4
2
3
5
CAM
Industry Canada Notice
The Industry Canada label identifies
certified equipment. This
certification means that the
equipment meets certain
telecommunications network
protective, operational and safety
requirements. The Department does
not guarantee the equipment will
operate to the user’s satisfaction.
Before installing this equipment,
users should ensure that it is
permissible to be connected to the
facilities of the local
telecommunications company. The
equipment must also be installed
using an acceptable method of
connection. The method of
connection approved for this
equipment as designated by D.O.C.
Standard CS-03 is a CA11A/CA14A
or CA11W/CA14W connection
arrangement. The A or W suffix
indicates that either desk or wall
mounting is approved. In some cases,
the company’s inside wiring
associated with a single line
individual service may be extended
by means of a certified jack-plugcord ensemble (telephone extension
cord). The customer should be aware
that compliance with the above
conditions may not prevent
degradation of service in some
situations.
Existing telecommunications
company requirements do not permit
their equipment to be connected to
customer provided jacks except
where specified by individual
telecommunications company tariffs.
Repairs to certified equipment
should be made by an authorized
Canadian maintenance facility
designated by the supplier. Any
repairs or alterations made by the
user to this equipment, or equipment
malfunctions, may give the
telecommunications company cause
to request the user to disconnect the
equipment.
Users should ensure for their own
protection that the electrical ground
connections of the power utility,
telephone lines and internal metallic
water pipe system, if present, are
connected together.
This precaution may be particularly
important in rural areas.
CAUTION: Users should not attempt
to make electrical ground
connections themselves, but should
contact the appropriate electric
inspection authority, or electrician, as
appropriate.
NOTICE: The Load Number (LN)
assigned to each terminal device
denotes the percentage of the total
load to be connected to a telephone
loop which is used by the device, to
prevent overloading. The termination
Venture 3-Line Telephone User Guide 49
Regulatory
Canadian regulatory
information
Regulatory
of a loop may consist of any
combination of devices subject only
to the requirement that the sum of the
LN of all the devices does not exceed
100.
This telephone has been tested and
found to comply with the limits for a
Class B digital device in accordance
with the Canadian EMI requirement
ICES-003.
CAUTION: To eliminate the
possibility of accidental damage to
cords, plugs, jacks and the telephone,
do not use sharp instruments during
the assembly procedures.
WARNING: Do not insert the plug
at the free end of the receiver cord
directly into a wall or baseboard jack.
Such misuse can result in unsafe
sound levels
50 Venture 3-Line Telephone User Guide
.
For North American Markets mains
nominal AC voltage 110-117V:
The exclamation point
within an equilateral triangle is intended to alert the
user to the presence of
important operating and
maintenance (serving)
instruction in the literature
accompanying the product.
For Venture- Input: 117/120VAC,
50/60Hz, 12W and Output: 16VAC
500 mA.
For International Markets mains
nominal AC voltage 220-240V:
This symbol on the product is also
used to identify the following
important information:
For Venture- Input: 220/240VAC,
50/60Hz, 12W and Output: 16VAC
500 mA.
Shock Hazard Warning:
To avoid potential electrical shock
hazard to personnel or damage to the
telephone, use only the manufacturer
supplied equipment and installation
procedures. Specifically, use only 6
conductor modular Teladapt plug/
cords with this product, and the AC
transformer must be CSA/UL or
CSA-NRTL/C approved Class 2,
level C, rated as follows:
Substitution of non approved
equipment will void the Aastra
warranty.
For address for warranty and repairs
in Canada:
Please call Aastra Telecom
at 1-800-574-1611
Radio/TV interference
Terminals equipped with electronic
push-key dials generate and use radio
frequency energy, and if not installed
and used properly and in strict
accordance with the manufacturer’s
instructions, may cause interference
to radio and television reception.
These terminals have been tested and
found to comply with the limits for a
Class B digital device in accordance
with the specifications in Part 15 of
the FCC rules. While these rules are
designed to provide reasonable
protection, there is no guarantee that
interference will not occur in a
particular installation. You can
determine whether interference
occurs by monitoring your radio or
television reception while placing a
call.
If your terminal causes interference,
one of the following measures may
correct the problem:
Reorient or relocate the receiving TV
or radio antenna, where this may be
done safely.
To the extent possible, move the
telephone and the radio or television
farther away from each other, or
connect the telephone and the radio
or television to outlets on separate
circuits.
Consult the dealer or an experienced
radio/television technician for
additional suggestions.
Federal Communications
Commission (FCC) notice
FCC registration number: This
telephone equipment complies with
Part 68, Rules and Regulations, of the
FCC for direct connection to the
Public Switched Telephone
Network. (The FCC registration
number appears on a sticker affixed
to the bottom of the telephone.)
☞ Note: FCC registration does
not constitute an expressed or
implied guarantee of performance.
Your connection to the telephone line
must comply with these FCC rules:
Use only an FCC standard RJ11W/
RJ14W or RJ11C/RJ114C network
interface jack and FCC compliant
line cord and plug to connect this
telephone to the telephone line. (To
connect the telephone, press the
small plastic tab on the plug at the
end of the telephone’s line cord.
Insert into a wall or baseboard jack
until it clicks. To disconnect, press
the tab and pull out.)
If a network interface jack is not
already installed in your location,
you can order one from your
telephone company. Order RJ11W/
RJ14W for wall-mounted telephones
or RJ11C/RJ14C for desk/table use.
In some states, customers are
permitted to install their own jacks.
Venture 3-Line Telephone User Guide 51
Regulatory
U.S. regulatory information
Regulatory
Your telephone may not be
connected to a party line or coin
telephone line. Connection to Party
Line Service is subject to state tariffs.
(Contact the state public utility
commission, public service
commission or corporation
commission for information.)
It is no longer necessary to notify the
Telephone Company of your phone’s
Registration and REN numbers.
However, you must provide this
information to the telephone
company if they request it.
If this terminal equipment causes
harm to the telephone network, the
telephone company will notify you in
advance that temporary
discontinuance of service may be
required. If advance notice isn’t
practical, the telephone company will
notify the customer as soon as
possible. Also, you will be advised of
your right to file a complaint with the
FCC if you believe it necessary.
52 Venture 3-Line Telephone User Guide
The telephone company may make
changes in its facilities, equipment,
operations or procedures that could
affect the operation of the equipment.
If this happens the telephone
company will provide advance notice
in order for you to make necessary
modification to maintain
uninterrupted service.
Do not attempt to repair this
equipment yourself. If trouble is
experienced with this equipment, for
repair or warranty information please
contact 1-800-574-1611 or write to
Aastra Telecom
155 Snow Blvd.
Concord, Ontario
L4K 4N9.
If the equipment is causing harm to
the telephone network, the telephone
company may request that you
disconnect the equipment until the
problem is resolved.
Signaling method: The unit’s
push-key dial allows it to signal in
tones (DTMF). It can complete calls
to local and long distance lines and
can also complete long distance calls
via computer-phone systems such as
MCI or SPRINT.
Ringer Equivalence Number:
The FCC Registration label (on
bottom of phone), includes a Ringer
Equivalence Number (REN), which
is used to determine the number of
devices you may connect to your
phone line. A high total REN may
prevent phones from ringing in
response to an incoming call and may
make placing calls difficult. In most
areas, a total REN of 5 should permit
normal phone operation. To
determine the total REN allowed on
your telephone line, consult your
local telephone company.
Hearing aids: The telephone is
compatible with hearing aids
equipped with an appropriate telecoil
Programming emergency numbers:
When programming emergency
numbers and/or making test calls to
emergency numbers:
1. Check with local authorities before
making any test calls to emergency
numbers.
2. Remain on the line and briefly
explain to the dispatcher the reason
for calling before hanging up.
3. Perform such activities in the offpeak hours, such as early mornings or
late evenings.
CSA-NRTL/C installation
instructions
Warning: Avoid electrical shock
hazard to personnel or equipment
damage observe the following
precautions when installing
telephone equipment:
1. Read and understand all
instructions.
1. Never install telephone wiring
during a lightning storm.
2. Follow the warnings and
instructions marked on the product.
2. Never install telephone jacks in
wet locations unless the jack is
specifically designed for wet
locations.
3. Unplug this product from the wall
outlet before cleaning. Do not use
liquid cleaners or aerosol cleaners.
Use a damp cloth for cleaning.
3. Never touch uninsulated telephone
wires or terminals unless the
telephone line has been disconnected
at the network interface.
4. Do not use this product near water,
for example, near a bath tub, wash
bowl, kitchen sink, or laundry tub, in
a wet basement, or near a swimming
pool.
4. Use caution when installing or
modifying telephone lines.
Important safety
instructions
5. Do not place this product on an
unstable cart, stand or table. The
product may fall, causing serious
damage to the product.
When using your telephone
equipment, basic safety precautions
should always be followed to reduce
risk of fire, electric shock and injury
to persons, including the following:
6. This product should never be
placed near or over a radiator or heat
register. This product should not be
placed in a built-in installation unless
proper ventilation is provided.
Venture 3-Line Telephone User Guide 53
Regulatory
option and is compliant with the
requirements for hearing aid
compatibility of the Americans with
Disabilities Act (ADA).
Regulatory
7. Do not allow anything to rest on
the power cord. Do not locate this
product where the cord will be
abused by persons walking on it.
spilled on the product, disconnect
and allow the product to dry out to
see if it still operates; but do not open
up the product.
cord directly into a wall or baseboard
jack. Such misuse can result in
unsafe sound levels or possible
damage to the handset.
8. Do not overload wall outlets and
extension cords as this can result in
the risk of fire or electric shock.
(C) If the product housing has been
damaged.
16. Save these instructions.
9. Never spill liquid of any kind on
the product.
10. To reduce the risk of electric
shock do not disassemble this
product, but have it sent to a qualified
service person when some service or
repair work is required.
11. Unplug this product from the
wall outlet and refer servicing to
qualified service personnel under the
following conditions:
(D) If the product exhibits a distinct
change in performance.
12. Avoid using a telephone during
an electrical storm. There may be a
remote risk of electric shock from
lightning.
13. Do not use the telephone to report
a gas leak in the vicinity of the leak.
(A) When the power supply cord or
plug is damaged or frayed.
14. CAUTION: To eliminate the
possibility of accidental damage to
cords, plugs, jacks, and the
telephone, do not use sharp
instruments during the assembly
procedures.
(B) If the product has been exposed
to rain, water or liquid has been
15. WARNING: Do not insert the
plug at the free end of the handset
54 Venture 3-Line Telephone User Guide
The exclamation point within
an equilateral triangle is
intended to alert the user to
the presence of important
operating and maintenance
(serving) instruction in the literature accompanying the
product.
This symbol on the product is used to
identify the following important
information:
Shock Hazard Warning:
To avoid potential electrical shock
hazard to personnel or damage to the
telephone, use only the manufacturer
supplied equipment and installation
procedures. Specifically, use only 6conductor modular Teladapt plug/
cords with this product, and the AC
For North American Markets mains
nominal AC voltage 110-117V:
For Venture- Input: 117/120VAC,
50/60Hz, 12W and Output: 16VAC
500 mA.
For International Markets mains
nominal AC voltage 220-240V:
For Venture- Input: 220/240VAC,
50/60Hz, 12W and Output: 16VAC
500 mA.
Substitution of non approved
equipment will void the Aastra
warranty.
Warranty and repair
If you have several telephones and
you are having problems with all of
them, or if your telephone works in
some outlets and not in others, your
problem may originate with the local
telephone lines or with central office
equipment. Contact your telephone
company repair service listed in the
front of your phone book.
return the terminal to the
manufacturer or its authorized agents
for repair or refurbishment. You will
be billed for any repairs.
Should the terminal fail during the
twelve month warranty period,
please return it for repair to the
manufacturer, or to the authorized
agent as specified in the product
literature. You will be responsible for
shipping charges, if any, and for
presenting proof of your telephone’s
date of purchase.
Repair to this equipment can only be
made by Aastra Telecom Inc. and its
authorized agents, and by others who
may be authorized by the FCC.
Questions about the warranty or
requests for the manufacturer’s
policy and procedure on repair and
refurbishment should be directed to
the manufacturer or authorized agent
as specified in the product literature.
If the terminal is covered by a
Telephone Company Maintenance
Agreement, follow the procedure set
forth in the Maintenance Agreement
for obtaining repair or replacement of
the terminal.
If the terminal is no longer covered
by the manufacturer or its authorized
agents’ Warranty, and is not covered
by a Telephone Company
Maintenance Agreement, you may
Manufacturer’s limited twelve
month warranty
Coverage: The manufacturer
warrants this terminal against defects
and malfunctions for a period of
twelve months from the date of
original purchase. If there is a defect
or malfunction, Aastra Telecom Inc.
or its authorized agents will, at its
option, and as the exclusive remedy,
either repair or replace the terminal at
Venture 3-Line Telephone User Guide 55
Regulatory
transformer must be CSA/UL or
CSA-NRTL/C approved Class 2,
level C, rated as follows:
Regulatory
no charge if returned within the
warranty period.
If replacement parts are used during
repair, these parts may be refurbished
or may contain refurbished materials.
If it is necessary to replace the
terminal, it may be replaced with a
refurbished terminal of the same
design and color. If it should become
necessary to repair or replace a
defective or malfunctioning terminal
set under this warranty, the
provisions of this warranty shall
apply to the repaired or replaced
terminal until the expiration of ninety
(90) days from the date of pick-up, or
the date of shipment to you of the
repaired or replacement set or until
the end of the original twelve month
warranty period whichever is later.
Exclusions: Aastra Telecom Inc.
does not warranty this terminal to be
compatible with the equipment of
any particular telephone company.
This warranty does not extend to
56 Venture 3-Line Telephone User Guide
damage to product resulting from
improper installation or operation,
alteration, neglect, abuse, misuse,
fire or natural causes such as storms
or floods after the terminal is in your
possession.
or limited herein are the sole
warranties and are in lieu of all other
warranties, expressed or implied,
including warranties or fitness for
particular purpose and
merchantability.
Aastra Telecom shall not be liable for
any incidental or consequential
damages, including but not limited to
loss, damage, or expense directly or
indirectly arising from the
customer’s use or inability to use this
product, either separately or in
combination with other equipment.
This paragraph, however, shall not
apply to consequential damages for
injury to the person in the case of
telephones used or bought for use
primarily for personal, family, or
household purposes.
State law provisions: This warranty
gives you specific legal rights and
you may have other rights which vary
from state to state. Some states do not
allow the exclusion of incidental or
consequential damages or allow
limitation on implied warranties or
their duration, so that above
exclusions or limitations may not
apply.
The warranty sets forth the entire
liability and obligations of Aastra
Telecom Inc. and its authorized
agents with respect to breach of
warranty, and the warranties set forth
C
Call timer 21, 27
on a memory key 22
Call Waiting 15, 23
Callers list 29, 34
delete a list 33
Directory 33
memory key 33
set up 33
Callers log 23
Calling Line ID 15, 25, 34
calls logged
all, unanswered, none 23
CAM
connecting 45
Canadian regulatory
information 49
change
disable key 24
change language selected 25
check line cord 36
cleaning the display 41
Clear Msg. Wtg 22
conference calls 17
dialing 14
connecting
cord adapter module
(CAM) 45
handset 7
line one on a separate jack
and lines two and three on
one jack 47
lines 1 and 2 on one jack
and line 3 on a separate
jack 48
one or more lines, one
phone jack 8
three lines, three phone
jacks 10
two lines, two phone jacks
9
contrast, increase or decrease
21
cord
short 11
D
daisychain 45
date, setting 25
Venture 3-Line Telephone User Guide 57
Index
A
access codes 22
activate
a feature using a memory
key 27
an option using a memory
key 27
feature using a list 29
Handsfree 16
Mute 16
Room monitor 18
allowing calls to restricted
numbers 24
answer line 22
answering calls 15
area codes, prevent display 23
assembling the phone 7
automatically generated lists
34
Index
delete
a Callers list 33
a Directory 33
disable key 24
list information 27, 31
dial tone, headset 21
dialing
autodialer 27
calls 14
from a list 29
Directory 24, 29, 34
Callers list information 33
delete a Directory 33
information organization
34
item retrieval shortcut 29
items in list 34
main list 34
Private 24, 32, 34
Public 24, 34
setting up 34
display
Callers list 33
58 Venture 3-Line Telephone User Guide
cleaning 41
language 12
Don’t disturb 20, 27
on a memory key 22
status message 36
E
electrical outlet 5
end a call 14
enter
name 12
number 13
external calls
answering 15
placing 14
F
feature
ON 36
turn light on/off 28, 32
feature codes 35
H
handset
card 12
connecting 7
cord 7
Handsfree 16
activate 16
automatic page answer 21
dialing 14
Handsfree/Mute key 21
Headset 21
home run 45
I
information storage and access
areas 29
installation 5
Installation planning
worksheet 5, 6
intercom
dialing 14
look up numbers 13, 34
making calls using a memory key 27
J
jack pin-out 45
L
language
change selected 25
display 12
line
automatic answer 22
automatic selection 22
longest ringing 22
reservation 14
ring tone 24
line in use 14
Line x available 14
Line x Reserved 36
lines
connecting three lines to
phone jack 47, 48
list
definitions 34
retrieve an item 29
lists
activate a feature 29
delete information 27, 31
make a call 29
using 29
locate a sub-directory 31
lock lists 24
M
main list 34
Make calls first 17
making a call 14
dialing 14
lists 14, 29
memory key 14, 27
using a memory key 27
using an autodialer 27
using handsfree 14
using line keys 14
memory key 22, 31, 35
activate a feature 27
activate an option 27
Callers list information 33
making calls 27
page one phone 27
programming 22
Room monitor 18
setting up 34
transfer using 17
message waiting 36
microphone
Handsfree 16
monitor a room 18
more than one line ringing 15
mute 16
Mute, activate 16
N
name, a Private Directory 32
Aastra help desk 25, 41
O
options
reset 24
setting 20
other equipment 7
overrides 24
P
page
Venture 3-Line Telephone User Guide 59
Index
join call 14
Index
on a memory key 22
one phone 18
one phone using a memory
key 27
receiving 21
page all 27
password 22
delete 24
phone
busy 14
programming 20
phone busy 17
phone ID 12, 13, 24
phone jacks 5
Phone list 29, 31, 34
using 13, 34
phone name 24
Phone not responding 14
phone numbers
automatically sent 22
PINs 22
power adaptor cord 11
powering up your phone 12
60 Venture 3-Line Telephone User Guide
Prime line 22
prime line 22
Private Directories 34
Private Directory
name 32
private numbers 22
Public Directory 34
Q
Quick Start Card 5
R
Receive page 21
receiver volume 16
Redial list 29, 34
repairs 41
repeat caller 23
reserve line 14
reset options 24
Restrictions 23
retrieve a list item 29
ring tone, choosing 24
Ringer is OFF 36
Room monitor 18, 21, 27
activate 18
memory key 18
on a memory key 22
set up 18
running cable to the jacks 45
S
save
disable 24
save information
to Directory 26, 30, 31
to Services list 26, 30, 31
second call
answering 15
display information 15
secure number 22
select line key 17
send number, automatic 22
separate calls 23
Services list 29, 35
feature light on/off 28, 32
setting up 34
set the time and date 25
T
telephone company features 35
Telephone light 20, 28, 32
telephone light 32
time, setting 25
Time/date 25
timing calls 21
Transfer 16
troubleshooting 37
turn on a feature and light 28,
32
twisted-pair cable 45
type of call
Callers list information 33
icons 33
types of rings 24
Index
setting up
Callers lists 33
Directory 34
memory keys 34
Services list 34
speaker
Handsfree 16
stand
angle adjustment 11
attaching 11
status messages 36
stopping calls 23
System is busy 14
U
U.S. regulatory information 51
using the lists 29
V
version of software 25
volume, adjusting 16
W
wall-mount 11
warranty 41
wiring 5, 7
phone jacks 45
Venture 3-Line Telephone User Guide 61