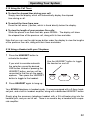
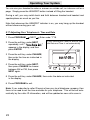
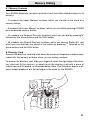
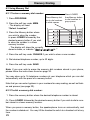
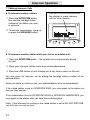
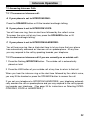
1
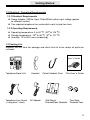
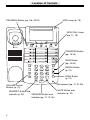
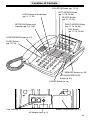
EP4300
4 Line Intercom Speakerphone
with Caller ID and Jumbo Pivoting Display
User’s Guide
Please read before using telephone
Getting Started
Congratulations! You’ve purchased a HGC EP4300 System
Intercom Speakerphone that meets the highest standards for quality and convenience in the Small Office/Home Office environment. To
get the most from your system, please take time to read this guide
thoroughly.
1.1 Phone Features
Toll Restriction
Restrict specific numbers and prevent unauthorized long distance calls.
Busy Lamp Field
See at a glance what other extensions are in use.
Call Privacy On/Off
Prevents others from joining or listening to your conversation unless you
conference them into the call.
and many more including
66 Name and Numbers Directory, 50 Name and Numbers Call ID List,
Caller ID on Call Waiting, High Quality Speakerphone, Line Reserve,
Do Not Disturb, Exclusive HOLD, Headset Compatibility, Conference,
Centrex Compatibility, Distinctive Ringing, Off Hook Ringing, Transfer,
and Battery Backup.
i
Getting Started
1.2 Electrical / Operating Requirements
1.2.1 Electrical Requirements
Power Adapter: 230Vac Input, 9Vdc/500mA (other input voltage applies
for different market)
Two supplied telephone line cords which each include two lines
1.2.2 Operating Requirements
Operating temperature: 0 to 40 oC (32o to 104 oF)
Storage temperature: -15o to 55 oC (5o to 131 oF)
Humidity: 10 to 85% (non-condensing)
1.3 Packing List
Remove the unit from the package and check this list to be certain all parts are
included:
User’s Guide
Telephone Base Unit
Handset
Telephone Line Cords
(1 long and 1 short)
AC Adapter
Coiled Handset Cord
This User’s Guide
Wall Mount
Bracket/Desk Pedestal
Two Desk
Pedestal Feet
ii
Table of Contents
1. Getting Start . . . . . . . . . . . . . . . . . . . . . . . . . . . . . . . . . . . . . . . . . . . .
1.1 Phone Features . . . . . . . . . . . . . . . . . . . . . . . . . . . . . . . . . . . . . . . .
1.2 Electrical / Operating Requirements . . . . . . . . . . . . . . . . . . . . . . . . .
1.2.1 Electrical Requirements . . . . . . . . . . . . . . . . . . . . . . . . . . . . .
1.2.2 Operating Requirements . . . . . . . . . . . . . . . . . . . . . . . . . . . .
1.3 Packing List . . . . . . . . . . . . . . . . . . . . . . . . . . . . . . . . . . . . . . . . . .
i-ii
i
ii
ii
ii
ii
2. Location of Controls . . . . . . . . . . . . . . . . . . . . . . . . . . . . . . . . . . . . . . vi-vii
3. Installing Your System . . . . . . . . . . . . . . . . . . . . . . . . . . . . . . . . . . . . .
3.1 Connect Line Cord . . . . . . . . . . . . . . . . . . . . . . . . . . . . . . . . . . . . .
3.2 Connect Handset . . . . . . . . . . . . . . . . . . . . . . . . . . . . . . . . . . . . . .
3.3 Connect Power Cord . . . . . . . . . . . . . . . . . . . . . . . . . . . . . . . . . . . .
3.4 Install Wall Mount Bracket/Desk Pedestal (Optional) . . . . . . . . . . . .
3.4.1 Install Wall Mount Bracket . . . . . . . . . . . . . . . . . . . . . . . . . . .
3.4.2 Install Desk Pedestal . . . . . . . . . . . . . . . . . . . . . . . . . . . . . .
3.5 Setting User PIN . . . . . . . . . . . . . . . . . . . . . . . . . . . . . . . . . . . . . . .
3.6 Verifying Proper Installation . . . . . . . . . . . . . . . . . . . . . . . . . . . . . .
1-3
1
2
2
2
2
2
3
3
4. Setting Up Your System . . . . . . . . . . . . . . . . . . . . . . . . . . . . . . . . . . . .
4.1 Setting Up Your System At A Glance . . . . . . . . . . . . . . . . . . . . . . . .
4.2 Setting Distinctive Ringing . . . . . . . . . . . . . . . . . . . . . . . . . . . . . . . .
4.3 Setting Up Toll Restriction . . . . . . . . . . . . . . . . . . . . . . . . . . . . . . . .
4.3.1 To set the system's toll restriction access code . . . . . . . . . . .
4.3.2 To set the restricted numbers at a particular telephone . . . . .
4.3.3 To set the allowed numbers at a particular telephone . . . . . .
4.3.4 To completely restrict specific lines at a telephone . . . . . . . . .
4-8
4
4
5
5
6
7
8
5. Operating Your System . . . . . . . . . . . . . . . . . . . . . . . . . . . . . . . . . . . .
5.1 Indicator Light Description . . . . . . . . . . . . . . . . . . . . . . . . . . . . . . . .
5.2 Adjusting Volume Levels . . . . . . . . . . . . . . . . . . . . . . . . . . . . . . . . .
5.3 Making and Answering a Call . . . . . . . . . . . . . . . . . . . . . . . . . . . . .
5.4 Using Redial . . . . . . . . . . . . . . . . . . . . . . . . . . . . . . . . . . . . . . . . . .
5.5 Using Hold . . . . . . . . . . . . . . . . . . . . . . . . . . . . . . . . . . . . . . . . . . .
5.6 Using Another Line During a Conversation . . . . . . . . . . . . . . . . . . .
5.7 Conferencing Calls . . . . . . . . . . . . . . . . . . . . . . . . . . . . . . . . . . . . .
5.8 Transferring Calls . . . . . . . . . . . . . . . . . . . . . . . . . . . . . . . . . . . . .
5.8.1 Transferring an Outside Call to Another Station . . . . . . . . .
5.8.2 Transferring an Outside Call to All Stations . . . . . . . . . . . .
5.9 Using Caller ID . . . . . . . . . . . . . . . . . . . . . . . . . . . . . . . . . . . . . . .
5.10 Using Telephone Company Voice Mail . . . . . . . . . . . . . . . . . . . . . .
5.11 Using Flash. . . . . . . . . . . . . . . . . . . . . . . . . . . . . . . . . . . . . . . . . . .
5.12 Using Mute . . . . . . . . . . . . . . . . . . . . . . . . . . . . . . . . . . . . . . . . . .
9-23
9
10
11
12
12
13
14
15
15
16
17
18
19
19
iii
Table of Contents
5.13
5.14
5.15
5.16
5.17
Using Do Not Disturb . . . . . . . . . . . . . . . . .
Releasing Call Privacy . . . . . . . . . . . . . . . .
Using the Call Timer . . . . . . . . . . . . . . . . .
Using a Headset with your Telephone . . . .
Adjusting Your Telephone's Time and Date .
.
.
.
.
.
.
.
.
.
.
.
.
.
.
.
.
.
.
.
.
.
.
.
.
.
.
.
.
.
.
.
.
.
.
.
.
.
.
.
.
.
.
.
.
.
.
.
.
.
.
.
.
.
.
.
.
.
.
.
.
.
.
.
.
.
.
.
.
.
.
.
.
.
.
.
.
.
.
.
.
.
.
.
.
.
.
.
.
.
.
20
21
22
22
23
6. Memory Dialing . . . . . . . . . . . . . . . . . . . . . . . . . . . . . . . . . . . . . . . . . .
6.1 Memory Features. . . . . . . . . . . . . . . . . . . . . . . . . . . . . . . . . . . . . . .
6.2 Using Memory Dial . . . . . . . . . . . . . . . . . . . . . . . . . . . . . . . . . . . . .
6.2.1 To store a memory dial number . . . . . . . . . . . . . . . . . . . . . . .
6.2.2 To dial a memory dial number . . . . . . . . . . . . . . . . . . . . . . . .
6.3 Using Personal Directory Dial . . . . . . . . . . . . . . . . . . . . . . . . . . . . .
6.3.1 To store a personal directory dial number . . . . . . . . . . . . . . .
6.3.2 To dial a personal directory number . . . . . . . . . . . . . . . . . . . .
6.4 Using Shared Directory Dial . . . . . . . . . . . . . . . . . . . . . . . . . . . . . . .
6.4.1 To store a shared directory dial number . . . . . . . . . . . . . . . . .
6.4.2 To dial a shared directory number . . . . . . . . . . . . . . . . . . . . .
6.5 Special Memory Features . . . . . . . . . . . . . . . . . . . . . . . . . . . . . . . .
24-30
24
25
25
25
26
26
27
27
27
28
29
7. Intercom Operation . . . . . . . . . . . . . . . . . . . . . . . . . . . . . . . . . . . . . . . .
7.1 Making Intercom Calls . . . . . . . . . . . . . . . . . . . . . . . . . . . . . . . . . . .
7.2 Answering Intercom Calls . . . . . . . . . . . . . . . . . . . . . . . . . . . . . . . .
7.2.1 To answer an intercom call . . . . . . . . . . . . . . . . . . . . . . . . . .
7.2.2 To answer an intercom call if you are currently on
an outside call . . . . . . . . . . . . . . . . . . . . . . . . . . . . . . . . . . . .
7.3 Making Pages . . . . . . . . . . . . . . . . . . . . . . . . . . . . . . . . . . . . . . . . .
7.4 Answering Pages . . . . . . . . . . . . . . . . . . . . . . . . . . . . . . . . . . . . . . .
7.5 Selecting Intercom Ring, Intercom Voice, or Handsfree . . . . . . . . . .
7.6 Using Off Hook Voice Announce . . . . . . . . . . . . . . . . . . . . . . . . . . .
7.7 Monitoring a Room Using the Intercom . . . . . . . . . . . . . . . . . . . . . .
7.8 Naming Stations . . . . . . . . . . . . . . . . . . . . . . . . . . . . . . . . . . . . . . .
31-37
31
32
32
32
33
34
34
35
36
37
8. Centrex Operation . . . . . . . . . . . . . . . . . . . . . . . . . . . . . . . . . . . . . . . . 38-38
8.1 Using the Dial Prefix . . . . . . . . . . . . . . . . . . . . . . . . . . . . . . . . . . . 38
9. Additional Information . . . . . . . . . . . . . . . . . . . . . . . . . . . . . . . . . . . . .
9.1 Using Other Telephones With Your EP4300 Telephone . . . . . . . . . .
9.2 Using the DATA/Fax Jack . . . . . . . . . . . . . . . . . . . . . . . . . . . . . . . .
9.3 Using the Network Services Button . . . . . . . . . . . . . . . . . . . . . . . . .
9.4 Replacing Your Battery . . . . . . . . . . . . . . . . . . . . . . . . . . . . . . . . . .
39-41
39
40
40
41
iv
Location of Controls
PROGRAM Button (pp. 4-8, 23-27)
MSG Lamp (p. 18)
NEW CALL Lamp
(pp. 17, 18)
TRANSFER Button
(pp. 15-16)
PAGE Button
(pp. 33-34)
REDIAL Button
(p. 12)
HOLD Button
(p. 12)
VOLUME Control
Buttons (p. 10)
HEADSET Button and
Indicator (p. 22)
SPEAKER Button and
Indicator (pp. 11, 31-36)
v
Microphone (pp. 11, 31-36)
MUTE Button and
Indicator (p. 19)
Location of Controls
CALLER ID Button (pp. 17-18)
LINE Buttons and Indicators
(pp. 9, 11, 20)
LEFT ARROW Button
(pp. 17-18, 26-28)
DELETE Button
(pp. 11, 17-18)
RIGHT ARROW Button
(pp. 17-18, 26-28)
INTERCOM Button and
Indicator (pp. 9, 31-34)
DIAL Button
(pp. 17-18, 26-28)
CONFERENCE Button (p. 15)
FLASH Button
(pp. 19, 24)
MEMORY Buttons (p. 25)
NETWORK SERVICES
Button (p. 40)
LOWER Button (p. 25)
POWER
L1/L2
L3/L4
Battery Compartment (p. 41)
Line Jacks (p. 1)
AC Adapter Jack (p. 2)
vi
Installing Your System
3.1 Connect Line Cord
Connect First Line Cord
Connect one end of a long telephone
line cord to the jack on the bottom of
the telephone labeled L1/L2.
Connect the other end to the jack(s)
labeled Lines 1 & 2 either:
Lines
1&2
L1/L2
directly to the wall jack if it is a twoline RJ14 jack
OR
to a two-line coupler (not provided) if
you have two single-line RJ11 jacks
for lines 1 and 2. Then connect the
two cords of the coupler to the corresponding wall jacks. Two-line couplers are available many places, for
example Radio Shack (part #279401).
Connect Second Line Cord
Connect one end of a long telephone
line cord to the jack on the back of
the telephone labeled L3/L4.
Connect the other end to the wall
jack(s) labeled Lines 3 & 4 in the
same manner as described in the
previous step.
Note: If you are installing a 3-line
EP4300 telephone, or are connecting a 4-line telephone to only 3 lines,
connect the other end of the line
cord directly to the wall jack labeled
Line 3.
1
Line 1
Line 2
L1/L2
L3/L4
Installing Your System
3.2 Connect Handset
Plug either end of the coiled handset cord into the handset and the other end into
the jack on the side of the telephone. Place the handset in the cradle.
3.3 Connect Power Cord
Plug the AC power cord into the adapter jack on the bottom of the telephone.
Thread the power cord into the recessed groove. Plug the AC adapter into an electrical outlet not controlled by a wall switch.
3.4 Install Wall Mount Bracket/Desk Pedestal (Optional: Please contact your
local agent for ordering)
First, you must connect the long telephone line cord to the jack by the baseboard,
and plug the AC adapter into the nearest electrical outlet.
3.4.1 Install Wall Mount Bracket
Reverse Handset Hook
Slide the telephone hook out of the
cradle, rotate it 180 degrees so that
its tab faces upward, and then slide
it back into the cradle.
Attach Telephone to Wall
Hold the telephone close to the wall
and connect the short telephone
line cord to the jack.Then mount the
telephone to the wall plate, sliding it
down firmly so that it locks securely
in place.
3.4.2 Install Desk Pedestal
The wall mount bracket can also be
used as a desk pedestal. Simply
attach the bracket in the opposite
direction that you would for wall
mounting, pressing firmly upward to
snap it in place.
You may choose to place your
EP4300 telephone on a desk without the desk pedestal. If you do so,
set the desk pedestal/wall mount
bracket aside in case you want to
use it in the future.
2
Installing Your System
3.5 Setting User PIN
To Enter User Mode
1 Press PROGRAM button.
2 Press the soft key under NEXT, then “ Enter Code:” appears in the display.
3 To enter User mode, simply enter the User password.
- The default User password is *718.
Note: If in case that the Toll restriction access code password is forgotten, please
contact your local dealer or the support centre, for master reset. This will bring the
passwords back to 1234.
3.6 Verifying Proper Installation
The following procedure should be used at each telephone to verify proper installation. Also use this procedure any time you are experiencing difficulty, to test system configuration and identify possible system connection errors. The phone must
be connected to the AC power supply, line 1 must be connected to the line 1 jack,
and the phone must have been assigned an intercom station number.
First, verify that line 1 is connected to the same telephone number at all the telephones. To do this, press the line 1 button at one of the telephones. The line 1 LED
should be green, the speakerphone LED should be red, and dial tone should be
heard from the speaker. Now go to each of the other stations and make sure that
each line 1 LED is red.
Next, make sure that lines 2, 3 and 4 are connected the same at all the phones by
following the following steps at each telephone:
1. Press the line 1 button. The line 1 LED should be green, the speakerphone LED
should be red, and dial tone should be heard from the speaker.
2. Dial the telephone number for line 2. The line 2 LED should flash slowly. If the
line 2 LED does not flash, then line 2 is improperly connected to this telephone.
3. If this telephone utilizes line 3 and/or line 4, repeat steps 1 and 2, substituting
the respective phone number(s) in step 2.
3
Setting Up Your System
4.1 Setting Up Your System At A Glance
The following must be done at each station:
Program
Factory Setting
Page
None Set
4
No Restrictions
5-8
Ring
34
Program
Factory Setting
Page
Set Toll Restriction Access Code
1234
5
Store Shared Directory
Dial Numbers
None Stored
27
Name Stations
None Named
37
Set Distinctive Ringing
Toll Restriction
Select Intercom Ring, Voice
or Handsfree
The following must be done at Station #11:
4.2 Setting Distinctive Ringing
1 Press PROGRAM
NEXT
Enter code: *718.
2 Press the soft key under NEXT repeatedly, until “ Distinctive Ring”
appears in the display, and then press ENTER.
3 Press the soft key under CHANGE repeatedly, until the desired
distinctive ring setting for Line 1 is displayed.
The choices are:
L1:RING SOUND #1 (factory setting) through RING SOUND #8
4 Press the soft key under NEXT to see the current setting for Line 2,
and repeat steps 3 and 4 to change the settings for Lines 2-4.
5 Press PROGRAM to exit.
Note: At any time when you have a particular distinctive ring setting displayed, you
may press the soft key under HEAR to hear an example of that distinctive ring.
4
Setting Up Your System
4.3 Setting Up Toll Restriction
4.3.1 To set the system’s toll restriction access code:
At Station #11:
1 Press PROGRAM
NEXT
Enter code: *718.
2 Press the soft key under NEXT repeatedly, until “ Toll Restriction”
appears in the display, and then press ENTER.
- The display will read “ Access Code:****. ”
3 Press the soft key under CHANGE if you wish to store a new access code.
4 Enter a 4 digit number.
5 Press PROGRAM to exit.
The Toll Restriction feature enables you to control outgoing calls and helps you prevent unauthorized long distance calls.
If you ever forget the access code, simply set a new code at Station #11. Until you
set the access code, the code will be the one set at the factory, which is “1234”.
Note: After setting a station’s restrictions, its toll restriction is automatically ON.
5
Setting Up Your System
4.3.2 To set the restricted numbers at a particular telephone:
1 Press PROGRAM
NEXT
Enter code: *718.
2 Press the soft key under NEXT repeatedly, until “ Toll Restriction”
appears in the display, and then press ENTER.
- The display will read “ Enter Code: ”
3 Enter the 4 digit toll restriction access code which was set at Station #11
(See preceding page).
- You will hear a confirmation beep and will see “ Set Restricted #”
4 Press ENTER
- The display will show the currently stored Restriction #1, or indicate
“1:
” if there is no Restriction #1 yet stored.
5 Press the soft key under CHANGE if you wish to store a new Restriction #1,
then dial desired restricted number, up to 6 digits.
6 Press the soft key under SAVE.
7 Press the soft key under NEXT and repeat steps 5-6 if you wish to store any
additional restrictions at this phone.
Toll restriction numbers are set individually at each station, so the restrictions can
vary from phone to phone.
Some examples of popular restrictions:
“1” ... to restrict all numbers starting with “1”.
“01” ... to restrict all international calls.
“0” ... to restrict all operator-assisted calls.
“#976” ... to restrict all “0976” and “1976” calls.
(When you enter restricted numbers, “#” is a wildcard that stands for the number
“0” or “1”.)
Note: Restrictions are usually just a few digits, since they prevent the dialing of all
numbers starting with those digits.
6
Setting Up Your System
4.3.3 To set the allowed numbers at a particular telephone:
1 Press PROGRAM
NEXT
Enter code: *718.
2 Press the soft key under NEXT repeatedly, until “ Toll Restriction”
appears in the display, and then press ENTER.
- The display will read “ Enter Code: ”
3 Enter the 4 digit toll restriction access code which was set at Station #11
(See page 5).
- You will hear a confirmation beep and the display will read
“ Set Restricted #”
4 Press the soft key under NEXT.
- The display will read “ Set Allowed #”
5 Press ENTER
- The display will show the currently stored Allowed #1, or indicate
“1:
” if there is no Allowed #1 yet stored.
6 Press the soft key under CHANGE if you wish to store a new Allowed #1,
then dial desired allowed number, up to 10 digits.
7 Press the soft key under SAVE.
8 Press the soft key under NEXT and repeat steps 6-7 if you wish to store any
additional allowed numbers at this phone.
If you set restrictions at a particular phone, you will most likely also want to store
some allowed exceptions at that telephone.
For example, if you restrict long-distance calls, you will probably want to store some
allowed area codes, such as “1301”. Or, for example, you may wish to store
“1800”, to allow all “1800” calls. Or “1*******” to allow all “1+7 digit” calls.
(When you enter allowed numbers, “*” is a wildcard that stands for any number
from 0-9.) You may also want to store some specific allowed numbers, for example other company offices.
7
Setting Up Your System
4.3.4 To completely restrict specific lines at a telephone:
1 Press PROGRAM
NEXT
Enter code: *718.
2 Press the soft key under NEXT repeatedly, until “ Toll Restriction”
appears in the display, and then press ENTER.
- The display will read “ Enter Code:”
3 Enter the 4 digit toll restriction access code which was set at Station #11
(See page 5).
- You will hear a confirmation beep and the display will read “ Set
Restricted #”
4 Press the soft key under NEXT repeatedly, until “ Line Restriction”
appears in the display, and then press ENTER.
5 Press the soft key under CHANGE repeatedly, until the desired Line 1
Restriction setting is displayed.
The choices are:
L1: NORMAL (factory setting)
L1: RESTRICTED
6 Press the soft key under NEXT to see the current setting for Line 2, and
repeat steps 5 and 6 to change the settings for Lines 2-4.
7 Press PROGRAM to exit.
In addition to setting specific restrictions at a particular phone (See preceding
page), you may completely restrict any or all of the lines at a particular station.
People will not be able to make any outgoing calls on any lines that are completely restricted at a station, with the exception of the allowed numbers at that station
and calls to “911”. However, they will still be able to receive incoming calls on
these lines, take calls off hold, and have full use of the intercom.
The ability to completely restrict lines is useful in an office where you only want
people to make calls on certain lines at particular stations. You may also wish to
put one station in a public area, such as a lobby, and completely restrict all or most
of its lines.
8
Operating Your System
5.1 Indicator Light Description
Line indicators
Off
Line is free
On steady (red)
On steady (green)
Line is in use at another station
Line is in use at your station
Flashing slowly (orange)
Flashing slowly (red)
An outside call is ringing at your telephone
An outside call is ringing, but your ringer is Off,
Delayed, DND, or another call is already ringing
On (red) plus wink
On (green) plus wink
Call is on hold at another station
Call is on hold at your station
On (red) plus orange wink
Call is on hold past reminder time at another ext.
On (green) plus orange wink Call is on hold past reminder time at your station
Note that the orange wink alerts everybody to a call that is still on hold past the reminder time.
Flashing quickly (red)
Flashing quickly (green)
Call is being transferred to all stations
Call is being transferred to your station
Intercom Indicator
Off
Intercom is free
On steady (red)
On steady (green)
Intercom is in use at another station
Intercom is in use at your station
Flashing quickly (red)
Flashing quickly (green)
Someone is paging all stations
Someone is intercoming or paging your station
LCD Station In-Use Indicators
Off
That station is free
On
9
That station is in-use
Operating Your System
5.2 Adjusting Volume Levels
To adjust the ringer volume:
While the phone is on-hook and idle:
1 Press the up and down VOLUME
buttons to set desired ringer
volume. With each press, the
phone will ring once at the
new volume.
VOLUME
Press to raise volume
Press to lower volume
To adjust the handset volume:
While using the handset:
1 Listen to dial tone or voice.
2 Press the up and down VOLUME buttons to set desired handset volume.
To adjust the speakerphone volume:
While the speakerphone is activated:
1 Listen to dial tone or voice.
2 Press the up and down VOLUME buttons to set desired speakerphone
volume.
To adjust the intercom speaker volume:
While using the intercom or receiving a page:
1 Listen to the voice coming through your speaker.
2 Press the up and down VOLUME buttons to set desired intercom
speaker volume.
The speaker volume levels for the intercom and for outside calls are separate and
independent of one another. You may, for example, set your speakerphone so that
a caller’s voice will be at a normal level, yet intercom pages will come through at
a louder volume.
10
Operating Your System
5.3 Making and Answering a Call
To make and answer calls using the handset:
1 Lift the handset.
If you wish to override automatic line selection, press desired LINE button
before lifting the handset.
2 Replace the handset in the cradle to hang up.
You can lift the handset to make a call, the phone selects a line according to its
automatic line selection setting. If you lift the handset while your phone is ringing,
your phone will automatically select the ringing line. If you wish to override automatic line selection, press the desired LINE button before lifting the handset.
To make and answer calls using the speakerphone:
1 Press the SPEAKER button to activate the speakerphone.
If you wish to override automatic line selection, press the desired LINE button
instead of pressing the SPEAKER button, and you will be connected to that
line on speakerphone.
2 Press SPEAKER again to hang up.
You can use the speakerphone to make or answer an outside call, an intercom call
or a page. Simply press the SPEAKER button instead of lifting the handset.
When you press the SPEAKER button to make a call, the phone selects a line
according to its automatic line selection setting. If you press the SPEAKER button
while your phone is ringing, you will automatically answer the ringing line. If you
wish to override automatic line selection, press the desired LINE button instead of
pressing the SPEAKER button, and you will be connected to that line on the speakerphone.
During a call, you may switch back and forth between handset and speakerphone
as much as you like. Simply press the SPEAKER button while using the handset
to activate the speakerphone and then hang up your handset. To switch back to a
handset call, lift the handset.
Note: You may make calls on either handset or speakerphone using the “predialing” feature. Many people find this a convenient and relaxing method of placing
calls. See page 30 for details on using the predialing feature.
11
Operating Your System
5.4 Using Redial
1 Press REDIAL.
2 Press the right arrow button under the display to scroll through a list of the
last five numbers dialed, along with the date, time and duration of each call.
The Redial feature enables you to redial or simply view any of the last five telephone numbers you dialed, along with the time, date and duration of each call.
Note that the redial feature is useful if you simply wish to review your recent calls,
or if you wish to know the duration of a particular call. There is no need to actually dial the number.
5.5 Using Hold
1 Press HOLD.
2 To take the call off hold, press
the line button of the line on hold.
Press HOLD to
place an outside
call on hold
REDIAL
HOLD
Note: Once a call is on hold, it can
be taken off hold by any EP4300 telephone.
While a caller is on hold, you can replace the handset without disconnecting the
call. Press the LINE button at any time to return to your call. Note: You cannot
put an intercom call on hold.
If the call is still on hold at your telephone after one minute, a triple ring will sound,
and will sound every minute thereafter to alert you that the caller is still on hold.
You can also take a call off from hold at a non-EP4300 telephone, by simply seizing the line at that telephone.
12
Operating Your System
5.6 Using Another Line During a Conversation
1 Press HOLD to place the first call on hold.
2 Press another LINE button to make a call on that line.
3 Or, press the flashing LINE button to answer the incoming call.
While having a conversation on one line, you may make a call on another line.
Press HOLD to place your first call on hold and then press another LINE button to
make a second call. Press the first LINE button at any time to return to your original call and disconnect the second call. If you wish to keep the second call, you
must remember to place it on hold before returning to the original call.
While having a conversation on one line, if a call comes in on another line, its line
lamp will begin flashing and a double ring will sound every 15 seconds to alert you
of that incoming call. If an incoming call is ringing on a line that is set to “ringer
off” at your telephone, the alerting ring will not sound.
You may answer the call by pressing the flashing LINE button. Remember to put
the first call on hold before answering the incoming call, or the first call will be disconnected.
You can switch between lines as much as you want during the course of a call.
Always remember to place your current call on hold before seizing another line, or
you will disconnect your current call.
13
Operating Your System
5.7 Conferencing Calls
To conference two outside calls:
1 Make or answer a call.
CONFERENCE
2 Press HOLD.
3 Make or answer a call on another line.
FLASH
The Conference
button allows you
to join two outside
calls, or another
station to an outside call
4 When the second call is connected,
press the CONFERENCE button.
The lines are immediately conferenced.
5 To end a conference call, hang up. Both parties will be disconnected.
Or You may press a LINE button if you wish to continue with the call on that line.
The party on the other line will be disconnected.
To conference another station while on an outside call:
1 Place an intercom call to the desired station. The outside call is automatically
placed on hold.
2 After the person at the other station answers, press the CONFERENCE
button to create a conference call.
3 To end the conference call, hang up. The person at the other station may remain
connected to the outside call.
While having a conversation on one line, you can make or answer a second call on
another line, then connect both lines together to create a conference call.
If you wish to talk privately with one party during a conference call, press HOLD to
place both lines on hold, and then press a LINE button to talk privately with the person on that line. Press CONFERENCE to resume the conference call.
You may also use the conference feature to join another station to a call on an outside line. The person at either EP4300 telephone can leave the conference call by
hanging up, and the remaining station will stay connected to the outside call.
Another way to conference another station to an outside call is to tell the person at
the other station to press the appropriate LINE button at their telephone. Note that
if System Call Privacy is ON, you must first turn Call Privacy OFF by pressing the
CONFERENCE button, or the person at the other station will not be able join the
call by pressing their LINE button.
14
Operating Your System
5.8 Transferring Calls
5.8.1 Transferring an Outside Call to Another Station
To transfer a call after first announcing it to the other station:
1 Place an intercom call to the
desired station. The outside
call is automatically placed
on hold.
2 Wait for an answer.
Announce that you are
transferring the call.
3 Press the TRANSFER button.
Press TRANSFER
to send a call to
another station
TRANSFER
! DEF
PAGE
$ MNO
REDIAL
To transfer a call directly without first announcing it to the other station:
1 Press the TRANSFER button.
2 Dial the desired two-digit station number to transfer the call to that station.
You may transfer a call to another station after first placing an intercom call to the
desired station to announce the call. If the person at the other station wishes to
talk to the caller, simply press the TRANSFER button and hang up your telephone.
This feature is especially useful for screening calls.
Note: If the other EP4300 station does not wish to be transferred the call, press
the LINE button to return to the outside call.
You may also transfer a call directly, without announcing it to the other station.
While the desired station is ringing, the call will stay on hold at all the other stations,
including yours. If the person at the desired station does not answer, you can reengage the call by pressing the flashing LINE button. Likewise, if you hear your
telephone ringing the transfer ring and you are nearer to another telephone, you
can take the call at this telephone simply by pressing the flashing LINE button.
15
Operating Your System
5.8.2 Transferring an Outside Call to All Stations
To use the transfer ring:
1 Press TRANSFER twice.
All the other phones will now
ring with the transfer ring.
To use one of eight personal rings:
1 Press TRANSFER and then
the desired dial pad number
buttons (from 31-38).
All the other phones will now ring with
the personal ring represented by that
number.
Press TRANSFER twice
to transfer a call to all stations
Or use the dialpad numbers 31-38 to transfer a
call to all stations with a
personal ring
TRANSFER
! DEF
PAGE
$ MNO
REDIAL
You may transfer an outside call to all stations by using the transfer ring or one of
eight personal rings. If you answer a call that is not for you, and you do not know
where to direct it, just press TRANSFER twice. All of the other phones will ring in
the transfer ring and the call will be transferred to whoever answers next. The call
will remain on hold at your station until another station picks up the call.
Your EP4300 telephone also features eight unique personal transfer rings which
you may use to transfer a call to all of the other stations. This feature is helpful if
you wish to transfer a call to a particular person who may not always be by a particular phone. Many people find this method of transferring a call more professional and unobtrusive than the traditional method of using voice pages to call people
to the phone. You may assign each person their own personal ring, and each time
a call comes in for them, you can transfer the call to all stations with their personal ring.
16
Operating Your System
5.9 Using Caller ID
1 Press CALLER ID.
Press CALLER ID and the arrow
buttons to view the caller list
2 Use the right and left arrow
buttons under the display to
view the caller list.
3 To dial a number in the caller
list, lift your handset, or press
DIAL, or SPEAKER, or a LINE
button when the desired number
is displayed.
18
The Caller ID feature works in conjunction with Caller ID service, which may be offered
by your local telephone company, is name and number and call waiting caller ID compatible, and can store up to 50 of your most recent calls.
In order for this feature to work, you must subscribe to the Caller ID service from your
local telephone company. Name and number caller ID and call waiting caller ID may
not be available in all areas that offer caller ID service, and may cost more than basic
number caller ID service.
When you press the CALLER ID button to view the caller list, the display will indicate
the number of new calls in the caller list, as well as the total number of calls in the caller
list. A “new” call is one that has not yet been viewed. You can then use the right arrow
button to view the list from most recent to oldest, or the left arrow button to go from the
oldest to the most recent calls.
To use the NEW CALL Lamp:
When the NEW CALL lamp is lit solid, this means that at least one new call has been
added to the caller list since the Caller ID button was last pressed.
To delete numbers from the caller list:
1 While viewing the caller list, press the DELETE button twice when the desired
number is displayed,
Or, press the DELETE button and keep it depressed for 5 seconds to delete
all the numbers in the caller list.
Note: In addition to being able to delete any and all records from your caller list,
you can decide whether calls are stored in the first place. You may choose separately for each line at your phone. To do this, press PROGRAM, then NEXT until
you see “Caller ID Store”, then press ENTER. Press CHANGE if you wish to
change the setting for Line 1, and then press NEXT and CHANGE to view and
change the settings for Lines 2-4.
17
Operating Your System
5.10 Using Telephone Company Voice Mail
To use your MSG lamp to indicate voice mail messages:
1 Subscribe to voice mail service from your local Telephone Company.
2 Follow the instructions at right to set your voice mail detector to the proper line.
- The MSG lamp will now flash whenever you have new messages.
To access your voice mail messages:
1 Dial the number for your Telephone Company voice mail service. You may
wish to store this number in one of your phone’s memory locations for easy
access (see page 25).
To turn off the MSG lamp:
If your MSG lamp ever remains flashing even after you have retrieved your messages, you may turn it off manually by following the following instructions:
1 Press PROGRAM
NEXT
Enter code: *718.
2 Press the soft key under NEXT until “ New Call Lamp and VMWI Message”
appears in the display.
3 Press the soft key under RESET.
If you subscribe to Telephone Company voice mail, the MSG lamp will flash when
you have unretrieved messages.
18
Operating Your System
5.11 Using Flash
1 Press FLASH instead of the switch-hook when using custom calling services
or when activating certain Centrex or PBX features.
Press the FLASH button instead of pressing the switchhook to activate services
such as Call Waiting or 3-Way Calling, or to activate certain PBX or Centrex features. You may be required to press other buttons before or after you press FLASH.
Refer to the custom calling instructions provided by your local telephone company
or to the operating instructions provided with your PBX.
You can store a switchhook flash into a memory location. When you store a flash,
it is represented in the display by a small “f”. (See page 29.)
5.12 Using Mute
1 Press MUTE.
- The MUTE indicator turns ON.
2 Press MUTE again to cancel MUTE.
- The MUTE indicator turns OFF.
Press MUTE to turn off your microphone so you cannot be heard
HEADSET
SPEAKER
MUTE
The Mute feature allows you to turn off your telephone’s microphone so that the
other party cannot hear you.
The Mute feature works whether you are using the handset or the speakerphone. It
silences only your voice; you will still be able to hear the other party.
The Mute feature automatically cancels when you hang up, or switch between lines.
19
Operating Your System
5.13 Using Do Not Disturb (DND)
To activate Do Not Disturb:
1 Press PROGRAM
NEXT
Enter code: *718.
2 Press the soft key under NEXT repeatedly, until “Don’t Dsturb:OFF”
appears in the display.
3 Press the soft key under CHANGE.
The display will now read “Don’t Dsturb:ON”.
4 Press PROGRAM to exit.
You will notice that your phone’s DND indicator in the display is now on, and
your telephone’s display will read “Do Not Disturb.”
To cancel Do Not Disturb:
Press the soft key under RESET at any time to cancel Do Not Disturb.
The Do Not Disturb feature is useful to prevent interruptions during meetings or
whenever you do not want to be disturbed.
While the Do Not Disturb feature is activated, your telephone will not ring.
Incoming calls will be signaled only by the LINE indicators flashing. Pages will not
be heard through your telephone, and other stations will be unable to make intercom calls to you or transfer calls to your telephone.
You may still answer any outside call by pressing the desired flashing line button.
You may also place outside calls and intercom calls while your Do Not Disturb is
activated.
20
Operating Your System
5.14 Releasing Call Privacy
If your system is set to have call privacy normally ON, it will automatically be on
during each call.
The CONFERENCE button is
1 Press the CONFERENCE button
also used to release Call Privacy
any time you wish to turn the call
off during a call
privacy OFF during a particular call.
“Privacy Released” will appear in the
display to indicate that call privacy is
temporarily off.
CONFERENCE
FLASH
The Call Privacy feature prevents people at other stations from joining or listening
to your conversation unless you conference them to the line or release the call privacy during the call.
If you release Call Privacy during a call, this new setting will remain for the length
of the call, and the setting will automatically return to the system setting when you
hang up.
Note: Call Privacy is always on for intercom calls.
21
Operating Your System
5.15 Using the Call Timer
To view the elapsed time during your call:
Simply view the display, which will automatically display the elapsed
time during a call.
To restart the timer from zero:
Press the left arrow (<)button, which is found directly below the display.
To view the length of your previous five calls:
While the phone is on-hook and idle, press REDIAL. The display will show
the elapsed time of the previous call, along with its time and date.
Note that you can use the right arrow button under the display to view the lengths
of the previous five calls, along with their times and dates.
5.16 Using a Headset with your Telephone
1 Press the HEADSET button to
activate the headset.
If you wish to override automatic
line selection, press the desired
LINE button instead of pressing the
HEADSET button, and you will be
connected to that line on the speakerphone. Then press the HEADSET
button to toggle to the headset.
Use the HEADSET button to toggle
the headset on and off.
HEADSET
SPEAKER
MUTE
2 Press HEADSET again to hang up.
Your EP4300 telephone is headset-ready. It comes equipped with a 2.5mm headset jack, and a built-in headset amplifier, along with a dedicated HEADSET button
Simply plug the accessory telephone headset with a 2.5 millimeter plug into the
headset jack, and you are all set. There is no need to buy a headset with a separate amplifier.
22
Operating Your System
You can use your headset to make or answer an outside call, an intercom call or a
page. Simply press the HEADSET button instead of lifting the handset.
During a call, you may switch back and forth between handset and headset and
speakerphone as much as you like.
Note that whenever the HEADSET indicator is on, you may hang up the handset
without disconnecting your call.
5.17 Adjusting Your Telephone’s Time and Date
1 Press PROGRAM
NEXT
Enter code: *718.
2 Press the soft key under NEXT
repeatedly, until “ Time/Date Set”
appears in the display, and then
press ENTER.
If you subscribe to Caller ID service, then
the Date and Time is set automatically
3 Press the soft key under CHANGE,
then enter the time as instructed in
the display.
4 Press the soft key under NEXT,
then press CHANGE to choose
between AM or PM, then press
NEXT again.
5 Press the soft key under CHANGE, then enter the date as instructed
in the display.
6 Press PROGRAM to exit.
Note: If you subscribe to caller ID service from your local telephone company, then
there is no need to set the time and date for your telephone. This will be set automatically by the caller ID information, and will be updated as new calls come in.
23
Memory Dialing
6.1 Memory Features
Your EP4300 telephone can store up to 66 of your most often dialed numbers in its
memory.
- 8 numbers into Upper Memory locations, which you can dial at the touch of a
memory button;
- 8 numbers into Lower Memory locations, which you can dial by pressing LOWER
plus the desired memory button;
- 10 numbers into Personal Directory locations, which you can dial by pressing”#”
followed by the arrow buttons and the DIAL button;
- 40 numbers into Shared Directory locations, which you store at Station #11 and
which you can dial from any phone in the system by pressing “*” followed by the
arrow buttons and the DIAL button.
Directory Card
Remove the directory card and write down the names or telephone numbers associated with the memory locations where you are storing numbers.
To remove the directory card, slide your fingernail under the right edge of the directory card and lift the card out, or simply touch the directory card with a piece of
scotch tape and lift upward, as illustrated below. Note: The illustration depicts a different model telephone, but the technique is the same for the EP4300.
PROGRAM
CALLER ID
<
DELETE
>
DIAL
NEW CALL
LINE 4
LINE 3
LINE 2
LINE 1
INTERCOM
LOWER
24
Memory Dialing
6.2 Using Memory Dial
6.2.1 To store a memory dial number:
1 Press PROGRAM.
2 Press the soft key under MEM.
- The display will read
“Select Location”
Press Memory button to dial numbers
in white spaces
Press LOWER,
then Memory button
to dial numbers in
gray spaces
3 Press the Memory button where
you wish to store the number,
or press LOWER followed by the
desired memory button if you wish
to store the number in a lower
memory location.
- The display will show the currently
stored number, or indicate “ Empty Location”. ”
4 Press the soft key under CHANGE if you wish to store a new number.
5 Dial desired telephone number, up to 32 digits.
6 Press the soft key under SAVE.
Note: If you ever wish to erase the memory dial numbers stored in your phone,
please follow the instructions found on page 30.
You may store up to 16 telephone numbers at your telephone which you can dial
automatically with the press of a memory button.
Note that you can enter hyphens in your numbers for easy reading, as well as flashes and pauses (see page 29).
6.2.2 To dial a memory dial number:
1 Press the memory button where the desired telephone number is stored.
Or, Press LOWER followed by the desired memory button if you wish to dial a number stored in a lower memory location.
When you press a memory button, the speakerphone turns on automatically, and
the number is dialed out. You may lift the handset to switch to a handset call at any
time.
25
Memory Dialing
6.3 Using Personal Directory Dial
6.3.1 To store a personal directory dial number:
1 Press PROGRAM.
2 Press the soft key under MEM.
- The display will read “ Select Location”
3 Press the “ # ” button.
- The display will read “ Empty Location, ” or indicate that your personal
directory is full.
4 Press the soft key under CHANGE if you wish to store a new number, or press
NEXT repeatedly until you see the previously stored entry you would like to
change, and then press CHANGE.
5 Dial desired telephone number, and then press NEXT.
- The display will show the currently stored name, or indicate “ No Name. ”
6 Press the soft key under CHANGE if you wish to store a new name, and
then use the dialpad numbers and the soft keys to enter the name to go
along with the telephone number.
7 Press the soft key under SAVE.
You may store up to 10 personal directory dial telephone numbers at your telephone.
Note that you can enter hyphens in your numbers for easy reading, as well as flashes and pauses (see page 29).
If you would like to erase the personal directory numbers stored in your phone,
please follow the instructions found on page 30.
26
Memory Dialing
6.3.2 To dial a personal directory number:
1 While the phone is on-hook and idle, press the “ # ” button.
- The display will read “ Personal Dir. ”
2 Use the right and left arrow buttons below the display to view the personal
directory entries.
Note: The directory is organized alphabetically, and you may jump to your desired
entry, or one close to it, by pressing the corresponding dialpad number. For example, press the “5” dialpad button three times to jump to the first entry starting with
“ L ” . You can then use the right and left arrow buttons if needed to view the entries
starting at that point.
3 When the desired entry is displayed, you may dial it simply by lifting your
handset, or by pressing DIAL, or SPEAKER, or by pressing a desired LINE
button.
6.4 Using Shared Directory Dial
6.4.1 To store a shared directory dial number:
At Station #11:
1 Press PROGRAM.
2 Press the soft key under MEM.
- The display will read “ Select Location”
3 Press the “ * ” button.
- The display will read “ Empty Location, ” or indicate that the shared
directory is full.
4 Press the soft key under CHANGE if you wish to store a new number,
or press NEXT repeatedly until you see the previously stored entry you would
like to edit, and then press CHANGE.
5 Dial desired telephone number, and then press NEXT.
- The display will show the currently stored name, or indicate “ No Name. ”
6 Press the soft key under CHANGE if you wish to store a new name,
and then use the dialpad numbers and the soft keys to enter the name
to go along with the telephone number.
27
Memory Dialing
7 Press the soft key under SAVE.
The Shared Directory Dial feature allows you to store an additional 40 telephone
numbers into memory at Station #11 and dial them from any phone in the system.
Note that you can enter hyphens in your numbers for easy reading, as well as flashes and pauses (see page 29).
If you would like to erase the shared directory numbers, please follow the instructions found on page 30.
Note: After you store a shared directory dial number at station #11, please
allow 24 hours for it to be shared with the other stations in the system.
6.4.2 To dial a shared directory number:
1 While the phone is on-hook and idle, press the “ * ” button.
- The display will read “ Shared Directory”
2 Use the right and left arrow buttons below the display to view the
shared directory entries.
Note: The directory is organized alphabetically, and you may jump to your desired
entry, or one close to it, by pressing the corresponding dialpad number. You can
then use the right and left arrow buttons if needed to view the entries starting at that
point.
3 When the desired entry is displayed, you may dial it simply by lifting your
handset, or by pressing DIAL, or SPEAKER, or by pressing a desired
LINE button.
28
Memory Dialing
6.5 Special Memory Features
Storing a hyphen into memory:
You can store hyphens in your memory dial numbers for easy reading. To insert a
hyphen into a number you are storing, press PAGE. Each press of PAGE will insert
a hyphen.
Storing a dialing pause into memory:
You can store a pause in a memory location for use with certain banking and long
distance services. You may also need to insert a pause between the access number and the telephone number if your telephone is connected to a PBX or Centrex
system. To insert a dialing pause into a number you are storing, press HOLD.
Each press of HOLD will insert a 1.5 second pause, represented by a “,”in the
display.
Storing a switchhook flash into memory:
You can store a switchhook flash into a memory location for use with certain custom calling services, such as Call Waiting. You may also need to insert a switchhook flash as part of a feature activation code if your telephone is connected to a
PBX or Centrex system. To insert a switchhook flash into a number you are storing, press FLASH.
Storing temporary tone dialing into memory:
If your system is set to pulse dialing mode, you can store a temporary switch to
tone dialing as part of a number you are storing in a memory location. You may,
for example, wish to dial a number in pulse followed by an access code in tone dialing. To insert a “switch to tone” into a sequence you are storing, press the *
(TONE) button. All the following numbers in the sequence will automatically be
dialed in tone mode.
Storing one of the last five numbers dialed into memory:
To store a redial number into memory, follow the instructions for entering a number
into memory, simply press REDIAL button. You may then press the soft key under
SCROLL to scroll through the last five numbers dialed. Press the memory button,
where you wish to store the number.
29
Memory Dialing
Storing a Caller ID number into memory:
To store a caller ID number into memory, follow the instructions for entering a number into memory, simply press REDIAL button. You may then press the soft key
under SCROLL to scroll through the Caller ID list. Press the memory button, where
you wish to store the number. Note that you can store caller ID names and numbers into private and shared directories as well into memory button locations.
Predialing:
You may predial a call, which allows you to casually enter a telephone number and
check it in the display before it is dialed out. To make a predialed call, enter the
number using the dialpad while the telephone is on-hook, then lift the handset or
press the SPEAKER button or press the desired LINE button. If you make a mistake while dialing the number, you can use the DELETE button to erase digits one
at a time.
Note: To insert a dialing pause into predialing. Press “HOLD”. Each press of
HOLD will insert a 1.5 second pause, represented by a “,” in the display.
Erasing numbers stored in memory:
To erase all memory dial numbers and personal directory numbers stored in
your telephone, press PROGRAM
NEXT
Enter code: *718, then press the
soft key under NEXT repeatedly, until “Advanced Setting” appears in the display,
and then press ENTER. “Erase Memory” will appear in the display. Press
ENTER. “Memory Dials” will appear in the display. Press the soft key under
ERASE. After a brief pause, the display will read “Erasing Done!” To erase the
shared directory numbers, at station #11 follow the above steps until you see
“Memory Dials” in the display. Press NEXT, and you will see “Shared Directory”
in the display. Press the soft key under ERASE. After a brief pause, the display will
read “Erasing Done!” To erase the toll restrictions stored in your telephone
follow the above steps until you see “Erase Memory” in the display. Press NEXT
repeatedly, until you see “Erase Toll Restr” in the display, and then press ENTER.
If you are not at station #11, you will be prompted to enter the toll restriction access
code. Do this, then press the soft key under ERASE. After a brief pause, the display will read “Erasing Done!”
30
Intercom Operation
7.1 Making Intercom Calls
To intercom another station:
1 Press the INTERCOM button,
then dial the two-digit station
number of the station you wish
to intercom.
Use the INTERCOM button and
the dialpad to make intercom
calls to other stations
2 To end the conversation, hang up
or press the SPEAKER button.
To intercom another station while you are on an outside call:
1 Press the INTERCOM button. The outside call is automatically placed
on hold.
2 Place your intercom call the same way as described above.
3 Press the LINE button of your outside call at any time to return to that call.
You may place an intercom call by dialing the two-digit station number of the
desired station.
When you place an intercom call, your speakerphone turns on automatically.
If the called station is set to INTERCOM RING, you may speak to the station as
soon as they answer.
If the called station is set to INTERCOM VOICE or INTERCOM HANDSFREE, you
may speak to the station after you hear the confirming tone.
Note: If the intercom line is busy or the called station is set to DO NOT DISTURB,
you will hear a no action tone.
31
Intercom Operation
7.2 Answering Intercom Calls
7.2.1 To answer an intercom call:
A If your phone is set to INTERCOM RING:
Press the SPEAKER button or lift the handset and begin talking.
B If your phone is set to INTERCOM VOICE:
You will hear one ring, then an alert tone followed by the caller’s voice.
To answer the voice call at any time, press the SPEAKER button or lift
the handset and begin talking.
C If your phone is set to INTERCOM HANDSFREE:
You will hear one ring, then a triple alert tone to let you know that your phone
has automatically answered an intercom call on speakerphone. At any time
you may respond to the call by speaking towards your telephone.
7.2.2 To answer an intercom call if you are currently on an outside call:
1 Press the flashing INTERCOM button. The outside call is automatically
placed on hold.
2 Press the LINE button of your outside call at any time to return to that call.
When you hear the intercom ring or the alert tone followed by the caller’s voice,
you may lift the handset or press the SPEAKER button to answer the call.
If you set your telephone to INTERCOM HANDSFREE, your telephone automatically answers the call on speakerphone and you may respond to the call by speaking towards your telephone. (See page 34 for instructions on Selecting INTERCOM RING, VOICE or HANDSFREE.)
32
Intercom Operation
7.3 Making Pages
To page another station:
1 Press PAGE.
2 Dial the two-digit station number
of the station you wish to page.
3 After you hear the paging tone,
speak towards the telephone or
lift the handset and make your
announcement.
Press PAGE followed
by a station button to
make a page to that
station
TRANSFER
Press PAGE twice
to make an All Page
PAGE
REDIAL
To make an All Page:
1 Press the PAGE button twice.
2 After you hear the paging tone, speak towards the telephone or lift
the handset and make your announcement.
3 Replace the handset in the cradle or press the SPEAKER button to
hang up.
The Paging feature allows you to make announcements to other EP4300 stations
in the system. When you make a Page, your speakerphone is automatically activated; you can talk immediately using the speakerphone, or lift the handset and
talk.
Note: You may Page another station only if it is not in use, does not have DO NOT
DISTURB activated, and is not set to Block Pages. If the station is in any of these
conditions, you will hear a no action tone.
The All Page feature enables you to make announcements through all of the other
EP4300 stations.
When you make an All Page, your announcement, preceded by a double paging
alert tone, will be heard at all the phones that are not in use and do not have their
DO NOT DISTURB or Page Block activated.
33
Intercom Operation
7.4 Answering Pages
To answer a page directed to your station or an All Page:
1 Lift the handset or press the SPEAKER button, or press the flashing
INTERCOM button.
2 Hang up the call.
Once you hear the announcement, you may answer a page directed to your station
by pressing the flashing INTERCOM button. You may answer an All Page by
pressing the flashing INTERCOM button. In either case you will then be connected to the caller in a private intercom conversation.
A page directed to a particular station may be answered only at that station.
However, you may answer an All page from any phone in the system, even one that
is busy on an outside line, has DO NOT DISTURB set or has blocked pages.
Blocking Pages at your telephone:
If you wish, you may block pages at your telephone. If you do so, when a person
at another station makes an All Page, it will not be heard through your telephone.
Also, when anyone tries to page your station, they will hear a no action tone and
will not be able to make their announcement through your speaker.
To block pages at your telephone, press PROGRAM
NEXT Enter code: *718,
then press the soft key under NEXT repeatedly until “Intercom Prefs” appears int
he display, and then press ENTER. Press the soft key under NEXT until “Pages”
appears in the display, along with the current setting. Press the soft key under
CHANGE if you wish to change the setting. The choices are Pages: ALLOWED
(factory setting), and Pages: BLOCKED. Press PROGRAM to exit.
7.5 Selecting Intercom Ring, Intercom Voice, or Handsfree
To choose how your phone will respond to intercom calls:
1 Press PROGRAM
NEXT
Enter code: *718.
2 Press the soft key under NEXT repeatedly, until “ Intercom Prefs”
appears in the display, and then press ENTER.
34
Intercom Operation
3 Press the soft key under CHANGE repeatedly, until the desired intercom
setting is displayed.
The choices are:
Intcm: RING (factory setting)
Intcm: VOICE
Intcm: HANDSFREE
4 Press PROGRAM to exit.
INTERCOM RING: When someone makes an intercom call to you, your telephone
will ring repeatedly with the intercom ring. You may respond to the call by lifting the
handset or pressing the SPEAKER button.
INTERCOM VOICE: When someone makes an intercom call to you, your telephone will ring once, then give you an alert tone, followed by the caller’s voice.
You may respond to the call by lifting the handset or pressing the SPEAKER button.
INTERCOM HANDSFREE: When someone makes an intercom call to you, your
telephone will ring once, then give you a triple alert tone which lets you know that
your phone has automatically answered the intercom call on speakerphone. You
may respond to the call simply by speaking towards your telephone.
Note: When someone makes an intercom call to you while you are on an outside
line, you will hear a single intercom ring regardless of your intercom ringer setting.
7.6 Using Off Hook Voice Announce
To make an off hook voice announcement:
1 Make an intercom call to another ext. that is busy on an outside call.
2 After you hear the confirming tone, you may make your announcement and
your voice will be heard through the speaker at the called station.
To respond to an off hook voice announcement:
1 Press the flashing INTERCOM button. The outside call is automatically
placed on hold.
2 Press the LINE button of your outside call at any time to return to that call.
35
Intercom Operation
Your EP4300 telephone will allow you to make an intercom call to another station,
even if that station is busy on an outside call. Your voice will be heard through the
speaker of the called station without interrupting their call in progress.
Note: If the station you are calling is busy on the speakerphone or has blocked Off
Hook Voice Announcements, you will still be able to alert the station with a single
ring, but you will not be able to make your voice announcement.
You may respond to an Off Hook Voice Announcement by pressing the flashing
INTERCOM button. You will be connected to the other station on the intercom, and
the outside call will automatically be placed on hold. When you wish to return to
the outside call, press its LINE button, and the intercom call will be disconnected.
Blocking off hook voice announcements at your telephone:
If you wish, you may block Off Hook Voice Announcements at your telephone.
To do so, press PROGRAM
NEXT
Enter code: *718, then press the soft key
under NEXT repeatedly until “Intercom Prefs” appears in the display, and then
press ENTER. Press the soft key under NEXT until “OHVA” appears in the display, along with the current setting. Press the soft key under CHANGE if you wish
to change the setting. The choices are OHVA: ALLOWED (factory setting), and
OHVA: BLOCKED. Press PROGRAM to exit.
7.7 Monitoring a Room Using the Intercom
1 Place an intercom call to telephone you wish to monitor.
2 Press MUTE if you want to prevent sounds in your room from being
heard at the monitored phone.
3 To end monitoring, hang up the handset or press SPEAKER. The
remote station will disconnect immediately.
Note: The remote phone must be set to Intercom HANDSFREE. (See page 34.)
The Room Monitoring feature allows you to activate the speakerphone of another
station to monitor sounds in that room. This feature is especially useful in a nursery room or home office where there are children present.
36
Intercom Operation
The remote station must be set to INTERCOM HANDSFREE. When you call this
phone on the intercom, its speakerphone activates and remains on, allowing you
to hear sounds in that room until you hang up.
To prevent sounds in your room from being transmitted to the room you are monitoring, you must press MUTE on your phone.
7.8 Naming Stations
At Station #11:
1 Press PROGRAM
NEXT
Enter code: *718.
2 Press the soft key under NEXT
Station Naming"
repeatedly, until "S
appears in the display, and then
press ENTER.
- The display will show the currently
stored name for station #11, or
No Name" if no name has
indicate "N
yet been given to station #11.
3 Press the soft key under CHANGE if you wish to store a new name for
station #11, or press NEXT repeatedly until you see the station number
that you want to name, and then press CHANGE.
4 Use the dialpad numbers to enter the name for the desired station.
5 Press the soft key under SAVE.
Repeat steps 1-5 for any additional stations you wish to name.
If you wish, you may give a name to each of your EP4300 telephones, so that people can see the names along with the station numbers when they place intercom
calls. For example, you might name station #12 "Mary" and station #15
"Conference Room."
Your EP4300 system can accomodate up to 16 stations. The maximum number of
lines will depend on how you choose to install the system.
Note: If your station is not #11, you just can see the name along with the station.
37
Centrex Operation
8.1 Using the Dial Prefix
1 Press the desired LINE button.
2 Press CALLER ID.
2 Use the right and left arrow buttons
under the display to view the caller list.
9,5551830
00:03
3 To dial a number in the caller list,
press DIAL to make an outside call.
- The display will show the prefix
number such as “9,”, and the number
you desired.
38
Additional Information
9.1 Using Other Telephones With Your EP4300 Telephone
Using other EP4300 intercom telephones
Your EP4300 telephone is fully compatible with other EP4300 intercom phones.
You may mix and match basic, voice mail, and cordless versions as well as mixing
and matching EP4300 telephones with different numbers of lines. The EP4300
system boasts flexibility as well as expandability.
Using standard telephones
You may also use standard (non- EP4300) telephones in conjunction with your
EP4300 telephones. All features of the non- EP4300 telephones will operate normally. However, they will not be able to share the features of the EP4300 telephones.
Line Status and Calls on Hold
The line status indicators of the EP4300 phones will recognize the standard telephones, and when you place a call on hold at a EP4300 telephone, you will be able
to take the call off hold at a standard telephone.
Note: If the line status indicators of your EP4300 telephones do not function properly, either failing to light up when a standard telephone uses a line, or staying lit
even though no telephone is using a line, then please see page 59 and follow the
instructions for setting the loop voltage detector.
Call Privacy
Call privacy is not observed by non- EP4300 telephones. A non- EP4300 telephone on any line has access to that line at any time, whether or not it is being used
by a EP4300 telephone.
Intercom
Non- EP4300 telephones cannot use the intercom feature to communicate with
EP4300 telephones.
Using fax machines and computer modems
You may connect computer modems or fax machines to any of your lines, and the
line indicators of the EP4300 telephones will light when these devices are using a
line.
You may also connect fax machines and computer modems to Line 2 by connecting them to the data/fax jacks. Use of the data/fax jack is discussed on the following page.
39
Additional Information
9.2 Using the Data/Fax Jack
To connect a modem or a fax machine to your EP4300 phone:
1 Simply plug your modem or fax
machine into the data/fax jack on
the side of the telephone.
The data/fax jack is found on the
right side of your Ep4300 phone
For added convenience, you may
connect modems or fax machines
to the telephone line by plugging
them into the data/fax jacks,
which are found on the right side
of the EP4300 telephones. Note
that the data/fax jack is connected
to Line 2.
9.3 Using the Network Services Button
To activate a Network Service:
1 While the phone is on-hook and
idle, press the NETWORK SERVICES button.
- The display will read “Network
Services.”
Use the NETWORK
SERVICES button
for easy access to
Telephone Company
network services
2 Use the right and left arrow buttons below the display to view
the Network Services list.
3 When the desired Network Service is displayed, you may dial it simply by
lifting your handset, or pressing DIAL , SPEAKER , or the HEADSET button.
The NETWORK SERVICES button provides easy access to Telephone Company
network services. All the needed feature codes are pre-programmed in the telephone.
Feature network code
> All Call FWD on *05
> All Call FWD off #05
> Call FWD busy on *17
> Call FWD busy off #17
> Call FWD no answer on *19
> Call FWD no answer off #19
40
Additional Information
9.4 Replacing Your Battery
Your EP4300 telephone uses AC power from a standard wall outlet. As long as the
telephone is connected to a wall outlet, it will operate using the AC power. Please
remember to plug your telephone into a wall outlet that is not controlled by a wall
switch. If AC power is disconnected or there is a power failure, the telephone automatically switches to battery operation for approximately two hours. When the
power is restored, the telephone automatically switches back to AC power and
resumes normal operation. If the battery is missing or low on power when AC
power is lost, the telephone will not function. However, all feature settings and
memory numbers will be maintained, since they are stored in a static memory that
retains its contents without electricity.
Please note that it is not necessary for you to install batteries in your EP4300 telephone for it to function normally. In fact, batteries are not even needed to preserve
your memory dial numbers in the event of a power failure. This is because all
memory dial numbers are stored in a static memory which retains its contents even
with no electrical power. You may wish to install batteries in at least one EP4300
phone for emergency operation, or have another standard phone available.
Note: The only purpose of having batteries installed is so that the telephone itself
can function for up to a few hours in the event of a power failure. After batteries
installed and the telephone on idle state, the batteries can use one year.
If you do choose to install batteries in your EP4300 telephone, we recommend only
the use of alkaline batteries. Also, please make sure to install the batteries after
the telephone has already been plugged into the AC electrical outlet.
Note: It is recommended that you have at least one standard telephone connected, that does not require battery power, so that you are always sure to have use of
a telephone during a power failure.
41
42
EP4300 UG
Feb 2007
Version 1.3