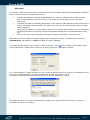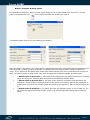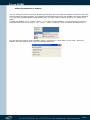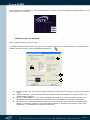
1
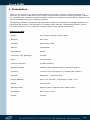
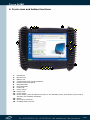
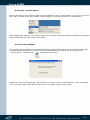
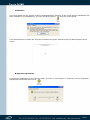
TACTUM CE360
User Manual
TACTUM CE360
THANK
YOU
& CONGRATULATIONS:
Thank you for purchasing the TACTUM CE360 wireless touch panel of VITY Media Bus Control ®
automation system. TACTUM CE360 is the wireless LCD touch panel to replace all your remote controls.
This manual is made to assist you to install the TACTUM CE360.
The information in this manual is copyright protected. No part of this manual may be copied or
reproduced in any form without prior written consent of VITY Technology Headquarters – France. VITY
Technology is not responsible for operational, technical or editorial errors/omissions made in this manual.
All the information in this manual may be subject to change without prior notice. TACTUM CE360 and
Media Bus Control® is a register trademark of VITY Technology. All other brand or product names are
trademarks of their respective companies or organizations.
180 rue Pierre Landais, 56850 Caudan, France
WWW.VITY.COM
REVISION
NUMBER OF THIS MANUAL:
TACTUMCE360_UM_080307_EN_0002
2/24
TACTUM CE360
INDEX
1.
2.
3.
4.
5.
Presentation............................................................................................................ 4
Package Content...................................................................................................... 5
Precautions............................................................................................................. 6
Front-view and button functions................................................................................. 7
Operation................................................................................................................ 8
Powering ON and OFF.............................................................................................. 8
Start Up................................................................................................................ 8
Access the « Control Panel ».................................................................................... 9
Save the setup changes.......................................................................................... 9
Calibration........................................................................................................... 10
Brightness adjustment........................................................................................... 10
Wifi setup............................................................................................................ 11
Network Ip setup.................................................................................................. 12
Date & time setup................................................................................................. 13
Volume & sound setup........................................................................................... 13
Battery Schemes & Sleep modes............................................................................. 14
Hiding the Windows Ce taskbar............................................................................... 15
6. Fastoch operation................................................................................................... 16
Install / Update Fastoch on the panel....................................................................... 16
Install a project on the panel.................................................................................. 17
Closing Fastoch player........................................................................................... 20
Connect the Tactum ce360 to a Vity Mediabus network.............................................. 20
Learn / Verify the infrared codes from your Tactum ce360.......................................... 20
7. Brands compatible with MEDIA BUS CONTROL® automation systems............................. 23
8. Warranty............................................................................................................... 24
3/24
TACTUM CE360
1. Presentation
Thank you for buying a Vity Tactum Ce360 touchpanel. Featuring a slim yet robust magnesium alloy
enclosure, the Tactum ce360 with 8.4 TFT display is powered by a a Geode processor providing « instanton » capability with extended use between battery operation. An optionnal external battery expansion can
provide an additionnal 3 hours of battery operation.
The operating software is Windows Ce bringing with it support for Windows Ce compatible applications, a
full desktop (IE) browser, thin-client/server computing client software, Windows Media Player, and the
Vity Fastoch player to run your Fastoch created projects on the Tactum ce360 tablet.
SPECIFICATIONS
Display
8,4'' Hi-Brite LCD with resistive touch
Reslution
800 x 600
Processor
AMD Geode LX 800
Memory
256 MB RAM
Flash Memory
64 MB
CF card for VITY application
512 MB
Stylus
non electric tip
Protective bumpers
2 rubber bumpers
Network interface
PCMCIA; USB; Integrated 802.11; Bluetooth built-in
I/O ports
12 VDC in Jack; Microphone-In; Headset jack; USB 2.0
Enclosure
Magnesium – Aluminium alloy
AC/DC adaptater
Input: 100-240 VAC; 1.2A; Output: 12VDC, 3,5 A
Battery
Internal 14W
Desktop Cradle
Optional: Pass-Trough Ethernet, USB 2.0 ports
Dimensions
200 x 240 x 18 mm
Weight
0,86 Kg
4/24
TACTUM CE360
2. Package Content
Tactum ce360 (battery pack built-in) with Stylus
& Protective jacket
AC-DC power adapter with power cord
This manual
5/24
TACTUM CE360
3. Precautions
•
•
•
•
•
•
Always exercise care when operating and handling the Tactum Ce360.
Do not apply excessive pressure to the display screen.
Avoid exposing the panel screen to direct sunlight or other heat source. Where possible, the
Tactum Ce360 should be facing away from direct lighting to reduce glare.
If the AC-DC power adapter is used to recharge or power the device, do not use any AC-DC
adapter other than the one provided with the device or acquired from the manufacturer or its
partner.
In the unlikely events that smoke, abnormal noise, or strange odor is present, immediately
power the Tactum ce360 off and disconnect all power sources. Please report the problem to your
provider immediately.
Never attempt to disassemble the Tactum ce360. You will lose any product warranty on the
Tactum Ce360.
6/24
TACTUM CE360
4. Front-view and button functions
1
2
15
3
13
8
12
10
11
9
14
4
5
6
7
1.
2.
3.
4.
5.
6.
7.
8.
9.
10.
11.
12.
Record led
Network led
Battery led
Toggle open/close virtual keyboard
Launch Internet Explorer
Programmable
Programmable
Cursor Up
Cursor Down
Cursor Left
Cursor Right
Power button, push & release to enters or exit standby mode, push & hold (more than 5
seconds) for hardware shutdown
13. Stylus
14. DC-IN jack connector
15. Compact flash card slot
7/24
TACTUM CE360
5. Operation
Powering ON and OFF
Note : Depending on how you received your Tactum Ce360, the battery packs shipped with your sample
device may be low in power – please be prepared to use the AC-DC adapter with the Tactum ce360 in
setting up the device for the first time and to fully charge the internal battery pack. You may charge the
external battery pack with it attached to the Tactum Ce360 or with the optional battery charger kit.
Note : When the battery pack(s) is (are) charging, the battery led should blink slowly. If plugging in the
AC-DC adapter does not trigger this blinking activity and the LED stay dark, the battery pack(s) may have
been drained substantially. Then try unplugging/replugging the AC-DC adapter at the Tactum ce360 to
activate the charging process.
Note : Please use (push and quick release) the Power Button to put the device in « Stand By » mode while
not in use. Pushing briefly on the Power Button will wake up the system within seconds.
In general, to activate the Tactum ce360, push and quickly release the Power Button to the left of the
front bezel. The display will comes in a few seconds, wait some more seconds to have the wifi network
connected. To turn off the display of the tactumce360 between normal usage session, push and quickly
release the Power Button. To shutdown and totally turn off the Tactum ce360 please press and hold the
Power button more than 5 seconds. Note that when restarting after a complete off, the panel will take
about 45 seconds for the complete bootup.
Start Up
If the power up (from Stand By or otherwise) is successful the Windows Ce-like Desktop
The wireless LAN adapter may take 10 to 15 seconds to be (re-)established.
The Vity Fastoch player starts automatically and attempt to connect to your Mediabus network, if the
wireless network or the Mediabus network is not ok, then it will display a warning message and lock the
fastoch program until a correct network and mediabus connection is made. When the Fastoch project is
compiled in ''Demo'' mode then this warning message is not issued and the panel is not locked even when
there's no Mediabus communication.
8/24
TACTUM CE360
Access the « Control Panel »
Most of the setup of your Tactum ce360 can be modified thru the « control panel », to open it up, click on
the « start » button of the main toolbar, select « settings » and then click onto « control panel »
After changing the setup of your Tactum ce360, do not forget to save the changes, otherwise the changes
will be loosed after the next reboot of the panel.
Save the setup changes
The changes into the setup are not saved automatically and will be loose at the next reboot of the panel.
To make them permanently you need to save the new settings of the panel. To do that, go to the
« control panel », locate the icon
and double-click onto it.
Select the « Save current settings » tab and click in the box « Save Current Settings », the new settings
of your Tactum ce360 will be then saved into the non volatile memory of the panel.
9/24
TACTUM CE360
Calibration
The touch display for the Tactum ce360 is calibrated before shipping. In the event that the calibration has
been modified or is unsatisfactory, you may the Stylus option
from the control panel.
You'll be asked then to follow the onscreen indication and press with the stylus on different parts of the
screen.
Brightness adjustment
To adjust the brightness of your Tactum ce360, go to the « control panel », locate the icon for brightness
adjustment and double-click onto it.
10/24
TACTUM CE360
Wifi setup
The Tactum ce360 is delivered with an embedded (user-inaccessible) 802.11b/g WLAN adapter equipped
with a custom antenna in a snap-type housing.
•
•
•
•
Through the support of typical WLAN adapters, the Tactum ce360 should be able to detect
802.11 access points in the vicinity for you to select the access point of your choice for
connection.
The SSID and WEP (is enabled) parameters on the Tactum ce360 and the access points have to
match. The SSID is case-sensitive. For data secure access it is recommended that you enable
WEP encryption.
When WEP is enabled, you may need to consult your network administrator or your networking
equipment literature to properly configure associated settings such as Authentification mode,
etc...
Refer to the access point operating manuals for setting up the 802.11 access points.
Note that the Tactum ce360 are always shipped pre-configured as follow : Ip address set as fixed to
192.168.0.42, wifi SSID set to VITY and WEP encryption disabled.
To modify the Wifi setup of your Tactum ce360, locate the icon
area of the display, double-click on this icon to open up the wifi
in the Tray bar in the bottom right
property window.
The « IP Information » page will show you the current Ip address set for your panel, if this address is not
set or set to something like 0.0.0.0 this means that the wifi connection is not ok.
To modify or setup the wifi connection go the the « wireless information » page
This page will show you all the wifi access point visible in the vicinity and the one that your panel is
connected to and the link quality.
11/24
TACTUM CE360
To connect to another access point, select the access point name into the list of visible access points and
then click on the « connect » button, this will open the property window for this connection and let you
setup WEP parameters if needed, you can later go back to this page by double-clicking onto the name of
access point into the list
Network Ip setup
Once you have setup the wifi connection, you can then setup the Ip address of the Tactum ce360, go to
the « control panel » and double-click on the icon
to open the network connection page
Locate the « PCI-VNWLC51 » connection and double-click on it's icon, to enter the setup page for this
network connection
Set the IP address to be « static » by selecting ''Specify an IP address'' and then give the Ip address,
subnet mask and default gateway addresses.
12/24
TACTUM CE360
If you wish to connect to the internet, please give also the Ip address of a primary DNS.
Date & time setup
To adjust date & time of your Tactum ce360, go to the « control panel », locate the icon for Date/time and
double-click onto it.
Volume & sound setup
To adjust the volume and the sounds properties of your Tactum ce360, go to the « control panel », locate
the icon for Volume & sound and double-click onto it.
13/24
TACTUM CE360
Battery Schemes & Sleep modes
It is possible to setup your panel to enter sleep modes or not to save battery life. Go to the « control
panel » and locate the icon
for the power scheme and double-click onto it.
The battery page will give you the status of the battery.
Using the page « Schemes » you will be able to change the behaviour of the panel when connected to the
main AC power or when running on battery. To disable all kind of sleep modes, change all options to
never. If you wish to let the panel enter some sleep mode change from never to the amount of time you
wish, you have 3 levels of sleep mode, each level correspond to a different depth of sleep mode :
•
•
•
« Switch state to User Idle », will switch off the display but the panel will still work, a simple
touch on the screen will bring back the panel to full operation without delay.
« Switch state to System Idle », will turn off the network connection and slow down the
processor, in this mode the Fastoch player on the panel is not able to process any feedback, a
simple touch on the screen will bring back the panel to full operation, allow a few seconds to do
so.
« Switch state to Suspend », the panel will enter the standby mode, to turn it back on, you
will need to press on the power button, allow 10 to 15 seconds before being able to use the
panel.
14/24
TACTUM CE360
Hiding the Windows Ce taskbar
You can setup the panel to hide the Windows Ce taskbar, this will make the taskbar invisible for the user,
but still usable for setup purpose, this method is preferable than to hide the taskbar from within Fastoch,
if you setup the taskbar hidden from Fastoch then you won't have access to it and to any setup of the
panel.
To Hide the taskbar, go to « Start » menu – if you don't see the taskbar, you can popup the onscreen
keyboard and press on the keys « ctrl » « esc » - select « settings » then « taskbar and Start menu »
Into the property window of the taskbar, check / uncheck the « Auto hide » box to hide / show the
taskbar. Do not forget to save your new settings after that.
15/24
TACTUM CE360
6. Fastoch operation
Install / Update Fastoch on the panel
nota : Fastoch player must be closed
Fastoch comes pre-installed on your Tactum ce360, but you may need to reinstall it or update it – updates
can be found onto our website www.vity.com , before installing the update, verify that you have
MediabusTools (v8 or greater) installed on your Pc – MediabusTools can be download from our web site -,
remove the compact flash from your Tactum ce360 and insert it into the compact flash reader of your Pc,
then execute the update setup on your Pc, MediabusTools will be automatically launched to transfer the
Fastoch player files onto your compact flash. When this is done, insert back the compact flash inside your
Tactum ce360.
1
Remove the compact
flash from the panel,
and insert it on your
computer
2
Onto your computer, run
the update setup, the
files will be transfered
automatically
to
the
compact flash
3
Insert
back
the
compact flash inside
your Tactum ce360
To finish the installation of the update in the main memory of the panel, from the touchpanel, locate the
explorer icon
and double-click onto it, this will open the explorer window
From the explorer locate the « Storage Card » folder and double-click onto it to display it's content.
Locate the « CeInstall.exe » program and launch it by double-clicking onto it.
16/24
TACTUM CE360
Into the menu of « CeInstall », click on to the button « install », this will transfer the Fastoch player in the
main memory of the panel.
Install a project on the panel
nota : Fastoch player must be closed
To install a Fastoch project onto your panel, from Fastoch compile your project using the compilation icon.
Fastoch will ask you then some compilation parameters :
1
2
3
4
1.
2.
3.
4.
Select version 5 for your Tactum ce360 (the other version are for previous versions of the ce360
panel)
Select « Normal » if you want the panel to connect to the Vity network, or « demo mode » for
demonstration purpose
Select « Hide taskbar », if you want to disable the ability to go to the windows Ce menu (it is
preferable to let this box unchecked and then to set the taskbar to autohide on the panel)
check the box « Load all windows at startup » if you want that all the project is loaded in main
memory at startup, unselect if you want that the pages are loaded in the memory only when
displayed – it is preferable to let this box checked.
17/24
TACTUM CE360
It is not necessary to enter tcp/ip parameters as you'll need to enter them manually on the panel itself
(see « wifi setup » and « network Ip setup » in this manual).
The project is then compiled and saved into the directory of your choice.
If MediabusTools is installed on your computer, then remove the compact flash from the touch panel and
insert it in the compact flash reader of your pc and click on the « Download button », this will automatically
launch MediabusTools to transfer the compiled project files onto the compact flash.
When the transfer is complete, insert back the compact flash into your Tactum ce360 panel and restart it,
it will automatically start the Fastoch player with the newly compiled Fastoch files.
If you have only the compiled files in the form of a zip file, copy manually the zip file onto the compact
flash of the panel, then insert back the compact flash in the touchpanel, locate the explorer icon
and double-click onto it, this will open the explorer window
From the explorer locate the « Storage Card » folder and double-click onto it to display it's content.
18/24
TACTUM CE360
Locate the « CeInstall.exe » program and launch it by double-clicking onto it.
Click on the « install » button just like for the player installation, this will browse the compact flash wand
will display a list of installable projects found, select the one that you want to install by double-clicking on
it's icon.
Let the installation process go up to the end, then when it's finish, click onto the ok button, and reboot
your panel.
19/24
TACTUM CE360
Closing Fastoch player
For setup reasons, you may need to close the Fastoch player of the panel, to do this, restart the panel
(hold the power button for more than 5 seconds to switch it off and then put it back on), when the Vity
start window appear on the screen press on the [X] box to close Fastoch.
Connect the Tactum ce360 to a Vity Mediabus network
To be fully operational, your Tactum ce360 need to be connected to the Vity Mediabus network. It can
connected to a Xmonopro/Ip or Multicustom or Minimono/Ip or a combination of thoses controllers as soon
as they accept an Ip connection.
lan
Tactum Ce366
Wifi
access point
Vity IP controller
Xmonopro/Ip or Multicustom or Minimono/Ip
Learn / Verify the infrared codes from your Tactum ce360
20/24
TACTUM CE360
nota : Fastoch player must be closed
You can learn and verify the infrared codes of the Vity controller using your Tactum ce360, this is made
thru CeInstall, from the touchpanel, locate the explorer icon
and double-click onto it, this will
open the explorer window
From the explorer locate the « Storage Card » folder and double-click onto it to display it's content.
Locate the « CeInstall.exe » program and launch it by double-clicking onto it. Into the menu of
« CeInstall », click on to the button « Infrared », this will open the infrared window list of your project.
21/24
TACTUM CE360
To Learn an infrared code, select the code you want to learn from the list in the left portion of the window,
then press on the « Learn » button, the « forced » box must be checked if you want to learn in ''forced''
mode – in the ''normal'' or ''non forced'' mode the controller will try to recognise the kind of infrared, this
is not compatible with all kind of infrared devices, in this case check the box ''forced'' to learn in forced
mode, in this mode the Vity controller will learn the infrared code the way you play it, if you play a short
bcode it will learn a short infrared, if you play a long code it will learn a long infrared -
When pressing on the « learn » button, the Vity controller will enter the infrared learning mode (the learn
led should be on), locate the infared learning sensor in front of the Vity controller and approach the
infrared remote control you want to learn, then press shortly (half of a second) onto the remote key you
want to learn.
Distance of 5 to 10 cm
The learning led of the Vity controller will blink and then goes off, this indicate that the infrared code has
been learned, if the learn led of the controller doesn't goes off that means that the infrared remote has
not sent the infared (check the battery) or that the Vity controller doesn't recognise the kind of infrared,
in this case please learn your codes in « forced » mode.
Once the infrared code has been learned, ''verify'' it for validation.
To verify an infrared code, select the code you want to learn from the list in the left portion of the window,
then press on the « verify » button, the Tactum ce360 will then send the command to the Vity controller
to play the infrared code to the device, this let you test your infrared codes and validate them.
22/24
TACTUM CE360
7. Brands compatible with MEDIA BUS CONTROL® automation
systems
MEDIA BUS CONTROL automation systems is compatible to drive many brands of the AV
manufacturers, lights manufacturers and EIB manufacturers. You will find here a list with main
brands, but Media Bus Control can control more systems...
3M, ABB, Adtec, Akg, AllenHeath, Analogway, Ask, Autopatch, Barco, Behringer,
Biamp, Canon, Clipsal, CommTec, DIS, Epson, Extron, Faroudja, Fostex, Gyra,
Hager, Imerge, Jung, JVC, Kenwwod, Knox, Kodak, Kramer, Legrand, Lexicon,
Lightec, Lite Touch, Lutron, Meridian, Merten, Mitsubishi, Nec, Niko, Onkyo,
Panasonic, Phillips, Pioneer, Pixelmagics, Proxima, RGB Spectrum, Samsung,
Sennheiser, Siemens, Sharp, Sony, Tasca, Theben, Vigatec, Vity, Xantech,
Yamaha, Zumtobel ... and more.
23/24
TACTUM CE360
8. Warranty
1- VITY Warranty
VITY Technology Headquarters, France and its subsidiaries VITY china, VITY USA, warrant their products any defects
in materials and workmanship for a period of 2 years from the date of the invoice. This warranty concerns products
manufactured by VITY Technology. A return material authorization (RMA) must be obtained from VITY before
products are returned for service. This authorization can be obtain on the website of vity : www.vity.com and have to
be returned by fax to VITY - +33 297 89 20 10. In the case of product is distributed by Vity Technology, the
applicable warranty is the warranty of the manufacturer and can be less or more than 2 years. This warranty will be
specified on the invoice.
Warranty of TACTUM CE360: 1 year and 3 months for the batteries
2- What This Warranty Does Not Cover
This warranty does not apply to (a) any VITY product that has been modified, altered or repaired by an unauthorized
agent or improperly transported, stored, installed, used, or maintained; (b) damage caused by acts of nature,
including flood, erosion, or earthquake; (c) damage caused by a sustained low or high voltage situation or by a low or
high voltage disturbance, including brownouts, sags, spikes, or power outages; or (d) damage caused by war,
vandalism, theft, depletion, or obsolescence.
3- Disclaimer of Other Warranties
The warranties contained in Section 1 are the exclusive warranties given by VITY and supersede any prior, contrary
or additional representations, whether oral or written. VITY disclaims and excludes all other warranties – whether
express, implied, or statutory.
4- Buyer’s Exclusive Remedies for Any Nonconformity
If a VITY product fails to conform to the warranties in Section 1, Buyer must notify VITY within a reasonable time and
in no event more than thirty (30) days after the discovery of the nonconformity, and VITY will repair any
nonconforming products or components.
5- Application of the warranty
During the period of warranty, VITY Technology will repair the defective units free. The defective products must be
sent to your expenses to the VITY Technology's offices (Caudan). The repaired units will be turned over to our
expenses with the recipient. Apart from the period of warranty, VITY Technology will repair the defective units in its
offices at Caudan, and the cost of repair will be the responsibility of the customer. In the case of the defected product
was bought to a Vity subsidiary or a Vity distributor, you have to return it directly to them.
6- Exclusion of Consequential and Incidental Damages.
Vity shall be not liable under any circumstances for consequential or incidental damages including, but not limited to,
labour costs or loss of profits arising in connection with the use of or the inability to use Vity products.
7- Transport Damage
VITY will not be responsible for items damaged during shipment to or from VITY. The shipping carrier is responsible
for items damaged during shipment.
8- No Modifications
This warranty may not be modified except in writing by an authorized VITY officer.
9- Other Notice
VITY reserves the right to modify or discontinue designs, specifications, warranties, prices, and policies without prior
notice
24/24