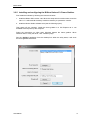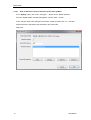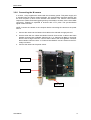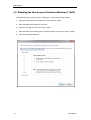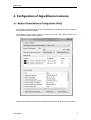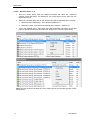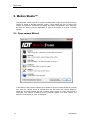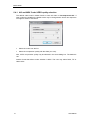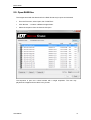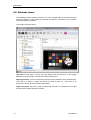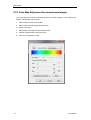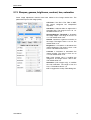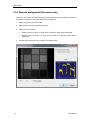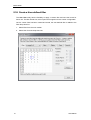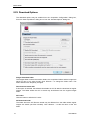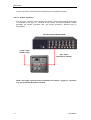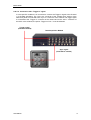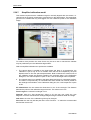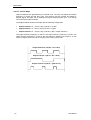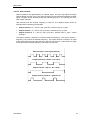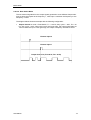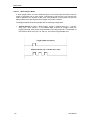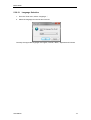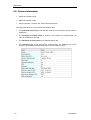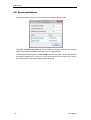
1
Motion Studio Motion Studio Users Manual User Manual 1 (For Windows™) Motion Studio Software Release 2.12 Document Revision March 2014 Products Information http://www.idtvision.com North America 1202 E Park Ave TALLAHASSE FL 32301 United States of America P: (+1) (850) 222-5939 F: (+1) (850) 222-4591 [email protected] Europe via Pennella, 94 I-38057 - Pergine Valsugana (TN) Italy P: (+39) 0461- 532112 F: (+39) 0461- 532104 [email protected] Eekhoornstraat, 22 B-3920 - Lommel Belgium P: (+32) 11- 551065 F: (+32) 11- 554766 [email protected] Copyright © Integrated Design Tools, Inc. The information in this manual is for information purposes only and is subject to change without notice. Integrated Design Tools, Inc. makes no warranty of any kind with regards to the information contained in this manual, including but not limited to implied warranties of merchantability and fitness for a particular purpose. Integrated Design Tools, Inc. shall not be liable for errors contained herein nor for incidental or consequential damages from the furnishing of this information. No part of this manual may be copied, reproduced, recorded, transmitted or translated without the express written permission of Integrated Design Tools, Inc. 2 Users Manual Motion Studio Table of Contents 1. TERMS AND CONDITIONS ...................................................................7 2. SYSTEM OVERVIEW .............................................................................8 2.1. 2.2. 3. SOFTWARE PACKAGE .....................................................................................8 MINIMUM COMPUTER REQUIREMENTS .............................................................9 INSTALLING THE SYSTEM.................................................................10 3.1. IDT CAMERAS INSTALLATION .......................................................................10 3.1.1. 3.1.2. 3.2. Software Installation........................................................................................... 10 Hardware installation (USB 2.0) ........................................................................ 11 MOTIONSCOPE M CAMERA INSTALLATION .....................................................12 3.2.1. 3.2.2. 3.2.3. 3.2.4. 3.2.5. 3.2.6. 3.3. 4. Installing the Dalsa-Coreco X64 Xcelera-CL PX4 frame grabber...................... 12 Installing the National Instruments PCIe-1429 frame grabber........................... 14 Configuring the NI-1429 frame grabber for 64-bit Operating Systems.............. 15 Installing and configuring the EPIX PIXCI™ E4 Frame Grabber....................... 16 Installing and configuring the Bitflow Karbon-CL Frame Grabber ..................... 19 Connecting the M camera.................................................................................. 21 DISABLING THE USER ACCOUNT CONTROL ON WINDOWS 7 (UAC) ................22 CONFIGURATION OF GIGA-ETHERNET CAMERAS ........................23 4.1. 4.2. 4.3. 4.4. 4.5. 4.6. MOTION STUDIO NETWORK CONFIGURATION UTILITY....................................23 CONFIGURING THE Y CAMERA IP ADDRESS ...................................................24 CONFIGURING THE N/NR/NX/OS CAMERA IP ADDRESS .................................25 FORBIDDEN IP ADDRESSES ..........................................................................26 LARGE DATAGRAM SIZE (JUMBO PACKETS) ...................................................27 CONFIGURING THE WINDOWS FIREWALL ......................................................29 4.6.1. 4.6.2. 4.6.3. 4.7. 5. How to add Motion Studio to the list of allowed programs................................. 29 How to allow incoming echo requests (HG cameras)........................................ 31 How to disable the Windows Firewall ................................................................ 33 CONFIGURING THE X CAMERA IP ADDRESS ...................................................35 MOTION STUDIO™ .............................................................................36 5.1. 5.2. 5.3. OPEN CAMERA WIZARD................................................................................36 MOTION STUDIO MENU STRUCTURE .............................................................41 FILE MENU .................................................................................................42 5.3.1. 5.3.2. 5.4. Initialize a camera window ................................................................................. 42 Open File Images............................................................................................... 42 SAVE IMAGES ..............................................................................................43 5.4.1. 5.5. 5.6. AVI and MOV Codec/JPEG quality selection .................................................... 44 OPEN RAW FILES ........................................................................................45 DATABASE VIEWER ......................................................................................46 5.6.1. 5.7. 5.8. 5.9. 5.10. 5.11. 5.12. 5.13. 5.14. 5.15. 5.16. The viewer Toolbar ............................................................................................ 47 EDIT MENU .................................................................................................48 IMAGE MENU ..............................................................................................49 LOOKUP TABLE ............................................................................................50 ORIENTATION ..............................................................................................51 IMAGE INFO .................................................................................................51 COLOR MAP ADJUSTMENT FOR MONOCHROME IMAGES .................................52 SHARPEN, GAMMA, BRIGHTNESS, CONTRAST, HUE, SATURATION ...................53 REMOVE BACKGROUND (X4 CAMERA ONLY)..................................................54 FILTER MENU .............................................................................................55 CREATE A USER-DEFINED FILTER .................................................................56 Users Manual 3 Motion Studio 5.17. 5.18. 5.19. CAMERA MENU .........................................................................................57 CAMERA CONTROL - LIVE.............................................................................58 CAMERA CONFIGURATION ............................................................................59 5.19.1. 5.19.2. 5.19.3. 5.19.4. 5.20. 5.21. SAVE AND LOAD SAVE CAMERA CONFIGURATION ..........................................65 RECORD CONFIGURATION ............................................................................66 5.21.1. 5.21.2. 5.21.3. 5.21.4. 5.21.5. 5.21.6. 5.22. 5.23. 5.24. 5.25. Frame by frame review................................................................................. 110 Playback Speed and Playback Settings....................................................... 111 PLAYBACK MENU ....................................................................................112 ANNOTATIONS ...........................................................................................113 TRACKING MENU .....................................................................................114 TRACKING CONTROL ..................................................................................115 TRACKING PROCEDURE ..............................................................................117 5.36.1. 5.36.2. 4 Activate camera list ...................................................................................... 105 Tools menu................................................................................................... 106 Options ......................................................................................................... 107 Master/Slave operation modes .................................................................... 108 PLAYBACK CONTROLS ...............................................................................110 5.31.1. 5.31.2. 5.32. 5.33. 5.34. 5.35. 5.36. Copy Calibration file from CD......................................................................... 97 Download Calibration file from flash memory ................................................ 97 Camera Calibration ........................................................................................ 98 Flash Memory Diagnostics ........................................................................... 100 Color Balance Adjustment............................................................................ 101 IRIG Calibration (X cameras) ....................................................................... 102 HG Logs ....................................................................................................... 102 Image parameters ........................................................................................ 103 MULTIPLE CAMERAS SUPPORT ...................................................................104 5.30.1. 5.30.2. 5.30.3. 5.30.4. 5.31. Data acquisition cables and back panel......................................................... 89 Analog Input Configuration............................................................................. 92 Analog Input Data Pane ................................................................................. 93 Data Graph Configuration .............................................................................. 94 Data Processing Menu ................................................................................... 95 FFT and Power Spectrum .............................................................................. 95 Data Information............................................................................................. 96 Note about the “Overrun” error....................................................................... 96 ADVANCED CAMERA CONFIGURATION IN CAMERA MENU ...............................97 5.29.1. 5.29.2. 5.29.3. 5.29.4. 5.29.5. 5.29.6. 5.29.7. 5.29.8. 5.30. Gamma........................................................................................................... 86 Automatic White Balance ............................................................................... 87 DATA ACQUISITION MODULE .........................................................................88 5.28.1. 5.28.2. 5.28.3. 5.28.4. 5.28.5. 5.28.6. 5.28.7. 5.28.8. 5.29. Raw converter batch files ............................................................................... 83 IMAGES RECOVERY .....................................................................................84 IMAGE CONFIGURATION ...............................................................................85 5.27.1. 5.27.2. 5.28. Record Tab..................................................................................................... 66 SSD Options................................................................................................... 68 SSD mission mode......................................................................................... 69 Advanced Sync/Trigger Configuration ........................................................... 71 Acquisitions Configuration and selection ....................................................... 73 Direct write to disk Option (M2D) ................................................................... 75 SAVING ACQUIRED IMAGES AND DATA ...........................................................75 DOWNLOAD OPTIONS ..................................................................................78 DOWNLOAD MANAGER .................................................................................80 RAW DOWNLOAD AND RAW CONVERTER ......................................................81 5.25.1. 5.26. 5.27. Auto-exposure ................................................................................................ 61 Motion Trigger ................................................................................................ 62 Region of Interest (ROI) ................................................................................. 62 ROI for 7 and 8 series cameras (Dynamic Magnification) ............................. 63 Add a new track-point and compute............................................................. 117 Edit the tracking configuration...................................................................... 118 Users Manual Motion Studio 5.36.3. 5.36.4. 5.36.5. 5.36.6. 5.36.7. 5.36.8. 5.37. 5.38. DATA MENU ..............................................................................................126 VIEW MENU ..............................................................................................127 5.38.1. 5.38.2. 5.39. Camera Information...................................................................................... 160 VIDI MOTION (LENS CALCULATOR) ...............................................161 6.1. 6.2. 6.3. 6.4. 6.5. 6.6. 7. OVERVIEW ................................................................................................161 CAMERA INFORMATION ..............................................................................162 FIND RESOLUTION FROM MAX RATE ............................................................163 RESOLUTION VERSUS RATE TABLE..............................................................164 LENS CALCULATIONS .................................................................................165 SPEED CALCULATIONS ...............................................................................166 FRAME SYNCHRONIZATION AND EVENT TRIGGERING ..............167 7.1. 7.2. 7.3. 7.4. OVERVIEW ................................................................................................167 RECORD MODES AND TRIGGER CONFIGURATION ........................................168 CHANGE THE SYNC AND THE TRIGGER .......................................................169 TRIGGERING THE CAMERA AND SYNCHRONIZING WITH STROBE LIGHT ..........170 7.4.1. 7.4.2. 7.4.3. 7.4.4. 8. Synchronizing via the leading edge of a pulse event (Single exposure) ......... 170 Synchronizing via the trailing edge of a pulse event (Single exposure) .......... 171 Synchronizing and controlling the exposure with an input pulse ..................... 172 Synchronizing in double exposure mode......................................................... 173 MOTION STUDIO REMOTE CONTROL ............................................174 8.1. 8.2. 8.3. OVERVIEW ................................................................................................174 SOFTWARE INSTALLATION ..........................................................................175 CONFIGURING THE WIRELESS CONNECTION ................................................177 8.3.1. 8.3.2. 8.4. Configuring the host......................................................................................... 177 Configuring the client (Pocket PC)................................................................... 182 USING THE MOTION STUDIO REMOTE CONTROL .........................................185 8.4.1. 8.4.2. 9. Download Options ........................................................................................ 131 Camera Options ........................................................................................... 132 Time Stamp Options..................................................................................... 134 Miscellaneous Options ................................................................................. 136 Reticule ........................................................................................................ 138 Histogram ..................................................................................................... 139 Focus Line / Image Profile ........................................................................... 140 Timing Hub Control ...................................................................................... 141 Analog Data Output...................................................................................... 151 Image Tile Utility........................................................................................... 154 Ethernet cameras monitor ............................................................................ 156 Language Selection...................................................................................... 157 Vidi Motion.................................................................................................... 158 WINDOW MENU........................................................................................159 HELP MENU ..............................................................................................159 5.41.1. 6. Zoom Tools .................................................................................................. 128 View Thumbnails .......................................................................................... 129 TOOLS MENU ...........................................................................................130 5.39.1. 5.39.2. 5.39.3. 5.39.4. 5.39.5. 5.39.6. 5.39.7. 5.39.8. 5.39.9. 5.39.10. 5.39.11. 5.39.12. 5.39.13. 5.40. 5.41. Show the tracking data and the vectors ....................................................... 119 Save the tracking data.................................................................................. 121 Calibration .................................................................................................... 122 Basic calibration model ................................................................................ 122 Simplified calibration model ......................................................................... 124 Generic calibration model ............................................................................ 125 Starting the remote server on the Host............................................................ 185 Running the Remote control on the Pocket PC ............................................... 186 APPENDIX A - IMAGE FORMATS ....................................................189 Users Manual 5 Motion Studio 9.1. FORMATS OVERVIEW .................................................................................189 9.1.1. 9.1.2. 9.1.3. 9.1.4. 9.1.5. 9.1.6. 9.1.7. 9.1.8. 9.1.9. 9.1.10. 9.1.11. 9.1.12. 9.1.13. 9.1.14. TIFF Format ..................................................................................................... 189 Bitmap Format ................................................................................................. 189 JPEG Format ................................................................................................... 190 PNG Format..................................................................................................... 190 TP2 format ....................................................................................................... 190 FBA format....................................................................................................... 190 AVI Format....................................................................................................... 190 MOV Format .................................................................................................... 190 BLD Format...................................................................................................... 191 MPEG Format .............................................................................................. 191 MPEG H.264 (Advanced Video Coding) ...................................................... 191 Multi-page Bayer Format (MRF) .................................................................. 191 Multi-page Compressed Format (MCF) ....................................................... 193 Note on 16 bit grayscale formats ................................................................. 193 10. APPENDIX B – ERROR CODES .......................................................194 11. APPENDIX C - SPATIAL FILTERING................................................200 11.1. 11.2. 11.3. 11.4. LINEAR FILTERS (CONVOLUTION FILTERS)...................................................200 LINEAR SHARPENING FILTERS .....................................................................201 LINEAR SMOOTHING FILTERS......................................................................202 NONLINEAR FILTERS ..................................................................................204 12. APPENDIX D - COLOR FILTER ARRAYS (CFA)..............................205 13. APPENDIX E – EDR/XDR ..................................................................207 14. APPENDIX F – GLOSSARY ..............................................................209 6 Users Manual Motion Studio 1. Terms and Conditions For more detailed information, see the “Terms and Conditions” as stated in the camera manual and the IDT web site. Users Manual 7 Motion Studio 2. System Overview 2.1. Software package Upon the installation of the Motion Studio software package several options are available to the user. These options are easily accessed via the Program menu under the Windows Start button. The programs and associated files are organized under the IDT/MotionProX folder (IDT/MStudio64 for the 64 bit version). The folder includes the programs and the associated documentation. Other software components included in the package are copied into “Public Documents/IDT). The path of “Public Documents” folder depends on the operating system. Windows XP: “C:/Documents and Settings/All Users/Documents/IDT” Windows Vista, Window 7 and Windows 8: “C:/Users/Public/Documents/IDT” 8 Users Manual Motion Studio 2.2. Minimum computer requirements MotionPro X/Y – MotionXtra N/NR/NX/Os PC (Win32 and x64) Operating System Windows XP, Vista, 7 and 8 Processor Pentium III or equivalent with 500 MHz processor. RAM 4 GB USB 2.0 Port USB 2.0 port that is NOT shared with other devices (X and Y) Network adapter Giga-Ethernet (recommended) or 10/100 Mbps. Hard Drive 300 GB or greater hard drive (recommended). NOTE: Use an USB 2.0 port on the computer or a Giga-Ethernet port. USB 1.1 DOES NOT support camera operation. MotionScope M™ PC Win32 PC x64 Operating System Windows XP, Vista, 7 and 8 Windows XP, Vista, 7 and 8 Processor Intel CORE 2 at 2 GHz Intel CORE 2 at 2 GHz. RAM 4 GB 4 GB Frame Grabber Coreco X64 Xcelera-CL PX4 NI PCIe-1429 EPIX PIXCI E4 Bitflow Karbon Coreco X64 Xcelera-CL PX4 NI PCIe-1429 EPIX PIXCI E4 Bitflow Karbon Computer Slots One available x8 or larger PCI Express slot One available x8 or larger PCI Express slot Hard Drive 300 GB or greater hard drive 300GB or greater hard drive Users Manual 9 Motion Studio 3. Installing the System This section specifies the minimum recommended computer requirements and gives the procedures needed to install the Camera Head, Camera Cable, Power Supply, I/O Cable, and software. 3.1. IDT Cameras Installation 3.1.1. Software Installation Windows XP/Vista/7/8 Before installing the software make sure that the computer has Windows XP, Vista or 7 installed as operating system. 1. Log into Windows with a username and password that has ADMINISTRATIVE PRIVILEGES. 2. Insert the Motion Studio CD in the CD drive. If the computer is configured to AUTORUN, the installer will run automatically. If not, click on the Windows Start button. Select Run from the menu. Use the Browse button to locate the SETUP.EXE file on the CD and click the OK button. 3. Select the “Install” option and follow the on-screen instructions. 4. EXIT when the installation is complete and restart your computer. 10 Users Manual Motion Studio 3.1.2. Hardware installation (USB 2.0) A 24 VDC, 1 Amp supplies the camera with the necessary power. This power supply unit is included with the camera system package. All communication and data transfer with the host computer is done via the USB 2.0 or the Giga-Ethernet interface. The USB 2.0 interface requires a single cable, which is also supplied with the camera package. External triggering and synchronization are done via the two connectors (BNC type). Triggering is expected to be done with a TTL pulse. The synchronization signal is also TTL level. NOTE: Connect the camera to the computer before connecting the camera to the power source. Windows XP/Vista/7/8 1. Connect the USB 2.0 cable to an available USB 2.0 port on your computer. 2. Connect the other end of the USB 2.0 cable to the back of the camera. 3. Connect the camera to the power source. 4. Turn the camera ON/OFF switch to the ON position and wait a few seconds for the camera to initialize it self. 5. Follow the on-screen instructions. Click on the YES or Continue Anyway button when prompted by the operating system to proceed with the installation. NOTE: Use an USB 2.0 port on your computer. USB 1.0 does NOT support camera operation. Users Manual 11 Motion Studio 3.2. MotionScope M camera installation 3.2.1. Installing the Dalsa-Coreco X64 Xcelera-CL PX4 frame grabber Install the frame grabber in a PCIe x8 or x16 slot and power up your computer. Install the “X64 Xcelera-CL PX4 driver for Sapera LT Image Library” and follow the procedure below to update the firmware. 1. From the “All Programs -> DALSA -> X64 Xcelera-CL PX4 Driver” menu, select the “CorDeviceManager” item. 2. Select the Firmware Update Tab. 3. From the Configuration combo, select the “10 Taps Format 2” option. 4. Click the Start Update button. 5. Restart the computer. 12 Users Manual Motion Studio Install the “Sapera LT Image Library” version 6.04. Then follow the procedure below to edit the camera serial port. The configuration is necessary to correctly operate the camera. 1. From the DALSA -> Sapera LT menu, select the Sapera Configuration item. 2. From the Maps to combo-box in the “Serial Ports” group, select the “COM 4” option. 3. Exit the program and restart the computer. NOTE: if more than 1 frame grabber is installed, you have to select a different COM port for each frame grabber (COM4 for FG1, COM5 for FG2, etc.). Users Manual 13 Motion Studio 3.2.2. Installing the National Instruments PCIe-1429 frame grabber • Install the software by following the instructions below. 1. Install the “NI VISION Acquisition software” version 8 or later, which includes the NIIMAQ driver software. 2. Install the Motion Studio software suite (see the following topics). • Install the frame grabber in a PCIe x8 or x16 slot and power up your computer. • Connect the camera (see the following topics). • Run the NI “Measurement and Automation” utility and follow the instructions below. 1. From the left pane, expand the “Devices and Interfaces” branch of the configuration tree 2. Expand the “NI-IMAQ Devices” branch. 3. Expand the “NI PCI2-1429” branch. 4. Right click “Channel 0” and select “Camera”. 5. From the menu, locate IDT, then “MotionScope M3” or “MotionScope M5” and select it. 6. Exit the measurement and Automation utility. 14 Users Manual Motion Studio 3.2.3. Configuring the NI-1429 frame grabber for 64-bit Operating Systems A firmware update is available for the NI-1429 device to allow non-LabVIEW applications to run on 64-bit systems with more than 3 GB of physical memory. To update the device firmware, launch the Measurements and Automation Explorer (MAX) and select Tools, NI Vision, Update NI-IMAQ Device Firmware. From the “Available Bitstreams” window, select the 32-bit/64-bit option, then press “Apply Update”. If the warning below appears, select OK. Users Manual 15 Motion Studio 3.2.4. Installing and configuring the EPIX PIXCI™ E4 Frame Grabber Install the software by following the instructions below: 1. Install the “XCAP Imaging Application for Windows 95/98/ME/NT/2000/XP/Vista” software. 2. Install the Motion Studio software suite (see the following topics). Then power off the computer, install the frame grabber in a PCI Express x8 or x16 available slot and power up the computer. Install the drivers for the frame grabber form the location where XCAP has installed them. The default is C:\Program Files\EPIX\XCAP\Drivers\WinXP. Run “XCAP for Windows”. Enter the activation code and restart the application. 16 Users Manual Motion Studio 3.2.4.1. How to set the M3 or M5 camera as default To set M3 or M5 as default, the board sub-model must be changed. 1. From the PIXCI menu item, select “PIXCI Open/Close”. 2. If the Close button is grayed out, click Open. A window with a pre-configured camera model will be open. 3. From the PIXCI Open/Close window, click “Board Info”. The dialog box below will appear. 4. Click “Submodel Setup”. The PIXCI Maintenance dialog box will appear, like in the picture below. 5. From the Set new submodel list” select IDT M-3 or M-5. 6. Click OK. Users Manual 17 Motion Studio 3.2.4.2. How to increase the amount of memory allocated for the acquisitions The PIXCI E4 drivers do not allow increasing the number of buffers to acquire via the XCLIB library. It may be done only via the XCAP Imaging application. The PIXCI driver allocates the memory when Windows starts up, then each change is followed by a computer reboot. 1. From the PIXCI menu item, select “PIXCI Open/Close”. 2. If the Close button is active, click Close. 3. Click the “Driver Assistant” button and select the “Set Frame Buffer Memory Size” item. 4. Change the memory size in the “Memory requested for Frame Buffers” control. 18 Users Manual Motion Studio 3.2.5. Installing and configuring the Bitflow Karbon-CL Frame Grabber First install the software by following the instructions below. 1. Install the Bitflow SDK version 5.60. When the setup asks for serial number, enter the value “0”. It will install all the binary modules necessary to operate the camera. 2. Install the Motion Studio software suite (see the following topics). Then power off the computer, install the frame grabber in a PCI Express x8 or x16 available slot and power up the computer. Follow the instructions on video when Windows detects the frame grabber. When Windows asks to verify the driver, click “Install anyways”. Run the “SysReg” application from the desktop link. When the utility starts, it will show the frame grabber information. Users Manual 19 Motion Studio 3.2.5.1. How to attach the correct camera file to the frame grabber From “SysReg” utility, click on the “Configure…” button next to “Board operation”. From the “Board Details” window that appears, click the “Add…” button. In the “Choose camera file” dialog box that opens, locate the “Make: IDT, Inc.” tree item. Expand the tree to the bottom and select M3 or M5 camera file. Select OK. 20 Users Manual Motion Studio 3.2.6. Connecting the M camera A 12 VDC, 1 Amp supplies the camera with the necessary power. This power supply unit is included with the camera system package. All communication and data transfer with the host computer is done via the Camera Link interface. The Camera Link interface requires two cables. External triggering and synchronization are done via the three SMA connectors. Triggering is expected to be done with a TTL pulse. The synchronization signal is also TTL level. NOTE: Connect the camera to the computer before connecting the camera to the power source. 1. Connect the camera to the Camera Link cable on the side with a single jack and. 2. One the other side, the cables are labeled A and B. Connect the A cable to the frame grabber connector that is labeled “Camera Link 1” or “Camera Link Base” or that is far from the PCI-e edge connector. Connect the B cable to the frame grabber connector that is labeled “Camera Link 2” or “Camera Link Med/full” or that is closest to the PCIe edge connector. 3. Connect the camera to the power source. Cable A Cable B PCIe Slot Users Manual 21 Motion Studio 3.3. Disabling the User Account Control on Windows 7 (UAC) To disable the User Account Control on Windows 7, follow the instructions below. 1. Open the “Control panel” and select the “User Accounts” option. 2. Enter the page that manages you account. 3. Click the “Change User Account Control” option. 4. Move the slider to the bottom (like in the picture below) to the “never notify” position. 5. Click OK and restart Windows. 22 Users Manual Motion Studio 4. Configuration of Giga-Ethernet cameras 4.1. Motion Studio Network Configuration Utility The network configuration utility is an external application that allows the user to configure the IP addresses of the cameras. From Windows “Start” menu, select All Programs, then IDT, then Motion Studio, then Tools and then “Network Configuration” Some of the parameters that can be configured are the same for all the camera models. Users Manual 23 Motion Studio Network adapter: the default value is broadcast, i.e. the driver searches for cameras through each enabled network adapter. If a specific adapter is selected, the driver searches for cameras only through it. Network performance: it’s a delay added to the data exchange between the cameras and the computer. If there is traffic on your local network, then move the slider to “More reliable” to avoid loss of data during the communication Network Connections: click this button to open the “Network Connections” control panel applet and configure the network adapter’s IP address. Ethernet Datagram size: see one of the topics below. 4.2. Configuring the Y camera IP address Y cameras are delivered with a specific IP address. If the address is not compatible with your network parameters, the camera is not able to establish a communication with the computer through the network. To set the IP address for the first time, please follow the instructions below. • Connect the Y camera to the computer through the USB 2.0 cable. • From the Motion Studio program group, select Tools and run the “Network Configuration”. • The Y camera will be listed as “Camera Name – MotionPro Y (USB)”. Select it, and click the “Edit IP Address…” button. • Enter the IP address and the subnet mask. Then click OK and exit the configuration utility. • Turn off the camera and turn it on. The new IP address is stored and will be used by the camera in Giga Ethernet communication. NOTE #1: the computer network adapter may not have a specific IP address because it’s assigned by the DHCP. If there is any problem for the software to detect the camera, it’s better to assign a specific IP address also to the computer adapter. To do that, open the “Network Connections” window and select the Properties of the network adapter. Select the “Internet Protocol (TCP/IP)” and click the “Properties…” button. Select the “Use the following IP address” option and set the IP address and subnet mask values. NOTE #2: if the camera IP address is not compatible with the adapter’s IP address, the camera will be listed with a yellow exclamation mark. If you try to open a session the software will not be able to grab images from the camera and an error message will appear. 24 Users Manual Motion Studio 4.3. Configuring the N/NR/NX/Os camera IP address N cameras are delivered with a specific IP address. If the address is not compatible with your network parameters, the camera is not able to establish a full communication with the computer through the network. To set the IP address for the first time, please follow the instructions below. • Connect the camera to the computer via the Ethernet cable. • From the Motion Studio program group, select Tools and run the “Network Configuration”. • The N camera will be listed as “Camera Name – MotionXtra N”. Select it, and click the “Edit IP Address…” button. • Enter the IP address and the subnet mask. Then click OK and exit the configuration utility. • Turn off the camera and turn it on. The new IP address is stored and will be used by the camera in Giga Ethernet communication. NOTE: if the camera IP address is not compatible with the adapter’s IP address, the camera will be listed with a yellow exclamation mark. If you try to open a session in this condition the software will not be able to grab images from the camera and an error message will appear. Users Manual 25 Motion Studio 4.4. Forbidden IP addresses The following IP addresses are not allowed to be configured on the camera. • Loopback addresses: from 127.0.0.0 to 127.255.255.255. • Multicast addresses: from 224.0.0.0 to 239.255.255.255. The following combinations of IP address and subnet mask are not allowed as well: • Broadcast addresses: (IP_subnet_mask | IP_address) = 255.255.255.255. • Sub-network addresses: (~IP_subnet_mask & IP_address) = 0.0.0.0 The IP address 0.0.0.0 is allowed. In that case the camera is supposed to connect to a DHCP server and receive a valid IP address. 26 Users Manual Motion Studio 4.5. Large datagram size (Jumbo packets) Some Giga-Ethernet network adapters are able to send and receive large data packets. The usual datagram size is 1500 bytes. Large datagram packets, called Jumbo packets, are up to 9000 bytes. If both the camera and the adapter can use jumbo packets, the transfer speed is increased. To activate jumbo packets, do the following. Configuring Jumbo packets on the Network adapter 1. From Windows “Start” menu, open the “Network Connections” window and select the network adapter. 2. Right click and select the Properties menu item. 3. From the Properties dialog box, click the “Configure…” button. 4. From the network adapter configuration dialog, select the “Advanced” tab. 5. From the property list, locate the “Jumbo Packet” item (or anything similar to that) and change the value from 1500 to the maximum. Users Manual 27 Motion Studio Configuring Jumbo packets on the camera 1. From the Motion Studio program group, select Tools and run the “Network Configuration”. 2. Make sure that the camera is listed and the “Jumbo” item in the camera list is set to “Yes”. 3. From the “Ethernet Datagram Size” list. select any size that is “smaller” than the value selected in the network adapter configuration. NOTE: in some network environments the maximum datagram size might be not supported and the cameras may time out and/or behave in a strange way. To avoid that, reduce the datagram size on both the adapter and the camera. 28 Users Manual Motion Studio 4.6. Configuring the Windows Firewall All the cameras that support gigabit Ethernet communication may have issues if the Windows Firewall is installed. They communicate through the UDP network protocol and need to open listening ports to receive the images. In most of the cases, the windows firewall shouldn’t be disabled, Motion Studio should be added to the list of the allowed programs and some other parameters should be configured in the firewall (especially with HG cameras). 4.6.1. How to add Motion Studio to the list of allowed programs. When an Ethernet camera is operated for the first time, the Windows firewall detects the attempt to communicate through the network and tries to block it. The message below appears The software will be allowed to communicate through the network if both the private and public options are selected. Then click the “Allow access” button. If the User Account Control (UAC) is disabled or you don’t check both the options, you may still allow the communication through the firewall. • From the control panel, start the Windows Firewall and select “Allow a program or feature through Windows Firewall”. • Scroll the list and make sure that “Motion Studio” is in and all the check boxes are selected (see below). Users Manual 29 Motion Studio 30 Users Manual Motion Studio 4.6.2. How to allow incoming echo requests (HG cameras) HG cameras support the ICMP (Internet Control message Protocol). The cameras send a “ping” to the connected computer to check if the communication is still available. If the firewall blocks such packets the communication between the camera and the computer fails. For this reason, adding Motion Studio to the list of allowed programs is not enough. In addition, ICMP echo requests should be allowed. 4.6.2.1. Windows XP To detect if ICMP echo requests are allowed, open the Windows firewall and select the “Advanced Tab”. Click the ICMP settings and make sure that the “Allow incoming echo requests” option is selected. Users Manual 31 Motion Studio 4.6.2.2. Windows Vista / 7 / 8 • From the control panel, open the Windows Firewall and select the “Advanced settings” option (left pane). On Windows 8, the control panel can be open from the Metro start screen. • Select the “Inbound rules” item on the left pane and find the following rules in the list: 1. Windows Vista: “Networking – Echo Request (ICMPv4-In)”. 2. Windows 7 and 8: “File and Printer sharing (Echo request – ICMPv4-In)”. • If they are disabled (gray), select them and click the Enable rule button on the right pane or right click on the rule and select the “Enable rule” menu item (see below). Note: the rules should be enabled for every Profile used in the computer (Private, Public and Domain). 32 Users Manual Motion Studio 4.6.3. How to disable the Windows Firewall To disable the Windows firewall the user needs Administrative privileges. The firewall separately manages three profiles and it should be disabled on all of them: • Domain profile. • Private Profile. • Public Profile. To disable the firewall, follow the instructions below: From the Control Panel, open the Windows Firewall dialog box. From the options list on the left, select “Advanced Settings” and open the “Windows Firewall and advanced security” window. Users Manual 33 Motion Studio Click the “Windows Firewall Properties” button and open the “Properties” dialog box. Select the “Domain Profile” tab and set the “Firewall State” to off, then select the “Private Profile” and set the “Firewall State” to off, and then select the “Public Profile” and set the “Firewall State” to off. 34 Users Manual Motion Studio 4.7. Configuring the X camera IP address When a MotionPro X camera is powered up, it does not have an IP address. Without a valid IP address the camera can be enumerated, but some parameters, such as camera model, serial number, etc. cannot be read. The Configuration utility enumerates all the IDT GE cameras and shows each camera’s IP address or “none”. A camera without a valid IP address is listed with a red spot on the icon. For each camera the user may click the “Edit IP Address…” button. If the camera has an IP address, it may be edited, and otherwise the application “suggests” a value. The user may edit and test the camera IP address and subnet mask. By pressing the “Test IP address” button the user sends a PING command to the specified address and checks if it is available. Users Manual 35 Motion Studio 5. Motion Studio™ This application allows the user to acquire, save/play-back image records, and control the camera in Single or Double Exposure modes. It also allows the user to retrieve file images from previous acquisitions for display and further manipulation. Upon execution the user can select to use the application to open a file images or to open a camera window. 5.1. Open camera Wizard A discussion of the program interface as it applies to the live camera window is provided first. Once the camera option is selected from the first menu the Camera Wizard is displayed. This wizard allows the user to select which camera to control and access if more than one camera is attached to the computer system. For each camera, the attribute ‘monochrome’ or ‘color’ is displayed. 36 Users Manual Motion Studio Refresh List Click this button to restart the cameras detection procedure. Enumeration filter The user can select which camera type is enumerated and listed in the camera wizard window. 1. Click the “Enum Filter…” button. 2. Check or uncheck the camera models. 3. Click OK. Users Manual 37 Motion Studio Select/Deselect All Click “Select All” to select all the cameras of the list, click “Deselect All” to deselect them. Camera Info Click this button to display the camera information. Camera name Each camera has a name. If the camera has flash memory, the name is stored into it. Cameras without flash memory have the name stored in a configuration file in the hard disk. To change camera name, click the “Edit name…” button. IP Address Click the “Edit IP address” button and manually assign an IP address to the camera. The user may edit and test the camera IP address and subnet mask (disabled for X cameras). By pressing the “Test IP address” button the user sends a PING command to the specified address and checks if it is available Activation Key 38 Users Manual Motion Studio Some cameras have time limited license. If the license has expired and you have a 16 digit activation key, click the button and enter the key. Camera interface Before opening camera windows the user may select the interface. • Standard: a limited set of controls are displayed in a vertical bar on the right side of the camera window. • Digital Cinema: a limited set of controls for recording and a full set of controls for image processing. • Automotive: the controls used in a typical automotive environment. • Expert: all the camera controls are displayed. Activate Camera List If more than one camera is going to be used, the camera list interface may be activated. For a more detailed description of camera list mode, see the “Multiple Camera Support” topic. Plus Mode The plus option can be activated on each camera independently. Just click on the Plus cell in the camera list and select Yes or No. The option is disabled if the camera does not support it. In Plus™ mode, the camera is capable of acquiring images at double speed and with double memory space. See below. Reset camera configuration If this option is selected, the configuration stored in the camera is reset and the camera is opened with default settings. Users Manual 39 Motion Studio Once the Wizard competes the initialization procedure for the camera the application window for the active camera is open as shown below (expert interface). Along with the usual top bar menu structure the application also includes a docked dialog bar on the right side and a pan tool. In this menu the main operational controls of the camera are grouped by function: Camera Control (Live and Playback), Acquisition Settings (Camera, record and Color). The function of these controls is in great part also accessible from the top menu bar. 40 Users Manual Motion Studio 5.2. Motion Studio Menu structure The main menu bar contains the following options: File Edit Image Filter Camera Playback Tracking View Tools Window Help The application also includes a docked dialog bar on the right side. The Docked Dialog Bar has the main operational controls of the camera and they are grouped by function: Camera Configuration, Image Recording Configuration, Color Configuration (for color cameras only) and Playback controls for acquired images. Users Manual 41 Motion Studio 5.3. FILE Menu The file menu contains the following options: • Open previously acquired and filed images. • Open the camera window. • Open the RAW files. • Open the database viewer window. • Save images on the hard disk and close windows • Select from a list of the five most recently displayed images. 5.3.1. Initialize a camera window From the main menu select File > Open > Camera. 5.3.2. Open File Images From the main menu select File > Open > Images. 42 Users Manual Motion Studio 5.4. Save images Each acquired sequence may be opened and saved in a different format. 1. From the File menu select File >> Save The program will create a new acquisition folder in the current database and save the images and the acquisition settings. For further information about the parameters please refer to the paragraph 5.20 (Saving acquired images and data). 1. Click “Browse” to change the location of the database folder. 2. Enter the folder name, the image prefix and the comment (optional). 3. Select the file type and the rate. If the file is compressed AVI, select the codec. 4. Select start index, stop index and step. 5. Select the Reset Frames Numbering option to change the start frame index to 0. 6. Also a subset of the sequence can be saved. Select a region of interest by pressing the Edit button. 7. Select the Data Acquisition File Type, if present. Users Manual 43 Motion Studio 5.4.1. AVI and MOV Codec/JPEG quality selection The default codec used in Motion Studio to save AVI files is “Uncompressed AVI”. If other codecs are installed, the default codec may be changed each time a new sequence of images is saved in AVI format. • Select the codec from the list. • Select the compression quality with the slider (0 to 100). Also, JPEG compression quality may be selected in the same dialog box. The default is 100. Another format that allows codec selection is MOV. The user may select RAW, TIF or H264 codec. 44 Users Manual Motion Studio 5.5. Open RAW files The images saved with fast download in the RAW format may be open and reviewed. • From the File menu, select Open, then “RAW Files”. • Click “Browse…” to select a different Images folder. • Select the sequence from the list and click Open. The sequence is open as a virtual camera with a single acquisition. The user may playback the images and save them in any format. Users Manual 45 Motion Studio 5.6. Database viewer The database viewer window browses the current Images folder and enumerates the acquisition folders. It shows also the cameras and devices connected to the computer (Timing Hub/Data Acquisition). The window has three panes. Left Pane: the left pane is a tree view and displays the tree structure of the images database. It shows images, raw files and data acquisition files. Right Upper Pane: it’s a list view and it shows the main parameters of the selected item. If the item is a device it shows the device ID, serial number, etc. If the item is an acquisition it shows all the acquisition parameters. Right Lower Pane: the pane is used to preview the first frame of a sequence or the data acquired with the data acquisition module. 46 Users Manual Motion Studio 5.6.1. The viewer Toolbar New Database The selection of this item opens the 'Create New database' dialog box. The user may browse the existing directories in the hard disk or create a new directory. If the OK button is pressed the root database files are copied in the new directory and the user can start saving new sequences in the new folder. Open Database Browse the directories in the hard disk and locate a database folder. The program recognizes as valid database locations the directories where the file xvdb.mdb is found. Changes to the currently selected database are reflected on the settings. Refresh Click this button to refresh the viewer contents. Open Item Click this button to open the currently selected item. The button is enabled if the selected item is a sequence or a camera. Edit Item Click this button to edit the currently selected item. The button is enabled if the selected item is an acquisition folder. The user may change the folder name, date, time and acquisition comment. Delete Item Click this button to delete the currently selected item. The button is enabled if the selected item is an acquisition folder. iPod Synchronization If your iPod is connected to the computer, Motion Studio can detect it and allow you to transfer your acquired sequences. You may transfer the sequences from iPod to the current database and vice versa. You may also eject the iPod. Users Manual 47 Motion Studio 5.7. EDIT menu The Edit menu contains UNDO and REDO for image operations. It also has a “Go To…” function for jumping to a particular frame in a sequence. 48 Users Manual Motion Studio 5.8. IMAGE menu The Image menu contains the LUT operations. It also allows flipping and rotating of the image. If the Camera window is open and the Thumbnails bar is in use, the “Thumbnails Cfg...” option displays for Thumbnail view configuration options. For more information, refer to “View Thumbnails”. If an image sequence is open, the Image menu has an Image Info option for displaying and editing the acquisition settings. The Adjust sub menu has controls for the following: • Color Map for colorizing monochrome images • Inverting. • Background removing for monochrome images (old MotionPro X4 only). Users Manual 49 Motion Studio 5.9. Lookup Table The lookup table (LUT) transformations are basic image-processing functions that you can use to improve the contrast and the brightness of an image by modifying the dynamic intensity of region with poor contrast. LUT transformations can highlight details in areas containing significant information, at the expense of other areas. A LUT transformation converts input gray-level or color values (8, 10 or 12 bit) into other gray-level or color values. The transfer function has an intended effect on the brightness and contrast of the image. Each input value is transformed into a new value by a transfer function Output value = F (input value) Where F is a linear or nonlinear, continuous or discontinuous transfer function defined over the interval [0, max]. In case of an 8-bit image, a LUT is a table of 256 elements. Each element of the array represents an input value. Its content indicates the output value. 1. Select one of the pre-defined Lookup Tables (A, B, C, D or E) or. 2. Select the “User” option. 3. Drag and drop the red handles in the curve window. 4. Move the sliders to change the Y position of the handles. 5. Click Reset to reset the lookup table to the original diagonal value. 50 Users Manual Motion Studio 5.10. Orientation The image may be rotated and/or flipped. 1. Select Image from the main toolbar. 2. Select “Orientation” from the drop-down menu. 3. Edit the parameters. 4. Click OK. 5.11. Image Info The main acquisition parameters may be displayed and edited. 5. Select Image from the main toolbar. 6. Select Info from the drop-down menu. 7. Edit the parameters. 8. Click OK to change the parameters on the acquisition. Users Manual 51 Motion Studio 5.12. Color Map Adjustment for monochrome images The Color Map has controls for displaying black and white images in color using a preloaded, user-defined color scheme. 1. Select Image from the main toolbar. 2. Select Adjust from the Image drop-down list. 3. Select Color Map. 4. Select Base Color Map from the drop-down list. 5. Change the RGB values and Point Index. 6. Click OK to change the image. 52 Users Manual Motion Studio 5.13. Sharpen, gamma, brightness, contrast, hue, saturation Some image adjustment controls have been added to the image vertical bar. The parameters improve the image quality. CFA filter: if the file is TP2, FBA or MRF, the control configures the interpolation algorithm. Anti-Alias: it reduces alias on edges with a Gaussian filter. The range is from 0 to 1.0. the default value is 0.0. Sharpen/Sharpen Threshold: it sharpens the image edges. The range is from 0.0 to 1.0. The default value is 0.0. Gamma: introduces a gamma correction to the image. The range is from 0.1 to 4.0. The default value is 1.0. Brightness: it increases or decreases the image brightness. The range is from -0.25 to 0.25. The default value is 0.0. Contrast: it increases or decreases the image contrast. The range is from 0.5 to 1.5. The default value is 1.0. Hue (color images only): it modifies the image hue. The range is from -180 to 180. The default value is 0. Saturation (color images only): it modifies the color saturation. The range is from 0.0 to 2.0. The default value is 1.0. LUT: it toggles the Lookup Table dialog box. Users Manual 53 Motion Studio 5.14. Remove background (X4 camera only) This tool is very useful to remove temporal noise background from images taken with the X4 camera. It requires a very dark and uniform background. 1. Select Image from the main toolbar. 2. Select Adjust from the Image drop-down list. 3. Select one of the options. • Subtract minimum value: on each row the minimum value will be subtracted. • Subtract value on column: on each row the value on a specific column will be subtracted. 4. Use the Zoom drop-down list to inspect the image details. 54 Users Manual Motion Studio 5.15. FILTER menu The filter menu has several preset filters as well as user defined filters. The filter menu for Windows differs from the Mac filter menu. The Windows version offers two additional Effect filters Uniform Noise and Gaussian Noise. A preview window with an image thumbnail is available and includes the filter kernel display box. Windows From the main toolbar select Filter > the desired filter submenu from the following: • Sharpening filters: Laplace, Prewitt and Sobel. • Smoothing filters: Average, Gaussian, Smooth, and Median. • Effect filters: Minimum, Maximum, Uniform Noise, Gaussian Noise, Erode, Dilate, Open, Close. MAC From the main toolbar select Filter > the desired filter submenu from the following: • Sharpening filters: Laplace, Prewitt and Sobel. • Smoothing filters: Average, Gaussian, Smooth, and Median. • Effect filters: Minimum, Maximum, Erode, Dilate, Open, Close. Users Manual 55 Motion Studio 5.16. Create a User-defined filter The User filter utility has the flexibility to apply a custom filter and save the kernel for future use. The filter kernel size, anchor point and image divisor are custom configurable. Once a custom filter has been created and saved, the user-defined filter is added to the Filter drop-down list. 1. Select Filter from the main toolbar. 2. Select User from the drop-down list. 56 Users Manual Motion Studio 5.17. CAMERA Menu The Camera Menu on the main toolbar offers an alternative to using the buttons and dialog box provided by the Docked Dialog menu including the following functions: 1. Record 2. Stop 3. Play 4. Playback 5. Select “Live” mode. 6. Select previous and next acquisition settings. 7. Start and Stop the remote connection server (see chapter 7). 8. Edit Region of Interest (ROI). Users Manual 57 Motion Studio 5.18. Camera Control - Live The Camera Control Tab at the top of the Docked Dialog menu has camera control functions including the following: 1. Record. 2. Live play of images (continuous). 3. Trigger. 4. Attach. 5. Stop. Video Output This option enables or disables video output in X, Y and MotionXtra Legacy cameras. Y cameras: the video output modes are listed below: • PC only: images are sent to the computer via GE or USB, no HDMI output is produced. • PC and HDMI: any time an image is sent to the computer (playback or live) the same image is sent also to the HDMI output. The live/playback speed is reduced because a double output is done. • HDMI only: computer and HDMI operations are independent. The user can do live on the computer and playback on HDMI or vice versa autonomously. Live/Playback speeds are independent. This option is active on new design Y cameras only. Video Format X and MotionXtra legacy: select NTSC or PAL format. Y cameras: select one of six HDMI formats (720p 60Hz, 720p with overlay, 1080p 60 Hz, 1080p 25 Hz, 1080p 24 Hz, or 1080p 30 Hz) 58 Users Manual Motion Studio 5.19. Camera Configuration Expert Interface Use the Camera Tab on the Docked Dialog menu at the right of the image to configure the camera. The configuration options are as follows: Sensor Gain Use the sensor gain drop-down list to select a Gain value from “1.00” to “2.82”. Reset Click the Reset button if a Device IO Control error message appears. The Reset button restores the camera from the error condition. Rate Use the Rate drop-down list to select a new Frame Rate value. If the current exposure is too large for the selected rate, the program automatically adjusts it to an acceptable value. Low Light mode Click the button to set the rate to 25 Hz and the exposure to four times the current value. If the button is clicked twice or an acquisition is started the original values of exposure and rate are restored. The option is useful for preview in low light conditions. Exposure Use the f-stop buttons to select a new exposure value. The value is in microseconds. Exposure Mode Use the drop-down list to select either Single, Double, EDR or XDR exposure mode (for XDR see the appendix). Auto-Exposure Select this option to activate the automatic exposure adjustment. Motion Trigger Select this option to activate the motion trigger. Binning Use the Binning drop-down list to select a new value from 1x1 to 4x4. Pixels may be grouped to form a larger pixel, which results in added SNR and sensitivity. When this parameter is changed, the Region of Interest (ROI) is reset. The control is disabled when the camera is in live mode. Pixel Depth Use the drop-down list to select the pixel depth: 8, 9 or 10-bit for monochrome cameras, 24, 27 or 30-bit (RGB) for color cameras. ROI Click on the ROI button to open the ROI dialog, and change the current settings. For more information, see “Set a Region of Interest (ROI)”. Users Manual 59 Motion Studio Standard Interface If the Standard interface is selected, only a subset of the controls is shown in the camera Tab. Digital Cinema interface If the digital cinema interface is selected, a subset of camera controls and image processing controls are shown in the camera Tab. The exposure control allows the configuration of the shutter angle. Automotive Interface The automotive interface includes the controls most frequently used in automotive environments. 60 Users Manual Motion Studio 5.19.1. Auto-exposure When this option is selected, the camera automatically adjusts the exposure to match a specified average luminance value. The camera reacts to any change of external light intensity by changing the current exposure value. 1. Click the “Edit…” button and change the region of interest like in the picture below. 2. Select the “Configure min and max exposure” option to set limits to the exposure. 3. Click OK and enable the auto-exposure. Users Manual 61 Motion Studio 5.19.2. Motion Trigger The motion trigger option activates the trigger when a change in the image is detected. 1. Click the “Edit…” button to open the configuration dialog. Change the region of interest like in the picture below. 2. Change the trigger condition and the sensitivity value from 1 (less sensitive) to 20 (most sensitive). 3. Click “Start Test” to test the parameters. If the trigger condition becomes true, the red frame turns into green. 4. Click OK to enable the motion-trigger. A red thick frame will be displayed on the live image. The frame cannot be moved or resized. To change it, click the “Edit…” button. 5.19.3. Region of Interest (ROI) The IDT cameras have a Partial Windowing capability that can be selected and set via the software interface. A region of interest for the image that is less than the total 62 Users Manual Motion Studio available area of the sensor may be selected. This region can be interactively adjusted and can occupy any area of the sensor’s active pixels. 1. Click on the ROI button on the Camera Configuration Tab. 2. From the Edit Region of Interest dialog box, select the ROI by setting the numerical values for its origin and dimensions or by dragging the handles of the red box that highlights the ROI within the sensor area. Once the ROI is configured only the active portion of the image is acquired and displayed. It is important to note that the maximum framing rate of the camera is inversely proportional to the number of rows in the ROI. The options are below: Resolution: select a resolution from the buttons on the left side or edit the values in the X Origin, Y Origin, Width and Height text boxes. Center ROI: click the button to center the current ROI. Reset ROI: click the button to reset to the maximum value. Max fps, frames, time: displays the maximum acquisition rate, the max number of frames and the corresponding recording time for each ROI. If the camera has onboard SSD, it shows also the streaming fps, e.g. the frame rate that allows continuous streaming on the disk without overrun. 5.19.4. ROI for 7 and 8 series cameras (Dynamic Magnification) Some camera models allow dynamic magnification. The zoom factor range is from 1X (no zoom) to 16X (16 times zoom). The zoomed portion may be dragged in the full resolution window, as in the picture below. If the Dynamic Magnification is disabled the camera supports regular region of interest. Users Manual 63 Motion Studio 64 Users Manual Motion Studio 5.20. Save and Load Save camera configuration To Save the current camera configuration, select “Save camera Cfg…” from File menu, then select one of the available configurations or type a new name and comment. Then click OK. Configuration files may be also deleted. To load a camera configuration, select “Load Camera Cfg…” from File menu, then select one of the available configurations and click OK. Users Manual 65 Motion Studio 5.21. Record Configuration 5.21.1. Record Tab Use the Record tab on the Docked Dialog box at the right of the image to set the record options. Record mode Use the drop-down list and select one of the following options: • Normal: the camera acquires and stops when the memory segment is filled. • Circular: the camera acquires and restarts when the memory segment is filled. The camera waits for an event trigger to complete the acquisition. • BROC (Burst Record on Command): the memory segment is divided into subsegments; the camera acquires in circular mode in a sub segment. When the event trigger is issued, the camera completes the acquisition and start acquiring in the following sub-segment until the memory segment is filled. Frames In the text box edit the number of frames to be recorded to the camera memory in a single acquisition. The values can be set from 1 up to a maximum number depending on the amount of free memory and the number of rows on each frame. Select the number of rows on each frame with the ROI setting. BROC Length If BROC mode is selected, use the text box to type the number of frames of each subsegment. If the number of frames is 1000 and the BROC length is 100, the camera will acquire 10 sub-segments. Frame Sync / Sync Cfg Sync Configuration and Event Trigger configuration are separated. Synchronize the camera with a pulse train and simultaneously issue an event trigger from the “Trigger In” BNC connector. Use the drop-down list to select Internal or External synchronization source. If the “Frame Sync” is external, use the “Sync Cfg” drop-down list to select one of the following options: edge-high, edge-low, pulse-high, and pulse-low. Trigger Cfg In Circular or BROC mode, select from the following event triggers options: 66 • Edge High • Edge Low • Switch Closure Users Manual Motion Studio Trigger Adjust When the record mode is set to Circular or BROC, the Trigger Adjust controls are active. In this mode the camera acquires the set number of frames before the trigger event (pretrigger) and the remaining after (post-trigger) the trigger event. Use the slider to adjust the number of pre- and post-trigger frames or edit the pre-trigger box. Advanced Sync/Trigger Configuration Use the Advanced… button to open the Trigger, Sync In and Sync Out configuration dialog. Acquisitions Configuration Use the Wheel Icon button to open the Advanced Acquisitions Configuration dialog. Select Acquisition Use the arrow buttons to select the previous or next acquisition. Memory Indicator Bar The colored bar depicts the available memory. Users Manual 67 Motion Studio 5.21.2. SSD Options Os cameras are equipped with 8 GB RAM (DDR) and onboard solid state disk (256 or 512 GB). The images may be recorded into RAM and/or SSD in the modes listed below. OFF: the SSD is not used and the camera acquires images in the DDR like any other IDT camera without SSD. Backup: the DDR is used as a temporary buffer. The images are acquired in the DDR and, when recording is done, the images are transferred to the SSD asynchronously. The camera can record at any frame rate but the maximum number of frames that can be recorded in each acquisition is limited by the DDR size. Streaming: In SSD streaming mode, the DDR is used as a temporary buffer. The images are acquired in the DDR and synchronously transferred to the SSD. Since the write to disk speed (in frames per second) is fixed and the write to DDR speed is configurable, the maximum number of frames that can be recorded depends on the difference between those two numbers. The “Streaming fps” is the frame rate that corresponds to the write to disk speed. If the frame rate is lower than streaming fps, the max number of frames that can be acquired is limited by the SSD size. If the frame rate is larger than the streaming fps, the max number of frames is variable and it’s calculated assuming that the record mode is normal. If the record mode is circular and you wait too long before triggering, you may receive a disk overrun error message. Mission: in mission mode, the DDR is used as a temporary buffer. For more information, see the topic below. 68 Users Manual Motion Studio 5.21.3. SSD mission mode The mission mode has been designed to acquire images when the camera is disconnected from the computer. The SSD may be divided into segments, called steps; each step may have different parameters such as exposure, frame rate, region of interest. Each step is recorded in normal mode and the recording start may be automatic or generated by the trigger. The picture below shows the interface. Steps in flash memory Steps acquired in SSD To configure the camera in mission mode: • Click “Reset Steps” to clear the upper list. • Click “Add step” as many times as the required number of steps. • Edit the parameters by clicking on the corresponding field in the list. If a step need to be automatically executed after the previous one, select “Auto advance” in the “Action at end” column of the previous step, otherwise, select “Stop”. • Select the “Execute at next camera power cycle” to enable the execution of the mission when the camera is powered up. • Click “Write to camera” • Exit the program. The next time the camera will be power cycled the steps will be automatically executed and the image stored in the SSD. Once the mission is executed once, the camera may be power cycled more times, but the images will not be overwritten. To display images acquired during the mission: • Run Motion Studio and select the SSD mission mode. • If the steps have been recorded and stored in the SSD, they will be listed in the lower list of the mission dialog. Users Manual 69 Motion Studio • Highlight one of the steps of the list and click “Load step to camera memory”. If the step size is larger than the camera memory, a drop down menu will appear, showing a list of segments. Select one of them to load the images. To save images acquired during the mission: • 70 Check or uncheck the boxes on the left side of each step and click Download. The images will be downloaded in RAW format. Users Manual Motion Studio 5.21.4. Advanced Sync/Trigger Configuration Trigger In Y and N cameras can enforce a minimum time that the trigger input must remain continuously at its active level before it recognizes a valid trigger. This parameter is called “Debounce” and can be used to reject noise pulses on the trigger input, or to de-bounce mechanical contacts used as trigger sources. After it recognizes a valid trigger pulse, the camera can wait for a few microseconds before issuing the trigger. This parameter is called “Delay”. Sync In The “Debounce” and “Delay” parameters can be applied to the sync in source as well (see above). If an external sync source is connected to the camera, the software is able to detect the rate and the pulse width of the signal. If the user sets the frame sync parameter to external and no signal is active on the “Sync In”, the program displays a warning message. The polarity of the “Sync In” signal may be inverted. Sync Out The sync out mode can be configured: • Default: the sync out signal follows the sync in (internal or external). The signal width is the exposure time. • Inverted Default: the signal follows the sync in as in the default, but it’s inverted. • Configurable Width: the user can define the width of the sync out signal. • Inverted Configurable Width: like in the option above, but inverted. • Disabled: the sync out signal is disabled. A “Delay” can also be added to the Sync Out signal. Alignment: when the auto-exposure option is selected the exposure is done at the end of the acquisition period. Then the period and exposure are not aligned. The alignment option is used to decide whether the sync out will be aligned to the period or to the exposure. Marker If this option is enabled, the user can send to the camera a pulse that gets recorded in one frame. The recorded pulse is a marker in the frame and lets the user know that something happened at that time. The marker is shown in the frame if the “Marker” Time stamp option is selected. The pulse can be sent through the “Sync In” connector or the “Trigger In” connector. Users Manual 71 Motion Studio 72 Users Manual Motion Studio 5.21.5. Acquisitions Configuration and selection The acquisitions configuration dialog is activated by clicking the gear icon on the “Camera” or the “Record” tab. A list of the current acquisition may be activated by clicking the “List” button on the right side (see below). The user may edit some of the acquisition parameters before recording, add an acquisition or delete it. The general download parameters are stored in the first page of the “General Options” dialog and may be activated by selecting “Download options”. For a detailed description of the download options, see the topics below. The images are stored in a set of sub-folders organized as below: “Images Folder”/”Test Session Folder”/”Acquisition Folder” The Images folder is set in the “Download options” dialog and should not be changed frequently. Users Manual 73 Motion Studio Test Session Name This parameter is the name of the Test session folder and it is created before saving the images. It will contain all the acquisition folders. Assign the same name to the acquisition If this option is selected, the acquisition folder name is the same of the session folder. If more than one acquisition is saved, a number is added to the folder name in order to avoid overwriting the images. Acquisition Folder name This parameter is the name of the prefix of the acquisition folder. Each folder name is created by adding a number to this parameter (for example, if the name is “Acq” the folders will be “Acq_000”, “Acq_001”…). Overwrite folder If this option is unchecked, the software creates a different folder each time the images are saved (Acq_000, Acq_001 …). If the parameter is checked, two options are available: • The “Download images after acquisition and restart” option is not selected. In this case the program saves the images in the same folder all the time. Example: the folder name is A. then the program creates the folder A the first time and saves the images. If subsequent acquisitions are done, the program saves the images in the same A folder and overwrites them. • The “Download images after acquisition and restart” option is selected. In this case the program creates folder names from the acquisition name with 7 digits. Example: the acquisition name is A, then the program creates A_0000000, then A_0000001, then A_0000002 and so on. Image Prefix Type the image prefix into the text box. If the “Camera Name” option is selected the image prefix is the name of the camera. Comment Type a comment to the acquisition. The comment will be saved in a configuration file with the images and may be also shown in the time stamp. Frames Use this dialog box to set the number of frames to record. Time It displays the acquisition record time. File Type and Codec Use the drop-down list to set the image type format for archiving files to the hard drive of the computer. Some image formats support codec’s. The camera memory may be organized with multiple acquisitions. New Create new acquisition folders to store a new sequence of images using the. Configure all of the parameters independently for each folder. Defrag The acquisitions are defragmented in camera memory. Delete and Delete All Delete a selected folder or all folders. 74 Users Manual Motion Studio 5.21.6. Direct write to disk Option (M2D) If the camera is an M-series and the “M2D” option is active (a license file is required), the configuration dialog shows a write to disk section. Delete Files: click this button to delete the files stored in the acquisition folder. Edit: click this button to change the write to disk settings. Memory Buffer Size: it indicates the amount of computer memory allocated for the acquisition. The camera acquires images in this memory buffer and the data is automatically saved to the hard disk in real time. Disks: select the disk drives used for the acquisition. Folder: type the name of the folder where the images will be stored. 5.22. Saving acquired images and data The acquired images stored in different areas of the camera memory can be saved to the computer’s hard drive. Click the Save button on the main toolbar or select File from the main toolbar > Save Acquisitions… Users Manual 75 Motion Studio Some of the parameters are described in the “Acquisitions Configuration” topic above. Output Pixel Depth The output file pixel depth may be different from the original image's pixel depth. Use the drop-down list to select one of the mono or color pixel depths. 10/30-bit images can be saved in 8/24-bit, 9/27-bit and 10/30-bit image files. TIFF, PNG, MPT, MCF and MRF support both 8/24-bit and 10/30-bit; BMP, JPEG, AVI and MOV support 8/24-bit only. Color images are saved in BGR Windows format. Rate [fps] If the sequence is saved in AVI or MOV format, the playback rate may be configured. From Frame/To Frame/Step Type the desired Start Frame Index, Stop Frame Index and Step value directly into the text box. For example, if from=2, to=10 and step=2, only the following frames will be saved: 2, 4, 6, 8 and 10. Reset Numbering In Circular mode the frame number may be negative; also, the Step may be different from 1. Select the Reset Numbering Option to save images with numbers starting from 0 index and step 1. If data acquisition is connected and some data have been acquired with the images, the user may select the file format. Available formats are: ASCII, Tecplot, LabVIEW, Excel XML spreadsheet and Excel XLS workbook. 76 Users Manual Motion Studio Tile Images: the data graph is printed and tiled to the bottom of the image Show colored graph: if the camera is monochrome, the images are converted into color and a colored data graph is tiled. Print graph label: a label with a description of each channel is added to the data graph. Users Manual 77 Motion Studio 5.23. Download Options The download options may be enabled from the “Acquisition Configuration” dialog box, from the “Save Acquisitions” dialog box or from the “General Options” dialog box. Images Download folder The images folder is where the session folders, the acquisition folders and the images are stored (in raw or any other format). Click “Browse...” to change the folder name. This folder should not be frequently changed. Download and create AVI If this option is selected, the software downloads an AVI file after the download of regular images. The folder where the AVI is stored may be different from the regular images folder. AVI codec Click this button to edit the AVI codec AVI download folder The folder where the AVI files are stored may be different from the folder where regular images are stored (raw files included). Click “Browse…” to edit the name of the AVI folder. 78 Users Manual Motion Studio Enable RAW Download and Convert If this option is enabled, the camera downloads the images in raw metadata format. Once the raw download is activated and the raw data is saved, the data may be converted into a standard image format. The conversion process may be started automatically (“Convert after download” option) or postponed (“Convert later” option). If the “Delete after conversion” option is enabled, the raw file is deleted after the conversion. For more information about this topic, refer to the RAW converter topic below. Jpeg download Some camera models (HG and Y-series) support direct jpeg download. The images are converted into jpeg by the camera firmware and sent to the computer. The software reads the images and stores them to the hard disk without any conversion. Save acquisition data The program saves acquisition data to the images file. The data may include IRIG time, temperature, image index, exposure, rate and other information. Save ISO files. If this option is selected, the MME/MII files are generated in the acquisition folder. Click Edit to modify some of the MME/MII strings. Download images after acquisition and stop If this option is selected, Motion Studio stores the data to the hard disk immediately after each acquisition. Download images after acquisition and restart “N” times If this option is selected, Motion Studio stores the data to the hard disk immediately after each acquisition. After saving the images, the camera is armed. The process is repeated N times. Arm the camera and switch to next segment If the camera memory is segmented and this option is selected, the software automatically switches to the next segment when the previous acquisition is complete. Users Manual 79 Motion Studio 5.24. Download Manager The download progress is reported in a window called Download manager. Downloads are queued and executed in the correct order. The status of each download is continuously updated (see below). The download process may be aborted at any time by clicking the “Abort” button. Click the “Close the window…” button to hide the manager window when downloads are complete. 80 Users Manual Motion Studio 5.25. Raw Download and Raw Converter Once the raw download is activated and the raw data is saved, the data may be converted into a standard image format. The conversion process may be started automatically (“Convert after download” option) or postponed (“Convert later” option). 1. Convert after download: the file is automatically converted after the download. The raw converter runs in background and converts the file. An icon is displayed in the tray notification area of Windows. A red icon means that the conversion process is in progress, a green icon means that the conversion has been completed. The raw converter window may be displayed at any time by clicking on the tray area icon. Raw Converter icon 2. Convert later: the file is converted manually by the user. From the Start menu select “All Programs”, then “IDT”, then “Motion Studio”, then “Tools” and then run the “Raw Converter”. Locate the args.ini file in the acquisition directory and click OK. Users Manual 81 Motion Studio Then select the conversion options. The file format may be changed and the raw file can be kept and converted more than once. Some of the conversion options can be modified before the conversion (file type, codec, and pixel depth and playback rate). When the OK button is clicked, the raw converter is started and the sequence queued in the conversion manager (see below). The conversion process may be aborted at any time, by clicking the “Abort” button. 82 Users Manual Motion Studio 5.25.1. Raw converter batch files If the amount of raw sequences to convert is large, the user may generate a batch file and run the conversion once. From Tools menu, select “Raw batch editor…” New batch file: click this button, to reset the current batch and generate a new file. Open batch file: opens a previously generated batch file. Save batch file: save the changes in the current batch file or in a new file. Add: adds a sequence to the current batch file (ARGS.INI file) Remove: removes a sequence from the current batch file. Remove all: removes all the sequences from the list. Convert to: the files may be converted in a folder that is different from the source images folder. Click Browse to select an existing folder or create a new one. Override images settings: click this option if you want to convert all the raw files in a single file format, set a single playback rate, reset frames numbering in all the selected sequences. The settings of each sequence will be overridden by the selected options. Once the batch file is generated and saved, you may launch the converter right away or save the batch file and convert it later. To do that, launch the raw converter and open the batch file. All the sequences included in the batch file will be converted. Users Manual 83 Motion Studio 5.26. Images Recovery After each acquisition a local configuration file is saved in the database directory (_nnn_recover.xsv, where “nnn” is the serial number of the camera). The file contains the information about the latest acquisition. If any error has occurred after an acquisition and the program has been restarted before the images have been saved, the acquisition may be recovered. 1. From the main toolbar select the File menu. 2. From the drop-down menu select the “Images Recovery” item. 3. Select one of the options. 84 Users Manual Motion Studio 5.27. Image Configuration The image tab includes controls for color reconstruction and white balance and controls for image improvement. Sharpening, gamma, brightness and contrast are active for monochrome cameras also. Light Source Use the drop-down list to select the light source that best fits the current environment. Select the User option to manually change the color gains or balance the colors with the White Balance automatic procedure. RGB Gains If the User light source is selected, use the Color Gain sliders to increase or decrease the corresponding color component (red, green or blue). The range is from 0.5 to 2.5. CFA Filter The slider controls the CFA Interpolation from the left side (“no filtering”) to the right side (full bilinear filtering). Sharpen Sharpen the image edges. The range is from 0.0 to 1.0. The default value is 0.0. Brightness Increase or decrease the image brightness. The range is from -0.25 to 0.25. The default value is 0.0. Contrast It increases or decreases the image contrast. The range is from 0.5 to 1.5. The default value is 1.0. Hue (color only) It modifies the image hue. The range is from -180 to 180. The default value is 0. Saturation (color only) It modifies the color saturation. The range is from 0.0 to 2.0. The default value is 1.0. Default Click on the Default button to reset to the original values. Users Manual 85 Motion Studio 5.27.1. Gamma The simple gamma slider has been replaced by a dialog box. If we assume that the camera dynamic range is from 0 (black) to 1023 (white), that range is divided into three zones: 1. Zone 1 (from 0 to level 1): in this zone the gamma 1 value is applied. 2. Zone 2 from level 1 to level 2: in this zone the gamma is a linear combination of gamma 1 and gamma 2. 3. Zone 3 (from level 2 to 1023): in this zone the gamma 2 value is applied. 86 Users Manual Motion Studio 5.27.2. Automatic White Balance Edit color gains manually or use the automatic balance procedure: 1. Select the Color tab from the Docked Dialog Bar. 2. Select the User option in the Light Source drop-down list. 3. Click Reset and snap an image (Stop button). 4. Press the Target button. A target will appear on the image. 5. Click on the image to move the target. Move the target over a gray, non-saturated area. 6. Click the Apply button. Users Manual 87 Motion Studio 5.28. Data Acquisition module The MotionPro Data Acquisition System is integrated in Motion Studio. When a Data Acquisition module is detected the camera window is split in two panes and an “Analog In” tab is added to the “Acquisition Settings” Tab. See the picture below. 88 Users Manual Motion Studio 5.28.1. Data acquisition cables and back panel The picture below shows the data acquisition module back panel Power Connector USB 2.0 Connector Analog Inputs Group Analog Outputs Group The BNC connectors are grouped in two groups: Analog Inputs • AIN1 to AIN15: the analog input channels • Sync In: the analog input external synchronization input • Trig In: the analog input external event trigger input • Sync Out: the analog input output signal. Analog Outputs • AOUT1 to AOUT4: the analog output signals • Sync In: the analog output external synchronization input • Trig In: the analog output external event trigger input Users Manual 89 Motion Studio For the connection of the DAS to the camera there are 2 possible scenarios. 5.28.1.1. Simple connection The “Sync Out” connector of the “Analog Input section” of the Data Acquisition back panel is connected to the “Sync In” connector of the camera. The Data Acquisition module generates the camera acquisition rate, the camera acquires in External Sync In configuration. Data Acquisition Module (DAS) Trigger signal (Camera only) Sync signal (from DAS to camera) Camera NOTE: The trigger signal must be connected to the camera “Trigger In” connector only, not to the Data Acquisition module 90 Users Manual Motion Studio 5.28.1.2. Connection with “Trigger In” signal In some specific conditions it is convenient to connect the Trigger In signal to the Channel 1 of the data acquisition. The “Sync Out” connector of the “Analog Input” section of the DAS back panel is connected to the “Sync In” connector of the camera. The trigger signal is connected to the “Trigger In” connector of the camera and to the “AIN 1” connector of the DAS. In the software, the option “Trigger on Chn 1” must be selected. Trigger signal (Camera and DAS) Data Acquisition Module Sync signal (from DAS to camera) Camera Users Manual 91 Motion Studio 5.28.2. Analog Input Configuration On/Off The acquisition module may be enabled and disabled. If enabled, the camera rate control is grayed out and the acquisition rate is automatically computed and configured. See below. Trigger In on Chn 1 Select this option and connect the trigger signal to the channel 1 input. The sampling of the trigger signal will help synchronizing the images with the data. Sampling Rate Select the number of samples per second. The max sampling rate is 500 KHz. Samples per frame Select the number of data samples per camera frame. The value is used a divider of the acquisition rate to compute the camera acquisition rate. The number is a multiple of the active channels number. Camera recording rate The camera rate is automatically computed with the formula below: Cam Rate = (DAS Sampling Rate) / (Samples per Frame) Channels selection Each channel may be independently enabled and configured. Channel On/Off Enables and disables the channel Label, Units, Conversion factor Enter the channel label, the units and the conversion factor. 92 Users Manual Motion Studio 5.28.3. Analog Input Data Pane Navigation Configuration Process FFT/Power Spectrum Information The acquired data is shown in a pane below the image window. Navigation buttons: first sample, previous sample, next sample, last sample. Data graph configuration: see below. FFT and Power Spectrum: see below. Data Processing Menu: see below. Data Information: see below. Horizontal resolution: select the graph horizontal resolution in milliseconds per division. Vertical resolution: select the graph vertical resolution in Volts per division. Show Data Points: if this option is checked, the data points are highlighted (squares). Channel: select if you want to be displayed all the channels or one single channel. Average and Standard Deviation: for each channel the average and the standard deviation are shown. Data Index, Time and value: the index, time and value of the currently selected data item. Operations list: see the Data Processing topic below. Users Manual 93 Motion Studio 5.28.4. Data Graph Configuration From the data pane, click the data graph configuration button. Background color: the data graph background color. Grid color: the data graph grid color. Cursor Color: the data graph cursor color (vertical line). Units Display: the graph may be displayed in Volts or in converted units. All channels conversion factor: If all the channels are shown in the graph window, select which conversion factor to use for the visualization. Channel color: select the channel and set the graph color. 94 Users Manual Motion Studio 5.28.5. Data Processing Menu The acquired data may be processed in the current window. To activate the filters or the mathematical operations, click the Data Processing button. Select the Filter submenu or the Math submenu. Filter operations: low pass filter, high pass filter, Band Pass filter, Band Stop filter or Remove average. Mathematical operations: Negative, Invert, Square and Square Root. If the filters or the mathematical operations are activated the operations list is filled with those operations. The user may: • Select the items in the list and activate the single operation. • Reset the list and delete the operations. 5.28.6. FFT and Power Spectrum The FFT dialog box appears if the FFT button is clicked. The user may select the channel to display, the FFT and the power spectrum. Users Manual 95 Motion Studio 5.28.7. Data Information From the data pane, click the data Info button. General information about the data acquisition is displayed. 5.28.8. Note about the “Overrun” error The “Overrun” error appears when the buffers allocated for the data acquisition are not enough and the acquisition is too fast. The error appears more easily when large sampling rates are configured (100 KHz, 250 KHz or 500 KHz). To avoid the error, increase the number of frames to acquire. 96 Users Manual Motion Studio 5.29. Advanced Camera Configuration in Camera menu From the main toolbar select Camera > Advanced to access operations for the noise calibration file management and the Advanced Color Balance. 5.29.1. Copy Calibration file from CD Each camera is shipped with a calibration file. For versions of Motion Studio below 2.07.04, the file is stored in the WINDOWS\System32 directory (WINNT\System32 for Windows 2000). For versions of Motion Studio above 2.07.04, the file is stored in “C:\Common Files\IDT\CameraFiles”. If the file is not stored in the local directory, it may be copied from the camera CD. 5.29.2. Download Calibration file from flash memory Giga-Ethernet cameras have on-board flash memory. The calibration file is stored in the flash memory and may be downloaded and copied to the hard disk. Users Manual 97 Motion Studio 5.29.3. Camera Calibration To reduce the noise associated with CMOS sensors and improve the performance of the default calibration file, Motion Studio offers a Calibration dialog box. 1. Select Camera from the main toolbar. 2. Select Advanced > Camera Calibration. To reduce the noise associated to the CMOS sensor and improve the performance of the default calibration file, select the following options: • Enable background removal (factory calibration): it removes the background from any acquired images and reduces the noise. • Enable pixel sensitivity correction (factory calibration): it enables the compensation of differences in pixels sensitivity. • Enable noise reduction with dark columns: the option enables or disables the use of masked (dark) columns to reduce the time-dependent noise. In some camera models the option is enabled and cannot be disabled. • Acquire the background images in the optimal conditions: the camera lens cap must be on. The driver acquires the background images in the optimal conditions for all the parameters (exposure, rate, sensor gain and pixel gain). The background images are not saved into the calibration file. This option is disabled on “new design” cameras. • Reload factory calibration file: the driver loads the default camera calibration file. This option is useful if the user wants to reload the default background images To reduce the background noise in current conditions, select the following options. 98 • Enable current condition background removal: if this option is selected the driver uses the background images that have been acquired in current conditions and corrects the images. The background calibration data is saved in a file and reloaded when the program is launched. This option is disabled on “new design” cameras. • Enable current condition pixel sensitivity correction: if this option is selected the driver uses the coefficients that have been computed in current conditions and corrects the acquisitions. The coefficients are saved in a file and reloaded when the program is launched. This option is disabled on “new design” cameras. • Acquire the background images in current conditions: the camera lens cap must be on. The driver computes the background images for the current operating conditions. If the sensor gain or the region of interest change after the calibration, the correction may be wrong. This option is disabled on “new design” cameras. • Acquire the PSC images in current conditions: the lens must be removed and a constant light should illuminate the sensor. The driver computes the pixel sensitivity correction coefficients for the current operating conditions. If sensor gain and region of interest change after the calibration, the correction may be wrong. This option is disabled on “new design” cameras. • Reset current conditions file: if this option is selected, the current conditions calibration file is deleted and the current images and coefficients are reset. Users Manual Motion Studio Users Manual 99 Motion Studio 5.29.4. Flash Memory Diagnostics It’s a tool to test the camera flash memory. 1. Select Camera from the main toolbar. 2. Select Advanced > Flash Memory Diagnostics. 3. Click Test Flash Memory to perform a test. 100 Users Manual Motion Studio 5.29.5. Color Balance Adjustment Build user-defined color tables with the Color Balance procedure. 1. Select Camera from the main toolbar. 2. Select Advanced > Color Balance. 3. Use the Color Balance Pad, to create new color schemes (Light Source Tables), edit or delete them. Default: Click the button to load the default configuration. Color Matrix Units: Click the appropriate button to select either the RGB or YUV color matrix. Color balance procedure 1. Drag the colored circles to the corresponding color area. 2. Click the “Color Balance” button. Users Manual 101 Motion Studio 5.29.6. IRIG Calibration (X cameras) This option is enabled only on X/HS cameras when the IRIG B-120 item is selected in the Time stamp tab of the general options. The calibration is a automatically started after each acquisition if the “Run IRIG calibration after each acquisition” option is enabled. The IRIG precision is 1 s. The calibration procedure checks the images IRIG flags in order to find a “one second” transition. Once the transition is found, the time precision is increased according to the acquisition rate. 5.29.7. HG Logs HG cameras store error and update log files in the onboard flash memory. The HG log menu items allow to: • Download and show the error log files stored in the HG camera flash memory. • Download and show the update log file stored in the HG camera flash memory. • Delete the log error files from the HG camera flash memory. 102 Users Manual Motion Studio 5.29.8. Image parameters Some advanced parameters may be changed. TNK (Temporal Noise Killer): the slider controls the time-dependent noise reduction filter. Each pixel value is compared with the same pixel value in images acquired before and after and the result is used to eliminate the component of noise that is not a fixed pattern. Anti-Alias (Gaussian): the slider controls the strength of the smoothing effect on the image. The effect is a reduction of image noise and a reduction of details due to the blurring. Sharpen Threshold. The parameter is used in the sharpening algorithm and controls the minimum brightness change that is sharpened. DNR (Dynamic Noise Reduction): reduce the effect of noise in the image (not all the camera modesl suppor tit). JPEG compression: some camera models support JPEG compression. Move the slider to the right side to increase the compression ratio and reduce the image quality. IDT recommends that those parameters are not changed. The values should be always set to default (optimized image quality). Users Manual 103 Motion Studio 5.30. Multiple cameras support Motion Studio supports multiple cameras systems. The way the camera views are shown depends on the selected options. If the “Activate camera list” option is not selected, the program opens a separate window for each camera. The windows are tiled and each camera can operate independently from each other. Each camera may have different parameters from other cameras. The cameras may be also configured as master/slave. 104 Users Manual Motion Studio 5.30.1. Activate camera list If this option is selected, the program opens a vertical “camera list” bar. From this bar the user may: • Select a camera: do a single click on the camera thumbnail to activate it. Do a double click to activate the camera and start Live. • Select a subset of the cameras: check the check boxes at the left side of the camera thumbnail and operate the camera control bar. Click “Select All” to select all the cameras, click “Deselect All” to deselect all the cameras. • Rename a camera: right click on the camera icon and select the “Rename” option. • Activate the “Tools” menu: see below • Configure the “Options”: see below. • See the status of the cameras: below the camera name, model and serial number, the camera status is displayed (Ready, Live, Recording…). • Exit the session: Click the Exit button to exit the session. Users Manual 105 Motion Studio 5.30.2. Tools menu Click on the Tools button, a popup menu will appear: • Select items: the user may select or deselect all the cameras, or select cameras of the same family (Y, N or HG). When more than one camera is selected, Motion Studio detects any conflict in the parameters and shows a red warning icon. • Erase camera memory: the camera memory is erased and the images deleted. Actually the images are not physically erased from memory and may be restored later. • Restore cameras memory: Motion Studio tries to restore deleted images. This option is not available on HG cameras. • Synchronize parameters: the parameters of the camera that is currently in foreground are copied to any other camera that is selected (check box on the camera list). The parameters that are not supported by other cameras are not configured and the corresponding item in the camera list is marked in red. • Store parameters to flash memory: the current configuration is stored in the camera flash memory. If the camera looses power after this operation, the configuration is loaded and applied the next time the camera is powered up. • Sort cameras: sort the cameras. • Detect master camera: if the cameras are connected in Master/Slave mode, the software is able to detect which camera is the Master. 106 Users Manual Motion Studio 5.30.3. Options Enable automatic detection of cameras: if this option is selected, Motion Studio activates a timer that looks for connected cameras. If a new camera is detected it willl be automatically added to the list. Allow different exposure values on each camera: if this option is selected, the user may set different values of exposure in selected cameras, otherwise the exposure is set to the same value in each selected camera. Allow different trigger values on each camera: if this option is selected, the user may set different values of trigger configuration (edge-high, edge-low, switch closure) in selected cameras, otherwise the trigger configuration is set to the same value in each selected camera. Users Manual 107 Motion Studio 5.30.4. Master/Slave operation modes In this operation mode, one of the cameras acts as the master and the others as slaves. The master camera controls itself and some of the configuration parameters of the slaves, such as record mode, acquisition rate, etc. To set one camera as master, check the “Master Camera” check box on the “Camera Control” group in the camera control bar. The check box is hidden when only one camera is connected. The master camera drives the slaves’ acquisitions via the sync out signal. The picture below shows how to configure a two cameras master/slave layout. Slave Camera Master Camera Trigger Master camera’s “Sync Out” signal must be connected to slave camera’s “Sync In” connector. To provide simultaneous trigger to cameras (circular and BROC mode), master camera and slave camera should receive the same trigger signal. Two Master synchronization modes are available: 1. Sync Master/Slave: the master camera produces a synchronization signal whose frequency is the same as the master cameras frame rate. The slave cameras are automatically configured to operate with external frame sync and all the cameras run at the same frame rate. 2. 1PPS Master/Slave: The master camera generates “1PPS” sync out signal (1 Hz) and operates with the internal sync clock. The slave cameras are automatically 108 Users Manual Motion Studio configured to operate with external 1PPS sync and they align their internal sync signal to the external 1PPS reference. In this fashion, the slave cameras may operate at any frequency that is a multiple of the master’s operating frequency. The master sync signal is similar to a GPS reference signal that is used to align the acquisition frame rates. This mode is not supported by all the camera models. Users Manual 109 Motion Studio 5.31. Playback Controls The Playback controls work like other familiar media player controls. The controls include the following: • Directional play • Forward or reverse • Step forward and reverse • Skip to first or last frame • Stop play 5.31.1. Frame by frame review The frame number and corresponding time from the initial frame (or from the event trigger frame, if the mode is Circular or BROC) are displayed in seconds. Use the slider bar to browse through the frames. In Circular or BROC acquisition mode when the pre-trigger and post-trigger have been selected, a red marker shows the position of Frame 0 (the trigger frame). Indexes of frames before the trigger frame display Negative and indexes of frames after the trigger display Positive. 110 Users Manual Motion Studio 5.31.2. Playback Speed and Playback Settings Playback slider Move the slider to select a frame. The red triangle indicates the position of frame 0 (circular mode only). Loop playback button Click on the button to continuously loop the acquisition. Zero button Click this button to set the frame 0 position (trigger). Start Frame Type the number directly into the Start Frame text box. Stop Frame Type the number directly into the Stop Frame text box. Skip frames Use to skip frames during playback. Goto Button It opens a dialog box. Enter the image index to be displayed. Playback rate Slider Use to adjust the speed of the playback. The actual playback rate depends on the processor speed and it is shown in box above the slider. If the actual rate is slower than the desired one, use the skip frames control to increase it. Synchronize If two or more cameras have separate windows, the user may synchronize the playback between some of them. Select the “Synchronize” option on each camera window and click the playback buttons. The “Synchronize” check box is not visible when the cameras are listedin a “Camera List”. Users Manual 111 Motion Studio 5.32. PLAYBACK Menu The Playback menu displays when file images are open. When the program is in Camera mode, access the Playback menu through the Camera Option on the main toolbar. Standard operations include the following: • Play Forward or Backward • Jump to First or Last frame • Loop Through • Playback Speed • Playback’s Start and End frames for loop through. The items share their functionality with the docked button bar on the right side of the application window. 112 Users Manual Motion Studio 5.33. Annotations The Annotation button on the playback tab shows the annotation dialog box. General annotation Add a general comment to the acquired sequence. Images annotation A note may be added to the current image. Use the playback button to locate an image and add the note. Data annotation Add a note about data (for future use). The horizontal bar shows the positions of the notes (black vertical lines) and the position of the currently displayed image (gray handle). Buttons operations include the following. • Use the arrow controls to locate the annotations. • Reset all the annotations. • Delete an annotation. • Undo the latest edit of an annotation. Users Manual 113 Motion Studio 5.34. TRACKING menu The Tracking Menu on the main toolbar offers an alternative to using the buttons and dialog box provided by the Docked Dialog menu including the following functions: • Enable and disable tracking. • Open the tracking configuration dialog. • Add, remove or reset the track-points. • Compute tracking. • Show or hide the vectors, the table/graph dialog box and the correlation windows. 114 Users Manual Motion Studio 5.35. Tracking control The tracking control tab appears on the main dialog bar if the “Tracking” option is enabled in the General Options (“Enable Motion tracking” in the Miscellaneous Tab). Users Manual 115 Motion Studio Use the tracking tab to enable and configure the tracking points. The options are as follows: Show tracking: enables or disables the display of the tracking point and trajectory. If this option is unchecked no tracking can be computed. Manual Track: select this option to disable any automatic calculation and manually track the points. Track computation buttons: click the track buttons to compute tracking one step forward or backward, to the start frame or to the stop frame. Table/Graph: shows or hides the table graph window. Vectors: shows or hides the trajectory vectors. Point: select the track point to configure Color: the track point color Size: the correlation area size in pixels. The area is a square. New: click the button to add a new track-point. Reset: click the button to reset all the computed positions. Delete: click this button to delete the current track point. Tracking Configuration: click this button to open the configuration dialog box. Save: click this button to save the tracking results in ASCII, LabVIEW, Tecplot or Excel format. Calibration: opens and closes the tracking calibration dialog box. 116 Users Manual Motion Studio 5.36. Tracking procedure 5.36.1. Add a new track-point and compute To add a new track-point, follow the steps below: 1. Click the New button on the tracking tab. The cursor will change into an arrow with a plus symbol. 2. Move the cursor to the image and click on the position where the track-point needs to be added. The cursor will change to the standard arrow. 3. The track-point position may be changed by dragging the central cross (see below). 4. Then the point trajectory may be computed by clicking the green arrow buttons on the tracking bar. Users Manual 117 Motion Studio 5.36.2. Edit the tracking configuration Click the “Trk Config” button on the tracking bar or select the “Configuration” item from the tracking menu. The options are as follows. Set Image intensity: when a new track-point is added the program computes the intensity range on the current image. The current image will be considered as a reference image for the computations. If the option is disabled, no intensity is computed. Filter image: before each computation a set of sharpening filters is applied to the images. The filters reduce the effect of the background on the computation. If the option is disabled no filter is applied before the computations. Validate position: after the regular calculation of a track point a least squares algorithm is applied. The algorithm is performed with the point and other four points (two before and two after). The result is used to correct (validate) the point position. Mode: the tracking algorithm can be adapted to different tracking conditions (deformable translation, rigid translation and rigid translation with rotation). Displacement range: the displacement from one point to the next may have a limited range. Enter the values to avoid errors. Display vectors: the track-point trajectory may be displayed as a sequence of arrows, a continuous line or a dotted line. The trajectory is shown is the “Vectors” button in the tracking bar is selected. 118 Users Manual Motion Studio 5.36.3. Show the tracking data and the vectors From the tracking bar, click the Table/Graph button. The same dialog box shows the table with the computed values and the graphs. The first column lists the frame number, the second lists the time. Then for each point there are listed the position (in pixels or mm if the calibration is on), the speed and the acceleration. Calculate V and A: click this button to calculate speed and accelerations of the tacking points. Users Manual 119 Motion Studio Each component of the data can be separately displayed in a graph. The “Point” combobox lists the configured points, and the “Show” combo-box lists the components (X, Y, Vx, Vy, Ax, and Ay). 120 Users Manual Motion Studio 5.36.4. Save the tracking data The tracking results are always saved in a default binary file and reloaded when the image sequence is open again. The user may save the data in a different format: 1. From the tracking bar, click the “Save…” button. 2. Enter the folder name, the file name and a comment (optional). 3. Select the file format: • Binary file (BIN). • ASCII text file (ASC). • Tecplot Text file (PLT). • LabVIEW Measurement file (LVM). • Excel XML Spreadsheet file (XML). • Excel XLS Workbook file (XLS). 4. Click the OK button. Users Manual 121 Motion Studio 5.36.5. Calibration The tracking displacements are computed in pixels and can be converted into mm through a calibration. Click the calibration button on the tracking tab to open the calibration window. Before activating or computing a calibration, a calibration folder must be created or selected. New: Click this button to create a new calibration folder with undefined parameters. Browse: click this button to select an existing calibration folder and load the current calibration settings. Once a calibration folder has been created or selected, select the model and click “Calibrate…” (see below). If the calibration is loaded you may click On/Off to activate or deactivate it, or click “Discard” to discard it. 5.36.6. Basic calibration model The basic model is the simplest. The user is asked to drag a line on the calibration target and enter a distance in mm. 122 Users Manual Motion Studio The calibration grid has two handles. The handles may be dragged over two reference points on the calibration image. Users Manual 123 Motion Studio 5.36.7. Simplified calibration model This method requires that the calibration target is vertically aligned with the camera, i.e. vertical lines in the target correspond to vertical lines on the target image. The rectangular grid has four handles that may be dragged over four reference points of the calibration image. To achieve more precision the zoom factor may be set to 300 or 400 and the handles may be positioned upon the calibration target marks. With the simplified calibration two options are available: 1. The camera plane is parallel to the target plane and there is no perspective: the calibration is just a way to find a constant value that will be multiplied by the pixel displacements to find the space displacements. Both horizontal and vertical lines of the calibration target are perfectly parallel to the rectangle sides. In the Calibration dialog box, the “Use Perspective” option is OFF, and the rectangle sides are parallel. 2. The camera plane is not parallel to the target plane and there is a perspective effect. The effect is computed only on horizontal lines while vertical line must be parallel to the rectangle vertical sides. In the Calibration dialog box, the “Use Perspective” option is ON. X/Y Dimensions: the user enters the dimensions in mm of the rectangle. The distance between the points of the calibration target is known. The values are in mm. Focal Length: the camera focal length in mm. Diagonal: when the “Use perspective” option is off, the user may check the “Use diagonal” check box and enter the rectangle diagonal length instead of Width and height. Grid Color: the color of the calibration grid may be changed. Pixel size: the user may edit the pixel size. Click “Find size…” to select the camera model and find the correct size. 124 Users Manual Motion Studio 5.36.8. Generic calibration model The generic calibration considers different kind of distortion due to optical and/or perspective issues. The calibration grid is more complex than a rectangle, is a multi-point grid (see below). The points of the grid will be positioned over the marks of the calibration target. Then the program computes the parameters of a third grade polynomial which maps the points of the image (pixels) into the points of the real space (mm). The grid may be moved and resized. The way the grid is resized is controlled by the “Grid Mode” in the calibration dialog: • Zoom: in this mode the handles are positioned over the four external corners of the grid. The grid may be zoomed or moved. • Constrained: in this mode the handles are positioned over the four external corners of the grid. The grid can be distorted. • Free: in this mode each point of the grid has its own handle and can be moved independently. Grid Size (X/Y): the user enters the dimensions in mm of the grid (distance between the grid corners). The distance between the points of the calibration target is known. The values are in mm (1 inch = 25.4 mm). Grid Nodes (X/Y): the user enters the number of nodes in the grid. The minimum is 4, while the maximum is 20. The number of nodes depends on the calibration target. Users Manual 125 Motion Studio 5.37. DATA menu When acquired data pane is visible and some data is displayed the DATA menu is active. Use the Data menu to apply filters and mathematical operators, to show or hide the FFT/Power Spectrum window and to open the data graph configuration dialog box. 126 Users Manual Motion Studio 5.38. VIEW menu Use the View menu to magnify the image, restore the original size (100% zoom) or compute a zoom factor that fits in the window. Use the View menu to select the toolbar options. Users Manual 127 Motion Studio 5.38.1. Zoom Tools The Zoom In and Zoom Out tools let you change the image magnification. The Dynamic Zoom tool lets you zoom in or our by dragging the mouse or mouse wheel up or down. To Increase or decrease magnification, do one of the following: • Select a magnification percentage from the toolbar Zoom menu. • From the View menu, select the Zoom In or the Zoom Out tool, and then click the image. To zoom in on a specific area, use the Zoom In tool and draw a rectangle. • From the View menu, select the Dynamic Zoom tool and then drag up to zoom in to the area where you begin dragging, or drag down to zoom out from that location. To deselect one of the Zoom tools, press the ESC key on the keyboard. 128 Users Manual Motion Studio 5.38.2. View Thumbnails 1. Select View menu > Thumbnails Toolbar. Once an image sequence is opened or acquired, the Thumbnail Toolbar is populated with images. 2. Use the arrow buttons on the Playback Control tab to scroll through the images. 3. Click on a Thumbnail in the sequence to select a frame for display. The selected image is highlighted in the sequence. Users Manual 129 Motion Studio 5.39. TOOLS menu The Tools menu has the General Options for the program and the Timing Hub control dialog. If a Camera window is open, the Tools menu contains the following options: • Download Manager. • Advanced Acquisition Configuration dialog box (see Acquisitions Configuration on the Record tab). • Histogram window. • Reticule display. • Focus Line tool for help focusing the image. • Timing Control for the generation of timing signals with the MotionPro Timing Hub. • Analog output for the generation of analog waveforms with the MotionPro Data Acquisition System (DAS). • Ethernet cameras network configuration. • Raw Image converter and Batch editor. • Image tile utility. • Vidi Motion (Lens Calculator). • Options dialog box. • Language selection. 130 Users Manual Motion Studio 5.39.1. Download Options The download options are described in the topic above. Users Manual 131 Motion Studio 5.39.2. Camera Options Live While Record: during a recording session the preview can be enabled on all cameras, fully disabled or activated only on the camera window that has the focus. Trigger Hot Key: the software trigger can be sent to the cameras by clicking the Trigger button on the camera toolbar or by pressing a keyboard key. The user can configure that key. Exposure format: the exposure may be displayed in microseconds or in degrees as shutter angle. Maximize exposure: if this option is selected, the exposure is automatically set to the maximum every time the frame rate changes. Disable 1024x1024…: new Y4 and NR4 cameras have 1024x1024 maximum resolution, while older ones have only 1016x1016. In a mixed environment the user may want to operate all the cameras with 1016x1016 maximum resolution. This option disables the 10124x10124 resolution in new cameras. Disable hardware BROC…: Y cameras with firmware 151.137 (and newer) and N/NR/NX cameras with firmware 159.134 (and newer) support hardware BROC. With this feature BROC is executed in camera firmware and the maximum number of BROC segments is limited to 256. Software BROC supports 1024 segments, so the may disable hardware BROC and allow the camera to acquire up to 1024 segments in software. Automatically arm the camera when MS opens it: if this option is selected, Motion Studio puts the camera in record mode immediately after opening it. 132 Users Manual Motion Studio Get raw gray data from color cameras: grayscale images coming from the sensor are not converted into RGB format. The frames are acquired and displayed as black and white images. Convert color data to grayscale: converts color RGB images into 8-bit grayscale images. Network performance: the network performance is a delay added to the data exchange between the cameras and the computer. If there is traffic on your local network, then move the slider to “More reliable” to avoid loss of data during the communication. Users Manual 133 Motion Studio 5.39.3. Time Stamp Options To display frame information directly on the images, check the corresponding boxes. Comment: the acquisition comment. Date: the acquisition date. Marker: display the frame marker. Time: the acquisition time (or current time during live). Frame Number: the frame index. File Name: the name of the file where the image is stored. Rate and Exposure: the values of rate and exposure during the acquisition. Camera name: the name of the camera. Time from recording start: it shows on each frame the time elapsed from the start of the acquisition. IRIG/GPS: the IRIG or GPS date and time. UTC: since the IRIG time is always expressed in UTC time, the user may add and offset to modify the time into his own time zone. Acquired DAS value and precision: the data acquired with the Data Acquisition module. The number of decimal digits may be configured. 134 Users Manual Motion Studio Temperature and units: the camera board temperature and the units (degrees Celsius or Fahrenheit). Time from trigger and precision: the elapsed time from the trigger frame. The number of digits is configurable. You may either display in seconds with up to 6 decimal digits or in milliseconds with up to 3 decimal digits. Add Logo: a bitmap can be displayed on the acquired frames and saved to the image files. Click the browse button to locate a TIFF, BMP or PNG file. Run IRIG Calibration: when this option is selected, the program automatically starts an IRIG calibration after each acquisition. Add vertical offset…: if this option is selected the time stamp is not printed on the image, but on a horizontal black stripe set above or below the image. The stripe is saved on the images when the frames are saved. Font: select the font for the time stamp. Position: select the display position Top/left (default), top/right, bottom/left or bottom/right. Color: select the time stamp color. If the image is monochrome, the color will be converted into grayscale when the images will be saved. Size: select the font size. Users Manual 135 Motion Studio 5.39.4. Miscellaneous Options Show Main Menu dialog at start-up: it displays the main menu dialog box when Motion Studio is initialized. Prompt before closing camera windows: the program will prompt the user before closing any camera window. Show cameras enumeration filter at start-up: if the option is checked the camera enumeration filter dialog is displayed when the camera wizard is started. Check Calibration file at start up: if this option is selected the program checks the calibration file when the camera is open. If the camera does not have a calibration file, the option may be unchecked. Allow multiple instances of Motion Studio: if this option is selected, more than one instance of MS may run at the same time, otherwise only one instance may run. Enable motion tracking: this option enables and disables the motion tracking. Save Tracking data with IRIG time: if this option is selected, the tracking data is saved with the IRIG time information. Enable Camera Local Trace: it logs each camera operation in a text file in the program directory for diagnostic purposes. Enable Camera Remote Trace: it logs the communication between the cameras and the client Palm when the remote connection server is active. 136 Users Manual Motion Studio Delete Trace: all the trace files stored in the local hard disk are deleted. Show trace: opens the folder where the trace files are stored. Enable Remote Connection server: if this option is selected the remote connection server may be started and the camera may be remotely controlled by a Pocket PC via the wireless LAN. For more info, see the “Motion Studio Remote Control” paragraph. Reticle Color: select the color of the reticule in the tools. Users Manual 137 Motion Studio 5.39.5. Reticule The reticule is a pair of crossed lines drawn over the image. It may be used to vertically or horizontally align the camera. The color of the cross may be edited in the general options. To move the cross just click on the image. If the reticule is shown in live and playback images and the images are saved, the reticule is burned into the image data, like the time stamp. 138 Users Manual Motion Studio 5.39.6. Histogram The image intensity Histogram is used to set the camera exposure parameters and with the camera focusing to optimize the dynamic range. Color cameras have three color components (red, green and blue) and luminance. For monochrome cameras the histogram is computed on the grayscale pixel values. Users Manual 139 Motion Studio 5.39.7. Focus Line / Image Profile The Focus Line Intensity dialog box displays the values of image intensity (levels of gray in monochrome images and levels of red, green, blue or luminance on color images) along the points of the focus line. If the image is well focused, you will see the intensity changing when the line crosses an edge of the image. 1. From the main toolbar select Tools > Focus Line/Image Profile. 2. Use the “Type” drop-down list to select Focus Line or Image Profile. 3. Use the “Color” drop-down list to select the Focus Line color. 4. To position the focus line, drag the line handles and position them across the image edges. 140 Users Manual Motion Studio 5.39.8. Timing Hub Control Motion Studio provides the controls for the MotionPro Timing Hub. If a Timing Hub is detected, the Timing Control menu item is displayed in the Tools menu. From the main toolbar select Tools > Timing Control. 5.39.8.1. Channels selection and controls Current channel: select the channel you want to configure. Signal generation: see the “Signal generation” topic below. Label: The user may change the label of the output channel. Mode: The operating mode may be selected. For a more detailed description of the modes, refer to the topics below. External In: when the selected mode is “external”, the user may select the external input channel (0 or 1). Gate: each channel may be gated. The gate channel may be one of the two external inputs (0 or 1) or one of the other output channels. The gate selection is disabled if the mode is “Start/Stop” or “Rate Switch”. Invert: the output signal, the input signal (external mode only) and the gate signal may be inverted. Users Manual 141 Motion Studio Frequency/Period: the user may select the frequency in Hz or the period in us of the selected channel. Duty cycle: the user may select the channel duty cycle in percentage (1 to 999) or duration of the high value of the channel in us. Pulses: if the mode is burst the user may select the number of pulses generated by the trigger. Delay: the output delay may be adjusted. The range is from 0 to 9 s (steps of 100 ns). If the mode is external the delay steps are in external signal clocks. Reset: the delay may be reset to the default value (0). External Frequencies: the external input channels frequency may be displayed by selecting the check box. Signals buttons: each channel may be turned on and off by clicking the corresponding button. 142 Users Manual Motion Studio 5.39.8.2. Signal Display and lock The output channels signals are shown in the black window. The user may select the Time base period. If auto is selected, the application shows four periods. Lock: two or more output channels may be locked by checking the “lock” check boxes. If two or more channels are locked, they are simultaneously turned on and off when one of the locked buttons is clicked. Users Manual 143 Motion Studio 5.39.8.3. Internal Mode Output waveforms are generated by the internal clock. The user may adjust the internal frequency or period and the duty cycle. The channel may be inverted and gated by another signal. The gate can be selected among the external inputs (0 or 1) or among one of the other output channels. The diagram below shows an example with the following configuration: Output channel 0: F = 100 Hz, duty cycle 50%, no gate. Output channel 1: F = 50 Hz, duty cycle 50%, no gate. Output channel 2: F = 100 Hz, duty cycle 50%, gate = output channel 0. The output channel 0 frequency is 100 Hz. The output channel 1 frequency is 50 Hz. The output channel 2 frequency is 100 Hz but the channel is gated by the output 0, so the result is a signal which has 100 Hz frequency and a duty cycle of 25%. Output Channel 0 (100 Hz – DC = 50%) Output Channel 1 (50 Hz – DC = 50%) Output Channel 2 (100 Hz – gate=chn 0) 144 Users Manual Motion Studio 5.39.8.4. External Mode Output waveforms are generated by an external signal. The user may adjust the output channel divider and duty cycle. The output channel may be inverted and gated by another signal. The gate can be selected among the external inputs (0 or 1) or among one of the other output channels. Let’s assume that the external frequency is 200 Hz. The diagram below shows an example with the following configuration: Output channel 0: F = 100 Hz, duty cycle 50%, external input 0, no gate. Output channel 1: F = 50 Hz, duty cycle 50%, external input 0, no gate. Output channel 2: F = 100 Hz, duty cycle 50%, external input 0, gate = output channel 0. The output channel 0 frequency is half the external frequency. The output channel 1 frequency is one fourth the external frequency. The output channel 2 frequency is equal to the external frequency but the channel is gated by the output 0, so the result is a signal which has half the external frequency and a duty cycle of 25%. External Input 0 clock signal (200 Hz) Output Channel 0 (100 Hz – DC = 50%) Output Channel 1 (50 Hz – DC = 50%) Output Channel 2 (200 Hz – gate=chn 0) Users Manual 145 Motion Studio 5.39.8.5. Start/Stop Mode The two external signals drive the output signals generation. The input 0 starts the output, while input 1 stops it. The frequency and delay of the output are configured as in “internal” mode. No gate is allowed. When the stop signal level is high, the output signal is truncated. The diagram below shows an example with the following configuration: Output channel 0: mode = Start/Stop, F = 100 Hz, duty cycle = 50%. External Input 0 External Input 1 Output Channel 0 (F = 100 Hz – DC = 50%) 146 Users Manual Motion Studio 5.39.8.6. Rate Switch Mode The two external signals drive the output signals generation at two different frequencies. Input 0 starts the outputs at the frequency 1, while input 1 switches the frequency to the Frequency 2 value. The diagram below shows an example with the following configuration: Output channel 0: mode = Rate Switch, F1 = 100 Hz, duty cycle1 = 50%, F2 = 50 Hz, duty cycle1 = 50%. When the input 0 level goes high, the output signal starts at 100 Hz. When the input 1 level goes high, the output 0 frequency switches to 50 Hz. External Input 0 External Input 1 Output Channel 0 (F1=100 Hz, F2 = 50 Hz) Users Manual 147 Motion Studio 5.39.8.7. “Burst Single” Mode In burst (single) mode, one of the external inputs or one of the output channels is used as trigger to generate one or more pulses. The frequency and the Duty cycle controls are used to determine the duration of the pulse. The generation of the pulses may be also delayed. Both the output signal and the trigger may be also inverted. The diagram below shows an example with the following configuration: Output channel 0: mode = Burst (single), Trigger = External Input 0, F = 100 Hz, duty cycle = 50%, pulses = 3. The external Input 0 serves as a trigger. When the trigger goes high, three pulses are generated by the output channel 0. The duration of the pulses is about 5 ms (50 % of 100 Hz). The pulses are generated once. Trigger (External input 0) Output Channel 0 (F = 100 Hz, DC = 50%) 148 Users Manual Motion Studio 5.39.8.8. “Burst retriggered” mode The Burst retriggered mode is equivalent to the burst single mode. The pulses are generated any time the trigger signal goes high and not only once. The diagram below shows an example with the following configuration: Output channel 0: mode = Burst (retriggered), Trigger = External Input 0, F = 100 Hz, duty cycle = 50%, pulses = 2. The external Input 0 serves as a trigger. When the trigger goes high, three pulses are generated by the output channel 0. The duration of the pulses is about 5 ms (50 % of 100 Hz). The pulses are generated each time the trigger goes high. Trigger (External input 0) Output Channel 0 (F = 100 Hz, DC = 50%) Users Manual 149 Motion Studio 5.39.8.9. Signal generation (Camera synchronization) The Timing Hub may be used to synchronize a camera or other devices. The Signal Generation options are: • User: the output signal synchronizes an external device. No internal control is done by the program. • Camera (simple): the label edit box will be converted into a list of open cameras. In the camera dialog bar the “Rate” control will be disabled, the “Rate Sync” control will be set to “External” and the camera operation frequency will be configured directly from the timing panel. If the “Sync Cfg” value is set to “Pulse High” or to “Pulse Low”, the camera exposure is controlled by the duty cycle of the external square wave. In this condition the exposure edit box is grayed out and the value is automatically computed. 1. If the “Sync Cfg” value is set to Pulse High, the exposure is equal to the inverse of the output channel frequency multiplied by the duty cycle. 2. If the “Sync Cfg” value is set to Pulse Low, the exposure is equal to the inverse of the output channel frequency multiplied by (100 - duty cycle). 150 Users Manual Motion Studio 5.39.9. Analog Data Output Motion Studio provides the controls for the generation of analog output with the MotionPro Data Acquisition System (DAS). The available analog output channels in the module are four. From the main toolbar select Tools > Analog Out. 5.39.9.1. General parameters and channels configuration Period and Rate: select the period of the generated waveform. The corresponding rate in Hertz is displayed. Sampling Source: the sampling source may be the internal module clock or an external digital signal. Sampling Rate: select the sampling rate in Hz. If the sampling source is external, enter the external signal frequency. Trigger Source: the event trigger starts the waveforms output. It may be software, external edge high, or external edge low. Current channel: select the channel you want to configure. Waveform: select the channel waveform: square, sine, triangle, saw tooth, or waveform file. Amplitude, Offset and Phase: if a waveform is selected, edit the amplitude, the offset and the phase. Users Manual 151 Motion Studio Browse: if the “File” option is selected, click the “Browse” button to open a data file. The file will be played back. Signals buttons: each channel may be turned on and off by clicking the corresponding button. 152 Users Manual Motion Studio 5.39.9.2. Data display and lock The output channels signals are shown in the black window. The user may select the Time Base period in µs. If auto is selected, the application shows four periods. Lock: two or more output channels may be locked by checking the “Lock” options. If two or more channels are locked, they are synchronously turned on and off when one of the channel buttons is pressed. Users Manual 153 Motion Studio 5.39.10. Image Tile Utility The Image Tile Utility is an external application that may be invoked by Motion Studio. It allows the user to horizontally or vertically tile image sequences. Image A and Image B Click the Browse button to select the sequences that will be tiled. Image A+B Click the browse button to select the name of the output image sequence. File Type Select the output image sequence type. Codec If the file format supports the codec, it may be selected. Rate Edit the output rate (AVI and MOV only). Tile mode The images may be tile horizontally or vertically tiled. Start Click this button to start the tile process. The image tile utility can be used with command line parameters. The syntax is below. To display the help message: 154 Users Manual Motion Studio XImgTile /H To tile images: XImgTile /A ImgA /B ImgB /O ImgAB /T OutType /V TileV /R Rate where: • ImgA: full path of Image A (ex: C:\Program Files\IDT\MotionProX\Imgs\ImgA.tif). • ImgB: full path of Image B (ex: C:\Program Files\IDT\MotionProX\Imgs\ImgB.tif). • ImgAB: full path of Files\IDT\MotionProX\Imgs\ImgAB.tif). • OutType: output file type (1:TIF, 2:BMP, 3:JPG, 4:PNG, 11:MPT, 12:MRF, 13:AVI, 16:MPG). • TileV: 0 for horizontal tile, 1 for vertical tile. • Rate: output file rate, only for file image formats that support the parameter (ex: AVI). Users Manual output image (ex: C:\Program 155 Motion Studio 5.39.11. Ethernet cameras monitor The tool detects the Ethernet cameras connected to the network and updates their status in real time. Some of the detection parameters may be changed. Network adapter: select the computer network adapter that is connected to the camera network. Refresh Camera list: click this button to reset the list and restart camera detection process. The options that may be edited are shown below: Search for new cameras: it configures the frequency of enumerating and detecting new cameras. Poll for camera status: it configures the frequency of polling cameras for status. Camera series: select which camera model should be detected and listed. 156 Users Manual Motion Studio 5.39.12. Language Selection 1. From the Tools menu, select “Language…” 2. Select the language from the list and click OK. Currently the supported languages are English, German, Italian, Japanese and Chinese. Users Manual 157 Motion Studio 5.39.13. Vidi Motion For a detailed description of the Vidi Motion tool, please refer to the Vidi Motion topic. 158 Users Manual Motion Studio 5.40. WINDOW menu If more than a window is open in the Motion Studio program, use the window menu to cascade, tile horizontally, tile vertically or select one of the windows. 5.41. HELP menu This menu contains support options and information including: e-mail tech support and software and manual updates. Users Manual 159 Motion Studio 5.41.1. Camera Information Cameras Info displays a dialog box with the information about the cameras, such as model, type (color or black and white), ID and serial number. The information may be saved in a text file by clicking the “Save…” button. From the main toolbar, select Help > Cameras Info. 160 Users Manual Motion Studio 6. Vidi Motion (Lens calculator) 6.1. Overview Vidi Motion contains the most important specifications of the IDT cameras and a lens calculator. With Vidi Motion you may: • Show the main specifications of each camera model. • Find the resolution that fits a specific frame rate. • Print a table of “resolution versus frame rate” or “frame rate versus resolution”. • Calculate amount of motion blur, correct exposure time, depth of field, hyper focal distance etc. • Calculate the speed at impact, of a free falling object. It is assumed that the object falls in vacuum, thus no compensation for air resistance is included. • Calculate the circumference speed of a spinning object. Users Manual 161 Motion Studio 6.2. Camera information • Select the camera Family. • Select the camera model. • Set the resolution, memory size, frame rate and exposure. The right pane will show some camera specifications and: • The maximum frame rate for the selected resolution (in normal and in plus mode, if supported) • The maximum recording length in frames. If the camera has onboard SSD, the value is calculated for the disk. • The maximum recording time for the selected frame rate. • The streaming fps: if the camera has onboard SSD, the streaming fps is the maximum frame rate that allows streaming to the disk without overrun. 162 Users Manual Motion Studio 6.3. Find resolution from max rate • Click the “Find resolution from max rate” button. • Type a frame rate and select “Plus mode” if required. • Click OK. The utility will calculate the resolution that fits the required frame rae. If the canmera cannot support the frame rate, an error message will appear. Users Manual 163 Motion Studio 6.4. Resolution versus rate table • Click the “Resolution vs rate table…” button. • Select the table type • Enter the minimum height (or rate), the maximum height (or rate) and the step • Click Refresh • Click “Export table” to save the table o a text file. If the camera supports extra region of interest (e.g. regions of interest that exceed the sensor resolution) a table with extra ROI and speeds is displayed. 164 Users Manual Motion Studio 6.5. Lens Calculations Select the calculation of Focal length, Field of View or Object Distance. Select the lens aperture and the measurement units for length, speed and resolution. The result will be displayed in the pane at the right side, including: Field Height and Width, Resolution, Angle of View, Image Diagonal, Magnification factor and the compatible lenses types. If the lens specifications shown are not compatible with your lens, you need to lower the Horizontal and Vertical Resolution to avoid “vignetting”. For fast moving object calculations enter the object speed in the selected units. The Object movement per frame, the object motion blur and the object pixel blur will be calculated. If the object movement is too big: increase the recording speed. If the motion blur is too high: decrease the exposure time. Users Manual 165 Motion Studio 6.6. Speed calculations Speed calculations include circumference speed and falling objects speed. The object circumference speed can be calculated by entering the speed of the spinning object in rpm and the diameter of the object in the configured units. The theoretical impact speed of a falling object may be calculated. The starting speed of the object is assumed to be equal to 0. Input the distance from the object to the impact point in the correct units and the speed will be calculated. 166 Users Manual Motion Studio 7. Frame Synchronization and Event Triggering 7.1. Overview The camera and software enable external sync and triggering capabilities. The camera is synchronized externally via a trigger source in the form of a TTL pulse. The synchronization INPUT signals as well as a synchronization OUTPUT signal are handled through BNC connectors. The synchronization signal is output for every frame that is acquired and can supply the time reference for other pieces of hardware, for example a strobe for illumination. Two options are available: 1. Cameras with 2 BNC connectors: 1 input connector is used for synchronization and event triggering. The output connector is used for sync out. 2. Cameras with 3 BNC connectors: a “Trig In” connector is used for event triggering, a “Sync in” connector is used for external synchronization. The output connector is used for sync out. Users Manual 167 Motion Studio 7.2. Record Modes and Trigger Configuration On the Record tab, the default Frame Sync source of the camera is set to Internal. If in External, the camera must have an external Sync signal. TRIG IN: use the Trigger in connector at the back of the camera for event triggering. SYNC IN: use the Sync In for external synchronization. SYNC OUT: use the Sync Out for sync out. 168 Record Mode Sync In Configuration Trigger In Configuration Normal Internal or external (the BNC is used to provide a sync signal) Ignored (the camera does not require event trigger) Circular/BROC Internal or external (the BNC is used to provide a sync signal) All values (the camera requires an event trigger) Users Manual Motion Studio 7.3. Change the Sync and the Trigger 1. Select the Record tab. 2. Use the Frame Sync drop-down list to select from the following options: • Select Internal to acquire frames continuously at a rate that is dependent on the frame read-out time and the exposure. • Select External to wait for an external trigger input to acquire frames. An external signal must be provided. 3. In external mode, the camera waits for an external sync input to acquire a frame. Use the Sync Cfg drop-down list to select from the following options. • Select Edge-High to trigger on the positive going slope of the signal. • Select Edge-Low to trigger on the negative slope of the signal. • Select Pulse High mode to set the duration of the exposure to equal the trigger signal duration (High state). • Select Pulse Low mode to set the duration of the exposure to equal the trigger signal duration (Low state). The time delay between the trigger signal and the acquisition of the image is less than 20 ns. If the record mode is set to “Circular” or “BROC” each acquisition requires an event trigger. To set a trigger, click on the Trigger button on the Camera Control tab for a software trigger, or use an external trigger source. 1. Select the Record tab. 2. Use the Record Mode drop-down list to select BROC or Circular. 3. Use the Trig Cfg drop-down to select from the following options: Edge High, Edge Low, and Switch Closure. Users Manual 169 Motion Studio 7.4. Triggering the camera and synchronizing with strobe light The camera cab is used together with a strobe for illumination. In this case it is necessary to synchronize the illumination pulse event with the camera exposure. Examples of methods that can be employed are presented in the following. The schematics of various timing diagrams are included. This diagram assumes the use of an externally pulse(s) (TTL) to synchronize both the camera and the strobe. 7.4.1. Synchronizing via the leading edge of a pulse event (Single exposure) The figure shows the timing signals in a single exposure configuration. In the Record Tab the frame sync is set to “External Edge-High” and the exposure mode is set to “single”. The camera exposure is started by the leading edge of the pulse signal and the exposure duration is set in the “Exposure” control of the camera software panel. Definitions: • Input sync pulse is TTL level. • Illumination pulse duration: typical 7-10 ns for flash lamp and 100-150 ns for diode pumped lasers respectively). • Camera exposure > Illumination latency + Illumination pulse duration. 170 Users Manual Motion Studio 7.4.2. Synchronizing via the trailing edge of a pulse event (Single exposure) The figure shows the timing signals in a single exposure configuration. In the Record Tab the frame sync is set to “External Edge-Low” and the exposure mode is set to “single”. The camera exposure is started by the trailing edge of the pulse signal and the exposure duration is set in the “Exposure” control of the camera software panel. Definitions: • Input sync pulse is TTL level. • Illumination pulse duration: typical 7-10 ns for flash lamp and 100-150 ns for diode pumped lasers respectively). • Camera exposure > Illumination latency + Illumination pulse duration. Users Manual 171 Motion Studio 7.4.3. Synchronizing and controlling the exposure with an input pulse The figure shows the timing signals in a single exposure configuration. In the camera panel the frame sync is set to “External Pulse-High” and the exposure mode is set to “single”. The camera exposure is integrated over the high part of the input pulse and the camera ignores the exposure value set in the “Exposure” control of the camera software panel. Definitions: • Input sync pulse is TTL level. • Illumination pulse duration: typical 7-10 ns for flash lamp and 100-150 ns for diode pumped lasers respectively). • Camera exposure > Illumination latency + Illumination pulse duration. 172 Users Manual Motion Studio 7.4.4. Synchronizing in double exposure mode The figure below shows the timing signal in a typical double exposure PIV configuration. In the camera panel the sync mode is set to “External Edge-High” and the exposure mode is set to “double”. The time between the two laser pulses must be larger than the sum of the first laser pulse duration and the camera frame transfer time. The second exposure duration cannot be set and depends from the camera frame readout, so the second laser pulse duration must be configured to the desired exposure time. Users Manual 173 Motion Studio 8. Motion Studio Remote Control 8.1. Overview The camera may be remotely controlled by a Pocket PC. The requirements are: 1. A Windows 2000/XP personal computer (the “host”) with the following items: the camera and software, a 10/100/1000 Ethernet network card or an 802.11b (wireless) network card. 2. A pocket PC (the “client”) with the following items: Windows Mobile 2003 Second Edition, the Motion Studio Remote Control software, and an 802.11b (wireless) network card. 174 Users Manual Motion Studio 8.2. Software installation To install Motion Studio on the host, follow the instructions on the Quick Start Guide. To install the “Motion Studio Remote Control” on the Pocket PC, you need Microsoft ActiveSync installed on your computer. There are two ways to install the Remote Control. 1. When installing Motion Studio, the setup asks for the Setup type among Typical, Full and Custom. Select custom and check the Remote Control Option. Then follow the on-screen instructions. 2. Run the xstream_rem.exe self-extracting file from the Remote subdirectory of the Motion Studio CD and follow the on-screen instructions. Both the install options copy the remote Control Install files to the XRemote sub-directory of the Microsoft ActiveSync application. Users Manual 175 Motion Studio To install the Remote Control to the Pocket PC: 1. Locate the XRemote subdirectory in the Microsoft ActiveSync folder. 2. Run the CEInstall.exe application and follow the on-screen instructions. 176 Users Manual Motion Studio 8.3. Configuring the wireless connection In order to remotely control the camera from the client, the wireless connection requires to be configured. A wireless network may be of two types: “infrastructure” (usually used when a wireless router is present on a LAN) and “ad-hoc” (computer to computer connection, usually used when no wireless router is present on a LAN). Both types of wireless connection may be used to remotely control the camera. 8.3.1. Configuring the host The computer running Motion Studio can have more than one network card. In this section, we show the configuration of the wireless card in a computer to computer (ad how) connection. We suppose that the host computer is connected to the corporate LAN via the Ethernet card and the wireless card will be used in a dedicated connection to the Pocket PC. From the Start Menu, select All Programs, Accessories, Communications, and Network Connections. The window below will appear. If the wireless card is not connected to any wireless connection, the wireless connection status is shown as “disconnected”. Right click on the “Wireless Network Connection” item and select Properties. Then select the Wireless Networks Tab. Users Manual 177 Motion Studio The dialog box shows the available wireless network. Click the Advanced button. The following dialog box appears. Select the “Compute-to-computer (ad hoc) networks only” option, to display only the dedicated connections. The click Close and then click the Add button. The following dialog box appears. 178 Users Manual Motion Studio Edit the network name (SSID), uncheck the “The key is provided for me automatically” option, enter the Network Key and then confirm it. The network key is a password which is required to authenticate the connection. You will be required to enter the same key when you will configure the Pocket PC wireless connection. Then click OK. The new network appears in the preferred networks list, but it’s still not active. Users Manual 179 Motion Studio From the Wireless Network connection Properties dialog box, select the General Tab as shown below. Select the Internet Protocol (TCP/IP) item, and click Properties. The following dialog box appears: Select the “Use the following IP Address” option and enter the IP address and the subnet mask. Make sure that your IP address is not duplicated in the network. Otherwise the connection would be refused. 180 Users Manual Motion Studio Click OK, then OK again and wait a few seconds until the wireless connection shows its status as “Connected” (see the picture below). The message below will appear from the status bar. NOTE: if the wireless network connection is protected by a firewall, make sure that the port 8164 is open to the TCP and UDP traffic. Users Manual 181 Motion Studio 8.3.2. Configuring the client (Pocket PC) From the Windows Mobile Start menu, select the Settings item. Then select the Connection Tabs as shown below. Select the Connections item. The screen below appears: Make sure that the “My network card connects to:” option is “Work”. Then from the list of network adapters (you may have different models on your Pocket PC) select your wireless Adapter. 182 Users Manual Motion Studio Select the “Use specific IP address” option and enter the address and the subnet mask. The subnet mask must be the same as the one entered in the host TCP/IP configuration. The IP address must be different from the host’s. Then click OK and disable/enable the wireless card to let the configuration changes take effect. When the new changes take effect, the wireless connection starts and the message box below shows up: Select the “Work” option and click connect. You will be asked to enter the network key as shown below Enter the network key you entered in the host connection configuration (see above) and click connect. If the connection starts the dialog box below appears. Users Manual 183 Motion Studio 184 Users Manual Motion Studio 8.4. Using the Motion Studio Remote Control 8.4.1. Starting the remote server on the Host 1. Run Motion Studio. 2. From the main menu select Options. 3. From the General Options dialog box, select the Camera Tab and check the “Enable Remote Connection server” option. Then click OK. 4. Open a camera window. 5. From the Camera menu, select the “Start remote Connection Server” item. Users Manual 185 Motion Studio 8.4.2. Running the Remote control on the Pocket PC 1. From the Pocket PC Start menu, select Programs. 2. From the Programs window, select the “Motion Studio Remote Control” application and start it. The program will set the Pocket PC landscape view and show the following screen. To start the connection to the host, a valid IP address needs to be entered. If the host connection is active and the server has been activated in Motion Studio, the IP address is shown in the Servers list. Otherwise, click the Search button. If no IP address appears in the servers list, enter the address manually. Then click connect and start the remote control. The application includes a configuration panel on the right, a control bar on the bottom and a main toolbar. Configuration panel 186 Users Manual Motion Studio Control Bar Main toolbar The Control Bar has camera control functions including the following: • Record. • Stop/Snap a single image. • Live play of images. • Trigger. • Camera selection: if more than one camera is active on the host, you may select which camera to operate. The Configuration Panel allows configuring the main camera parameters, such as: • Exposure. • Acquisition rate. • Automatic save on images after acquisition (auto-save flag). • Number of frames to record. • Record mode. • Sync mode. • The Playback controls work like other familiar media player controls. The controls include the following: • • • • • Directional play Forward or reverse Step forward and reverse Skip to first or last frame Stop play The Main Toolbar has controls for zoom and pan the image, including the following: • Zoom In. • Zoom Out. • Toggle the pan window. Users Manual 187 Motion Studio When the pan window is enabled, the user may drag the red rectangle and locate the area of the image to display. 188 Users Manual Motion Studio 9. Appendix A - Image Formats Motion Studio supports the image formats listed in the table below: Format Ext Pixel Depth Notes Tagged Image File Format - TIFF™ TIF 8/16/24/48 Gray/Color Windows™ Bitmap BMP 8/24 Gray/Color JPEG File JPG 8/24 Gray/Color Portable network Graphics – PNG PNG 8/16/24/48 Gray/Color Type 2 Bayer TP2 8 Gray/Bayer Falcon eXtra RAW FBA 8/24 Gray/Color Multi-Page TIFF MPT 8/16/24/48 Gray/Color Multi-page Raw MPR 8/16/24/48 Gray/Color (IDT proprietary) Multi-page Compressed MCF 8/16/24/48 Gray/Color (IDT proprietary) Audio Video Interleaved (AVI) AVI 8/24 Gray/Color Apple Quick Time (MOV) MOV 8/24 Gray/Color Weinberger Sequence (BLD) BLD 8/24 Gray/Color Moving Picture Experts Group (MPEG) MPG 8/24 Gray/Color (MPEG-1) MPEG H.264 (Advanced Video Coding) MP4 8/24 Gray/Color (MPEG-4) 9.1. Formats Overview 9.1.1. TIFF Format TIFF pictures store a single raster image at any color depth. TIFF is arguably the most widely supported graphic file format in the printing industry. It supports optional compression, and is not suitable for viewing in Web browsers. The TIFF format is an extensible format, which means that a programmer can modify the original specification to add functionality or meet specific needs. This can lead to incompatibilities between different types of TIFF pictures. 9.1.2. Bitmap Format Windows bitmap files are stored in a device-independent bitmap (DIB) format that allows Windows to display the bitmap on any type of display device. The term "device independent" means that the bitmap specifies pixel color in a form independent of the method used by a display to represent color. The default filename extension of a Windows DIB file is .BMP. For further information, refer to the Microsoft™ documentation. Users Manual 189 Motion Studio 9.1.3. JPEG Format The name "JPEG" stands for Joint Photographic Experts Group, the name of the committee that created the standard. The JPEG standard specifies both the codec, which defines how an image is compressed into a stream of bytes and decompressed back into an image, and the file format used to contain that stream. The compression method is usually lossy, meaning that some visual quality is lost in the process and cannot be restored. However there are variations on the standard baseline JPEG that are lossless. 9.1.4. PNG Format PNG is an extensible file format for the lossless, portable, well-compressed storage of raster images. PNG provides a patent-free replacement for GIF and can also replace many common uses of TIFF. Indexed-color, grayscale, and true-color images are supported, plus an optional alpha channel. Sample depths range from 1 to 16 bits. PNG is designed to work well in online viewing applications, such as the World Wide Web, so it is fully stream-able with a progressive display option. PNG is robust, providing both full file integrity checking and simple detection of common transmission errors. Also, PNG can store gamma and chromaticity data for improved color matching on heterogeneous platforms. PNG is a platform-independent format that supports a high level of lossless compression, alpha channel transparency, gamma correction, and interlacing. It is supported by more recent Web browsers. 9.1.5. TP2 format Type-2 format is the Redlake raw data format. It’s the format used to save raw image data. 9.1.6. FBA format The FBA format is the Falcon eXtra raw data format. It’s the format used by Falcon eXtra software to save raw image data. For further information, please refer to falcon documentation. 9.1.7. AVI Format The Microsoft AVI file format is a Resource Interchange File Format (RIFF) file specification used with applications that capture, edit, and play back audio-video sequences. In general, AVI files contain multiple streams of different types of data. Most AVI sequences use both audio and video streams. A simple variation for an AVI sequence uses video data and does not require an audio stream. The program supports uncompressed (raw) and compressed AVI. The INDEO 5.11 codec is installed on 32-bit Windows. 9.1.8. MOV Format The Apple Quick Time MOV file format is used with applications that capture, edit, and play back audio-video sequences. In general, MOV files contain multiple streams of different types of data. The codec supported in Motion Studio are RAW, TIF and H264. Apple QuickTime™ is required. 190 Users Manual Motion Studio 9.1.9. BLD Format The BLD format corresponds to the file format RAW, which is known from several applications. Each BLD file needs a corresponding descriptor file in the DSC format. In a BLD file all single frames of an image sequence are stored successively uncompressed in the block format. The data is in binary raw data format (e.g. for grayscale pictures 1 Byte per Pixel). The descriptor file (DSC) belonging to the BLD file is a line-orientated ASCII file, in which values like e.g. resolution, frames or date are stored. The DSC file can be created with any text editor. 9.1.10. MPEG Format MPEG, which stands for “Moving Picture Experts Group”, is a name of family standards used for coding audio-visual in a digital compressed format. MPEG is a generic means of compactly representing digital video and audio signals for consumer distribution. The basic idea is to transform a stream of discrete samples into a bit-stream of tokens which takes less space, but is just as filling to the eye. The graphic library implements the MPEG-1 format, the standard on which such products as video CD and MP3 are based. The compression/decompression technique implemented in MPEG is “lossy”, e.g. some amount of data information is lost. 9.1.11. MPEG H.264 (Advanced Video Coding) It is also known as MPEG-4 Part 10 or MPEG-4 AVC (Advanced Video Coding). The intent of the H.264 project was to create a standard capable of providing good video quality at substantially lower bit rates than previous standards without increasing the complexity of design so much that it would be impractical or excessively expensive to implement. An additional goal was to provide enough flexibility to allow the standard to be applied to a wide variety of applications on a wide variety of networks and systems, including low and high bit rates, low and high resolution video and broadcast. The MPEG H.264 format is supported only on a 32 bit Windows OS with installed QuickTime™. 9.1.12. Multi-page Bayer Format (MRF) Multi-page Bayer Format (MRF) is an uncompressed IDT proprietary file format. Multiple raster images are stored in a single file. The format is described below. Each MRF file contains a file header, an image header and an array of bytes that defines the image data bits. The image raster data is not compressed and stored in the file “as it is”. Mono images pixel depth may be 8, 9 or 10; color images are stored in Bayer format (8, 9, 10 bit) or in BGR format (24, 27, 30 bit). The file structures are the following: 9.1.12.1. File header A MRF file begins with a file header structure containing the IDT signature. typedef struct _MRFFILE_HEADER { char szSign[8]; // IDT signature unsigned int nReserved; // reserved } MRFFILE_HEADER, *PMRFFILE_HEADER; Members Users Manual 191 Motion Studio szSign[8]: a 8 char buffer which contains the signature “IDT-MRF”. It indicates that the file contains a valid Multiple Raw File. nReserved: this field is reserved for future use. 9.1.12.2. Image header The file header is followed by the image header which contains general information about the images. typedef struct _MRFIMG_HEADER { unsigned int nSize; unsigned int nPages; unsigned int nWidth; unsigned int nHeight; unsigned int nBPP; unsigned int nReserved1; unsigned int nReserved2; unsigned int nReserved3; unsigned short nBayer; unsigned short nCFAPattern; unsigned int userData[59]; unsigned int nRecSpeed; } MRFIMG_HEADER, *PMRFIMG_HEADER; // // // // // // // // // // // // size of this header number of pages/frames image width image height bits per pixel reserved reserved reserved the image is Bayer Bayer pattern user data array recording speed Members nSize: size of the structure in bytes. nPages: number of images contained in the file nWidth: width of each image in pixels. nHeight: height of each image in pixels. nBPP: number of bits per pixels reserved1,2,3: reserved values. nBayer: the image is Bayer. nCFAPattern: color filter array pattern used to de-bayer the image (0:GRBG, 1:BGGR, 2:RGGB, 3:GBRG). nRecSpeed: the recording speed. userData: an array of 59 unsigned integer values. nRecSpeed: the recording speed multiplied by 1000. 9.1.12.3. Data arrays The image header is followed by the images data. Images are stored contiguously in uncompressed format. 192 Users Manual Motion Studio 9.1.13. Multi-page Compressed Format (MCF) Multi-page Compressed Format (MCF) is a compressed IDT proprietary file format. Multiple raster images are stored in a single file. 9.1.14. Note on 16 bit grayscale formats 10-bit images acquired from the camera may be saved in different 16 bit formats. These formats include TIF, PNG, MPT, MRF and MCF. Since 16 bit grayscale format is not a standard, not all the applications for image processing may correctly display the saved images. Users Manual 193 Motion Studio 10. Appendix B – Error codes A list of Motion Studio error codes with a brief description is below. ERR001: Internal error. The program has generated a severe internal error and must be restarted. ERR005: Invalid database path. The program is trying to open a database from a wrong directory. ERR011: Error opening file. The program failed opening an image file because it is damaged or the format is not supported. ERR012: Error opening image sequence. The program failed opening an image sequence because it is damaged or the format is not supported. ERR023: Camera generic error. Unspecified camera error. ERR027: Camera play time out. The camera cannot snap images and a time out occurred. Check if the camera sync configuration is set to external and the external sync signal is available. ERR028: Camera acquisition time out. The camera cannot acquire images and a time out occurs. ERR033: Unable to open camera. The program cannot start the communication with the camera. Check the hardware and the cables. ERR034: Unable to create a folder. The program cannot create a new folder in the database for the storage of the acquired images. Check your administrator privileges. ERR035: not enough camera memory to add a new acquisition. All the camera memory is filled with acquisitions. A new acquisition cannot be added. ERR036: Unable to delete the current acquisition. The program cannot delete the current acquisition from the camera memory configuration. ERR037: Camera hardware generic error. An error occurred in the communication through the USB or the Ethernet cable. ERR038: The buffer is too small. The buffer allocated for the image snap is too small. ERR039: Camera device I/O error. An error occurred in the communication through the USB cable. Check the cables and the USB board. ERR040: Camera I/O read error. An error occurred while the program was reading an image from the camera. Check the cables and the USB board. ERR041: Cannot complete the operation because the camera is busy. The camera is busy and cannot perform the requested operation. Wait and try again. 194 Users Manual Motion Studio ERR042: An error occurred during the calibration procedure. The error can occur during the camera background calibration or during the tracking calibration. Restart the program and try again. ERR045: Invalid range value. The error occurs when the user tries to configure a parameter which is out of the allowed range. Correct the value and try again. ERR048: An error occurred during the color balance and/or white balance procedure because one of the circular targets is outside the image. Move the targets and try again. ERR049: An error occurred during the color balance and/or white balance procedure. Move the targets and try again. ERR055: Unable to create a new database. The error occurs when the program tries to create a new database. Check your administrator privileges and try again on a different folder. ERR056: Unable to delete folder. The error occurs when the program tries to delete a folder (acquisition, calibration or tracking) from the current database. Check your administrator privileges. ERR059: Unable to create calibration folder. The error occurs when the program tries to create a new calibration folder and save the calibration image. ERR061: Unable to copy file. The error occurs when the program tries to copy the camera calibration file from the distribution CD. Check your administrator privileges and the CD integrity. ERR065: Invalid camera calibration file. The error occurs when the program tries to copy a camera calibration file that is not valid. Check if the file is damaged. ERR067: Camera I/O write error. An error occurred while the program was trying to write a parameter to the camera. Check the cables and the USB board. ERR068: Unable to open camera driver. The program cannot start the communication with the camera. Check the hardware and the cables. ERR070: Invalid iTunes version. The error occurs because the program is trying to communicate with the iPod through iTunes and the version is not valid. Install a newer version of iTunes. ERR071: iTunes Type library is not compatible. The error occurs because the program is trying to communicate with the iPod through iTunes and the version is not valid. Install a newer version of iTunes. ERR072: Unable to connect to iPod through iTunes. There is a communication error between the program and the iPod. Try again. ERR073: More than one iPod found. The computer is connected to more than one iPod. Disconnect one of them and try again. ERR074: Unable to connect to iTunes. There is a communication error between the program and iTunes. ERR075: Not enough space on the destination database. The error occurs because the program tries to synchronize with the iPod, but the iPod disk has not enough space to store the database. Users Manual 195 Motion Studio ERR076: Unable to delete the iPod acquisition list. The error occurs because the program is trying to synchronize with the iPod but it’s not able to delete the previous acquisition list. ERR077: Unable to delete the acquisition folder. The error occurs because the program is trying to synchronize with the iPod but it’s not able to delete one of the acquisition folders. ERR078: Unable to create the acquisition folder. The error occurs because the program is trying to synchronize with the iPod but it’s not able to create a new acquisition folder. ERR079: Unable to copy the database system files. The error occurs because the program is trying to synchronize with the iPod but it’s not able to copy the database system files. ERR080: Unable to find images. The error occurs because the program is trying to synchronize with the iPod but it cannot find images in the source database. ERR081: Unable to add files to the iPod acquisition list. The error occurs because the program is trying to synchronize with the iPod but it cannot add a sequence to the iPod list. ERR082: Unable to add files to the iPod acquisition list. The error occurs because the program is trying to synchronize with the iPod but it cannot add a sequence to the iPod folders. ERR083: Unable to convert the acquisition to the iPod format. The error occurs because the program is trying to add a sequence to the iPod list but it cannot convert it to the proper iPod format. ERR084: Multiple camera snap time out. The error occurs because the program is trying to snap an image from a multiple camera setup. One or more cameras failed, check the cables. If the system is in Master/Slave configuration check that the sync in connector of the slave camera is connected to the sync out connector of the master. ERR086: Unable to save calibration image. The error occurs because the program tries to save a tracking calibration image. Check your administrator privileges and try again. ERR087: Unable to download the camera calibration file from flash memory. Check the cables and try again. ERR088: The command line passed to the raw converter to convert a file is not correct. ERR089: Unable to find acquisition directory. This error occurs when the Raw Converter tries to open an INI files but is not able to find it. Check the command line path and try again. ERR090: Invalid configuration file. This error occurs when the Raw Converter tries to convert a sequence but the configuration file is not valid. ERR091: Unable to read the RAW file. This error occurs when the Raw Converter tries to convert a sequence but the raw file is not valid or damaged. ERR092: the raw file and the converter have different versions. This error occurs when the Raw Converter tries to convert a sequence generated by an older version of the software. ERR093: Unable to set the IP address. This error occurs when the program tries to change the camera IP address and it fails. Check that the selected IP address is 196 Users Manual Motion Studio compatible with the network adapter subnet mask and disconnect the USB cable if it’s connected. ERR094: Unable to assign a specific IP address to the camera. The automatic assignment of the IP addresses has failed. Try with the manual configuration. ERR095: Data acquisition module over-run. A data acquisition module internal error has occurred. ERR096: Data acquisition module under-run. A data acquisition module internal error has occurred. ERR097: Unable to download the camera calibration file from flash memory because the camera calibration file is not stored in the flash. Contact the technical support. ERR098: The calibration file download has been aborted. The user has clicked the Abort button during the download. ERR099: Unable to set the IP address. An error occurred in the procedure of setting the IP address starting from the camera MAC address. Make sure that the MAC address is correct and the camera is connected to the network. ERR100: Unable to save tracking data. The error occurs because the program tries to save the tracking results to a file and it fails. ERR101: Invalid file format. The error occurs when a waveform file is not valid. The file may be damaged or have invalid data. ERR102: Unable to save to a file. The error occurs when the program cannot save an image to the specified file format. ERR103: Unable to save to a file. The error occurs because the file is too large and the file format does not support that size. ERR104: Unable to allocate enough computer memory for the acquisition. This error occurs when M cameras try to acquire a large number of images in computer memory. ERR105: The camera cable has been disconnected. ERR106: The program is unable to attach to the camera. The program instance has been detached from the camera because the control has been taken by someone else. ERR107: Unable to configure the camera for first use. The procedure of setting up the camera for the first time failed. ERR108: Aborted operation. The error message occurs when the user aborts the raw conversion procedure. ERR109: The selected region of interest is not supported by this file format. ERR110: the application is not able to open a device in the Galileo network. ERR111: the HG100K camera memory cannot be erased. ERR112: a Galileo wireless device cannot be configured. ERR113: a frame cannot be read from the camera during a procedure of sequence save. Users Manual 197 Motion Studio ERR114: the compressed AVI codec is not valid and the sequence cannot be saved. ERR115: memory allocation error. The program cannot allocate enough memory to open and display a sequence of images. ERR116: write to disk overrun. When the program acquires in direct write to disk mode with M camera, the memory allocated for buffering is not enough and it is overwritten. ERR117: SD card download error. The camera cannot download the images to the SD card. ERR118: the time limited license has expired. Contact IDT for a new activation code. ERR119: The activation key cannot be sent to the camera. Reboot the camera, restart Motion Studio and try again. ERR120: Read EEPROM error. The camera cannot be initialized because the EEPROM data cannot be read. ERR121: The HDMI output cannot be initialized. ERR122: SD card download error. Some cameras were not able to save the images to their SD card devices. ERR123: Unable to save images (communication error). The HG camera is not able to switch to 1 Gbps speed and the images cannot be downloaded. ERR124: the message appears when the cameras are configured a Master/Slave and a time out occurs. ERR125: When the user selects the Master/Slave mode, the software tries to understand if the cameras are properly connected. If the detection procedure fails an error message is generated. ERR126: the message appears when the user tries to open a raw file generated by old N cameras. That file cannot be displayed by the RAW viewer but it can be converted by the RAW converter. ERR127: some IP addresses such as loopback addresses or multicast addresses, cannot be used to configure the camera. ERR128: the log files cannot be downloaded from the HG camera flash memory. ERR129: the log files cannot be deleted from the hard disk. Make sure they are not used by some other application. ERR130: the message appears when the user tries to close Motion Studio when one or more cameras are still downloading images to the hard disk. The user should wait before the download is complete. ERR131: the message appears when the information stored in the camera EEPROM cannot be retrieved. If the software cannot read the proper information from the camera, the camera should not be opened because the results are unpredictable. Such error may appear when there is a communication problem between the camera and the computer through the Ethernet network. 198 Users Manual Motion Studio ERR132: this message appears when the software is not able to send to the camera the command that stores the configuration in the flash memory. It is a camera internal firmware error. ERR133: in SSD mission mode, the configuration cannot be stored into the camera flash memory. ERR134: in SSD mission mode, the SSD cannot be erased. ERR135: in SSD mission mode, a segment of the mission cannot be loaded from the SSD to the camera memory ERR136: in SSD mission mode, the configuration cannot be stored into the camera flash memory and executed right away. ERR137: in SSD mission mode, the images cannot be read from the SSD to the camera memory. ERR138: the specified file cannot be erased. Users Manual 199 Motion Studio 11. Appendix C - Spatial filtering Spatial filters alter pixel values with respect to variations in light intensity in their neighborhood. The neighborhood of a pixel is defined by the size of a matrix, or mask, centered in the pixel itself. These filters can be sensitive to the presence or the absence of light intensity variations. Spatial filters can serve a variety of purposes, such as detecting edges along a specific direction, contouring patterns, reducing noise and detail outlining and smoothing. Spatial filters fall in two categories: High-pass filters emphasize significant variations of the light intensity usually found at the boundary of object. They are also called sharpening filters. Low-pass filters attenuate variations of the light intensity. They have the tendency to smooth images by eliminating details and blurring edges. They are also called smoothing filters. In the case of a 3x3 matrix, the value of the central pixel derives from the values of its eight surrounding neighbors. A 5x5 matrix specifies 24 neighbors; a 7x7 matrix specifies 48 neighbors and so forth. If P(i,j) specifies the intensity of the pixel P with the coordinates (i,j), the pixels surrounding P(i,j) can be indexed as follows (in the case of a 3x3 matrix): P(i-1,j-1) P(i,j-1) P(i+1,j-1) P(i-1,j) P(i,j) P(i+1,j) P(i-1,j+1) P(i,j+1) P(i+1,j+1) A linear filter assigns to P(i,j) a value which is a linear combination of its surrounding values. For example: P(i,j) = P(i-1,j-1) + P(i,j-1) + P(i+1, j-1) - P(i-1,j+1) - P(i,j+1) - P(i+1,j+1) A nonlinear filter assigns to P(i,j) a value that is not a linear combination of the surrounding values. For example: P(i,j) = max( P(i-1,j-1), P(i+1, j-1), P(i-1,j+1), P(i+1,j+1) ) 11.1. Linear filters (Convolution filters) A convolution is a mathematical function that replaces each pixel by a weighted sum of its neighbors. The matrix defining the neighborhood of the pixel also specifies the weight assigned to each neighbor. This matrix is called the convolution kernel. For each pixel P(i,j) in an image, the convolution kernel is centered on P(i,j). Each pixel masked by the kernel is multiplied by the coefficient placed on top of it. P(i,j) becomes the sum of these products. 200 Users Manual Motion Studio In the case of 3x3 neighborhood, the coefficients of the kernel matrix can be indexed as follows. K(i-1,j-1) K(i,j-1) K(i+1,j-1) K(i-1,j) K(i,j) K(i+1,j) K(i-1,j+1) K(i,j+1) K(i+1,j+1) The grater the absolute value of a coefficient K(a,b), the more the pixel P(a,b) contributes to the new value of P(i,j). If a coefficient K(a,b) is 0, the neighbor P(a,b) does not contribute to the new value of P(i,j). 0 1 0 1 0 1 0 1 0 then P(i,j) = P(i,j-1) + P(i-1,j) + P(i+1, j) + P(i,j+1) If the kernel contains both negative and positive coefficients, the transfer function is equivalent to a weighted differentiation and produces a sharpening or high-pass filter (like Laplacian, Prewitt and Sobel filters). If all coefficients in the kernel are positive, the transfer function is equivalent to a weighted summation and produces a smoothing o low-pass filer (like Average and Gaussian filters). 11.2. Linear sharpening filters Typical smoothing filters are: Gradient filters A gradient filter highlights the variation of light intensity along a specific direction, which has the effect of outlining edges and revealing texture. A gradient convolution filter is a first-order derivative. Its kernel uses the following matrix: a -b c b x -d c d -a Where a, b, c and d are integer coefficients and x=0 or x=1. This kernel has an axis of symmetry that runs between the positive and negative coefficients of the kernel and through the central element. This axis of symmetry gives the orientation of the edges to outline. Users Manual 201 Motion Studio There are two sets of pre-defined gradient filters used in Motion Studio. They are listed below. The Prewitt filters have the following kernels. The notations N (north) NE(north-east) E (east) SE (south-east) S (south) SW (south-west) W (west) NW (north-west) indicate which edges of bright regions they outline. The Sobel filters are very similar to the Prewitt filters except that they highlight light intensity variations along a particular axis that is assigned a stronger weight. They have the following kernels. Laplacian filters A Laplacian filter highlights the variation of the light intensity surrounding a pixel. The filter extracts the contour of objects and outline details. Unlike the gradient filter, it is omni directional. The Laplacian filter is a second-order derivative. Its kernel uses the following matrix: a d c b x b c d A where a, b, c and d are integers. The Laplacian filter has two different effects, depending on whether the central coefficient x is equal or greater than the sum of the absolute values of the outer coefficients. If x is equal to that sum, the filter extracts the pixels where significant variations of light intensity are found. The presence of sharp edges, boundaries between objects, modification in the texture of a background, noise, and other effects can cause these variations. The transformed image contains white contours on a black background. If x is greater than that sum, the filter detects the same variations as mentioned above, but superimposes them over the source image. The transformed image looks like the source image, with all significant variations of the light intensity highlighted. 11.3. Linear Smoothing filters A smoothing filter attenuates the variations of light intensity in the neighborhood of a pixel. It smoothes the overall shape of objects, blurs edges, and removes details. It is an averaging filters and its kernel uses the following matrix: a 202 d c Users Manual Motion Studio b x b c d a where a, b, c and d are positive integers, and x=0 or x=1. Because all the coefficients are positive, each central pixel becomes a weighted average of its neighbors. The stronger the weight of a neighbor is. The more influence it has on the new value of the central pixel. A list of average smoothing kernels is shown below A Gaussian filter attenuates the variations of light intensity in the neighborhood of a pixel. It smoothes the overall shape of objects and attenuates details. It is similar to a smoothing filter, but its blurring effect is more subdued. Its kernel uses the following matrix. a d c b x b c d a where a, b, c and d are positive integers, and x=0 or x=1. Because all the coefficients are positive, each central pixel becomes a weighted average of its neighbors. The stronger the weight of a neighbor is. The more influence it has on the new value of the central pixel. Unlike a smoothing kernel, the central coefficient of a Gaussian filter is greater than 1. Therefore the original value of a pixel is multiplied by a value greater than the weight of any of its neighbors. As a result, a greater central coefficient corresponds to a more subtle smoothing effect. A larger kernel size corresponds to a stronger smoothing effect. Users Manual 203 Motion Studio 11.4. Nonlinear filters A nonlinear filter replaces each pixel with a nonlinear function of its surrounding pixels. Like the convolution filters the nonlinear filters operate on a neighborhood. A Median filter is a nonlinear low pass filter that assigns to each pixel the median value of its neighborhood, effectively reducing isolated pixels and reducing details. However, the median filter does not blur the contour of objects. A Maximum Filter is a nonlinear filter that assigns to each pixel the maximum value of pixels in its neighborhood. This has the effect to increase the contrast of the image. A Dilation of an image is a particular case of max filter. The output pixel is set to the maximum of the corresponding input pixel and its 8 neighbors. The effect of dilation is to fill up holes and to thicken boundaries of objects on a dark background (that is, objects whose pixel values are greater than those of the background). A Minimum Filter is a nonlinear filter that assigns to each pixel the minimum value of pixels in its neighborhood. This has the effect to decrease the contrast of the image. An Erosion of an image is a particular case of min filter. The output pixel is set to the minimum of the corresponding input pixel and its 8 neighbors. The effect of erosion is to remove spurious pixels (such as noise) and to thin boundaries of objects on a dark background (that is, objects whose pixel values are greater than those of the background). Opening an image is a sequence of erosions followed by dilations. The process of opening has the effect of eliminating small and thin objects, breaking objects at thin points, and generally smoothing the boundaries of larger objects without significantly changing their area. Closing an image is a sequence of dilations followed by erosions. The process of closing has the effect of filling small and thin holes in objects, connecting nearby objects, and generally smoothing the boundaries of objects without significantly changing their area. 204 Users Manual Motion Studio 12. Appendix D - Color Filter Arrays (CFA) The Color camera uses a single image sensor. Color imaging with a single sensor requires the use of a Color Filter Array (CFA) which covers the sensor array. In this fashion each pixel in the detector samples the intensity of just one of the three color components, i.e. red, green or blue. The recovery of full-color images from a CFA-based sensor requires a method of calculating values of the other color separations at each pixel. These methods are commonly referred as color interpolation or color “demosaicing” algorithms. In a single-sensor camera, varying intensities of light are measured at a rectangular grid of image sensors. To construct a color image, a CFA must be placed between the lens and the sensors. A CFA typically has one color filter element for each sensor. Obviously, the color interpolation algorithms depend on the CFA configuration. Many different CFA configurations have been proposed. The one used in IDT cameras is the Bayer pattern. A Bayer pattern consists of pixels on your sensor tinted green, red or blue and set in a mosaic pattern. Consider the figure below: moving from left to right and then down, you see that you have a GR-BG pattern. This is your Bayer pattern, and is then placed all over the sensor to form the Bayer Mosaic Pattern. This means that you have half of your pixels tinted with a Green sensitive element, a quarter tinted with a Red sensitive element, and a quarter tinted with a Blue sensitive element. The MotionPro/MotionScope camera models have different Bayer patterns: • X3, Y3-C, Y3-HD, N3-S1, N3-S2 and M3 have BG-GR pattern. • X4, X5, Y5, Y5 HD, M5, and N5 have GR-BG pattern. • Y4, N4, Y3-S1, Y3-S2, N3-S3, N3-S4, Y6, Y7, NX7, Y8, NX8 have GB-RG pattern. The camera driver may perform six different interpolation algorithms (demosaicing): Advanced: a new advanced method for high quality reconstruction. Nearest: the algorithm is based on nearest neighbor reconstruction. Users Manual 205 Motion Studio Bilinear: for each missing pixel, a weighted value of the surrounding four pixels is computed. It’s the simplest method and is non-adaptive. The indiscriminate averaging of neighboring pixel causes a blur effect (“Zipper”). Gradient A: the interpolation is done using chrominance gradients in two steps. First the luminance channel is interpolated (green). Then the color differences (red minus green and blue minus green) are interpolated. Gradient B: the interpolation is done using luminance gradients in a more adaptive way than algorithm B. Gradient C: the interpolation is done using a threshold based variable number of gradients. Hue Transition A: the algorithm is based on the assumption that the hue of the image cannot change abruptly and in an unnatural manner. The term hue refers to the relation between luminance (green) and chrominance (red, blue). Hue Transition B: based on the same principles of “A” method, but more precise Pixel Grouping: the algorithm is based on the observation that natural scene images are usually composed of numerous groups of pixels, and have approximately the same brightness and color. 206 Users Manual Motion Studio 13. Appendix E – EDR/XDR The Extended Dynamic Range (EDR/XDR) is an IDT-proprietary implementation that enhances the camera dynamic range. Cameras with 8 bit pixel depth (X-series) may increase the dynamic range to 11 bits. Cameras with 10 bit dynamic range (Y-series and N-series) may increase the dynamic range to 13 bit. Let’s imagine a picture of a high contrast scene. In the picture we may have a very bright portion (almost saturated) and a very dark portion that is almost black. How can we change our exposure to have a good image? If we try to increase the exposure to improve the dark details, we saturate the bright area. On the other side, if we decrease to improve the bright area, we reduce the light to the dark area and we loose information. The solution is EDR/XDR. EDR is implemented in Y4/N4 cameras. The sensor is capable of acquiring even and odd rows with different exposures. The two “half images” are then interpolated to produce two different images with two different intensities. XDR is implemented in all the camera models that support double exposure. Then the pictures are linearly combined to obtain a third picture with increased sensitivity. The ratio between higher exposure and lower exposure gives the new pixel depth, which can be 9, 10 or 11 bits for 8 bit images or 11, 12 and 13 bits for 10 bit images. The resulting image may be converted back to 8 bits (or 10 bits) with a look up table. The example below shows the result of EDR/XDR. The first image shows a dark area at the top left side. If we increase the exposure, the top left side becomes visible but the image saturates at the right side (see below). Users Manual 207 Motion Studio With XDR the two images are combined and the result is a uniform image without dark or saturated zones. 208 Users Manual Motion Studio 14. Appendix F – Glossary A Ambient Light It’s the available natural light completely surrounding a subject. It’s tight already existing in an indoor or outdoor setting that is not caused by any illumination supplied by artificial light source. Aperture It’s the lens opening. The hole or opening formed by the metal leaf diaphragm inside the lens or the opening in a camera lens through which light passes to expose the sensor. The size of aperture is either fixed or adjustable. Aperture size is usually calibrated in fnumbers-the larger the number, the smaller the lens opening. Aperture affects depth of field, the smaller the aperture, the greater is the zone of sharpness, the bigger the aperture, the zone of sharpness is reduced. The size of the aperture is indicated by its fnumber. ASCII American Standard Code for Information Interchange, an encoding system for converting keyboard characters and instructions into the binary number code that the computer understands. Aspect ratio It’s the ratio between the width and height of an image or image sensor. Auto focus It’s a system that automatically focuses the camera lens. AVI (Audio Video Interleaved) It’s a file format used to store video and audio. For further information, refer to the Microsoft™ documentation. Users Manual 209 Motion Studio B Bandwidth It’s the capacity of a networked connection and determines how much data can be sent along the networked wires. The bandwidth is particularly important for Internet connections, since greater bandwidth also means faster downloads. Bayer pattern A Bayer pattern consists of pixels on the sensor tinted green, red or blue and set in a mosaic pattern. Moving from left to right and then down, the pattern may be GR-BG. This is the sensor’s Bayer pattern, and is then placed all over the sensor to form the Bayer Mosaic Pattern. This means that half of the pixels are tinted with a Green sensitive element, a quarter tinted with a Red sensitive element, and a quarter tinted with a Blue sensitive element. Binning Binning is a method of increasing camera speed and sensitivity to boost low signals. Binning causes the acquired image to be brighter and smaller, but the resolution will be lower as a result. Because the image is smaller, the image transfer time is reduced significantly. When you select a binning setting in your imaging software, the camera combines data from several pixels in the camera’s CCD into a single super pixel. For example, a 2x2 bin means that 2 pixels in the horizontal direction and 2 pixels in the vertical direction are combined to form one super pixel. Bit Depth It’s the color or gray scale of an individual pixel. A pixel with 8 bits per color gives a 24 bit image. (8 Bits x 3 colors are 24 bits.) 24 bit color resolution is 16.7 million colors. BMP (Bitmap) It’s a file format used to store images. For further information, refer to the Microsoft™ documentation. BNC BNC is the acronym for Bayonet Neill-Concelman (for the inventors Paul Neill and Carl Concelman). It’s a twist-and-lock connector for coaxial cables, used for electronic equipment and for wiring LANs. Brightness It’s the value of a pixel in an electronic image, representing its lightness value from black to white. It’s usually defined as brightness levels ranging in value from 0 (black) to 255 (white). BROC (Burst Record on Command) It’s one of the operating modes of a camera with on board memory. The memory is divided into segments; the camera acquires in circular mode in a segment. When the event trigger is issued, the camera completes the acquisition and start acquiring in the following segment until the memory is filled. 210 Users Manual Motion Studio C C-Mount A standard threaded lens mount used to attach a camera to a microscope, or a separate lens to a camera. CCD (Charge Coupled Device) It’s the light sensitive silicon chip near the optical interface of the camera that converts light intensities into electrical signals. Every pixel's charge is transferred through a very limited number of output nodes (often just one) to be converted to voltage, buffered, and sent off-chip as an analog signal. All of the pixel can be devoted to light capture, and the output's uniformity (a key factor in image quality) is high. Circular Mode It’s one of the operating modes of a camera with on board memory. The camera acquires and restarts when the memory is filled. The camera waits for an event trigger to complete the acquisition. CFA (Color Filter Array) The filter dyes placed directly over each pixel on the chip surface. CMOS (Complementary Metal-Oxide Semiconductor) It’s the light sensitive silicon chip near the optical interface of the camera that converts light intensities into electrical signals. Each pixel has its own charge-to-voltage conversion, and the sensor often also includes amplifiers, noise-correction, and digitization circuits, so that the chip outputs digital bits. These other functions increase the design complexity and reduce the area available for light capture. With each pixel doing its own conversion, uniformity is lower. But the chip can be built to require less off-chip circuitry for basic operation. Contrast It’s a measure of rate of change of brightness in an image. Users Manual 211 Motion Studio D Dark Current The charge accumulated by pixels while not exposed to light. Normally, this charge is reduced or eliminated prior to capturing a picture. Depth of Field The distance between the nearest and farthest points that appears in acceptably sharp focus in a photograph. Depth of field varies with lens aperture, focal length, and camerato-subject distance. Diaphragm An adjustable device inside the lens which is similar to the iris in the human eye, it’s comprised of six or seven overlapping metal blades; continuously adjustable from "wide open" to "stopped down"; controls the amount of light allowed to pass through the lens and expose the sensor when a picture is taken. It also controls the amount of depth of field the photograph will have. Openings are usually calibrated in f-numbers. The more blades used will have a more natural and rounded spots. Digitization It’s the process of converting analog information into digital format. Digital Camera It’s an electronic device used to capture and store photographs electronically instead of using photographic film like conventional cameras. Modern compact digital cameras are typically multifunctional, with some devices capable of recording sound and/or video as well as photographs. Double Exposure It’s a capability of CCD and CMOS cameras to acquire two images within a 100 ns interval. The first camera exposure may be controlled while the second exposure doesn’t. DLL (Dynamic Linking Library) A dynamic link library (DLL) is a collection of small programs, any of which can be called when needed by a larger program that is running in the computer. The small program that lets the larger program communicate with a specific device such as a printer or scanner is often packaged as a DLL program (usually referred to as a DLL file). The advantage of DLL files is that, because they don't get loaded into RAM together with the main program, space is saved in RAM. Dynamic Range It’s the ratio of the saturation level of the CCD to the readout noise of the CCD camera system. Dynamic range is a measure of the ability of the camera to capture both bright and dark features in a single image. In general, the higher the camera’s dynamic range, the more information per pixel it can capture. It’s usually expressed in dB. 212 Users Manual Motion Studio E Ethernet (10Base-T) It’s a local area network (LAN) architecture developed by Xerox Corporation in cooperation with DEC and Intel in 1976. Ethernet uses a bus or star topology and supports data transfer rates of 10 Mbps. Exposure The amount of time that light reaches the image sensor. Users Manual 213 Motion Studio F F-Number The ratio of the diameter of the opening to the focal length of the lens; a large aperture is indicated by a small numerical f-number. The f-number series is a geometric progression based on changes in the size of the lens aperture, as it is opened and closed. As the scale rises, each number is multiplied by a factor of 1.4. The standard numbers for Calibration are 1.0, 1.4, 2, 2.8, 4, 5.6, 8, 11, 16, 22, 32, etc., and each change results in a doubling or halving of the amount of light transmitted by the lens to the film plane. Fast Ethernet (100Base-T) A newer version of Ethernet, called also 100Base-T, which supports data transfer rates of 100 Mbps. Field of View It’s the area visible through the camera’s optics. Fill Factor The fill factor indicates the size of the light sensitive photodiode relative to the surface of the pixel. Because of the extra electronics required around each pixel the "fill factor" tends to be quite small, especially for Active Pixel Sensors which have more per pixel circuitry. To overcome this limitation, often an array of micro-lenses is placed on top of the sensor. FireWire (IEEE 1394) High bandwidth (40 megabytes/second - 1394a; 80 megabytes/second - 1394b) interface for connecting digital imaging, storage, and other devices to host computers. Focal Length The distance from the optical center of the lens to the image sensor when the lens is focused on infinity, usually expressed in millimeters. Focus It’s the process of bringing one plane of the scene into sharp focus on the image sensor. Fps (Frames per second) It’s used to describe how many frames a camera can acquire per second. Frame One of the still pictures that make up a video. Frame Grabber It’s a device that lets you capture individual frames out of a video camera or off a video tape. Frame Rate It’s the number of frames that are shown or sent each second. Live action relates to a frame rate of 30 frames per second. 214 Users Manual Motion Studio G Gigabit Ethernet A version of Ethernet, which supports data transfer rates of 1 Gigabit (1,000 megabits) per second. The first Gigabit Ethernet standard (802.3z) was ratified by the IEEE 802.3 Committee in 1998. Gray Level It’s the brightness of a pixel. Gray Scale It’s an image containing shades of gray as well as black and white. GUI (Graphical User Interface) A system that simplifies selecting computer commands by enabling the user to point to symbols or illustrations (called icons) on the computer screen with a mouse. H High-G It refers to the Vehicle Impact Test or similar environment that includes up to 100-G shock and 5-G vibration stress. Generally indicates ability to withstand extreme shock and vibration forces. I Image Intensifier It’s an electro-optical vacuum tube which intensifies or amplifies on low light level images. Integration It’s the active collection of photons as done by an image sensor. Interpolation Method used to increase the resolution of an image map by adding pixels to an image based on the value of surrounding pixels. This method can cause artifacts. IP Address The Internet Protocol Address is a unique set of numbers used to locate another computer on a network. The format of an IP address is a 32-bit string of four numbers separated by periods. Each number can be from 0 to 255 (i.e., 1.154.10.266). Within a closed network IP addresses may be assigned at random, however, IP addresses of web servers must be registered to avoid duplicates. IRIG (Inter-Range Instrumentation Group) Time code signals of various formats defined by the IRIG 200-98 standard/time derived from GPS satellites. Both require an optional receiver/decoder/generator module. Iris It’s a diaphragm in the lens that opens or closes to set the aperture (the amount of light that passes through the lens to the CCD). Users Manual 215 Motion Studio J K L Laser Laser is an acronym for Light Amplification by Stimulated Emission of Radiation. A laser is a cavity, with mirrors at the ends, filled with material such as crystal, glass, liquid, gas or dye. It’s a device which produces an intense beam of light with the unique properties of coherence, collimation and mono-chromaticity. LED (Light Emitting Diode) Light producing transistor used to display dots, numeric and text, slowly replacing by LCD display. Lens One or more pieces of optical glass or similar material designed to collect and focus rays of light to form a sharp image on the sensor. Lossless It’s an image format which stores the image in a non-compressed format, or in a compressed format that don’t loose information. Lossy It’s an image format that sacrifices a certain amount of image information in order to create a smaller compressed file. Low-G It refers to a general industrial environment with less than 10-G shock and 2.5-G vibration stresses. 216 Users Manual Motion Studio M MAC Address The Media Access Control address is a hardware address that uniquely identifies each node of a network. A MAC address is 48 bits long and is commonly written as a sequence of 12 hexadecimal digits (for instance, 48-3F-0A-91-00-BC). MAC addresses are uniquely set by the network adapter manufacturer and are sometimes called "physical addresses" for this reason. MCF (Multi-page Compressed Format) Multi-page Compressed Format (MRF) is a compressed IDT proprietary file format. Multiple raster images are stored in a single file. Micro-lens To overcome the limitations of a low fill factor, on certain sensors an array of micro-lenses is placed on top of the pixel array in order to funnel the photons of a larger area into the smaller area of the light sensitive photodiode. Megapixel It means having a resolution of one million pixels. MOV It’s a file format used to store images. The Apple Quick Time MOV file format is used with applications that capture, edit, and play back audio-video sequences. MPEG (Moving Picture Experts Group) It’s a file format used to store videos. MPEG is a name of family standards used for coding audio-visual in a digital compressed format. MPEG is a generic means of compactly representing digital video and audio signals for consumer distribution. MRF (Multi-page Raw Format) Multi-page Raw Format (MRF) is an uncompressed IDT proprietary file format. Multiple raster images are stored in a single file. Users Manual 217 Motion Studio N NTSC (National Television Standards Committee) It’s a standard for video broadcasting and recording in the US and Japan. O Offset It’s the offset value adjusts the CCD black level relative to the analog-to-digital converter zero. It is factory-optimized for the camera’s maximum dynamic range. Optical Zoom It indicates that the camera has a real multi-focal length lens, as opposed to a digital zoom, which magnifies the center portion of the picture. 218 Users Manual Motion Studio P PAL (Phase Alternation Line) It’s a standard for video broadcasting and recording in Europe. Palette It’s a thumbnail of all available colors to a computer or devices. The palette allows the user to choose which colors are available for the computer to display. The greater the number of colors, the larger the data file becomes and more processing time is required to display your images. If the system uses 24-bit color, then over 16.7 million colors are included in the palette. Peltier Cooler Thermoelectric cooling uses the Peltier effect to create a heat flux between the junctions of two different types of materials. This effect is commonly used in electronic components and small instruments. There are no moving parts and such a device is maintenance free. Pixel It’s an individual element of either a sensor or a digital image. PIV (Particle Image Velocimetry) Particle Image Velocimetry is an optical method used to measure velocities and related properties in fluids. The fluid is seeded with particles, which, for the purposes of PIV, are generally assumed to faithfully follow the flow dynamics. It is the motion of these seeding particles that is used to calculate velocity information. Plug-in A file containing data used to alter, enhance, or extend the operation of a parent application program. Plug-ins, both commercially and independently authored, can usually be downloaded for free and are stored locally. Plug-ins come in different versions specific to particular operating systems. PNG (Portable Network Graphics) It’s a file format used to store images. PNG is an extensible file format for the lossless, portable, well-compressed storage of raster images. PNG provides a patent-free replacement for GIF and can also replace many common uses of TIFF. Indexed-color, grayscale, and true-color images are supported, plus an optional alpha channel. Sample depths range from 1 to 16 bits. Pulse It’s a signal whose amplitude deviates from zero for a short period of time. A pulse may be periodic (pulse train) and not periodic (single pulse). The Pulse Width is the time between the rising edge and the falling edge of a pulse. If the pulse is periodic it has a period and a duty cycle. Users Manual 219 Motion Studio Q Quantum Efficiency It’s a quantity defined for a photosensitive device such as photographic film or a sensor (CCD or CMOS) as the percentage of photons hitting the photo reactive surface that will produce an electron-hole pair. It is an accurate measurement of the device's sensitivity. It is often measured over a range of different wavelengths to characterize a device's efficiency at different energies. R Resolution Resolution is expressed as either the number of pixels counted horizontally by the number of pixels counted vertically or by the number of mega pixels. It can be expressed as one of the following formats: QVGA (320 x 240), VGA (640 x 480), SVGA (800 x 600), XGA (1024 x 768) UXGA (1600 x 1200). RGB (Red, Green and Blue) The color system used in most digital cameras in which the image is separated by capturing the red, green, and blue light separately and then are re-combined to create a full color image. 220 Users Manual Motion Studio S Sensor It’s an electronic device that converts the light allowed in by the shutter to an electrical signal. Sensor Gain It’s the amount of analog signal amplification. The gain is factory-optimized for the camera’s maximum dynamic range. Sharpness The clarity of detail in a photo Shutter It’s the device in the camera that opens and closes to let light from the scene strike the image sensor and expose the image. The three primary types used in digital photography are digital shutters, iris shutters and focal plane shutter. SDK (Software Development Kit) It’s a programming package that enables a programmer to develop applications for a specific platform. An SDK typically includes one or more APIs programming tools and documentation. Spike It’s a short pulse of voltage or current, usually undesirable. Square wave It’s a periodic signal which changes instantaneously between two fixed levels. The values are usually 0 and 5 V (TTL) or 0 to 3.3 V (CMOS). Switch Closure It’s a type of external event trigger. The trigger is detected when the poles of the trigger connector are shorted by a switch. Synchronous Synchronous events occur at the same time or at the same rate or with a regular or predictable time relationship or sequence. Users Manual 221 Motion Studio T TIFF (Tagged Image File Format) It’s a file format used to store images. TIFF pictures store a single raster image at any color depth. TIFF is arguably the most widely supported graphic file format in the printing industry. It supports optional compression, and is not suitable for viewing in Web browsers. Thumbnail It’s a small, low-resolution version of a larger image file that is used for quick identification. Trigger A trigger is something that causes a data acquisition system to start collecting data or a camera to start acquiring images. It may be as simple as pressing a software button or a set of conditions which when met trigger data capture (internal triggers), or an externally generated, hardware signal (an external trigger). Tripod A tripod is a three-legged supporting stand used to hold the camera steady, especially useful when using slow shutter speeds. Another is the monopod, single leg tripod. TTL (Transistor-Transistor Logic) A common semiconductor technology for building discrete digital logic integrated circuits. For digital circuits, logic 1 is obtained for inputs of 2.0 to 5.5 V and logic 0 for inputs of 0 to 0.8 V. TWAIN It’s a protocol for exchanging information between applications and devices such as scanners and digital cameras. TWAIN makes it possible for digital cameras and software to "talk" with one another on PCs. 222 Users Manual Motion Studio U Underexposure A picture that appears too dark because not enough light got to the imaging system. USB (Universal Serial Bus) It’s a serial bus standard for connecting devices. It was designed for computers such as PCs and the Apple Macintosh, but its popularity has prompted it to also become commonplace on video game consoles, PDA, cell phones. It has a slow version (USB 1.1 – 12 Mbps) and a high speed version (USB 2.0 – 480 Mbps). USB 2.0 Finalized in 2001, Universal Serial Bus (USB) 2.0 is a complete overhaul of the Universal Serial Bus input/output bus protocol which allows much higher speeds than the older USB 1.1 standard did. The goal of the new serial bus is to broaden the range of external peripherals that can be used on a computer. A hard drive can easily hit the USB 1.1 bottleneck whereas it now becomes more 'usable' under USB 2.0 conditions. USB 2.0 maximum speed is 480 Mbps. V W White balance It’s a function to compensate for different colors of light being emitted by different light sources. X XDR (Extended Dynamic Range) It’s an IDT-proprietary implementation that uses the double exposure capability of the MotionPro series cameras. Y Z Users Manual 223