1
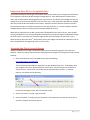
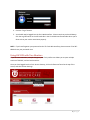
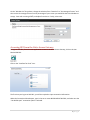
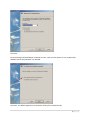
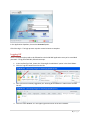
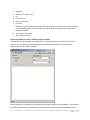
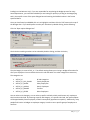
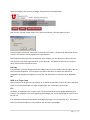
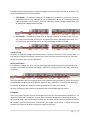
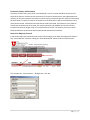
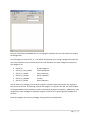
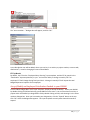
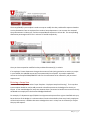
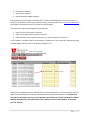
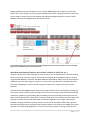
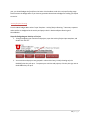
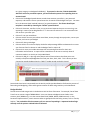
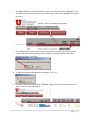
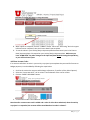
FY’13REFERENCEMANUAL SAPBusinessObjects Planning&Consolidation (MainCampusVersion) Contents Important Note: BPC vs. PeopleSoft Data .................................................................................................... 3 Accessing the Citrix Access Gateway ............................................................................................................ 3 Using SAP BPC with Two Monitors ............................................................................................................... 4 Accessing BPC from the Citrix Access Gateway ............................................................................................ 5 Logging Off .................................................................................................................................................... 8 Open the Main Budget Menu ....................................................................................................................... 9 Using The Main Budget Menu .................................................................................................................... 11 Personnel Budgeting ................................................................................................................................... 11 Employee Salary Planning ....................................................................................................................... 11 Populating Employee Salary Planning Input Template ....................................................................... 12 Job Code .............................................................................................................................................. 14 INCR % or Target Comp ....................................................................................................................... 14 FTE ....................................................................................................................................................... 14 Contract Term ..................................................................................................................................... 15 Salary Justification .............................................................................................................................. 15 Comments ........................................................................................................................................... 15 Promotion, Equity and Retention ....................................................................................................... 16 Insert New Employee Record .............................................................................................................. 16 Employee Distribution Planning ............................................................................................................. 17 Populating Distribution Input Template ............................................................................................. 17 Employee Distributions ....................................................................................................................... 19 Changing Existing Distributions ........................................................................................................... 19 Adding a New Distribution .................................................................................................................. 19 FTE by Month ...................................................................................................................................... 20 Accept/Modify an Employee Distribution Pushed to your BUORG ........................................................ 20 Entering a Lump Sum .............................................................................................................................. 21 Steps for entering a Lump Sum ........................................................................................................... 22 Employee Name Update ......................................................................................................................... 22 Finance Budgeting ....................................................................................................................................... 24 Base Budget Account #’s and Other Transfer’s In Account #’s ............................................................... 24 Base Personnel and NPS Funds (Account #49997 & #49999) ............................................................. 24 1 | P a g e Benefits Reimbursed for Fund 1001 Activities (Account #49998) ...................................................... 24 Other Non‐base Funding Transfers‐in (Account #’s 49910‐19,49920‐29, etc…) ................................ 25 Steps for budgeting an Activity or Project .......................................................................................... 26 Overview of the Activity/Project Input Template ............................................................................... 27 Budget Method ................................................................................................................................... 28 Budget Spread ..................................................................................................................................... 30 Finance Detail Input Template ............................................................................................................ 30 Add New Account Codes ..................................................................................................................... 32 Adding Prospective Activities and Projects ............................................................................................. 33 Prospective Activity/Project................................................................................................................ 33 Reporting .................................................................................................................................................... 33 Required Reports .................................................................................................................................... 34 Optional Reports ..................................................................................................................................... 34 Special thanks to Steve Peterson (SVP Health Sciences Office) for his significant time and contributions to the creation of this user manual. 2 | P a g e ImportantNote:BPCvs.PeopleSoftData The SAP BusinessObjects Planning & Consolidation (BPC) system allows you to change several elements of an employee’s personnel profile during the budget process. These data elements include the job code, new record numbers and changing faculty contract terms. This allows you to budget correctly for changes that you know will be effective in the new fiscal year, or for employee’s data that has changed after the personnel data was loaded in mid‐January. Examples of some common situations include a faculty member who has received a promotion for the new fiscal year, or a current employee who has changed positions after the initial personnel data was loaded in January. When data is exported from the BPC system back to PeopleSoft for the new fiscal year, these records will not load properly if the corresponding data elements have not been changed in PeopleSoft through the ePaf system. If you make any of these changes in BPC you should submit an ePaf with a July 1st effective date no later than the 3rd week of May so that your budget records will be reflected in FYSC as well as PeopleSoft for the beginning of the new fiscal year. AccessingtheCitrixAccessGateway SAP BusinessObjects Planning & Consolidation (BPC) can be accessed through the ITS Citrix Access Gateway. Below are step‐by‐step instructions outlining how to navigate to, and log into the Citrix Access Gateway. 1. Open a web browser, and in the Address Bar type the following: http://applications.med.utah.edu The Citrix Web Interface delivers applications to your desktop using Citrix. Accordingly, when you navigate to the Citrix Web Interface for the first time, you may need to install the Citrix ActiveX control. Your browser should prompt you automatically to install it. In Internet Explorer, you would see the following: Click on the message to install the Citrix ActiveX control. 2. At the “User name:” prompt, type your UNID. 3. At the “Password:” prompt, type your password. This password is the same one you enter to access the Campus Information System. 3 | P a g e 4. Click the “Log In” button. 5. You should now be logged into the Citrix Web Interface. Please note that you should always click the Log Off button on the left hand side in the Citrix Web Interface window when you’re done so that your session terminates properly. NOTE: If you have forgotten your password to the ITS Citrix Web Interface, please contact ITS at 587‐ 6000 to have your password reset. UsingSAPBPCwithTwoMonitors If you have two monitors, a simple change to your Citrix preferences allows you to open multiple sessions of SAP BPC, and use both monitors. Once you have logged into the Citrix Access Gateway, click on Preferences found at the top of the screen, and then Session Settings. 4 | P a g e On the “Window size” drop down, change the selection from “Seamless” to “Percentage of Screen” and then set the Percentage of Screen to the percentage of your screen you would like the Citrix Window to occupy. Start with a setting of 90%, and adjust from there. Finally, select save. AccessingBPCfromtheCitrixAccessGateway To log into SAP BPC, from the main applications screen in the Citrix Access Gateway, click on the icon labeled SAP BPC. Click on the “Interface for Excel” icon. The first time you log on to SAP BPC, you will be required to input connection information. When the Connection Wizard opens, type in the server name BPCLB.MED.UTAH.EDU, and make sure the “Use default port” connection option is selected. 5 | P a g e Click Next. On the Planning and Consolidation credentials screens, make sure the option to “Use my Microsoft Windows user ID and password” are selected. Click Next. The default application set should list UTAH_EDU and look like this: 6 | P a g e Click Next. Click Finish. You should now see a login screen like this: 7 | P a g e In the Application dropdown, choose the Personnel option. Click OK to log in. The login process may take several minutes to complete. LoggingOff There is a sequence that needs to be followed to exit the SAP BPC application once you’ve concluded your work. To log off of SAP BPC, follow these steps: 1. In the interface for Excel, choose the “Planning & Consolidation” option in the Excel Ribbon. 2. Click the “Log Off” button found on the left: 3. Once you have successfully logged off, the “Planning & Consolidation” ribbon menu will look like this: 4. Click the “Close Window” X in the upper right hand corner of the Citrix window. 8 | P a g e OpentheMainBudgetMenu When you first open the Excel interface it will look similar to this. On the right hand side of the screen you will see an area titled “Action Pane”. Underneath the title of “Tasks” will be the option to “Open a custom menu”. Click this link. If you don’t see this option inititally, click the Home icon located at the top of the Action Pane. If you still do not see this option, close all existing Excel worksheets by clicking the “close window” “X” in the top right hand corner of Excel. 9 | P a g e After clicking the “Open a custom menu” link, the Custom Menu Selection will appear in the Action Pane. Main EV__DEFAULT 10 | P a g e Select the Main Budget Menu, and click the green check box. The Main Budget Menu should now appear in the main Excel window. UsingTheMainBudgetMenu The Main Budget Menu is used to navigate to the input templates and the reports that are used to complete your FY’13 budget. PersonnelBudgeting The process for personnel budgeting is comprised of 6 steps. Each step is generally completed in this order, although you can switch between input templates at any time. Employee Salary Planning Employee Distribution Planning Employee Accept or Modify Employee Lump Sum Planning New Employee Name Update Personnel Reports EmployeeSalaryPlanning Click the link “Input Template – Employee Salary Planning” in the Main Budget Menu to open the input template. The Employee Salary Planning input template is used to budget: 11 | P a g e Job Code Increase % or Target Comp FTE Contract Term Salary Justification Comment Promotion, Equity and Retention funding (only for funds directly allocated for these categories from the Budget Office, not to be used when making these salary adjustments with internal department funds) Jan‐Jun 2012 Total Comp New Employee Records PopulatingEmployeeSalaryPlanningInputTemplate To populate the input template with employees from a home department, double click the cell J25 where is says “No_BUORG” and the following selection box will appear with a list of the home departments you have access to budget. Home departments in SAP BPC are identified by combining the Business Unit and ORG ID. For instance if your ORG is 00356 and it is located in BU 01 the number listed in the system will be 100356 (note: no 12 | P a g e leading 0 on the Business Unit). If you are responsible for completing the budget process for many home departments, you can find the BUORG you are looking for quickly by clicking on the Magnifying tool in the top left corner of the open dialogue box and entering the BUORG number in the format specified above. Once you have found your BUORG click on it to highlight it and then click the “OK” button at the top of the dialogue box. If you would prefer to make your selections by double clicking, do the following: Click the “Open option dialogue box” Check the box enabling members to be selected by double clicking, and then click okay The Job Category is set to ACTIVE_JC. This default setting allows you to bring in budget information for all of your employees. You can double‐click on this cell and switch it to other categories as necessary. The categories are: ACTIVE_JC ACTIVE_JC_FAC_SALARY ACTIVE_JC_SALARY ACTIVE_JC_HOURLY ACTIVE_JC_TRAINEE ACTIVE_JC_OTHER All Job Categories Faculty Employees Salary Employees Hourly Employees Trainees Other Employees You can select a Job Category, or even select a specific Job Code, which would return only employees that have that Job Code. By selecting a specific Job Category, or a specific Job Code, the input template will be populated by fewer employees, and will consequently populate more quickly. Additionally, many people find it easier to budget an employee category in order to see a specific group of employees at one time. 13 | P a g e Select the category that you wish to budget, along with the home department. Now click the “Expand” button shown in the screen shot above. A box will appear like this: Leave the option selected of “Clear input” and hit the “OK” button. The personnel data based on your criteria in the selection list will populate the input template. After employee information has populated the input template, you are able to key values into input cells, which are cells with a light yellow fill, and a red border. For additional direction on how this is done, please see the information below: JobCode If an employee’s job code changes during the budget process, you can update their job code in BPC so that it matches PeopleSoft. If an employee’s job code in BPC does not match their job code in PeopleSoft, the employee’s budget year comp rate, and distributions in FYSC will not be updated by BPC. INCR%orTargetComp Salary increases can be given as a percentage, or an annual compensation rate can be input. Note that either an increase percentage or a target compensation rate can be input, but not both. FTE By default, an employee’s FTE is equal to their FTE at the time the Personnel Budget Workbook was created. If an employee’s FTE will change during the budget year, a user should type the new FTE into the FTE cell. If an employee will be terminated before the budget year begins, the FTE should be zero. This ensures that the terminated employee’s salary expense will not impact your budget. 14 | P a g e Interdependencies exist between an employee’s budget year compensation rate and an employee’s FTE. These interdependencies are outlined below: FTE Example 1: An employee receives a 2.5% budget year increase on a current year comp rate of $36,000 and their FTE is reduced from the pre‐populated 1.00 to 0.50. The budget comp rate (column W) reflects a 2.5% increase, while the reduced FTE creates a budget compensation rate of $18,450 and a Budget ABA of $36,900. FTE Example 2: A budget year Target Comp of $36,900 is input for an employee with a current year comp rate of $36,000, and their FTE is reduced from the pre‐populated 1.00 to 0.50. The result is a comp rate of $36,900, an FTE of 0.50, and a budgeted ABA of $73,800. ContractTerm By default, an employee’s budget year contract term is the same as their current year contract term. If a user wishes to change an employee’s contract term, they may select the contract term cell, and select the correct contract term from the drop down. SalaryJustification If an employee’s budget year salary increase percentage falls outside the guidelines established by the President, an input box (see below) will appear in column AC, alerting the user that a salary justification is required. Given that SAP BPC is open for budgeting prior to the guidelines being provided; any comp rate increase entered before final guidelines are published requires a salary justification. The threshold requiring an increase will be updated in SAP BPC to reflect the guidelines once they are finalized. All salary justification boxes should be completed as part of the budget approval process. Comments A user can include comments that are meaningful to them for their own information and reference. It is important to note that if a budgeter wants to access comments throughout the upcoming fiscal year, they must be made in the comment box in column AE. Any other type of comment (via Excel Comments for example), will not be preserved or accessible after the budget process closes. A report will be made available in the future that shows all comments made, by employee. 15 | P a g e Promotion,EquityandRetention Any salary increase that is given that is not considered a “merit” increase should be noted in one of these three columns. Please enter the total annual $ increase in the box that is most appropriate and reflective of why the employee received an increase. You may choose to split their total increase among the three boxes. If a salary increase is not noted in one of these boxes it will be assumed that it was a merit based increase. Merit based increases do not need to be noted. These boxes are only fields to classify and record the type of increase. The amount entered is not added to the amount of salary increase entered in the target comp or % increase boxes to the left. The amount you enter in those fields should be the total increase which would already include these amounts. InsertNewEmployeeRecord If you need to add a new Job Record you can do so by clicking the cell under the employee ID where it says ”Insert New Rec” and then clicking the “Insert New Record” button under the selection area. This will open the “Insert member…” dialogue box. Click OK. 16 | P a g e In column K, either enter in the job code (JC + 4 Digit Job Code) in the job code cell for the new employee record if you know what the job code is, or double click the job code cell and the select the job code from the Job Code dialogue box that appears. Now enter in the target comp, FTE, Contract Term, and any other field that pertains to this newly added record. Once you have entered your budget data you can click the “Submit” button at the top of the screen and the data will be written back to the data base. The first time this is done may take a few minutes as data for every employee is updated. Subsequent submissions will be much quicker as only changed data will be submitted to the database. EmployeeDistributionPlanning Click the link “Input Template –Employee Distribution Planning” in the Main Budget Menu to open the distribution input template. The Employee Distribution Planning input template is used to budget: Activity/Project salary distributions Account number for salary distributions Start/End Dates Distribution percentage FTE by month PopulatingDistributionInputTemplate To populate the input template with employees from a home department, double click the cell AE25 where is says “No_BUORG” and the following selection box will appear with a list of the home departments you have access to budget. 17 | P a g e Once you have found your BUORG click on it to highlight it and then click the “OK” button at the top of the dialogue box. The Job Category is set to ACTIVE_JC. This default setting allows you to bring in budget information for all of your employees. You can double‐click on this cell and switch it to other categories as necessary. The categories are: ACTIVE_JC ACTIVE_JC_FAC_SALARY ACTIVE_JC_SALARY ACTIVE_JC_HOURLY ACTIVE_JC_TRAINEE ACTIVE_JC_OTHER All Job Categories Faculty Employees Salary Employees Hourly Employees Trainees Other Employees You can select a Job Category, or even select a specific Job Code, which would return only employees that have that Job Code. By selecting a specific Job Category, or a specific Job Code, the input template will be populated by fewer employees, and will consequently populate more quickly. Additionally, many people find it easier to budget an employee category in order to see a specific group of employees at one time. Select the category that you wish to budget, along with the home department. 18 | P a g e Now click the “Expand” button shown in the screen shot above. A box will appear like this: Leave the option selected of “Clear input” and hit the “OK” button. The personnel data based on your criteria in the selection list will populate the input template. Note that the Employee Distribution Planning input template generally takes about a minute to open. Expansion after a data submission (without closing the input template) generally takes between 10‐15 seconds. After employee information has populated the input template, you are able to key values into input cells, which are cells with a light yellow fill, and a red border. For additional direction on how this is done, please see the information below: EmployeeDistributions An employee’s active distribution rows in PeopleSoft as of January 15th serve as the starting point in SAP BPC for budgeting an employee’s FY’13 salary distributions. ChangingExistingDistributions You can change the activity/project (Column AN), account number (Column AP), start and end dates (Column AQ &AR) as well as the distribution % (Column AS) of existing distribution lines by keying in the new information. AddingaNewDistribution A new distribution row can be added by selecting the cell in column AJ where it says “Insert New Dist” and then clicking on the “INSERT NEW DIST” button at the top of the screen. 19 | P a g e The “Insert member...” dialogue box will appear, and click “OK.” A new distribution row will be added, where you can key in an activity or project number, account code, distribution %, as well as changing the start and end dates. FTEbyMonth By default, the FTE on the “Employee Salary Planning” input template, and the FTE by month in the “Distribution” input template stay in sync. You have the ability to change a monthly FTE if an employee’s FTE will change during fiscal year 2013. A change in monthly FTE will impact the total budgeted personnel expense for an employee. Accept/ModifyanEmployeeDistributionPushedtoyourBUORG From the Main Budget Menu click “Input Template –Employee Accept of Modify.” Select your BUORG by double clicking cell S28 and selecting your BUORG from the menu. You can also select an activity or project within the BUORG you designated in S28 by double clicking cell S29, and choosing it in the select member dialogue box. Once you have made your designations, click the “Expand” button at the top. Click “OK” when the dialogue box appears. This input template currently takes about 90 seconds to expand. 20 | P a g e The Accept/Modify input template is used to accept or modify the salary and benefit expense related to a salary distribution from an employee from another home department. You can enter the accepted Comp Rate amount in Column AC, and the accepted Benefit expense in Column BV. The corresponding distribution percentage and FTE are in columns AT and BH respectively. Once you have accepted or modified a salary and benefit amount(s), hit submit. If an employee’s home department changes the amount of salary being pushed to an activity or project in your BUORG, the updated amount will not automatically be accepted. You need to update the amount in the Accepted COMP/BENEFITS cells for the new amount to be reflected in your personnel expense total. EnteringaLumpSum From the Main Budget Menu select “Input Template – Employee Lump Sum Planning.” The Lump Sum input template should be used to add personnel or benefit expenses to the budget of an Activity or Project. A user would budget for lump sum amounts when a personnel or benefit cost cannot be cleanly attributed to an employee in the Personnel Budget Workbook. For example, if a department pays $5,000 in hourly personnel expense from a given chartfield each year, but at the time of the budget it is unknown who will receive those dollars, how many hourly employees will be hired, etcetera, it would make sense to budget that cost in a lump sum in the Activity or Project that pays the expense. 21 | P a g e StepsforenteringaLumpSum Only relevant fields need to be input for a lump sum amount, although Activity/Project, Account, Start/End, and Amount are always required. 1. To add a lump sum personnel expense, enter your BUORG in cell O22, or double click this cell to open the ORG tree to select your ORG. 2. Hit the “Expand” button. 3. Click “OK” when the “Expand options” dialogue box appears. 4. Lump sum amounts that have been previously entered will show up in the “EXISTING ENTRIES” section, whereas new entries should be added in the first row in the “NEW ENTRIES” section. 5. Enter a job code in Column O. 6. Enter an activity or project number in Column Q (required). 7. Enter a personnel account code (50000‐58999) in Column S (required). 8. Enter the Start and End date in Column T and U (required). Note that the start and end dates determine the months that the personnel expense will be incurred in, meaning that if a personnel expense will only be incurred in December, the start and end date should be set 12/01/12 through 12/31/12 respectively. 9. Enter amount in Column W (required). 10. Enter any comments in column X. 11. Distribution percentage should be entered in Column AM. 12. FTE should be entered in Column BA. 13. Benefit expense should be entered into column BO. Click the submit button to record the lump sum personnel expense entry. Note that existing lump sum entries can be modified. EmployeeNameUpdate From the Main Budget Menu select “Input Template – New Employee Name Update.” The New Employee Name Update input template is the starting point for budgeting any employee that was not part of your home department on January 15th, 2012. New employee ID’s are comprised of the two digit fiscal year + your six digit BUORG + 01 through 17. For each home department, new employees are broken out into five employee classes. They are: 1. New Faculty Employee 2. New Salary Employee 22 | P a g e 3. New Hourly Employee 4. New Trainee Employee 5. New Non Benefit Eligible Employee Each employee class has a distinct benefit profile. Therefore, add employees in the correct section. If there are not adequate rows for the employee class you are using, please e‐mail [email protected] and request that additional rows of an employee class be added. Three inputs are required for budgeting a new employee. 1. Input a name or description in Column E. 2. Input the job code of the employee in Column F. 3. Indicate whether your employee is an hourly or salaried employee in Column H. As an example, if I needed to add a new accountant, I would enter a name, job code, and employee type in N13XXXXXX06, which is the first “New Salary Employee” line. When you have updated the three required fields, click the submit button. The new employee will now appear in the Employee Salary Planning, and Distribution Planning input templates. It is important to note that the description you input in the employee name field (column E) will not update the default EMPL ID description (the value that shows as the employee name in input templates, and reports) until the next day. 23 | P a g e FinanceBudgeting BaseBudgetAccount#’sandOtherTransfer’sInAccount#’s Account #’s 49997, 49998, 49999 are reserved for use in the transfer‐in of base budget funding. Most other transfer‐in amounts budgeted should use account numbers in the 49910‐49919 account range. The correct budget and use of these numbers is described below. BasePersonnelandNPSFunds(Account#49997썏) Account number 49997 is reserved for fund 1001 non‐personnel services (NPS) base budget amounts. Account number 49999 is reserved for fund 1001 personnel base budget amounts. Users cannot enter amounts for these account numbers in their budget template. The cells are non‐data entry cells and these account numbers cannot be added if they are not already present from a prior year. The budget office will push these amounts out to individual activities, which will populate your budget template. The amount pushed by the budget office with be based upon the amount you budgeted in each account number in the prior year, plus any changes authorized by the President and Senior VP of Academic Affairs. These final base numbers are generally not known until after the President issues his budget guidelines in early March. If you are budgeting prior to the final guidelines being issues you will likely not have any amount for these accounts show up in your budget template. Once final guidelines are issued you can expect to see your allocated base amount(s) show up in your budget template and reports under the appropriate account #(s). Generally it is not possible to shift base NPS funds (account #49997) to base personnel funds (account #49999). A request to do so should be submitted to the budget office where it will be presented to the Senior VP of Academic Affairs office for consideration. If approved the budget office will update the respective amounts in your budget template. Note: A shift of funds from NPS to personnel base accounts will generally require a contribution of the total moved from NPS being allocated to the benefits pool and thus the final amount transferred to your personnel budget will be less than the amount taken out of the NPS account. Amounts can be shifted from one of your activities to another in the same 49997 or 49999 accounts without approval from the Senior VP of Academic Affairs. Simply submit a request to Sandy Hughes ([email protected]) in the budget office and she can reallocate funds between activities. BenefitsReimbursedforFund1001Activities(Account#49998) Activities in Fund 1001 are generally eligible to participate in the benefit’s pool. If your activity participates in the benefit pool, your benefits expenses are reimbursed out of central funds. This occurs automatically each pay period where a transfer‐in is made to account number 49998 equal to the amount of benefits expenses incurred and recorded in account number 59000 (benefits expenses). To properly budget for these reimbursed benefits expenses you will enter an amount equal to the benefits system calculated by the BPC system in account number 49998. Once your personnel budget amounts are entered, you can simply enter the amount shown in the personnel section of your activity 24 | P a g e budget template under benefit expenses in the account 49998 budget cell as shown in the example below. Note: if you change any of your personnel budget information, including amounts for lump sums you will need to re‐open your activity template and update the budget amount for account number 49998 to match the new budgeted benefit expense amount. For Fund 1001 activities only, you should enter the total for benefits listed in your Personnel Expense section in the budget field for account #49998 as shown in the example above. OtherNon‐baseFundingTransfers‐in(Account#’s49910‐19,49920‐29,etc…) Activities will generally receive funding from sources that are not considered part of your base funding, but are recurring or one‐time in nature. These funds should generally be budgeted under the account range of 49910‐49919 for fund 1001 and 49920‐49929 for fund 2000 or 2500. Each type of fund will use a different type of account range for transfer‐in’s. Please refer to the General Accounting web site for information regarding the account number range you should use for a specific activity if you have questions. Funds that should be budgeted under these account ranges include, but are not limited to, funding you may receive from the diversity office, funding from other areas on campus, promotion funds for faculty promotions, productivity (SCH) funding, degree funding and recurring funding commitments from the Senior VP of Academic Affairs. Often there is confusion about what is considered part of your base funds and what is considered non‐base and therefore should be budgeted in these ranges. One common example is funding received for faculty promotion. The Senior VP of Academic Affairs often agrees to fund these promotions by increasing your base funding. However, the funds are not added to your base amounts until the following budget year. So if you have a faculty member receiving a promotion this 25 | P a g e year, you should budget the funds from the Senior Vice President under this non‐base funding range. Please contact the budget office if you have any questions about how to budget for funding you expect to receive. Activity/Project Planning From the Main Budget Menu select “Input Template – Activity/Project Planning.” Revenues, expenses and transfers are budgeted at the activity and project level in BusinessObjects Planning and Consolidation. StepsforbudgetinganActivityorProject 1. To begin budgeting your activities and projects, open the Activity/Project input template, and double click cell T41. 2. Your activities and projects are grouped in a hierarchical way, initially showing only the BUORG(s) that they roll up to. To expose your activities and projects, click the plus sign next to the BUORG they roll up to. 26 | P a g e Select the activity or project you would like to budget, and click “OK.” 3. Click the “EXPAND” button in the upper left hand corner. Actual balance sheet and summary of revenue and expense data are populated into each activity and project input template. These actual data come directly from PeopleSoft, and are integrated into the input template to provide the user with a historical basis to assist in the budget process. Completing the budget for an Activity or Project can be broken down into three general steps. 1. Complete the fiscal year 2012 projected JAN‐JUN column. Note that all values will be zero, with the exception of Personnel Expense, which is set equal to “FY 2012 Actual JUL‐DEC.” Complete the fiscal year 2013 budget column. Validate the personnel whose salaries (in whole or in part) have been distributed to the activity or project using the Personnel Expense by Funding Source report. 2. 3. OverviewoftheActivity/ProjectInputTemplate Below is a description of the various sections of the Activity/Project input template: Columns T‐U: The GL Account Code and the Account Code Description. Column V: The Budget Method column is where users can control whether expenses are budgeted at the summary level (meaning all account codes that belong to a given category are budgeted on a single line) or at the Account Detail level (meaning all account codes that belong 27 | P a g e to a given category are budgeted individually). If you need to alter the “FY2012 PROJECTED JAN‐JUN” values for personnel expense, you must follow the process for expanding these to Account Detail. Column W: The Budget Spread column controls how revenues, transfers in, non personnel expenses, and transfers out are spread across the 12 months of the budget fiscal year. You must be in the Account Detail method (column V) to spread expenses. The finance detail input template is accessible by choosing the “DETAIL” spread method. Column X: Revenues, transfers in/out, or non personnel expenses that are non‐recurring, non‐ operating in nature can be designated as “Y” in the one‐time column if it is an transaction that will not occur year after year. Column Z: Last year actual data. Columns AA‐AD: Current year to date actual data, January through June projection, current year forecast, and current year budget. Column AF: Next year budget. Columns AG‐AH: The columns display the dollar and percentage difference between the current year Forecast Total in column AC and the Budget Total in column AF. Column AI: A users can include comments that are meaningful to them for their own information and reference. A report will be created that can be run to concisely show all comments made in an Activity or Project Workbook. Columns BJ, BQ, CK: A plus sign exists above each of these columns that allow you to see monthly actual/forecast/budget data for fiscal year 2011, 2012, 2013. This is where you also change the monthly budget when the “INPUT” budget spread method is elected. Several tools have been incorporated into the Activity and Project Workbook to facilitate the process of forecasting and budgeting, and to add a greater amount of detail and granularity to the Workbook. BudgetMethod Formal Account Code ranges exist in the Business Unit 01 Chart of Accounts. For example, Out of State Travel has an account range of 60000‐60019. Users can choose to budget Account Codes at the summary level (60000 only), or at the account detail level (60000, 60001, 60002 etcetera). In the Personnel Expense section, certain account codes are grouped under hierarchy parents, such as “Faculty Salaries.” Do not double click the summary cell as a means of expanding it. Important backend logic will only run if the process outlined below is followed: 28 | P a g e 1. To budget individual Account Codes within a range, a user would select the “SUMMARY” cell in the row of the account code that you want to see in detail, and click the “SHOW DETAIL” button at the top. 2. The “SHOW DETAIL” button initiates a query which brings in all detail rows pertaining to the account code row selected. After the query completes, a “Refresh Data After Drill Down” dialogue box appears. Click “OK.” 3. An SAP BusinessObjects dialogue box then appears. Click “Yes.” 4. All account codes within the selected “SUMMARY” range that have transactional values in FY 2011, FY 2012, or FY 2013 will appear. 29 | P a g e Please note that even if rows have been budgeted in the “Account Detail” method, when an activity or project is re‐expanded, personnel and non personnel expense rows will always expand in the “SUMMARY” method. BudgetSpread Spreading your budget values across the underlying months of the fiscal year is important for variance analysis during the budget year. The value that you input in the “FY 2013 BUDGET TOTAL” cell (column AF) of each row can be spread across the months that make up fiscal year 2013. The monthly budget values will be exported back to PeopleSoft, and will serve as the basis for the monthly budget, the YTD budget, and the Annual budget for each account code row. Multiple spreading methods are available to the user. They are: Even:Budgetvaluesarespreadacrosstheunderlyingmonthsevenly.Thisisthedefault spreadingmethod. Days:Budgetvaluesarespreadacrosstheunderlyingmonthsbasedonthenumberofdays inthemonth. Input:Budgetvaluesarespreadacrosstheunderlyingmonthsbasedonauser’sinputsin columnsBY‐CJ.Toexposethemonthsforfiscalyear2013,clicktheplussignabovethe columnCKheader. Detail:Ausermaywishtolistthetransactionsthatmakeupthevalueinthe“FY2012 PROJECTEDJAN‐JUN”or“FY2013BUDGETTOTAL”columns.Ifauserselectsthe“DETAIL” BudgetSpread,alinkincolumnYappearsthatsays“Open.” Double clicking the “Open” link in Column Y opens the Finance Detail input template. FinanceDetailInputTemplate The following steps should be followed to use the finance detail input template: 1. Change the “BUDGET SPREAD” of a row in “Account Detail” “BUDGET METHOD” from “INPUT” to “DETAIL.” 2. Double click the “Open” link in column Y. 3. The “Finance Detail” input template opens, and a “Expand Options” dialogue box appears. Click “OK.” 30 | P a g e 4. Enter the account code you wish to budget in the detail method in the first yellow input box in column G that reads, “NO_ACCOUNT.” Note that any entries previously added for the given activity or project will show up in the “EXISTING ENTRIES” area at the top. 5. An Information dialogue box appears. Click “OK.” This populates FY 2011 Actual, FY 2012 Actual Jul‐Dec, and FY 2012 Budget information for the account code that is entered. 6. Enter any projected or budget amounts in columns N or Q respectively, and add the associated description in column S. 7. If additional detail rows are needed for any given account code, select the “Insert New Detail” cell in column F, and then click the “INSERT NEW DETAIL” button at the top. 31 | P a g e 8. When inputs are complete, click the “SUBMIT” button. When the “Processing” box in the upper left hand corner completes, close the Finance Detail input template. 9. To see the values in your Activity/Project input template that have been input in the Finance Detail input template, click expand on your Activity/Project input template. Make sure you have “SUBMITTED” any other changes in the input template PRIOR to hitting the expand key, or you will lose those inputs. AddNewAccountCodes If an account code does not exist in your activity or project input template that you need for forecast or budget purposes, it can be added by following the steps below. 1. Scroll to the section the account code belongs to (Revenue, Transfers In/Out, Other Expense). 2. Select the “Insert New ACCT” cell in column S at the bottom of the correct section. 3. Click the “INSERT NEW ROW” button. 4. A new account code is then added to the section. Note that after a new account code is added and a value for it has been submitted, when the activity or project is re‐expanded, the account will be sorted based on its value in column T. 32 | P a g e AddingProspectiveActivitiesandProjects From the Main Budget Menu select “Input Template – Prospective Activity/Project.” You are able to create prospective activity and project budget workbooks within a BUORG. You would elect to create a prospective activity or project to budget revenues, expenses, or transfers that will take place in an activity or project that does not currently exist in PeopleSoft, but that will exist in PeopleSoft during the Budget Year. It is important to note that any activity or project that is set up in PeopleSoft will be available in BPC the next day. Therefore, a prospective activity or project would only be needed if the actual activity or project will not be set up in PeopleSoft while you are completing your FY’13 budget. ProspectiveActivity/Project To create a prospective activity or project, follow the steps below. 1. 2. 3. 4. 5. 6. Double click cell C10 and select the BUORG the newly added activity or project will belong to. Click the expand button. Click “OK” when the Expand Options dialogue box appears (always use the “Clear input” option). Input the activity/project name or description in column E. Designate the fund in column F. If access to the prospective activity or project will be granted to an individual using the budget owner security process, input their UNID in column G. This step can generally be ignored. 7. Click the submit button. The prospective activity or project is available for budgeting immediately after the submit button is clicked. The name you keyed in as the New Description will appear the following business day as an administrative process needs to run in order for that to be updated. Reporting All reports are generally created by entering criteria in the fields located at the top of the report and then by clicking on the “Expand” button. Reports can be printed using the standard Excel print menu. Click on the “File” menu and then select “Print” from the menu items listed. Generally you can change the print settings to fit your needs. PDF versions can be created through the same “File” menu. Click on “File” and then select “Save As” from the menu items listed. Click the Save as type drop down box and 33 | P a g e select “Send as PDF” button in the list that comes up at the bottom of the dialogue box. Type in a file name and select the location to save the file. Several different personnel and finance reports will be available to users from the custom menu. Some of these reports will be required as part of your final budget submission and some will be optional reports. Optional reports will generally be reports that are designed for a specific group or are designed to provide information in a different format or detail level from the standard required reports. RequiredReports There are four required reports that need to be submitted to the Senior Vice President of Academic Affairs and/or Presidents office as part of your final budget submission. These four reports should be the first pages of any material submitted as your budget request. You may include additional information or similar reports as well, however, they should be located after these required reports. The four required reports are: Employee Detail Report. This report is ran at the ORG level and will list current and budgeted FTE, Comp Rate, ABA and Benefit dollars as well as related percentage increases in each category. Financial Summary Report. This report can be ran at the ORG level, the activity level, the Fund level, and possible combinations of these three selections. For your final budget submission, it should be ran at the ORG level and included in the front of your budget book. If you believe it is important to run the report at other levels of detail (i.e. fund level or a specific activity) please do not include those reports with the required ORG level report. They should be presented in your budget submission at the appropriate point where their relevance is discussed in your budget narrative. Salary Increase Report. This report will list all employees who have received a salary increase that is above the final recommend budget guidelines issued by the President and the SVP’s. Retention, Promotion, Equity Report. This report will list the individuals who received salary increase that you identified as belonging to one of these three categories in your budget workbook. OptionalReports Various optional reports will be created and will be listed on the custom menu when they are available. The number of optional reports will increase significantly once the new BPC system if fully implemented and operational. During this first year of development the number of Optional Reports is expected to relatively small. Additional reports and report functionality will continue to be developed during the remainder of the fiscal year and will be added to custom menus as soon as possible. 34 | P a g e