1
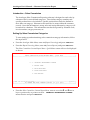
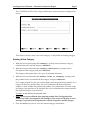
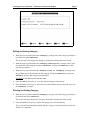
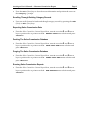
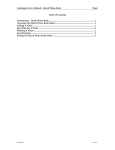
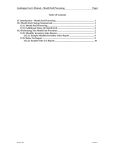
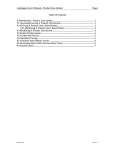
Autologue User’s Manual – Salesman Commission Report
Page i
Table Of Contents
Introduction – Sales Commission ........................................................................................ 1
Setting Up Sales Commission Categories........................................................................... 1
Entering A New Category................................................................................................ 2
Editing An Existing Category ......................................................................................... 3
Deleting An Existing Category....................................................................................... 3
Scrolling Through Existing Category Records ............................................................ 4
Exporting Sales Commission Data....................................................................................... 4
Packing The Sales Commission Database.......................................................................... 4
Purging The Sales Commission Database.......................................................................... 4
Running Sales Commission Reports ................................................................................... 4
Entering Sales Commission Invoice-Category Records................................................... 5
Entering A New Sales Commission Invoice Record .................................................. 6
Revision 6/02
Version 7.1
Autologue User’s Manual – Salesman Commission Report
Page 1
Introduction – Sales Commission
The Autologue Sales Commission Reporting software is designed to track sales by
salesman code for user-defined categories. Users define category numbers and
specific product lines to be included. Specific product lines cannot be defined in
more than one category! Salesman codes must also be setup within the customer
records. Once this information is setup, sales and receipt amounts by category will
be tracked in a database. This information can then be reported by salesman code,
invoice number, category amounts, etc.
Setting Up Sales Commission Categories
To start setting up and maintaining sales commission category information, follow
the steps below:
•
From the Autologue Main Menu, enter 11 (Report Processing) and press <Return>.
•
From the Report Processing Menu, enter 18 (Custom Reports) and press <Return>.
The Sales Commission Custom Report Menu - Quick Menu screen will now be displayed
as shown:
+-admin---------------------------------------------------------------1 of 1--+
|
SALES COMMISSION CUSTOM REPORT MENU - Quick Menu
|
+-----------------------------------------------------------------------------+
--> 1. CATEGORY MAINTENANCE SCREEN
2. EXPORT DATA
3. PACK DATA BASE
4. PURGE DATA BASE
5. RUN REPORTS
+-Tue Jun 18 16:52:26 19XX--------------------------------------------(Q)uit--+
|
TO CREATE AND EDIT CATEGORY GROUPS (or Q to quit)
|
+-----------------------------------------------------------------------------+
•
From the Sales Commission Custom Report Menu, enter 1 or use the and arrow
keys to position the --> pointer on the 1. CATEGORY MAINTENANCE SCREEN
menu selection and press <Return>.
Autologue User’s Manual – Salesman Commission Report
Page 2
The COMMISSIONED SALES Category Maintenance screen will now be displayed as
shown:
This screen is used to enter a new sales category or edit/delete an existing category.
Entering A New Category
•
With the cursor positioned at the Category: prompt, enter a numeric category
number between 1 and 999 and press <Return>.
•
With the cursor positioned at the Category Description: prompt, enter a
description of the category and press <Return>.
The category description allows for up to 29 printable characters.
•
With the cursor positioned at the Product Lines In Category: prompt, enter
the product lines to be included in the category and press <Return>.
For a single product line, the user would simply enter the product line number. For a
range of consecutive product lines, the user would enter the first product line
number, a dash, and the last product line number. For combinations of both a single
and range of product lines to be included, the user would entered a comma between
the single and ranges of product lines.
Example: 4,53-55,59,63-64,100-101
Note: Spaces are not allowed when entering product lines! Each product line
number can ONLY be assigned to ONE category! The screen will display an error
message if a product line being entered is already assigned to another category.
•
Press the <F10> (Save) key to save the entered category information.
Autologue User’s Manual – Salesman Commission Report
Page 3
Editing An Existing Category
•
With the cursor positioned at the Category: prompt, enter the category number to
be edited and press <Return>.
The screen will now display the category description and product lines setup.
•
With the cursor positioned at the Category Description: prompt, enter a new
description for the category and press <Return> or just press <Return> to skip
past the description.
•
With the cursor positioned at the Product Lines In Category: prompt, enter
the product lines to be included in the category and press <Return> or just press
<Return> to leave the assigned product lines.
Example: 4,53-55,59,63-64,100-101
•
Press the <F10> (Save) key to save the entered category information.
•
Press the <F1> (Reset) key to clear the screen information and position the cursor at
the Category: prompt.
Deleting An Existing Category
•
With the cursor positioned at the Category: prompt, enter the category number to
be deleted and press <Return>.
The screen will now display the category description and product lines setup.
•
Press the <F4> (Delete) key to delete the category record information.
The screen will automatically display the first category record information after the
deletion is completed.
Autologue User’s Manual – Salesman Commission Report
•
Page 4
Press the <F1> (Reset) key to clear the screen information and position the cursor at
the Category: prompt.
Scrolling Through Existing Category Records
•
User can scroll forward or backward through category records by pressing the <F8>
(Next) or <F9> (Prev) keys.
Exporting Sales Commission Data
•
From the Sales Commission Custom Report Menu, enter 2 or use the and arrow
keys to position the --> pointer on the 2. EXPORT DATA menu selection and press
<Return>.
Packing The Sales Commission Database
•
From the Sales Commission Custom Report Menu, enter 3 or use the and arrow
keys to position the --> pointer on the 3. PACK DATA BASE menu selection and
press <Return>.
Purging The Sales Commission Database
•
From the Sales Commission Custom Report Menu, enter 4 or use the and arrow
keys to position the --> pointer on the 4. PURGE DATA BASE menu selection and
press <Return>.
Running Sales Commission Reports
•
From the Sales Commission Custom Report Menu, enter 5 or use the and arrow
keys to position the --> pointer on the 5. RUN REPORTS menu selection and press
<Return>.
Autologue User’s Manual – Salesman Commission Report
Page 5
The Commissioned Sales Report screen will now be displayed as shown:
Entering Sales Commission Invoice-Category Records
•
From the Sales Commission Custom Report Menu, enter ? or use the and arrow
keys to position the --> pointer on the ?. INVOICE CATEGORY MAINTENANCE
SCREEN menu selection and press <Return>.
The Commissioned Sales Invoice-Category Maintenance screen will now be displayed as
shown:
Autologue User’s Manual – Salesman Commission Report
Page 6
This screen is used to enter a new sales commission invoice record or edit/delete an
existing record.
Entering A New Sales Commission Invoice Record
•
With the cursor positioned at the Invoice Number: prompt, enter the invoice
number (1-65535) and press <Return>.
•
With the cursor positioned at the Date: prompt, enter the invoice date
(MM/DD/YY) and press <Return>.
•
With the cursor positioned at the Core: prompt, enter the core dollar amount and
press <Return> or just press <Return> to default the field to a value of 0.00.
•
With the cursor positioned at the Lab/Misc: prompt, enter the labor/miscellaneous
dollar amount and press <Return> or just press <Return> to default the field to a
value of 0.00.
•
With the cursor positioned at the Tax: prompt, enter the tax dollar amount and
press <Return> or just press <Return> to default the field to a value of 0.00.
•
With the cursor positioned at the Total: prompt, enter the total dollar amount and
press <Return> or just press <Return> to default the field to a value of 0.00.
•
With the cursor positioned at the Customer Number: prompt, enter the customer
number and press <Return>.
•
With the cursor positioned at the Amt Paid: prompt, enter the amount paid dollar
amount and press <Return> or just press <Return> to default the field to a value
of 0.00.
•
With the cursor positioned at the Pmt Date: prompt, enter the payment date
(MM/DD/YY) and press <Return>.
•
With the cursor positioned at the Category: prompt, enter a numeric category
number between 1 and 999 and press <Return>.
Note: If a category number that does not currently exist is entered, the field will be
cleared and the cursor will again be positioned at the Category: prompt.
•
With the cursor positioned at the Amount: prompt, enter the dollar amount to be
tracked against the entered category and press <Return>.
•
With the cursor positioned at the Qty: prompt, enter the quantity to be tracked
against the entered category and press <Return>.
•
With the cursor positioned at the Core Amount: prompt, enter the core dollar
amount to be tracked against the entered category and press <Return> or just press
<Return> to default the field to a value of 0.00.
•
Press the <F10> (Save) key to save the entered commissioned sale invoice-category
maintenance information.