1
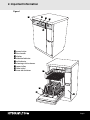
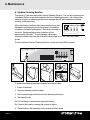
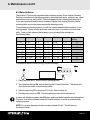
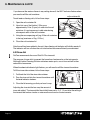
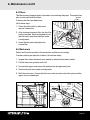
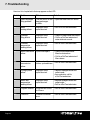
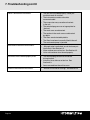
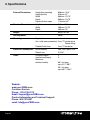
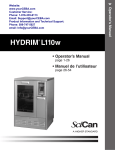
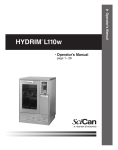
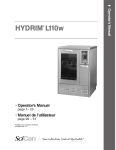
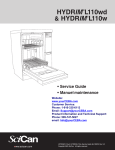
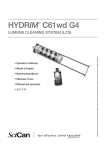
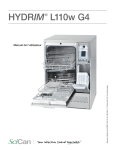
P0
P1
P2
P3
P4
Rinse and
hold
Regular wash
Regular wash
Heavy duty
Heavy duty
and dry
wash
wash and dry
• Operator’s Manual
Website:
www.yourCEBA.com
Customer Service:
Phone: 1-916-335-6113
Email: [email protected]
Product Information and Technical Support:
Phone: 509-747-5027
email: [email protected]
HYDRIM L110w Operator's Manual 95-108257 Rev. 2.0
Copyright 2003 SciCan. All rights reserved.
www.scican.com
Table of Contents
1. Introduction . . . . . . . . . . . . . . . . . . . . . . . .2
2. Important Information . . . . . . . . . . . . . . . .3
3. Disclaimers . . . . . . . . . . . . . . . . . . . . . . . .4
4. Installation . . . . . . . . . . . . . . . . . . . . . . . . .5
4.1
4.2
4.3
4.4
4.5
4.6
Suggested Installation Configurations
Electrical Connection
Connection to Water Intake
Drainage
Disconnecting the Unit
Installation Tips
5. Instructions for Use . . . . . . . . . . . . . . . . .8
5.1
5.2
5.3
5.4
5.5
5.6
Program Description Chart
Instrument Reprocessing Recomendations
Inventory of Goods
Accessory Configurations
Activating the Unit
Interrupting a Program
6. Maintenance . . . . . . . . . . . . . . . . . . . . . .12
6.1
6.2
6.3
6.4
6.5
Hydrim Cleaning Solution
Water Softener
Rinse-Aid
Filters
Wash Arms
7. Troubleshooting . . . . . . . . . . . . . . . . . . .16
8. Warranty . . . . . . . . . . . . . . . . . . . . . . . . .19
9. Specifications . . . . . . . . . . . . . . . . . . . .20
Website:
Manufactured by:
www.yourCEBA.com
SciCan
Customer
1440 Don MillsService:
Road,Toronto,
ON
M3B
3P9
CANADA
Phone: 1-916-335-6113
Phone:
(416) 445-1600
Email:
[email protected]
Fax:
(416) 445-2727
T
oll
free:
1-800-667-7733and Technical Support:
Product Information
Phone: 509-747-5027
For all service and repair inquiries:
email:
[email protected]
In Canada / United States:
1-800-870-7777
SciCan Inc.
500 Business Center Drive,Pittsburgh, PA 15205 USA
Phone:
(412) 494-0181
Fax:
(412) 494-4794
Toll free:
1-800-572-1211
Email (Service and Repair): [email protected]
Email: [email protected]
Page 1
1. Introduction
Congratulations on your selection of the HYDRIM ® L110w instrument washer.
The Hydrim L110w is designed to complement the STATIM family of autoclaves by quickly
and hygienically preparing soiled instruments for sterilization.
To ensure years of safe, trouble-free service, carefully review this Operator’s Manual
before operating the unit. The Hydrim L110w is suitable only for the applications listed in
this user manual. The manufacturer cannot be held responsible for damage caused by
improper use.
Operational, maintenance, and replacement instructions must be followed for the product
to perform as designed. All trademarks referred to in this manual are the property of their
respective owners. Contents of this manual are subject to change without notice to reflect
changes and improvements to the Hydrim product.
The Hydrim L110w should only be installed and serviced by a SciCan qualified contractor,
as it is an Installation Category 2 device. Before connecting the unit, the installer should
check that the voltage and frequency of the electrical supply correspond with the details in
the installation instructions. Please note, this unit is completely isolated from the electrical
supply only when it is unplugged or the circuit breaker is turned OFF. This must be done
before any repair work is carried out.
The Hydrim L110w uses exclusively Hydrim Cleaning Solution. The unit will not perform
as outlined by SciCan using other cleaning solutions or cleaning products. Using other
cleaning solutions or cleaning products may damage the unit, cause excessive foaming
and may void the warranty.
Pay close attention to the symbols that appear in the margins. The following symbols indicate:
a potential hazard to the operator,
a situation or circumstance which may lead to a mechanical failure,
important information.
Hydrim is a registed trademark of SciCan, Division of Lux & Zwingenberger Ltd.
Page 2
2. Important Information
Figure 1
1
■
2
■
3
■
4
■
5
■
1 power button
■
2 door handle
■
3 display
■
4 chemical indicator
■
5 salt indicator
■
6 cleaning solution drawer
■
7 upper trolley
■
8 lower trolley
■
9 rinse-aid container
■
7
■
P0
P1
P2
P3
P4
Rinse and
hold
Regular wash
Regular wash
Heavy duty
Heavy duty
and dry
wash
wash and dry
8
■
9
■
6
■
Page 3
3. Disclaimers
Do not permit any person other than authorized personnel to supply parts or maintain
your Hydrim L110w. SciCan shall not be liable for incidental, special or consequential
damages caused by any maintenance or services performed on the Hydrim L110w by
unauthorized personnel, or for the use of equipment or parts manufactured by a third
party, including lost profits, any commercial loss, economic loss, or loss arising from
personal injury.
Never remove the cover of the unit and never insert objects through holes or openings in
the cabinetry. Doing so may damage the unit and/or pose a hazard to the operator.
Allow only trained and authorized personnel to operate the unit.
Cleaning solutions may irritate. Avoid contact with eyes and mouth.
Always turn the unit OFF before adding softener salt, adding solutions or performing
routine maintenance to the unit. For further information or questions about the
Hydrim L110w, contact your authorized dealer.
Website:
www.yourCEBA.com
Customer Service:
Phone: 1-916-335-6113
Email: [email protected]
Product Information and Technical Support:
Phone: 509-747-5027
email: [email protected]
Page 4
4. Installation
4.2 Electrical Connection
P0
P1
P2
P3
P4
Rinse and
/ 23.75"
Height (free standing) : 850 mm
/ 33.5"
(Built in) : 810 mm / 32"
The machine must be installed and leveled
correctly for the unit to function as described.
All electrical work must be carried out by a
qualified electrician and in compliance with all
local and national electrical codes.
Width : 600 mm
hold
Regular wash
Regular wash
Heavy duty
Heavy duty
and dry
wash
wash and dry
n:
pth
De
"
.75
23
pe
The Hydrim L110w should only be installed and
serviced by a qualified SciCan contractor, as it
is an Installation Category 2 device. The
contractor should be experienced in installing
equipment that requires electrical hook-up as
well as plumbing.
m/
0m
: 60
D
11 epth
43 w
m ith
m d
/ 4 oo
5" r o
4.1 Suggested Installation
Configurations
This appliance must be correctly
grounded! The manufacturer
cannot be held responsible for
damage or injury caused by
power cord intake hoses
drain
incorrect or missing grounding.
Before making any connections,
check that the voltage shown on
the serial number label
corresponds to your power supply.
The machine is supplied as
Figure 2
standard for connection
to a 208-240 V 60 Hz single-phase power supply and is fitted with a power supply cord
1.8m / 6ft. long. It should be connected to the main power supply according to the
information below.
Electrical Connection
Voltage:
208-240 V
Frequency:
60 Hz
Rated load:
2.5 kW
Circuit breaker: 15 A maximum
If you need to extend the mains connecting lead, do not cut off the plug. Replace the
whole cable, which can be disconnected at the junction box on the rear of the unit.
Page 5
4. Installation cont’d
4.3 Connection to the Water Intake
The unit must be connected to the water supply in accordance with all local and national
plumbing codes. SciCan recommends a hard plumbing installation within 1.5m / 5ft. of the
unit. If additional distance is necessary, commercial grade plumbing hose must be used
to minimize leaks.
Connect the inlet hoses to hot and cold water taps using the enclosed parts and in
accordance with the installation instructions.
Water Connection
Water Pressure:
0.5 - 10 bar / 7 - 145 psi
Water Temperature:
• Cold water less than 30˚C / 86˚F
• Hot water up to 60˚C / 140˚F
4.4 Drainage
The unit is supplied with a 1.5 m / 5 ft. flexible drain hose with a 2 cm / 3/4" barb inlet.
The hose should not be shortened or attached to any fittings that would cause a reduction
in water flow. The drain system is equipped with a non-return valve that prevents dirty
water from flowing back into the unit.
The drain hose should not be further than 1.5 m / 5 ft. from a hard plumbing drain. If this is
not possible, then commercial grade plumbing hose must be used to minimize leaks.
The hose can be attached to an existing drain line through the use of a 3.5 cm / 1 1/2" or
larger stand pipe / P-trap combination. Alternatively, the hose can be connected directly
to the existing drain lines, provided any fittings or adapters used do not reduce the water
flow. The drain hose should not exceed 3.3 m / 13 ft. in length, or be attached to the main
drain at a point higher that 35 cm / 14" above the floor.
4.5 Disconnecting the Unit
To disconnect the unit, follow these steps:
1. Unplug the unit from the mains supply.
2. Turn off the water supply
3. Disconnect the drain and water intake hoses.
4. Pull out unit and carefully withdraw hoses at the same time.
Page 6
4. Installation cont’d
4.6 Installation Tips
1
Obtain the hardness of water using the enclosed test-strips, or from the local water utility.
You need this information to adjust the water softener dial in the unit according to the
operator’s manual, section 6.2.
2
The installation site needs to be inspected and prepared in advance. An electrician and/or
a plumber may be required for this.
a) A level, water-resistant surface, preferably close to the sink for easy access to the hot
and cold water and the drain, is recommended for installation site.
b) Holes may need to be drilled into the cabinet to route the hot and cold water hoses,
drain tube and power cord to the supplies.
c) The supply hoses provided with the unit are 2 m / 6.5 ft long with 2 cm / 3/4" garden
hose female fittings. The hot and cold water lines must have taps with corresponding
male fittings. A water pressure of 0.5-10 bar (7-145 psi) is required. Make sure that the
hot and cold water hoses are connected to their respective inlet connectors (not
reversed) at the back of the unit.
d) The flexible drain tube provided with the unit is 1.5 m / 5 ft long with a barb inlet, inner
diameter of 2 cm / 3/4". It should be connected to a drain point no more than 35 cm /
14" above the floor.
e) If the unit cannot be installed close to the sink, the water hoses and the drain may
need to be extended. Any additional necessary tube, connector and fitting should be
procured prior to installation. Please note that the drain tube should not exceed 3.3 m /
13 ft. Make sure that the extension hoses for cold and hot water can withstand
the water line pressure.
f)
The Hydrim L110w is constructed with an air gap / anti-siphoning device on the inlet
hoses and drain hose. No additional air gap / anti-siphoning device is neccessary.
g) A power outlet of 208-240 V, 60 Hz with proper grounding is required for the unit.
The power cord of the unit is 1.8 m / 6 ft long.
3
The Hydrim washer is very heavy. Seek assistance if moving it.
4
When connecting the water hoses, the connector with the elbow connects to the back of
the unit. The washer with the screen goes into the connector in the other end of the hose.
5
Make sure that the voltage and frequency of the power outlet are the same as specified
on the label of the unit.
6
Make sure that Hydrim cleaning solution, water softening salt (if required), and rinse-aid
are available.
7
Once installed, turn the water taps to the open position, ensure the unit is plugged in to
the power supply, and run a program. Check the water and drain connections at both
ends for leaks.
Page 7
5. Instructions for Use
5.1 Program Description Chart
The program duration and consumption details are shown in the chart below:
Program
P0 - Rinse and
Hold
P1 - Regular wash
P2 - Regular wash
with dry
P3 - Heavy duty
wash
P4 - Heavy duty
wash with dry
Wash
Temperature
30˚C / 86˚F
Time*
Water Usage
8 minutes
4 L / 1 gallon
50˚C / 122˚F
50˚C / 122˚F
20 minutes
30 minutes
12 L / 3 gallons
12 L / 3 gallons
50˚C / 122˚F
30 minutes
16 L / 4 gallons
50˚C / 122˚F
40 minutes
16 L / 4 gallons
* Actual cycle time will vary depending on incoming water temperature and pressure
P0 should be used to keep instruments moist when they will not be washed
within one hour
P1 and P2 should be used to wash instruments in baskets
P3 and P4 should be used to wash instruments in cassettes, hinged instruments,
and heavily soiled instruments
5.2 Instrument Reprocessing Recommendations
When used correctly, the Hydrim L110w is effective for the removal of debris on
instruments that may result in the insulation of microorganisms during a terminal
sterilization. Prior to inserting your instruments into the Hydrim, consult the
manufacturer's reprocessing instructions.
All critical and semi-critical instruments can be considered clean after processing in the
Hydrim L110w. Critical instruments: used to penetrate soft tissues or bone, for example
forceps, scalpels, and scissors. Non-critical instruments: devices that come into contact
only with unbroken skin. Non-critical instruments can be terminally processed
in the Hydrim L110w.
Examples of instruments suitable for washing in the Hydrim L110w include: Stainless
steel scalers, spatulas, hemostats, evacuation tips, scissors, forceps. All other
instruments should have the following properties: heat resistance to a temperature of up
to 90˚C / 194˚F and corrosion resistance in the presence of heat and alkalinity.
Also, when assessing instrument suitability with Hydrim Cleaning Solution, reference
these guidelines:
•
Page 8
Good quality stainless steel instruments are suitable for processing with
Hydrim Cleaning Solution.
5. Instructions for Use cont’d
•
•
•
•
•
•
•
•
•
•
•
Carbon steel is not suitable for processing in Hydrim Cleaning Solution. Examples
of carbon steel are Hartzell tips and burs.
Stainless steel instruments that have working tips made of other materials may not
be suitable for processing in Hydrim Cleaning Solution. Check with the
manufacturer of the instrument for the material.
Stainless steel instruments that are chrome plated are not suitable for processing
in Hydrim Cleaning Solution. Mechanical rotating instruments such as burs,
grinders and root canal instruments are not suitable for processing in Hydrim
Cleaning Solution.
Dental handpieces, microkeratomes, phaco tubing, fiberoptics and electrical
equipment should not be processed in the Hydrim.
The high heat retention capacity of stainless steel allows for fast drying. Plastic has
a lower heat retention capacity, thus needing a longer drying time.
Rhodium-coated specula should be arranged so that their surfaces do not suffer
any damage. Not all specula with glass are suitable for machine treatment.
SciCan recommends that all hinged instruments be placed in open baskets in the
Heavy Duty cycle.
When processing small objects in the Hydrim use the basket with hinged lid
(SciCan part number 01-108294). Failure to do so will result in small objects being
thrown out of the baskets, which may cause damage to the machine.
Please ask the instrument manufacturer's advice on the suitability for processing
complicated instruments in this washer.
Remove any residual debris (e.g. cement, resin) prior to placing instruments in the
unit. It is not necessary to routinely rinse instruments under running water.
Plastic objects that are not resistant to hot water are not suitable. Highly absorbent
materials such as sponges or towels should not be placed in the unit.
5.3 Inventory of goods
When you receive your Hydrim L110w packing carton, the items listed below will
be included :
Standard items
Upper trolley
Part number 15553.20
Lower trolley
Part number 15554.10
Long basket (3 pcs) for upper rack
Part number 01-108232
Page 9
5. Instructions for Use cont’d
Rack for 5 cassettes for lower trolly
Part number 01-108231
Statim 2000 basket
Part number 01-107240
Basket with hinged lid
Part number 01-108294
The following items are optional, allowing you to customize the Hydrim L110w
to your needs:
Large basket
Part number 01-108210
350 mm X 368 mm X 64 mm (13.75" X 14.5" X 2.5")
Statim 5000 basket
Part number 01-107241
373 mm X 178 mm X 42 mm (14.75" X 7" X 1.75")
Rack for 5 large cassettes
for upper trolley
Part number 01-108230
Rack for Hinged Instruments
Part number 15793.00
Hygiene basket
Part number 01-108298
5.4 Accessory Configurations
Upper trolley :
1. 2 x long basket
2. Long basket and 2 x basket with hinged lid
3. 2 x Statim 2000 basket
4. Statim 2000 basket and 2 x hygiene basket
5. Statim 5000 basket and 2 x hygiene basket
6. Cassette rack for 5 large (8" x11") cassettes
For configurations 1- 5, the large basket can be placed
on the top layer of the upper trolley.
Lower trolley :
1. Cassette rack for 5 large (8" x 11") cassettes
2. 2 x long basket
3. Large basket
4. 3 x Statim 2000 basket
5. 2 x Statim 2000 basket and 1 x hygiene basket
6. Statim 2000, Statim 5000 and hygiene basket
7. Long basket 2000 basket and hinged basket
Page 10
P0
P1
P2
P3
P4
Rinse and
hold
Regular wash
Regular wash
Heavy duty
Heavy duty
and dry
wash
wash and dry
5. Instructions for Use cont’d
5.5 Activating the Unit
Prior to activating the unit, follow these steps:
display
indicator lights
1. Set the power button to ON.
2. Select the appropriate program (P0-P4).
•
The display will show the selected program
•
The program then starts automatically.
•
During the program, the display alternates between the cycle selected (eg. P3)
and the approximate time remaining in the cycle. The indicator light for the
selected program is lit.
3. The program has ended when “00” appears in the display and the buzzer sounds for
10 seconds.
4. After the program has ended :
•
Set the power button to OFF and open the door
•
Remove the instruments from the unit
5.6 Interrupting a Program
NOTE: Interrupting a program is not recommended. If you need to interrupt a program,
the instruments will be processed again to ensure proper washing. To interrupt a program,
set the power button to OFF to stop the water circulation. The indicator lights will go out.
Open the door. Make the desired changes to the instruments in the washer. When the unit is
powered ON again, the display will show “00”. At this point, the operator has two choices:
1. Within 10 seconds after powering the unit ON, the operator can select a new cycle and
the Hydrim L110w will run that cycle
2. If a new cycle is not selected, the unit will re-start the previous cycle from the
beginning. This ensures that instruments are properly washed.
NOTE: If the cycle is interrupted during the drying phase, it is considered complete and the
Hydrim L110w will not restart automatically as described in (2) above.
Page 11
6. Maintenance
6.1 Hydrim Cleaning Solution
The Hydrim L110w uses exclusively Hydrim Cleaning Solution. The unit will not perform as
outlined by SciCan using other cleaning solutions or cleaning products. Also, using other
cleaning solutions or cleaning products may damage the unit, cause excessive foaming
and may void the warranty.
chemical
indicator light
When the chemical indicator light shines continuously, and
Ed appears on the display, the solution level is low and the
container is in need of replacement. The cycle is aborted at
this point. Each cleaning solution container will last
approximately 45 cycles. To avoid spillage, replace the
solution container only when the chemical indicator light is on. Also, be sure to wear
gloves.
To order additional Hydrim Cleaning Solution, contact your local SciCan dealer.
1
5a
2
3
4
5b
To replace the cleaning solution container, follow these steps:
1. Power off machine
2. Open the cleaning solution drawer.
3. Put a new cleaning solution box into the drawer upside down.
4. Tear open the tab.
5a. Pull out the spout and remove the protective cap.
5b. Connect the hose by screwing the connector tightly.
6. Place the box in the cleaning solution drawer and then close.
Page 12
6
6. Maintenance cont’d
6.2 Water Softener
The Hydrim L110w has an integrated water softening system. Since Hydrim Cleaning
Solution has sufficient softening properties to minimize water spots, residual soap, scale
and calcium build-up, the Hydrim L110w is shipped with the softening salt setting at 0.
If you are in an area where the water hardness is higher than normal, the use of water
softening salts and rinse-aid may improve the cleaning results.
To use the water softening system, you will first need to determine the hardness of your
local tap water. Please use the enclosed water test strips, or contact your local water
utility. Once you are aware of the hardness, you can identify the setting from
the following table:
ppm
qpq
0 - 110
120 - 140
150 - 180
190 - 210
220 - 290
300 - 370
380 - 540
550 - 890
0 - 6.5
7-8
8.5 - 10.5
11 - 12
12.5 - 17
17.5 - 21.5
22 - 31.5
32 - 52
˚dH
0-6
7-8
9 - 10
11 - 12
13 - 16
17 - 21
22 - 30
31 - 50
˚fH
0 - 11
12 - 15
16 - 17
18 - 21
22 - 29
30 - 37
38 - 54
55 - 89
˚Clarke
mmol / l
0-8
9 - 10
11 - 12
13 - 15
16 - 20
21 - 26
27 - 38
39 - 62
0 - 1.1
1.2 - 1.4
1.5 - 1.8
1.9 - 2.1
2.2 - 2.9
3.0 - 3.7
3.8 - 5.4
5.5 - 8.9
Hydrim L110w
setting
0
1
2
3
4
5
6
7
To change the water softener setting, follow these steps:
1. Press and hold the P1 and P2 buttons simultaneously
2. Turn the power button ON, before releasing the P1 and P2 buttons. The display will
show the actual water softener setting value.
3. Adjust by pressing P0 for down and P1 for up. Default value is 0.
4. Set the power button to OFF. The new setting is stored in the unit memory.
In areas with hardness greater than 890 ppm, additional water treatment may be required.
Contact a local water treatment company to advise on how to install an external water
softening system.
NOTE: Do not pour cleaning solution into the container for salt. This will destroy
the water softener.
Page 13
6. Maintenance cont’d
If you have set the water softener to any setting above 0, the SALT indicator flashes when
you need to refill the salt container.
salt container lid
To add water softening salts, follow these steps:
1. Open the salt container lid.
2. Upon first use of the Hydrim L110w, pour
approximately 1 litre (1 quart) of water into the salt
container. It is not necessary to add water during
subsequent refills of the salt container.
3. Using the accompanying salt jug, fill the salt container
to the top (maximum of 1kg / 2.2 lbs.)
4. Close the salt container lid.
After the salt has been added to the unit, the softening salt indicator will initially remain lit.
The indicator will turn off when the salt solution has become sufficiently concentrated.
6.3 Rinse Aid
SciCan recommends the use of Stat-Dri Plus rinse aid.
The purpose of rinse aid is to prevent the formation of watermarks on the instruments.
Although Hydrim Cleaning Solution minimizes water spots, use of rinse-aid will further
reduce this occurrence.
When the chemical indicator light flashes, you will need to refill the rinse-aid container.
To fill the rinse-aid container, follow these steps:
lid
1. Fold back the lid of the rinse aid container.
level
indicator
2. Pour the rinse-aid into the rinse-aid container until
the level indicator darkens.
3. Close the lid ensuring you that you hear it snap.
rinse-aid
container
Adjusting the rinse aid dial can vary the amount of
rinse-aid added. The rinse aid dial has initially been set to “3.5”. Do not alter the setting of
the rinse aid dial unless streaks or water marks are found on the instruments.
Page 14
6. Maintenance cont’d
6.4 Filters
The filters prevent large particles in the water from reaching the pump. These particles
may occasionally block the filters.
coarse
filter
To ensure the filters are debris free,
follow these steps:
1. Check the filters daily for debris and
remove if necessary.
2. After undoing the coarse filter, the fine filter
can be removed. Remove any debris from
the filter cavity and rinse the filters under
running water.
3. Insert the filter units and tighten the
coarse filter.
fine filter
6.5 Wash arms
Debris can block the nozzles in the wash arms and the arm mountings.
To make sure they are kept free of debris, follow these steps:
1. Inspect the nozzles and wash arms weekly for blocked holes due to debris.
2. Pull the lower arm upwards and lift off.
3. Unscrew the upper wash arm collar and remove the upper wash arm.
4. Clean both wash arms under running water.
5. Refit the wash arms. Ensure that the lower wash arm has locked into place and the
upper one is screwed tight.
upper
wash
arm
lower
wash
arm
upper
wash
arm collar
Page 15
7. Troubleshooting
Here is a list of cycle faults that may appear on the LED.
Fault # Problem
Page 16
Effect
Solution
E0
Heat Exchanger
filling problem.
The unit fails to fill the • Open the water shut-off valves.
heat exchanger
in 300s.
E1
Water
heating failure.
Improper wash,
cycle aborted.
• Call for a SciCan technician.
E2
Chamber
filling failure.
Improper wash,
cycle aborted.
• Check for water intake obstruction.
• Call for a SciCan technician if
water intake is normal.
E3
Chamber
temperature
reading failure.
Improper wash,
cycle aborted.
• Call for a SciCan technician.
E4
Water evacuation
failure.
Cycle interrupted.
• Check the fine and coarse
filters for obstruction.
• Call for a SciCan technician if
filters clean.
E6
Serial
transmission
failure.
Unit functionality
• Call for a SciCan technician.
failure, cycle aborted.
Ed
Dosing system
failure.
Improper wash,
cycle aborted.
• Replace detergent bottle and
restart cycle.
• If error persists, call for
a SciCan technician.
E8
Water inlet
temperature
reading failure.
Improper wash,
cycle aborted.
• Replace detergent bottle and
restart cycle.
• Call for a SciCan technician.
E9
Program timeout.
Program fails to end
in 3 hours.
• Call for a SciCan technician.
EF
Flow error
Cleaner flow meter
error.
• Call for a SciCan technician.
7. Troubleshooting cont’d
Here is a list of common occurrences and their corresponding solutions.
Problem
Cause / Solution
Unit does not start up.
•
•
•
•
Lower wash arm rotates with difficulty.
• Wash arm is blocked by small debris.
See Section 6.5
Water remains inside the unit after the
program has ended.
• Blockage or kink in drain.
• Pump is jammed.
• Filters are blocked. See Section 6.4.
Unusual amout of foam is created.
• Normal dishwashing liquid has inadvertently been
poured into the Rinse Aid container.
• Instruments have been soaked in a cleaning
solution other than Hydrim Cleaning Solution.
Unit stops suddenly during a cycle.
• Cut in electricity supply to unit.
• Check curcuit breaker.
• Water leakage in the Hydrim.
Call a SciCan technician.
Knocking sound can be heard while washing
is taking place.
• A wash arm is knocking agains the items inside
the unit.
Rattling sound can be heard while washing
is taking place.
• The items have not been properly placed in
the unit.
Knocking sound coming from the intake valves.
• This is caused by the way the water pipes have
been laid and has no effect upon the way the unit
functions. There is no remedy for this.
Drying performance has decreased.
• The air filter may need to be changed. Call a
SciCan technician.
Fault with fuse in mains electricity supply.
Plug not inserted into wall outlet.
Unit door not closed properly.
Water tap is not turned on properly.
Caution: Repairs should be carried out by a
skilled and qualified specialist. Improper repairs
can lead to considerable equipment damage as
well as danger to the user.
Page 17
7. Troubleshooting cont’d
Debris is found on the instruments.
• The unit was not loaded properly. Water jets
could not reach all surfaces.
• The instrument cassettes or baskets
were overloaded.
• There were too many cassettes or baskets
in the unit.
• The selected program was not appropriate for
the load.
• The wash arms are obstructed.
• The nozzles in the wash arms are obstructed
by debris.
• The filters are obstructed by debris.
• The filters have been incorrectly fitted in the unit.
• The waste water pump is jammed.
White stains are left on the instruments.
•
Instruments have not been properly dried.
• The selected program did not include the
drying function.
• Amount of rinse aid was set too low. See
Section 6.3.
• Items removed from the unit too soon.
Smears are found on the instruments.
•
Page 18
Although water is quite hard, no salt has been put
into the unit. See Section 6.2.
• Water softener was set too low. See Section 6.2.
• Lid on salt container is not closed properly.
Amount of rinse aid set too high. See Section 6.3
8. Warranty
Limited Warranty
For a period of one year, SciCan guarantees that the Hydrim L110w, when
manufactured by SciCan in new and unused condition, will not fail during normal service
due to defects in material and workmanship that are not due to apparent abuse, misuse,
or accident.
In the event of failure due to such defects during this period of time, the exclusive
remedies shall be repair or replacement, at SciCan’s option and without charge, of
any defective part(s), provided SciCan is notified in writing within thirty(30) days of
the date of such a failure and further provided that the defective part(s) are returned
to SciCan prepaid.
This warranty shall be considered to be validated, if the product is accompanied by the
original purchase invoice from the authorized SciCan dealer, and such invoice identifies
the item by serial number and clearly states the date of purchase. No other validation is
acceptable. After one year, all SciCan’s warranties and other duties with respect to the
quality of the product shall be conclusively presumed to have been satisfied, all liability
therefore shall terminate, and no action or breach for any such warranty or duty may
thereafter be commenced against SciCan.
Any express warranty not provided hereon and any implied warranty or representation as
to performance, and any remedy for breach of contract which, but for this provision, might
arise by implication, operation of law, custom of trade or course of dealing, including any
implied warranty of merchantability or of fitness for particular purpose
with respect to all and any products manufactured by SciCan is excluded and disclaimed
by SciCan. If you would like to learn more about SciCan products and features, visit our
website at www.scican.com.
Website:
www.yourCEBA.com
Customer Service:
Phone: 1-916-335-6113
Email: [email protected]
Product Information and Technical Support:
Phone: 509-747-5027
email: [email protected]
Page 19
9. Specifications
External Dimensions:
Height (free standing)
Height (built in)
Width
Depth
Depth with door open
850 mm / 33.5"
810 mm / 32"
600 mm / 23.75"
600 mm / 23.75"
1143 mm / 45"
Chamber Dimensions:
Height
Width
Depth
609 mm / 24"
388 mm / 15.25"
483 mm / 19"
Weight:
85 kg / 187 lbs
Running Noise:
50 dB
Plumbing:
Supply Hoses
(hot / cold water connection) 2 cm / 3/4" garden hose
female fitting
Flexible Drain Hose
2 cm / 3/4" barb inlet
Electrical Consumption:
North America
Rated Load
208 - 240 V 60 Hz 15 A
2.5 kW
Other:
Pollution Degree
Installation category
Maximum
relative humidity
2
II
Website:
www.yourCEBA.com
Customer Service:
Phone: 1-916-335-6113
Email: [email protected]
Product Information and Technical Support:
Phone: 509-747-5027
email: [email protected]
Page 20
80 % for temp
up to 31˚C / 88˚F
50 % for temp
up to 40˚C / 104˚F