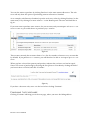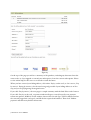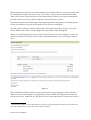
1
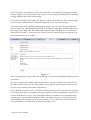
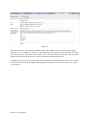
B E E T RIE VE US ER’S MA NUA L
Covers Beetrieve Standard/Enterprise version 3.1
Sonora IT AS
©2009–2013 Sonora IT AS
All rights reserved. This publication may not be altered or copied from in any way, though it may be
eletronically redistributed in unaltered form as long as it is clearly identified with the title from the front
page and as originating from Sonora IT AS. Such identification must also include a clickable link leading to
one of the two URLs shown below on this page.
Sonora IT, Sonora IT AS, Beetrieve and surveyCanvas are trademarks of Sonora IT AS.
www.beetrieve.com
www.beetrieve.no
1. How to use Beetrieve!..............................................................................................4
2. Creating a survey with Beetrieve!..........................................................................7
3. Creating the survey questions!...............................................................................11
The Tools palette!.......................................................................................................................................................12
Example: a simple, three-page questionnaire!...........................................................................................................13
4. Working with participants!...................................................................................27
Adding the first participants!....................................................................................................................................27
Example: Importing participants #om file!..............................................................................................................28
Participants, post adding!...........................................................................................................................................31
Before survey start!....................................................................................................................................................31
A$er survey start!
......................................................................................................................................................32
Re-queuing bounced emails!.......................................................................................................................................35
Adding more particpants!..........................................................................................................................................35
Disabling participants!..............................................................................................................................................36
5. Testing the survey!..................................................................................................38
6. Startup and Reminders!.........................................................................................39
Starting the survey!...................................................................................................................................................39
Reminders!.................................................................................................................................................................42
7. Co%ecting results!...................................................................................................44
Status & Preferences!.................................................................................................................................................44
Survey Report!...........................................................................................................................................................45
Viewing results!.........................................................................................................................................................46
Results Report!...........................................................................................................................................................46
Charts Lab!...............................................................................................................................................................48
Results table & exporting the results!........................................................................................................................49
8. Purchasing answers and Enterprise subscriptions!...............................................50
Initiating a purchase!................................................................................................................................................50
Finishing the purchase!..............................................................................................................................................51
Beetrieve User’s Manual"
1. How to use Beetrieve
Thank you for using Beetrieve, we hope you enjoy it!
Beetrieve is unique in a number of ways. It looks and behaves like a true
application, for one thing. It just happens to be served online, so you don’t have to install anything, and you don’t
have to worry about setting up an infrastructure to facilitate running surveys. More than that, by adapting the best
interface conventions we could come up with, whether they
originated on the web or on the desktop, Beetrieve completely
redefines what an online survey application can look and behave like,
in terms of ease of use and use effectiveness.
If you just want to get started setting up your survey, go ahead and skip
to chapter 2. Otherwise read on to get a quick conceptual overview of
Beetrieve. This should give you a good idea about how you might
adapt Beetrieve to your own needs.
***
Beetrieve is very flexible in allowing you to run surveys the way you prefer. In the simplest case,
you only need to create the survey questions, then you can start the survey and begin collecting
results.
Collect results phase
Create
questions
Start survey
Share link
Figure 1.1: Beetrieve simple workflow
It can really be this simple: Create some questions, or just make a few changes to one of the built
in questionnaire templates. Then click start and share the link to the survey. Results!
Beetrieve can be as simple or as powerful as you need it to be, and the above is but one of many
possible scenarios. Figure 1.2 shows a few more possibilities:
4 Beetrieve User’s Manual
Collect results phase
Purely open
Purely
invitationbased
Create
questions
Start survey
Share link
Create
questions
Start survey
Share link
Add
participants
Create
questions
Start survey
Add
participants
Share link
Create
questions
Add
participants
Start survey
Share link
Add
participants
Create
questions
Start survey
Share link
Create
questions
Add
participants
Start survey
Add more
participants
Create
questions
Add
participants
Start survey
Add more
participants
Figure 1.2. Workflow scenarios
Whenever you create a new survey, Beetrieve automatically sends you a link to the survey in an
email. When you have started the survey, you can share or publish this link to anyone and everyone you wish to have participate in the survey. When the link is clicked and the survey taken, results will show up in the Results Panel in the survey’s admin interface.
That then is an example of a completely open survey, i.e. one where anyone who can click on the
link to the survey can participate. If that is all you need, you can skip all parts of this manual that
deals with participants and invitation emails.
However, Beetrieve was envisioned and built as a professional survey solution, so that is only one
of many possibilities. Another option is to add ‘explicit participants’ to the survey. These are on a
basic level email addresses that you enter into the Participants panel of the admin interface. See
the Working with Participants chapter for more info.
If you run your survey not using the link that Beetrieve emails to you for the survey, but only
email addresses that you add explicitly to the survey, you are running a pure invitation-based survey.
As fig. 1.1 shows, you can add participants before or after starting the survey, and you can add
more participants at any time. You can of course also mix invitation-based answers and answers
from the open link in the same survey.
Beetrieve User’s Manual"
Using explicit participants usually affords more control than just using the open link, because
their answers are linked to their entries in the Participants panel. Invitation-based survey are also
usually preferred when the statistical certainty of the results is of the essence. There are however
many cases where it is not possible or practical to use invitation-based participants, for instance
when asking for feedback on a website.
But this is not a survey methodology paper, but a user’s manual. We have released a methodology
paper in Norwegian, which can be found on our website. The paper will be translated to English
in the fall of 2013 and likewise be released to our website.
This manual covers both Beetrieve Standard and Beetrieve Enterprise. Sections only applicable to
Beetrieve Enterprise are marked as such.
6 Beetrieve User’s Manual
2. Creating a survey with Beetrieve
Beetrieve probably does not look like any other online survey solution you have used before. Instead of looking and behaving like a series of web pages, Beetrieve looks and behaves like a true
application in your browser, and takes many cues from applications you use on your desktop, like
email applications.
Figure 2.1: The Beetrieve main window
When you open Beetrieve for the first time, you will see something similar to the illustration
above. A quick--reference text box will also show, which you can dismiss with its close box.
In the main menu, to the left, ‘Surveys’ have been preselected, as most of your time will be spent
here. The upper part of the window shows the list of surveys you currently have created (empty
when you log in for the first time) and the lower part of the window displays the administrative
interface for the currently selected survey (similarly initially empty).
The focus of this user’s manual is on creating and running surveys, so the other main menu
choices are not explored, except as necessary. There will also be many possibilities and options
that can not be covered in a User’s manual. Please refer to the reference manuals and the online
support for more details.
Beetrieve User’s Manual"
To create your first survey, simply click the ‘New Survey’ button in the upper section of the window. You will be prompted for a name:
Figure 2.2
Click Create and the survey will be created and automatically chosen for administration. The
window will now look like in fig. 2.3:
Figure 2.3
The list of surveys contains the one entry you have just created, and it is highlighted, indicating
that it is currently selected. The tools for setting up and running the selected survey, the administration interface, displays in the lower part of the window.
You can create as many surveys as you like this way, at any time. All the surveys you create show
as a list in the upper part of the window. It might look like this with three surveys:
8 Beetrieve User’s Manual
Figure 2.4
To select a survey to work with, click on it:
Figure 2.5
When you create a new survey, Beetrieve will send you an email to your log in address with the
open link to the survey. If you plan to run an open survey, you can forward the email to whoever
you would like to participate in the survey, or you can copy the link from the email and share it
on the web.
If you don’t have the email handy, you can use the ‘Show links’ button above the survey list to display the same links for the currently selected survey.
Figure 2.6
The standard open link is displayed at the top of the box that is displayed. This is the link you
spread, by email, on a webpage or otherwise, to everybody you want to have participate in the
survey.
Beetrieve User’s Manual"
In the second text box you will find code that you can embed in your own webpage to display the
survey inline on that webpage.
You may freely adjust the parameters of the iframe tag to suit your need, including the width and
height. When a survey is served embedded, Beetrieve makes some adjustments to fit into a narrower space, but the only thing that is needed from Beetrieve’s point of view is the src parameter.
Do not edit it. Please see the Beetrieve Reference manual for a discussion on the parameters of
the iframe tag.
See chapter 5, Testing the Survey, for information about the last entry in the box, the test link.
The links/code are displayed in text boxes, and each will highlight if you click inside them, for
easy copying. Use the close box ⨂ to dismiss the dialog when done.
10 Beetrieve User’s Manual
3. Creating the survey questions
When you have created or selected a survey, the lower part of the Beetrieve window displays the
administrative interface for that survey, as shown in fig 2.3. By default, the admin interface opens
with the Questions panel open.
That does not mean you have to start by creating questions, but it is the usual starting point.
Most of the administrative tasks you will perform on the survey, such as starting it and checking
its status, can be performed directly in the various panels in the administrative interface. However, creating the survey questions takes place in a special editor because it requires more space
than the admin interface can provide directly.
We call this unique questions editor surveyCanvas, and you open it by clicking on the ‘Start surveyCanvas’ button in the Questions Panel (see figure 2.3).
Figure 3.1: The surveyCanvas window
surveyCanvas opens in a separate window, shown in fig. 3.1. surveyCanvas offers a radically different and much more efficient approach to questionnaire creation than other survey solutions.
While most other solutions use some form of wizard approach, surveyCanvas is more direct. In
Beetrieve User’s Manual"
surveyCanvas, you use the Tools palette (green in Beetrieve Standard, blue-grey in Beetrieve Enterprise) to place the questions onto the Questions Area (the large white area) and manipulate them
with the Options Panel (the steel blue area). This is similar to the way other applications that manipulate visual objects, for instance Powerpoint, operate. Just like in Powerpoint, surveyCanvas
offers a lot of flexibility in the way you work: you can insert all the elements/questions into the
Questions Area first, then jump back and forth between them and set them up like you want, or
you can insert a question and immediately use its Options panel. As in a slide in Powerpoint, you
can move elements/questions around, rearrange them, delete and insert new elements/questions
wherever you want, at any time. At all times you see the elements/questions almost exactly as
they will appear to your audience (the survey participants).
THE TOOLS
PA L E T T E
The Tools palette contains an Insert command menu for inserting, into the questionnaire, new
elements as well as questions from previous surveys or from one of the supplied templates, and a
number of tool buttons.
Figure 3.2: The suveyCanvas Tools Palette
The buttons are, from left to right:
• Delete: Deletes the currently selected element.
• Undo: Undoes the last action.
• Redo: Redoes the last action (after using undo).
• Move up: Moves the currently selected element up one place, if possible.
• Move down: Moves the currently selected element one place down, if possible.
• Move to end: Moves the currently selected element to the end (bottom) of the questionnaire.
• Preview: Opens the questionnaire in a live preview window, so you can see exactly how it looks
and behaves for a participant.
• Print: Opens the questionnaire up in a separate window that, if printed, will yield a print-out of
one page of the questionnaire per printed page
• Export: Exports the questionnaire as an Microsoft Word .doc file1
After survey start only the three last buttons will be available.
1 Any
images in the questionnaire will not be included
12 Beetrieve User’s Manual
EXAMPLE:
A S I M P L E , T H R E E - PA G E Q U E S T I O N N A I R E
The absolute easiest way to get quickly up and running with a high-quality questionnaire is to
start with one of the built-in questionnaire templates, available from the Insert menu.
However, it is more instructive to show how to use surveyCanvas through an example, starting
from scratch. Follow the steps in this example to set up a simple questionnaire, demonstrating
the basics of surveyCanvas. The editor is much more powerful and capable than is demonstrated
here, so please see the reference manual for details on all aspects of the editor.
The example uses an imagined survey about vacations to try to find out something about the relationship between education, income and vacation habits.
Let us assume a new survey called ‘Vacation habits’ has been created, as demonstrated previously.
With this survey selected, click the ‘Start surveyCanvas’ button in the Questions panel in the
admin interface (see fig. 3.1) to bring up the surveyCanvas window. A quick-reference window will
show, overlaid the surveyCanvas window, which you can dismiss by clicking its close box.
Within a survey like this, there are still a large number of possible questions that could be asked.
Things will however be kept simple and short to demonstrate the concepts.
You will ask about the participant’s income, his or her education, and where he or she has gone
on vacation. In addition it would probably be wise to ask about gender and age.
In surveyCanvas you do not have to stress getting the questions down correctly at once, because
it is so easy to jump around in the questionnaire to edit later. So let’s get a ‘draft’ of the questionnaire down in the Questions Area to start with.
The first item in a questionnaire is usually some text, so start by inserting a text element. Choose
‘Text’ from the pull-down menu in the Tools palette:
Beetrieve User’s Manual"
Figure 3.3: Choose what to insert....
Figure 3.4: ... and it is instantly inserted.
You just created the first item in your questionnaire. It is that easy. Notice how the Insert menu
works like a desktop app command menu: You choose what you want to insert form the menu,
and it is instantly inserted.
Ignoring the Options panel for the time being, continue by inserting the first question, in which
you’ll ask about income.
For most of the questions that deals with numbers, such as income and age, it is often a good idea
to present ready-made options in relevant groups. For this, a question type where it is only possible to select one of many alternatives is appropriate. The two question types which fits that de-
14 Beetrieve User’s Manual
scription are ‘Drop-down menu’ and ‘Multiple choice - one answer’ (i.e. radio buttons). For this
question, choose ‘Drop-down menu’ from the Tools palette pull-down menu.
Figure 3.5: The result of choosing Drop-down menu "om the Insert menu
As you can see, the drop down menu element was immediately inserted below the currently selected element (the text), and then selected.
Moving on, you need another question of the same type, to ask about the participant’s level of
education. Use a ‘Multiple choice - one answer’ type question for this. Choose that element type
from the Tools palette pull-down menu.
Figure 3.6
Don’t worry about the contents of each question for now, but just concentrate on getting the
structure of the questionnaire down.
You are going to ask the participants about two aspects of their vacations during the last 12
months: where they went and the cost.
Since they might have gone on multiple vacations to multiple locations during this period, the
participants need to be able to give more than just one answer to that question. The question
type ‘Multiple choice - multiple answers’ is what is needed. Choose that from the Tools palette
pull-down menu.
Beetrieve User’s Manual"
Figure 3.7
The question about cost can be a ‘Drop-down menu’ type:
Figure 3.8
Now go back and do the first ‘refinement pass’. For the first text you need to quickly introduce
the survey and the first question, so select the text element by simply clicking on it in the Questions Area. This will also displays the text element’s Options panel.
16 Beetrieve User’s Manual
Figure 3.9
To change the text, simply enter a new text in the text box in the Options panel...
Figure 3.10
...and click ‘Apply’.
Figure 3.11
Now move to the next question by clicking on it in the Questions Area.
Beetrieve User’s Manual"
Figure 3.12
In this question you want the participant to tell you his or her age. You can group together years
in five when entering the alternatives the drop-down menu will contain, in the text box in the
Options panel. Also, enter a default entry that will be visible on the drop down menu, but which
is not a selectable answer.
Figure 3.13
The ‘Label’ property in the Options is the name of the question. Its usefulness is primarily in
identifying the question in the results. When you look at the survey results in Beetrieve, for instance as diagrams, each diagram will have a title which is that question’s label property. So although it is not strictly necessary, it is a very good idea to give the questions in surveyCanvas
relevant labels.
The labels can also be made visible above each question, so you can formulate and use them as
(short) question texts.
18 Beetrieve User’s Manual
For the income question, you will use a similar approach as age, except using radio-buttons. You’ll
present the survey participants with options such as USD 0–10 000, 10 000–20 000 and so on.
Click on the question in the Questions Area and fill in the Options panel as in figure 3.16.
Figure 3.14
All those alternatives don’t look too good when displayed horizontally, so change the orientation
to ‘Vertical’ in the Options panel:
Figure 3.15
Now for the next question. There are many ways to ask where someone went on vacation. Here
you’ll only ask about different types of vacation, such as ‘cruise’, ‘camping’, etc. In a real survey
this part would undoubtedly have been expanded significantly to try to pinpoint various other
aspects of the vacation trip(s).
Click on the next question in the Questions Area and fill in the Options panel like in fig. 3.16
Beetrieve User’s Manual"
Figure 3.16
If you make a mistake while working with the questionnaire, like entering something incorrect or
deleting something you shouldn’t have, be it an element or a long list of answer values, you can
always click the Undo button to correct your mistake. surveyCanvas has a 5 level undo buffer.
In the last question you will ask about the total cost of the vacation trips. You’ll need alternatives
from USD 0–10 000 and above for this. Since this is the same list as the income list, minus one
zero in all numbers, you can copy and paste that list into the ‘Answer alternatives’ text box in the
new question’s Options panel, then edit it. Click on the ‘Income’ question in the Questions Area,
select all in the Answer alternatives text box in the options panel, right-click on what you have
selected and choose ‘Copy’.
20 Beetrieve User’s Manual
Figure 3.17
Then click on the vacation cost question in the Questions Area, remove the default entries in the
Answer alternatives text box in the Options panel, right-click inside it and choose ‘Paste’.
Figure 3.18
Then edit the values and fill in the other options as they are displayed in fig. 3.19.
Beetrieve User’s Manual"
Figure 3.19
The questionnaire still lacks a few bits and pieces, like explanatory texts above each question.
We’ll fix that next.
To insert new elements anywhere in the questionnaire, all you need to do is select the element in
the Questions Area above the element that you want to insert, then select the element type you
want from the pull-down menu in the Tools palette.
Figure 3.20
22 Beetrieve User’s Manual
Figure 3.21
If you place an element in the wrong position in the Questions Area, simply use the ‘Move Up/
Down’ buttons in the Tools palette to move the element to the correct position.
Enter the text you want in the text box in the options panel, and proceed to do so for any other
text you need. The result might look like in fig. 3.22.
Figure 3.22
Beetrieve User’s Manual"
You are also going to ask about gender, which is a simple two-options question. Select the first
element in the questionnaire - the text, insert a ‘Multiple Choice - one answer’ type question and
fill enter the appropriate Options:
Figure 3.23
In this case you could make the label visible in the questionnaire:
Figure 3.24
You may at any point while working with the questionnaire click the Preview button in the Tools
palette to get a 100% accurate view of the questionnaire as a participant would see it. If you try
that now you will see that the questions currently all show on one page. It is normally better to
break the questionnaire up into several pages, especially if it contains many questions.
In surveyCanvas this is accomplished by using the Page Break element. This you will find lower
down in the Insert pull-down menu in the Tools palette. surveyCanvas treats this as any other
element, which means you can insert a page break element wherever you want, and you can move
them around and delete them.
24 Beetrieve User’s Manual
Put the first page break underneath the question about age. Select the age question in the Questions Area and select ‘Page Break’ from the pull-down menu in the Tools palette. Do the same
underneath the income question.
Figure 3.25
If you now use ‘Preview’ you will see that you have the three-page questionnaire we were after.
The preview is live, so you can fill in the questions and click ‘Next’ and ‘Previous’. In fact, the
preview function uses the same set of underlying code as is used for the real participants, so everything works as it would for a real participant. The only added feature in Preview mode is the
“Jump to page” pull-down menu, which allows you to jump to any specific page in the questionnaire without having to actually fill in the questions on each page.
Beetrieve User’s Manual"
Figure 3.26: The result of clicking ‘Preview’ in the Tools palette
There are certainly several enhancements you could do to this questionnaire, like adding an open
text answer for those specifying ‘Other’ under the vacation type question, adding a comment box
at the end, etc. And there are many more possibilities we have not covered here, like branching,
adding a header with an image, etc. Please refer to the reference manual for details about all aspects of surveyCanvas.
When you are done, simply close the surveyCanvas window. Everything that has been done is
automatically saved, and that is always true for anything you do in surveyCanvas. That means you
can close the window at any time (or quit the browser, for that matter), and everything you have
done in surveyCanvas up to that point will be there the next time you open it.
You can still open surveyCanvas after you have started the survey. It will then display in a limited
editing mode. In this mode, it is only possible to change certain aspects of the questionnaire, like
the text entered with the text tool, validation choices and certain visual settings. It is not possible
to delete, add, edit or move questions or answer alternatives.
26 Beetrieve User’s Manual
4. Working with participants
This chapter explains how to add and work with explicit participants, i.e. participant email addresses and other participant data, in Beetrieve. If you only plan to run open surveys, i.e. to only
share the link to the survey that Beetrieve emails you when you create the survey, you can skip
this chapter.
ADDING
T H E F I R S T PA R T I C I PA N T S
Beetrieve has a powerful set of tools for working with participants, and it starts with the tools
you have available for getting the participants added to the survey. You can add participants at
any time. Initially, the Participants panel in the admin section of Beetrieve will present you with
three possible ways to add participants to the survey.
Figure 4.2
The simplest of these is the last one, which allows you to simply enter (or copy and paste from
elsewhere) email addresses into a text box and click ‘Import’
Figure 4.3
Beetrieve User’s Manual"
Also, if you already have a set of participants that you have added to another survey, nothing
could be easier than reusing those participants in this survey. Just click on the middle alternative,
‘From another survey’ and select that other survey from the drop-down menu. Then click ‘Use’
The ‘Import from file’ option is slightly more involved, but also the most powerful. With this
tool, you can import up to 12 pieces of information for each participants (Beetrieve Enterprise
only), anything form street address and real name to, well, anything you have on file for them. You
can then use this meta-data in the invitation- and reminder emails (see the Startup and Reminders
section). Additionally, this means Beetrieve can form one link in a data processing chain, as everything you import here are exported out again, together with results. See the Results section for
details on this.
EXAMPLE: IMPORTING
PA R T I C I PA N T S F R O M F I L E
This example uses certain features that are only accessible in Beetrieve Enterprise. While we believe that adding participants in this way is something that those with an Enterprise account is
most likely to use, adding participants from file is also possible in Beetrieve Standard. The only
limitation in Beetrieve Standard is that only the email address can be imported from the file, as
shown here, and used elsewhere in Beetrieve, not any other participant data.
Let us assume you have email addresses and other information in an Excel spreadsheet.
Figure 4.4
This example file only contains 5 address rows, however Beetrieve can easily handle thousands of
participants.
To get this data into Beetrieve as participants, you will first have to save the file as a tabseparated text file or as a csv file. Use the File menu’s ‘Save As...’ command for this. Choose ‘Save
as Type’ ‘Text (tab separated)’ or ‘CSV’ and save the file to a suitable location.
Address data from other file types can of course also be imported, as long as you can save or export the data as a tab-delimited text file or as a CSV file.
28 Beetrieve User’s Manual
Figure 4.5
Now return to Beetrieve’s Participants panel, click the ‘Import from File’ pane and use the standard File import tool there to open the file you just saved.
Figure 4.6
If you saved the tab-delimited text file / CSV file to the same location as the original Excel file,
make sure you select the file with .txt or .csv extension for importing. When you have loaded the
file, click the ‘Import...’ button.
This will bring up an intermediate panel in the Survey Admin interface, where you can check that
Beetrieve has interpreted the file correctly, and tell it what pieces of the file to import.
Beetrieve User’s Manual"
Figure 4.7
If you only want the email addresses, ignoring everything else, just click ‘Import!’. Otherwise,
read on.
At the top of the window, Beetrieve indicates how the file was read. In this case, Beetrieve read it
as comma-delimited, containing 6 rows, 5 columns, consistent with the Excel file.
The rest of the window deals with how you would like to import (parts of) the file. In panel ➀
you choose how you would like to deal with any rows that do not contain a syntactically correct
email address (or where the email address field is empty). The default is to ignore/skip such rows.
Please see the Beetrieve Reference Manual for a discussion about the options in this panel.
The panel labelled ➁ gives you a preview of the first three rows in the file. This is both so that
you can check the integrity of the import, and so that you can choose which of the columns
should be imported. Beetrieve scans the first several rows and tries to find the column that contains email addresses. If it can, it will be indicated in the drop-down menu above that column, as
it has been in fig. 4.7.
If you want to import additional columns (i.e. besides the one containing the email addresses),
you do so by using the drop-down menus above the columns you want to import.
30 Beetrieve User’s Manual
Figure 4.8: Importing other participants data (Beetrieve Enterprise)
In fig 4.8 column 1, 3 and 4 (and the email addresses in column 2) are imported. Column 5 is ignored and will not be imported.
The columns you import will now be part of the results you can export. Also, the contents of the
imported columns can be used in invitation- and reminder emails simply by entering codes
#v01# #v02# , etc., in the email texts. The same codes can also be used in surveyCanvas to
merge the same variables into the questionnaire, see the surveyCanvas reference manual for more
on this.
When all is as you want it, click ‘Import’.
P A R T I C I PA N T S ,
POST ADDING
Regardless of how you added your participants, the Participants panel changes its purpose from
adding to managing participants after you have added the first batch.
BEFORE
S U RV E Y S TA RT
If you added the participants before you started the survey, the Participants panel will now look
something like in fig. 4.9.
Beetrieve User’s Manual"
Figure 4.9
The panel displays the participants that have been added (in batches of 100, with next/prev navigation if necessary). Each participant has a delete button in front of it. Also you can delete and
add participants using the Participants command menu, as well as search for participants on any
piece of information you have imported.
AFTER
S U RV E Y S TA RT
If you add participants before you start the survey, those participants will be sent invitation
emails upon start. See the ‘Startup and Reminders’ chapter for details on the invitation email. If
you add participants after survey start, they will initially look like in figure 4.10, adding a status
indicator in front of every participant.
Figure 4.10
When adding (more) participants after survey start, you will have to use the “Send unsent” command in the Participants command menu to send the invitation emails.
32 Beetrieve User’s Manual
This will generate invitation emails, using the email message in its current form as it is shown in
the Startup panel, and send that email to every participant whose email had not previously been
sent. (you may therefore add participants in several bathes before using the ‘Send unsent’ command)
When the invitation emails are being sent, the status indicators will update to show the progress
of the email sending for each participant, and for the participants where the email reached successfully, the status of each participant’s progress through the questionnaire.
All the status indicators, except when filled grey, are clickable. For a complete list of all indicators, their meaning, and what will happen when clicked on, see the Beetrieve reference manual.
However, they all show that very information if you hover over them, as shown in this illustration.
Figure 4.11
Fig 4.11 shows the status as the invitation emails have been queued for sending. As the sending
progresses, the status indicators will update, Fig. 4.12 shows the Participants panel after one participant’s email has reached successfully, and fig. 4.13 after the sending is done completely.
Figure 4.12
Beetrieve User’s Manual"
Figure 4.13
There is now one invitation email that has been delivered, [email protected] (the only real
email address in this example), and the rest have failed/bounced, indicated by the red background
colour. The population as calculated by Beetrieve will therefore at this point be 1.
It will usually take about an hour for emails to show the red failed status. This is because Beetrieve will try several times (up to 5) to resend emails that fail. While this is happening, the status
indicator will show the grey ‘in queue’ colour.
Figure 4.14
After Beetrieve has sent a participant’s email, whatever the result, you can click its More... button
next to the status indicator to see details about that email sending/participant, as well as execute
several useful commands, as shown in fig. 4.14, which shows the participant additional info panel
for a bounced email and a participant that has started, but not finished, filling in the questionnaire, respectively.
Editing the email address, and the links at the bottom of the panel, are Beetrieve Enterprise only
features. Note that using the links are precisely equivalent, and will have the same effect, as the
participant him/herself opening the questionnaire.
34 Beetrieve User’s Manual
RE-QUEUING
BOUNCED EMAILS
Every invitation email that Beetrieve has registered as bounced/failed, will display with a red
status indicator. You can click the status indicator to quickly re-queue that specific email, forcing
Beetrieve to try to send it again.
You can also use the “Try all bounced again” command in the Participants menu to have Beetrieve
try to send every email that failed again. If successful this time around, the red colour will disappear and the population will be updated.
Figure 4.15
There can be many reasons why an email bounces. Check the participant’s additional info panel
to see why the email failed, and correct it if possible.
ADDING
M O R E PA R T I C PA N T S
As you can see in figure 4.14 above, there is an ‘Add...’ command in the Participants menu. That
means that you can add more participants at any time before or after survey startup. Adding more
participants is very simple, because you add more participants exactly the same way as you added
the first batch. That is to say, when you use the ‘Add...’ command, the Participants panel will
show you the exact same tools for adding participants that you saw before, and they work exactly
the same.
Figure 4.15
Beetrieve User’s Manual"
The only difference is the ‘Cancel’ button at the bottom of the panel to bring you back to the already added participants without adding any new ones.
You are free to use any method to add more participants, regardless of which method you used to
add the previous batch of participants.
Please see the beginning of this chapter for more details on adding participants.
Note that no attempt is made by Beetrieve to block an already existing email being added again
as a participant. Even if two participants share the same email address, they will still be two different participants to Beetrieve.
If you for any reason decide that you should not have added the participants, you can use the ‘Delete unsent’ command to remove the participants with a not sent status, but leave the other participants intact.
Figure 4.16
As the participants open and complete the questionnaire, the status indicator for those participants will change to half-filled green (opened but not completed) to fully filled green (completed).
DISABLING
PARTICIPANTS
As you run your survey, it may generate some response in the form of reply emails. Some of these
might be requests to not receive more emails regarding the survey you are running. It is a good
idea to respect such wishes, and fortunately it is very simple to make sure these participants
never receive any more emails as a result of this survey: disable them in the Participants panel.
Disabling a participant is a one-click operation; just find the correct participant and click the
status indicator in front of it. It will turn to orange, indicating a disabled participant.
36 Beetrieve User’s Manual
Figure 4.17
He or she will then not receive any of the Reminder emails you send out from this moment on, if
any. Also, 1 is subtracted from the population, as Beetrieve calculates it in the Results panel.
To find the correct participant in a large set, use the search function in the Participant panel.
Search on (parts of the) email address or any other relevant piece of information that you have
imported.
If you for any reason want to enable the participant again, the button changes to ‘Enable’ on any
disabled participants in the list.
Also, keep in mind that if you want to reuse the participants from one survey to the next, you
can, under the ‘From another survey’ panel to add participants, check the box to make sure that
both disabled and failed email addresses are left out.
Beetrieve User’s Manual"
5. Testing the survey
Before you take the survey live, you probably want to test it as well as you can. You can do this in
several ways and on several levels in Beetrieve.
In chapter 3 you already saw how you can use the live preview function in surveyCanvas to get a
100% accurate questionnaire shown just like a participant would. This you can use to thoroughly
test for questionnaire logic, spelling and other issues.
You might also want to have other people look over the questionnaire, as well as any invitation
email you plan to send, if you use explicit participants. Beetrieve provides two ways to do that.
One, you can send them the test link. The test link is included in the email with the link to the
survey that Beetrieve sent you when you created the survey. It is also shown when you click the
‘Show link’ button above the survey list (see fig. 2.6). When the test link is clicked, it will open
the questionnaire just like it would for a real participant.
Two, you can use the Survey Admin’s Test Panel.
Figure 5.1
You use the Test panel to test the survey with invitation-based participants. That is to say, the
recipients of the emails you enter in the test text box will get an invitation email when you click
‘Send emails!’. That email is composed in the Startup panel (see chapter 6, Startup and Reminders).
However, a default invitation email is used if you do not compose your own.
You can use both methods of testing both before and after survey start.
Test participants never contribute to the results, and do not figure in the Results
panel at all.
38 Beetrieve User’s Manual
6. Startup and Reminders
S TA R T I N G
THE SURVEY
Having created the survey questions, and possibly added participants, you are now ready to start
the survey. If you have added, or are going to add, explicit participants, you may also want to
compose an invitation email to send to those participants. All this takes place in the Startup
panel.
Note that if you only plan to use the open link to the survey, you can just hit the ‘Start the survey...’ button, set the preference pertaining to open participants as described in this chapter, and
start the survey and move on to the next chapter, Co%ecting results. The rest of the discussion in
this chapter is only relevant if you add explicit participants with the Participants panel.
Figure 6.1
The Startup panel looks like in fig 6.1 before start. As you can see, a default invitation email is
displayed. If you do not plan to add participants to the Participants panel but only plan to use the
open link, or if you are happy to use the default message, you do not have to edit the email text at
all. Otherwise, feel free to edit it to better suit your needs. Wherever you want the link to the
survey to show in your message, you type in #link# . You can enter #link# more than one place
in the email body to show the link several places.
Do not paste the open link from the ‘Show links’ box or from the email you received with links
when you created the survey, into the email message. The email message is only for email-based
participants, and they will receive a correct link by using the #link# code.
In Beetrieve Enterprise, you can additionally send participants directly to a specific page in the
questionnaire by using #link#XXX# in the email body, where XXX is a page number. For in-
Beetrieve User’s Manual"
stance, using the code #link#5# in the email body will create a link that sends the participants
directly to page 5 of the questionnaire. You can use several of #link# , #link#XXX# with different page numbers in he same email message.
If you delete the subject or message text, Beetrieve will use the default text. Also, if the message
does not contain #link# Beetrieve will still add the link at the end of the message.
As was mentioned in the Working with participants chapter, you can use the data you imported
when you imported your participants from file in the email message (Beetrieve Enterprise only).
Referring to that chapter, the Excel file had the company name in column #1. It was therefore
imported into variable 01. You can use the code #v01# in the email message to merge the company name into the text, as in fig. 6.2.
Figure 6.2
After composing the message, click Save. A “Message saved” notice will display briefly next to the
Save button.
You can use another from-address than the default one (your log in address) if you wish. This is
the address which will receive any reply emails to the invitation- and reminder emails you send
out. Just type in another email address and hit Save.
If you check the “Style the email…” checkbox, the header that you have created in surveyCanvas,
to be displayed on top of every page in the questionnaire, will also be displayed on top of the invitation email when it is sent to your participants. Beetrieve will then create a multipart/mime
email message, with an html part with the header, and a plain text part, for email systems that
cannot display html messages. If you do not check this, or if you have not created a header for
your questionnaire in surveyCanvas, a plain text message is sent.
40 Beetrieve User’s Manual
We recommend you test the email with the Test panel before you go live to check that the email
looks good, if you use this feature.
***
Regardless of if you use the email message or not, click ‘Start the survey’ when you are ready to
take the survey live and start accepting participants and results.
When you click the start button, an intermediate panel will show, prompting you to set a few
preferences before starting the survey.
Figure 6.3
The first option sets whether to run the survey anonymously or not. Normally, with invited participants, their email addresses are shown along with their answers in different places in the Results panel. However, with this option set, no email addresses or other pieces of imported participant data will show anywhere in the results, and the answers are shown in random order.
This option only affect invitation-based participants. Any participants from the open link will
always be anonymous by nature, since all participants use the same link.
This option cannot be changed after survey startup, to keep the integrity of the choice intact.
Remember that checking this option is the only way to truly run an anonymous survey.
The second option only affect participants coming in from the open link, if any. Since all the participants of this kind share one link, there is no way for Beetrieve to distinguish between them.
Therefore there is by default no stopping someone from clicking an open link several times, potentially answering the survey many times. Enabling this option makes certain that does not happen.
However, checking this options has some ramifications, please see the Beetrieve reference manual for a discussion on these.
Once you have sat the preferences the way you desire, click the ‘Start the Survey!’ button to actually start the survey. This will open the survey for participation, send out the invitation emails if
you have added participants before start, and activate the Reminders and the Results panel.
Beetrieve User’s Manual"
When you have started the survey, the Startup panel will show you information about the sending
of invitation emails in place of the Start button. The invitation emails, if any, are generated by
Beetrieve and queued for sending. It might take up to 3 minutes before the emails start queuing
and going out. Until then Sent, Queued and Error/bounced will all show 0 (zero).
The status is live, and will show and update how many emails are in queue, have been sent, and
have failed in real time. You can also see the state of individual participants’ invitation emails in
the Participants panel, see the Working with Participants chapter for details.
Figure 6.4
Sending this batch of invitation emails is done when the number in ‘Queued’ reaches 0 again.
Note that sometimes this can take a very long time, even days, for a small number of emails. This
can happen if the receiving email server has intermittent problems. You can ignore this.
REMINDERS
Usually, when you use explicit participants, you would like as many of those participants to take
the survey as possible. It is therefore common to send participants that have not completed the
survey in a number of days a reminder.
You use the Reminders panel to construct a reminder email and execute the sending of reminder
emails.
When you have written and saved an email in the Reminders panel, the ‘Send Reminders!’ button
will show at the top of the panel.
42 Beetrieve User’s Manual
Figure 6.5
Click the button to send out the reminder emails. The email is only sent to those participants
that have yet to complete the survey (i.e. those that have not opened the questionnaire at all, and
those that have not reached the end of same). The reminders are not sent to those who you have
disabled in the Participants panel, or whose invitation email failed/bounced.
The dates of any previous reminders will show beneath the ‘Send Reminders’ button. All reminders will also be marked in the graph showing answer distribution over time in the Survey report
(see chapter 7).
Beetrieve User’s Manual"
7. Collecting results
Everything that has to do with results from the survey is collected together in the Results panel
of the survey’s admin interface.
Figure 7.2: The Results panel in Beetrieve Enterprise
S TAT U S & P R E F E R E N C E S
The upper part of the panel shows the current status of answers for the survey, and lets you set a
few preferences pertaining to results. Please see the Beetrieve reference manual for a discussion
on the preferences.
‘Started answers’ shows how many participants have clicked the link to the questionnaire and
started to take it (but not necessarily answered all of its questions), as a number, and as a percentage of the total population. ‘Completed answers’ likewise show you how many have reached the
end of the questionnaire.
The total population is the potential number of people that can answer the questionnaire. The
parenthesis shows the population from explicit participants + open participants.
In Beetrieve Standard the answer limit is 100 for the account by default, i.e. you will be able to
display/chart up to 100 answers in total. If the number of answers you have received in all your
surveys exceed the current answer limit, the ‘Free answers’ number will be negative and indicated
in orange. If that happens, not all answers will display in the result charts/tables.
44 Beetrieve User’s Manual
Figure 7.3
To stop accepting answers for a survey, highlight the survey and click the Close button shown in
fig. 2.5.
To purchase more answers, click the ‘Get more answers...’ button. It is completely up to you to
decide if you want to purchase more answers, and you may do so at any time before or after the
number of received answers has exceeded the current answer limit. Please see the next chapter,
Purchasing answers and subscriptions, for details.
In Beetrieve Enterprise Single the answer limit is per survey, so that if you for instance have
an Enterprise Single 500 subscription, you will be able to see up to 500 answers in each of the
surveys you have created.
SURVEY REPORT
The Survey report, which will open when you click the ‘Survey Report’ button, contains all the
important information about the survey collected in one place. Population and participation
status, invitation- and reminder emails, the full questionnaire, a graph showing participation over
time, and one graph showing the distribution of time used by the participants to complete the
questionnaire (Beetrieve Enterprise only) are all found in this report.
Beetrieve User’s Manual"
Figure 7.4: Answer distribution over time, as shown in the Survey report
VIEWING
R E S U LT S
The Results panel contains four tools for getting at the actual results of the survey.
R E S U LT S R E P O RT
The Results Report aggregates your survey’s results into a compact but all-inclusive report. It
contains all answers in an easy to digest format, running from the first to the last question in your
survey.
Answers to all multiple choice type questions are given in both tables and charts by default,
showing the number of participants answering each alternative, and the tables also show the percentage for the same. The percentage is always calculated per question, from the total number of
participants giving an answer to that particular question.
46 Beetrieve User’s Manual
Figure 7.5
In the report header you will find a number of options, letting you control several aspects of the
report. Most of these options should be fairly easy to understand, and they have immediate and
visible effect. See the Beetrieve Reference manual if you need more information about these options.
Answers to textual questions are given as a listing of the text answers.
The charts in the report always display as bar charts, as in figure 7.5. If you need more control, see
the next section, Charts Lab. The charts themselves can be manipulated in a few different ways,
for instance you can hover the mouse pointer over the bars to see its value, and each chart can be
printed and saved individually by using the two buttons each chart displays in its upper right corner. For more detailes on the charts please refer to the Beetrieve Reference Manual.
Note that due to the nature of these charts, new to Beetrieve 3.1, they can not be dragged and
dropped, nor right-clicked to get a menu for saving them to your computer. The aforementioned
save button is how you save them to your own computer.
Beetrieve User’s Manual"
CHARTS LAB
The Charts Lab is a powerful editor where you can see, manipulate and save charts for the results
in your survey in a very detailed way.
Figure 7.6: An answer distribution column chart in the Charts Lab
The Charts Lab is discussed in detail in the Beetrieve Reference Manual.
48 Beetrieve User’s Manual
R E S U LT S
TA B L E
&
E X P O R T I N G T H E R E S U LT S
Both the ‘Results table’ and the ‘Download!’ button will yield a table with results data. The major
difference between them is that the ‘Results table’ displays the table right inside Beetrieve,
whereas the ‘Download’ button at the bottom of the Results panel will let you download a file
with the results data, either as an Excel file, or as a tab-separated text file.
The results table shows all the results from your survey over all your participants, one row per
participant. It therefore exposes differences in answers between individual participants in a better way than what the Results Report can. The Results Report is however usually a better tool to
get a good overview over the results if you do not really care about who answered what.
From the Results table you can also contact individual participants by email, even if you are running an anonymous survey.
Both the results table and the downloaded file will only show answers up to the current answer
limit. See the ‘Status’ section for details.
Beetrieve User’s Manual"
8. Purchasing answers and Enterprise subscriptions
Accounts in Beetrieve are created so that the answer limit for surveys is 100 in total by default. If
you find that the surveys you have run have generated more than a hundred answers, you may
want to purchase access to some or all of those answers.
Or maybe you need access to Beetrieve Enterprise, with its powerful toolset, so that you can run
as many surveys as you want in the course of a year, with the answer limit you need.
If, what and when you purchase is completely up to you. Beetrieve is very flexible. You can purchase answers in several batches, to ‘keep up’ with incoming answers. You can purchase answers
before the answer limit is reached, or afterwards. All answers are always recorded by Beetrieve,
regardless of the current answer limit.
I N I T I AT I N G
A PURCHASE
One obvious way to start the process of purchasing answers is to press the ‘Get more answers...’
button in the Results panel in Beetrieve Standard. This will send you to the built-in web store,
which will be pre-configured to purchase answers.
Figure 8.1
50 Beetrieve User’s Manual
You can also initiate a purchase by clicking ‘Purchase’ in the main menu in Beetrieve. The web
store will only show the option of purchasing answers in Beetrieve Standard.
As an example, with Beetrieve Standard, open the web store, either by clicking ‘Purchase!’ in the
main menu, or by clicking ‘Get more answers...’ in the Results panel. The store will look like in
fig. 8.1.
If you now want to purchase more answers for your account, and you anticipate at least 2000 answers to come in, you could choose to purchase 4x500 answers.
Figure 8.2
This account currently has an answer limit of 100 (the free number of answers every account has
by default). If you purchase 2000 answers, you will therefore be able to see/export up to 2100 answers.
When you have selected the quantity and product, indicate that you have read and accepted
Sonora IT’s terms of purchasing by checking the box (please review them by clicking the link if
you haven’t done so before) and click ‘Continue’.
Figure 8.3
If you have a discount code, enter it in the box before clicking ‘Continue’.
FINISHING
THE PURCHASE
Clicking ‘Continue’ will bring you to the next page, where you enter the billing address.
Beetrieve User’s Manual"
Figure 8.4
On the top of the page you will see a summary of the purchase, including any discounts form discount codes or, if you upgrade or extend your subscription, from the current subscription. Please
see the online help for the store to see details on such discounts.
When you have entered your billing address, click either ‘Pay by credit card’, or if it is active, ‘Pay
by invoice’. Paying by invoice is for the time being only possible if your billing address is in Norway, and you are paying using Norwegian kroner.
If you click ‘Pay by invoice’, the next page is a simple summary with the final ‘Place order’ button.
If you click ‘Pay by credit card’, a separate window will open, securely hosted by our payment
transaction partner, DIBS AS. In the window, choose/click on card type (VISA or MasterCard are
the currently supported card types), and fill inn the required information. Then click ‘Validate
payment’ and follow any further instructions.
52 Beetrieve User’s Manual
When the payment has been successfully validated, the window will close2 and your purchase will
be immediately activated. The same is true if you chose to pay by invoice and clicked the final
‘Place order’ button. That means that if you purchased more answers, you can now immediately
go back to the survey and you will see that the answer limit has been raised.
If you however purchased an Enterprise Subscription and where using Beetrieve Standard up until now, you will have to log out and in again to access Beetrieve Enterprise.
Also, all current and future (within the Enterprise subscription period) surveys you create will
have a default answer limit corresponding to the answer limit of the subscription.
When a successful purchase has been carried out, the Beetrieve web store displays an order confirmation window to that effect, and an order confirmation email is sent to your log in email address.
Figure 8.5
The confirmation window contains a transaction ID only if you paid using a credit card. Also, a
‘Back to surveys’ button displays if you purchased answers, which will bring you back to the admin for the surveys. Otherwise, use the ‘Surveys’ entry in the main menu to return to the surveys.
Some browsers behave in a way that makes it necessary to keep the separate window open. In such cases
the order confirmation is shown in the same separate window.
2
Beetrieve User’s Manual"