1
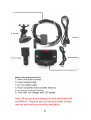
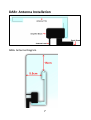
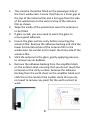
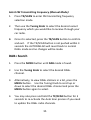
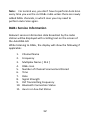
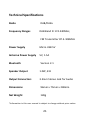
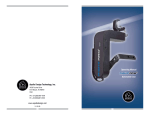
English
AutoDAB-GO
Digital In-Car DAB+ Digital Radio with
FM Transmitter & Bluetooth Hands-Free
1
Safety Instructions
Warning
•
Do not expose this radio to rain or moisture.
•
Obey local traffic laws and do not use whilst driving.
•
Clean with a dry cloth.
•
Do not block any ventilation openings.
•
Do not use near heater vents.
•
Use accessories provided by manufacturer.
•
Do not leave your radio where excessive heat could
cause damage.
2
Contents
4
Controls and Connectors
6
Operating the AutoDAB-GO
7
DAB+ Antenna Installation
10 Selecting Audio Output
11 DAB+ Search
12 DAB+ Service Information
13 Preset Stations
14 Bluetooth
18 Aux In
19 Settings
21 Technical Specifications
3
Controls and Connectors
4
5
Operating the AutoDAB-GO
1.
Mount the AutoDAB-GO on the dashboard using the
provided suction cup holder.
2.
Connect one end of the USB power supply cable to the
Micro USB socket on AutoDAB-GO and the other end to
the dual USB car charger. Plug the dual USB car charger
into the car 12V power socket.
3.
Connect the supplied antenna to the antenna socket.
4.
Turn on the power with the POWER SWITCH and the
display will show ‘AutoDAB, Digital Radio on the Move’.
Use MODE button to select DAB mode.
5.
For first time use, you need to scan all the local DAB+
channels by pressing and holding TX/SCAN button for 3
seconds to activate Auto Scan. All available DAB+ radio
channels will be scanned and saved until another Auto
Scan is performed. During scanning, a percentage bar
will be shown on the display to indicate the progress and
the total number of channels available will be displayed.
6.
Once scanning is complete, you can select any DAB+
radio channel via the Tuning Knob.
6
DAB+ Antenna Installation
DAB+ Antenna Diagram
7
1.
2.
3.
4.
5.
6.
The antenna should be fitted on the passenger side of
the front windscreen. Ensure that there is a 15cm gap at
the top of the antenna film and a 5cm gap from the side
of the windscreen to the vertical strip of the antenna
film as shown.
Wipe the inside of the windscreen were the antenna is
to be fitted.
If glass is cold, you may need to warm the glass to
ensure good adhesion.
Ensure the glass surface is dry before mounting the
antenna film. Remove the adhesive backing and stick the
lower horizontal section of the antenna film to the
windscreen. Be careful not to touch the sticky side of the
antenna film.
Stick the antenna to the glass, gently applying pressure
to remove any air bubbles.
Remove the adhesive backing from the amplifier block
on the antenna lead, ensuring that you do not touch the
terminals or the sticky surface. Remove the adhesive
backing from the earth sheet on the amplifier block and
stick this to the metal of the A pillar. Note that you do
not need to remove any paint for the earth contact to
work.
8
7.
Route the antenna lead down the A pillar to where the
AutoDAB GO is to be mounted. Ensure you do not trap
any leads as you go.
Do not attach the DAB antenna above heater wires, in a
location which would obstruct the view of the driver, or in a
location that would receive interference from metal. For your
safety, do not run cables so that they interfere with operation
of the vehicle, or through a location that would interfere with
the function of the airbags.
Selecting Audio Output – Aux Out
1.
Press and hold the MENU button to enter menu mode.
Use the Tuning Knob and scroll to AUX IN/OUT Select
and confirm by pressing MENU again. Use the Tuning
Knob to select AUX OUT and confirm by pressing the
MENU button. You will then be returned to the source
you were previously on. A headphone icon “ ” will be
displayed at the top of the display.
2.
Connect the supplied 3.5mm Audio Cable to the 3.5mm
Line Out connector on the side of the AutoDAB-GO and
then connect to the Aux in of the car stereo.
Note: In AUX OUT mode, there will be no FM
transmission to the car stereo.
9
Selecting Audio Output – FM Transmission
Select FM Transmitting Frequency (Auto Mode):
1.
Press and hold the MENU button to enter menu mode.
Use the Tuning Knob and scroll to AUX IN/OUT Select
and confirm by pressing MENU again. Use the Tuning
Knob to select AUX IN and confirm by pressing the
MENU button. This will enable FM transmission mode.
2.
Press TX/SCAN button to show FM transmitting
frequency (TX Frequency).
3.
Press and hold TX/SCAN button for 3 seconds to activate
the automatic scanning of a vacant transmission
frequency without interference with other channels. The
scanning process will take 20-30 seconds and is
accompanied by a flashing display of ---.-MHZ, before
stopping at a vacant frequency.
4.
After a vacant frequency is found, press the TX/SCAN
button again to confirm and exit the setting or this will
occur automatically after 3 seconds. The selected vacant
frequency will be shown at the top right of the display,
e.g. TX 108.0MHz
5.
Tune your car FM radio system to match the selected
vacant frequency for transmission of the audio signal
from AutoDAB-GO to your car stereo audio system.
10
Select FM Transmitting Frequency (Manual Mode):
1.
Press TX/SCAN to enter FM transmitting frequency
selection mode.
2.
Then use the Tuning Knob to select the desired vacant
frequency which you would like to receive through your
car radio.
3.
Once it is selected, press the TX/SCAN button to confirm
and exit. If the TX/SCAN button is not pushed within 3
seconds the AUTODAB-GO will revert back to normal
DAB+ mode and no changes will be made.
DAB+ Search
1.
Press the MODE button until DAB mode is found.
2.
Use the Tuning Knob to select the desired DAB+
channel.
3.
Alternatively, to view DAB+ stations in a list, press the
MENU button. Use the Tuning Knob to scroll up or
down to select the desired DAB+ channel and press the
MENU button again to select.
4.
You may also press and hold the TX/SCAN button for 3
seconds to re-activate the Auto Scan process if you need
to update the DAB+ radio channels.
11
Note: For normal use, you don’t have to perform Auto Scan
every time you use the car DAB+ radio unless there are newly
added DAB+ channels, in which case you may need to
perform Auto Scan again.
DAB+ Service Information
Relevant service information data broadcast by the radio
station will be displayed with scrolling text on the screen of
the AutoDAB-GO.
While listening to DAB+, the display will show the following if
applicable:
1.
2.
Channel Name
Frequency
3.
4.
5.
6.
7.
8.
9.
10.
11.
Multiplex Name(DLS)
DAB+ Icon
Number of Channel Scanned and Stored
Time
Date
Signal Strength
FM Transmitting Frequency
Bluetooth Connection Status
Aux-In or Aux-Out Status
12
Preset Stations
Storing Preset Stations:
To program and store your favourite DAB+ preset stations:
1.
Press and hold the PRESET button for 3 seconds to enter
Store Preset Stations mode.
2.
Use the Tuning Knob to scroll up or down to select a
number in the memory bank to store your favourite
station.
3.
Press the PRESET button to confirm and exit.
Stored Successfully will be displayed.
Selecting Preset Stations:
To select your favorite DAB+ preset stations:
1.
Press the PRESET button to enter Select Preset Stations
mode.
2.
Use the Tuning Knob to scroll up or down to select a
Preset Station.
3.
Press the PRESET button again to confirm and exit.
13
Bluetooth
Pairing a Phone:
When pairing a phone with AutoDAB-GO for the first time,
follow the below procedures:
1.
Press the MODE button until you scroll the screen to
Bluetooth mode.
2.
Press and hold the TX/SCAN button to put the
AutoDAB-GO device into pairing mode. Pairing in
Progress will be shown.
3.
From your phone, turn on Bluetooth and search for
Bluetooth peripherals. A list of available Bluetooth
peripherals will be displayed.
4.
Select CAR DAB in the list and once connection is
established, the Bluetooth screen will display Connected
and a Bluetooth icon will be shown at the top of the
AutoDAB-GO display.
5.
In Pairing in Progress mode, if you want to stop
searching for a new phone, you can press the PRESET
button to stop searching and return to the last
connected phone.
Note:
During the process of re-connecting to the last
connected phone, it may up to one minute for
14
re-connection depending on the model of the phone. In
the reconnecting process, the Bluetooth icon at the top
of the AutoDAB-GO display will be flashing and the LCD
will show Not Connected.
6.
You can disconnect an existing connected phone by
pressing and holding the TX/SCAN button to force the
AutoDAB-GO into pairing mode to connect another new
phone.
Note: The flashing of the Bluetooth icon indicates that
a Bluetooth device is not connected. Once it is
connected, the icon will stop flashing.
Manage Phone Call:
1.
When there is an incoming call, the AutoDAB-GO plays a
ringtone. Press PRESET to answer a call. The speaker
phone volume and call duration will be displayed at the
bottom of the screen. You can use the Tuning Knob to
adjust the volume level.
2.
Press and hold PRESET to decline a call.
3.
To end a call, press PRESET.
Selecting Bluetooth Phone Voice to your Car Stereo through
FM Transmitter or Built-In Speaker:
1.
Press and hold MENU button to enter menu.
15
2.
Use the Tuning Knob to scroll down the menu and select
Phone Speaker Setting. Press MENU button to confirm.
3.
Use the Tuning Knob to select Built-in Speaker or Car
Speaker and confirm by pressing the MENU button again.
You will then be returned back to the source you were
previously on.
4.
Use the Tuning Knob to adjust the voice volume to the
desired level when it is in Built-in Speaker mode.
5.
When in Car Speaker mode, the voice volume can only
be adjusted by the car stereo volume control button. Car
Speaker will be displayed at the bottom of the
AutoDAB-GO screen.
Note: When the Car Speaker is selected, the phone voice
can be input into car stereo by either using AUX OUT or FM
Transmitter.
Bluetooth Music Playback
FM transmission Mode
1.
Ensure Bluetooth mode is selected and a phone is
paired.
Select the music file from your phone and select
playback via Bluetooth (Refer to your phone user guide
for more information).
16
2.
Make sure you have selected AUX IN mode by pressing
and holding the MENU button to enter menu mode.
Use the Tuning Knob to scroll to AUX IN/OUT Select and
confirm by pressing MENU again. Use the Tuning Knob
to select AUX IN and confirm by pressing MENU button.
3.
Press TX/SCAN button to enter FM transmitting
frequency selection mode,
4.
Then use the Tuning Knob to select your desired vacant
frequency
5.
Press PRESET button to play or pause the music
playback.
6.
Use the Tuning Knob to select next or previous songs.
Note
A. Once your phone is paired to the AutoDAB-GO, the
connection between both devices will be automatically
re-established each time you enter your vehicle if the
AutoDAB-GO is powered on. AutoDAB-GO automatically
connects itself to the last phone you used with it. If you
want to connect AutoDAB-GO to another phone you
already paired but not the last one, you have to first
disconnect the last phone by selecting Forget this Device
in your phone’s Bluetooth Settings menu. Then press
and hold the TX/SCAN button to enter pairing mode
again.
17
B.
You can pair up to eight Bluetooth devices with
AutoDAB-GO.
Aux In
The AutoDAB-GO features a 3.5mm Aux-IN jack on the
right-hand side. External analogue audio source from an iPad,
iPhone, iPod, Tablet, Android phone or MP3 players etc. can
be fed wirelessly through the FM transmission into your car
stereo audio system.
To connect an external music player:
Press MODE button until you see AUX IN displayed on the
screen.
If you can’t find AUX IN, then press and hold the MENU
button to enter menu.
1.
Use the Tuning Knob to scroll to AUX IN/OUT Select,
press MENU button to confirm,
2.
Use the Tuning Knob to select AUX IN and confirm by
pressing MENU button again.
6.
Connect an external audio source into the AUX IN jack
on the right-hand side of AutoDAB-GO with the provided
3.5mm audio cable.
18
Settings
Screen Background/Font Colour
The colour of the screen background and font can be set to
four different combinations to match with your overall car
dashboard colour:
1.
2.
3.
4.
Black background/white font
Black background/blue font
Black background/orange font
Colour
To set the colour, follow the procedure below:
•
Press and hold the MENU button for 3 seconds and scroll
to Colour Setting.
•
Use the Tuning Knob to scroll and select the desired
colour and press MENU button to confirm. You will
then be returned to the previously selected source.
LCD display Dimmer Control
When driving at night, you can control the brightness of the
colour LCD display by pressing and holding the MODE button
to dim the display. Press and hold the MODE button again to
return to normal brightness level.
19
Language Selection
1.
Press and hold the MENU button
2.
Use the Tuning Knob to scroll to Language Setting and
confirm by pressing the MENU button again
3.
Use the Tuning Knob to select your desired language and
confirm by pressing the MENU button
Factory Reset
1.
Press and hold the MENU button
2.
Use the Tuning Knob to scroll to Factory Reset and
confirm by pressing the MENU button again.
3.
Use the Tuning Knob to select YES or NO for the reset
and confirm by pressing the MENU button.
Software Version
1.
Press and hold the MENU button
2.
Use the Tuning Knob to scroll to Software Version and
confirm by pressing the MENU button to see the current
software version of the device.
3.
Press the MODE button to exit menu.
20
Technical Specifications
Radio
Frequency Ranges
DAB/DAB+
DAB Band III 174-240MHz,
FM Transmitter 87.5-108MHz
Power Supply
Micro USB 5V
Antenna Power Supply
5V, 1.5A
Bluetooth
Version 2.1
Speaker Output
1.0W, 8 Ω
Output Connectors
3.5mm Stereo Jack for Audio
Dimensions
96mm x 75mm x 248mm
Net Weight
128g
*Information in this user manual is subject to change without prior notice.
21