1
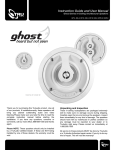
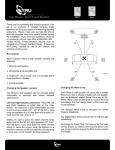
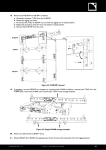
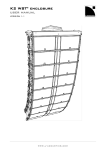
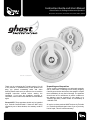
Instruction Guide and User Manual
Ghost Series In-Ceiling Architectural Speakers
GP-4, GG-4, GP-6, GG-6, GC-6, GP-8, GG-8, GC-8, GPD-6, GGD-6
Patent No. US 7,543,681 B2
Thank you for purchasing this TruAudio product. Like all
of our products, if installedcorrectly, these speakers will
bring you yearsof outstanding audio and video
listening.Please make sure you take the time to read the
complete instruction manual before starting the
installation. If you have any questions, concerns or
comments, call our main office, 888-858-1555 and thanks
again.
Please NOTE: These speakers should only be installed
by a TruAudio Certified Dealer. If these are NOT being
installed by one of these dealers, the warranty could be
void.
Unpacking and Inspection
These in-ceiling loudspeakers are packaged extremely
well to make sure no damage occurs during shipping.
Carefully open the box and remove the speakers. Inspect
them immediately for any kind of damage. The speakers
should have left our warehouse in perfect condition so
any damage must be reported to your dealer or to
TruAudio right away. Please contact us immediately at
1.888.858.1555
All service to these products MUST be done by TruAudio
or a TruAudio Authorized repair center. If you try to do any
kind of repair, This will void the warranty!
Ghost Series In-Ceiling
Choosing the Speaker Location
Speaker Installation
Before you install your speakers you should take careful
consideration their location. Makesure to note location of
lighting fixtures, electrical, plumbing and any other
obstructions. If the house was pre-wired at construction
time, make sure you know where the speaker cable is
located in the wall or ceiling.
These speakers are mono so you will need two speakers
for stereo sound, one for the right channel and one for the
left. There should be a two conductor speaker cable
pre-wire to each of the speaker locations. Make sure you
find each of the speaker cables and pull them though the
cut speaker holes. Remove the speaker from the box and
inspect for any damage.
Wall Placement: When placing your speakers into the
wall, if possible, they should be mounted facing toward
the listening area. Take in consideration where the
furniture is located when finalizing where the speaker will
be installed. Remember that with this type of “built-in”
architectural speaker, once the hole is cut for the speaker
installation, it is very costly to move the location.
Preparation before Speaker Installation
If your home was pre-wired for speakers at construction
time, you might have used TruAudio rough-in kits (RC
series) prior to drywall at each speaker location. (There
should also be speaker cable at this location). After the
drywall is installed and the hole is cut, the speaker is then
easily installed. Once the hole is cut in the drywall, the
pre-wired speaker cable should be somewhere in the
wall/ ceiling near the hole. If you did use rough-in speaker
rings, move on to “Speaker Installation”. If the speaker
hole has not been cut from the drywall please read the
following instructions: If the house is at the point of actual
“Speaker installation”, speaker cable should already be
run to each speaker location even if the hole is not cut.
Find the location to where the speaker wirewas pre-wired
to. Check the area for obstructions such as plumbing,
heating ducts or electrical wiring.
Locate the wood studs or joists nearest the desired
location and make sure they will not interfere with speaker
location. Use the supplied speaker cutout to get the
recommended dimension of the hole needed for that
particular speaker. Position the cutout in the desired
location and outline the speaker opening to be cut. If you
are not sure of possible obstructions, cut a small hole in
the center of your outline. This will allow you to check for
obstructions. If there are no problems with your mounting
location, proceed and cutout the outlined hole. At this
point, you should be able to see or find the speaker cable.
Pull the cable through the hole.
If the wall or ceiling in not already insulated, we suggest
using TruAudio model FE-24, an inwall foam enclosure
that will greatly improve the speakers sound. Other
options for sound dampening material would include
typical insulation or Dacron. If this material has a foil layer,
position the foil away from the speaker magnet.
If there is any damage, contact TruAudio immediately,
888-858-1555.
Backbox Option: The Ghost series speakers offer an
optional backbox (BB-6p or 8p) that can be purchased
separately. If you are using the backbox, now is the time
to attach them to the speakers. Please follow the
instructions that come with the backbox.
Preparing the speaker cable: You should have located
the speaker cable by now, so it’s time to prep it for
connection to the speaker. Strip back the outside
insulation so the individual conductors are showing.
Depending on the cable, there should be two or four
separate conductors. Strip back the insulation on each
conductor to show the bare copper wire. We suggest
stripping enough so that 3/8” of copper wire is showing.
Push down each post and insert the speaker cable. The
posts will be located on the back of the speaker on the
crossover. Make sure that only BARE wire is touching the
speaker post once it slides back into place. All TruAudio
products feature gold push binding posts which are quick
and simple to use and also are great for conducting
speaker signal.
Caution: Make sure to observe polarity, R + (positive)
from the amp or volume control to speaker R + and R
– (negative) to R –. Make sure to do the same for the
left channel.
When connecting the other end of the speaker cable to
the amplifier or receiver make sure to observe the same
polarity as you did at the speaker connection.
To prepare the speaker for the actual installation, turn all
the mounting toggles (dog ears) in toward the speaker
frame. This will allow the speaker to easily fit into the
precut hole. Put the speaker into the hole (the speaker
cable should be connected) and make sure the speaker
cable stays connected to the speaker. Carefully tuck the
speaker cable up into the hole as you put the speaker into
place. Hold it in place with one hand and with your other
hand carefully tighten the mounting screws evenly to
secure the speaker. As you tighten the screws, the dog
ears will flip into position to grip into the drywall. DO NOT
Ghost Series In-Ceiling
over tighten the mounting screws. This will cause damage
to the mounting toggle and the speaker will not stay in
place.
Adjust the Tweeter: This series of in-ceiling speakers
offer swivel tweeters so they are more versatile for
different applications. After the location of the speaker is
determined and the speaker is installed, adjust the
tweeters toward the listening area. Sometimes,
depending on the installation, it might be necessary to
reflect the sound off a wall or ceiling.
Adjust the Level Control: Some of the Ghost series
offer level control to adjust the high and low output. If your
speaker offer this, the switches are located on the front
face of the speaker. You can adjust these controls to get
more or less high frequency and more or less bass. Adjust
the switch to each setting until you get the desired amount
of high frequency and then do the same for the bass. We
suggest starting at -3dB and then from there you can
increase or decrease the desired level. The adjustments
are -6dB, -3dB and 0dB.
Painting the Speaker
If you are going to paint your speakers, we suggest
painting the grills before Installation. This is one of the
advantages of the Ghost series speakers, that the
speaker itself does not need to be painted, onlt the grill.
The Ghost series is a frameless speaker and will save
time on labor since the grill can be painted before hand
and be ready for install that the same time as the
installation of the speakers.
When painting the grills, it is VERY IMPORTANT that you
remove the cloth like material (Dacron) from the grill
before painting, and then you can paint the grills lightly
and be careful not to clog the holes. Depending on the
thickness of the paint, you may want to thin it slightly. This
will help prevent clogging the grill holes. Another
suggestion is finding a spray paint that will match and
paint the grill with that. Your local hardware store should
have as good selection of spray paints. Do not paint the
grill while it’s still on the speaker, paint them separately.
Grill installation: Remove the grill from the box and
install it onto the speaker. Align the grills edges to the
outer edge of speaker and allow magnets to attach grill to
speaker, carefully push the grill on. Make sure to check all
the way around the grill to ensure its sitting on the
speaker evenly.
SoundVision Technologies dba TRUAUDIO
PRODUCT WARRANTY
All in-wall, in-ceiling, outdoor speakers, volume controls and freestanding loudspeakers have a limited lifetime warranty.
This warranty includes lifetime parts and repair labor on all components. Powered subwoofers and active electronics
have a one (1) year limited warranty. This warranty includes one (1) year parts and repair labor on all components.
TRUAUDIO’s obligation under these warrantees is limited to repairing or replacing any component found defective in
material or workmanship under normal conditions of use. These warrantees shall not apply to products which have
been abused, modified, disassembled, or repaired by anyone other than TRUAUDIO or one of its appointed service
centers. Products to be repaired under this warranty must be returned to the factory or designated service center with
all transportation and insurance charges pre-paid.
It i s the polic y of T R U A U D IO to c o n ti n u o u s l y i ncorporate i mprovements i nto our products. A l l specif icat ions ar e
su bj e c t t o c hange w i th o u t n o ti c e . If y o u h a v e any questi ons regardi ng thi s or any other TR U A U D IO pr oduct s,
pl e ase c all 1- 888- 8 5 8 -1 5 5 5 , Mo n d a y – F ri d a y, 7:00 am – 6:00 pm MS T.
TRUA UDI O S peak e r S y s te m s , S t. Ge o rg e , U tah, 84790
Offi ce : 435. 986. 157 4 F a x : 4 3 5 .2 5 1 .9 8 1 5
Ghost Series In-Ceiling
GP-4 In-ceiling, 2 way
Woofer:
Tweeter:
Power:
Impedance:
Frequency Response:
Sensitivity:
EQ Adjustments:
Grill Type:
Grill Material:
Finish Dimensions:
Cutout Dimension:
4 1/2" white polypropylene
3/4” silk soft dome, swivel
5 - 55 watts
8 ohms
65 - 20k Hz
90 dB (2.83 volts @ 1 meter)
Tweeter & woofer 0, -3, -6
Ghost style, frameless
Powder coated steel
7 1/2” (189.04 mm) diameter,
3 5/8” (92.69mm) deep
6 11/16” (170.2 mm) diameter
GP-6 In-ceiling, 2 way
Woofer:
Tweeter:
Power:
Impedance:
Frequency Response:
Sensitivity:
EQ Adjustments:
Grill Type:
Grill Material:
Finish Dimensions:
Cutout Dimension:
6 1/2” white polypropylene
1” silk soft dome, swivel
5 - 100 watts
8 ohms
51 - 20k Hz
91 dB (2.83 volts @ 1 meter)
Tweeter & woofer 0, -3, -6
Ghost style, frameless
Powder coated steel
9” (229.3 mm) diameter,
4” (104 mm) deep
8 3/16” (208.3 mm) diameter
GP-8 In-ceiling, 2 way
Woofer:
Tweeter:
Power:
Impedance:
Frequency Response:
Sensitivity:
EQ Adjustments:
Grill Type:
Grill Material:
Finish Dimensions:
Cutout Dimension:
8” white polypropylene
1” silk soft dome, swivel
5 - 125 watts
8 ohms
42 - 20k Hz
91 dB (2.83 volts @ 1 meter)
Tweeter & woofer 0, -3, -6
Ghost style, frameless
Powder coated steel
10 1/2” (267.84 mm) diameter,
4 3/16” (106.06 mm) deep
9 13/16” (248.9 mm) diameter
GC-6 In-ceiling, 2 way
Woofer:
Tweeter:
Power:
Impedance:
Frequency Response:
Sensitivity:
EQ Adjustments:
Grill Type:
Grill Material:
Finish Dimensions:
Cutout Dimension:
6.5” carbon fiber
1” titanium, swivel
5 - 150 watts
8 ohm
35 - 22K Hz. (+/-3 dB)
92 dB (2.83 volts /1 meter,+3dB)
Tweeter & woofer 0, -3, -6
Ghost style, frameless
Powder coated steel
9" (229mm) diameter,
4" (104mm) deep
8.19" ( 208mm) diameter
GPD-6 In-ceiling, Stereo
Woofer:
Tweeter:
Power:
Impedance:
Frequency Response:
Sensitivity:
EQ Adjustments:
Grill Type:
Grill Material:
Finish Dimensions:
Cutout Dimension:
6 1/2” white polypropylene
Dual 1” silk soft dome, swivel
5 - 100 watts
8 ohms
52 - 20k Hz
91 dB (2.83 volts @ 1 meter)
Tweeter & woofer 0, -3, -6
Ghost style, frameless
Powder coated steel
9” (229.3 mm) diameter,
4” (104 mm) deep
8 3/16” (208.3 mm) diameter
GG-4 In-ceiling, 2 way
Woofer:
Tweeter:
Power:
Impedance:
Frequency Response:
Sensitivity:
EQ Adjustments:
Grill Type:
Grill Material:
Finish Dimensions:
Cutout Dimension:
4 1/2” white glass fiber
3/4” titanium, swivel
5 - 70 watts
8 ohms
60 - 20k Hz
90 dB (2.83 volts @ 1 meter)
Tweeter & woofer 0, -3, -6
Ghost style, frameless
Powder coated steel
7 1/2” (189.04 mm) diameter,
3 5/8” (92.69mm) deep
6 11/16” (170.2 mm) diameter
GG-6 In-ceiling, 2 way
Woofer:
Tweeter:
Power:
Impedance:
Frequency Response:
Sensitivity:
EQ Adjustments:
Grill Type:
Grill Material:
Finish Dimensions:
Cutout Dimension:
6 1/2” white glass fiber
1” titanium, swivel
5 - 125 watts
8 ohms
43 - 20k Hz
91 dB (2.83 volts @ 1 meter)
Tweeter & woofer 0, -3, -6
Ghost style, frameless
Powder coated steel
9” (229.3 mm) diameter,
4” (104 mm) deep
8 3/16” (208.3 mm) diameter
GG-8 In-ceiling, 2 way
Woofer:
Tweeter:
Power:
Impedance:
Frequency Response:
Sensitivity:
EQ Adjustments:
Grill Type:
Grill Material:
Finish Dimensions:
Cutout Dimension:
8” white glass fiber
1” titanium, swivel
5 - 150 watts
8 ohms
34 - 20k Hz
91 dB (2.83 volts @ 1 meter)
Tweeter & woofer 0, -3, -6
Ghost style, frameless
Powder coated steel
10 1/2” (267.84 mm) diameter,
4 3/16” (106.06 mm) deep
9 13/16” (248.9 mm) diameter
GC-8 In-ceiling, 2 way
Woofer:
Tweeter:
Power:
Impedance:
Frequency Response:
Sensitivity:
EQ Adjustments:
Grill Type:
Grill Material:
Finish Dimensions:
Cutout Dimension:
8” carbon fiber
1” titanium, swivel
5 - 175 watts
8 ohm
30 - 22K Hz. (+/-3 dB)
93 dB (2.83 volts /1 meter,+3dB)
Tweeter & woofer 0, -3, -6
Ghost style, frameless
Powder coated steel
10.5" (268mm) diameter,
4.19" (106mm) deep
9.81" (248mm) diameter
GGD-6 In-ceiling, Stereo
Woofer:
Tweeter:
Power:
Impedance:
Frequency Response:
Sensitivity:
EQ Adjustments:
Grill Type:
Grill Material:
Finish Dimensions:
Cutout Dimension:
6 1/2 ” white glass fiber
Dual 1“ titanium, swivel
5 - 150 watts
8 ohms
34 - 20k Hz
91 dB (2.83 volts @ 1 meter)
Tweeter & woofer 0, -3, -6
Ghost style, frameless
Powder coated steel
9” (229.3 mm) diameter,
4” (104 mm) deep
8 3/16” (208.3 mm) diameter