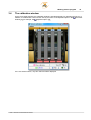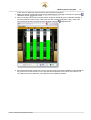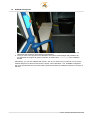
1
User manual
Author:
N. Waas
Date:
25.06.2008
EYEONE Konfigurator
MG Industrieelektronik GmbH
Nobelstraße 7
D-76275 Ettlingen
Germany
Telefon 07243/5801- 0
Telefax 07243/5801- 20
EYEONE Konfigurator
© 2000 - 2008 MG Industrieelektronik GmbH
All rights reserved.
No part of this document may be reproduced in any way without permission of MG Industrieelektronik GmbH,
Nobelstraße 7, 76275 Ettlingen, Germany.
Product names mentioned in this document may be protected by copyrights of other enterprises.
Juni 2008, Ettlingen, Germany.
Publisher
MG Industrieelektronik GmbH
Responsable author
N. Waas
Quality assurance
R. Ganninger
Graphics
N. Waas
Translation
Studio1Solutions
Table of contents
Table of contents
3
1 ..........................................................................................................................................
Introduction
6
2 ..........................................................................................................................................
Installation
8
3 ..........................................................................................................................................
Working with the program
3.1
The counting
window
.............................................................................................................
8
3.2
EYEONE datasheet
............................................................................................................. 9
3.3
The parameter
window
.............................................................................................................
10
3.4
The calibration
window
.............................................................................................................
15
3.5
Run firmware
update
.............................................................................................................
20
3.6
Password.............................................................................................................
protection
21
24
4..........................................................................................................................................
Contact
© 2000 - 2008 MG Industrieelektronik GmbH
I
Chapter
1
Introduction
Introduction
1
3
Introduction
Welcome to
EYEONE Configurator
System requirements
The EYEONE Configurator has a few system requirements before being installed on your computer.
This section lists some of the basic requirements.
For a trouble-free operation your system must be equipped at least as follows:
500 MHz processor speed,
32 MB main memory,
CDROM or DVD drive,
Graphic card and monitor supporting a resolution of at least 800x600 pixels at 16-Bit color depth
and
· a serial port to connect the sensor.
·
·
·
·
The EYEONE Configurator is a windows-based application program and runs on these operating
systems:
·
·
·
·
·
Microsoft Windows 98 SE
Microsoft Windows ME
Microsoft Windows 2000, SP4
Microsoft Windows XP Home Edition
Microsoft Windows XP Professional Edition
The EYEONE Configurator need not necessarily be installed on your computer in order to be used. It
can also run directly from a CD, USB stick or similar devices.
© 2000 - 2008 MG Industrieelektronik GmbH
Chapter
2
Installation
6
2
EYEONE Konfigurator
Installation
Connecting the Sensor
To do the settings for a sensor and/or calibrate it, first you must establish a connection between the
sensor and the PC or Notebook on which the EYEONE Configurator will run. The sensor
communicates with a PC through a serial port.
The serial connecting cable must be equipped with an RJ11 jack on one end. The following diagram
shows the pin assignment for this connector.
Connect the cable’s jack (RJ11) to the matching socket on the EYEONE distributor node. You will find
the distributor node mostly inside the door box of the corresponding door.
© 2000 - 2008 MG Industrieelektronik GmbH
Chapter
3
Working with the program
8
EYEONE Konfigurator
3
Working with the program
3.1
The counting window
The configurations routine’s main window displays details like the status of the connection, the
connected sensor’s firmware version, the door status and the number of the count results stored on
the sensor.
The top area of the window shows the main menu bar and below it the quick start bar. You can access
all functions of the EYEONE Configurator, including the help functions, either from the menu bar or
from the quick start buttons.
The following functions are available to you:
Funciton
Firmware Update
Quick start
What it means
Using this function you can load a new
to the sensor.
Firmware
20
on
Adjust parameters
You can adjust all
as its address etc.
Calibrate sensor
You will need this function to
Print datasheet
You can take
a print out 9 of a connected sensor’s
parameters and file the output for your record.
Adjust interface
Here you can select the interface where the sensor is
connected to your PC or Notebook.
Change language
The configuration application software offers you different
parameters
10
of the sensor such
calibrate
15
the sensor.
© 2000 - 2008 MG Industrieelektronik GmbH
Working with the program
9
language options. If you wish, you can toggle between
various languages.
Switch signal on or off
during counting
The connected speakers enable you to also hear the
instances of passengers entering and exiting the vehicle.
The counting range
The main screen displays the count values saved on the connected sensor. If a sensor is connected
the current count results are displayed in realtime.
You can delete the values stored on the sensor using the button "Delete".
The stored count results in the sensor will be deleted not only in the configuration program; they
will no longer be available to the onboard unit, if one is connected.
If the sensor is connected to an onboard unit and it picks up the count results automatically from the
sensor (for example, when leaving a stop), it may happen that the count results are seen in the
configurator window only for a short duration. As the onboard unit picks up the results, it will reset the
stored values in the sensor.
The status bar
The status bar indicates two details:
· the sensor’s current firmware version
· the state of the door that is the take-off point for the sensor.
The message in the field "Door" indicates from which state of the door the connected sensor is
currently taking-off. The counting sensor operates with limitations only as long as the door is opened
(see also the section
"Evaluation delay" 13 under sensor parameters) 10 . The sensor receives the
message about the state of the door from a door contact. The sensor must learn as to which position
of the door contact represents "Door opened" and which "Door closed". You can adjust this in the
section
"Door contact" 12 dealing with sensor parameters.
3.2
EYEONE datasheet
To print a datasheet, select from the menu "Parameter" the option "Print datasheet ..." or click
the corresponding button on the quick start bar.
Before printing the datasheet the system displays the following input dialog:
© 2000 - 2008 MG Industrieelektronik GmbH
10
EYEONE Konfigurator
Here you can enter the description of the vehicle (for example, the vehicle number or the registration
number) and that of the relevant door. The entered values will be automatically saved to the datasheet.
However, you can skip this dialog.
3.3
The parameter window
In this window you can set all relevant parameters for the EYEONE Counter sensor.
These are classified into five sections:
Parameters
11
Door characteristics
11
© 2000 - 2008 MG Industrieelektronik GmbH
Working with the program
Door contact
11
12
Onboard unit interface
Evaluation-delay
12
13
General parameters
You can set the sensor’s Address in the general parameters. For each vehicle, you can operate
simultaneously 15 sensors maximum.
Each sensor of a vehicle must have a unique Address.
The EYEONE counting sensor is supplied ex factory in two different variants. The standard version
has four channels and an assembly width of 90 cm. There is another version for narrow doors with an
assembly width of 60 cm and two channels.
Depending on the type of sensor that is currently connected you must set the matching channel
number (two or four).
You can also deactivate any individual channel of a sensor. By default all channels should always be
active. A channel may only be deactivated, for example, if it is blocked permanently due to its
assembled position (for example, because of a mirror projecting into the sensor path).
Specifying a value in the field Follow-up delay indicates how long the sensor should remain in
operating mode after the IBIS master device cuts off.
Door characteristics
In bus traffic system often the practice is to only enter the vehicle from the driver’s side and only exit
through the rear doors.
The EYEONE sensor takes this aspect into account.
You can specify for each sensor if "its" door is a primary entry, primary exit or a universal door.
For example, if you decide for an entry door, the sensor watches out more on passengers entering the
vehicle.
A similar setting option is available for controlling the counting sensor’s recognition algorithm by
enabling the checkbox Doorway separation.
Using this option you can divide the sensor’s recognition area into two separate units. The sensor will
treat the left and the right area as a single independent recognition area and assume that there is no
© 2000 - 2008 MG Industrieelektronik GmbH
12
EYEONE Konfigurator
overlapping between both the areas. In other words, it assumes that no passenger can wander from
the left into the right area and the other way round.
If the doorway separation option is active, you should also specify how the entry situation is at the
corresponding door.
Typically there are two kinds:
1. The way for the passengers is mainly determined by the vehicle’s design at this door.
2. The way for the passengers into the vehicle’s interior is basically optional after the separator.
Normally, the first kind is found at the vehicle’s driver-end door. The second kind is found, for example,
in normal doors of busses or rail cars that are equipped with a separator but not compel the passenger
to move further in a particular direction into the vehicle.
Door contact
This option allows you to set which state of the door contact switch an open door represents. This
value must be set correctly because the sensor is only active when the door is opened.
You can verify the correct function of the door contact in the
status bar of the counting window 9 .
Here the field "Door" must display "open" when the door is really in opened condition and "closed"
when it is closed.
The door contact must be connected in such a way that it reports "Door open" as soon as the
door begins to open and "Door closed" only when the door is fully closed.
Onboard unit interface
You can connect the EYEONE counting sensor in two ways to your onboard system:
over the IBIS-Bus
over an RS485 interface
If you are using an RS485 interface, then you can specify a time-gap in milliseconds in the drop-down
field "Send delay" during which the sensor waits between instances of sending and receiving
telegrams. Here the default value is 20 ms.
The EYEONE sensors cannot be interchanged later between IBIS-Bus and RS485. The
EYEONE sensors are supplied ex factory either with IBIS-Bus or RS485 interface. This option is
only intended for conveying information to the application software about the interface being used
by the hard ware.
Special options
© 2000 - 2008 MG Industrieelektronik GmbH
Working with the program
13
The option "Apply only Door contact 1, if Door contact 2 is active." is meant to
prevent a loss of the door signal as it normally drops when the ignition is cut off. If you need this option,
please contact us for more information.
To enable this option special cabling is necessary for your vehicle.
If the option "Use extended b-telegram" is active in addition to the number of passengers
entering and exiting in the standard IBIS-telegram 183 another value is used for the signal activity of
the corresponding sensor.
If this option is checked the sensor’s response to a query by the master device is no longer
VDV-300 compatible.
The option "Throng recognition" is intended for better recognition of people in thronging or
jamming situations. If many people enter or exit a vehicle in crowds, that is to say, without any distance
from each other, for the sensor it is difficult or impossible to distinguish individual persons in a throng.
In such a situation typically less people are counted than those who actually enter or exit the vehicle.
The option "Throng recognition" will influence the sensor’s counting strategy. In thronging
situations individuals are separated much better and the total result of the counting is also better. It is
only useful if you have primarily people thronging in one direction at the door for which the throng
recognition is activated. But if there is simultaneously dense entering and exiting traffic you should
deactivate this option.
Evaluation delay
Normally, the EYEONE counting sensor begins to count as soon as the door contact reports "open"
until the door contact reports again "closed".
There are situations for the door where it may be meaningful to extend or shorten the time during
which the sensor is counting.
Es gibt drei Fälle, die konfiguriert werden können:
© 2000 - 2008 MG Industrieelektronik GmbH
14
EYEONE Konfigurator
Evaluation delay in "Door opened"
Discarding the counting results before "Door closed"
Evaluation delay beyond "Door closed"
1. Case: Evaluation delay in "Door open"
In some door designs the door sweeps through one or many sensor rays during the opening action. In
rare cases this may result in mere door movement being assessed as passenger activity of entering or
exiting.
In order to intercept such situations, the EYEONE sensor offers the option to configure delaying the
evaluation while opening the door. All counting events within this period after "Door opened" will be
ignored.
2. Case: Discarding counting results before "Door closed"
This represents the opposite of the first case. Even while closing the door it may happen that the doors
slide through the sensor area and trigger counting operations.
3. Case: Extension of evaluation delay beyond "Door closed"
This option is intended for intercepting certain characteristics of certain door contacts. There are some
door contacts which erroneously report "Door closed" as soon as the door just begins to close and not
when the door is closed fully.
The counting sensor finishes its recording once it receives the "Door closed" message from the door
contact. However, in such a situation there can be a considerable time-gap between the signal "Door
closed" and the really closed condition of doors as long as still some people have time to enter or exit
the vehicle. All these people would be lost to the counting statistics, if this property of the special door
contact is not taken into account.
Therefore, you have the option to specify a period beyond which the sensor should continue to record
even when the door contact has already reported "Door closed".
© 2000 - 2008 MG Industrieelektronik GmbH
Working with the program
3.4
15
The calibration window
As the name itself suggests, the calibration window is intended primarily for calibrating the sensor. In
addition, it visualizes the current sensor activity and some of the adjusted options in the
parameter
window 10 (for example, the
separator option 11 ).
If it is a 2-channel sensor, only two channels will be displayed.
© 2000 - 2008 MG Industrieelektronik GmbH
16
EYEONE Konfigurator
The threshold
If a sensor is connected, the door is opened and the
state of the door contact 12 has been set
correctly in the parameters, the calibration window will then show for each channel data about the
current calibration threshold and the present activity on the corresponding channel.
The threshold has two functions:
1. Due to consideration of manufacturing tolerances not all channels of a sensor are aligned 100%
parallel. Wide deviations in a hundredth of millimeter area may mean scanning deviations in a
centimeter area on the ground height if converted into the assembly height of the sensor. So as to
balance these fluctuations each sensor must possess information about what a plane surface is
that is parallel to the ground. This operation involves "calibration" of the sensor.
2. Moreover, the calibration threshold allows you to determine the area under which counting events
are intended to be ignored. In this way, you can specify, for example, that animals or people below
a particular body size are disregarded straightaway. Typically, this option is used, for example, to
exclude children below a particular age automatically from counting.
Sensor calibration
To calibrate the sensor, i.e. to fix its threshold, do the following:
1. For this, you need a bright-colored plank or a cardboard that is slightly narrower than the width of
the door on which the sensor is mounted. The plank or the cardboard should have a depth of
approximately 30 cm.
2. The vehicle should be standing on a flat surface and not in an inclined position (if the vehicle
supports kneeling function).
3. Open the vehicle’s door and connect the computer unit to the sensor or – normally this is simpler –
© 2000 - 2008 MG Industrieelektronik GmbH
Working with the program
17
to the sensor’s distributor node and launch the EYEONE Configurator.
4. Make sure that the configuration program has established a connection to the sensor. Open the
calibration window 15 from the menu "Calibrate parameters ...".
5. Now you should view the sensor activity shown as green colored bars in the calibration window, if
you move within the sensor area. If this is not the case, all bars will appear in grey; check if the
correct state of the door contact has been adjusted under the
parameters 10 .
6. Now stand outside the vehicle just in front of the door edge and hold the calibration board parallel to
the ground in the sensor area in such a way that all the channels of the sensor are crossed. You
can observe this at the deflection of all channels in the calibration window..
© 2000 - 2008 MG Industrieelektronik GmbH
18
EYEONE Konfigurator
7. Hold the cardboard or the plank as much as possible at the height that should define later the
calibration and, therefore, the threshold of identification.
8. Once you have correctly placed the calibration board at the desired height and parallel to the
ground within the range of all sensor channels, click the button "Calibrate" in the calibration
window.
Alternatively, you can also calibrate with a timer. Just as in a camera, all you need to do is to set the
desired delay time for the timer and click the option "Timer calibration". The EYEONE Configurator
will count the specified seconds in decreasing numbers and start the calibration sequence on expiry of
the time.
© 2000 - 2008 MG Industrieelektronik GmbH
Working with the program
19
This procedure needs to be followed only once at the time of mounting the sensor. The EYEONE
sensor does not need any maintenance. Periodic re-calibration or such procedure is not necessary.
Tip: You should briefly test the relevant sensor after every calibration by entering and exiting the
vehicle a few times. If you notice that the sensor is counting incorrectly too often and, for
example, fails to identify you a few times, possibly the calibration threshold has been set either
too high or too low.
In such case, please re-calibrate the sensor until you achieve the optimum results.
Change threshold manually
In rare situations it may be necessary to manually readjust the calibration threshold of one or many
channels. For example, if a calibration value clearly deviates from other values due to heavy reflections
on the vehicle (for example, due to reflection from a mirror or the door).
This function should only be used, if it is absolutely necessary. Incorrect or incoherently set
measurements will give rise to totally meaningless count results. Before you decide to use this
function you are advised to
consult with us 24 first.
As a protection against incorrect inputs, by default, the function to manually change the calibration
values is disabled. However, you can enable this function by clicking the button "Enable".
After enabling the calibration values of individual channels can be edited. Change the value of the
affected channel as desired and click "Set calibration value manually" to apply the new calibration
© 2000 - 2008 MG Industrieelektronik GmbH
20
EYEONE Konfigurator
values.
The calibration values are incremental from top to bottom and no the other way round.
The top-most calibration limit is 800 and the bottom-most is 3600. For example. If you wish to set
the calibration threshold slightly upwards, you must decrease the calibration value.
3.5
Run firmware update
To run a firmware update you need a valid firmware file. Firmware files normally have a file extension
like this ".h86".
In the main menu, select the options "File" - "Run firmware update".
During a firmware update it is likely that the current parameters and also the calibration
thresholds get deleted. If necessary, first note down the current settings so that you will be able to
reset them after a firmware update operation. Alternatively, you can take
a print-out of the
sensor’s datasheet 9 . In this way, you have all the settings’ information at a glance.
© 2000 - 2008 MG Industrieelektronik GmbH
Working with the program
21
The program will load the firmware on to the sensor after you click "Run update". If the Update has
been successful, you will notice that the
status indicator 9 has changed from "green" to "red".
As soon as the sensor has saved the new firmware information it will re-establish the connection to
your PC automatically.
If the connection does not take place automatically, quit the EYEONE Configurator, briefly
disconnect the cable from your PC or Notebook and start the configuration program all over
again.
After every firmware update, please check the sensor’s parameters and calibration without fail.
Don’t forget to re-calibrate the sensor, if necessary.
3.6
Password protection
By assigning a password you can safeguard the EYEONE Configurator from unauthorized use. By
default no password is setup.
You can enter your own password for the application by opening the menu "Options – Change
password ...".
You can use any type of alpha-numeric characters, including spaces. However, spaces should
not be placed at the beginning and end of the relevant password. You may attempt to enter
leading or closing spaces but they will be deleted automatically. For example, if you enter
something like "
MyPassword
", it will only be saved as "MyPassword".
Commit your password to memory well because without this password you cannot start the
EYEONE Configurator at all and there is no way to change or delete the password.
© 2000 - 2008 MG Industrieelektronik GmbH
Chapter
4
Contact
24
4
EYEONE Konfigurator
Contact
MG Industrieelektronik GmbH
Nobelstraße 7
D-76275 Ettlingen
Telefone:
Fax:
+49 (0) 7243 5801 - 0
+49 (0) 7243 5801 - 20
Internet:
http://www.mg-industrieelektronik.de
E-Mail for requests:
[email protected]
E-Mail for questions about [email protected]
EYEONE Configurator:
© 2000 - 2008 MG Industrieelektronik GmbH
Key words
Key words
print out 9
set 10
Password
change 21
delete 21
set 21
Power off delay 10
Preview 9
Print 9
A
Address
10
C
Calibrate 15
Calibration
with timer 15
CDROM 6
Channel
Amount of 10
deactivate 10
Connecting the sensor
Contakt 24
Counting results
delete 8
show 8
R
RS485
S
Serial interface
Setup 6
6
Threshold
change by hand 15
check after firmware update
set 15
Distance to the ground 15
Distributor node 6
Door characteristics 10
Door contact
set 10
Status bar 8
Door Description 9
Door separation 10
U
USB
Vehicle description
10
F
20
I
IBIS-Bus 10
Ignition 10
Impressum 24
Installation 6
Introduction 3
O
Onboard unit interface
10
P
Parameters
check after firmware update
6
V
E
Firmware
run an update
Version 8
6
T
D
Evaluation delay
10
20
© 2000 - 2008 MG Industrieelektronik GmbH
9
20
25