1
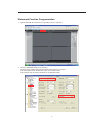
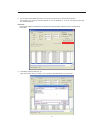
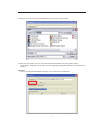
• 4 /8 /16 LAN HR recorder
4 305 45 / 46 / 47 / 57 / 58 / 59 / 66 / 67 / 68
Digital Video Recorder
1
2
3
4
5
6
7
8
9
10
1.,
2ABC
3DEF
4GHI
5JKL
6MNO
7PQRS
8STU
9WXYZ
11
12
13
14
15
16
Esc
ACT
Status
PWR
Enter
0
-/_
Fn
Rec
Mult
LE04885AA
USER MANUAL
Watermark Function Programmation
1- Login the DVR with the web client (see operating manuel , chapter 9.1).
2- Select the “ENCODE” button on the left pane.
Check the box to enable watermark function and then click the “Set” button.
If you want watermark on all channels select “All” in Channel field.
In this example only the channel 01 will be an enabled watermark.
2
3- The following dialogue box pops up.
You can input the overlay watermark information such as 123123123.
Click the “OK” button to exit.
Save and quit the Configuration menu.
4- In the main interface, click the “Search” button.
3
5- System pops up the following interface to select the record file of the watermark information.
For example, you selected a record of 2010-04-13 9: 0: 0—2010-04-13 9: 35: 55, 13th April and then click the “download” button.
Important
Note the file shall be recorded after you watermark setup operation; otherwise there is no watermark information.
6- The following dialogue box pops up.
Input the file name and then click the “Save” button to download the file to your local PC.
4
7- In the following interface, click the “Watermark” button on the right pane.
8- A dialogue box pops up. Click the “Local File” button on the top.
5
9- Now you can select the file you just downloaded and then click the “Open” button.
10- Click the “Verify” button; you can see the file watermark information in the corresponding column.
System begins verification and you will see the corresponding modification information at the bottom of the
interface.
Important
There is no watermark information to display if your current file has no watermark.
6