1
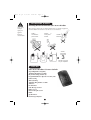
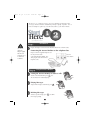
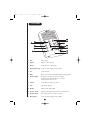
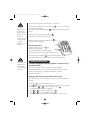
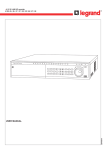
DA071 V6 Qk
5/17/02
2:39 PM
Start
Here!
Quick Quick
Start Guide
- next
page ...
Reference
Guide
Page 1
DA
071
Digital
Answering
Machine
with
Speaker Phone
QUICK
START GUIDE
DA071 V6 Qk
5/17/02
2:39 PM
Page 2
INSTALLATION & SAFETY
Please do not
attempt to
unplug any
appliance
during an
electrical storm.
Choosing the best location for your Answer Machine
When choosing a location for your Answer Machine there are a number of appliances
the Answer Machine should not be near, and area’s you should avoid.
DON T overload the
power outlet.
AVOID multi power
boards
AVOID Moisture
AVOID connecting
more than
3
phones as ringing
may be impaired
FEATURES
Your Answer Machine’s Features Include:
Superb Digital Record Quality
10 Minutes Digital Record Time
Day & Time Stamp (default off)
Programmable Remote Operation Security Code
Call Screening
Memory Backup
Adjustable Ring Number / Volume
Toll Saver
Room Monitor
Call / Message Counter
Remote Access
Phone Pick-Up Detection
Redial
Speaker Phone
Fast Message Playback
i
DA071 V6 Qk
5/17/02
2:39 PM
Page 3
This page is a very condensed version of your owners manual. It is designed to allow
you to get your Answer Machine installed and operating as quickly as possible - however
it does not attempt to explain any of the advanced features of your Answer Machine.
Start
Here!
Quick Reference Guide
Installation
Use only the
Uniden AC
Adaptor supplied
with this unit
and make sure it
is switched on
at all times
Plug the AC Adaptor cord into the Answer Machine and then into a 240v AC Outlet.
Connecting the Answer Machine to the telephone line
Plug one end of the supplied Telephone cord
into the jack on the back
of the Answer Machine labelled “line”.
Then plug the cords other end into a
telephone socket.
Bottom of
Answer Machine
Using Your Answer Machine
Setting the Answer Machine to answer calls
on
ans,/spk.
3def
2abc
To turn on the Answer Machine press # once.
The red “Answer-on” indicator lights up.
speaker
1
te
dele
6mno
5jkl
4ghl
volume
rdl/p
agm
1
7pqrs
set
9wxyz
8tuv
speaker
on
sns
off
#
0
*
NE
RING
L
ER
PHONE
DIGITA
WITH
MACHI
ANSWE
SPEAK
Playing Messages
2abc
.
ans,/spk.
3def
2abc
To play all the messages (old and new), press
speaker
1
te
dele
6mno
5jkl
4ghl
volume
rdl/p
agm
1
7pqrs
set
9wxyz
8tuv
off
sns
speaker
on
#
0
*
NE
RING
L
ER
PHONE
WITH
DIGITA
MACHI
ANSWE
SPEAK
Deleting Messages
To delete a specific message, press
the message is playing.
4ghl
te
dele
once while
speaker
6mno
5jkl
4ghl
volume
rdl/p
agm
1
7pqrs
set
9wxyz
8tuv
off
sns
speaker
on
#
0
*
NE
RING
L
ER
SPEAK
ii
ans,/spk.
3def
2abc
1
delete
PHONE
DIGITA
WITH
ANSWE
MACHI
DA071 V6 Qk
5/17/02
2:39 PM
Page 4
CONTENTS
Installation & Safety, Features ..........................................................................................................................i
QuickStart Guide ....................................................................................................................................................ii
Contents, Parts Checklist ..................................................................................................................................iii
Functions ..................................................................................................................................................................1
Installation ...............................................................................................................................................................2
Preparation ............................................................................................................................................................2
Recording an Outgoing Message ...................................................................................................................2
Setting the Day and Time................................................................................................................................3
Setting the Number of Rings...........................................................................................................................3
Adjusting the Volume ......................................................................................................................................3
Basic Operation ......................................................................................................................................................4
Turning the Answer Machine on ....................................................................................................................4
Playing Messages ............................................................................................................................................5
Deleting Messages ...........................................................................................................................................5
Remote Operation..................................................................................................................................................5
Remote Commands .........................................................................................................................................6
Speakerphone .........................................................................................................................................................7
Trouble Shooting ...................................................................................................................................................7
Warranty .................................................................................................................................................Back Cover
PARTS CHECKLIST
If any of these items are missing or damaged, please contact the place of
purchase.
or
1
te
dele
speaker
6mno
5jkl
4ghl
Telephone Cord and
Splitter for New Zealand
ans,/spk.
3def
2abc
volume
Start
Here!
rdl/p
1
agm
pqrs
7
off
set
wxyz
9
8tuv
sns
r
speake
on
Quick Reference Guide
Quick Start Guide - next page ...
#
0
Telephone Cord and
Splitter for Australia
*
DA
071
NE
RING
L
ER
SPEAK
PHONE
WITH
DIGITA
MACHI
ANSWE
Digital
Answering
Machine
with
Speaker Phone
DA071 Answer machine
AC Adapter
iii
QUICK
START GUIDE
Operating Guide
Other printed materials
DA071 V6 Qk
5/17/02
2:39 PM
Page 5
FUNCTIONS
1
2
2
1
te
dele
3
4ghl
7pqrs
set
5
8
volume
rdl/p
ogm
4
speaker
6mno
5jkl
6
7
ans,/spk.
3def
abc
tuv
8
off
10
9wxyz
sns
r
11
speake
on
#
0
*
HINE
G
ERIN
AL
ER
SPEAK
9
PHONE
WITH
DIGIT
01. Play:
Plays messages.
22. Repeat:
Repeat the current message.
23. Delete:
Used to delete one or all messages.
ANSW
MAC
12
13
24. Outgoing Message: Used to record the outgoing message (OGM).
25. Set:
Sets the time/date.
26. Skip:
Skips to next message or if held down speeds up during playback.
27. Message Light:
The light lets you know if you have new messages
and whether your Answer Machine is on or off and
when the Speaker Phone is in use.
28. Volume:
Used to adjust the volume up or down.
29. Stop:
Stops message playback.
10. Redial:
Redials the last number dialed.
11. Answer on/off:
Switches Answer Machine between answer on and answer off.
12. Speaker Phone:
Turns the Speaker Phone function on and off..
13. Microphone:
Used for recording outgoing message (OGM).
1
DA071 V6 Qk
5/17/02
2:39 PM
Page 6
INSTALLATION
Use only the
Uniden AC
Adaptor supplied
with this Uniden
DA071 Digital
Telephone
Answering
Machine.
Do not tell the
callers that you
are not at home.
Instead say that
you cannot come
to the phone
right now.
Connecting Power
1. Plug the AC Adaptor into the power socket at the rear of the Answer Machine.
2. Then plug the other end into your mains socket.
PREPARATION
Recording the Outgoing Message
To record the outgoing message (OGM) the caller hears when the Answer Machine
answers a call.
ogm
1. To record the OGM message, hold down 7 until the
Answer Machine beeps.
2. Speak in a normal voice about 20cm (8 inches) away
from the microphone (located on the front of
the Answer Machine).
3. When you finish recording, press 5 .
The Answer Machine automatically plays back the
outgoing message.
If no outgoing OGM is recorded when you press 7 ,
“You have no announcement one” is announced.
pqrs
speaker
mno
e
delet
6
5jkl
4ghl
volume
rdl/p
agm
1
9wxyz
tuv
8
7pqrs
jkl
ans,/spk.
3def
2abc
1
off
set
r
speake
on
sns
#
0
*
E
RING
KER
PHONE
WITH
DIGITAL
MACHIN
ANSWE
SPEA
ogm
pqrs
To play back your outgoing OGM message at any time,
press 7 , the Answer Machine
beeps and the outgoing message plays.
ogm
pqrs
To record a new outgoing message simply follow
the above instructions.
Your old message will instantly be deleted.
ans,/spk.
3def
2abc
1
speaker
mno
e
delet
6
5jkl
4ghl
volume
rdl/p
agm
1
7pqrs
9wxyz
tuv
8
off
set
sns
on
r
speake
#
0
*
E
RING
KER
SPEA
2
2
PHONE
WITH
DIGITAL
ANSWE
MACHIN
DA071 V6 Qk
5/17/02
2:39 PM
Page 7
Setting the Day and Time
time
1. Press and hold down 6 button until the
Answer Machine announces the day of the week.
2. Press 3 or 1 repeatedly until the day of
the week is announced.
3. Press 6 . The preset hour is announced.
4. Press 3 or 1 repeatedly until the desired hour
*
is announced.
5. Press 6 . The preset minute is announced.
6. Press 3 or 1 repeatedly until the desired minute is announced.
7. Press 6 to store the the settings. The Answer Machine announces the day and time
then beeps.
To check the current day/time at any time, press 6 once.
mno
1
e
delet
4
time
volume
rdl/p
agm
mno
speaker
6mno
5jkl
ghl
ans,/spk.
3def
2abc
abc
1
7pqrs
9wxyz
8tuv
off
set
sns
on
r
speake
#
0
abc
E
RING
time
KER
PHONE
WITH
DIGITAL
MACHIN
ANSWE
SPEA
mno
abc
time
mno
time
mno
Setting the Number of Rings
The ring select switch on the bottom of the Answer Machine controls how long the Answer
Machine waits before it answers a call. Slide the switch to the desired position.
2 The Answer Machine answers after two rings.
4 The Answer Machine answers after four rings.
7 The Answer Machine answers after seven rings.
RINGER
SELECT
2
4
7 T/S.
T.S. (Toll Saver) - When you call your Answer Machine from a remote location to
check messages, if there are new messages, the Answer Machine answers after two rings.
Otherwise, the Answer Machine answers after four rings. This helps you avoid unnecessary
toll charges when calling by long distance to check your messages. If you hear more than
two rings, you know you can hang up because the Answer Machine has no new messages.
Adjusting the Volume
volume
Use the
and
to adjust the speaker volume up or down.
volume
Hold down * until it beeps, then use
or
to adjust the ring volume.
Press 5 to store the new setting.
set
jkl
3
3
DA071 V6 Qk
5/17/02
2:39 PM
Page 8
SETTING THE ANSWER MACHINE TO ANSWER CALLS
To Turn the Answer Machine On
When a message is
being left, the
message is heard
through the
speaker. This
cannot be
turned off.
on
To turn on the Answer Machine and set it to answer calls and record messages, press # once.
“Answer-on”, is announced, then beeps once and plays the outgoing message.
The red “Answer-on” indicator lights up. The Answer Machine is now set to answer calls
e
delet
4
speaker
6mno
5jkl
ghl
ans,/spk.
3def
2abc
1
volume
rdl/p
agm
1
7pqrs
9wxyz
8tuv
off
set
sns
on
r
speake
#
0
*
E
RING
The Day and Time
will only be
announced if it
has been set. Refer
pg.3 for setting
instructions
KER
PHONE
WITH
DIGITAL
MACHIN
ANSWE
SPEA
To Turn The Answer Machine Off
off
To turn off the Answer Machine press 0 again.
“Answer off”, is announced, then beeps and the red “Answer-on” indicator turns off.
Screening Calls
To screen calls, let the Answer Machine answer them, then listen to the caller’s message
through the Answer Machine speaker. If you decide to answer the call, pick up any phone on
the same line and talk.
Playing Messages
If there are new messages, the red “answer on” indicator flashes, the number of flashes
equals the number of messages.
To play all the messages (old and new), press 2 . The number of messages recorded is
announced, each message number and the day and time the message was recorded and
then plays the message.
abc
Playing New Messages Only
To play only new messages, hold
down 2 for 2 seconds.
(If there are no new messages stored,
the Answer Machine announces “You have no
new messages:”).
abc
ans,/spk.
3def
2abc
1
speaker
mno
e
delet
6
5jkl
4ghl
volume
rdl/p
agm
1
7pqrs
9wxyz
tuv
8
off
set
sns
on
r
speake
#
0
*
E
RING
KER
SPEA
4
PHONE
WITH
DIGITAL
ANSWE
MACHIN
DA071 V6 Qk
5/17/02
2:39 PM
Page 9
After all messages have played, “End of message(s)” is announced.
The Answer
Machine does not
delete messages
that have not been
played to the end.
If you have
messages that have
not been played,
the Answer
Machine sounds
four beeps.
To replay a message while you are listening to it, press 1 once . The current message
starts again from the beginning.
To return to a previous message hold down 1 until it beeps. Release button to play the
message.
To play the message at a faster speed, hold down
Release button to resume play at normal speed.
3abc
To skip to the next message during playback, press
The next recorded message plays.
3abc
once.
Deleting Messages
delete
1
ghl
lete
de
speaker
6mno
5jkl
4ghl
ans,/spk.
3def
2abc
To delete a specific message, press 4 once
while the message is playing.
The Answer Machine beeps once while the message
is playing and deletes the current message, then plays the next.
volume
rdl/p
agm
1
9wxyz
tuv
8
7pqrs
off
set
sns
on
r
speake
#
0
*
E
RING
KER
PHONE
WITH
DIGITAL
MACHIN
ANSWE
SPEA
delete
To delete all messages, hold down 4 when playback has finished.
The Answer Machine announces “Erase message(s)”, then sounds a long beep.
ghl
Be sure to set each
digit within 8 seconds. Otherwise,
you must start over
from Step 1.
REMOTE OPERATION
Call Your Telephone From Any Remote Location Using A
Touchtone Phone
When you hear the OGM, enter your security code (915-factory default).
After the Answer Machine beeps once to verify you entered the code correctly, enter the
number(s) for the function(s) you want the Answer Machine to perform.
(Functions list on page 6)
Changing The Remote Operation Security Code
The remote operation security code is preset to 915, but you can change it by following
these steps.
set
1. Hold down * until the Answer Machine beeps once.
2. Press 3 and the security code “915” is announced, then it announces the first digit “9”.
3. Repeatedly press 3 or 1 to set the first digit, then press * .
The Answer Machine announces the second digit “1”.
4. Press 3 or 1 to set the second digit, then press * .
5. Press 3 or 1 to set the third digit, then press * .
The Answer Machine sounds a long beep and announces the new security code.
abc
set
abc
set
abc
set
abc
5
DA071 V6 Qk
5/17/02
2:39 PM
Page 10
REMOTE COMMANDS
If the Answer
Machine is turned
off, Remote Access
Features are not
available.
Be sure to set each
digit within 8 seconds. Otherwise,
you must start over
from Step 1.
Press
0
0
To
Turn the Answer Machine off. The Answer Machine beeps and announces
“Answer Off”.
2
Play all messages. If no message is recorded, “You have no messages” is
announced.
3
Play new messages. When new messages are recorded, the Answer Machine
announces the number of new messages before playback. If no new message
is recorded, “You have no new messages” is announced.
4
Monitor the room where the Answer Machine is installed. The room is
monitored for 20 seconds. Press 4 again for another 20 seconds. You can
repeat this for as long as you like.
5
Delete all messages (except new messages). Press 1 after the Answer
Machine announce “Erase messages”, then the Answer Machine beeps.
6
Stop playback and message recording.
7
Record a memo.
8
1
Change OGM. After the Answer Machine beeps, begin your new OGM.
When you finish, press 6 . The Answer Machine beeps and replays.
8
2
Play OGM. If no OGM is recorded, “You have no announcement one”
is announced.
*
Disconnect Line
#
Skip the OGM Message
After you press 2 or 3 to play messages:
Press
To
1
Replay the previous message
3
Skip to the next message
4
Replay the current message
5
Delete the current message
6
Stop message playback.
6
DA071 V6 Qk
5/17/02
2:39 PM
Page 11
SPEAKERPHONE
Making a Call
If the last number
is over 32 digits, it
will redial previous
32 digits.
speaker
Press
to turn on the speaker phone feature, dial the phone number.
Complete the conversation, press
again to turn off the speaker phone feature.
The Green indicator light is on when the speaker phone is in use.
speaker
Answering a Call
speaker
Press
at any time to answer a call.
Redial / Pause Function
If power is
disconnected from
the unit, the last
number dialed will
be lost from the
redial memory.
The unit automatically stores the last number you dial.
Press
to turn on the speaker phone and then press .
The phone automatically dials the last number dialed.
The pause function programs in a 2 second pause between dialling segments.
speaker
rd/p
Setting Speakerphone Volume
Press
volume
or
to set desired volume.
TROUBLE SHOOTING
If your Answer Machine is not performing to your expectations, please try these simple steps
first before calling Uniden customer service.
PROBLEM
SUGGESTION
Answering system
does not work
• Make sure the telephone line cord is plugged in.
• Make sure that the AC Adaptor is plugged in.
• Make sure the Answer Machine is turned on.
• The memory may be full. Delete some messages.
Messages are
incomplete
• The incoming messages may be too long.
• The memory may be full.
• Delete some or all of the saved messages.
No sound on the
base unit speaker
• Adjust the volume control.
Refer page 3.
Cannot record
outgoing message
(OGM)
• The memory may be full. Delete some or all of the
saved messages.
Cannot access
remote call-in
features.
• Make sure you’re using the correct PIN number.
• Remote features cannot be accessed if Answer Machine is
turned off.
7
DA071 V6 Qk
5/17/02
2:39 PM
Page 12
THANK YOU
FOR PURCHASING A UNIDEN PHONE!
WARRANTY
One Year Limited Warranty
Important:
Evidence of original purchase is required for warranty service.
Warrantor:
Uniden Australia Pty Limited A.B.N. 58 001 865 498
Uniden New Zealand Limited
ELEMENT OF WARRANTY: Uniden warrants to the original retail owner for the duration
of this warranty, its DA071 (herein after referred to as the Product), to be free from defects in
materials and craftsmanship with only the limitations or exclusions set out below.
WARRANTY DURATION: This warranty to the original retail owner only, shall terminate
and be of no further effect 12 months after the date of original retail sale. This warranty will
be deemed invalid if the product is; (A) Damaged or not maintained as reasonable and necessary, (B) Modified, altered or used as part of any conversion kits, subassemblies, or any
configurations not sold by Uniden, (C) Improperly installed, (D) Repaired by someone other
than an authorised Uniden Repair Agent for a defect or malfunction covered by this warranty, (E) Used in conjunction with any equipment or parts or as part of a system not manufactured by Uniden, (F) Warranty is only valid in original country of purchase.
PARTS COVERED: This warranty covers for one (1) year, the DTAM only. All accessories
(AC Adaptor etc)are covered for 90 days only.
STATEMENT OF REMEDY: In the event that the product does not conform to this warranty at any time while this warranty is in effect, the warrantor at its discretion, will repair
the defect or replace the product and return it to you without charge for parts or service.
THIS WARRANTY DOES NOT COVER OR PROVIDE FOR THE REIMBURSEMENT OR PAYMENT OF INCIDENTAL OR CONSEQUENTIAL DAMAGES. THIS GUARANTEE IS IN ADDITION TO AND DOES NOT IN ANY WAY AFFECT YOUR RIGHTS UNDER THE CONSUMER
GUARANTEE ACT.
PROCEDURE FOR OBTAINING PERFORMANCE OR WARRANTY: In the event that
the product does not conform to this warranty, the Product should be shipped or delivered,
freight pre-paid, with evidence of original purchase (eg. a copy of the sales docket), to the
warrantor at:
UNIDEN AUSTRALIA PTY LIMITED
UNIDEN NEW ZEALAND LIMITED
SERVICE DIVISION
SERVICE DIVISION
345 Princes Highway,
150 Harris Road,
Rockdale NSW 2216
East Tamaki, Auckland
Ph (02) 9599 3355 Fx (02) 9599 3278
Ph (9) 273 8383 Fx (9) 274 4253
Toll Free 1300 366 895
Toll Free 0800 4 UNIDEN
4 864 336
www.uniden.com.au
www.uniden.co.nz
Customers in other States should ship or deliver the Product freight pre-paid to their nearest
Uniden Authorised Repair Centre (Contact Uniden for the nearest Warranty Agent to you).
© 2002
Uniden Australia Pty Limited
Uniden New Zealand Limited