1
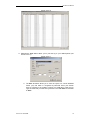
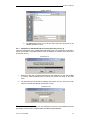
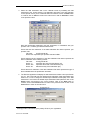
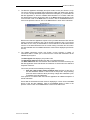
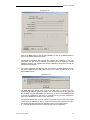
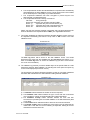
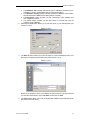
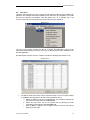
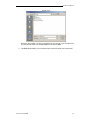
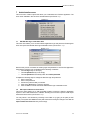
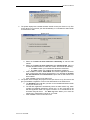
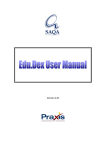
Edu.Dex User manual
Table of contents
1
2
Introduction......................................................................................................................... 2
Starting Edu.Dex ................................................................................................................ 3
2.1
Starting Edu.Dex from the Windows Start menu ........................................................ 3
2.2
Starting Edu.Dex from the Edu.Dex Data Validation desktop folder........................... 3
3 The Edu.Dex login.............................................................................................................. 4
4 The Edu.Dex main menu.................................................................................................... 5
4.1
Main menu overview ................................................................................................... 5
5 Validate submission menu ................................................................................................. 7
5.1
Incoming submission menu......................................................................................... 7
5.2
Outgoing submission menu......................................................................................... 7
5.2.1
Submission to Standard ETQA from Training Provider (version 1) ..................... 7
5.2.2
Submission to SETA ETQA from Training Provider .......................................... 14
5.2.3
Submission to Standard ETQA from Training Provider (version 2) ................... 20
6 View menu........................................................................................................................ 26
6.1
Reports menu............................................................................................................ 26
6.1.1
Detailed validation report menu ......................................................................... 26
6.1.2
Aggregated validation report menu.................................................................... 28
6.2
Files menu................................................................................................................. 32
7 Administration menu......................................................................................................... 35
7.1
Edit Edu.Dex login credentials menu ........................................................................ 35
7.2
Edit import submission folder menu .......................................................................... 35
7.3
Edit export submission folder menu .......................................................................... 36
7.4
Compress Edu.Dex database menu ......................................................................... 36
7.5
View Edu.Dex system setting.................................................................................... 36
7.6
Download Edu.Dex system updates ......................................................................... 37
7.7
Set data submission transfer contact details ............................................................ 37
8 Help menu ........................................................................................................................ 37
9 Automatic data submission transfer ................................................................................. 37
9.1
Overview ................................................................................................................... 37
9.2
Transferring a data submission to a remote server .................................................. 37
10
Edu.Dex system updates.............................................................................................. 39
Acronyms, terms and definitions
Edu.Dex
Edu.Dex standard
-
ETQA
NLRD
NLRD Load Specifications
-
SAQA
SETA
UNC
-
Education and Training data exchange standard data
validation utility
Education and Training data exchange standard that
conforms to the NLRD Load Specification
Education and Training Quality Assurance body
National Learner’s Records Database
National Learner’s Records Database batch file load
specifications
South African Qualifications Authority
Sector Education and Training Authority
Universal naming convention
Edu.Dex User Manual
1
Introduction
The Edu.Dex data validation utility is a custom designed application that ensures that data
transmitted within the Education and Training sector of South Africa conforms to the
education and training data exchange (Edu.Dex standard) standard.
The primary objective for the development of the Edu.Dex standard is to ensure that any
learner registration related data that is transmitted from one information system to another
system in batch format complies to the South African Qualifications Authority’s (SAQA)
National Learner’s Records Database (NLRD) Load Specifications.
The NLRD Load Specification has been developed for the transmission of data from an
Education and Training Quality Assurance body (EQTA) to the NLRD system. The NLRD
Load Specification therefore does not specifically accommodate the transmission of learner
registration data from and to other education and training sector stakeholders.
The secondary objective of the development of the Edu.Dex standard is Therefore to provide
the Education and Training sector of South Africa with a comprehensive standard, which
complies with the NLRD Load Specification standard, for the transmission of learner
registration data between all Education and Training sector stakeholders.
Version 2.02 17/04/2008
2
Edu.Dex User Manual
2
Starting Edu.Dex
The Edu.Dex data validation utility can be started from the Windows Start menu or from the
Edu.Dex Data Validation desktop folder.
2.1
Starting Edu.Dex from the Windows Start menu
To start Edu.Dex from the Windows Start menu, click on the Windows Start menu button,
select the Programs option, then select the Edu.Dex Data Validation option and click on the
Edu.Dex icon.
2.2
Starting Edu.Dex from the Edu.Dex Data Validation desktop folder
To start Edu.Dex from the Edu.Dex Data Validation desktop folder, locate and open the
Edu.Dex Data Validation folder on your Windows desktop (see Screen 2.2.1).
Screen 2.2.1
Once the Edu.Dex Data Validation folder is open, select the Edu.Dex icon to start the
Edu.Dex application (see Screen 2.2.2).
Screen 2.2.2
Version 2.02 17/04/2008
3
Edu.Dex User Manual
3
The Edu.Dex login
After starting the Edu.Dex application, you must login (see Screen 3.1). This process
authenticates you as a user of the system, after which the full functionality of the Edu.Dex
application is made available to you.
Screen 3.1
1. Enter your User Login details (the initial login details will have been supplied to you
with the installation set of Edu.Dex).
2. Enter your Password and click on OK to proceed.
3. Click on Cancel if you want to close the application.
Version 2.02 17/04/2008
4
Edu.Dex User Manual
4
The Edu.Dex main menu
After you have successfully logged into the Edu.Dex application, the main menu screen will
be displayed (see Screen 4.1). This screen presents the main menu items.
Screen 4.1
4.1
Main menu overview
Validate Submission
This menu item contains options that allow you to validate incoming (data has been supplied
to you) or outgoing (data that you are supplying to another education and training
stakeholder) data submissions. The menu items available in this main menu item are:
Incoming submission
Outgoing submission
The sub-menu items available in each of the above mentioned menu items are activated in
accordance with your organization’s specific needs.
View
This menu item contains options that allow you to view the results of the most recently
completed data validation. The menu items available in this main menu are:
Reports
This option presents you with the following types of reports relating to the last data
validation that has been completed:
Files
This menu option presents you with a view of the last data files that have been
submitted for validation. The individual sub-menus available for this menu item are
dependent on the data files that you submitted for validation.
Administration
This menu item contains options that allow you to administer the Edu.Dex application. The
individual sub-menus available for this menu item are dependent on the configuration of the
Edu.Dex application.
Version 2.02 17/04/2008
5
Edu.Dex User Manual
Help
This menu item contains options that allow you to access help files in regard the utilization of
the Edu.Dex application and Edu.Dex standard.
Exit
This menu item allows you to exit the Edu.Dex application.
Detailed descriptions of each of the main menu items are provided in this user manual.
Version 2.02 17/04/2008
6
Edu.Dex User Manual
5
Validate submission menu
This menu item contains options that allow you to validate incoming (data has been supplied
to you) or outgoing (data that you are supplying to another education and training
stakeholder) data submissions. The menu items that are available to you from this menu are
customized in accordance with your type of organization.
5.1
Incoming submission menu
All of the menu items in this menu are inactive for training providers as the organization does
not receive any learner registration records from another education and training stakeholder.
5.2
Outgoing submission menu
The outgoing submission menu options (see Screen 5.2.1) that are available in this version of
Edu.Dex are described below.
Screen 5.2.1
5.2.1 Submission to Standard ETQA from Training Provider (version 1)
This menu item allows you to validate data submissions that your organization would like to
submit to an ETQA1. The ETQA selection screen is displayed on selection of this menu item
(see Screen 5.2.1.1).
Screen 5.2.1.1
1. Select the ETQA that you will be submitting the data submission to and click on Next
to continue. Click the Close button to cancel the process and return to the main
menu.
2. The date selection screen will be displayed (see Screen 5.2.1.2). Click on the date
edit box to activate the calendar (see Screen 5.2.1.3).
1
An ETQA requires that your data submission conforms to the ETQA file specification format
which is completely compliant with the NLRD Load Specifications.
Version 2.02 17/04/2008
7
Edu.Dex User Manual
Screen 5.2.1.2
3. Select the data submission date on the calendar screen by indicating the data
submissions year, month and day. The application will return to the date selection
screen (Screen 5.2.1.2) once a valid date has been entered. Click on the Next button
to continue, click on Close to return to the main menu or click on Previous to return
to the previous screen.
Screen 5.2.1.3
Note that the Edu.Dex application uses this information, in combination with your
provider code2, to identify your data submission file/s.
Ensure that the first characters of the data submission file names represent your
provider code:
File name:
nnnnffyymmdd.dat
Where nnnn represents your provider code like FOOD-111
Ensure that the last six characters of the data submission file names represent the
date of submission in the following manner:
File name:
nnnnffyymmdd.dat
Where yy
represents the year of the submission (06).
Where mm
represents the month of the submission (07).
Where dd
indicates the day of the submission (11).
Ensure that the ff characters of the data submission file name represent the type of
file as indicated in the file specification document.
4. The Edu.Dex application will display the data submission location screen (see Screen
5.2.1.4). The screen will have the default import submission folder path loaded (see
Section 7.2 on how to change the default import submission folder path). If the data
submission is not found in the default import submission folder path then click on the
Search button and browse to the correct location. Click on the Next button to
continue, click on the Previous button to return to the previous screen or click on the
Close button to return to the main menu.
2
Training provider code issued by the primary ETQA of your organization
Version 2.02 17/04/2008
8
Edu.Dex User Manual
Screen 5.2.1.4
5. The Edu.Dex application will display the export location screen (see Screen 5.2.1.5).
The screen will have the default export submission folder path loaded (see Section
7.3 on how to change the default export submission folder path). If you would like the
Edu.Dex application to save the validated data submission to a location other than
the default export location shown then click on the Search button and browse to the
correct location. Click on the Next button to continue, click on the Previous button to
return to the previous screen or click on the Close button to return to the main menu.
Screen 5.2.1.5
Note that the Edu.Dex application expects to find your data submission files with the
naming convention specified in step 3 at the location specified in step 4. The system will
return an error if any of these details or if the remainder of the file name/s is/are incorrect.
If the data submission has the correct naming convention and is found in the path
indicated then the validate submission screen will be displayed (see Screen 5.2.1.6).
6. The validate submission screen (see Screen 5.2.1.6) presents a number of
information fields to enable you to ensure that the correct data submission will be
validated by the system.
The Data supplier field displays your provider code.
The Submission date field indicates the date of your data submission.
The Data submission files area indicates which data files have been located by the
Edu.Dex application. Each data file that is located has a check mark in the data file’s
respective check box.
The screen provides a customisable processing option:
• Pilot test (1000 records without relational rules) performs a pilot test of
the data submission limited to 1000 records or less per file. This processing
option has been included to allow pre-testing of large data submissions prior
to validation of the full submission.
If this option is not selected then the Edu.Dex application will validate all aspects of
the full submission.
Ensure that the information that this screen is displaying is correct. Click on the Next
button to start the data validation. Click on the Previous button to return to the
previous screen or click on the Close button to return to the main menu.
Version 2.02 17/04/2008
9
Edu.Dex User Manual
Screen 5.2.1.6
Note: The submission of Qualification (Legacy) and Learning Programs (Legacy)
records can be completed in two different ways:
1. The qualification or learning program may be offered by all Providers that
are accredited at the ETQA. In this scenario the uniqueness of a legacy
qualification or learning program is validated on the Qualification_Code or
Course_Code field. This option requires that you enter the provider code
that all the qualifications or learning programs are accredited against
(contact the recipient ETQA for further information).
2. The qualification or learning program may only be offered by a particular
Provider that is accredited at the ETQA. In this scenario the uniqueness
of a legacy qualification or learning program is validated on the
combination of the Qualification_Code and your Provider_Code or
Course_Code and your Provider_Code fields.
The Edu.Dex application will display the Legacy qualification submission and/or
Legacy learning program submission screens if the submission contains a
Qualification (Legacy) and/or Learning Program (Legacy) file/s (see Screen
5.2.1.6.a).
Version 2.02 17/04/2008
10
Edu.Dex User Manual
Screen 5.2.1.6.a
Indicate the nature of the legacy qualification or learning program records by
selecting the relevant tick box. Click on the Next button to start the data validation or
click on the Cancel button to return to the validate submission screen.
7. The Edu.Dex application will complete the required data validation on the data
submission. The five progress indicators (Load data, File layout validation, Content
validation, Business rule validation and Create submission) will provide you with an
indication of the progress.
8. The system will display the following type of message if the data validation process
has been completed successfully (see Screen 5.2.1.7). Click on OK to return to the
data validation screen.
Screen 5.2.1.7
The View log button will be active if any of the data fields or records in the data
submission generated a warning message. The results presented in this report are
also available from the View menu (see Section 6.1.1). Click on the View log button
to access the validation log (see item 10 and Screen 5.2.1.9 for more information).
Click on the Close button to return to the main menu.
The data submission that you must submit to the ETQA can be found at the export
location that you indicated in item 5. Please note that the data submission found in
this location has been prepared in a particular format for the recipient ETQA:
a. The data submission has been compressed for ease of transmission.
b. The compressed file contains the standard Edu.Dex reports that are automatically
generated during the data validation process. These reports have been included
for the ETQA as proof of the quality of your data submission.
c. The compressed submission has been encrypted to prevent anyone from
tampering with your data submission.
d. The compressed submission naming convention is:
File name:
nnnnyymmdd.zip
Where nnnn represents your provider code like FOOD-111
Where yy
represents the year of the submission (06).
Where mm
represents the month of the submission (07).
Where dd
indicates the day of the submission (11).
Version 2.02 17/04/2008
11
Edu.Dex User Manual
Please note that the specially prepared compressed and encrypted submission file
must be submitted to the recipient ETQA and NOT your original data submission.
9. The system will display the following message if the data validation process could not
be completed successfully (see Screen 5.2.1.8). Click on OK to return to the data
validation screen.
Screen 5.2.1.8
The View log button will be active on the data validation screen. The results
presented in this report are also available from the View menu (see Section 6.1.1).
Click on the View log button to access the validation log (see item 10 and Screen
5.2.1.9 for more information).
10. The validation log presents you with a detailed report of the specific fields in a data
submission that have failed validation. On selecting this menu option the Import log
screen will be displayed (see Screen 5.2.1.9).
The log provides you with the following information so that you can better understand
the factors that contributed to the data submission failing the data validations:
Screen 5.2.1.9
1. The Number column indicates the number of the error reported.
2. The Validation rank column indicates the type of error that was encountered
(non-compliance, content, general information and critical information).
3. The Validation severity column indicates whether the error that was
encountered is preventing the successful validation of the data submission (fatal
or non-fatal).
Version 2.02 17/04/2008
12
Edu.Dex User Manual
4. The File name column indicates the file in which the error was encountered.
5. The Record number column indicates the record (line) in the file that holds the
invalid value. Note that the record numbering is sequential, starting at the first
valid data record found in the file.
6. The Field name column indicates the name of the field that has failed validation.
7. The Field value column indicates the value found in the field that has failed
validation.
8. The Description column provides you with a description of the factor that caused
the field content to fail validation.
Selecting the Print button allows you to print the log to your default printer (see Screen
5.2.1.10).
Screen 5.2.1.10
The Save as button allows you to save the report to a comma delimited format (.csv) file
which is recognized by Microsoft Excel (see Screen 5.2.1.11). Browse to the location to
which you would like to save the log. Type the name that you want the log saved to in the
File name box and click on Save.
Screen 5.2.1.11
The Close button allows you to exit the Import log screen and return to the validate
submission screen.
Version 2.02 17/04/2008
13
Edu.Dex User Manual
5.2.2 Submission to SETA ETQA from Training Provider
This menu item allows you to validate data submissions that your organization would like to
submit to a SETA ETQA3. The ETQA selection screen is displayed on selection of this menu
item (see Screen 5.2.2.1).
Screen 5.2.2.1
1. Select the ETQA that you will be submitting the data submission to and click on Next
to continue. Click the Close button to cancel the process and return to the main
menu.
2. The contact details screen will be displayed (see Screen 5.2.2.2).
Screen 5.2.2.2
Enter a contact name and email address for an individual in your organization that
must receive any feedback in regard to the data submission and click on Next to
continue (see Section 7.7 on how to change the default contact name and email
values). Click the Previous button to return to the previous screen. Click the Close
button to cancel the process and return to the main menu.
3. The date selection screen will be displayed (see Screen 5.2.2.3). Click on the date
edit box to activate the calendar (see Screen 5.2.2.4). Click the Previous button to
return to the previous screen. Click the Close button to cancel the process and return
to the main menu.
3
A SETA ETQA requires that your data submission conforms to the SETA ETQA file
specification format.
Version 2.02 17/04/2008
14
Edu.Dex User Manual
Screen 5.2.2.3
4. Select the data submission date on the calendar screen by indicating the data
submissions year, month and day. The application will return to the date selection
screen (Screen 5.2.2.3) once a valid date has been entered. Click on the Next button
to continue, click on Close to return to the main menu or click on Previous to return
to the previous screen.
Screen 5.2.2.4
Note that the Edu.Dex application uses this information, in combination with your
provider code4, to identify your data submission file/s.
Ensure that the first characters of the data submission file names represent your
provider code:
File name:
nnnnffyymmdd.dat
Where nnnn represents your provider code like MQAU-111
Ensure that the last six characters of the data submission file names represent the
date of submission in the following manner:
File name:
Where yy
Where mm
Where dd
nnnnffyymmdd.dat
represents the year of the submission (05).
represents the month of the submission (04).
indicates the day of the submission (11).
Ensure that the ff characters of the data submission file name represent the type of
file as indicated in the file specification document.
5. The Edu.Dex application will display the data submission import location screen (see
Screen 5.2.2.5). The screen will have the default import submission folder path
loaded (see Section 7.2 on how to change the default import submission folder path).
If the data submission is not found in the default import submission folder path then
click on the Search button and browse to the correct location. Click on the Next
4
Training provider code issued by the primary ETQA of your organization
Version 2.02 17/04/2008
15
Edu.Dex User Manual
button to continue, click on the Previous button to return to the previous screen or
click on the Close button to return to the main menu.
Screen 5.2.2.5
6. The Edu.Dex application will display the export location screen (see Screen 5.2.2.6).
The screen will have the default export submission folder path loaded (see Section
7.3 on how to change the default export submission folder path). If you would like the
Edu.Dex application to save the validated data submission to a location other than
the default export location shown then click on the Search button and browse to the
correct location. Click on the Next button to continue, click on the Previous button to
return to the previous screen or click on the Close button to return to the main menu.
Screen 5.2.2.6
Note that the Edu.Dex application expects to find your data submission files with the
naming convention specified in step 4 at the location specified in step 5. The system
will return an error if any of these details or if the remainder of the file name/s is/are
incorrect. If the data submission has the correct naming convention and is found in
the path indicated then the validate submission screen will be displayed (see Screen
5.2.2.7).
7. The validate submission screen presents a number of information fields to enable you
to ensure that the correct data submission will be validated by the system.
The Data supplier field indicates your provider code.
The Submission date field indicates the date of the data submission.
The Data submission files area indicates which data files have been located by the
Edu.Dex application. Each data file that is located has a check mark in the data file’s
respective check box.
The screen provides a customisable processing option:
• Pilot test (1000 records without relational rules) performs a pilot test of
the data submission limited to 1000 records or less per file. This processing
option has been included to allow pre-testing of large data submissions prior
to validation of the full submission.
If this option is not selected then the Edu.Dex application will validate all aspects of
the full submission.
Ensure that the information that this screen is displaying is correct. Click on the Next
button to start the data validation. Click on the Previous button to return to the
previous screen or click on the Close button to return to the main menu.
Version 2.02 17/04/2008
16
Edu.Dex User Manual
The Edu.Dex application will complete the required data validation on the data
submission. The five progress indicators (Load data, File layout validation, Content
validation, Business rule validation and Create submission) will provide you with an
indication of the progress.
Screen 5.2.2.7
8. The system will display the following type of message if the data validation process
has been completed successfully (see Screen 5.2.2.8). Click on OK to return to the
data validation screen.
Screen 5.2.2.8
The View log button will be active if any of the data fields or records in the data
submission generated a warning message. The results presented in this report are
also available from the View menu (see Section 6.1.1). Click on the View log button
to access the validation log (see item 10 and Screen 5.2.2.10 for more information).
Click on the Close button to return to the main menu.
The data submission that you must submit to the SETA ETQA can be found at the
export location that you indicated in item 6. Please note that the data submission
found in this location has been prepared in a particular format for the SETA ETQA:
a. The data submission has been compressed for ease of transmission.
b. The compressed file contains the standard Edu.Dex reports that are automatically
generated during the data validation process. These reports have been included
for the SETA ETQA as proof of the quality of your data submission.
c. The compressed submission has been encrypted to prevent anyone from
tampering with your data submission.
d. The compressed submission naming convention is:
File name:
nnnnyymmdd.001
Version 2.02 17/04/2008
17
Edu.Dex User Manual
Where nnnn represents your provider code like MQAU-111
Where yy
represents the year of the submission (05).
Where mm
represents the month of the submission (04).
Where dd
indicates the day of the submission (11).
Please note that the specially prepared compressed and encrypted submission file
must be submitted to the SETA ETQA and NOT your original data submission.
9. The system will display the following message if the data validation process could not
be completed successfully (see Screen 5.2.2.9). Click on OK to return to the data
validation screen.
Screen 5.2.2.9
The View log button will be active on the data validation screen. The results
presented in this report are also available from the View menu (see Section 6.1.1).
Click on the View log button to access the validation log (see item 10 and Screen
5.2.2.10 for more information).
10. The validation log presents you with a detailed report of the specific fields in a data
submission that have failed validation. On selecting this menu option the Import log
screen will be displayed (see Screen 5.2.2.10).
The log provides you with the following information so that you can better understand
the factors that contributed to the data submission failing the data validations:
1. The Number column indicates the number of the error reported.
2. The Validation rank column indicates the type of error that was encountered
(non-compliance, content, general information and critical information).
3. The Validation severity column indicates whether the error that was
encountered is preventing the successful validation of the data submission (fatal
or non-fatal).
4. The File name column indicates the file in which the error was encountered.
5. The Record number column indicates the record (line) in the file that holds the
invalid value. Note that the record numbering is sequential, starting at the first
valid data record found in the file.
6. The Field name column indicates the name of the field that has failed validation.
7. The Field value column indicates the value found in the field that has failed
validation.
8. The Description column provides you with a description of the factor that caused
the field content to fail validation.
Version 2.02 17/04/2008
18
Edu.Dex User Manual
Screen 5.2.2.10
11. Selecting the Print button allows you to print the log to your default printer (see
Screen 5.2.2.11).
Screen 5.2.2.11
a. The Save as button allows you to save the report to a comma delimited
format (.csv) file which is recognized by Microsoft Excel (see Screen
5.2.2.12). Browse to the location to which you would like to save the log.
Type the name that you want the log saved to in the File name box and click
on Save.
Version 2.02 17/04/2008
19
Edu.Dex User Manual
Screen 5.2.2.12
b. The Close button allows you to exit the Import log screen and return to the
validate submission screen.
5.2.3 Submission to Standard ETQA from Training Provider (version 2)
This menu item allows you to validate data submissions that your organization would like to
submit to an ETQA5. The ETQA selection screen is displayed on selection of this menu item
(see Screen 5.2.3.1).
Screen 5.2.3.1
1. Select the ETQA that you will be submitting the data submission to and click on Next
to continue. Click the Close button to cancel the process and return to the main
menu.
2. The date selection screen will be displayed (see Screen 5.2.3.2). Click on the date
edit box to activate the calendar (see Screen 5.2.3.3).
Screen 5.2.3.2
5
An standard ETQA requires that your data submission conforms to the Standard ETQA file
specification format which is compliant with the NLRD Load Specifications.
Version 2.02 17/04/2008
20
Edu.Dex User Manual
3. Select the data submission date on the calendar screen by indicating the data
submissions year, month and day. The application will return to the date selection
screen (Screen 5.2.3.2) once a valid date has been entered. Click on the Next button
to continue, click on Close to return to the main menu or click on Previous to return
to the previous screen.
Screen 5.2.3.3
Note that the Edu.Dex application uses this information, in combination with your
6
provider code , to identify your data submission file/s.
Ensure that the first characters of the data submission file names represent your
provider code:
File name:
nnnnffyymmdd.dat
Where nnnn represents your provider code like CHED-1
Ensure that the last six characters of the data submission file names represent the
date of submission in the following manner:
File name:
nnnnffyymmdd.dat
Where yy
represents the year of the submission (07).
Where mm
represents the month of the submission (12).
Where dd
indicates the day of the submission (02).
Ensure that the ff characters of the data submission file name represent the type of
file as indicated in the file specification document.
4. The Edu.Dex application will display the data submission location screen (see Screen
5.2.3.4). The screen will have the default import submission folder path loaded (see
Section 7.2 on how to change the default import submission folder path). If the data
submission is not found in the default import submission folder path then click on the
Search button and browse to the correct location. Click on the Next button to
continue, click on the Previous button to return to the previous screen or click on the
Close button to return to the main menu.
Screen 5.2.3.4
6
Training provider code issued by the primary ETQA of your organization
Version 2.02 17/04/2008
21
Edu.Dex User Manual
5. The Edu.Dex application will display the export location screen (see Screen 5.2.3.5).
The screen will have the default export submission folder path loaded (see Section
7.3 on how to change the default export submission folder path). If you would like the
Edu.Dex application to save the validated data submission to a location other than
the default export location shown then click on the Search button and browse to the
correct location. Click on the Next button to continue, click on the Previous button to
return to the previous screen or click on the Close button to return to the main menu.
Screen 5.2.3.5
Note that the Edu.Dex application expects to find your data submission files with the
naming convention specified in step 3 at the location specified in step 4. The system
will return an error if any of these details or if the remainder of the file name/s is/are
incorrect. If the data submission has the correct naming convention and is found in
the path indicated then the validate submission screen will be displayed (see Screen
5.2.3.6).
6. The validate submission screen (see Screen 5.2.3.6) presents a number of
information fields to enable you to ensure that the correct data submission will be
validated by the system.
The Data supplier field displays your provider code.
The Submission date field indicates the date of your data submission.
The Data submission files area indicates which data files have been located by the
Edu.Dex application. Each data file that is located has a check mark in the data file’s
respective check box.
The screen provides a customisable processing option:
• Pilot test (1000 records without relational rules) performs a pilot test of
the data submission limited to 1000 records or less per file. This processing
option has been included to allow pre-testing of large data submissions prior
to validation of the full submission.
If this option is not selected then the Edu.Dex application will validate all aspects of
the full submission.
Ensure that the information that this screen is displaying is correct. Click on the Next
button to start the data validation. Click on the Previous button to return to the
previous screen or click on the Close button to return to the main menu.
Version 2.02 17/04/2008
22
Edu.Dex User Manual
Screen 5.2.3.6
Click on the Next button to start the data validation or click on the Cancel button to
return to the validate submission screen.
7. The Edu.Dex application will complete the required data validation on the data
submission. The five progress indicators (Load data, File layout validation, Content
validation, Business rule validation and Create submission) will provide you with an
indication of the progress.
8. The system will display the following type of message if the data validation process
has been completed successfully (see Screen 5.2.3.7). Click on OK to return to the
data validation screen.
Screen 5.2.3.7
The View log button will be active if any of the data fields or records in the data
submission generated a warning message. The results presented in this report are
also available from the View menu (see Section 6.1.1). Click on the View log button
to access the validation log (see item 10 and Screen 5.2.3.9 for more information).
Click on the Close button to return to the main menu.
The data submission that you must submit to the ETQA can be found at the export
location that you indicated in item 5. Please note that the data submission found in
this location has been prepared in a particular format for the recipient ETQA:
a. The data submission has been compressed for ease of transmission.
Version 2.02 17/04/2008
23
Edu.Dex User Manual
b. The compressed file contains the standard Edu.Dex reports that are automatically
generated during the data validation process. These reports have been included
for the ETQA as proof of the quality of your data submission.
c. The compressed submission has been encrypted to prevent anyone from
tampering with your data submission.
d. The compressed submission naming convention is:
File name:
nnnnyymmdd.zip
Where nnnn represents your provider code like CHED-1
Where yy
represents the year of the submission (07).
Where mm
represents the month of the submission (12).
Where dd
indicates the day of the submission (02).
Please note that the specially prepared compressed and encrypted submission file
must be submitted to the recipient ETQA and NOT your original data submission.
9. The system will display the following message if the data validation process could not
be completed successfully (see Screen 5.2.3.8). Click on OK to return to the data
validation screen.
Screen 5.2.3.8
The View log button will be active on the data validation screen. The results
presented in this report are also available from the View menu (see Section 6.1.1).
Click on the View log button to access the validation log (see item 10 and Screen
5.2.3.9 for more information).
10. The validation log presents you with a detailed report of the specific fields in a data
submission that have failed validation. On selecting this menu option the Import log
screen will be displayed (see Screen 5.2.3.9).
The log provides you with the following information so that you can better understand
the factors that contributed to the data submission failing the data validations:
Screen 5.2.3.9
a) The Number column indicates the number of the error reported.
b) The Validation rank column indicates the type of error that was encountered
(non-compliance, content, general information and critical information).
c) The Validation severity column indicates whether the error that was
encountered is preventing the successful validation of the data submission (fatal
or non-fatal).
d) The File name column indicates the file in which the error was encountered.
e) The Record number column indicates the record (line) in the file that holds the
invalid value. Note that the record numbering is sequential, starting at the first
valid data record found in the file.
Version 2.02 17/04/2008
24
Edu.Dex User Manual
f) The Field name column indicates the name of the field that has failed validation.
g) The Field value column indicates the value found in the field that has failed
validation.
h) The Description column provides you with a description of the factor that caused
the field content to fail validation.
Selecting the Print button allows you to print the log to your default printer (see
Screen 5.2.3.10).
Screen 5.2.3.10
The Save as button allows you to save the report to a comma delimited format (.csv)
file which is recognized by Microsoft Excel (see Screen 5.2.3.11). Browse to the
location to which you would like to save the log. Type the name that you want the log
saved to in the File name box and click on Save.
Screen 5.2.3.11
The Close button allows you to exit the Import log screen and return to the validate
submission screen.
Version 2.02 17/04/2008
25
Edu.Dex User Manual
6
View menu
The View menu item contains options that allow you to view the results of the most recently
completed data validation. The specific menu items available (see Screen 6.1) are described
below.
Screen 6.1
6.1
Reports menu
This menu option allows you to access the reports generated by the Edu.Dex application for
the most recent data submission that was validated. The application generates two types of
reports as described below (see Screen 6.1.1).
Screen 6.1.1
6.1.1 Detailed validation report menu
This report presents you with a detailed report of the specific fields in a data submission that
have failed validation. On selecting this menu option the Detailed validation report screen will
be displayed (see Screen 6.1.1.1).
Screen 6.1.1.1
Version 2.02 17/04/2008
26
Edu.Dex User Manual
1. The report provides you with the following information so that you can better
understand the factors that contributed to the data submission failing the data
validations:
1. The heading area of the report details the submission that was validated.
2. The Number column indicates the number of the error reported.
3. The Validation rank column indicates the type of error that was encountered
(non-compliance, content, general information and critical information).
4. The Validation severity column indicates whether the error that was
encountered is preventing the successful validation of the data submission (fatal
or non-fatal).
5. The File name column indicates the file in which the error was encountered.
6. The Record number column indicates the record (line) in the file that holds the
invalid value. Note that the record numbering is sequential, starting at the first
valid data record found in the file.
7. The Field name column indicates the name of the field that has failed validation.
8. The Field value column indicates the value found in the field that has failed
validation.
9. The Description column provides you with a description of the factor that caused
the field content to fail validation.
2. Selecting the Print button allows you to print the report to your default printer (see
Screen 6.1.1.2).
Screen 6.1.1.2
3. The Save as button allows you to save the report to a comma delimited format (.csv)
file which is recognized by Microsoft Excel (see Screen 6.1.1.3). Browse to the
location to which you would like to save the report. Type the name that you want the
report saved to in the File name box and click on Save.
Version 2.02 17/04/2008
27
Edu.Dex User Manual
Screen 6.1.1.3
4. The Close button allows you to exit the Detailed validation report screen and return to
the main menu.
6.1.2 Aggregated validation report menu
These reports present you with summary reports of the results of the data validations
completed on the data submission. Two further menu options are made available to you once
you select this menu item (see Screen 6.1.2.1).
Screen 6.1.2.1
6.1.2.1
Complete menu
This report presents you with a summary report of all of the validations completed on a data
submission and the results of each validation rule. On selecting this menu option the
Aggregated validation report (complete) screen will be displayed (see Screen 6.1.2.1.1).
Version 2.02 17/04/2008
28
Edu.Dex User Manual
Screen 6.1.2.1.1
1. The report provides you with the following information so that you can better
understand the data submission:
1. The heading area of the report details the submission that was validated.
2. The File name heading indicates the file for which the results are displayed.
3. The Validation rank heading indicates the type of validation reported on (noncompliance, content, general information and critical information).
4. The Validation severity heading indicates whether the validation would result in
the data submission validation from failing (fatal or non-fatal).
5. The Description column provides you with a description of the validation that
was completed on the file.
6. The Count column provides you with the number of records that meet the
conditions of the validation.
2. Selecting the Print button allows you to print the report to your default printer (see
Screen 6.1.2.1.2).
Screen 6.1.2.1.2
3. The Save as button allows you to save the report to a comma delimited format (.csv)
file which is recognized by Microsoft Excel (see Screen 6.1.2.1.3).
Version 2.02 17/04/2008
29
Edu.Dex User Manual
Screen 6.1.2.1.3
Browse to the location to which you would like to save the report. Type the name that
you want the report saved to in the File name box and click on Save.
4. The Close button allows you to exit the Aggregated validation report (complete)
screen and return to the main menu.
6.1.2.2
Filtered
This report differs from the complete aggregated report in that this report only displays
validations that were met by the data submission (results of validation that failed). On
selecting this menu option the Aggregated validation report (filtered) screen will be displayed
(see Screen 6.1.2.2.1).
Screen 6.1.2.2.1
1. The report provides you with the following information so that you can better
understand the data submission:
1. The heading area of the report details the submission that was validated.
2. The File name heading indicates the file for which the results are displayed.
Version 2.02 17/04/2008
30
Edu.Dex User Manual
3. The Validation rank heading indicates the type of validation reported on (noncompliance, content, general information and critical information).
4. The Validation severity heading indicates whether the validation would result in
the data submission validation from failing (fatal or non-fatal).
5. The Description column provides you with a description of the validation that
was completed on the file.
6. The Count column provides you with the number of records that meet the
conditions of the validation.
2. Selecting the Print button allows you to print the report to your default printer (see
Screen 6.1.2.2.2).
Screen 6.1.2.2.2
3. The Save as button allows you to save the report to a comma delimited format (.csv)
file which is recognized by Microsoft Excel (see Screen 6.1.2.2.3).
Screen 6.1.2.2.3
Browse to the location to which you would like to save the report. Type the name that
you want the report saved to in the File name box and click on Save.
4. The Close button allows you to exit the Aggregated validation report (filtered) screen
and return to the main menu.
Version 2.02 17/04/2008
31
Edu.Dex User Manual
6.2
Files menu
This menu option presents you with a view of the last data files that have been submitted for
validation. The individual sub-menus available for this menu item are dependent on the data
files that you submitted for validation. Note that Screen 6.2.1 is an example only – the
contents of this menu will vary according to the files that you have submitted.
Screen 6.2.1
The rest of this section contains the data of a learner file submission. Note that the
functionality described below is generic to any type of data file that has been submitted to the
Edu.Dex application.
On selecting the sub-menu item, the contents of the file are displayed (see Screen 6.2.2).
Screen 6.2.2
1. The data in the file view screen may be sorted according to your own needs. Clicking
on the Sort button will open the file sort screen (see Screen 6.2.3).
a. Select the field/s by which you would like the view sorted by selecting the
field name in the drop down list of Field names.
b. Select the order of the sort for the specific field by selecting the order
(ascending or descending) in the Sort order field.
c. Click on Save to apply the sort or Close to return to the file view without
applying the sort order.
Version 2.02 17/04/2008
32
Edu.Dex User Manual
Screen 6.2.3
2. The data in the file view screen may be filtered according to your own needs. Clicking
on the Filter button will open the file filter screen (see Screen 6.2.4).
a. Select the field/s by which you would like the view filtered by selecting the
field name in the drop down list of Field names.
b. Select the type of filter (equal to, greater or equal to, greater than, less or
equal to, less than, like or not equal to) that you would like to apply by
selecting the type in the Filter type field.
c. Enter the filter criteria into the Filter value field.
d. Indicate the type of join for the filter by selecting the AND or OR join
indicators at the bottom of the screen.
e. Click on Save to apply the filter or Close to return to the file view without
applying the filter.
Screen 6.2.4
3. The Save as button allows you to save the file to a comma delimited format (.csv) file
which is recognized by Microsoft Excel (see Screen 6.2.5).
Version 2.02 17/04/2008
33
Edu.Dex User Manual
Screen 6.2.5
Browse to the location to which you would like to save the file. Type the name that
you want the file saved to in the File name box and click on Save.
4. The Close button allows you to exit the file view screen and return to the main menu.
Version 2.02 17/04/2008
34
Edu.Dex User Manual
7
Administration menu
This menu item contains options that allow you to administer the Edu.Dex application. The
menu items available in this menu are described below (see Screen 7.1).
Screen 7.1
7.1
Edit Edu.Dex login credentials menu
This menu item allows you to set the Edu.Dex application login and password. Selecting this
menu item opens the Edit Edu.Dex login credentials screen (see Screen 7.1.1).
Screen 7.1.1
Note that this process overwrites the existing login and password for the Edu.Dex application.
Changing the Edu.Dex login credentials has the following constraints:
• The new login may not be empty.
• The new password may not be empty.
• The new password must exactly match the confirm password.
Complete the following steps to change the Edu.Dex login and password:
1. Enter a new login.
2. Enter a new password.
3. Confirm the password that you entered.
4. Click on the Save button to save the changes.
5. Click on Close to cancel and exit the Edit Edu.Dex login credentials screen.
7.2
Edit import submission folder menu
This menu option allows you to edit the default location at which the Edu.Dex application
expects to find a data submission to validate. Selecting the menu item opens the Edit import
submission folder screen (see Screen 7.2.1).
You may select a new location by browsing to the folder or by typing in the path (in UNC
format). The system will validate that the path exists before saving the changes. Note that the
Import submission folder field may not be empty.
Version 2.02 17/04/2008
35
Edu.Dex User Manual
Screen 7.2.1
7.3
Edit export submission folder menu
This menu item allows you to edit the default location to which the Edu.Dex application saves
a data submission that has passed validation and may be submitted to the data submission
recipient. Selecting the menu item opens the Edit export submission folder screen (see
Screen 7.3.1).
You may select a new location by browsing to the folder or by typing in the path (in UNC
format). The system will validate that the path exists before saving the changes. Note that the
Export submission folder field may not be empty.
Screen 7.3.1
7.4
Compress Edu.Dex database menu
This menu item allows you to optimise the space used by the Edu.Dex application database
by automatically completing two actions on the Edu.Dex database:
1. Any existing data submissions that are stored in the database are deleted from the
database.
2. The database is compressed and repaired.
The Edu.Dex application displays the following message once this process has been
completed successfully (see Screen 7.4.1).
Screen 7.4.1
7.5
View Edu.Dex system setting
This menu item allows you to view the internal parameters of the Edu.Dex application. The
Edu.Dex system displays the system settings screen on selection of this menu item (see
Screen 7.5.1).
Version 2.02 17/04/2008
36
Edu.Dex User Manual
Screen 7.5.1
7.6
Download Edu.Dex system updates
This feature has been disabled for this version of the Edu.Dex application.
7.7
Set data submission transfer contact details
This feature has been disabled for this version of the Edu.Dex application.
8
Help menu
The help menu allows you to access the Edu.Dex online user manual and Edu.Dex standard.
9
Automatic data submission transfer
9.1
Overview
The Edu.Dex application has a built in automatic data submission transfer functionality. This
functionality is however only available if:
1. Your version of Edu.Dex has been configured to transfer data submissions
automatically.
2. The ETQA that you are submitting data to has made data transfer facilities available
for the downloading of Edu.Dex validated data submissions.
This functionality makes use of the SSH program which provides secure encrypted
communications between two un-trusted hosts over an insecure network. Further the copying
of data is conducted using the PSCP program which utilises SSH for data transfers.
The PSCP program is automatically installed on your system by the Edu.Dex installation
program.
9.2
Transferring a data submission to a remote server
1. The data submission transfer is automatically initiated when the Edu.Dex application
has been set up to transfer data and when the application determines that the
recipient ETQA has made a server available that accepts Edu.Dex data submissions.
The data transfer process is initiated when you click the Yes button on a message
that is displayed as shown in Screen 9.2.1.
Version 2.02 17/04/2008
37
Edu.Dex User Manual
Screen 9.2.1
2. The system displays the schedule automatic transfer screen (see Screen 9.2.2). This
screen allows you to transfer your data immediately or to schedule the data transfer
for a later time or date.
Screen 9.2.2
a. Select the Transfer the data submission immediately to start the data
transfer.
b. Select the Transfer the data submission as indicated below option to
schedule the data transfer for a later time or date. Also indicate the following:
i. The Date on which you would like the submission transferred.
ii. The Time at which you would like the submission transferred.
c. Click on Next to continue - Please Note: The Edu.Dex application will at this
point in time freeze and become unresponsive if you selected the Transfer
the data submission as indicated below option until the data transfer has
been initiated.
d. Click on Close to return to the main menu.
3. The system will next display the progress screen (see Screen 9.2.3). This screen will
give you feedback in regard the success of the data transfer to the ETQA server.
a. The Resubmit button will take you back to the schedule automatic transfer
screen (see Screen 9.2.2).
b. The Edu.Dex application automatically saves the data transfer log, which
contains the feedback presented in Screen 9.2.3, to the \Logs path of the
Edu.Dex application folder. The log file is saved in a .csv format and can be
accessed using MS Excel. The Save log button allows you to save the
transfer log to a destination of choice in .csv format.
c. Click on Close to return to the main menu.
Version 2.02 17/04/2008
38
Edu.Dex User Manual
Screen 9.2.3
10 Edu.Dex system updates
The Edu.Dex application holds a number of values against which data is validated, this
includes the Qualifications, Course (or Unit Standards), Assessors and Moderators that may
be included in your data submission.
The process of accreditation in regard to qualifications and courses, and the registration of
assessors and moderators is dynamic in nature. The Edu.Dex application must therefore be
updated on a regular basis to ensure that the application holds required references in
accordance with accreditation and registration statuses for your organization.
The automatic download functionality for SAS SETA is found on the general SAS SETA
VeriDataNet web page. Instructions on how to request and implement SAS SETA updates
can be found on the Edu.Dex web site at www.praxis.co.za/EduDex. On the left hand side of
the screen select the “Level 3 - Training Provider” link. Click on the “How to update Edu.Dex
for SAS SETA data submissions” link to view the document that provides you with the
detailed instructions in this regard.
The automatic download functionality for ETDP SETA can be found on the ETDP DataNet
information system. Instructions on how to request and implement ETDP SETA updates can
be found on the Edu.Dex web site at www.praxis.co.za/EduDex. On the left hand side of the
screen select the “Level 3 - Training Provider” link. Click on the “How to update Edu.Dex for
ETDP SETA data submissions” link to view the document that provides you with the detailed
instructions in this regard.
Version 2.02 17/04/2008
39
Edu.Dex User Manual
The automatic download functionality for MQA SETA can be found on the MQA DataNet
information system. Instructions on how to request and implement MQA SETA updates can
be found on the Edu.Dex web site at www.praxis.co.za/EduDex. On the left hand side of the
screen select the “Level 3 - Training Provider” link. Click on the “How to update Edu.Dex for
MQA SETA data submissions” link to view the document that provides you with the detailed
instructions in this regard.
The automatic download functionality for the CHE can be found on the CHE HEQCIS
information web page. Instructions on how to request and implement CHE updates can be
found on the Edu.Dex web site at www.praxis.co.za/EduDex. On the left hand side of the
screen select the “Level 3 - Training Provider” link. Click on the “How to update Edu.Dex for
CHE data submissions” link to view the document that provides you with the detailed
instructions in this regard.
The e-mail that you receive will have a number of text files attached to it. The text files will
either have a .txt or .dat extension. The .txt files are not required by the Edu.Dex application
and have been included for information. These files are comma delimited and can be viewed
in MS Excel.
The .dat files are required by the Edu.Dex application. These files must be copied into the
“[application
folder]\Updates”
directory
(usually
found
at
c:\Program
Files\Edu.Dex\Updates)(see Screen 10.1).
Screen 10.1
Once the files are in place restart the Edu.Dex application and login. The following screen will
be displayed if the Edu.Dex application has found the update files (see Screen 10.2).
Screen 10.2
Clicking on the No button will cancel the update process and allow you to use the Edu.Dex
application as per normal (the message will display again the next time you login to the
Version 2.02 17/04/2008
40
Edu.Dex User Manual
application). Clicking on the Yes button will initiate the update process (see Screen 10.3). A
message will be displayed once the update has been successfully implemented, after which
you may continue using the Edu.Dex application as per normal. Please contact the Edu.Dex
helpdesk immediately if you experience any problems with the update functionality.
Screen 10.3
Version 2.02 17/04/2008
41