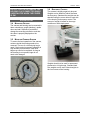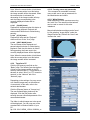
1
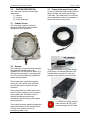
OCEAN
PRESENCE
Technologies
Underwater IP Camera System
OPT-09P User’s Manual
Version 1.0
OceanCam™
Model OPT-09P
Ocean Presence Technologies ©2014
OceanCam OPT-09P User’s Manual
Version: 1/8/14
NOTICE TO USERS
Copyrights ©2014 Ocean Presence Technologies.
All rights reserved.
This manual or the software described
herein, in whole or in part, may not be
reproduced, translated or reduced to any
machine-readable form without prior written
approval from Ocean Presence
Technologies.
Indicates potential electrical
hazard. Please handle with care
and observe all proper operations
and warnings.
OCEAN PRESENCE TECHNOLOGIES AND AXIS
CORPORATION PROVIDES NO WARRANTY WITH
REGARD TO THIS MANUAL, THE SOFTWARE OR
OTHER INFORMATION CONTAINED HEREIN AND
HEREBY EXPRESSLY DISCLAIMS ANY IMPLIED
WARRANTIES OF MERCHANTABILITY OR
FITNESS FOR ANY PARTICULAR PURPOSE WITH
REGARD TO THIS MANUAL, THE SOFTWARE OR
SUCH OTHER INFORMATION. IN NO EVENT
SHALL OCEAN PRESENCE TECHNOLOGIES NOR
AXIS CORPORATION BE LIABLE FOR ANY
INCIDENTAL, CONSEQUENTIAL OR SPECIAL
DAMAGES, WHETHER BASED ON TORT,
CONTRACT, OR OTHERWISE, ARISING OUT OF
OR IN CONNECTION WITH THIS MANUAL, THE
SOFTWARE OR OTHER INFORMATION
CONTAINED HEREIN OR THE USE THEREOF.
Ocean Presence Technologies reserves the right to
make any modification to this manual or the
information contained herein at any time without
notice.
Trademarks and registered trademarks
- Microsoft, and Windows are registered trademarks
of Microsoft Corporation in the U.S. and other
countries.
- iPad, iPhone and iPod touch are registered
trademarks of Apple Inc.
- UniPhier is a registered trademark of Panasonic
Corporation.
- "Super Dynamic", "SDII", "SDIII", "SD5", "SD5Link",
"i-PRO" and "i-PRO SmartHD" logos are trademarks
or registered trademarks of Panasonic Corporation.
- All other trademarks identified herein are the
property of their respective owners.
Ocean Presence Technologies
If you have any questions about this
product, you may call:
Ocean Presence Technologies at:
831-426-4678
or E-mail to: [email protected]
or Write to:
Ocean Presence Technologies
326 Pacheco Ave.
Santa Cruz, CA 950
Copyright ©2014
Page 2
OceanCam OPT-09P User’s Manual
Version: 1/8/14
TABLE OF CONTENT
1.0 SHIPPED COMPONENTS ..................... 4
4.2.7
Display the log list .................. 11
4.2.8
Playing Back Recorded Video 11
2.0 QUICK START....................................... 4
4.2.9
Transfer to PC........................ 12
2.1 Configuring the Network ......................... 4
4.2.10
Creating users and passwords 12
2.2 Deployment Testing................................ 5
4.2.11
White Balance ........................ 12
2.3 Using the Camera .................................. 5
2.3.1
Camera Access........................ 5
5.0 PRE-DEPLOYMENT TESTING ............ 13
2.3.2
Menu System ........................... 6
5.1 Camera/Network Tests ......................... 13
2.3.3
Single PTZ ............................... 6
5.2 Final Check-out .................................... 13
2.3.4
Movements .............................. 6
6.0 CARE & MAINTENANCE..................... 13
3.0 SYSTEM DESCRIPTION........................ 7
6.1 Opening the Housing ............................ 13
3.1 Camera System...................................... 7
6.2 Closing the Housing ............................. 13
3.2 Housing.................................................. 7
6.3 Above Water Maintenance.................... 13
3.3 Power & Network Subsystems................ 7
6.4 O-Ring Greasing Technique ................. 14
3.4 Mounting Options ................................... 8
6.5 Below Water Maintenance .................... 14
3.5 Moisture Purging System........................ 8
6.6 Periodic Maintenance ........................... 14
3.6 Buoyancy Control ................................... 8
7.0 APPENDIX........................................... 15
4.0 OPERATIONS ....................................... 9
7.1 Warranty .............................................. 15
4.1 Hardware Assembly ............................... 9
7.2 Accessories (Optional).......................... 15
4.2 Camera/Network Software...................... 9
7.3 Replacement Parts ............................... 15
4.2.1
Hemispheric Cameras .............. 9
7.4 Camera Specifications.......................... 16
4.2.2
Full Image Storage ................... 9
7.5 Housing Specifications ......................... 16
4.2.3
Security.................................... 9
7.6 Mounting the Camera ........................... 17
4.2.4
Image/Video PTZ Settings...... 10
7.7 Underwater Cable Wiring...................... 17
4.2.5
Using The Mouse ................... 10
4.2.6
Recording .............................. 10
Ocean Presence Technologies
Copyright ©2014
Page 3
OceanCam OPT-09P User’s Manual
1.0
SHIPPED COMPONENTS
Version: 1/8/14
To connect to the network, attach the other
end of the PoE cable to the OUT port of the
power supply. A standard Ethernet cable
can then be attached from the IN port of the
power supply to a router, computer or
Internet modem.
Once all network cables have been
attached, you can apply power to the
system. This begins the camera “booting”
process taking about a minute.
As soon as the camera's power supply has
been established, the two LEDs will show
the progress of the startup.
2.0
QUICK START
The OceanCam Underwater IP camera
system (UWIP) has been designed to
simplify installation and deployment. The
model OPT-09P employs a Panasonic WVSF438 Hemispheric camera that allows for
pan-tilt-zoom functions without moving
parts.
2.1
CONFIGURING THE NETWORK
You can now reach the camera via the
network using a browser. The camera is set
to DHCP or the IP address can be entered
into a browser window.
Software and manuals are available on the
CD provided. Once installed you can access
the camera. The application automatically
finds the camera in the local network.
The OceanCam is ready to be used out of
the box and is network ready. Configuration
software is included in the Installation CD
and should be downloaded and installed
into a Windows computer with a LAN.
The standard system includes a power
supply and an underwater Power-overEthernet (PoE) cable. The PoE connector
should be attached to the housing and the
cable stress relief sleeve lightly tightened.
Ocean Presence Technologies
Copyright ©2014
Page 4
OceanCam OPT-09P User’s Manual
2.2
DEPLOYMENT TESTING
The camera can be deployed while the
network is operational. This will allow the
monitoring of any leakage.
DO NOT PLUG IN OR REMOVE THE
HOUSING POE CONNECTOR WHILE
UNDERWATER WHEN THE POWER
IS ON!
The camera is slightly buoyant. Weights can
be added to decrease the buoyancy. Attach
weights under the four corners of the
housing using plastic cable ties.
It is advisable to test the system in fresh
water prior to saltwater deployment. If this is
not possible, lower the camera into the
water with the network active.
If a perfect o-ring seal has not been
obtained, fogging or condensation will soon
appear on the inside.
A submergence test can also we performed
without power applied. Lower the system to
a depth of 10 feet and then remove it for
visible inspection for leaks. If possible, test
the system again at a depth of 30 feet for 15
minutes.
Version: 1/8/14
If moisture is seen on the top inside of the
port, either the O-ring was not properly
sealed or additional moisture removal may
be required. If a dry system cannot be
obtained, please contact the manufacturer
for assistance.
2.3
USING THE CAMERA
Enter the IP address into a browser and the
camera will be displayed. You may be
requested to enter a user name and
password.
The admin password is set at the factory to
12345. It is highly recommended that you
create one ore more alternative admin
logins.
DEFAULT ADMINISTRATOR LOGIN
USER NAME: admin
PASSWORD: 12345
2.3.1 Camera Access
The camera can be accessed using a
browser. Double click on the camera in
EasyIP Setup or manually enter the IP
address into the browser.
IF ANY MOISTURE IS SEEN ON THE
TOP OF THE PORT, REMOVE THE
SYSTEM FROM THE WATER
IMMEDIATELY!
You maybe asked to install various ActiveX
components such as a viewer.
Ocean Presence Technologies
Copyright ©2014
Page 5
OceanCam OPT-09P User’s Manual
2.3.2 Menu System
The live video and the Setup screens can
be accessed from the side menu.
Version: 1/8/14
and "virtually" move the enlarged image
section within the entire image sensor area.
Generally the image is set to record the full
Hemispheric.
2.3.4 Movements
Hold down the mouse and a crosshairs will
appear. While holding down the mouse,
move in the direction desired. You can
zoom in by using the thumb wheel on the
mouse.
The various viewing windows can be
configured using the Image/Audio screens.
2.3.3 Single PTZ
Double Panorama display the 360-degrees
in two 180-degree panels. Switching to a
Single PTZ allow you to pan through the full
image. Click on a location or use the
position arrows to move the window.
The virtual PTZ function allows you to use a
mouse or joystick to continuously zoom in
on images from the selected video source
Ocean Presence Technologies
Copyright ©2014
Page 6
OceanCam OPT-09P User’s Manual
3.0
SYSTEM DESCRIPTION
The OceanCam consists of three major
subsystems:
1) Camera
2) Housing
3) Power & Network
3.1
Version: 1/8/14
3.3
POWER & NETWORK SUBSYSTEMS
Power-over-Ethernet (PoE) has the ability to
carry both data and power over a single
Cat5 cable. The underwater PoE connector
can be attached or removed underwater. A
stress relief sleeve is also used.
CAMERA SYSTEM
The OceanCam employs a full highdefinition 1080p camera that has been
designed for 24x7 operations.
3.2
HOUSING
The OceanCam housing has been specially
designed and manufactured for the
Panasonic WV-SF438 camera. Model OPT09P has been designed to a working depth
of 125 feet. Other models are available for
greater working depths.
The system employs a PoE power supply
(PoE injector). A standard Ethernet Cat5
network cable connects to a local area
network (router) and then to the Internet.
The housing uses a specially designed
acrylic port. Care needs to be exercised
when cleaning as the surface could be
scratched.
The housing features a cable stress relief.
Pairs of circular o-ring are used to insure a
more reliable seal. The dome is free of
attached components and can be
completely removed exposing the camera
and components.
A 110/240 VAC power supply is
used to deliver 48 VDC to the
camera through the PoE cable.
The housing has been specially designed to
protect the electronics from small amounts
of water in the unlikely event of an
improperly seated o-ring.
Ocean Presence Technologies
Copyright ©2014
Page 7
OceanCam OPT-09P User’s Manual
DO NOT PLUG IN OR REMOVE THE
HOUSING POE CONNECTOR WHILE
UNDERWATER WHEN THE POWER
IS ON!
SYSTEM OPTIONS
3.4
MOUNTING OPTIONS
Version: 1/8/14
3.6
BUOYANCY CONTROL
The camera is slightly negatively buoyant.
Weights can be added to further decrease
the buoyancy. Standard dive weights can be
attached using the corner hole on each side
of the housing for buoyancy control. The
amount of weight is based on the surge
conditions of each deployment.
The camera and housing can be mounted in
three orientations: upright (desktop), upside
down and wall. Software is provided to
change the recording orientation such that
the video is properly displayed on the
monitor.
3.5
MOISTURE PURGING SYSTEM
To ensure the best operation of the camera,
moisture inside the housing needs to be
removed. The use of a silica-drying bag is
used. If the housing is opened, especially in
high humidity environments, fresh silica
bags may need to be replaced. As long as
the housing is not opened, bags do not
need to be changed.
Weights should not be used for permanent
placement or in high surge. Standard lead
dive weights can be used. Attach weights to
the four corners of the housing.
Ocean Presence Technologies
Copyright ©2014
Page 8
OceanCam OPT-09P User’s Manual
4.0
4.1
OPERATIONS
HARDWARE ASSEMBLY
The camera system is shipped completely
assembled and ready for operation. The
PoE injector is also ready for use.
Attach the PoE cable to the camera using
the underwater connector. Lightly tighten
the stress relief sleeve.
Attach the other end of the PoE cable to the
OUT port of the power injector.
Attach the Ethernet cable to the network
with a CAT5 cable (not supplied) and the IN
port of the PoE injector.
Once both network connectors are
attached, plug the power into a 110/240
VAC source.
The system provides for the removal of
moisture from inside the housing with the
use of silica bags. Weights can be attached
to the corners of the housing.
Version: 1/8/14
4.2.2 Full Image Storage
It is possible to store a full image (fisheye),
regardless of the live image stream that is
being displayed. This ensures that the
recording always contains the full image,
even though the operator may have used
the vPTZ features to zoom into the image in
order to examine a specific detail.
4.2.3 Security
The camera provides you with three
different access levels (administrator,
camera control and live only), allowing
people with different levels of authorization
to access the camera images.
The settings relating to the authentication
such as users and PCs restrictions for
accessing the camera can be configured on
the “User mng.” page. Click the [User auth.]
tab on the “User mng.” page.
Once the underwater PoE network cable
has been attached, you can be apply power
to the system. This begins the camera
“booting” process taking about one minute.
4.2
CAMERA/NETWORK SOFTWARE
The camera comes with a full set of features
including, Internet server, image capture, Email and FTP image transmission, user
security and many more.
4.2.1 Hemispheric Cameras
Hemispheric cameras use a single fish-eye
lens to capture the entire scene. This can
be recorded for future viewing. The
recorded video can be investigated with
pan, tilt and zoom functions and can be
played back at various speeds. A 960p
window (1280 x 960) can be used to play a
de-wrapped video at 30 fps.
Ocean Presence Technologies
The settings relating to the authentication of
users who can access this camera from the
PC or a cellular phone/mobile terminal can
be configured on this page. Up to 18 users
can be registered.
Note: When user authentication has failed
to pass (authentication error) 8 times within
30 seconds using the same IP address
(PC), access to the unit will be denied for a
while.
Copyright ©2014
Page 9
OceanCam OPT-09P User’s Manual
4.2.4 Image/Video PTZ Settings
The camera has numerous combinations of
viewing, control and recording windows. To
use Electronic PTZ (pan-tilt-zoom) the
camera’s Image Capture Mode is set to
Double Panorama + Single PTZ.
Version: 1/8/14
4.2.5 Using The Mouse
You can now use the scroll wheel to zoom +
(roll upwards) or zoom - (roll downwards).
4.2.6 Recording
Video and audio can be stored to several
storage devices including the on-board SD
Flash Card. The card can only be installed
or removed by opening the housing and
removing the camera.
An 8 GB SD card is provided. Larger SD
cards up to 64 GB are optional.
Images displayed on the “Live” page can be
recorded on the SD memory card manually.
This button is operable only when “Manual”
is selected for “Save trigger” on the [SD
memory card] tab on the “Basic” page of the
setup menu.
The H.264(1) Image Capture Mode is set to
Double Panorama 1920 x 1080.
It is possible to select “JPEG”, “H.264(1)”, or
“H.264(2)” on “Recording format” of the
setup menu. When “JPEG” is selected for
“Recording format”, still image data are
recorded. When “H.264(1)” or “H.264(2)” is
selected, video data are recorded.
ONLY ONE RECORDING FORMAT CAN BE
RECORDED AT A TIME. CHANGING THE
RECORDING FORMAT WILL RE-FORMAT THE
SD CARD REMOVING ALL PREVIOUSLY
RECORDED IMAGES/VIDEO.
The H.264(2) Image Capture Mode is set to
Single PTZ 1280 x 960 which is the
maximum resolution with a 30 frames per
second recording speed. This is the
maximum frame rate that the camera can
obtain.
It is recommended to select only one
recording format (M-JPEG, H.264(1) or
H.264(2) PTZ window.
Click the [SD] button on the lower left of the
Live Page. The SD recording window will
open. A record light in the upper left of the
Live Page will turn red indicating recording.
The images/video will be logged once the
stop button is pushed.
Ocean Presence Technologies
Copyright ©2014
Page 10
OceanCam OPT-09P User’s Manual
Version: 1/8/14
Images recorded on the SD memory card
can be copied onto the PC.
Third-party software such as Milestone
Software can be used to record video
streams directly to the PC hard disk. See
included CD for information on a free
license.
4.2.7 Display the log list
The Manual/Schedule log of the cameras
will be displayed in list form. Logs filed when
images have been recorded manually or
during the period of the schedule on the SD
memory card will be displayed. The log list
can be displayed only when “On” is selected
for “Save logs” on the [Log] tab of the
“Basic” page.
Note: Enter the desired number of image
and press the [Enter] key on the keyboard.
The image of the designated number will be
displayed.
4.2.8.1
[REW] button
Each time the button is clicked, the
playback speed will change.
When the [PLAY] button or the [REV PLAY]
button is clicked during fast reverse
playback, playback speed will return to the
normal playback speed.
4.2.8.2
[REV PLAY] button
Images will be played in reverse sequential
order.
4.2.8.3
[PLAY] button
When this button is clicked, images will be
played in sequential order.
4.2.8.4
4.2.8 Playing Back Recorded Video
When clicking a time and date listed on the
log list window, the “Live” page will turn to
the “Playback” page.
When images associated with the clicked
time and date are on the SD memory card,
the first image of them will be displayed.
When clicking a time and date listed on the
log list window, total number of images
associated with the clicked time and date,
and the number of the currently displayed
image will be displayed.
Ocean Presence Technologies
[FF] button
Each time the button is clicked, the
playback speed will change. When the
[PLAY] button or the [REV PLAY] button is
clicked during fast playback/fast reverse
playback, playback speed will return to the
normal playback speed.
4.2.8.5
[TOP] button
The first image will be displayed.
4.2.8.6
[PREV. IMAGE] button
The previous frame will be displayed and
paused when this button is clicked during
playback. Each time this button is clicked
during pausing, the frame previous to the
currently displayed frame will be displayed.
Copyright ©2014
Page 11
OceanCam OPT-09P User’s Manual
Note: When the mouse button is held down
while the mouse pointer is on this button,
the image number will be decreased. When
the mouse button is released, the
decreasing of the image number will stop
and the image corresponding to the
currently displayed number will be
displayed.
4.2.8.7
[PAUSE] button
Playback will be paused when this button is
clicked during playback. Playback will
resume when this button is clicked during
pausing.
4.2.8.8
[STOP] button
Playback will stop and the “Playback”
window will turn to the “Live” page.
4.2.8.9
Version: 1/8/14
4.2.10 Creating users and passwords
If the computer is accessible to several
users, make sure to set up passwords for
the Administrator and others.
4.2.11 White Balance
Water absorbs the color spectrum removing
the “reds” first. The camera’s white balance
can be used to correct for this color
imbalance.
Manual white balance settings can be found
by first selecting “Image Adjust” under the
Image/Position tab. Reduce the “blues” and
increase the “reds.”
[NEXT IMAGE] button
The next frame will be displayed and
paused when this button is clicked during
playback. Each time this button is clicked
during pausing, the frame next to the
currently displayed frame will be displayed.
Note: When the mouse button is held down
while the mouse pointer is on this button,
the image number will be increased.
4.2.9 Transfer to PC
Click the [SD memory card] tab on the
“Basic” page. The following are descriptions
of how to copy images saved on the SD
memory card onto the PC. It is necessary in
advance to select “Allow” for “FTP access to
camera” on the “Network” tab of the
“Network” page.
Depending on the settings of a proxy server
or a firewall, images may not be obtained
via a network. In this case, refer to the
network administrator.
Click the [Execute] button of “Access img.”
The user authentication window will be
displayed. Click the [OK] button after
entering the user name and password of the
camera administrator.
The folder in which images are to be saved
will be displayed. You can copy any of the
recorded files to Window folders on your
PC.
ftp://192.168.0.10/B/M_LOCAL/1000004_xx
Ocean Presence Technologies
Copyright ©2014
Page 12
OceanCam OPT-09P User’s Manual
5.0
PRE-DEPLOYMENT TESTING
It is advisable to test the components of the
system prior to open water deployment.
5.1
CAMERA/NETWORK TESTS
First attach the network cables and power.
Cable ties may also be used to secure the
cable to one of the corners. Apply power to
the camera system. The camera will powerup and establish a network connection.
Test the camera by initiating the network
software. Start the EasyIP Setup Program
and select the camera. It should be set to
either automatically acquiring the IP
address (DHCP) or it will display the
manually entered IP address.
At this point, all systems are now
operational and ready for the final predeployment check.
5.2
FINAL CHECK-OUT
The camera employs a PoE connection that
can be removed and reattached
underwater. The underwater portions of the
connector should be protected from
contamination as much as possible
especially if they remain unconnected for
long periods of time. Special cable plugs are
available as accessories for this purpose.
Check to see that the connections are firmly
attached and the stress relief sleeve is
lightly tightened. The camera system is now
ready for deployment.
WARNING: DO NOT EXCEED THE DEPTH
LIMITATION OF THE HOUSING. FAILURE TO
HEED THIS WARNING MAY RESULT IN
LEAKAGE AND POSSIBLY IMPLOSION AND
SERIOUS INJURY.
Version: 1/8/14
6.0
6.1
CARE & MAINTENANCE
OPENING THE HOUSING
BE SURE TO SOAK AND RINSE THE HOUSING
IN FRESH WATER AND THOROUGHLY DRY IT
BEFORE OPENING.
The camera can be exposed by first
removing the eight hold-down screws.
While the dome is off the housing base, be
sure to protect the exposed O-ring mating
surfaces from damage or contamination.
Also protect the dome from scratching.
6.2
CLOSING THE HOUSING
DO NOT FORCE THE SCREWS, AS THE
STRONER STAINLESS STEEL WILL DAMAGE
THE ACRYLIC TREADS.
The dome is first positioned over the base.
The assembly is then aligned so that it fits
over the camera. Screws can be inserted in
any order but should be carefully threaded
by hand. The screws should turn easily by
hand.
ONCE ALL EIGHT SCREWS HAVE BEEN HAND
THREADED TO AT LEAST HALF THEIR
LENGTH, THEY CAN BE LIGHTLY TIGHTENED
USING THE ALLEN KEY PROVIDED. FINAL
TIGHTENING SHOULD BE DONE IN A
COLCKWISE MANNER.
If the camera was removed, it should be
positioned such that the top of the camera
faces to the front of the housing. Care
should be exercised inserting the Ethernet
connector into the camera.
6.3
ABOVE WATER MAINTENANCE
The housing is made of acrylic and
polycarbonate plastic, materials that are
well suited for this application, but with
certain limitations which must be observed.
CLEANING: DO NOT CLEAN ACRYLIC OR
POLYCARBONATE PARTS WITH ANY
SOLVENTS OTHER THAN SOAP AND WATER
OR 70% ISOPROPYL ALCOHOL.
Ocean Presence Technologies
Copyright ©2014
Page 13
OceanCam OPT-09P User’s Manual
Keep the housing out of direct sunlight as
much as possible. The materials are subject
to crazing, a surface cracking phenomenon,
which does not affect its strength. Crazing is
caused by ultraviolet radiation, present in
sunlight.
The closed clear housing acts as a
greenhouse and will heat quickly if left in
direct sunlight. Heat is hard on optical and
electronic components, so when the
housing is out of the water, keep it covered
or shaded as much as possible.
Protect the housing from impact. The
material will shatter if subjected to sufficient
shock. Protect the housing from damage
while the unit is not in use.
Rinse the outside surfaces with fresh water
after use. Soaking in fresh water is also
advisable. The plastic and stainless steel
fittings are impervious to salt water, but will
lose their luster if even small amounts of
salt are allowed to accumulate.
6.4
O-RING GREASING TECHNIQUE
The housing is sealed with pairs of O-rings,
which require meticulous care. To maintain
a watertight seal, the O-ring and its mating
surfaces must be clean, free of foreign
material, and lubricated with silicone
grease.
The following maintenance procedure
should be performed:
Clean all old silicone grease from O-ring
and mating surfaces using paper towels.
Inspect O-ring for foreign material (sand,
seaweed, hair, etc.), cracks, cuts, soft
spots, or deformities. Replace O-ring if
damaged. Inspect mating surfaces for
scratches, rough spots, dents, or cracks.
A SILICA DRYING BAG MUST BE REPLACED
IF THE HOUSING IS OPENED FOR
MAINTENANCE.
Apply thin, even coat of silicone grease to
O-ring using fingers. Install the O-rings.
Immediately wash your hands in a mild
Ocean Presence Technologies
Version: 1/8/14
soap and dry before handling other
components.
6.5
BELOW WATER MAINTENANCE
The camera system is designed for
continuous underwater operation and can
operate safely for months without removal.
The placement and conditions underwater
will dictate the frequency and extent of
surface growth and contamination and will
dictate how often the system may need to
be removed for maintenance.
The acrylic port can be rubbed with a soft
cloth to remove algae growth. Particulate
matter that may settle on the port can be
dusted by hand. If the housing shows
excessive accumulation of algae growth, it
should be detached from the cables and
brought to the surface for a more thorough
cleaning.
WARNING: THE POWER SUPPLY MUST
FIRST BE DISCONNECTED BEFORE THE
UNDERWATER POWER CONNECTOR IS
REMOVED. FAILURE TO DO SO WILL NOT
HARM THE CAMERA BUT MAY CAUSE
DAMAGE TO THE POWER SUPPLY.
POWER CABLE REMOVAL WITH THE POWER
ON WILL VOID WARRANTY.
6.6
PERIODIC MAINTENANCE
The OceanCam has been designed for
continuous underwater operations and
could operate in place for as much as six
months. Generally, it is advisable to remove
the camera every 2-3 months for a thorough
cleaning.
A thin coating of silicone grease on the
acrylic surfaces is somewhat effective in
reducing algae growth.
The frequency of underwater maintenance
will depend on other maintenance practices
that may lead to a build up of sediment on
the port. The port should be “dusted” as
often as possible and at least at the
conclusion of other cleaning activities.
Copyright ©2014
Page 14
OceanCam OPT-09P User’s Manual
7.0 APPENDIX
7.1 WARRANTY
The manufacturer inspects and tests each
housing for watertight integrity before it is
delivered.
The manufacturer will repair or replace at
the manufacturer’s option any housing that
proves to be defective in construction or
materials within one year of date of delivery.
The manufacturer is not liable for damage to
equipment caused by leakage of water into
the housing, nor is the manufacturer liable
for loss of data or income there from as may
result from such leakage. The manufacturer
is not liable for any accidents during which
this housing was in use.
This warranty is void in event of negligent
handling of the housing including, but not
limited to, dropping the housing,
modifications to the housing by other than
the manufacturer, improper care of the
sealing components, exceeding the
specified depth limitation or pressurizing the
housing in excess of 5 pounds per square
inch (psi).
There is no express or implied warranty, nor
warranty of merchantability, except as
stated by the manufacturer above. Camera
and subcomponents carry warranties as
expressed by their respective manufacturer.
The buyer understands that because of the
nature of this product, housing use
underwater involves certain risks and
agrees to hold the manufacturer harmless,
except as stated above.
WE HIGHLY RECOMMEND THAT FLOOD AND
THEFT INSURANCE IS CARRIED AT A
SUITABLE LEVEL FOR REPLACEMENT IF
WARRANTED.
Ocean Presence Technologies
Version: 1/8/14
7.2
ACCESSORIES (OPTIONAL)
Optional accessory products that have been
designed to work with the OceanCam
include:
• Wireless Network Adapter
• Video Recording Software
• Anti-theft Locking System -- special antitheft tamper-resistant locking system
Contact Ocean Presence Technologies at
[email protected] for more information.
7.3
REPLACEMENT PARTS
Spare parts packages include one silicone
grease package; silica bag and one Allen
wrench.
PART #
DESCRIPTION
PRICE
06001
Screw, machine 6-32 x 1/4
pan head Phillips, SS
$0.18
06002
Screw, machine 6-32 x 1/4
flat head Phillips, SS
$0.18
06003
Screw, SHCS 6-32 x 1, SS
$0.23
06004
Screw, SHCS 10-32 x 3/4,
SS
$0.29
06005
Screws, 10-32 x 3/4, pack of
8
$12.00
06006
Screw, SHCS 2-56 x 3/8, SS
$0.28
06007
DOS O-ring kit (4)
$29.95
06008
OPT-09P spare parts kit
$39.95
99001
Silica bags, pack of 6
99002
Port O-ring kit
99003
Silicone grease, in small
container
99004
Owner’s Manual
$6.95
$17.95
$2.60
$19.50
All other parts are custom made, and may
require return of the housing to the
manufacturer for repair or replacement.
Copyright ©2014
Page 15
OceanCam OPT-09P User’s Manual
7.4
CAMERA SPECIFICATIONS
Camera
model
Image device
Max. image
Resolution
Zoom ratio
Lens
Minimum
Illumination
Video
streaming
Image
settings
Frame rate
Other
functions
Network
Protocols
Interface
Ethernet
Power
consumption
Panasonic WV-SF438
Sensor 1/3“ CMOS, progressive
scan, 3.1 megapixels
1080p at 30 fps
1x, 2x, 4x controlled by browser
GUI (Panorama, Double
Panorama, Fisheye mode)
1x ~4x (Quad PTZ or Single PTZ
mode)
Focal Length: 0.837 mm
Angular Field of View:
Horizontal: 188 °, Vertical: 181 °
Maximum Aperture Ratio: 1:2.4
(Fixed)
Focusing Range: 0.3 m ~ ∞
Color: 1.5 lx (F2.4, Auto slow
shutter: Off (1/30s),
Gain:On(High))
Color: 0.1 lx (F2.4, Auto slow
shutter: Max. 16/30s,
Gain:On(High)) *1
BW: 1.2 lx (F2.4, Auto slow
shutter: Off (1/30s),
Gain:On(High))
BW: 0.08 lx (F2.4, Auto slow
shutter: Off (16/30s),
Gain:On(High)) *1
Multiple, individually configurable
streams in H.264 and Motion
JPEG;
H.264(1): 1920x1080 / 640x360 /
320x180, up to 30 fps
H.264(2): 640x360 / 320x180, up
to 30 fps
JPEG: 1920x1080 / 640x360 /
320x180, up to 30 fps
1080p at 30 fps
Backlight compensation,
automatic white balance, image,
distortion correction (panorama
image correction included)
Security User-/Group
management, HTTPS/SSL, IP
address fi lter, IEEE 802.1x
Ethernet 10Base-T/100Base-TX
(RJ-45)
Power over Ethernet (IEEE
802.3af): PoE class variable
depending on operating mode;
power consumption; typ. 6 W;
with PoE switch
Ocean Presence Technologies
Version: 1/8/14
Operating
temperature
Operating
humidity
Local storage
Software
Cellular
phone
compatibility:
Mobile
terminal
compatibility
–10 °C to +50 °C {14 °F to 122
°F}
Less than 90 %
(no condensation)
SDXC memory card: 64 GB
SDHC memory card: 4 GB, 8 GB,
16 GB, 32 GB
(except miniSD card and microSD
card)
Windows Internet Explorer 9.0
(32-bit)
Windows Internet Explorer 8.0
(32-bit)
Windows Internet Explorer 7.0
(32-bit)
Microsoft Internet Explorer 6.0
SP3
JPEG image, AUX control (by
access level)
iPad, iPhone, iPod touch (iOS
4.2.1 or later)
TM
Android mobile terminals
7.5
HOUSING SPECIFICATIONS
Glass Dome
50% spherical polycarbonate
dome specially designed to
maximize the camera’s optics
Maximum
125 feet (38 meters)
operational
depth
Dimensions
8.5” x 8.5” x 5.0” (215.9mm x
(L x W x H)
215.9mm x 127mm)
Weight
5.5 lbs (2.5 kg) in air, slightly
negative buoyant in saltwater
Moisture
Silica dry bags
control
Underwater
Single Ethernet PoE cable, wet
cables
mating underwater connector
Copyright ©2014
Page 16
OceanCam OPT-09P User’s Manual
7.6
Version: 1/8/14
MOUNTING THE CAMERA
The camera housing provides for four
mounting holes on each corner of the
housing. These can be used for weights or
to attach the camera.
7.7
UNDERWATER CABLE WIRING
The Power-over-Ethernet underwater cable
has been specially designed for long life in
harsh conditions. It employs both power and
network connections as shown in the
diagram below.
Ocean Presence Technologies
Copyright ©2014
Page 17