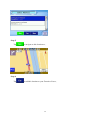
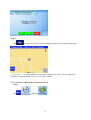
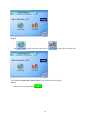
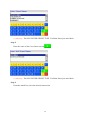
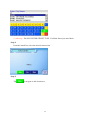
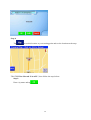
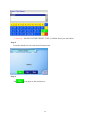
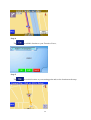
1
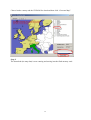
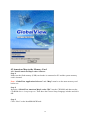
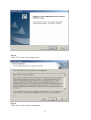
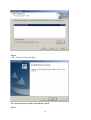
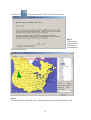
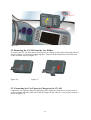
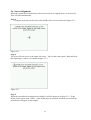
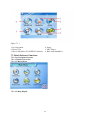
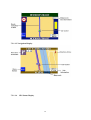
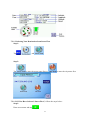
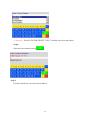
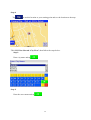
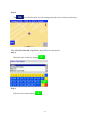
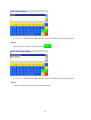
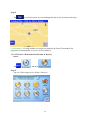
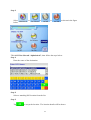
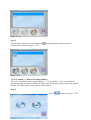
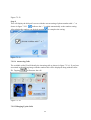
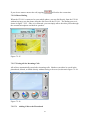
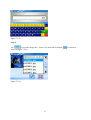
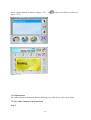
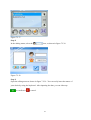
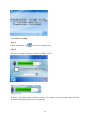
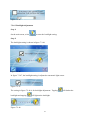
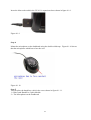
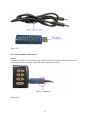
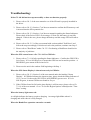
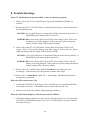
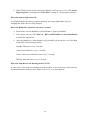
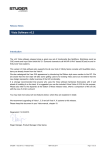
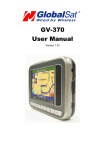
GV-101 User Manual
1
ver 1.16 Eng
Table of Content
1. Features and Specification
1.1 Features ......................................................................................................................5
1.2 Specification .............................................................................................................6
1.2.1 Hardware...........................................................................................................6
1.2.2 Software ............................................................................................................7
2. Introduction
2.1 Overview....................................................................................................................8
2.2 Detailed Hardware Functions ....................................................................................9
3. Download Software to Memory Card............................................................................12
4. Download Map Data to the Memory Card ....................................................................15
4.1 Europe Map to the Memory Card
4.1.1 Install Europe Map Loader Software....................................................15
4.1.2 Upload Europe Map to the Memory Card ............................................18
4.2 American Map to the Memory Card
4.2.1 Install American Map Loader Software................................................20
4.2.2 Upload American Map to the Memory Card ........................................23
5. Setup GV-101 in Car
5.1 Attach GV-101 and Car Holder on the Car ..........................................................26
5.2 Removing the GV-101 with the Car Holder ........................................................27
5.3 Connecting the Car Cigarette Charger to the GV-101 .........................................27
5.4 Powering the GV-101 On and Off .......................................................................28
5.4.1 Powering the GV-101 Off .....................................................................29
5.4.2 Powering the GV-101 On......................................................................29
5.5 Reset.....................................................................................................................29
5.5.1 Soft Reset ..............................................................................................29
5.5.2 Hard Reset.............................................................................................29
5.6 Screen Alignment.................................................................................................30
6. Changing the Battery .....................................................................................................32
7. Software
7.1 The Main Application Screen ..............................................................................33
7.2 Detail Software Functions....................................................................................34
7.2.1 Car Navigation System
7.2.1.1 Window Overview
7.2.1.1.1 Main Menu..................................................34
7.2.1.1.2 Map Display................................................35
7.2.1.1.3 Navigation Display .....................................35
7.2.1.1.4 GPS Status Display .....................................36
7.2.1.2 Selecting Your Destination.................................................36
7.2.1.2.1 If You Have Selected “Street First” ............37
7.2.1.2.2 If You Have Selected “City First”...............40
7.2.1.3 To Enter a Destination from Intersection...........................43
7.2.1.3.1 If You Have Selected “Street First” ............44
7.2.1.3.2 If You Have Selected “City First”...............47
7.2.1.4 To Enter a Destination from Points of Interest ..................51
7.2.1.4.1 If You Have Selected “Alphabetical”..........52
7.2.1.4.2 If You Have Selected “By Distance” ..........54
7.2.1.5 To Enter a Destination from Favorites...............................56
2
7.2.1.6 To Enter a Destination from Recent...................................59
7.2.1.7 To Enter the Center of City to Find the Destination ..........61
7.2.1.7.1 If You Have Selected “Alphabetical”..........63
7.2.1.7.2 If You Have Selected “By Distance” ..........65
7.2.1.7.3 If You Have Selected “List ALL” ...............67
7.2.1.8 To Set the Route Options ...................................................70
7.2.1.9 To Set the Region Options .................................................71
7.2.1.10 To Set the Display Options ..............................................72
7.2.1.11 To Create or Add to the Favorites List.............................73
7.2.1.12 To Add a Label to Your Favorites ....................................75
7.2.1.13 To Demo a Navigation .....................................................76
7.2.1.14 Use GPS Info ...................................................................78
7.2.2 Photo View............................................................................................79
7.2.3 Movie Playback ....................................................................................80
7.2.4 MP3 Player............................................................................................82
7.2.4.1 Creating a Play List............................................................82
7.2.4.2 Basic Operation..................................................................84
Play the Created Play List
Change the Playback Mode of the Play List
7.2.4.3 The Equalizer .....................................................................85
7.2.5 Optional Blue tooth HandsFree Carkit .................................................85
7.2.5.1 How to Use the Hands Free Carkit ....................................85
7.2.5.2 How to Set Up Blue tooth HandsFree Carkit with a
86
Mobile Phone
7.2.5.3 Blue tooth Mobile Phone Settings .................................... 88
7.2.5.3.1 Adding and Delete Phone Settings..................89
7.2.5.3.2 Connecting to a Phone ....................................89
7.2.5.3.3 Disconnecting the Mobile Phone ....................90
7.2.5.3.4 Adding “+” before the Setup Number.............92
7.2.5.4 Answering Calls .................................................................93
7.2.5.5 Hang Up the Calls..............................................................93
7.2.5.6 Direct Dialing.....................................................................93
7.2.5.7 List All Calls the Incoming Calls.......................................94
7.2.5.7.1 Adding Calls to the Phonebook.......................94
7.2.5.7.2 Deleting All the Received and Missed Calls...97
7.2.5.7.3 Direct Dialing..................................................98
7.2.5.8 Phonebook..........................................................................99
7.2.5.8.1 Add A Number to the Phonebook ...................99
7.2.5.8.2 Edit A Number in the Phonebook .................100
7.2.6 Setting Mode.......................................................................102
7.2.6.1 System Information..........................................102
7.2.6.2 Power Setting ...................................................103
7.2.6.3 Backlight Adjustment.......................................104
7.2.6.4 Language Selection..........................................105
7.2.6.5 About................................................................105
7.2.6.6 Screen Correction.............................................106
8. Index
8.1 Index A – Blue tooth HandsFree Carkit Installation
8.1.1 Introduction........................................................................................107
8.1.2 Blue tooth HandsFree Carkit Installation (Optional).........................108
3
8.2 Index B -- FM Transmitter (Optional)
8.2.1 Introduction........................................................................................110
8.2.2 FM Transmitter Installation ...............................................................110
9.Troubleshooting ............................................................................................................113
10. FCC
...............................................................................................................115
4
1. Features and Specification
1.1 Features
˙Complete car navigation solution in one box including car mount
˙Touch panel LCD with 65000 colors
˙Smart and easy:
- Attach, switch it on and go
- Large Function icons design for easy touched
- User-Friendly keypad
- Clear, high quality voice-guided instruction
- Powered by cigarette lighter or long-life rechargeable battery
- Easy to be mounted and removed
˙Built-in antenna; MMCX-type connector for optional external antenna
˙SD and CF storage card expansion slots
˙Supports MP3, Movie Player (dat and mpg format) & Playback Function
˙Supports Photo View
˙Senses lighting conditions for automatic backlight dimming
˙Optional FM transmitter for re-directing MP3 output and voice guidance to car audio
system (not legal in some countries)
˙Optional Blue-tooth Module for HandsFree Operation
1.2 Specification
1.2.1 Hardware:
Processor:
Screen:
Memory:
Battery:
GPS Receiver:
Samsung S3C2410 266Mhz
3.6”, 320_240 pixel, color TFT LCD
64 MB SDRAM, 32MB flash memory
Replaceable and rechargeable 1650 mAh Li-ion battery
SiRF Star_ high sensitivity chipset
20-channel “All-In-View” tracking
Built-in active antenna
MMCX-type connector for optional external antenna
Sound:
Internal stereo loud speaker
Output Audio: Headphone x 1
Power:
Cigarette plug or universal adapter
USB Port:
USB x 1 supports FM transmitter
SD Expansion Slot: SD x 1 supports SD or Multi Media Card
5
CF Interface Slot: CF x 1 supports Compact Flash Card
Blue tooth Expansion Slot: Blue tooth module for handsfree operation x 1
Physical Size:
140 mm (H) * 92 mm (W) * 35 mm (D)
1.2.2 Software
-
Microsoft Windows CE.Net 4.2 Core version
SD card or CF card with Global View Software and Maps (Memory Card Optional)
CD-ROM with maps for Europe or North America
SD card or CF card download the maps data from PC (CD-ROM) via the card reader
(optional)
Solutions_
Car Navigation
Mp3 Player
Movie Playback (AVI Divx 3.11) Function
Photo View
Carkit (Blue tooth HandsFree)
Languages
-
Available in English, German, French, Italian, Spanish, and Dutch.
6
2. Introduction
2.1 Overview
Figure 1.1
Figure 1.2
7
Figure 1.3
2.2 Detailed Hardware Functions
(1) Status Indicators
GPS LED: If it is a SOLID green, it means that GPS has not located its position. A
BLINKING green means it has located a fix.
POWER LED: Please check if the Power LED is lit in orange. (If lit in red, the
battery is not fully charged. If this is the case, please charge the battery and the orange
LED will start to blink).
(2) Power Button
Turn it on and then turn it off again.
(3) Main Control Buttons
a. Zoom Out (Car Navigation Only)
8
b.Zoom In (Car Navigation Only)
c. Volume Down
d. Volume Up
e. Mute
f. Set Destination (Car Navigation Only)
g.Main Menu
(4) USB Interface Connector
Enable to insert FM transmitter to deliver the quality of sound to car speakers.
(5) Power Connector
Connect the external power connector by using car charger or AC Adaptor.
(6) Stereo Speaker (each on the both sides)
Allow the MP3 and Voice Navigation through the two built-in speakers in the front and
back.
The Blue tooth Carkit also enables to substitute the speakers.
(7) Memory Card Slot – SD
The PC applications and map data can be stored and be used along with the CF
memory card simultaneously.
Note: “GlobalView Application Software” and “Map” must be on the same memory
card before use.
(8) Memory Card Slot – CF
The PC applications and map data can be stored and be used along with the SD
memory card simultaneously.
Note: “GlobalView Application Software” and “Map” must be on the same memory
card before use.
(9) Blue tooth Expansion Connector (Blue tooth HandsFree Module Selective)
(10)
System Reset Switch
Press down the “reset” button to reset the system.
(11)
Battery Cover
Open the battery cover for new battery replacement.
(12)
Car Mount Slots
Attach the GV-101 holder to the memory slots.
9
3. Download Software to Memory Card
After inserted the flash memory card into the card reader, execute the software application
and map data through the PC system then store all of the applications and map data to the
flash memory.
Step 1:
Make sure the flash memory (USB) card reader is connected to PC and the memory card (SD
or CF) is inserted.
Note: “GlobalView Application Software” and “Map” must be on the same memory card
before use.
Step 2:
Insert the PC application CD (“GlobalView American application installer” or
“GlobalView Europe application installer”) into the CD ROM drive. The installation will
automatically start. When the application has loaded, click “Make System Disk” on the start
menu.
Step 3:
On the install menu, click “Refresh” to show the Device List and select
which means
shows no memory card
the CD has inserted into the flash memory card; however,
installed. Click “Start” to start the CD copy to the selected memory card.
10
Step 4:
The correct window is shown below after the CD copy is completed.
11
4. Download Map Data to the Memory Card
4.1 Europe Map to the Memory Card
4.1.1 Install Europe Map Loader Software
Step 1:
Make sure the flash memory (USB) card reader is connected to PC and the system memory
card is inserted.
Note: “GlobalView Application Software” and “Map” must be on the same memory card
before use.
Step 2:
Insert the “GlobalView Europe Map Loader CD1” into the CD ROM, and then run the CDROM driver://setup/setup.exe. Choose a Setup Language window and click OK.
Step 3:
Click “Next” on the InstallShieldf Wizard.
12
Step 4:
Click “Yes” on the License Agreement.
Step 5:
Click “Next” on the Select Components.
13
Step 6:
Click “Finish” to finish installing.
4.1.2 Upload Europe Map to the Memory Card
Step 1:
Click the icon
of Desktop, and click “OK” on the welcome menu.
Step 2:
14
Choose both a country and the CD ROM for download then click “Generate Map”.
Step 3:
The download (the map data) is now running and storing into the flash memory card.
15
4.2 American Map to the Memory Card
4.2.1 Install American Map Loader Software
Step 1:
Make sure the flash memory (USB) card reader is connected to PC and the system memory
card is inserted.
Note: “GlobalView Application Software” and “Map” must be on the same memory card
before use.
Step 2:
Insert the “GlobalView American Map Loader CD1” into the CD ROM, and then run the
CD-ROM driver://setup/setup.exe. Then show the Choose Setup Language window and click
OK.
Step 3:
Click “Next” on the InstallShieldf Wizard.
16
Step 4:
Click “Yes” on the License Agreement.
Step 5:
Click “Next” on the Select Components.
17
Step 6:
Click “Finish” to finish installing.
4.2.2 Upload American Map to the Memory Card
Step 1:
18
Click the icon
of Desktop, and click“OK” on the welcome menu.
Step 2:
Choose both a
country and the
CD ROM for
download then
click “Generate Map”.
Step 3:
The download (the map data) is now running and storing into the flash memory card.
19
20
5. Setup GV-101 in Car
5.1 Attach GV-101 and Car Holder on the Car
Step 1:
Attach the car holder to the card slot in the back of the device by following the red arrow
shown in figure 5.1, and in figure 5.2 after it is completed.
Figure 5.1
Figure 5.2
Step 2:
Attach the car holder to the card slot on the bottom of the device by following the red arrow
shown in figure 5.3, and in figure 5.4 after it is completed.
Figure 5.3
Figure 5.4
Step 3:
Attach the suction mount (1) to the windshield and have the base (2) of the device stabilizes
on the dashboard as shown in figure 5.5.
21
Figure 5.5
5.2 Removing the GV-101 from the Car Holder
To remove the GV-101 from the car mount place two fingers in the position shown by the red
arrows in figure 5.6 and squeeze them together. Slide the holder downward in the direction
of the red arrow shown in figure 5.7.
Figure 5.6
Figure 5.7
5.3 Connecting the Car Cigarette Charger to the GV-101
Connect the car cigarette charger (small plug) to the right side of the device in the power-in
socket and then insert the other end of the car charger to the vehicle’s car accessory socket as
shown in figure 5.8.
22
Figure 5.8
5.4 Powering the GV-101 On and Off
Figure 5.9
5.4.1 Powering the GV-101 Off
When GV-101 is on press the power button once. It will automatically close any open
windows and enter a power saving mode.
23
5.4.2 Powering the GV-101 On
When GV-101 is in the standby mode press the power button once. It will automatically turn
back up to its normal operating state.
Note: Do not intend to turn the device on and off repeatedly for any technical problems that
might occur during the operation.
5.5 Reset
Should your GV-101 encounter an unexpected error, or if it locks up then the unit can be
reset. There are two types of reset: a hard reset and a soft reset. The reset switch is shown in
figure 5.10; you will need to use a stylus or pencil to activate the reset button.
Figure 5.10
5.5.1 Soft Reset
Press the Reset Button as shown in figure 5.10. This will restart the system retaining all the
information stored on the device.
5.5.2 Hard Reset
A hard reset will re-initialize the GV-101 back to the factory settings. You should not need
to use this under normal operating conditions. To start a hard reset, you need to press and
hold the reset button as shown in figure 5.10 meanwhile pressing down the power switch,
as shown in figure 5.9.
Note: A hard reset will delete some of the information stored on the device and revert to its
original factory settings. All data stored on the memory card, such as music files and phone
book in the carkit will be retained.
24
5.6 Screen Alignment
When the system has been hard reset, the screen needs to be aligned before it can be used.
This will start automatically.
Step 1:
Using the stylus tap on the cross in the middle of the screen as shown in figure 3.11.
Figure 5.11
Step 1:
The cross will now move to the upper left corner. Tap it in the center again. Repeat this for
the remaining 3 corners, as it shown in figure 5.12.
Figure 5.12
Step 3:
When the screen has been aligned successfully, it will be shown as in figure 5.13. If this
failed, please repeat steps 1 and 2. After all the steps are finished, touch the screen and the
main menu will appear on the display.
25
Figure 5.13
26
6. Changing the Battery
GV-101 contains a replaceable battery. A flip-up battery lid makes it easy for battery removal
by following the steps below.
Step 1:
Open the battery cover as shown in Figure 6.1.
Figure 6.1
Step 2:
Remove the battery by using a finger as shown in figure 6.2.
Figure 6.2
Step 3:
Figure 6.2 shows the battery replacement process following the red arrow and figure 6.3
shows it correctly replaced.
27
Figure 6.3
7. Software
7.1 The Main Application Screen
The main application screen controls the GV-101. All the main features are accessed from a
menu with six icons.
28
Figure 7.1.1
1.Car Navigation
2. Photo View
3. Movie Playback (AVI, MPEG) Functions
4. Setup
5. MP3 Player
6. Blue tooth HandsFree
7.2 Detail Software Functions
7.2.1 Car Navigation System
7.2.1.1 Window Overview
7.2.1.1.1 Main Menu
7.2.1.1.2 Map Display
29
7.2.1.1.3 Navigation Display
7.2.1.1.4
GPS Status Display
30
7.2.1.2 Selecting Your Destination from Street First
Step 1:
Tap
,
, and
.
Step 2:
Tap
to enter the street name first or
to enter the city name first.
7.2.1.2.1 If You Have Selected “Street First”, follow the steps below:
Step 1:
Enter street name and tap
.
31
(!) Advisory - DO NOT ENTER STREET TYPE. For Main Street just enter Main.
Step 2:
Enter the house number and tap
.
Step 3:
From the match list, select the desired address.
32
Step 4:
Tap
to navigate to this location or;
Step 5:
Tap
to add this location to your Favorites List or;
33
Step 6:
Tap
to set this location as your starting point and see the location on the map.
7.2.1.2.2 If You Selected “City First”, then follow the steps below:
Step 1:
Enter city name and tap
.
Step 2:
Enter the street name and tap
.
34
(!) Advisory - DO NOT ENTER STREET TYPE. For Main Street just enter Main.
Step 3:
Enter the house number and tap
.
Step 4:
From the match list, select the desired address.
35
Step 5:
Tap
to navigate to this location or;
Step 6:
Tap
to add this location to your Favorites List or;
36
Step 7:
Tap
to set this location as your starting point and see the location on the map.
(i) Information - If a large number of records are found by the “Street First” method, the
program will automatically revert to “City First” method.
7.2.1.3 To Enter a Destination from Intersection
Step 1:
Tap
,
, and then
.
37
Step 2:
Tap
to enter the street name first or
to enter the city name first.
7.2.1.3.1 If You Selected “Street First”, then follow the steps below:
Step 1:
Enter the street name and tap
.
38
(!) Advisory - DO NOT ENTER STREET TYPE. For Main Street just enter Main.
Step 2:
Enter the name of the Cross Street and tap
.
(!) Advisory - DO NOT ENTER STREET TYPE. For Main Street just enter Main.
Step 3:
From the match list, select the desired intersection.
39
Step 4:
Tap
to navigate to this location or;
Step 5:
Tap
to add this location to your Favorites List or;
40
Step 6:
Tap
to set this location as your starting point and see the location on the map.
7.2.1.3.2 If You Selected “City First”, then follow the steps below:
Step 1:
Enter the name of the city and tap
.
Step 3:
Enter the street name and tap
.
41
(!) Advisory - DO NOT ENTER STREET TYPE. For Main Street just enter Main.
Step 4:
Enter the name of the Cross Street and tap
.
(!) Advisory - DO NOT ENTER STREET TYPE. For Main Street just enter Main.
Step 5:
From the match list, select the desired intersection.
42
Step 6:
Tap
to navigate to this location or;
Step 7:
Tap
to add this location to your Favorites List or;
43
Step 8:
Tap
to set this location as your starting point and see the location on the map.
(i) Information - If a large number of records are found by the Street First method, the
program will automatically revert to City First method.
7.2.1.4 To Enter a Destination from Points of Interest
Step 1:
Tap
,
, and then
.
Step 2:
Tap one of the categories for Points of Interest.
44
Step 3:
Select
below.
or
or
or
as shown in the figure
7.2.1.4.1 If You Selected “Alphabetical”, then follow the steps below:
Step 1:
Enter the name of the destination.
Step 2:
Select a matching POI location from the list.
Step 3:
Tap
to accept the location. The location details will be shown.
45
Step 4:
Tap
to navigate to this location or;
Step 5:
Tap
to add this location to your Favorites List or;
46
Step 6:
Tap
to set this location as your starting point and see the location on the map.
7.2.1.4.2 If You Selected “By Distance”, then follow the steps below:
Step 1:
Select POI List.
Step 2:
Tap
to navigate to this location or;
47
Step 3:
Tap
to add this location to your Favorites List or;
Step 4:
Tap
to set this location as your starting point and see the location on the map.
48
7.2.1.5 To Enter a Destination from Favorites
Step 1:
Tap
,
, and then
.
Step 2:
Select a destination from the list if you have already created one.
Step 3:
Tap
to navigate to this location or;
Step 4:
Tap
to set this location as your starting point and see the location on the map or;
49
Step 5:
to create a label such as HOME for this destination or change the label if
Tap
one already exists or;
Step 6:
Tap
to delete this location from your Favorites List.
50
7.2.1.6 To Enter a Destination from Recent
Step 1:
Tap
,
, and then
.
Step 2:
Select the destination.
Step 3:
Tap
to navigate to this location or;
51
Step 4:
Tap
to set this location as your starting point and see the location on the map or;
Step 5:
Tap
to add this location to your Favorites List or;
52
Step 6:
Tap
to delete this location from your Recent List.
7.2.1.7 To Enter a Destination from City Centre
Step 1:
Tap
,
, and then
.
Step 2:
Tap
enter the state name.
53
Step 3:
Tap
or
_
to enter the city name first.
7.2.1.7.1 If You Selected “Alphabetical”, then follow the steps below:
Step 1:
Enter city name and tap
.
54
(!) Advisory - DO NOT ENTER STREET TYPE. For Main Street just enter Main.
Step 2:
From the match list, select the desired intersection.
Step 3:
Tap
to navigate to this location or;
55
Step 4:
Tap
to add this location to your Favorites List or;
Step 5:
Tap
to set this location as your starting point and see the location on the map.
56
7.2.1.7.2 If You Selected “By Distance”, then follow the steps below:
Step 1:
Tap
.
Step 2:
Tap
to navigate to this location or;
Step 3:
Tap
to add this location to your Favorites List or;
57
Step 4:
Tap
to set this location as your starting point and see the location on the map.
7.2.1.7.3 If You Selected “List ALL”, then follow the steps below:
Step 1:
Enter city name and tap
.
58
(!) Advisory - DO NOT ENTER STREET TYPE. For Main Street just enter Main.
Step 2:
From the match list, select the desired intersection.
Step 3:
Tap
to navigate to this location or;
59
Step 4:
Tap
to add this location to your Favorites List or;
Step 5:
Tap
to set this location as your starting point and see the location on the map.
60
7.2.1.8 To Set the Route Options
Step 1:
Tap
, and then
to open the Route Options Screen.
Step 2:
Select the desired options
Step 3:
Method: Select the method of routing. The quickest route, shortest route, route that favors
major roads, or route that favors local roads.
Toll Roads: Select whether toll roads should be included or excluded in the route
calculation.
Ferries: Select whether carpool lanes (High Occupancy Vehicle Lanes) should be included
or excluded in the route calculation.
Turns: Select whether the turns is more or less.
to accept or
Tap
to reject changes.
7.2.1.9 To Set the Region Options
Step 1:
Tap
, and then
to open the Region Options Screen.
61
Or,
Step 2:
Select the desired options.
Step 3:
Time Zone: Choose to use the sunlight time or current time zone setting.
Units: Choose different units and change.
Tap
to accept or
to reject changes.
7.2.1.10 To Set the Display Options
Step 1:
Tap
, and then
to open the Display Options Screen.
62
Step 2:
Select the desired option(s).
Step 3:
Map Orientation: Orient the Map Screen so that the driving direction is pointing up or
North is pointing up.
Color Scheme: Set color scheme to Day or Night mode. Auto setting changes from Day to
Night mode automatically at approximately sunrise and sunset.
Guidance Screen: Set the Guidance Screen to automatically switch when getting closer to a
turn maneuver, or have it appear only when manually selected.
POI Icons: You can select the Default or Custom or Off.
3D VIEW: Users can choose to use 2D or 3D mode for navigation.
Tap
to accept or
to reject change(s).
7.2.1.11 To Create or Add to the Favorites List
Step 1:
Tap
, and then
.
Step 2:
Select a recent destination.
63
Step 3:
.
Tap
Step 4:
Tap
.
64
7.2.1.12 To Add a Label to Your Favorites
Step 1:
Tap
,
, and then
.
Step 2:
Select a destination.
Step 3:
and enter a label using the keypad.
Tap
Step 4:
Tap
.
65
7.2.1.13 To Demo the Navigation
Step 1:
Press and hold your finger on the screen to show the option menu. Tap
and then place and hold the finger on the desired starting point.
Step 2:
Tap
to end the option menu.
66
Step 3:
, then
Tap
to run for the selected destination.
7.2.1.14 Use GPS Info
Step 1:
Tap
, and then
.
67
7.2.2 Photo View
All the files on the GV-101’s memory cards are scanned searching for images. Any pictures
found will be displayed as thumbnails as shown in figure 7.2.1.
On the image window, tapping the
button shows the previous page, tapping the
button shows the next page, and tapping the
button will close the Photo View.
Figure 7.2.1
To show an image in full screen mode simply select the picture by tapping on it as shown in
figure 7.2.2, and then tap on the
button as the enlarged image is shown in figure 7.2.3.
68
Figure 7.2.2
Figure 7.2.3
7.2.3 Movie Playback
Overview:
The movie on the GV-101 can be played back from either of the memory cards. The
supported movie files must be encoded in AVI Divx 3.11 and mpg format.
The GV-101 has a full function media player, which has play, pause, forward and rewind
functions in the movie player control as shown in figure 7.2.4.
Tap
to take you back to the
main GV-101 system menu.
69
Figure 7.2.4
Movie Display
Tap
to open and select the required files to play in the movie display as shown in
figure 7.2.5a. Tap
to go back to the main movie display control.
Figure 7.2.5a
Tapping
Tapping
allows you to play the movie whereas tapping
will stop playing.
will show you the display as shown in figure 7.2.5b.
Figure 7.2.5b
7.2.4 MP3 Player
Overview
70
The GV-101 scans the memory cards for MP3 audio recordings. Play lists can be created
from the audio files. All the songs are played sequentially from a play list.
7.2.4.1 Creating a Play List
Step 1:
Tap
on the main player control, after you have selected Music, the result will be
shown as in figure 7.2.6. Then tap
to show the play list as shown in figure 7.2.7.
Figure 7.2.6
Step 2:
When you open the play list, the system will look for the MP3 files and create a play list from
SD or CF memory card. You can easily tap
page as shown in figure 7.2.7.
for the previous page or
for the next
Figure 7.2.7
Step 3:
During the creation of the play list, you can tap
71
to add more songs. Your new selections
will be added to the play list and the name will be shown in red. Tap
selected song. Tap
to cancel all the display songs. Tap
to delete the
to select all and tapping
will go back to the MP3 Player Control as shown in figure 7.2.8.
Figure 7.2.8
7.2.4.2 Basic Operation
Figure 7.2.9
Play the Created Play List
After you have created a play list, the
GV-101 has normal playback features.
Tapping
music from the play list, whereas tapping
will pause the music but tap twice or
assume playing from the paused point. Tapping
the song, tap
or
allows you to play the
will stop playing. If you want to skip
to take you to either the previous or the next songs.
Change the Playback Mode of the Play List
There are two modes of playback: sequential and random. Tapping
72
to
will change the
songs to play randomly from the play list. When this occurs, a button
which will change back to play sequential mode.
will appear
Normally the player will stop at the end of the play list. You can select repeat mode to
continually replay the play list. Tapping
enables the repeat mode. If you tap
,
this will cancel the repeat mode, as shown in figure 7.2.9.
7.2.4.3 The Equalizer
The GV-101 has 4 equalizer settings to suit the style of the music. To select the style simply
tap
and
. There are four types of style: Default, Classical, Rock and Metal as shown
in figure 7.2.10.
Figure 7.2.10
7.2.5 Optional Blue tooth HandsFree CarKit
Blue tooth handsfree carkit is an external connector. Once installed on the GV-101, it will
become a blue tooth handsfree car phone enabling you to make and receive calls without
touching the mobile phone.
Note: See 8.1 Index A for the “Blue tooth HandsFree Carkit Installation” before use.
7.2.5.1 How to Use the HandsFree Carkit
on the main menu then tap
Instruction: Tap
as shown in figure 7.2.11.
73
to enter the handsfree application
Figure 7.2.11
Screen Overview:
Initiates an outgoing call or accepts an incoming call.
Terminates the current call.
Redials the last used number.
Displays the phone book.
Clear calls
Displays the setup options screen as shown in photo 7.2.11.
7.2.5.2 How to Set Up Blue tooth HandsFree Carkit with a Mobile Phone
Prior to linking the mobile phone to the GV-101, you need to ensure that you have a mobile
phone equipped with a blue tooth headset or handsfree profile. Consult your phone manual
or phone provider if you are not sure.
Step 1:
After tapping the
key from the main phone display as shown in figure 7.2.11, the
settings screen is displayed as in figure 7.2.12.
74
Figure 7.2.12
Step 2:
Tap
to enter the blue tooth setup mode as shown in figure 7.2.13.
Figure 7.2.13
Step 3:
to start pairing the phone. The screen will show “Pairing…” as shown in figure
Tap
7.2.14. At the meantime, look for the name “HandsFree” on your mobile phone and enter the
pass code “0000” if it is requested. The carkit will go back to its main function screen once
the pairing has been done successfully.
Note:
1. The carkit in GV-101 only supports handsfree profile. Most of the blue tooth mobile
phones on the market support this profile. Make sure all your Blue tooth mobile phones
support the handsfree profile before attempting to pair the devices.
2. For some mobile phones like T610, you can easily change the device name from the option
menu. (All the device names have to be in English otherwise the error message “Unknown
Device” will appear on the GV-101).
3. When the pairing is completed, “Unknown Device” will appear on the GV-101. After the
blue tooth is fully connected with the GV-101, the selected device name will be shown on the
device.
75
Blue tooth is a standard for connecting devices together to perform certain functions.
However, different companies implement the standard in different ways and incompatibilities
could occur.
Figure 7.2.14
7.2.5.3 Blue tooth Mobile Phone Settings
The GV-101 is capable of connecting with up to five different mobile phones. The example
in figure 7.2.15 shows two mobile phones configured.
Figure 7.2.15
7.2.5.3.1 Adding and Deleting Phone Settings
as shown in figure 7.2.5.2.
You can add a new mobile phone by tapping
If a phone is no longer required, it can be deleted by selecting the phone and tapping
7.2.5.3.2 Connecting to a Phone
You need to manually select which of the configured mobile phones is the active one by
following these steps:
76
.
Step 1:
Select the required mobile phone from the paired phones as shown in figure 7.2.16. For
example, select T610 then tap
to make the connection as shown in figure 7.2.17.
Figure 7.2.16
Figure 7.2.17
Step 2:
If the connection is successful, it will show
in the window indicating that the connection
between carkit and the mobile phone is active as shown in photo 7.2.18.
77
Figure 7.2.18
7.2.5.3.3 Disconnecting the Mobile Phone
To disconnect the phone follow the steps below:
Step 1:
Select the
icon as shown in figure 7.2.19.
Figure 7.2.19
Step 2:
Enter the configuration screen as shown in figure 7.2.20. You can see the current mobile
connection is T610, then tap
to disconnect it.
78
Figure 7.2.20
Step 3:
After disconnecting the icon will change to
disconnected as shown in figure 7.2.21.
, indicating that the phone has been
Figure 7.2.21
7.2.5.3.4 Adding “+” Before the Setup Numbers
There are some numbers that require adding a “+” before dialing. If you cannot dial out
properly through the carkit, it could be because some telephone providers require this number
format. The setup steps to correct this are shown below:
Step 1:
Select
79
as shown in figure 7.2.22.
Figure 7.2.22
Step 2:
This will display the dial prefix screen with the current setting of phone number add “+” as
shown in figure 7.2.23.
indicates the“+” is added automatically to the number setting.
After placing the number you desired, tapping
to complete the setting.
Figure 7.2.23
7.2.5.4 Answering Calls
The available caller ID will identify the incoming calls as shown in figure 7.2.24. If you have
associated an identifying image with the number this will be displayed along with the caller
ID. Tapping
will answer the call.
Figure 7.2.24
7.2.5.5 Hanging Up the Calls
80
If you do not want to answer the call, tapping
will refuse the connection.
7.2.5.6 Direct Dialing
When the GV-101 is connected to your mobile phone, you can dial directly from the GV-101
without having to use the phone using the dial screen in the GV-101. The dialing process is
shown in figure 7.2.25. After it is connected, you can simply talk to the other person through
the external microphone and built-in speakers.
Figure 7.2.25
7.2.5.7 Listing All the Incoming Calls
All calls are automatically stored after incoming calls. Numbers can either be saved in the
phonebook, deleted, or dialed directly without having to be saved, as shown in figure 7.2.26.
Figure 7.2.26
7.2.5.7.1
Adding Calls to the Phonebook
81
Step 1:
On the main menu, tap the
numbers and tap
key as shown as in figure 7.2.27. Then select one of the
key to enter it to the phonebook.
Figure 7.2.27
Step 2:
In the editing menu, select
figure 7.2.28.
column to enter the associated name as shown in
Figure 7.2.28
Step 3:
When the input box appears on the top of the screen, enter the name as shown in figure
7.2.29.
82
Figure 7.2.29
Step 4:
to open the image files. Select a file from the list and tap
Tap
shown in figure 7.2.30.
Figure 7.2.30
83
to confirm as
Step 5:
After it is finished, tap
to complete the setting as shown in figure 7.2.31.
Figure 7.2.31
7.2.5.7.2 Deleting All the Received and Missed Calls
Tap
to delete all calls as shown in figure 7.2.32.
Figure 7.2.32
7.2.5.7.3 Direct Dialing from the Call Log
84
Select a phone number as shown in figure 7.2.33. Tap
figure 7.2.34.
and proceed dialing as shown in
Figure 7.2.33
Figure 7.2.34
7.2.5.8 Phonebook
The carkit contains a phonebook facility allowing you to add, delete, edit or dial entries.
7.2.5.8.1 Add a Number to the Phonebook
Step 1:
85
Tap
to insert new information in the phonebook as shown in step 7.2.5.7.1 for
instructions.
Figure 7.2.35
Step 2:
After Step 1 is finished, it will appear as shown in figure 7.2.36.
Figure 7.2.36
7.2.5.8.2 Edit a Number in the Phonebook
Step 1:
Select a number you desire to be edited, then tap
86
to enter the editing menu.
Figure 7.2.37
Step 2:
In the editing menu, select the
icon, as shown in figure 7.2.38.
Figure 7.2.38
Step 3:
Open the editing menu as shown in figure 7.2.39. You can easily insert the names of
your desire by using the keyboard. After inputting the data, you can either tap
to confirm or
to cancel.
87
Figure 7.2.39
Step 4:
If selecting the
key as shown in figure 7.2.38, the photo selections will appear in the
setting as shown in figure 7.2.40. You can select one of the images and tap
Figure 7.2.40
Step 5:
After the editing is completed as shown in figure 7.2.41, tap
88
to confirm.
to confirm.
Figure 7.2.41
7.2.6 Setting Mode
The GV-101 contains six setting modes. To enter the main menu as shown in figure 7.2.42,
tap
.
Figure 7.2.42
7.2.6.1 System Information
Tapping
will present data on the total and free memory capacities.
Memory (Free/Total): Remaining/Overall
CF Card (Free/Total): CF remaining/CF Overall
PCB Version: MANTA_REV_3_PCB Version No.
Firmware Version: 0.21/0.23/DEV2 Firmware: Version No.
89
7.2.6.2 Power Setting
Step 1:
On the main menu, tap
to show the setting screen.
Step 2:
The power setting will appear as shown in figure 7.2.43.
Figure 7.2.43
Figure 7.2.44 shows the battery capacity.
Figure 7.2.44
In figure 7.2.45 shows the screen saver setting. For example, if you tap on the empty box, the
system will shut down after 30 sec of inactivity.
90
Figure 7.2.45
7.2.6.3 Backlight Adjustment
Step 1:
On the main menu, select
to enter the backlight setting.
Step 2:
The backlight setting is shown in figure 7.2.46.
Figure 7.2.46
In figure 7.2.47, the backlight setting is adjusted to automatic light sensor.
Figure 7.2.47
The setting in figure 7.2.48 is for backlight adjustment. Tapping
backlight and tapping
will lighten the backlight.
Figure 7.2.48
91
will darken the
Once the desired setting is selected, you can either tap
to confirm or
to cancel.
7.2.6.4 Language Selection
Step 1: 7
On the main menu, select
to enter the language setup mode.
Step 2:
The language setting appears as in figure 7.2.49. For example: for Dutch, you can easily pull
down from the language selections, then either tap
Figure 7.2.49
7.2.6.5 About
This setting will show the language selection version.
7.2.6.6 Screen Correction
This setting will show the screen correction.
92
to confirm or
to cancel.
Step 1:
On the main menu, tap
to show the setting.
Step 2:
Using the stylus tap on the cross in the middle of the screen as shown in figure 3.5.1. Please
see step 3.6 for complete instructions.
Figure 3.5.1
8. Index
8.1 Index A – Blue tooth HandsFree Carkit Installation
8.1.1 Introduction
Blue tooth HandsFree CarKit is an external connector. Once installed to the GV-101, it will
become a blue tooth handsfree car phone enabling you to make and receive calls without
touching the mobile phone as shown in figure 8.1.5. Figure 8.1.6 shows the complete set.
Blue tooth LED Status:
Standby: flash once every 3 seconds
Connecting: flash twice every 3 seconds
Under Connection: flash three times every 3 seconds
Talking: flash four times every 3 seconds.
Figure 8.1.5
93
Figure 8.1.6
8.1.2 Blue tooth HandsFree Carkit Installation (Optional)
Step 1:
Figure 8.1.7 shows the external microphone that connects to the audio output on the
handsfree module. Figure 8.1.8 shows it correctly plugged.
Figure 8.1.7
Figure 8.1.8
Step 3:
94
Insert the blue tooth carkit in the GV-101’s expansion slot as shown in figure 8.1.9.
Figure 8.1.9
Step 4:
Mount the microphone on the dashboard using the double-sided tape. Figure 8.1.10 shows
that the microphone which has to face the user.
Figure 8.1.10
Step 5:
You can place the handsfree carkit in the car as shown in figure 8.1.11.
1 = Blue tooth HandsFree Carkit Module
2 = The Microphone on the Dashboard
95
Figure 8.1.11
8.2 Index B - FM Transmitter (Optional)
8.2.1 Introduction
The GV-101 can use an FM Transmitter as an optional accessory. The main purpose for the
FM Transmitter is to adapt the wireless channels from voice source to the FM wireless
frequency. Simply apply this option by using your FM radio in the car to hear the voice from
your car speakers. There are two parts shown in figure 8.2.1, one is the FM Stereo
Transmitter converter, and the other one is the Audio Adaptor Lead.
96
Figure 8.2.1
8.2.2 FM Transmitter Installation
Step 1:
Connect the FM Stereo Transmitter to the USB of the device and then insert one end of the
audio adapter lead to the back of the FM Stereo Transmitter Socket.
Figure 8.2.2
97
Table 8.1
Step 2:
Insert the other end of the audio adapter lead into the headphone socket on the left side of the
device as shown in figure 8.2.3.
Figure 8.2.3
Step 3:
Figure 8.2.2 shows the FM Channel. For more information about the FM Channel and
Speakers adjustments, see Table 8.1.
98
Troubleshooting:
If the GV-101 did not boot up successfully or does not function properly:
1. Please refer to Ch. 3 of the user manual to see if the SD card is properly installed in
the driver.
2. Please refer to Ch. 2.2, Section (7) of the user manual to confirm the SD memory card
is inserted into the SD expansion slot.
3. Please refer to Ch. 2.2, Section (1) of the user manual regarding the Status Indicators.
Please check if the Power LED is lit in orange. (If lit in red, the battery is not fully
charged. If this is the case, please charge the battery and the orange LED will start to
blink.)
4. Please refer to Ch. 5.5.1 of the user manual with section entitled "Soft Reset" and
follow the steps accordingly. If this doesn't solve the problem, continue onto Step 5.
5. Please refer to "Hard Reset" under Ch. 5.5.2. Performing a Hard Reset should solve
the majority of problems.
When the GPS cannot locate a fix: 7.2.1.14 Use GPS Info:
1. Please refer to 7.2.1.14 Info regarding the Status Indicators. Confirm the GPS LED is
lit in Green. If it’s a SOLID green, it means that GPS has not located its position. A
BLINKING green means it has located a fix.
2. Please test the unit in the outdoor field beginning with Step 1.
When the GPS Status Display is shown incorrectly in GPSinfo:
1. Please refer to Ch. 2.2, Section 2 of the user manual under the heading "Status
Display". If GPSinfo indicates the incorrect time, please check the Status Indicator of
Ch. 2.2 to see if it shows the GPS LED is in BLINKING green or not. If it’s in
SOLID green, it means GPS has not found its fix yet.
2. If the GPS has found its fix but the time display is still incorrect, please refer to Ch.
7.2.1.9 of the user manual. Go to "To Set the Region Options" and adjust the "Time
Zone" setting.
When the battery light turns red:
A red light indicates the battery requires charging. An orange light blinks when it’s
charging and solid when it is fully charged.
When the HandsFree operation cannot be executed:
99
1. Please refer to Ch. 2.2, Section (9) to make sure the HandsFree Carkit Module is
properly installed.
2. If not, please refer to "Index A – Blue tooth HandsFree Carkit Installation" in the user
manual to install the application.
3. After the HandsFree Carkit Module is fully installed, please refer to Ch. 8.1.1 of the
user manual for the blue tooth LED Status.
Standby: flash once every 3 seconds
Connecting: flash twice every 3 seconds
Under Connection: flash three times every 3 seconds
Talking: flash four times every 3 seconds
4. Please check to see if the blue tooth LED is functioning normally.
When the Map Data is not showing in the GV-101:
In some cities, if the map is not displayed on the monitor, it may be because it has not been
downloaded into the memory card. Please refer to Ch. 5 in the user manual for map upgrade.
FCC Notices
This device complies with part 15 of the FCC rules. Operation is subject to the following two
conditions:
(1) This device may not cause harmful interference, and
(2) This device must accept any interference received, including interference that may cause
undesired operation.
FCC RF Exposure requirements:
This device and its antenna(s) must not be co-located or operation in conjunction with any
other antenna or transmitter.
NOTE: THE MANUFACTURER IS NOT RESPONSIBLE FOR ANY RADIO OR TV
INTERFERENCE CAUSED BY UNAUTHORIZED MODIFICATIONS TO THIS
100
EQUIPMENT. SUCH MODIFICATIONS COULD VOID THE USER'S AUTHORITY TO
OPERATE THE EQUIPMENT.
101
8. Trouble Shooting:
If the GV-101 did not boot up successfully or does not function properly:
6. Please refer to Ch. 2 to see if the SD card is properly installed the GlobalView
software.
7. Please refer the GV-101 LED status to confirm the SD memory card is inserted into
the SD expansion slot.
GPS LED: If it is a SOLID green, it means that GPS has not located its position. A
BLINKING green means it has located a fix.
POWER LED: Please check if the Power LED is lit in orange. (Note: if lit in red,
the battery is not fully charged. If this is the case, please charge the
battery and the orange LED will start to blink).
8. Please refer to the GV-101 LED status. Please check if the Power LED is lit in
orange. (Note: if lit in red, the battery is not fully charged. If this is the case, please
charge the battery and the orange LED will start to blink).
GPS LED: If it is a SOLID green, it means that GPS has not located its position. A
BLINKING green means it has located a fix.
POWER LED: Please check if the Power LED is lit in orange. (If lit in red, the
battery is not fully charged. If this is the case, please charge the battery
and the orange LED will start to blink).
9. Please refer to 4.5.1 with section entitled "Soft Reset" and follow the steps
accordingly. If this doesn't solve the problem, continue onto Step 5.
10. Please refer to "Hard Reset" under 4.5.2. Performing a Hard Reset should solve
the majority of problems.
When the GPS cannot locate a fix.
3. Confirm the GPS LED is lit in Green. If it’s a SOLID green, it means that GPS has
not located its position. A BLINKING green means it has located a fix.
4. Please test the unit in the outdoor field beginning with Step 1.
When the GPS Status Display is shown incorrectly in GPSinfo:
3. If GPSinfo indicates the incorrect time, please check the Status to see if it shows the
GPS LED is in BLINKING green or not. If it’s in SOLID green, it means GPS has
not found its fix yet.
102
4. If the GPS has found its fix but the time display is still incorrect. Go to "To Set the
Region Options" and adjust the "Time Zone" setting of CarNavigation software.
When the battery light turns red:
A red light indicates the battery requires charging. An orange light blinks when it’s
charging and solid when it is fully charged.
When the HandsFree operation cannot be executed:
4. Please make sure the HandsFree Carkit Module is properly installed.
5. If not, please refer to "7.1.2 Index A – Blue tooth HandsFree Carkit Installation"
to install the application.
6. After the HandsFree Carkit Module is fully installed, please check to see if the Blue
tooth LED is functioning normally.
Standby: flash once every 3 seconds
Connecting: flash twice every 3 seconds
Under Connection: flash three times every 3 seconds
Talking: flash four times every 3 seconds
When the Map Data is not showing in the GV-101:
In some cities, if the map is not displayed on the monitor, it may be because it has not been
downloaded into the memory card. Please refer to Ch. 3 for map upgrade.
103