1
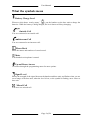
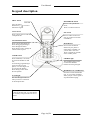
User Manual
User Manual
V20
Digital Enhanced
Cordless Communications
Important Notice: This device will not allow you to dial a telephone number after the loss
of mains power.
Thank you for your purchase of our product. Please read this manual carefully before use.
Page 1 of 24
User Manual
Contents
What the symbols mean ....................................................................................... 3
Keypad description............................................................................................... 4
Setting up your telephone..................................................................................... 5
Installation ............................................................................................................ 6
Important safety information................................................................................ 8
Making and answering calls ................................................................................. 9
Phone Book ........................................................................................................ 10
Call Logs ............................................................................................................ 11
Handset Setting................................................................................................... 12
Base Setting ........................................................................................................ 14
Resetting the system ........................................................................................... 17
Baby Call ( Optional ) ........................................................................................ 18
Handset registration............................................................................................ 19
Intercom and transfer.......................................................................................... 19
Troubleshooting.................................................................................................. 20
Technical details................................................................................................. 22
Warranty Information......................................................................................... 23
Declaration of conformity .................................................................................. 24
Page 2 of 24
User Manual
What the symbols mean
Battery Charge Level
Whenever this shows ‘nearly empty’ (
), put the handset on the base unit to charge the
batteries. While the battery is being charged, the level shown will keep changing.
Outside Call
You are connected to an outside call.
Intercom Call
You are connected to an intercom call.
Phone Book
Show the names and numbers of stored record.
Mute
Your handset's microphone is muted.
Up and Down Arrows
To browse through the programming menu for more options.
Signal Level
Shows the strength of the signal between the handset and base unit, and flashes when you are
out of range of the base unit, when the level is low, or the symbol is flashing, move closer to
base unit.
Missed Call
You have new missed call.
Page 3 of 24
User Manual
Keypad description
MENU button
PHONEBOOK button
Press to enter menu mode and
enter sub-menu.;
With the key " " to lock or
unlock the keypad.
Press to enter phonebook
menu ;
Press to confirm selection.
CALL button
INT button
Press to begin, answer and end
a telephone call.
Press to make an intercom
call (if you have more than
one handset)
UP and DOWN button
Press to show phonebook list
Press during programming to
move through the menu.
Press during a call to change the
volume in the earpiece.
Recall Button
You can activate Recall
function if your phone is
connected to a PABX, or if
you use Select Services.
Press to transfer an outside
call to another phone.
CLEAR button
Press and hold (2-3 seconds)
to switch the handset on and
off ;
Press during programming to
go back to the previous
option, or to clear digits one
by one from the display;
Press during a call to mute
the microphone.
CHARGE light
The CHARGE light comes
on when the handset's
batteries are being charged.
HANDSET LOCATOR button
Press this to make the handset
ring, if you cannot remember
where you put it. Press again to
stop the handset ringing.
IN USE light
The IN USE light comes on
when you have a connection
to the telephone line.
Before you can use the handset to make
calls for the first time, you will need to
fit and fully charge the batteries for 15
hours.
Page 4 of 24
User Manual
Setting up your telephone
Connection and conditions for use
You can connect your V20 to a direct exchange line (DEL), a line connected to a local
exchange, with its own phone number; to an extension socket connected to a DEL; or to an
extension on an approved compatible PBX. Do not connect the V20 as an extension to a
payphone.
How many phones can you connect?
The ringer equivalence numbers (RENs) of all instruments (phones, fax machines, etc.)
connected to an exchange line must not add up to more than 4, otherwise, one or more of
them may not ring and/or answer calls correctly. The V20 has a REN of 1, and most other
telephones have a REN of 1unless marked otherwise.
Radio signals between handset and base unit
To use your handset and base unit together, you must be able to establish a radio link
between them. Be aware that:
• Sitting the base unit as high as possible will give better results, in a two-storey house,
the best position may be on the first-floor landing.
• Any large metal object, like a fridge, a mirror or a filing cabinet, between the handset
and base unit may block the radio signal.
• Other solid structures, like walls, may reduce the signal strength.
Choosing a site for the base unit
The base unit should be placed on a level surface, in a position where:
• The mains adapter plug will reach a 240-V AC switched mains supply socket; never
try to lengthen the mains power cable.
• The telephone cable will reach your telephone line socket or extension socket.
• It is not close to another telephone, this can cause radio interference.
• It is not close to other electrical equipment, fridges, washing machines, microwave
ovens, TVs, fluorescent lights, etc
What's in this pack
Please check the box contents for completeness.
If any parts are missing, return complete box to
your supplier.
• The cordless handset .
• The base unit.
• Rechargeable AAA batteries.
• A telephone line cable.
• A mains power lead and adaptor.
• User manual
Note: Keep your proof of purchase to support any warranty claim
Page 5 of 24
User Manual
Installation
1. Choose a suitable site for the base unit
Make sure it is not near to another telephone, nor to other electrical
equipment.
2. Plug the mains power lead
and the telephone line cord
into the rear of the base unit
3. Plug the mains adapter
into a 240VAC, 50 Hz
mains socket, with the
switch on the socket set to OFF
Note: The illustration of adaptor
may vary from country to country.
4. Switch on mains power at the socket
5. Fit the batteries in the handset(s)
Insert the batteries cell following
the batteries polarity indication.
Fit the batteries compartment cover,
Sliding it until it clicks firmly into
Position.
Page 6 of 24
User Manual
6. Connect the base unit to the telephone line
Switch off power at the mains socket.
Insert the telephone line plug into the socket.
Switch mains power back on
Make sure the mains socket is
switched on if you want to use
the phone---it will not work
without electrical power.
Use the plug to raise the
shutter before pushing it into
the socket
Note:
1. The charge pod does not have
a connection to the telephone
line.
2. The illustration of telephone's
socket may vary from country
to country.
Page 7 of 24
User Manual
Important safety information
This equipment is not designed for making emergency calls in the event of a power failure.
Alternative arrangements should be made for access to emergency services.
(This means that you should also have a basic phone that does not need mains power,
connected to your line so that you can make calls during a power failure)
People with a heart pacemaker should consult their doctor before using the telephone.
If you wear a hearing aid, you should note V20 works by transmitting radio waves between
base and handset that may cause a humming noise.
1. DO NOT clean any part of your phone with benzene, thinner or other solvent chemicals,
which may cause permanent damage to your phone. This damage is not covered by the
Guarantee. When necessary, clean it with a damp cloth.
Cleaning it with a wet cloth may give you an electric shock.
2. DO NOT use this equipment in places where volatile or explosive materials may be
present.
3. DO NOT let the handset unit get wet. Electrical equipment can cause serious injury if used
while you are wet or standing in water. NEVER use your phone during a thunderstorm.
Unplug the handset unit from the telephone line and the mains socket when there are storms
in your area. Damage caused by lightning is not covered by the Guarantee.
4. The V20 will produce a certain amount of heat during operation. For this reason it is
recommended that this equipment is NOT placed in direct contact with antique, veneered or
delicate furniture surfaces.
5. DO NOT dispose batteries with normal household waste.
6. The V20 DECT phone emits radio signals which could interfere with other electronic
equipment, computers, radio, TV set, clock radio alarms, etc.
A distance of at least one meter should be maintained between V20 handset station and other
equipment. This will minimize the risk of such interference.
7. When you do not need to carry your handsets around, leave it on the charger pod, to keep
the batteries charged.
8. If you hear a warning tone as move around during a call, and/ or the sound in the earpiece
becomes faint or distorted; you may be going out of range of the base unit.
Move nearer to the base unit within 20 seconds, until the tone stops. Otherwise your call may
be cut off.
!
NOTE: Dispose of used batteries safely, never burn them, or put them
where they could get punctured.
Page 8 of 24
User Manual
Making and answering calls
To switch the handset ON or OFF
•
Press and hold the CLEAR
/OFF.
button for 2~3 seconds to switch the handset ON
To make a call
1. Key in the telephone number (If you make a mistake, press CLEAR
button to
clear digits from the display. To clear all digits, press and hold CLEAR
2. Press the CALL
button.
button.)
Or you also can dial the stored number through UP/DOWN button.
Note: You can dial the number after you press the CALL
button if you need, but you
won't be able to correct any mistakes if you do it in this way.
When you dial the outside line access digit (e.g. 9) then the telephone number, press and hold
the "#" button about 2 seconds for a pause.
To redial a call
In standby mode, press and hold the CALL
button to enter the dial list, and press the
UP/DOWN
button to scroll through the number you want to dial, then press the CALL
button to redial.
To answer a call
When the handset and base unit ring, press the CALL
button to answer a call, and the
symbol
or
appears in the display.
When the AUTO TALK is turned on, you can simply answer the call by lifting the handset
from the base unit (see AUTO TALK part).
To end a call
Press the CALL
button to end a call.
Earpiece volume
During a call, to adjust the volume of the earpiece:
Press the UP or DOWN button to change the volume (1 to 10).
Muting the mouthpiece
•
During a call, if you want the person on the other hand end cannot hear you; press
•
once to mute the mouthpiece;
CLEAR
While the mouthpiece is muted, you cannot press any number key to send digits down
the line; Press CLEAR
key again to get back to the call.
Page 9 of 24
User Manual
Phone Book
Up to 30 records could be stored in each handset's Phone Book. Each record can store up to
20 digits, and names of up to 8 characters could be stored with the number. In standby mode,
press UP/DOWN button to show phonebook list. There are two ways to enter phonebook.
In standby mode, press PHONEBOOK
button to enter phonebook; or through
MENU
and UP/DOWN
button to enter phonebook.
To store new number into phonebook
1. Press the PHONEBOOK
button, the display shows ADD
2. Press the PHONEBOOK
button again, then key in the name and the number
3. Press the PHONEBOOK
button to confirm
4. Press the CLEAR
to store number.
button twice to return to standby mode, or you can continue
To clear a number from phonebook
1. Press the PHONEBOOK
2. Press UP/DOWN
button, the display shows ADD
button to the location DELETE
3. Press PHONEBOOK
button to confirm, then press UP/DOWN
select the number you want to delete
4. Press the PHONEBOOK
DELETE
5. Press the CLEAR
button to
to delete the name and number, the display shows
button to return to standby mode
To modify (change) a number in phonebook
1. Press the PHONEBOOK
button, the display shows ADD
2. Press UP/DOWN
button to the location EDIT, then press PHONEBOOK
confirm, the display shows the first stored number
3. Press UP/DOWN
PHONEBOOK
4. Press CLEAR
to
button to select the number you want to modify, then press
to confirm
button to clear the old name, then key in the new name;
Page 10 of 24
User Manual
5. Press PHONEBOOK
to save the edit, press CLEAR
number and key in the new number.
6. Press PHONEBOOK
return to standby mode
button to clear the old
to save the change, then Press the CLEAR
button to
To clear all numbers from phonebook
1. Press the PHONEBOOK
2. Press UP/DOWN
button, the display shows ADD
button to the location DEL ALL
3. Press the PHONEBOOK
button to delete all numbers ,the display shows OK?
4. Press the PHONEBOOK
button to confirm ,the display shows EMPTY.
To dial a number from phonebook
1. In standby mode ,press UP/DOWN
button to enter the phonebook list directly;
2. Key in the first letter of the name to quick search the accordance number you want to
Dial;
3. Press CALL
button.
Call Logs
You must subscribe to Caller ID service from your service provider to use this feature.
Call Logs store information related to received calls, missed calls and dialed calls. The V20
can store up to a maximum of 30 calls, consisting of 10 received, missed and dialed calls
respectively.
To check call records
1. Press the MENU
button
The display shows CALL LOGS
2. Press the PHONEBOOK
button, then press UP/DOWN
locations MISSED, RECEIVED, or DIALED calls.
3. Press the PHONEBOOK
records
button, then press UP/DOWN
button to the
button to scroll the
To save a number in call logs
When you received a new number, you want to store in phonebook. The following is for your
reference.
1. Repeat step 1 to 3 above, until the display shows the new number.
Page 11 of 24
User Manual
2. Press the MENU
button, the displays shows SAVE
3. Press the MENU
button, the displays shows NAME?
4. Key in the name, Press the MENU
button to save.
To edit a number in call logs
1.
Repeat step 1 to 3 in “To check call records” section, until the display shows the
number;
2.
Press the MENU
EDIT;
3.
Press the PHONEBOOK
button, then press CLEAR
number and key in the new number;
Press the PHONEBOOK
button to save the change.
4.
button, then press UP/DOWN
button to the location
button to clear the old
To clear a number in call logs
1.
Repeat step 1 to 3 in “ To check call records” section, until the display shows the
number;
2.
button to the location
Press the MENU
button, then press UP/DOWN
DELETE;
3. Press the PHONEBOOK
button to confirm.
To clear all number in call logs
1.
Repeat step 1 to 3 in “To check call records” section , until the display shows the
number;
2.
Press the MENU
button, then press UP/DOWN
button to the location DEL
ALL;
Press the PHONEBOOK
button, the display shows OK?
Press the PHONEBOOK
button to confirm.
3.
4.
To dial a number from call logs
1. Ensure the required name/number is visible on the display
2. Press CALL
button
Handset Setting
Key tone on and off
Each time you press a key on your handset, you hear a tone. You can turn this off if needed.
1. Press the MENU
button, then press UP/DOWN
button to the location
HANDSET
2. Press the PHONEBOOK
button
The display shows KEYTONE
3. Press the PHONEBOOK
, the display shows ON? or OFF?
Page 12 of 24
User Manual
4. Press the PHONEBOOK
button to confirm
Ringer Volume (EXT / INT)
You have a choice of five volume levels (1 to 5).
1. Press the MENU
HANDSET
button, then press UP/DOWN
button to the location
2. Press the PHONEBOOK
button, then press UP/DOWN
location EXT VOL / INT VOL
3. Press the PHONEBOOK
button
The display shows the current volume level
4. Press UP/DOWN
button to the
button to change the volume
5. Press the PHONEBOOK
button to confirm the volume level you want
Ringer Melody (EXT / INT)
You have a choice of 9 ringing melodies
1. Press the MENU
HANDSET
button, then press UP/DOWN
button to the location
2. Press the PHONEBOOK
button, then press UP/DOWN
location EXT RING / INT RING
3. Press the PHONEBOOK
button
The display shows the current melody
button to the
4. Press UP/DOWN
button to change the melody
5. Press the PHONEBOOK
button to confirm the melody you want
Display language
You can select the language from the menu up to your preference:
1. Press the MENU
HANDSET
button then press UP/DOWN
button to the location
2. Press the PHONEBOOK
button then press UP/DOWN
location LANGUAGE
3. Press the PHONEBOOK
button
The display shows the current language
button again to the
4. Press UP/DOWN
button to the language you prefer
5. Press the PHONEBOOK
button to confirm
Your handset name
1. Press the MENU
HANDSET
button, then press UP/DOWN
Page 13 of 24
button to the location
User Manual
2. Press the PHONEBOOK
button, then press UP/DOWN
location SET NAME
3. Press the PHONEBOOK
button
The display shows the current name
button to the
4. Press the CLEAR
button repeatedly to clear the display, then key in your chosen
name
5. Press the PHONEBOOK
button to confirm
Auto Talk
Normally, you need to press the CALL
button to answer an incoming call. But with
AUTOTALK turned on, when your handset is resting on the base unit and it rings for an
incoming call, you can answer the call by simply lifting the handset. To turn auto-talk
ON/OFF:
1. Press the MENU
button then UP/DOWN
2. Press the PHONEBOOK
button to HANDSET
button then UP/DOWN
button to AUTOTALK
3. Press the PHONEBOOK
button again, the display shows ON? / OFF?
4. Press the PHONEBOOK
button to confirm
! If you have turned auto-talk on, do not press the CALL
button after you've answered
a call by lifting the handset, otherwise, you'll disconnect the call.
To Lock /Unlock the keypad
Press MENU
button and “
“ button consecutively to lock or unlock the keypad.
Date Set / Time Set
1. Press the MENU
button then UP/DOWN
2. Press the PHONEBOOK
Time SET;
3. Press the PHONEBOOK
set;
4. Press the PHONEBOOK
button to HANDSET;
button then UP/DOWN
button to DATE SET /
button again, then key in the date / time you want to
button to confirm.
Base Setting
Note: The default PIN is: 0000
Call Barring Function
Call barring enables you to restrict or bar certain types of calls from your phone.
Page 14 of 24
User Manual
To set call barring number
1. Press MENU
button then UP/DOWN
button until the display shows BASE
SET
2. Press the PHONEBOOK
button, the display shows PIN?
3. Key in your PIN number and press the PHONEBOOK
button, then press
UP/DOWN
button to the location BARRING
4. Press the PHONEBOOK
button, then UP/DOWN
button. The display shows
one of the numbers from 1 to 5 (The maximum call barring numbers you can set), and
then key in the telephone number you want to set call barring
5. Press PHONEBOOK
button, then the display shows HS?
Key in the handset number that you want to set call barring
6. Press PHONEBOOK
button to confirm
To delete call barring number
1. Press MENU
button then UP/DOWN
button until the display shows BASE
SET
2. Press the PHONEBOOK
button, the display shows PIN?
3. Key in your PIN number
4. Press the PHONEBOOK
BARRING
5. Press the PHONEBOOK
set.
button, then UP/DOWN
button to the location
button, the display shows the call barring number you
6. Press the CLEAR
button to delete the number
button to confirm
7. Press PHONEBOOK
Base Melody
You have a choice of nine ringing melodies for the base unit
button then UP/DOWN
button to the location BASE SET
1. Press MENU
2. Press PHONEBOOK
button and Key in the PIN number
3. Press PHONEBOOK
button then UP/DOWN
button to the location B RING
4. Press PHONEBOOK
button and press UP/DOWN button to change the
melody
5. Press the PHONEBOOK
button to confirm the melody you chosen
Base Volume
You have a choice of five volume levels (0 – 4)
1. Press MENU
button then UP/DOWN
button to the location BASESET
2. Press PHONEBOOK
button and Key in the PIN number
Page 15 of 24
User Manual
3. Press PHONEBOOK
button then UP/DOWN
VOLUME
The display shows the current volume level
button to the location B
4. Press UP/DOWN button to change the volume
5. Press the PHONEBOOK
button to confirm the volume level you chosen
To Set Dial Mode
You can change dial mode to TONE or PULSE dialing.
To set dial mode:
button, then UP/DOWN
button to the location BASE SET
1. Press MENU
2. Press the PHONEBOOK
button, the display shows PIN?
3. Key in your PIN number and press the PHONEBOOK
button, then press
UP/DOWN
button to the location DIAL MODE
4. Press the PHONEBOOK
button and press UP/DOWN
Dial mode as TONE or PULSE dialing
button to change
To reset base
1. Press MENU
button, then UP/DOWN
button to the location BASE SET
2. Press the PHONEBOOK
button, the display shows PIN?
3. Key in your PIN number and press the PHONEBOOK
button, then UP/DOWN
button to the location B RESET
4. Press PHONEBOOK
button, then the display shows RESET?
5. Press PHONEBOOK
back to B RESET
button to confirm, or Press CLEAR
button, and go
To change base PIN
1. Press MENU
button, then UP/DOWN
button to the location BASE SET
2. Press the PHONEBOOK
button, the display shows PIN?
3. Key in your PIN number and press the PHONEBOOK
button, then UP/DOWN
button to the location MAST PIN?
4. Press PHONEBOOK
button, the display shows PIN?, Key in the original PIN
number(default PIN:0000)
5. Repeat the step 4 and the display shows MAST PIN
6. Press PHONEBOOK
button, the display shows PIN?, Key in the new PIN
number,
7. Repeat the step 6, and press PHONEBOOK
button to confirm.
Page 16 of 24
User Manual
PABX
PABX is an auto pause function which is normally used for phones connected behind an
PABX. There are two different numbers can be set at the location PABX 1 & PABX 2. Each
number can store up to 5 digitals.
Example:
If you have set digit “9” at location PABX 1, when you dial the number 9,888888. Then auto
pause function will automatically insert a pause after the digit “9” whereby 9,888888 is being
dialed.
To set PABX number:
1. Press MENU
button, then press UP/DOWN button to the location BASE SET;
2. Press the PHONEBOOK
button, the display shows PIN?;
button, then UP/DOWN
3. Key in your PIN number and press the PHONEBOOK
button to the location PABX?;
4. Press the PHONEBOOK
button, the display shows PABX 1?;
5. Press the PHONEBOOK
button, the display shows EMPTY. Key in the number
you want to set as auto pause function;
6. Press PHONEBOOK
button to confirm.
To change PABX number:
1.
2.
Repeat step1~4 above;
Press the PHONEBOOK
have set;
3.
4.
Press the CLEAR
Press PHONEBOOK
button, the display shows the PABX number you
button to delete the number and key in the new number;
button to confirm.
Resetting the system
If you have set a PIN and forgotten it, you need to reset the system. The PIN will be reset to
0000. If you reset the system, you will lose all stored information (including numbers in
memory) and all features will return to their default settings. You need to register the handset
to the base unit again.
While you are resetting the system, you should disconnect the telephone line cord from the
back of the base unit, so you won't be interrupted by incoming calls. To reset the system
without the PIN:
1. Disconnect the power lead from the back of the base unit
2. Press and hold the HANDSET LOCATOR
button in the base unit ,at the
same time connect the power lead into the back of base unit.Release the LOCATOR
button after you hear “beep”sound for five times.The IN USE light on base unit lights
during this whole process.
Page 17 of 24
User Manual
3. After 2~3 seconds ,you can hear “beep” sound for two times again and the IN USE
light goes off;
4. Disconnect the power lead from base. Connect it again, then you will hear
confirmation tone from the base unit.
Baby Call ( Optional )
With baby call option turned on, you cannot make any outside call except to a number you
have programmed in. When you press any digital key, the programmed number will be dialed
out automatically.
To set the Baby Call number
1. Press MENU
BABYCALL
button, then UP/DOWN
2. Press the PHONEBOOK
shows SET NUM
3. Press the PHONEBOOK
number directly
button until the display shows
button, then UP/DOWN
button until the display
button and the display shows EMPTY, Key in the
(If you make a mistake, press the CLEAR
button to delete digits from the
display)
4. Press the PHONEBOOK
button to confirm, and the display shows BC MODE
To enter Baby call mode
1. Press the MENU
button, then UP/DOWN
button until the display shows
BABYCALL
button, the display shows ENABLE?
2. Press the PHONEBOOK
3. Press the PHONEBOOK
button to confirm, and the display shows BC MODE
to enter Baby call mode
Note: you must set the Baby Call number before enable Baby Call.
To exit Baby call mode
1. In Baby call mode, press the MENU
button, the display shows DISABLE?
2. Then press PHONEBOOK
button to exit Baby call mode.
To change the Baby call number
1. Press MENU
button, then UP/DOWN
2. Press the PHONEBOOK
shows SET NUM
3. Press the PHONEBOOK
4. Press and hold the CLEAR
button go to the location BABYCALL
button, then UP/DOWN
button until the display
button again, the display shows the stored number
button to clear the display
Page 18 of 24
User Manual
5. Key in the new number and press the PHONEBOOK
shows BC MODE
button and the display
Note: you should exit Baby Call mode before change the baby call number.
Handset registration
Your V20 is supplied with the handset already registered to the base unit, and you shouldn't
need to register it. But if you've bought extra handsets separately, you'll need to register each
one to your original base unit. Maximum 4 handsets can be registered to one base.
To register a handset
5. Press and hold the Handset locator
button on the base unit for a while, until
you hear "beep" sound twice continuously.
6. Press the MENU
REGISTER
button, then press UP/DOWN
button to the location
7. Press the PHONEBOOK
button, then press UP/DOWN
location SUB BASE
8. Press the PHONEBOOK
button again
The display shows BASE? 1 2 3 4
9.
button to the
Key in a base unit number
The display shows SEARCH + selected number, then shows the ID of the base unit
after 3~4 seconds.
10. Press the PHONEBOOK
button again
The display shows PIN?
to confirm.
11. Key in your pin (default 0000) and press PHONEBOOK
If the display says NOT REG, check to see if you key in the correct PIN, then
repeat the registration procedure again from step 1.
Intercom and transfer
To make an intercom call
1. Press the INT
button
2. Key in the number of the other handset
On the other handset's display, your number appears, and the INT symbol flashes. Then the
other handset user presses the CALL
button to connect the call.
For details of how to change the ringing melody and volume for intercom calls, see "INT
MELODY" and "INT VOLUME" on "HANDSET SETTING" part.
To end an intercom call
Page 19 of 24
User Manual
Press the CALL
button on your handset
The other person will hear Busy tone, and should also press the CALL
up.
button to hand
To transfer the outside call to another handset (if you have two or more handsets):
•
Press the INT
•
The outside call is put on hold. When the other handset answers, you can speak to the
user. If the other handset does not answer, you can get back to the outside call by
button and key in the number of the other handset.
pressing the INT
button again.
To transfer the outside call to another outside phone:
•
•
Press the Recall
button and key in the call number you want to transfer.
The first party is put on hold. When second party answers, you can speak to the user,
then press the CALL
button to hang up and transfer the call.
Note : Network Depending
Troubleshooting
Always check first that:
• You have followed the steps listed on pages to install and set up your V20.
• All connects are firmly inserted in their sockets.
• Mains power is switched on at the socket.
• The handset’s batteries are correctly and securely installed, and are not run down.
If you experience difficulties with the working of your V20, refer to the advice given below.
I cannot make or answer calls.
Check that the handset unit’s mains power adapter is plugged in and power is switched on.
The handset unit needs mains power for normal operation of the phone-not just charging the
batteries.
Make sure you are using the telephone line cable that was supplied with your V20. Other
telephone line cables might not work.
Check the battery level symbol on the display. If it is low, replace the handset on the base
unit or charger pod to recharge the batteries.
Switch off power at the mains socket, wait for a few seconds and then switch back on. This
may solve the problem.
If you still can’t make calls, try re-registering the handset.
When I press keys on the handset, nothing happens.
Make sure the batteries are fitted in your handset. If the battery level symbol on the display
shows “low”, recharge the batteries.
Page 20 of 24
User Manual
Check whether there’s a key symbol on the display. If so, the keypad is locked. Turn to the
user manual to find out how to unlock it.
When I press keys on the handset, digits appear on the display, but I can’t make an
outside call.
Call barring may have been set, see the user manual for more information.
Try moving the handset closer to the base unit.
Try a different position for the base unit-perhaps higher, or further from other electrical
equipment.
The phone does not ring
Check that the base unit’s mains power adapter is plugged in and power is switched on. The
base unit needs mains power for normal operation of the phone-not just charging the batteries.
Make sure you are using the telephone line cable that was supplied with your V20. Other
telephone line cables might not work.
Check that you have set the ringer volume to off. See the user manual for more information.
Check that the total REN value of all equipment connected to your telephone line is no more
than 4. Disconnect one or more telephones and see whether that helps.
When I press the CALL button, I hear a loud noise.
The strange noise is caused by interference. Disconnect the mains power lead from the back
of the base unit, and then wait for 30 seconds before reconnecting it.
There is 'beep' sound while I am on a call.
You may be going out of range of the base unit. Move closer, or your call may be cut off.
Check the Battery Level symbol on the display. If it is low, recharge the batteries.
The Caller Display feature isn’t working.
You need to subscribe to the Caller Display feature from your service provider.
The caller may have withheld their number, or they may be calling from a network that does
not transmit the Caller ID (for example, it may be an international call).
The handset’s battery is running low within an hour or two.
Before you used the handset for the first time, you should have left it on the base unit for up
to 15 hours to charge the battery fully.
You may need to replace the battery.
I cannot transfer a call.
Make sure the other handset is within range of the base unit, and is not busy on a call.
Make sure you are keying in the correct number for the other handset.
Page 21 of 24
User Manual
No display on LCD screen.
Make sure the battery have power.
I cannot register handset to base
Make sure the number of handset registered to base is less than 4.
Check that the base unit is not near other electrical equipment, such as TV or computer
Technical details
Full DECT GAP Compatible system
Standard
Frequency range
Digital Enhanced Cordless
Telecommunications (DECT)
1.88 to 1.9 GHz
Channel bandwidth
1.728 MHz
Modulation
GMSK
Operating range
Up to 300 m outdoors;
Up to 50 m indoors
Operating time
Standby time: 90 hours
Talking time: 8 hours
Temperature range
Operating 00C to 400C
Storage -200C to 600C
Electrical power
Handset---one 1.2 x 2 V 550 mAH NiMH,
rechargeable battery cell
Base unit---input 240 V AC, 50 Hz;
output 9V AC, 300 mA.
PABX compatibility
Timed break recall: 100 ms for short flash;
250 ms for long flash
Pause length: 3 seconds.
Signaling type: DTMF (dual-tone multifrequency)
Pulse dialing
Page 22 of 24
User Manual
Warranty Information
All NetComm Limited (“NetComm”) products have a standard 12 month warranty from date of purchase against
defects in manufacturing and that the products will operate in accordance with the specifications outlined in this
User Guide. However some products have an extended warranty option (please refer to your packaging). To be
eligible for the extended warranty you must supply the requested warranty information to NetComm within 30
days of the original purchase by registering on-line via the NetComm web site at:
www.netcomm.com.au
Contact Information
If you have any technical if difficulties with your product, please do not hesitate to contact NetComm’s
Customer Support Department.
Email: [email protected]
Fax: (+612) 9424-2010
Web: www.netcomm.com.au
Copyright Information
This manual is copyright. Apart from any fair dealing for the purposes of private study, research, criticism or
review, as permitted under the Copyright Act, no part may be reproduced, stored in a retrieval system or
transmitted in any form, by any means, be it electronic, mechanical, recording or otherwise, without the prior
written permission of NetComm Limited. NetComm Limited accepts no liability or responsibility, for
consequences arising from the use of this product. Please note that the images used in this document may vary
slightly from those of the actual product.
Specifications are accurate at the time of the preparation of this document but are subject to change without
notice. NetComm Limited reserves the right to change the specifications and operating details of this product
without notice. NetComm is a registered trademark of NetComm Limited. All other trademarks are acknowledged
the property of their respective owners.
Customer Information
ACA (Australian Communications Authority) requires you to be aware of the following information and warnings:
(1) This unit shall be connected to the Telecommunication Network through a line cord which meets the
requirements of the ACA TS008 Standard.
(2) This equipment has been tested and found to comply with the Standards for C-Tick and or A-Tick as
set by the ACA. These standards are designed to provide reasonable protection against harmful
interference in a residential installation. This equipment generates, uses, and can radiate radio noise
and, if not installed and used in accordance with the instructions detailed within this manual, may
cause interference to radio communications. However, there is no guarantee that interference will
not occur with the installation of this product in your home or office this equipment does cause some
degree of interference to radio or television reception, which can be determined by turning the
equipment off and on, we encourage the user to try to correct the interference by one or more of the
following measures:
• Change the direction or relocate the receiving antenna.
• Increase the separation between this equipment and the receiver.
• Connect the equipment to an alternate power outlet on a different power circuit from that to which
the receiver/TV is connected.
• Consult an experienced radio/TV technician for help.
(3) The power supply that is provided with this unit is only intended for use with this product. Do not use
this power supply with any other product or do not use any other power supply that is not approved
for use with this product by NetComm. Failure to do so may cause damage to this product, fire or
result in personal injury.
Product Warranty
The warranty is granted on the following conditions:
1
2
This warranty extends to the original purchaser (you) and is not transferable;
This warranty shall not apply to software programs, batteries, power supplies, cables or other
accessories supplied in or with the product;
Page 23 of 24
User Manual
3
4
5
6
The customer complies with all of the terms of any relevant agreement with NetComm and any other
reasonable requirements of NetComm including producing such evidence of purchase as NetComm
may require;
The cost of transporting product to and from NetComm’s nominated premises is your responsibility;
and,
NetComm does not have any liability or responsibility under this warranty where any cost, loss,
injury or damage of any kind, whether direct, indirect, consequential, incidental or otherwise arises
out of events beyond NetComm’s reasonable control. This includes but is not limited to: acts of God,
war, riot, embargoes, acts of civil or military authorities, fire, floods, electricity outages, lightning,
power surges or shortages of materials or labour.
The customer is responsible for the security of their computer and network at all times. Security
features may be disabled within the factory default settings. NetComm recommends that you enable
these features to enhance your security.
The warranty is automatically voided if:
1
2
3
4
5
6
You, or someone else, use the product, or attempts to use it, other than as specified by NetComm;
The fault or defect in your product is the result of a voltage surge subjected to the product either by
the way of power supply or communication line, whether caused by thunderstorm activity or any
other cause(s);
The fault is the result of accidental damage or damage in transit, including but not limited to liquid
spill-age;
Your product has been used for any purposes other than that for which it is sold, or in any way other
than in strict accordance with the user manual supplied;
Your product has been repaired or modified or attempted to be repaired or modified, other than by a
qualified person at a service centre authorised by NetComm; and,
The serial number has been defaced or altered in any way or if the serial number plate has been
removed.
Limitations of Warranty
The Trade Practices Act 1974 and corresponding State and Territory Fair Trading Acts or legalisation of another
Government (“the relevant acts”) in certain circumstances imply mandatory conditions and warranties which
cannot be excluded. This warranty is in addition to and not in replacement for such conditions and warranties.
To the extent permitted by the Relevant Acts, in relation to your product and any other materials provided with
the product (“the Goods”) the liability of NetComm under the Relevant Acts is limited at the option of NetComm to:
• Replacement of the Goods; or
• Repair of the Goods; or
• Payment of the cost of replacing the Goods; or
• Payment of the cost of having the Goods repaired.
Declaration of conformity
The V20 complies with the essential protective requirements and objectives of:
•
EC R& TTE Directive 1999/5/EC
•
EC Low Voltage Directive 73/23/EEC
•
EC EMC Directive 89/336/EEC
And conforms to the following relevant harmonized
standards:
•
TBR 10:1999
•
TBR 22:1997
•
TBR 38:1998
•
EN 301406 V1.5.1:2003
•
EN 301437 V1.1.1:1999
•
EN 301489-01 V1.4.1:2002
•
EN 301489-06 V1.2.1:2002
•
EN 60950-1:2001
•
A-Tick (N367)
Page 24 of 24