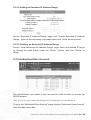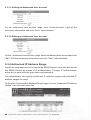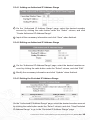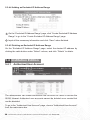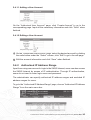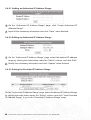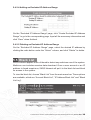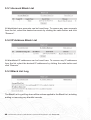
1
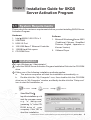
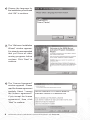
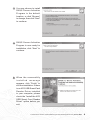
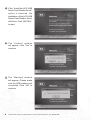
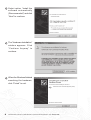
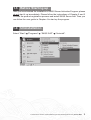
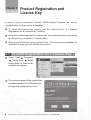
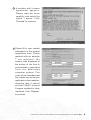
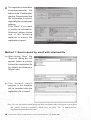
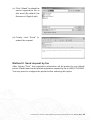
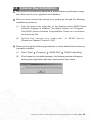
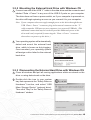
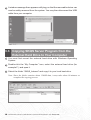
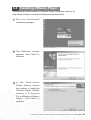
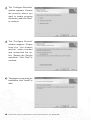
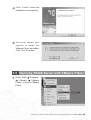
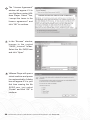
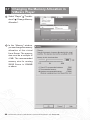
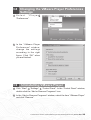
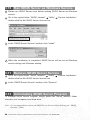
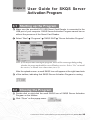
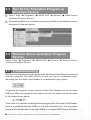
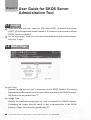
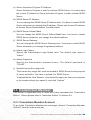
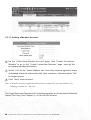
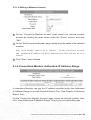
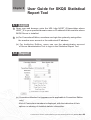
Server Side
Installation Guide and User Manual
Table of Contents
1
Chapter 1
Installation Guide for SKQS Server Activation Program
1.1
System Requirements
1.2Installation
1.3
Before Starting up
1.4Uninstallation
Chapter 2
2.1
2.2
Product Registration and License Key
Product Registration for a License Key
License Key Installation
Chapter 3
Installation Guide for SKQS Server Program
8
14
3.1
System Requirements
3.2
Connecting the External Hard Drive to Your Computer
3.2.1 Components of the External Hard Drive Kit
3.2.2 Mounting the External Hard Drive with Windows OS
3.2.3 Dismounting the External Hard Drive with Windows OS 3.3
Copying SKQS Server Program from the External Hard Drive to Your Computer
3.4
Installing VMware Player
3.5
Running SKQS Server with VMware Player
3.6
Shutting Down (Restarting) SKQS Server in VMWare Player
3.7
Changing the Memory Allocation in VMware Player
3.8
Changing the VMware Player Preferences Settings
3.9
Uninstalling VMware Player
3.10
Run SKQS Server as Windows Service
3.11
Remove SKQS Server Service
3.12
Uninstalling SKQS Server Program
The Electronic Version of Siku Quanshu (Intranet Version)(Version 3.0)
Contents i
Chapter 4
User Guide for SKQS Server
Activation Program
4.1
Starting up the Program
4.2
Closing the Program
4.3 Run Server Activation Program as Windows Service
4.4
Remove Server Activation Program Service
4.5Troubleshooting
Chapter 5
User Guide for SKQS Server
Administration Tool
5.1Login
5.2
Main Page
5.3
Consortium Member
5.3.1
Consortium Member Account
5.3.2 Consortium Member Authorized IP Address Range
5.3.3
Authorized User Account
5.3.4 Authorized IP Address Range
5.4
Institution Edition
5.4.1
Authorized User Account
5.4.2 Authorized IP Address Range
5.5
Black List
5.5.1 Account Black List
5.5.2 IP Address Black List
5.5.3 Black List Log
Chapter 6
User Guide for SKQS Statistical Report Tool
6.1Login
6.2Report
6.2.1 Login Report
6.2.2 Search Report
6.2.3 Book Browse Report
6.2.4 Dictionary Search Report
6.2.5 Correlated Word Search Report
ii Contents The Electronic Version of Siku Quanshu (Intranet Version)(Version 3.0)
25
28
41
Chapter 1
Installation Guide for SKQS
Server Activation Program
1.1 System Requirements
Please check the minimum requirements before you start installing SKQS Server
Activation Program.
Hardware
1. Intel XEON 3.0G CPU x 2
2. 2GB RAM
3. USB 2.0 Port
4. 100/1000 Base-T Ethernet Controller
5. 150GB Hard Disk space
6. CD-ROM Drive
Software
1. Microsoft Windows R Server 2003
(Traditional Chinese, Simplified
Chinese, English, Japanese or
Korean Version)
2. VMware Player
1.2 Installation
1 Login Windows as “Administrator”.
2 Insert the SKQS Server Activation Program Installation Disk into the CD-ROM
drive.
3 Either one of the following installation methods applies:
a. The autorun sequence will start the installation automatically; or
b. Double-click the “My Computer” icon, then double-click the CD-ROM
drive icon in “My Computer” window, and finally double-click the “Setup.exe”
icon to start the installation; or
c.
Select“Start”“Run”.
Input the installationp a t h
and the program name,
e.g. “e: \setup.exe”
(assuming “e:” is the CDROM drive of your
computer). Click “OK” to
start the installation.
The Electronic Version of Siku Quanshu (Intranet Version)(Version 3.0) Server Side
1
4 Choose the language for
the installation process and
click “OK” to continue.
5 The “Welcome Installation
Wizard” window appears.
It is strongly recommended
that you close all other
running programs before
continue. Click “Next” to
continue.
6 The “License Agreement”
window appears. Please
read the license agreement
carefully. Select “I accept
the license agreement”
if you accept the license
agreement, then click
“Next” to continue.
2
The Electronic Version of Siku Quanshu (Intranet Version)(Version 3.0) Server Side
7 You may choose to install
SKQS Server Activation
Program in the default
location, or click “Browse”
to change, then click “Next”
to continue.
8 SKQS Server Activation
Program is now ready for
installation, click “Next” to
continue.
9 When the successfully
installed message
appears, click “Finish” to
exit the installation. If there
is no ACS USB Smart Card
Reader Driver installed
in your computer, please
check the “Install the ACS
USB Smart Card Reader
Driver” option before you
exit.
The Electronic Version of Siku Quanshu (Intranet Version)(Version 3.0) Server Side
3
10 If the “Install the ACS USB
Smart Card Reader Driver”
option is checked, the
installation of the ACS USB
Smart Card Reader Driver
will follow. Click “INSTALL”
to start.
11 The “Confirm” window
will appear. Click “Yes” to
continue.
12 The “Warning” window
will appear. Please make
sure the USB reader is not
connected. Click “OK” to
continue.
4
The Electronic Version of Siku Quanshu (Intranet Version)(Version 3.0) Server Side
13 Follow the instructions in
the “Information” window.
Connect the USB reader
to the system and click
“OK” after the “Found New
Hardware Wizard” window
disappears. (See Points 15 - 18 )
14 When the installation is
completed, click “FINISH”
to exit.
15 I n t h e “ F o u n d N e w
Hardware Wizard”
window, select “No, not
this time” and click “Next”
to continue.
The Electronic Version of Siku Quanshu (Intranet Version)(Version 3.0) Server Side
5
16 Select option “Install the
software automatically
(Recommended)” and click
“Next” to continue.
17 The “Hardware Installation”
window appears. Click
“Continue Anyway” to
continue.
18 When the Windows finished
searching the hardware,
click “Finish” to exit.
6
The Electronic Version of Siku Quanshu (Intranet Version)(Version 3.0) Server Side
1.3 Before Starting up
After you have finished the installation of SKQS Server Activation Program, please
do not start it up immediately. Please follow the instructions of Chapter 2 and 3
to finish the product registration process and install SKQS Server first. Then you
can follow the user guide in Chapter 4 to start up the program.
1.4 Uninstallation
Select “Start”
“Programs”
“SKQS SAP”
“Uninstall” .
The Electronic Version of Siku Quanshu (Intranet Version)(Version 3.0) Server Side
7
Chapter 2
Product Registration and
License Key
In order to protect consumers’ benefit, SKQS Intranet Program can only be
activated after the license key is installed.
1 To obtain the license key, please read the instructions in “2.1 Product
Registration for a License Key” carefully.
2 Once the product registration is approved, the authorized user will receive
the license key via email in 3 working days.
3 After receipt of the license key, please follow “2.2 License Key Installation” to
install the license key and activate the product.
2.1 Product Registration for a License Key
1 Select “Start” “Programs”
“SKQS SAP”
“SKQS
ProductReg” to execute the
registration program.
2 The welcome page of the registration
program is shown. Click “Register Now”
to begin the registration process.
8
The Electronic Version of Siku Quanshu (Intranet Version)(Version 3.0) Server Side
3 A window with License
Agreement appears.
Please read the terms
carefully and select the
option “I agree”. Click
“Proceed” to continue.
4 Please fill in your contact
information in the product
registration form. (Fields
marked with an asterisk
are required.) The
license code displayed at
the bottom of the form is
automatically generated
from the dedicated
computer system. This
code will be recorded and
the license key will only be
applicable to this machine,
meaning that it cannot
activate SKQS Intranet
Program installed in other
machines. Click “Register”
to proceed.
*
The Electronic Version of Siku Quanshu (Intranet Version)(Version 3.0) Server Side
9
5 The registration information
is now summarized at the
bottom of the “Confirmation”
window. Please ensure that
this information is correct,
especially the contact email
address.
Click “Back” if you want
to modify the information.
Otherwise, please choose
one of the following
methods to submit the
registration request.
Method 1: Send request by email with attached file
(a)After clicking “Save”, the
“Save As” dialog box will
appear. Select a location
to store the registration file
(by default, the filename is
RegInfo.dat).
(b)T h e d e f a u l t e m a i l
program in the machine
will be launched after the
registration file is saved.
Note. In case the default email program does not launch after saving the registration
file, please launch it manually. Make sure the field “To:” is addressed to:
[email protected].
10
The Electronic Version of Siku Quanshu (Intranet Version)(Version 3.0) Server Side
(c) Click “Attach” to attach the
saved registration file to
this email (By default, the
filename is RegInfo.dat).
(d)Finally, click “Send” to submit the request.
Method 2: Send request by fax
After clicking “Print”, the registration information will be printed to your default
printer. Please send us the printed registration request by fax to (852) 2730 8686.
You may need to configure the printer before selecting this option.
The Electronic Version of Siku Quanshu (Intranet Version)(Version 3.0) Server Side
11
6 C l i c k “ F i n i s h ” i n t h e
“Confirmation” window
to exit the registration
program.
7 Click “OK” to finish the
whole process. The
license key request will be
processed within 3 working
days. The unique license
key will be sent to you by
email once the registration
is approved.
12
The Electronic Version of Siku Quanshu (Intranet Version)(Version 3.0) Server Side
2.2 License Key Installation
1 If the product is successfully registered, a unique license key (filename: magic.
dat) will be sent to your registered email address.
2 After you have received the license key, please go through the following
installation procedures:
(1) Copy the license key magic.dat to the directory where SKQS Server
Activation Program is installed. The default location is C:\Program Files\SKQS Server Activation Program\Data. Please do not rename the license key file.
(2) U p l o a d t h e l i c e n s e k e y m a g i c . d a t
(Please see Chapter 5 Section 5.2(i))
t o S K Q S S e r v e r.
3 Please go through the following procedures to verify whether the license key
is properly installed.
(1) Select “Start”
“Programs”
“SKQS SAP”
“SKQS ProductReg”.
(2) If the license key is installed properly, the following window will appear showing that registration has been successfully taken place.
The Electronic Version of Siku Quanshu (Intranet Version)(Version 3.0) Server Side
13
Chapter 3
Installation Guide for SKQS
Server Program
There are 4 major steps to install SKQS Server Program:
(a)Connect the external hard drive to your computer.
(b) Copy SKQS Server Program and SKQS Data from the external hard drive to
your computer.
(c) Download and install VMware Player.
(d)Run SKQS Server with VMware Player.
3.1 System Requirements
Please check the minimum requirements before you start installing SKQS
Server.
Hardware
Same as the requirements for the installation of “SKQS Server Activation
Program”. (See Chapter 1 Section 1.1)
Software
Same as the requirements for the installation of “SKQS Server Activation
Program”. (See Chapter 1 Section 1.1)
3.2 Connecting the External Hard Drive to Your Computer
3.2.1 Components of the External Hard Drive Kit
1 A special USB cable. This cable is shaped like the letter “Y” with one USB
connector at one end of the cable and two connectors at the other end of
the cable. This cable supplies power to the drive and handles the data going
between the drive and your computer
this means you don’t have any other
cables to connect.
2 An external hard drive.
14
The Electronic Version of Siku Quanshu (Intranet Version)(Version 3.0) Server Side
3.2.2 Mounting the External Hard Drive with Windows OS
1 Connect one end of the USB “Y” cable to the data drive and the connector end
labeled “Data + Power” to any one of the USB 2.0 ports on your computer.
The drive does not have a power switch, so if your computer is powered on,
the drive will begin spinning as soon as you connect it to your computer.
Note. If your computer does not supply enough power to the drive through the one USB “Data + Power” connector, plug in the unused connector on the “Y” cable to another USB port on your computer (or a powered USB hub). (This additional connection may be needed to provide additional power to the drive and is only required if connecting the “Data + Power” connector alone does not power up the drive.)
2 Your operating system will automatically
detect and mount the external hard
drive, which is known as hot plugging.
Once mounted, your operating system
will assign a drive letter for the external
hard drive.
3.2.3 Dismounting the External Hard Drive with Windows OS
1 Close all windows and quit all running applications which are stored on the
drive or using data stored on the drive.
2 Double-click the icon in your system
tray that represents the “Safely Remove
Hardware” function, and select “USB
Mass Storage Device” (external drive).
Then click “Stop” in the “Safely Remove
Hardware” window.
The Electronic Version of Siku Quanshu (Intranet Version)(Version 3.0) Server Side
15
3 A window message then appears notifying you that the removable device can
now be safely removed from the system. You may then disconnect the USB
cable from your computer.
3.3 Copying SKQS Server Program from the
External Hard Drive to Your Computer
1 You must first mount the external hard drive with Windows Operating
System.
2 Double-click the “My Computer” icon, select the external hard drive (for
example F:) and open it.
3 Select the folder “SKQS_Intranet” and copy it to your local hard drive.
Note. Since the folder contains about 130GB data, it may take about 90 minutes to
complete the copying process.
16
The Electronic Version of Siku Quanshu (Intranet Version)(Version 3.0) Server Side
3.4 Installing VMware Player
Download the latest version of VMware Player (Windows version) at
http://www.vmware.com/download/player/download.html.
1 R u n t h e d o w n l o a d e d
installation program.
2 The “Welcome” window
appears. Click “Next” to
continue.
3 I n t h e “ D e s t i n a t i o n
Folder” window, choose
the location to install the
VMware Player. Default
location is C:\Program
Files\VMware\VMware
Player\ . Click “Next” to
continue.
The Electronic Version of Siku Quanshu (Intranet Version)(Version 3.0) Server Side
17
4 The “Configure Shortcuts”
window appears. Choose
the place(s) where you
want to create program
shortcut(s), and click “Next”
to continue.
5 The “Configure Product”
window appears. Please
keep the “Yes disable
autorun” option checked
and unchecked the option “Enable the Google
searchbar”. Click “Next” to
continue.
6 The player is now ready for
installation, click “Install” to
start.
18
The Electronic Version of Siku Quanshu (Intranet Version)(Version 3.0) Server Side
7 Click “Finish” when the
installation is completed.
8 You must restart your
system to make the
VMware Player take effect.
Click “Yes” to restart.
3.5 Running SKQS Server with VMware Player
1 Select “Start” “Programs”
“VMware”
“VMware
Player” to launch VMware
Player.
The Electronic Version of Siku Quanshu (Intranet Version)(Version 3.0) Server Side
19
2 The “License Agreement”
window will appear if it is
your first time running VMware Player. Select “Yes,
I accept the terms in the
license agreement” and
click “OK” to continue.
3 In the “Browse” window,
browse to the copied
“SKQS_Intranet” folder.
Select the file SKQS.vmx
and click “Open”.
4 VMware Player will open a
virtual machine and power
it on automatically. A dialog
box will appear if it is your
first time running the file
SKQS.vmx, just select
“Create” and click “OK” to
continue.
20
The Electronic Version of Siku Quanshu (Intranet Version)(Version 3.0) Server Side
5 A Linux server will start
after the configuration file
is opened. SKQS Server
is actually residing inside
this Linux server. When
the login page appears,
do not attempt to login to
the server, just leave it
running. SKQS Server is
now working.
3.6 Shutting Down (Restarting) SKQS Server in VMware Player
1 In the login page, click
“Shut Down” (“Restart”).
2 In the confirmation window,
click “Shut Down” (“Restart”). VMware Player will
shut down (restart) SKQS
Server automatically.
The Electronic Version of Siku Quanshu (Intranet Version)(Version 3.0) Server Side
21
3.7 Changing the Memory Allocation in VMware Player
1 Select “Player” “Troubleshoot” “Change Memory
Allocation”.
2 In the “Memory” window,
you can change the memory
allocation of this virtual
Linux Server. The memory
size must be a multiple of
4 MB. The recommended
memory size for running
SKQS Server is 1024MB
or above.
22
The Electronic Version of Siku Quanshu (Intranet Version)(Version 3.0) Server Side
3.8 Changing the VMware Player Preferences Settings
1 S e l e c t
“Player”
“Preferences”.
2 In the “VMware Player
Preferences” window,
change the settings
according to the right
figure. Click “OK” when
you are finished.
3.9 Uninstalling VMware Player
1 Click “Start”
“Settings”
“Control Panel”. In the “Control Panel” window,
double-click the “Add or Remove Programs” icon.
2 In the “Add or Remove Programs” window, select the item “VMware Player”
and click “Remove”.
The Electronic Version of Siku Quanshu (Intranet Version)(Version 3.0) Server Side
23
3.10 Run SKQS Server as Windows Service
1 Please run SKQS Server once before making SKQS Server as Windows
service.
2 Go to the copied folder “SKQS_Intranet” “Utility”
double-click the file SKQS Server Service.exe.
“Service Installation”,
3 In the “SKQS Server Service” window, click “Install”.
4 When the installation is completed, SKQS Server will be run as Windows
service during next Windows startup.
3.11 Remove SKQS Server Service
1 Go to the copied folder “SKQS_Intranet”
“Utility”
double-click the file SKQS Server Service.exe.
“Service Installation”,
2 In the “SKQS Server Service” window, click “Remove”.
3.12 Uninstalling SKQS Server Program
To uninstall SKQS Server Program, simply delete the “SKQS_Intranet” folder
stored in your computer local hard drive.
Note. It is recommended to remove the SKQS Server Service before deleting the “SKQS_
Intranet” folder.
24
The Electronic Version of Siku Quanshu (Intranet Version)(Version 3.0) Server Side
Chapter 4
User Guide for SKQS Server
Activation Program
4.1 Starting up the Program
1 Make sure the provided ACS USB Smart Card Reader is connected to the
USB port of your computer. SKQS Server Activation Program cannot be run
without the presence of the Smart Card Reader.
2 Select “Start”
“Programs”
“SKQS SAP”
“Server Activation Program”.
Note.If it is the first time running the program, there will be a message dialog asking whether the program should be run as Windows service. Select “Yes” to install
the service, or install it at a later time (see 4.3).
After the splash screen, a small SKQS icon will appear at the right-hand side
3 of the taskbar, indicating that SKQS Server Activation Program is running.
4.2 Closing the Program
1 Double-click or right-click the small SKQS icon of SKQS Server Activation
Program on the taskbar.
2 Click “Close” on the popup menu.
The Electronic Version of Siku Quanshu (Intranet Version)(Version 3.0) Server Side
25
4.3 Run Server Activation Program as
Windows Service
1 Select “Start”
“Programs”
Activation Program Service”.
“SKQS SAP”
“Service”
“Install Server
2 When the installation is completed, the program will be run as Windows service
during next Windows startup.
4.4 Remove Server Activation Program Service
Select “Start”
“Programs”
Activation Program Service”.
“SKQS SAP”
“Service”
“Remove Server
4.5 Troubleshooting
SKQS Server Activation program will not work if the Smart Card Reader is removed
from the computer. The small SKQS icon will turn into an exclamation mark,
indicating that the Smart Card Reader is not detected by the system.
To resume the program, simply plug the Smart Card Reader back to the same
USB port. When the program is resumed to normal, the small icon will turn back
to the image shown below.
If the small icon remains unchanged after plugging back the Smart Card Reader,
there is a possibility that the USB port is not the expected one. You may either
reconnect the Reader back to the right USB port, or restart SKQS Server Activation
26
The Electronic Version of Siku Quanshu (Intranet Version)(Version 3.0) Server Side
Program and let the program reconfigure automatically.
However, if there is no USB Reader driver installed for that new USB port before,
the “Found New Hardware Wizard” window will appear, please install the driver
before restarting the program. (Please refer to Chapter 1 Installation Guide for
SKQS Server Activation Program Section 1.2 Points 15 - 18 )
The Electronic Version of Siku Quanshu (Intranet Version)(Version 3.0) Server Side
27
Chapter 5
User Guide for SKQS Server
Administration Tool
5.1 Login
1 Open your web browser, enter the URL http://HOST_IP/admin/skqs where
HOST_IP is the specified domain name or IP address of the machine where
SKQS Server is installed.
2 On the login page, enter the user name and password of the Administrator,
and click “Login”.
5.2 Main Page
(a)Idle Time
Specify the idle time for user’s connection to the SKQS Intranet. Exceeding
the maximum idle time will result in user’s disconnection to the SKQS Intranet.
Idle time must be greater than “0”.
(b)Usage Time
Specify the maximum usage time for user’s connection to SKQS Intranet.
Exceeding the usage time will result in user’s disconnection to the SKQS
Intranet. Usage time must be greater than “0”.
28
The Electronic Version of Siku Quanshu (Intranet Version)(Version 3.0) Server Side
(c) Server Activation Program IP Address
Server Activation Program is used to activate SKQS Server. You must input
the correct IP address of Server Activation Program in order activate SKQS
Server.
(d)SKQS Server IP Address
You can change the SKQS Server IP address here. You have to restart SKQS
Server whenever you change the IP address. Please use the new IP address
to access Server Administration Tool afterwards.
(e)SKQS Server Subnet Mask
You can change the SKQS Server Subnet Mask here. You have to restart
SKQS Server whenever you change the subnet address.
(f) SKQS Server Gateway
You can change the SKQS Server Gateway here. You have to restart SKQS
Server whenever you change the gateway address.
(g)Admin Login Name
Specify the Administrator Login Name here. The default login name is
“Admin”.
(h)Admin Password
Specify the Administrator password here. The default password is
“123456”.
(i) Upload License Key magic.dat
The License Key magic.dat must be resided in SKQS Server for the purpose
of server activation. You have to upload it to SKQS Server.
To upload the file, click “Browse”, choose the file magic.dat from your computer
or the location where you saved it, and click “Upload”.
5.3 Consortium Member
This section is applicable only to users who have purchased the “Consortium
Edition”. Others please refer to “Institution Edition” in Section 5.4.
5.3.1 Consortium Member Account
To go to the Consortium Member Account page, choose “Consortium Member
Account” from the main menu bar.
The Electronic Version of Siku Quanshu (Intranet Version)(Version 3.0) Server Side
29
5.3.1.1 Adding a Member Account
1 On the “Consortium Member Account” page, click “Create Consortium
Member” to go to the “Create Consortium Member” page. Input all the necessary member information.
2 Select “Yes” for the “Share Statistic Info” item if the member agrees to share
its detailed statistical information with other members, otherwise select “No”
for limited review.
3 Click “Save” when finished.
Note. A member account cannot be deleted once created, but you can disable it by changing its status to “Inactive”.
The Login Name and Password of Consortium member are for access to Statistical
Report Tool only (See Chapter 6), not the SKQS Intranet.
30
The Electronic Version of Siku Quanshu (Intranet Version)(Version 3.0) Server Side
5.3.1.2 Editing a Member Account
1 On the “Consortium Member Account” page, select your desired member
account by clicking the radio button under the “Select” column, and click
“Edit”.
2 On the “Edit Consortium Member” page, modify any information of the selected
member.
Note. If the member status is set to “Inactive”, all the related user accounts
and authorized IP addresses in Server Administration Tool will also be set to
inactive.
3 Click “Save” when finished.
5.3.2 Consortium Member Authorized IP Address Range
A consortium Member can use the IP address specified under the Authorized
IP Address Range to access Statistical Report Tool. (See Chapter 6 Statistical
Report Tool)
On the “Consortium Member Account” page, select the desired member, then
click “View Authorized IP Address Range” to go to the corresponding page.
The Electronic Version of Siku Quanshu (Intranet Version)(Version 3.0) Server Side
31
5.3.2.1 Adding an Authorized IP Address Range
On the “View Authorized IP Address Range” page, click “Create Authorized IP
Address Range”. Input the starting IP and ending IP address, and click “Save”
when finished.
5.3.2.2 Deleting an Authorized IP Address Range
On the “View Authorized IP Address Range” page, select the desired IP address
range by clicking the radio button under the “Select” column, and click “Delete”
to delete.
Note. All the excluded IP address range records under this deleted IP address range will
also be deleted simultaneously.
5.3.2.3 Setting the Excluded IP Address Range
1 On the “Consortium Member Account” page, select a desired member, then
click “View Authorized IP Address Range”.
2 On the “View Authorized IP Address Range” page, select the desired IP
address range and click “View Excluded IP Address Range”. The “Excluded
IP Address Range” will appear.
32
The Electronic Version of Siku Quanshu (Intranet Version)(Version 3.0) Server Side
5.3.2.4 Adding an Excluded IP Address Range
On the “Excluded IP Address Range” page, click “Create Excluded IP Address
Range”. Input all the necessary information and click “Save” when finished.
5.3.2.5 Deleting an Excluded IP Address Range
On the “View Authorized IP Address Range” page, select the desired IP range
by clicking the radio button under the “Select” column, and click “Delete” to
delete.
5.3.3 Authorized User Account
The administrator can create a user account for each member to access the
SKQS Intranet.
Note. A user account cannot be deleted once created, but you can disable it.
To go to the “Authorized User Account” page, choose “Authorized User Account”
from the main menu bar.
The Electronic Version of Siku Quanshu (Intranet Version)(Version 3.0) Server Side
33
5.3.3.1 Adding an Authorized User Account
On the “Authorized User Account” page, click “Create Account”. Input all the
necessary information and click “Save” when finished.
5.3.3.2 Editing an Authorized User Account
On the “Authorized User Account” page, select the desired user account and click
“Edit”. Edit the necessary information and click “Save” when finished.
5.3.4 Authorized IP Address Range
Apart from using user account to login to the SKQS Intranet, users can also access
the SKQS Intranet by means of IP authentication. Through IP authentication,
users do not need to enter login name and password.
The administrator can specify authorized IP address ranges and excluded IP
address ranges for users.
To go to the “Authorized IP Address Range” page, choose “Authorized IP Address
Range” from the main menu bar.
34
The Electronic Version of Siku Quanshu (Intranet Version)(Version 3.0) Server Side
5.3.4.1 Adding an Authorized IP Address Range
1 On the “Authorized IP Address Range” page, select the desired member
account by clicking the radio button under the “Select” column, and click
“Create Authorized IP Address Range”.
2 Input all the necessary information and click “Save” when finished.
5.3.4.2 Editing an Authorized IP Address Range
1 On the “Authorized IP Address Range” page, select the desired member account by clicking the radio button under the “Select” column, and click “Edit”.
2 Modify the necessary information and click “Update” when finished.
5.3.4.3 Setting the Excluded IP Address Range
On the “Authorized IP Address Range” page, select the desired member account
by clicking the radio button under the “Select” column, and click “View Excluded
IP Address Range” to go to the “Excluded IP Address Range” page.
The Electronic Version of Siku Quanshu (Intranet Version)(Version 3.0) Server Side
35
5.3.4.4 Adding an Excluded IP Address Range
1 On the “Excluded IP Address Range” page, click “Create Excluded IP Address
Range” to go to the “Create Excluded IP Address Range” page.
2 Input all the necessary information and click “Save” when finished.
5.3.4.5 Deleting an Excluded IP Address Range
On the “Excluded IP Address Range” page, select the desired IP address by
clicking the radio button under “Select” column, and click “Delete” to delete.
5.4 Institution Edition
5.4.1 Authorized User Account
The administrator can create authorized user accounts for users to access the
SKQS Intranet. Authorized user accounts cannot be deleted once created but
can be disabled.
To go to the “Authorized User Account” page, choose “Authorized User Account”
from the main menu bar.
36
The Electronic Version of Siku Quanshu (Intranet Version)(Version 3.0) Server Side
5.4.1.1 Adding a User Account
On the “Authorized User Account” page, click “Create Account” to go to the
corresponding page. Input all the necessary information and click “Save” when
finished.
5.4.1.2 Editing a User Account
1 On the “Authorized User Account” page, select the desired account by clicking
the radio button under the “Select” column, click “Edit” to go to the edit page.
2 Edit the account information and click “Save” when finished.
5.4.2 Authorized IP Address Range
Apart from using user account to login to the SKQS Intranet, users can also access
the SKQS Intranet by means of IP authentication. Through IP authentication,
users do not need to enter login name and password.
The administrator can specify authorized IP address ranges and excluded IP
address ranges for users.
To go to the “Authorized IP Address Range” page, choose “Authorized IP Address
Range” from the main menu bar.
The Electronic Version of Siku Quanshu (Intranet Version)(Version 3.0) Server Side
37
5.4.2.1 Adding an Authorized IP Address Range
1 On the “Authorized IP Address Range” page, click “Create Authorized IP
Address Range”.
2 Input all the necessary information and click “Save” when finished.
5.4.2.2 Editing an Authorized IP Address Range
1 On the “Authorized IP Address Range” page, select the desired IP address
range by clicking the radio button under the “Select” column, and click “Edit”.
2 Modify the necessary information and click “Update” when finished.
5.4.2.3 Setting the Excluded IP Address Range
On the “Authorized IP Address Range” page, select the desired IP Address Range
by clicking the radio button under the “Select” column, and click “View Excluded
IP Address Range” to go to the “Excluded IP Address Range” page.
38
The Electronic Version of Siku Quanshu (Intranet Version)(Version 3.0) Server Side
5.4.2.4 Adding an Excluded IP Address Range
On the “Excluded IP Address Range” page, click “Create Excluded IP Address
Range” to go to the corresponding page. Input all the necessary information and
click “Save” when finished.
5.4.2.5 Deleting an Excluded IP Address Range
On the “Excluded IP Address Range” page, select the desired IP address by
clicking the radio button under the “Select” column, and click “Delete” to delete.
5.5 Black List
SKQS Intranet applies a rule of thumb to detect any malicious use of the system.
Malicious use includes massive data download. Once a user account or an IP
address is found suspicious, SKQS Intranet will put it in the black list and block
its access to the system.
To view the black list, choose “Black List” from the main menu bar. Three options
are available, which are “Account Black List”, “IP Address Black List” and “Black
List Log”.
The Electronic Version of Siku Quanshu (Intranet Version)(Version 3.0) Server Side
39
5.5.1 Account Black List
All blacklisted user accounts can be found here. To remove any user accounts
from the list, select the desired accounts by clicking the radio button and click
“Remove”.
5.5.2 IP Address Black List
All blacklisted IP addresses can be found here. To remove any IP addresses
from the list, select the desired IP addresses by clicking the radio button and
click “Remove”.
5.5.3 Black List Log
The Black List Log will log down all the actions applied to the Black List, including
adding or removing any blacklist records.
40
The Electronic Version of Siku Quanshu (Intranet Version)(Version 3.0) Server Side
Chapter 6
User Guide for SKQS Statistical
Report Tool
6.1 Login
1 Open your web browser, enter the URL http://HOST_IP/report/skqs where
HOST_IP is your specified domain name or IP address of the machine where
SKQS Server is installed.
2 (a) For Consortium Edition, members can login the system by using either the member user account or the authorized IP address.
(b) For Institution Edition, users can use the administrator account
of Server Administration Tool to login to the Statistical Report Tool.
6.2 Report
(a) Consortium Member List (appears and is applicable to Consortium Edition only)
A list of Consortium members is displayed, with the indication of their options on sharing of detailed statistic information.
The Electronic Version of Siku Quanshu (Intranet Version)(Version 3.0) Server Side
41
(b) Consortium Member (appears and is applicable to Consortium Edition only)
Select either a particular member or all consortium members to be
included in the report.
(c) Start Date and End Date
Specify the start date and the end date of the report.
(d) Type
There are five types of report:
* Login
* Search
* Book Browse
* Dictionary Search
* Correlated Word Search
(e) Record
Each type of report offers different kinds of record, details see 6.2.1 - 6.2.5.
(f) Calculation
Each type of report offers different kinds of calculation, details see 6.2.1 - 6.2.5.
6.2.1 Login Report
Login Report provides statistical information on user login to the SKQS Intranet.
(a) Record
* All Logins
* Usage Time Per Day
* Usage Time Per Each User
* Current Login
(b) Calculation
* Total Number Of Logins
* Number Of Logins Per Day
* Usage Time Per Day
* Usage Time Per Login
* Total Usage Time
* Total Number Of Login Failures
42
The Electronic Version of Siku Quanshu (Intranet Version)(Version 3.0) Server Side
6.2.2 Search Report
Search Report provides statistical information on users performing search.
(a) Record
* All Searches
* All Search Records with Matches
* Search Record For Each User
(b) Calculation
* Total Number Of Searches
* Number Of Searches Per Day
6.2.3 Book Browse Report
Book Browse Report provides statistical information on users using Book Browse.
(a) Record
* All Book Browses
* Book Browse Record For Each User
(b) Calculation
* Total Number Of Book Browses
* Number Of Book Browses Per Day
6.2.4 Dictionary Search Report
Dictionary Search Report provides statistical information on users using Dictionary
Search.
(a) Record
* All Dictionary Searches
* Dictionary Search Record For Each User
(b) Calculation
* Total Number Of Dictionary Searches
* Number Of Dictionary Searches Per Day
6.2.5 Correlated Word Search Report
Correlated Word Search Report provides statistical information on users using
Correlated Word Search.
(a) Record
* All Correlated Word Searches
* Correlated Word Search For Each User
(b) Calculation
* Total Number Of Correlated Word Searches
* Number Of Correlated Word Searches Per Day
The Electronic Version of Siku Quanshu (Intranet Version)(Version 3.0) Server Side
43