1
Page intentionally blank
Replace with cover artwork
Copyright © 2000
Proprietary Notice
ARM, the ARM Powered logo, Thumb, and StrongARM are registered trademarks of ARM Limited.
The ARM logo, AMBA, Angel, ARMulator, EmbeddedICE, ModelGen, Multi-ICE, PrimeCell, ARM7TDMI, ARM7TDMI-S, ARM9TDMI, ARM9E-S, ARM946E-S,
ARM966E-S, ETM7, ETM9, TDMI, and STRONG are trademarks of ARM Limited.
All other products or services mentioned herein may be trademarks of their respective owners.
Neither the whole nor any part of the information contained in, or the product described in, this document may be adapted or reproduced in any material form
except with the prior written permission of the copyright holder.
The product described in this document is subject to continuous developments and improvements. All particulars of the product and its use contained in this
document are given by ARM in good faith. However, all warranties implied or expressed, including but not limited to implied warranties of merchantability, or
fitness for purpose, are excluded.
This document is intended only to assist the reader in the use of the product. ARM Limited shall not be liable for any loss or damage arising from the use of any
information in this document, or any error or omission in such information, or any incorrect use of the product.
Contents
Introduction ...................................................................................................................................................1
Setting-up the Software and Hardware.........................................................................................................2
Building a Sample Application ......................................................................................................................4
Downloading the Image ................................................................................................................................6
Running the Sample Application...................................................................................................................9
Debugging an Application ...........................................................................................................................10
Further Information .....................................................................................................................................11
Warranty Information ..................................................................................................................................12
References .................................................................................................................................................13
Evaluator-7T Installation Guide
1
Introduction
This booklet introduces the Evaluator-7T (ARM evaluation board).
The Evaluator-7T allows you to quickly familiarize yourself with the tools, environments, and products
available from ARM. It enables you to work through the stages required to build an ARM-based embedded
system.
To assist you, the Evaluator-7T package includes several example applications for you to compile, link,
download, debug, and extend.
In addition to this document, the Evaluator-7T package contains:
•
ARM Developer Suite (ADS) Free Evaluation Version v1.0.1, or later, CD-ROM
•
ARM Evaluator-7T Board Tools and Documentation CD-ROM
•
9-pin straight through RS-232 serial cable
•
Evaluator-7T board
•
9V power adapter.
Caution
If you already have a full version of the ADS do not install the ADS evaluation CD-ROM supplied with the
Evaluator-7T.
1.1
ARM Developer Suite CD-ROM
The CD-ROM contains an evaluation version of ADS. Evaluation ADS is a fully functional software
development toolkit that times out 45 days after installation. It requires Microsoft Windows 95, 98, NT 4.0,
or Windows 2000. See the CD-ROM packaging for system requirements and installation instructions.
1.2
ARM Evaluator-7T Board Tools and Documentation CD-ROM
This CD-ROM contains an assortment of tools, documentation, and example application source code
specific to the Evaluator-7T board. The contents of this CD-ROM include the following PDF documents:
•
Evaluator-7T Installation Guide (ARM DGI 0006)
•
ARM Evaluator-7T User Guide (ARM DUI 0134)
•
Samsung KS32C50100 Embedded Microcontroller User’s Guide v0.3 or later.
ARM DGI 0006A
Copyright © 2000 ARM Limited. All rights reserved.
1
Evaluator-7T Installation Guide
2
Setting-up the Software and Hardware
This section guides you through the steps necessary to prepare to work with the ARM Evaluator-7T.
2.1
Installing the Evaluator-7T tools and documentation
To install the Evaluator-7T tools and documentation:
1. Place the Evaluator-7T Tools and Documentation CD-ROM into the CD-ROM drive.
The tools and documentation installation software automatically loads and executes.
If this is not the case, select Run from the Start menu, and enter F:\setup.exe (where F is your
CD-ROM drive.
2. Select the drive and directory into which the software is to be installed. For example:
c:\Evaluator7T.
3. Follow the displayed prompts to complete the installation procedure.
4. Now follow the installation procedure for the ADS Evaluation Version as described in Installing the ADS
evaluation software.
2.2
Installing the ADS evaluation software
Refer to the CD-ROM packaging for instructions on how to install the ADS Evaluation Version.
When the installation is complete, you have installed a working evaluation version of ADS, all the tools, and
documents for the board.
2
Copyright © 2000 ARM Limited. All rights reserved.
ARM DGI 0006A
Evaluator-7T Installation Guide
2.3
Setting up the Evaluator-7T hardware
The Evaluator-7T is supplied with a 9-pin to 9-pin straight through serial cable. If you have a 25-pin
connector on your PC, a 9-pin to 25-pin male to female straight through adapter is required.
To set up the Evaluator-7T hardware:
1. Connect the serial cable between the COM1 Debug port on the Evaluator-7T and the host PC. Make a
note of the serial port that you use. This is important when you use the debugger.
2.
Connect the power adapter to the power connector on the Evaluator-7T (9V nominal, center pin
positive).
3. Connect the power adapter to the power socket.
The yellow LED on the seven-segment display lights to indicate that the power is on.
4. Press the System Reset button on the Evaluator-7T. The four general-purpose LEDs flicker and the
green LED D1 remains on. This indicates the board has been initialized and is working correctly.
Refer to the ADS Developer Guide (directory C:\ADS100\Pdf), the Evaluator-7T User Guide, and the
Multi-ICE User Guide for more information.
2.4
Initialization information
When the Evaluator-7T is powered on or reset, initialization code sets up the board. For ARM processor
based boards, initialization is performed by µHAL and the Angel debug monitor. When initialization is
complete, the board is ready to communicate with the host PC.
For the Evaluator-7T, a bootstrap loader is preloaded into the flash memory so that when the board is
powered on (or reset) the bootstrap loader initializes the board. If the initialization is successful, a green
LED on the board is constantly lit, indicating that the Evaluator-7T is ready for a program image to be
downloaded.
ARM DGI 0006A
Copyright © 2000 ARM Limited. All rights reserved.
3
Evaluator-7T Installation Guide
3
Building a Sample Application
The following procedure describes how to build a sample application, using CodeWarrior Integrated
Development Environment (IDE) from Metrowerks supplied with Evaluation ADS.
1. Start CodeWarrior from the Windows Start->Programs->ARM Developer Suite menu.
2. When CodeWarrior has loaded, select Open from the File menu option. The Open dialog window is
displayed.
3. Find the Pascal’s Triangle example, which is located in the same directory as the Evaluator-7T tools
and documentation, for example: c:\Evaluator7T\source\examples\pascal
4. Select the project file, pascal (filename pascal.mcp ), from the pascal directory.
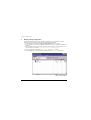
5. Press the Open button. A project window is displayed with the title pascal.mcp (see Figure 1).
Figure 1 Project window
4
Copyright © 2000 ARM Limited. All rights reserved.
ARM DGI 0006A
Evaluator-7T Installation Guide
6.
Select the Make option from the Project menu. The Pascal’s Triangle is compiled and linked. You can
now download the debug image of Pascal’s Triangle to the Evaluator-7T board, as described in
Downloading the Image on page 6.
Note
For more information about CodeWarrior, refer to the online help provided with the software, or to the ARM
Developer Suite CodeWarrior IDE User Guide. This is located in the directory in which you installed ADS,
for example: c:\ADS100\Pdf.
ARM DGI 0006A
Copyright © 2000 ARM Limited. All rights reserved.
5
Evaluator-7T Installation Guide
4
Downloading the Image
When you download an image, you transfer the code in the debug image from your host PC to the
Evaluator-7T. The image can then be executed under the control of the ARM eXtended Debugger (AXD).
After building the image (as described in Building a Sample Application on page 4):
1. Press the System Reset button on the Evaluator-7T board.
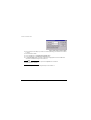
2. From CodeWarrior, select Debug from the Project menu to download the Pascal’s Triangle example
image. This launches the ARM eXtended Debugger (AXD). The Choose Target dialog box is displayed
(see Figure 2).
3.
4.
5.
6.
6
Figure 2 Choose Target dialog
In AXD, click on the Add button.
Select remote_a.dll from the Open dialog box. This installs the driver that is used to communicate
with the Evaluator-7T.
In the Choose Target dialog, ensure that ADP/Remote_A.dll is selected and then click on
Configure. The Remote_A Connection dialog is displayed.
Click on the Select button. The Available Connection Driver dialog box is displayed.
Copyright © 2000 ARM Limited. All rights reserved.
ARM DGI 0006A
Evaluator-7T Installation Guide
7.
8.
Select the ARM serial driver then click on OK button.
The Remote_A Connection dialog is displayed (see Figure 3).
9.
Figure 3 Remote_A Connection dialog
Now click on the Configure button. The Setup serial communication dialog box is displayed (see
Figure 4 on page 8).
ARM DGI 0006A
Copyright © 2000 ARM Limited. All rights reserved.
7
Evaluator-7T Installation Guide
Figure 4 Setup serial connection dialog
10. Set the serial port to the COM port you used on the host PC (see Setting up the Evaluator-7T hardware
on page 3).
11. Set the buad rate to 38400
12. Click on the OK button in the Setup serial connection dialog.
13. Click on the OK button in the Remote_A connection dialog.
14. In the Choose Target dialog, ensure that the ADP option is highlighted and click on the OK button.
AXD starts to download the image to the Evaluator-7T.
Note
If this fails select the Configure Target... option from the Options menu of AXD and
reconfigure the COM or baud rate.
You are now ready to run the Pascal’s Triangle example on the Evaluator-7T.
8
Copyright © 2000 ARM Limited. All rights reserved.
ARM DGI 0006A
Evaluator-7T Installation Guide
5
Running the Sample Application
It is asumed that you have completed the steps described in Building a Sample Application on page 4 and
Downloading the Image on page 6.
To start the Pascal’s Triangle example from AXD:
1. Select Go from the Execute menu.
The program stops at the main()C function.
2. Select Go again.
The LEDs on the Evaluator-7T flash once and the console window of AXD displays the following:
*** Pascal’s Triangle ***
1
1 1
1 2 1
1 3 3 1
1 4 6 4 1
************************************************************
** NOTE: Close the debugger and Reset the board **
************************************************************
ARM DGI 0006A
Copyright © 2000 ARM Limited. All rights reserved.
9
Evaluator-7T Installation Guide
6
Debugging an Application
To debug the sample application, follow only steps 1 and 2 of the download procedure again (see
Downloading the Image on page 6). Then from AXD:
1. Select Go from the Execute menu. The program stops at the main()function.
2. Scroll up to the pascal_triangle function in the Executing pascal.c window.
3. Click on the line containing for (j=1;j<depth;j++){
4. Select Toggle Breakpoint from the Execute menu.
5. The for (j=1;j<depth;j++){ line has a red dot. At this point the Evaluator-7T board lights D1, D2,
and D3 LEDs.
6. Select Go again from the Execute menu. The debugger executes all the lines of code between the
current point and the breakpoint. When the breakpoint is encountered, the debugger halts the program.
Only D1 and D2 are active.
7. Select Variables from the Processor Views menu. All the local variables in the pascal_triangle
function are displayed.
8. Select Go from the Execute menu. The program continues until completion.
Note
For more information about AXD Debugger, refer to the online help provided with the software or to the ARM
Developer Suite Debuggers Guide. This is located in the directory in which you installed ADS, for example:
c:\ADS100\Pdf.
10
Copyright © 2000 ARM Limited. All rights reserved.
ARM DGI 0006A
Evaluator-7T Installation Guide
7
Further Information
An email list server is provided by ARM so that you can share information with other Evaluator-7T users. To
subscribe, send an email to [email protected]. The list server will reply, welcoming
you to the Evaluator-7T email group. You can query other Evaluator-7T users by sending email to
[email protected].
To unsubscribe, send an email to [email protected].
For additional information on CodeWarrior IDE and AXD use the online help provided with ADS.
ARM DGI 0006A
Copyright © 2000 ARM Limited. All rights reserved.
11
Evaluator-7T Installation Guide
8
Warranty Information
The Evaluator-7T has been sold without any warranty, including without limiting the implied warranties of
merchantability, non-infringement, and fitness for a particular purpose. The Evaluator-7T is provided without
support.
In the case of a faulty component, ARM will replace that item or the complete unit, depending on the severity,
up to 60 days from the date of purchase.
The provision in this section shall constitute ARM’s exclusive liability and sole remedy for any and all
damages resulting from the use of the Evaluator-7T.
12
Copyright © 2000 ARM Limited. All rights reserved.
ARM DGI 0006A
Evaluator-7T Installation Guide
9
References
This section provides references to further information.
9.1
ARM documentation
•
•
•
•
•
•
•
•
9.2
Evaluator-7T User Guide (ARM DUI 0134)
ARM Developer Suite - Debugger Guide (ARM DUI 0066)
ARM Developer Suite - Debug Target Guide (ARM DUI 0058)
ARM Developer Suite - Developer Guide (ARM DUI 0056)
ARM Developer Suite - Getting Started (ARM DUI 0064)
ARM Developer Suite - CodeWarrior IDE Guide (ARM DUI 0065)
ARM Developer Suite - Tools Guide (ARM DUI 0067)
ARM Multi-ICE User Guide (ARM DUI 0048).
Recommended website
Documentation section and Development Support section on the ARM website:
http://www.arm.com
9.3
Recommended books
•
•
9.4
ARM Architecture Reference Manual, edited by Dave Jaggar, ISBN 0-13-736299-4
ARM System Architecture, by Steve Furber, ISBN 2-201-40352-8.
Further reading
•
Samsung KS32C50100 Embedded Network Controller User’s Manual v0.3
ARM DGI 0006A
Copyright © 2000 ARM Limited. All rights reserved.
13
Page intentionally blank
Replace with cover artwork