1
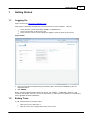
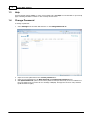
Train
User Manual
© 2013 LMP
All rights reserved. No parts of this work may be reproduced in any form or by any means graphic, electronic, or mechanical, including photocopying, recording, taping, or information
storage and retrieval systems - without the written permission of the publisher.
Products that are referred to in this document may be either trademarks and/or registered
trademarks of the respective owners. The publisher and the author make no claim to these
trademarks.
While every precaution has been taken in the preparation of this document, the publisher and the
author assume no responsibility for errors or omissions, or for damages resulting from the use of
information contained in this document or from the use of programs and source code that may
accompany it. In no event shall the publisher and the author be liable for any loss of profit or any
other commercial damage caused or alleged to have been caused directly or indirectly by this
document.
The text of this manual is subject to change without notice. The current version of the manual is
available from the Train documentation page: www.lmp.co.uk/train_docs.html
© 2013 LMP
Contents
I
Table of Contents
Part I Getting Started
3
1 Logging
...................................................................................................................................
On
3
2 Exiting ...................................................................................................................................
Train
3
3 Help
................................................................................................................................... 4
4 Change...................................................................................................................................
Password
4
5 Recent ................................................................................................................................... 5
Part II Report
10
1 User Comments
................................................................................................................................... 11
Part III Alert
14
1 Items Overdue
................................................................................................................................... 15
2 Items with
...................................................................................................................................
Actions
15
3 Items Not
...................................................................................................................................
Available
16
Part IV History
18
Part V Calendar
22
Part VI Graph
26
Part VII Search
30
Part VIII Locations
34
Part IX Settings
38
Index
© 2013 LMP
43
I
Getting Started
Part
I
Getting Started
1
Getting Started
1.1
Logging On
3
Train is accessed via: https://www.hsbtrain.co.uk/.
Train requires a Username and Password to be entered before access is allowed. This is to:
ensure that the correct data is made available to individual users,
protect the integrity of data stored, and
ensure that the correct security settings are applied to prevent misuse of the system.
Logon Screen
1.
2.
Enter the login name and password (as provided by LMP or the System Administrator) into the
appropriate boxes.
Click SUBMIT.
NOTE: Usernames and passwords within Train are not case sensitive – "M.BROWN", "M.Brown", and
"m.brown" are all valid. However, the use of punctuation, or spaces between characters, is relevant and
where applicable should be maintained.
1.2
Exiting Train
To exit Train and close the program, either:
Click Logout on the Menu Bar, or
Click the cross in the top right hand corner of the screen.
© 2013 LMP
4
1.3
Train (Web Version)
Help
Context-sensitive help is available on every screen within Train. Click Help? on the Menu Bar to open a help
page containing information relevant to the currently viewed screen.
1.4
Change Password
To change a password:
1.
Select Settings from the Menu Bar and move to the Change Password tab:
2.
3.
4.
Input the current password into the Current password box.
Input the new password into the New password and Confirm new password boxes.
Click Update Password. (HINT: If the current password was input incorrectly or the two instances of
the new password do not match an error message will display. Overtype the incorrect entry and click
Updated Password again).
© 2013 LMP
Getting Started
1.5
Recent
After logging in, Train will open onto the "Recent" screen:
© 2013 LMP
5
6
Train (Web Version)
To view a report, double click on the appropriate summary details:
Once the report has been viewed, click Recent or the web browser back button to the Recent screen.
© 2013 LMP
Getting Started
7
By default, the Recent screen displays a list of reports received within the last 14 days. This time-frame can
be changed to 1, 5, 7, 14, 21, 28 or 35 days:
1.
Select Settings from the Menu Bar:
2.
3.
Choose the required number of days from the Recent Reports Screen drop-down box.
Click Apply Changes.
Return to the Recent screen. This will now have updated to reflect the change made.
Report Listing
The Report Listing offers a number of options. Right-click in the Data Area to view the options menu:
Reload
This option forces the screen to refresh.
Save
To save the currently displayed report listing:
1.
2.
© 2013 LMP
Right-click in the Data Area of the screen.
Select "Save" from the subsequent menu.
8
Train (Web Version)
3.
4.
Navigate to the location in which the file is to be saved, select the appropriate file type from the dropdown list and set a file name.
Click Save.
Edit Displayed Data
Edit Displayed Data allows the customisation of information presented on the report listing.
To add fields to a view:
1.
2.
3.
4.
5.
Right-click in the Data Area.
Select "Edit Displayed Data" from the subsequent menu.
The Customize Columns box will open. Fields already visible on the screen are indicated by a tick in the
'Visible' column.
Place/remove ticks against the field names as required.
Close the Customize Columns box (click the cross in the top right hand corner) to apply the changes.
Show Filter
The Show Filter option allows the creation of a filter against the fields displayed on the current screen.
Clear Filter
The Clear Filter option removes any filter that has been applied to the screen. An empty filter row will appear
until the screen is refreshed.
© 2013 LMP
Report
Part
II
10
2
Train (Web Version)
Report
To view a report, either double-click on the appropriate report details in the data area of the screen or
highlight a report and click "Report" on the Menu Bar. The selected report will be displayed in a similar format
to a paper version:
Normally, the entire report will not fit onto the screen, so a scroll bar at the right hand edge allows a view of
the whole report to be obtained through scrolling up or down.
Printing, Emailing or Saving a report
Use the normal controls within your PDF viewer to print, email or save a copy of the report.
© 2013 LMP
Report
2.1
11
User Comments
The User Comments tab offers additional report viewing/downloading options as well as the facility to record
information against the report.
Open Report Window
The Open Report Window option will force the report to display in a PDF viewer outside Train.
Download Report
Download Report allows the report to be saved to the local computer. Once saved, the report can be
emailed from the saved location.
User Comments
Uniquely, electronic reporting offers a User Comments section as a separate tab. This enables the tracking of
actions performed as a result of the report, a User Status to be added, and also allows the action and
overdue reminders for a particular report to be cleared:
Available actions:
Field Name
Action
User Status
Select from The status selected will be stored against the current report.
the dropdown list
Remove from
Overdue List
Single click
Once selected, the current report will no longer appear on the "Overdue
Inspection" list of the Alert screen.
Remove Actions
Single click
Once selected the current report will no longer appear on the
© 2013 LMP
Result
12
Train (Web Version)
Reminder
User Comments
"Outstanding Defects" list of the Alert screen.
Text entry
Click into the box under "User Comments" and input the required text.
Information input here will be stored against the current report.
Save Changes
Click the Save Changes button to store any changes against the current report.
© 2013 LMP
Alert
Part
III
14
3
Train (Web Version)
Alert
Choose Alert on the Menu Bar to open the Alert screen. Alert offers an overview, via three tabs, of reports
of inspections which:
have overdue reports listed against them are require a more recent inspection report (Items Overdue)
require remedial action by the owner/user of the plant (Items with Actions)
could not have an examination carried out (Items Not Available)
By default, the Alert screen opens on the Items Overdue tab.
Report Listing
The Report Listing offers a number of options. Right-click in the Data Area to view the options menu:
Reload
This option forces the screen to refresh.
Save
To save the currently displayed report listing:
1.
Right-click in the Data Area of the screen.
© 2013 LMP
Alert
2.
3.
4.
15
Select "Save" from the subsequent menu.
Navigate to the location in which the file is to be saved, select the appropriate file type from the dropdown list and set a file name.
Click Save.
Edit Displayed Data
Edit Displayed Data allows the customisation of information presented on the report listing.
To add fields to a view:
1.
2.
3.
4.
5.
Right-click in the Data Area.
Select "Edit Displayed Data" from the subsequent menu.
The Customize Columns box will open. Fields already visible on the screen are indicated by a tick in the
'Visible' column.
Place/remove ticks against the field names as required.
Close the Customize Columns box (click the cross in the top right hand corner) to apply the changes.
Show Filter
The Show Filter option allows the creation of a filter against the fields displayed on the current screen.
Clear Filter
The Clear Filter option removes any filter that has been applied to the screen. An empty filter row will appear
until the screen is refreshed.
3.1
Items Overdue
Details of assets which are overdue for inspection are displayed on the Items Overdue tab.
Clearing Overdue Inspections
Overdue inspections are automatically cleared from the Alert screen when a new report is received.
However, where an asset has been scrapped or moth-balled, its details may be removed from the Items
Overdue or Items Not Available tabs by amending the User Comments tab on the last received report:
1.
2.
3.
4.
5.
3.2
Double-click on the required item to view the last received report.
Select the User Comments tab at the top of the screen.
Click into the "Remove from Overdue List" tick box.
Add any necessary detail in the User Comments field.
Click the Save Changes button.
Items with Actions
Repair Threshold
Four levels of repair categorisation are offered by Train. The repair thresholds are:
Immediate Repairs only - statutory repairs requiring immediate attention
Immediate and Time Qualified Repairs - as above, plus time-qualified statutory repairs
Repairs and Defects - as above, plus non time-qualified or non-statutory repairs.
All Repairs and Observations - as above, plus comments made by the inspector/surveyor.
Outstanding Repairs
Repair information is automatically cleared from the Alert screen when a new report which does not list any
repairs is received. Where an asset is repaired following an inspection, it is possible to remove it from the
Outstanding Repairs screen:
1.
2.
3.
4.
© 2013 LMP
Double-click on the required item to view the last received report.
Select the User Comments tab at the top of the screen.
Click into the "Remove Actions Reminder" tick box.
Add any necessary detail in the User Comments field.
16
Train (Web Version)
5. Click the Save Changes button.
3.3
Items Not Available
Reports listed on the Items Not Available tab are reports of non-inspection. Reasons for the non-inspection
are detailed within individual reports. Contact details are included within each report in order to rearrange the
inspection.
© 2013 LMP
History
Part
IV
18
4
Train (Web Version)
History
The History screen provides detailed information on a selected item of plant and displays all reports that have
been received for the selected item.
HINT: To view the History screen, a report for the relevant item must have been viewed. If a report has not
been viewed clicking the History Menu option will have no effect.
Report Listing
The Report Listing offers a number of options. Right-click in the Data Area to view the options menu:
Reload
This option forces the screen to refresh.
Save
To save the currently displayed report listing:
1.
2.
3.
Right-click in the Data Area of the screen.
Select "Save" from the subsequent menu.
Navigate to the location in which the file is to be saved, select the appropriate file type from the dropdown list and set a file name.
© 2013 LMP
History
4.
19
Click Save.
Edit Displayed Data
Edit Displayed Data allows the customisation of information presented on the report listing.
To add fields to a view:
1.
2.
3.
4.
5.
Right-click in the Data Area.
Select "Edit Displayed Data" from the subsequent menu.
The Customize Columns box will open. Fields already visible on the screen are indicated by a tick in the
'Visible' column.
Place/remove ticks against the field names as required.
Close the Customize Columns box (click the cross in the top right hand corner) to apply the changes.
Show Filter
The Show Filter option allows the creation of a filter against the fields displayed on the current screen.
Clear Filter
The Clear Filter option removes any filter that has been applied to the screen. An empty filter row will appear
until the screen is refreshed.
© 2013 LMP
Calendar
Part
V
22
5
Train (Web Version)
Calendar
The Calendar screen provides details of reports received within selected dates.
The upper portion of the screen allows the selection of a set of dates. This defaults to all inspected items
within the current year:
Once Show Reports has been clicked, the lower portion of the screen displays all inspection reports received
within the selected dates:
© 2013 LMP
Calendar
23
Click on the Year and Month selections to change the view to the required time frame.
Report Listing
The Report Listing offers a number of options. Right-click in the Data Area to view the options menu:
Reload
This option forces the screen to refresh.
Save
To save the currently displayed report listing:
1.
2.
3.
4.
© 2013 LMP
Right-click in the Data Area of the screen.
Select "Save" from the subsequent menu.
Navigate to the location in which the file is to be saved, select the appropriate file type from the dropdown list and set a file name.
Click Save.
24
Train (Web Version)
Edit Displayed Data
Edit Displayed Data allows the customisation of information presented on the report listing.
To add fields to a view:
1.
2.
3.
4.
5.
Right-click in the Data Area.
Select "Edit Displayed Data" from the subsequent menu.
The Customize Columns box will open. Fields already visible on the screen are indicated by a tick in the
'Visible' column.
Place/remove ticks against the field names as required.
Close the Customize Columns box (click the cross in the top right hand corner) to apply the changes.
Show Filter
The Show Filter option allows the creation of a filter against the fields displayed on the current screen.
Clear Filter
The Clear Filter option removes any filter that has been applied to the screen. An empty filter row will appear
until the screen is refreshed.
© 2013 LMP
Graph
Part
VI
26
6
Train (Web Version)
Graph
Graphical management information is presented on the Graph screen.
Five tabs are available:
Current Results - a pie chart showing a breakdown of the result of the last examination of each item of
plant with a Legend.
Results by Quarter - a bar chart with the result of the examinations carried out in each indicated period.
(Legend as displayed on Current Results screen). Hover over a bar to see a breakdown of the results.
Results by Year - a bar chart with the result of the examinations carried out in each indicated period.
(Legend as displayed on Current Results screen). Hover over a bar to see a breakdown of the results.
Due This Year - examinations still to be completed for the current year.
Due Next Year - examinations with a next inspection date of the next year.
For each tab, click on the relevant section of the graph to display a list of reports meeting the selection.
Report Listing
The Report Listing offers a number of options. Right-click in the Data Area to view the options menu:
Reload
© 2013 LMP
Graph
This option forces the screen to refresh.
© 2013 LMP
27
28
Train (Web Version)
Save
To save the currently displayed report listing:
1.
2.
3.
4.
Right-click in the Data Area of the screen.
Select "Save" from the subsequent menu.
Navigate to the location in which the file is to be saved, select the appropriate file type from the dropdown list and set a file name.
Click Save.
Edit Displayed Data
Edit Displayed Data allows the customisation of information presented on the report listing.
To add fields to a view:
1.
2.
3.
4.
5.
Right-click in the Data Area.
Select "Edit Displayed Data" from the subsequent menu.
The Customize Columns box will open. Fields already visible on the screen are indicated by a tick in the
'Visible' column.
Place/remove ticks against the field names as required.
Close the Customize Columns box (click the cross in the top right hand corner) to apply the changes.
Show Filter
The Show Filter option allows the creation of a filter against the fields displayed on the current screen.
Clear Filter
The Clear Filter option removes any filter that has been applied to the screen. An empty filter row will appear
until the screen is refreshed.
© 2013 LMP
Search
Part
VII
30
7
Train (Web Version)
Search
Search enables the creation of lists of reports that meet user-defined criteria.
By default, the Current Reports Only option is ticked. This means that only the most recently received
report for each relevant item is included in the search results. To view every (historic as well as current)
report that meets the search criteria, click into the Current Reports Only box to turn the option off.
Building a search
1.
2.
3.
Select Search from the Menu Bar.
The Search screen will open as above.
Set the "Report Types to Search" from the drop-down list. The default setting is All Types but the full
listing is:
All Types
Pressure Plant
Lifting Equipment / Lifts
Electrical
Local Exhaust Ventilation
Power Press
Not Availables
Written Schemes (PRESS)
Written Schemes (LOLER)
Selecting any other type than All Types will restrict the returned search results to just one category of
report.
4. Now build the search rules:
i.
ii.
iii.
Select the field to be searched from the drop-down menu in the left-hand box (Field box).
Select the appropriate criterion to be applied to the search from the drop-down list in the middle
box (Rule box). NOTE: Depending on the field selected in the first box a criterion may automatically
appear here. This can be amended if needed via the drop-down list.
Input the text to search for in the right-hand box (Value box).
© 2013 LMP
Search
iv.
31
Repeat steps i-iii in the other rows of the Search screen as required (a maximum of four rows of
search terms is available).
Toggle the "Current Reports Only" tick box on/off as required.
Where more than one row of search criteria is constructed, the rows will by default be linked with an
AND command (returning only those records where all criteria are met).
7. Click Search Now to display the results of the search.
5.
6.
Text field criteria
Fields that are text based (for example Item Id, Description, Location, Manufacturer etc) offer the following
criteria:
Contains
Doesn't contain
Is exactly
Is not
For example, to search for reports containing the manufacturer name 'Craven':
1.
2.
3.
4.
5.
Ensure "All Types" is selected in the Report Type field.
Select "Manufacturer" from the drop-down list in the Field box.
Select "Contains" from the drop-down list in the Rule box.
Input "Craven" in the Value box.
Click Search Now to display the results of the search.
Date field criteria
Fields that are date based (for example Next Thorough Date, Exam Date etc) offer the following criteria:
Is
Is
Is
Is
Is
Is
before the
after the
on or before the
on or after the
the
not the
To search for reports with an Exam date between 30 June 2009 and 31 December 2010:
1.
2.
3.
4.
5.
6.
7.
8.
9.
Ensure "All Types" is selected in the Report Type field.
Select "Exam Date" from the drop-down list in the Field box.
Select "Is on or after the" from the drop-down list in the Rule box.
Input 30/6/09 in the Value box.
In the Field box of the second row, select "Exam Date" from the drop-down box.
Select "Is on or before the" from the drop-down list in the Rule box.
Input 31/12/10 in the Value box.
Toggle the "Current Reports Only" tick box on/off as required.
Click Search Now to display the results of the search.
Repairs by Severity
It is possible to search for repairs by severity. However, within Train, the severity of repairs detailed is stored
as a number in the range 1 to 4. The numbers relate to degree of severity thus:
5
4
3
2
1
Immediate Repairs
Time qualified Repairs
Other identified defects
Observations
Clear
Criteria available on the Severity field are:
Is less than
Is greater than
Is exactly
© 2013 LMP
32
Train (Web Version)
Is not
For example, to search for immediate repairs listed on current reports:
1.
2.
3.
4.
5.
6.
Ensure "All Types" is selected in the Report Type field.
Select "Severity" from the drop-down list in the Field box.
Select "Is exactly" from the drop-down list in the Rule box.
Input "4" in the Value box.
Ensure "Current Reports Only" is ticked.
Click Search Now to display the results of the search.
Report Listing
The Report Listing offers a number of options. Right-click in the Data Area to view the options menu:
Reload
This option forces the screen to refresh.
Save
To save the currently displayed report listing:
1.
2.
3.
4.
Right-click in the Data Area of the screen.
Select "Save" from the subsequent menu.
Navigate to the location in which the file is to be saved, select the appropriate file type from the dropdown list and set a file name.
Click Save.
Edit Displayed Data
Edit Displayed Data allows the customisation of information presented on the report listing.
To add fields to a view:
1.
2.
3.
4.
5.
Right-click in the Data Area.
Select "Edit Displayed Data" from the subsequent menu.
The Customize Columns box will open. Fields already visible on the screen are indicated by a tick in the
'Visible' column.
Place/remove ticks against the field names as required.
Close the Customize Columns box (click the cross in the top right hand corner) to apply the changes.
Show Filter
The Show Filter option allows the creation of a filter against the fields displayed on the current screen.
Clear Filter
The Clear Filter option removes any filter that has been applied to the screen. An empty filter row will appear
until the screen is refreshed.
© 2013 LMP
Locations
Part
VIII
34
8
Train (Web Version)
Locations
The Locations screen enables the viewing of reports for locations or policies.
The Locations tab provides a list of locations/companies divided up by policy number and Location ID. Doubleclick on a location row to display the relevant Plant tab which details the most recent report for each current
item of plant at the selected location:
© 2013 LMP
Locations
© 2013 LMP
35
36
Train (Web Version)
Report Listing
The Report Listing offers a number of options. Right-click in the Data Area to view the options menu:
Reload
This option forces the screen to refresh.
Save
To save the currently displayed report listing:
1.
2.
3.
4.
Right-click in the Data Area of the screen.
Select "Save" from the subsequent menu.
Navigate to the location in which the file is to be saved, select the appropriate file type from the dropdown list and set a file name.
Click Save.
Edit Displayed Data
Edit Displayed Data allows the customisation of information presented on the report listing.
To add fields to a view:
1.
2.
3.
4.
5.
Right-click in the Data Area.
Select "Edit Displayed Data" from the subsequent menu.
The Customize Columns box will open. Fields already visible on the screen are indicated by a tick in the
'Visible' column.
Place/remove ticks against the field names as required.
Close the Customize Columns box (click the cross in the top right hand corner) to apply the changes.
Show Filter
The Show Filter option allows the creation of a filter against the fields displayed on the current screen.
Clear Filter
The Clear Filter option removes any filter that has been applied to the screen. An empty filter row will appear
until the screen is refreshed.
© 2013 LMP
Settings
Part
IX
38
9
Train (Web Version)
Settings
Alterations to the user profile can be made via the Settings screen.
Options
The Options tab displays a list of features that can be customised:
Recent Reports Screen - select the required number of days history to display on the Report screen.
Report Filters - by default the filter row is hidden on each screen (accessible via the right-click menu options
as required). To display the filter row by default, tick this option.
If any changes are made, click the Apply Changes button to save the profile. An 'Options Updated' message
will display to confirm that the change has been applied.
© 2013 LMP
Settings
39
Change Password
The Change Password tab allows you to choose a new password for your login.
1.
2.
3.
© 2013 LMP
Input the current password into the Current password box.
Input the new password into the New password and Confirm new password boxes.
Click Update Password. (HINT: If the current password was input incorrectly or the two instances of
the new password do not match an error message will display. Overtype the incorrect entry and click
Updated Password again).
Index
Index
Index
-Rreload 5
remove actions reminder
remove overdues 15
report type 30
results by quarter 26
results by year 26
-Ccalendar 22
change password 4, 38
clear filter 5
clear overdue inspections
current plant 34
current results 26
download report 11
due next year 26
due this year 26
user comments
username 3
edit displayed data 5
examinations by date 22
exit 3
-H4
-Llocations 34
logon screen 3
-Nnot availables
16
-Oopen report window
-P-
© 2013 LMP
3, 4
38
-U-
-E-
password
-Ssave 5
search 30
show filter 5
show filter row
-D-
help
15
11
11
15
43
LMP Technical Services Ltd
Rockleigh Court
Rock Road
Finedon
Northants
NN9 5EL
Telephone: 01933 683810
Fax: 01933 683819
Web: www.lmp.co.uk
Email: [email protected]