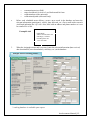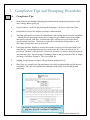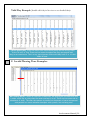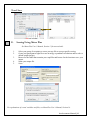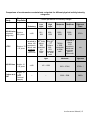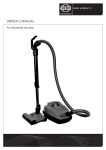
1
Accelerometer Data Collection and Scoring Manual For Adult & Senior Studies* Kelli L. Cain, M.A. Carrie M. Geremia, B.A. University California San Diego San Diego State University James Sallis Active Living Research Lab June 2012 *This comprehensive accelerometer data collection, data screening, and data processing manual was created as part of the Neighborhood Quality of Life and the Senior Neighborhood Quality of Life Studies, both of which used mail delivery and retrieval methods. This manual was started in 2002 and is based on the cumulative experience of our research team. We have adapted our protocols and materials for children and teens and successfully collected accelerometer data from over 5000 adults, seniors, teens, and children. The protocol has also been adapted for an international study in 12 countries that will pool accelerometer data from over 8000 participants. Although this manual is focused on data collection in adults and seniors, a version focused on children and adolescents will be posted soon. Suggested Citation: Cain, Kelli L. & Geremia Carrie M. (2012) Accelerometer Data Collection and Scoring Manual For Adult & Senior Studies. San Diego State University, San Diego, CA. Available for download at : http://sallis.ucsd.edu/measures.html Updated June 6, 2012 Accelerometer Manual | 1 Revised: June 2012 to update compliance table, new contact information, new ActiGraph model, general updates, and new references. Revised: July 2011 to update IPEN scoring protocols based on our sedentary validation study and to update references. Revised: June 2010 for IPEN accelerometer trainings with new Actigraph models only; co-authored by Dr. Simon Marshall (NIH: National Cancer Institute R01 CA127296; PI: James F. Sallis; Coinvestigators: Owen, N., De Bourdeauduij, I., Conway, T.L., Kerr, J., Adams, M). Revised: September 2004 to adapt for Senior Neighborhood Quality of Life Study (NIH: National Heart Lung and Blood Institute R01 HL077141; PI: Abby C. King; Coinvestigators: Sallis J.F., Conway, T.L., Frank, L.D., Saelens, B.E., Kerr, J.). Original protocol developed in 2002 for the Neighborhood Quality of Life Study (NIH: National Heart Lung and Blood Institute R01 HL67350; PI: James F. Sallis; Co-investigators: Conway, T.L., Frank, L.D., Saelens, B.E., Slymen D.D.). For questions, contact Kelli Cain @ [email protected] Accelerometer Manual | 2 Table of Contents 1. Preparing for Actigraph Data Collection ………………………………………. 5 A. Equipment………………………………………………………………5 B. Determining Inventory Needs………………………………………... 6 C. Budget/Staffing………………………………………………………...7 D. Data Decisions…………………………………………………………8 E. Tracking Actigraphs (Inventory)……………………………………..10 2. Charging, Testing, Initializing, and Delivering Actigraphs…………………..13 A. Batteries (old models only)……………………………………………13 B. Charging (new models only)………………………………………….13 C. Testing…………………………………………………………………14 D. Initializing (older models only)………………………………………14 E. Initializing (new models only)………………………………………..15 F. Attaching the Actigraph to a Belt…………………………………….16 G. Instructions for Wearing the Actigraph………………………………16 H. Recruitment Script Examples………………………………………...18 I. Mailing Procedures……………………………………………………19 3. Compliance Tips and Prompting Procedures…………………………………. 20 A. Compliance Tips.………………………………………………….…..20 B. Prompting Procedures…………………………………………….….. 21 C. Call Descriptions and Scripts ………….…………………………… 22 4. Receiving Actigraph Data…………………………………………………… .... 25 A. Downloading Actigraph Data from old models (Actisoft software). 25 B. Downloading Actigraph Data from new models (Actilife software). 26 C. Configuring Meter Plus to Screen Data…………………….........…. 26 D. Screening Data……………………………………………….....……. 28 E. Valid Wearing Time Examples………………….....……………...... 29 F. Invalid Wearing Time Examples……………………..…………….... 31 G. Overnight Wearing………………………………………………..….. 32 H. Meter Malfunction Examples…………….…………………………. 32 I. Memory Address Problem………...………………………………… 34 J. Shift Worker….. ……………………………………………………. . 35 K. Valid Wear Time Criteria……………………………………………. 35 L. When do you need a re-wear?............................................................36 M. Re-wear Call Script…….…………………………………………… . 37 Accelerometer Manual | 3 5. Cleaning and Scoring Data……………………………………………………38 A. Configuring MeterPlus to Clean Data………..…………………….. 38 B. Selecting Days to be Scored(Creating MPD files) …………………….40 C. Preparing Re-wear files for Scoring …………...……………………….40 D. Configuring MeterPlus to Score Data……...…………………………..41 E. Scoring Using Meter Plus……………………………………………….43 6. Management and training…………………………………………………….44 A. Hiring…………………………………………………………………….44 B. Delivery and Compliance Training ……………………………………44 C. Checking (Quality Control)…………………………………………….45 D. Electronic Tracking……..………….…………………………………..45 7. Troubleshooting……………………………………………………………….47 A. Equipment (older models)…….………………………………………..47 B. Equipment (new models)...……………………………………….... 49 C. MeterPlus Questions ……………………………………………………49 D. IPEN Questions……..…………………………………………………49 8. References…………………………………………………………………….51 9. IPEN Study-specific Guidelines…………………………………………….52 10. Appendices……………………………………………………………………55 A. Meter Instructions ……………………………………………………...55 B. Meter graphs for participants…………………………………………..56 C. Meter Log………………………………………………………………. 57 D. Cover letter for participants…………………………………………… 58 E. Reward letter…………………………………………………………….59 F. Mail Recovery Letter…………………………………………………….60 G. Checklist for in-person delivery ………………. …………………….61 H. Meter Calibration (older models only)………………………………….62 I. NQLS-Senior Cut-point Memorandum……………………………….. 63 J. Compliance and Return rates, Equipment loss, Device malfunctions...64 Accelerometer Manual | 4 1. Preparing for ActiGraph Data Collection ← A. Equipment There are several different ActiGraph models that are used in our studies. Below is a brief description of each. For NQLS-Adult, NQLS-Senior, we used both the 7164 and 71256 models. Within IPEN, a variety of models have been used. We are conducting studies to determine if a correction factor is necessary to allow us to use different Actigraph models in a pooled dataset. So far, the evidence from laboratory studies suggest that the different models are comparable when Freedson (1998) MVPA cut points are applied (John 2010, Corder 2007); however it has been suggested that there is less comparability on the lower end of the spectrum (Kozey 2010, Rothney 2008). Our studies in free living adults and youth are showing that the single axis data are comparable between the new models (i.e. GT1M vs GT3X/GT3X+) but are not comparable between the old (7164) and new models in sedentary, light or moderate intensity (<100 cpm for sedentary and Freedson ‘98 for light and moderate). However, when the Low Frequency Extension is applied to the data from the GT3X+, the differences are no longer significant (papers in process). Our studies indicate the ActiTrainer by ActiGraph is comparable to the new models at all intensities. We do not yet know the compatibility of the Actical (Respironics/MiniMitter) with these Actigraph models, but our colleagues in New Zealand are conducting analyses to help determine this. 7164 and 71256 (later models came in red and blue) 7164: This is the oldest model and is sometimes referred to as CSA or MTI monitor. It has a 22-day memory when used with 60s epoch and collecting activity data only. If collecting step counts or using a 30s epoch, the memory is reduced to 11 days. It runs on a coin battery that lasts approximately 6 months. This model is initialized and downloaded using an RIU reader and either DOS or Windows based Actisoft software. This model requires periodic calibration. The calibrator is a separate piece of equipment. This model is prone to developing a battery holder malfunction that occurs about 5% of the time. It causes the device to stop collecting new data. This model was used in our NQLS-Adult, NQLS-Senior, and IPEN studies. Pros: Long battery life, often acquired at low cost. Cons: Short memory, unit malfunction more common, no longer supported by MTI so can’t be repaired, requires calibration. 71256: This was a newer version of 7164 that had increased memory (91 days with 60s epoch and activity only). Everything else is the same as the 7164 model. This model was used in our NQLSAdult, NQLS-Senior, and IPEN studies. Pros: Memory increased, often acquired at low cost. Cons: Unit malfunction more common, no longer supported by MTI so can’t be repaired, requires calibration. The 7164 and 71256 are referred to as ‘older models’ throughout the manual. Accelerometer Manual | 5 GT1M: The GT1M uses new accelerometer technology. It has a rounded casing and is initialized and downloaded using a USB connection and Actilife software (all new models work with Actilife). It has a rechargeable battery that lasts about 14 days. It has 1MB of memory (340 days with 60-second epoch, less with smaller epochs or additional data). It is possible to collect step counts and horizontal plane data in addition to single-plane vertical activity data. This model was used in IPEN studies. The GT1M and GT3X (look is identical) Pros: Lot of memory, USB connection speeds up initialization and downloading process, unit malfunction less likely, doesn’t require calibration, can be repaired. Cons: Short battery life, data not comparable to older models. The GT1M, GT3X and GT3X+ are referred to as ‘new models’ throughout the manual. GT3X: This version is similar to the GT1M except that the rechargeable battery lasts 21 days, it has 4MB of flash memory, and it is possible to collect diagonal plane and inclinometer data. This model was used in IPEN studies. Pros: In addition to above, even more memory, more options for additional data collection (e.g., tri-axis data), can be repaired, single axis data appear to be comparable with GT1M. Cons: Still a short battery life although you get an extra 7 days from this model, inclinometer not validated, data not comparable to older models. GT3X+: This is the newest version of ActiGraph. It collects data in raw format with the epoch and filtering applied post-download. The user can specify the sampling rate up to 100 Hertz. The rechargeable battery lasts 31 days and it has 512MB of memory. New data collection is the ambient light sensor. This model is currently being used in our NQLSSenior Follow-up study. The GT3X+ looks similar but has a more secure USB plug Pros: In addition to above, more flexibility in scoring because of the postdownload epoch and filtering selection. Longer battery life should work for most studies. Less expensive. Raw data may provide access to new activity classification algorithms (e.g., pattern recognition). Cons: Data may not be comparable to older models without using the Low Frequency Extension (doesn’t apply to step counts which are not comparable with or without the low frequency extension; publication in process), inclinometer not validated, users don’t have guidance about Hertz selection. ← B. Determining Inventory Needs To determine how many units you need, there are a few estimations that need to be made. a. How many participants do you want to measure in what amount of time? b. How many units will be lost in this amount of time? (see our loss rates in Appendix, pg 64) c. What will be your average return time and in-office turnaround time? The following will affect your return time and loss rates: Accelerometer Manual | 6 How will your units be delivered and retrieved? What population are you working with? How well staffed you are for prompting the return of the units? o o o We developed a formula for helping determine the number of devices needed to complete data collection efficiently. 1. 2. 3. 4. # days of data collection/ [return time + in-office time] = X X * [loss rate] = Y X-Y = the # of time the unit can go out in data collection period used above (Z) Number of participants to measure/Z = desired inventory to meet your measurement goals FOR EXAMPLE: Suppose we needed to measure 100 people one time across a 12 month period using a mail out and mail return protocol. Using this formula and assuming a 30-day average return time, 5 days of in-office time, and 4% loss, it would be determined that 10 ActiGraphs were needed. So we would need to have 10 ActiGraphs for every 100 participants to measure. ← C. Budget and Staffing Below are the costs you can use to estimate budget and staffing (2011/2012 costs). These estimates include recruitment and data collection. We always assume postage rates will increase several times throughout the course of the study. Data collection costs: • Actigraphs: $250 per unit • Supplies: $13 per participant • Postage: $17 per participant (mail delivery and retrieval, USPS Priority Mail) • Phone expenses (assuming existing phone equipment): $7 per participant • Equipment accessories (belts, clips): $5/unit per year (newer units) and $25/unit per year (older units) • Incentives: $15 per measurement is our guideline (Actigraph alone = $15; survey + Actigraph =$30) • Travel costs: varies based on study design • Staff: at least 1 half-time person. Some studies need the equivalent of 3 full-time staff. It is important to have staff available for the follow-up and prompting; this is KEY to quick return time and low loss rate. Also, a dedicated staff member to work with the equipment is highly recommended. ← D. Data Decisions There are quite a few decisions to be made concerning data collection and scoring. Below is a list of things to consider, as well as recommendations or rules for how to deal with them. Pre-data collection 1. How long should we ask participants to wear the Actigraph? Accelerometer Manual | 7 We always ask for 7 complete days if the minimum is 5 valid days. A complete day is described below in #7-8. The days do not have to be consecutive, but it helps. Our studies in adults do not require a weekend day. If the accelerometer is picked up person and the unit is still collecting data, the pick-up day CANNOT be counted as a valid wearing day even if there are enough valid hours. Because the devices are still collecting data after download, the data collected will be a mix of participant movement and researcher movement. It is very labor-intensive to separate these data therefore it’s important to schedule the accelerometer retrieval for a day after you expect the participant to be done wearing it. 2. When should we ask them to wear the meter (e.g., waking time only, after school or work, all day and night). We ask participants to put it on first thing in the morning and take it off right before bed at night. Because the device is NOT water proof, participants are instructed to take the device off when showering or swimming. We ask participants not to wear the device when they are going to be out of town overnight because we want to measure activity that occurs in their neighborhood. 3. Should we ask participants to complete a log of when they put the unit on and take it off? Although we can get at most wear patterns by looking at the raw data, we always ask participants to complete a log of dates and times when they wear the meter, and when they took it off for more than 5 minutes. It can be useful when screening data and helps with compliance by serving as a reminder. 5. Should we ask participants to re-wear the Actigraph if not enough good data are collected the first time? Yes. We ask for re-wears if participants don’t meet the criteria for compliance. This drastically increases the amount of useable data we retrieve (see compliance rates in Appendix, pg 64). We generally don’t send more than two meters to any one person unless of equipment (not participant) error or we feel confident that they will wear and return the device. We make sure to tell participants that this is our procedure upfront. 6. What is enough ‘wearing time’ to be considered compliant and therefore not asked to do a rewear? For compliance screening for both adults and seniors, we wanted 5 valid days containing at least 10 valid hours or at least 66 valid hours across all wearing days. 7. How should we define a valid hour? For NQLS-Adult, we originally defined ‘non-wear’ time as more than 30 minutes of consecutive zero counts. For NQLS-Senior, we originally defined it as no more than 45 minutes of consecutive zeros. However, based on a few studies and our own in-house validation study, we have concluded that 60 minutes of consecutive zeros maximizes the detection of sedentary behavior – at least for adults. People can sit very still (no movement registered on the meter) for at least an hour. This definition was designed to maximize ‘sensitivity’ for sedentary time and not designed to maximize ‘specificity’ between nonwear and sedentary; therefore it is very important that ‘non-wear days’ are manually detected and screened out of the data. The 60 minute definition makes it very difficult to distinguish non-wear days, such as mailing days, WITHOUT MANUALLY SCREENING Accelerometer Manual | 8 the data. Screening is absolutely essential as we have found that more than half of mail days will have >10 valid hours using 60 minutes of zeros. With the new models, this is not much of an issue as a very low percent have more than a few valid hours. One study (Choi, 2012, MSSE) showed that their algorithm (90 minutes with a formula for allowances in the 30 minute upstream/downstream) performed better than the Troiano algorithm (60 minutes with 2 consecutive minutes for an allowance) in seniors, but studies haven’t been conducted comparing non-wear definitions without allowances which is what MeterPlus uses. For future studies, based on the information we have now, we will use 60 minutes of zeros. 8. How do you define a valid day? For compliance, a valid day contained at least 10 valid hours for all of our adult and senior studies. However, for NQLS-Adult and NQLS-Senior scoring, a valid day contained at least 8 valid hours. For IPEN we are using 10 valid hours for both compliance and scoring. 9. Should we have different valid wear time criteria for weekday vs. weekend days? No, we don’t for adults and seniors, although we reduce the usual 10 hour criterion to 8 hours on weekends for adolescents. 10. What software should we use to screen and score the Actigraph data? We use MeterPlus (www.meterplussoftware.com) for all of our studies. 11. What “epoch” should we use? The meter collects (samples) acceleration data 30 times every second and then sums them across a period of time, referred to as an “epoch.” The resulting value is referred to as a “count”. For adults and seniors, we analyze our data using a 60 second epoch which is generally accepted for this population and is consistent with the calibration studies that most cut points were derived from. However, many of the new algorithms use shorter epochs and since it is easy to aggregate up and impossible to reduce down, we now use the shortest epoch that the Actigraph memory will allow. With the newest model (GT3X+), the device collects raw data and the epoch applied after data are downloaded. This provides a lot of flexibility so we will reintegrate to 60 seconds for applying cut points and still have the ability to use shorter epochs for other purposes (e.g., pattern recognition). 12. Should we collect any additional data (e.g., step counts)? How should we process it/use it? We don’t typically collect additional data but MeterPlus (version 4.2 and newer) can now process data from multiple axes, step counts, and inclinometer data (GT3X and GT3X+ only). There has been one calibration study conducted with adults on a treadmill to come up with cut points for the composite score of the three axes (Vector Magnitude; Sasaki 2010). The values are for the Vector Magnitude are: • Light >2490 • Moderate 2491-5944 • Hard 5945-10,536 • Very hard >10,536 Accelerometer Manual | 9 Post-data collection 1. What cut-points should we use? For adult and senior studies, we use the Freedson adult cut points (Freedson 1998) and the 100 cpm sedentary cut point. Here are the adult ‘categories’ programmed in MeterPlus (in counts per minute): • Sedentary 0-100 • Light 101-1952 • Moderate 1953-5724 • Hard 5725-9498 MVPA • Very hard 9499-16000 • Out of range 16001-100000 (optional) { For NQLS-Senior, we also used alternative cut points that we derived based on a few previous studies (Pruitt 2008, Sallis 2009). We wanted to examine associations with lower-intensity PA levels in seniors, while still maintaining standardization for comparison with the NQLS-Adult sample. See memo in the Appendix for more details. Here are the cut points we used: • Sedentary 0-100 • Low Light 101-929 • High Light 930-1952 • Low Moderate 1953-3299 • High Moderate 3300-5724 • Vigorous 5725+ 2. Should we analyze patterns of PA (such as bouts)? If so, how should we define them? We haven’t analyzed ‘bouts’ in our studies but a 10 minute bout of MVPA with a 2 minute ‘allowance’ is common. Sedentary bouts is becoming more popular also and MeterPlus version 4.3 is able to do this. We are planning to analyze sedentary bouts in both the NQLS-Adult and NQLS-Senior data in 2012. 3. How should we deal with participants who have varying days of data collected? Some researchers impute values or use probability statistics (Catellier 2005, Troiano 2008) but we choose to create a mean activity score across valid days. In some analyses, we use ‘wearing time’ to statistically adjust for these differences. This seems to make a big difference with sedentary outcomes in our NQLS-Senior data as the differences in wearing time are likely sedentary activity. We focus a lot of time and resources on strategies to boost compliance to maximize each wearing time opportunity and use re-wears when necessary. 4. How should we deal with participants who wore the Actigraph 24 hours per day? We have a cleaning protocol to screen for overnight wearing using a maximum hourly count during overnight sleep hours. Then the pattern of data can be identified through visual inspection and the count values during ‘sleep’ replaced with “0” values in the CSV files. This has not been a big issue with adults and seniors but common in younger children. The reason we want to clean these data is so we don’t inflate sedentary estimates. Sleeping typically records as valid sedentary wearing time. 5. Should we summarize data within certain time periods (e.g., morning hours)? Accelerometer Manual | 10 This is becoming a popular way to look at accelerometer data. MeterPlus has a Time Filter feature that will allow you to segment the day and activity levels are summarized within the defined time periods. Work time, weekends, and leisure time such as after-work hours are examples of time filters that could be used for PA and sedentary behavior. ← E. Tracking ActiGraphs (Inventory) 1. We always create Microsoft Access databases* to inventory and track our ActiGraphs. We have found it helpful to create a record for each wearing so we can look things up by participant ID# or by ActiGraph serial #. We also like to look at trends of Actigraph malfunction to identify units that should be pulled out of rotation and inspected. The following variables may be useful to create in an Access database: o Participant ID number o Actigraph serial number o Recruiter/data collector identifier o stage/wave of data collection, including re-wear o round (number of times an ActiGraph has been used) o date delivered or mailed o date activated/initialized o date battery and/or memory will run out (useful for prompting) o date received o date downloaded o # valid days from screening process o # valid hours from screening process (optional) o actual dates worn (as verified from log or seen in data; will help with scoring later) o Day 1 date (these variables are helpful to spot trends in compliance issues) o Day 1 day of week o Day 1 valid or not o reason if not valid (e.g., put on too late, took off too early) o Day 1 comments o ….repeated for however many days you need o Comments Flags for the following situations may also be helpful: o Actigraph not downloaded because participant dropped, etc. (yes/no) o Actigraph lost (yes/no) o Actigraph sent for repair (yes/no) o Actigraph not worn at all (no data to save) (yes/no) o Actigraph worn overnight or other odd patterns in data (comment) o Aberrant data (all one value, 32767 values, all 5 digit counts) o Other data problems (comment) o Re-wear needed (yes/no) o Re-wear requested (yes/no) o Activity graphs requested (yes/no) We also create a table in the database to inventory each unit that includes the following variables: o serial number Accelerometer Manual | 11 o o o o 2. comments/notes (text field) status checkboxes for Active, Lost, Broken and On Loan calibration date (older units only) calibration adjusted (older units only) Before each scheduled meter delivery, create a new record in the database and enter the relevant information (participant #, serial #, date delivered, etc.). Put a small sticker on each ActiGraph indicating the “up” side. Also, label with an address and phone number so it can be returned if it is lost. Example Label NQLS Study 3900 5th Avenue, Suite 310 San Diego, CA 92103 If found, please call 1-877-555-9200 3. When the Actigraph returns and is screened, enter the relevant information (date received, date downloaded (or not downloaded), valid days, etc.) in the database. Sample meter tracking form* * tracking database is available upon request. Accelerometer Manual | 12 2. Charging, Testing, Initializing, and Delivering Actigraphs ← A. Batteries (old models only) The old models run on a lithium coin cell battery (CR2430 3 volt) that last approximately 4000, or between 5 and 6 months. It depends somewhat on the frequency of data downloads and the capacity of the particular manufacturer's battery. You have to keep track of when you change the batteries and schedule the next rotation. You CAN’T trust the battery life reported by the software. (From Actisoft User’s Manual) To replace the battery, follow these steps carefully. Reliability of the ActiGraph can be greatly affected if battery replacement is not carried out properly. 1. A good quality, #0 Phillips head screwdriver is required. We purchase ours at Sears. 2. Carefully remove the four screws on the back corners of the ActiGraph. After all four screws have been removed, carefully pry off the plastic cover to expose the battery and holder. It is helpful to use one of the loose screws to extract the cover. This is done by catching the threads in one of the holes and pulling away from the case. Caution: Do not attempt remove the circuit boards from the metal box or touch the sensor. Touching the sensor, even lightly, can damage it! 3. Remove the battery by inserting a small common blade jeweler screwdriver between the battery and the center of the battery holder opposite the leaf spring. Do not pry on the plastic nibs that hold the battery in. This will cause damage to the battery holder. Note that this terminal position is near the sensor. Use gentle force to release the battery. This method prevents damage to the small nibs that retain the battery. The idea here is to use minimal force to avoid permanently deforming the battery holder retaining nibs. 4. Insert new battery into the holder by snapping into place. The positive terminal (+) faces up. ← B. Charging (new models only) ActiGraphs will be initialized the day BEFORE they will be distributed or mailed to participants. Therefore, each unit must be fully charged and initialized with plenty of time before they are to be distributed. The ActiGraph GT3X+’s rechargeable Lithium Ion battery is capable of providing power for 31 days without recharging (GT1M is 14 days and GT3X is 21 days). Recharging is automatic and is accomplished by connecting the ActiGraph to a standard USB port. Charging time will depend on the battery life, but will typically not exceed three hours for a fully depleted battery. When connected to the USB port of a computer, the LED will FLASH until data collection starts. This indicates that the ActiGraph is charging. Once the battery is completely charged, the LED light inside the device will remain lit (it will no longer flash). This is something useful to tell participants if delivering in-person so they don’t think the meter has stopped working if the light stops flashing. When the device is removed from the charging hub, the LED will go off. A fully charged battery will have just over 4.0 volts. If the battery goes below 3.1 volts, the device will not have sufficient power to initialize and download. The battery level, reported in volts, can viewed using the Actilife lifestyle software. Just plug the device into a computer and the remaining voltage will appear on the default screen. Accelerometer Manual | 13 A USB hub should be used to charge multiple ActiGraph units. Each hub can be connected to an electrical outlet or to the computer. For most studies we use two USB hubs, enabling us to charge up to 14 devices at one time. TIP: You can purchase these hubs from any vendor, not just ActiGraph. ← C. Testing Test each unit by initializing and wearing it for at least 24 hours. Our preference for new units is to wear them as a pretest for 7 days to identify faulty batteries that cause the device to fail after 4 or 5 days. Download and check that the device recorded data and the counts are within a reasonable range (< 16,000 cpm). IPEN study investigators can send any questionable files to the IPEN Coordinating Center for a determination of the next steps. ← D. Initializing (older models only) 1. The Actisoft software must be installed on the computer you are using and initialization and download should happen on the same computer. 2. Place the Actigraph in the carriage, label side up and serial number facing away from you (notch facing you). 3. Open the Windows program (Actigraph.exe) 4. Choose the “Initialize” option at the top left corner of the screen. The program will begin, starting with reading the device information. 5. First check the battery, which will appear at the bottom right corner of the screen. Do not send an Actigraph if it has less than 400 hours left. 6. You will receive a pop-up window, confirming that you’d like to reset and initialize the Actigraph. If the battery life is sufficient, choose ‘Yes’. 7. The program will begin processing your request, then you will receive another pop-up window, this time to set the initialization information. The cycle period (epoch) will default to 1:00 minute. 8. Enter the start date, which is the date that the Actigraph will start recording. If sending the Actigraph by mail, choose a start date that is the appropriate amount of time ahead, using the calendar dropdown function. 9. Enter start time in military time (hh:mm:ss), which should be 00:00:01 (1 second after midnight). You will leave the “subject code name” field blank, as well as leaving the three boxes unchecked (AUX, FLASH, MARKER). If you check AUX, step counts will be collected along with activity data. Note that doing so will reduce your available memory by 50% . Verify that all information is correct before proceeding. 10. Press initialize, and the process will begin. Double check the start time at the bottom of the screen, and also double check that the “cycles” field resets to 0. When the pop-up window comes up, verify that the carriage is flashing the 1-2-3 sequence. Also verify the countdown time until initialization. 11. When an Actigraph is initialized, an INI file will be created in the “files” folder and will contain all initialization information. Do not erase or remove this file, as the Actigraph will not download unless this file is kept in its initialized folder/location. 12. Take note of the battery life (for the meter Access database), remove the Actigraph from the reader and press OK. Accelerometer Manual | 14 ← E. Initializing (new models only) 1. 2. 3. 4. 5. 6. Once all ActiGraphs are fully charged, then you can begin the initialization process. The Actilife software & drivers must be installed on your computer but unlike with the older models, the meters don’t need to be initialized and download on the same computer. Connect the Actigraph to the USB port by opening the rubber cover protecting the USB outlet on the ActiGraph unit and plugging the small end of the USB cord into this outlet (making sure that no other ports are being used) and open the Actilife software. On the main Actilife page, go to Options, then select Device Information. When connected properly, the software will recognize that a device is connected. Click OK to continue. Verify that the device is fully charged (over 4v) before initializing. Go back to the main page and click the “Start” icon. This will bring up the initialization screen. Make sure that “Activity (Default)” mode has been selected. You can select additional modes of data collection at this time. Change the epoch (60 sec for our adult and senior studies) However, our advice is usually to go as short as your memory will allow. You can always aggregate up to a longer epoch but can never reduce to a shorter epoch. Shorter epochs tend to be used in the newer algorithms being developed (e.g., Crouter 2-regression equation). Leave ‘Filter Option’ as ‘Normal.’ [However, based on recent study findings, it has been determined that the ‘Low Frequency Extension’ produces single axis output more similar to the older models which may actually be more accurate (paper in process)]. 8. Change the start time to 12:00am (midnight), and change the start date to the day that you’d like the Actigraph to start recording data. For mailing protocols, this is between 3 and 5 days depending on how far they will be sent and the postal service selected. For in-person delivery, this is usually the following day. 9. END DATE AND TIME: Make sure the ‘Enable Stop Time’ is unchecked. 10. Change the subject name using the participant ID#. It can also be helpful to add in additional information in the Name because this can be used to create separate variables (the ID can be “parsed”) in the output file. Click OK. 7. Accelerometer Manual | 15 11. The program will take a few seconds to initialize. Wait while this occurs. 12. A verification screen will appear. Be sure that the dates and times are correct and click ‘ok’. 13. You may now disconnect the ActiGraph from the USB cable. The LED will FLASH until it begins to collect data and then it will turn off. ← F. Attaching the Actigraph to a Belt 1. Belts are made from ¾” webbing material and dual-adjustable side release buckles. The belts can be purchased through Actigraph but we choose to make them ourselves. Here is the purchasing information for our supplies: Item Source Website Cost Meter Belts - 1" black Joann Fabric and webbing SKU# CDC N Craft Store (online) www.joann.com $44.99 / 50 yards 102226 about $0.42 / unit, Best Buy Button and depending on quantity Belt Buckles - 3/4" PH328 Buckle www.plastic-buckle.com ordered 2. Choose the belt size that the participant requested. We find it useful to offer specific sizes. For adults we offer, 36in (90cm), 48in (120cm) and 60in (150cm Attach the Actigraph to the belt before mailing it to the participant. 3. Take off one half of the buckle from the belt. 4. Pull the belt through the two belt loops on the sides of the Actigraph, so that the belt goes across the front of the Actigraph (the label will be against the person’s body). 5. Attach the other half of the buckle once the Actigraph is on the belt. Belts should be washed (hand-washed or cold cycle, no tumble drying) after each wear. ← G. Instructions for Wearing the Actigraph 1. The ActiGraph can be worn either over or under clothing, whichever is most comfortable to the participant. The meter does not need to be in direct contact with the body. However, it is essential that the ActiGraph be positioned snugly enough against the body that it cannot flop around. 2. Each participant will be instructed on how to wear the ActiGraph. The ActiGraph will be given to the participant already threaded onto the elastic belt. Participants should be instructed to wear the ActiGraph with the elastic belt fastened around the waist with the unit positioned over the right hip bone. They should be told not to wear it in any other way, including: Accelerometer Manual | 16 • • • • NOT in any pockets of clothing NOT in a backpack or handbag NOT in a car glove compartment or trunk NOT when they are spending the night outside of their neighborhood Participants will be instructed to wear the unit all day while they are awake. The only times they should remove the units are when they go to bed at night, or if the unit would become completely wet (e.g. swimming, showering). Instructions are mailed to participants along with the meter log describing how to wear the device (see full copy in Appendix). These instructions should also be explained in-person (or on the phone). The graphs on the right are used to help participants know what we look for when deciding on the need for a re-wear. This helps compliance. Example handout for participants The page on the left is for wear instructions; The page on the right is used to help participants understand compliance expectations Accelerometer Manual | 17 ← H. Recruitment Script Examples Some excerpts from recruitment script: “We would like you to wear a movement meter for 7 days. It is similar to a pedometer, except it measures general movement.” “To the best of your ability, go about your usual days --- don’t do anything different.” “Try to wear it all the time you are awake. The only time you should take it off is when you shower or if you swim because it’s not waterproof. “We would like you to wear it for at least 12 hours of the day. If you don’t wear it for long enough each day, or for enough days, we will ask you to wear it again.” “Make sure to put it on first thing tomorrow morning, take off last thing at night” “Leave next to your bed or by your cell phone to remind you to put it on each day” “You can wear it underneath or on top of your clothes” “We will give you a log, where you will note the days and times you put the meter on and take it off.” “The battery will run out in 10 days and the meter will stop working. This is why it’s very important that you wear it for 7 consecutive days.” “It runs on a watch battery and isn’t a tracking device. It can’t tell what type of activity you are doing or where you are.” “It’s really small, I’ve worn it myself and after a little while I forgot I was even wearing it.” “We will call you in a few days to see how things are going.” “It is special just for you so make sure no one else wears it.” “Please try to take care of the device it because is very valuable to us” Accelerometer Manual | 18 ← I. Mailing Procedures 1. Using Priority mail – each Actigraph should be attached to the appropriate belt and sent in a padded 7½”x10½” envelope. This envelope will serve as the participant’s return envelope when sending back the materials, so do not seal it closed. Ensure that this envelope has the return address information completed, as well as the appropriate postage and a checklist reminder sticker. Here is an example of the sticker: Did you remember to include … Completed Survey Completed Meter Log Activity Meter Belt Thank you for your participation! This envelope can be placed inside a bigger (9”x12”) manila envelope along with any other study materials. Depending on the weight of this package, it may be able to be dropped in any postbox. 2. Using Click N Ship - go to https://sss-web.usps.com/cns/landing.do a. Create an account and add both your return address and the participant’s address to the address book. Make sure to check “get track and confirm notifications via email”, and enter your email address for both your and the participant’s address. This way you’ll receive all shipping notifications for this package both when it is first sent and when it is returned. b. Use a flat-rate USPS envelope to send all of the appropriate study materials. These envelopes can be sent at one flat rate, regardless of how much it weighs. Make sure that the Actigraph is sent in a padded envelope that will serve as the participant’s return envelope. c. Follow the instructions on the Click N Ship site to create two labels for each package – one to the participant to be affixed to the flat rate envelope, and one return label to be affixed to the puffy return envelope. d. USPS will schedule a pickup of these packages, or they can be dropped off at a post office for delivery. We haven’t found it cost-effective to purchase insurance for the Actigraphs but this is an option with the Click N Ship. Accelerometer Manual | 19 3. Compliance Tips and Prompting Procedures ← A. Compliance Tips • Most helpful is the constant prompting and communication with participant (phone, email, mail, texting) and not giving up. • Project websites - useful for demystifying the Actigraphs, can also be a place for FAQs. • Email address and toll-free number encourages communication. • Actigraph-generated Excel charts of valid and non-valid wearing days to increase compliance – showing these to participants before their wearing time gives them a sense of the output, encourages complete valid days. Let them know they will have to re-wear if they don’t provide enough valid data. Visuals have worked best with kids but telling adults we will check their wearing time seems to work well. • Participant materials: Helpful to increase the amount of expected valid-wearing time on all materials (e.g., instructing participants to wear the meter for 12 hours in order to get 10), provide an “end-date” when the meter will run out of batteries or memory (this has improved our return times by 3 days on average). Including 8 days on the log resulted in 20% of sample providing 8 valid days, instead of 7 they were asked for. • Sending stamped return envelopes, offering in-home pickup (if local) • Meter logs (see example) provide participants with a daily assignment that can help improve compliance. They are also helpful when making decisions about wear time during data processing. Example of meter log to be given to participants to help data decisions and improve compliance Accelerometer Manual | 20 • • Reminders to put Actigraph next to bed or with cell phone – someplace where they’ll see it every morning. Offer incentive – usually $15 USD for Actigraph, but subject to providing enough valid data. ← B. Prompting Procedures Following these procedures has been shown to result in ~1 month mean return time: MC = Meter Check Call MR= Meter Reminder Call MP = Meter Prompt Call Standard 7-day wear contact schedule 1. Make your MC call the day you expect your participant to receive the meter. 2. Make your MR call to check in again and make sure the participant started wearing the meter. 3. Make your MP1 call (first prompt call) 8 days after the MC call. 4. Make your MP2 call. 5. Make your MP3 call and send an email if possible. 6. Make your MP4 call and mail a return envelope (#1). 7. Make your MP5 call. 8. Make your MP6 call and send an email if possible. 9. Make your MP7 call. 10. Make your MP8 call and mail another return envelope (#2). 11. Make your MP9 call. 12. Make your MP10 call and send an email. 13. Make your MP11 call. 14. Make your MP12 call and mail another return envelope. 15. At this point, the meter has been out for at least 6 months and 3 envelopes have been sent. Consult a supervisor about the next steps. Length of time before next contact Schedule your next call for 3 days later. Schedule your next call for 5 days later. Schedule your next call for 1 week later, if you speak with them or leave a message. Schedule your next call for 1 week later. If participant is local, offer to pick up. Schedule your next call for 1 week later. Schedule your next call for 1 week later. Schedule your next call for 1 week later. Schedule your next call for 1 week later. Schedule your next call for 1 week later. Schedule your next call for 2 weeks later. Schedule your next call for 2 weeks later. Schedule your next call for 2 weeks later. Schedule your next call for 2 weeks later. Schedule your next call for 2 weeks later, and continue calling for at least 6 months. Continue calling if you have had contact with participant and think continued attempts will help. A reward letter is an option but only if nothing else helps. The reward is usually comparable to the incentive they would have received for completing the study. Accelerometer Manual | 21 Call Descriptions and Scripts ← C. 1. Meter Check Call (MC) The Meter Check Call should be placed on the day (or one day after) the monitor is expected to arrive at the participant’s home. It reminds the participant to be on the lookout for the device and as prompt to start wearing it. Hello, I am [full name], from the [study name]. Can I speak to [participant’s name]? I’m calling to check if your movement meter has arrived in the mail? If yes, That’s great. Do you have questions about wearing the meter? How about completing the log? I will check back in a few days to see how things are going. If no, I will check back in a few days to see if you have received it. In the meantime, look out for it in the mail – it’s in a small padded envelope with the name “Project [XXXX]” on it. You can call me at [local number] if you have any questions. 2. Meter Reminder Call (MR) Participants should be contacted on the 3rd or 4th wearing day. This call is to ensure that the meter is being worn correctly and to answer any questions. It also helps to remind people to start wearing it and establishes a pattern of frequent communication between the participant and the recruiter. The MR contact can ALSO be a text message and/or an email. Hello, I am [full name], from the [study name]. Can I speak to [participant’s name]? I’m calling to check in and see how you are doing with the monitor and log? Are you writing down the time in the log when you are putting on and taking off the meter? 3. If participant IS wearing the meter, That’s great. Do you have questions about wearing the meter? How about completing the log? I will check back in a few days to see how things are going. Call me at [local number] if you have any questions. Terminate call. If participant has NOT started wearing the meter, As we discussed, the meter runs on limited battery life. I’m concerned, because if we don’t have enough days before the battery runs out, you will need to re-wear the meter. Is it possible for you to start wearing it tomorrow morning? Don’t forget to also fill in the log. I will check back in a few days to see how things are going. Call me at [local number] if you have any questions. Terminate call. Meter Prompt Call (MP1, MP2, MP3…) The first Meter Prompt Call (MP1) should be made 5 days after placing the Meter Reminder call. This call is intended to reduce turnaround time for meters. The call should be made when we expect the participant to have finished his/her seventh day of wearing the meter. Accelerometer Manual | 22 Key points: reminder to send back, other participants waiting for the meter. If the participant has provided an email address, this can be used to prompt the return of the meter. However, the first MP should not be a text or email unless the participant can’t be reached by phone. Hi, this is [First Name] from the [study name]. Is [participant’s first name] available? If no: May I leave a message with you? (Leave message with phone number and reminder) If person is on the phone: Hi [participant’s first name]! I’m calling to make sure everything is going okay with the meter and survey. • If in the mail: - When did you mail it? (if less than five days ago:) Great, it could still be in the mail. I’ll look for it in the next few days. (Set call back date for when it’s expected to arrive). • If participant can’t find/lost the activity meter: - The meter is extremely valuable to us and to our research. Please look for it and I’ll call you back in a couple of days to see if it’s been recovered. (Set next call date for 2-3 days later). • If participant hasn’t started wearing the meter: - Unfortunately, the meter runs on a battery with a short life, so you’ll need to send it back. We will send you a new meter in the mail when we get this one back from you. • Answering Machine Message: Hi, this is [recruiter’s name] from the [study name], calling for [participant’s name]. I’m calling to make sure everything is going ok with wearing your meter and to remind you to return it using the prepaid envelope as soon as you have completed your week of wearing. The meter contains very valuable data from past participants, so please remember to bring it with you to the clinic. If you have any further questions, please call us at [toll-free or local number]. Thanks and have a great day! • E-mail message (if appropriate): Dear [participant’s name], I gave you a call this week but haven’t been able to reach you by phone. I wanted to check in to make sure everything is going ok with wearing your meter. The meter contains very valuable data from past participants, so please return it to us as soon as you are finished. If you have any further questions, please write me back or call us at [toll-free or local number]. Thanks and have a great day! [staff name], [study name] Accelerometer Manual | 23 4. Receiving ActiGraph Data ← A. Downloading ActiGraph Data from Old Models (Actisoft software) 1. When the Actigraph is returned, wipe it with a sanitizing cloth to clean it. Put belt in designated ‘to be washed’ location. 2. Record date Actigraph received and date downloaded/verified in the meter Access form. Record number of days that meter was out. 3. Place the Actigraph in the carriage, label side facing up, and serial number facing away from you (notch facing toward you). 4. Open the Windows program (Actigraph.exe) 5. Scroll over “Stop Actigraph” and click on the “Stop & Download” option that will appear. 6. Select download data filename will pop-up – click OK, and if it is a long term meter, you will receive another pop-up warning that it could take some time – click OK again. 7. At this time, check that the battery life from the returned meter corresponds to the amount of time the meter has been in use. An increase in battery life signals a problem with the meter, see troubleshooting in appendix. Check the memory for errors (“memory address 0” is an error; see screening data section for more information). 8. When the screen reads “finished”, it will ask you if you’d like to view the file – click No and exit the program. 9. After downloading, a DAT file will be created in the same “files” folder as the original INI file. 10. Select the DAT and INI files and move them from the “files” folder into a separate folder created for participant meter data. 11. Once the files have been moved, rename them as “xxxxxxxxxxx_1” for each file where the “x’’s represent the participant’s ID. The “1” at the end corresponds to the first wearing time. This should be the same number that you entered in the “subject code name” field during while initializing. 12. All DAT files should be saved in the the same folder to enable batch scoring. However, we also create copies for participant folders 13. Once the DAT file has been downloaded, we switch to the MeterPlus software to screen, score, and analyze the Actigraph data. Accelerometer Manual | 24 ← B. Downloading ActiGraph Data from new models (Actilife software) 1. When the Actigraph is returned, wipe it with a sanitizing cloth to clean it. Put belt in designated ‘to be washed’ location. 2. Record date Actigraph received and date downloaded/verified in the Access database. 3. Connect Actigraph to the USB port (making sure that no other ports are being used). The meter should begin blinking. 4. Open the Actilife program and click on the “Download” icon. When connected properly, the software will recognize that a meter is connected. Click OK to continue. 5. When download has completed, you will receive a pop-up to save the data to file. Click “Yes”. Save the DAT file using the participant ID# with an underscore, then the stage of participation (e.g., 1001001000’s first meter should be named 1001001000_1). 6. All DAT files should be saved in the the same folder to enable batch scoring. However, we also create copies for participant folders 7. Once the DAT file has been downloaded, we switch to the MeterPlus software to screen, score, and analyze the Actigraph data. ← C. Configuring Meter Plus to Screen Data 1. Click on the MeterPlus icon to open the program. The default screen will look like this: 2. Click on ‘Tools’ and ‘Options’ to pull up the following screen to set the configuration options. These configuration settings apply to how MeterPlus processes data from the DAT file for viewing/screening purposes. Accelerometer Manual | 25 Configuration Setting Hours required for a valid day MINUTES of consecutive zeros to define non-wear time Actigraph Start Time for Participant’s Time Zone** Description The minimum number of valid hours recorded in the raw data file for a day to make the day valid. This can be overridden by double-clicking on a day in the day view list of the Main application window and forcing a day to be valid or invalid. The Actigraph records an activity count per epoch period. It will record a “0” if there was no movement. If there are at least as many minutes in a row (consecutive) as this value, then it is considered non-wearing time. MeterPlus will read the start time from the header of the file and there is no need to make adjustments unless the unit was initialized in a different time zone from where data were collected. For example, if a unit is initialized in the Pacific Time Zone and sent to the Eastern Time Zone, an adjustment of 3 hours should be made by adding 3 hours to the actual start time in the header. If the header indicates a midnight start time (0:00:00), the start time should be changed to “3”. ** When screening or scoring files from Baltimore, the Meter Start Time for Participant’s Time Zone should be changed to “3” to account for the time difference between San Diego, CA and Baltimore, MD. You’ll notice a shift in the data when you make this change and the days should look more ‘normal’. We don’t typically worry about this unless looking at hourly patterns or matching with other data (e.g., GPS or activity log). To clean files affected by time change, modify DAT file by either adding an hour of zero counts or deleting an hour of zero counts. Accelerometer Manual | 26 ← D. Screening Data Why do I need to screen data? When screening the data you are looking for several things. 1) The first is to determine if the data are valid. You will see some examples of invalid data below. 2) The second is to determine if there is enough wearing time in the file to be considered compliant without asking for a re-wear. . It is important to screen the data right away in case you to go back to a participant for a re-wear. It is imperative to screen the data prior to initializing it for another wearing in case the unit has malfunctioned and you need to take it out of the rotation How to screen data in MeterPlus (See MeterPlus User’s Manual, section 5 (Viewing Actigraph files) for detailed information about Viewing Files in MeterPlus) 1. Find the participant’s DAT or CSV file and drag it into MeterPlus. It is helpful to have the log to look at simultaneously. 2. Go to Reports, then Header Details to screen for errors. If using an older model (7164 or 71256), current memory address = 0 in the header of the file is an error! 3. MeterPlus shows you the date range from when the meter was initialized to when it was downloaded and whether or not each day is valid. Double check that the date initialized is the first date reflected in MeterPlus. If it isn’t, this could indicate a problem with the data file. 4. Open each wearing day in Detailed View by double clicking. Wearing days can be determined by using the log or by checking the data in the absence of a log. Note whether the participant noted the correct day of the week for the corresponding date. The detailed view in MeterPlus will show you the raw data. The data patterns of wearing the Actigraph and mail time are quite different, as are patterns from devices that are not functioning properly. Often times, a mail day or a malfunction will be listed as being valid, but upon reviewing the raw data, it will be clear that it is not (see examples below). Note: there may be discrepancies between the meter log and the scored data. Although most participants fill out the logs accurately, there are some who do not. There may be days where the log reflects 12 hours of movement, but you see 14. The downloaded data is likely more accurate than the log, so don’t worry about discrepancies. 5. People will occasionally go to sleep with the Actigraph on. There will be movement between the two days and it is hard to determine where one day ends and another begins. Just be aware that this data looks confusing and consult the meter log. You should make a note of this in the Access database so if cleaning of the file needs to occur later, these files will be easy to find. 6. Once you’ve verified that the wearing days look valid, write the number of valid hours above each corresponding day on the log, using a red pen. Another double check is to make sure the log start time reflects the start time in the data file. You can check this by counting the rows of consecutive zeros in the raw data file for a given day. Each row signifies an hour, starting at midnight. 7. Record the number of valid days in the Access tracking database. Also record the dates of wearing, any flags for bad or repeated data, and information about each wearing day (e.g., valid day, why not, day of week, etc.) Include any information here that otherwise would be gleaned from the log. Accelerometer Manual | 27 ← E. Valid Wearing Time Examples: Wearing time (continuous). These days look straight forward. Use log to match up days AND do a manual check of the first, the last, and a few middle wearing days to validate wearing time. What you see in the data supersedes what is reported on log (e.g., 7 days may be reported on the log but you see 8 days so it is “8”). Wearing time (intermittent). Wearing time is NOT straight forward. Use log to match up days AND do a manual check of each day to determine wearing time (double click to open every day with any valid hours). What you see in the data supersedes what is reported on log. It is possible that 7 consecutive days would be reported on the log but obviously not the case. Accelerometer Manual | 28 Valid Day Example (double-click day in list view to see detailed data): Typical Wearing Day. There are rows of zero counts during sleep and the activity starts at the 7th row, or 7am. There are low counts throughout but they are sporadic and they’re not consecutive. This is a very typical pattern and would likely have 13 or 14 valid hours of wear. ← F. Invalid Wearing Time Examples: Non-wearing day #1: Shows 10 valid hours in MeterPlus, but opening the raw data show that is either a mail day or a day when the meter was kept in a car. There are low counts and an abundance of zeros. The wear time pattern is present but the pattern of zeros interspersed with periodic low count indicates time spent with a person, but not being worn. Accelerometer Manual | 29 Non-wearing day #2: Shows 10 valid hours in MeterPlus, but opening the raw data show that is likely a mail day. There are low counts and an abundance of zeros that do not follow the typical wear time pattern. Also, the day is after the cluster of wearing time, separated by a non-valid day, and 1 day prior to download - all indicators of mail time. ← G. Overnight Wearing: Meter worn overnight. MeterPlus will show each day as valid with valid hours up to 24. The data will be mostly clumped in the waking hours of the day, but will show scattered counts throughout the sleeping hours. Flag these files in the tracking database so they can be cleaned later. We could manually replace these data with “0” values or use Time Filters to summarize activity during waking hours only. Accelerometer Manual | 30 ← H. Meter malfunction examples (counts over 16000, repeating counts, counts within a restricted range arranged in a columnar pattern, etc): Red flag! Meter malfunction examples: Accelerometer Manual | 31 Red Flag – stopped recording after 5 days. This is usually seen with the new models and wouldn’t happen if battery were fully charged. Most likely not fully charged when it went out or has a faulty battery. Test the unit several times before using again. Send to Actigraph for repair if problem happens again. ← I. Memory Address Problem: i. "Current Memory Address 0" in the header of the file is always a red flag. " This means the device stopped recording new data at some point. 2 data files from same Actigraph unit, 2 different participants, showing repeated data starting 2/16/2006: SAME DATA Accelerometer Manual | 32 ← J. Shift Worker: Before Time Zone Adjustment Make time adjustment using Meter Start Time for Participant Time Zone to make data fit into ‘days’. The reason you might want to do this is to avoid losing partial days at the beginning and ending of the wear time because they might not have enough valid hours to be considered ‘valid’ on their own. After Time Zone Adjustment ← K. Valid Wear Time Criteria Neighborhood Quality of Life Study (NQLS_Adult; ages 20-65) Participants measured for seven consecutive days using a 60-second epoch. Participants are required to have at least 5 valid days for each meter wearing. A valid day is defined as a day containing at least 10 valid hours. A valid hour is one that does not contain a string of 30 or more zeroes (equivalent of 30 minutes)*. For scoring, we used 8 hours as the minimum to include a few more participants in the accelerometer Accelerometer Manual | 33 sample. Exception: A participant can have less than 5 valid days if they have at least 66 valid hours over the course of the time they wore it. These days are manually changed to ‘valid’ in MeterPlus. Neighborhood Quality of Life Study for Seniors (NQLS-Senior; older adults 66+) Participants measured for seven consecutive days using a 60-second epoch. Participants are required to have at least 5 valid days for each meter wearing. A valid day is defined as a day containing at least 10 valid hours. A valid hour is one that does not contain a string of 30 or more zeroes (equivalent of 30 minutes). For scoring, we used 8 hours as the minimum for a valid day and 45 minutes of consecutive zeros for non-wearing time. Exception 1: A participant can have less than 5 valid days if they have at least 66 valid hours over the course of the time they wore it. These days are manually changed to ‘valid’ in MeterPlus. Exception 2: If a participant doesn’t meet the 66-hour requirement, they can also have enough valid days based on altered criteria. For this screen, we will accept an altered criterion of 45 zeroes which is also what was used for scoring. International Physical Activity and Environment Network Study (IPEN; adults 18-65) Participants measured for seven consecutive days using a 60-second epoch. Participants are required to have at least 5 valid days for each meter wearing. A valid day is defined as a day containing at least 10 valid hours. A valid hour is one that does not contain a string of 60 or more zeroes (equivalent of 60 minutes). At this point, there are no wear time exceptions. *Based on a few studies (Winkler unpublished, Rowlands 2009, Evenson 2009) and our own in-house validation study, we have concluded that 60 minutes of consecutive zeros maximizes the detection of sedentary behavior. People can sit very still (no movement registered on the meter) for at least an hour. Therefore, we are changing our procedure from 30 minutes of zeros to 60 minutes for future studies and re-analysis of NQLS-Adult and NQLS-Senior data. The studies we are referring to, including our own, were conducted in adults. It is not clear yet what might be appropriate for seniors but it may be longer than 60 minutes. Note: this definition makes it very difficult to distinguish non-wear days, such as mailing, WITHOUT MANUALLY SCREENING the data. Screening is essential as we have found that more than half of mail days will have >10 valid hours using 60 min of zeros. With the new models, this is not really an issue. ← L. 1. When do you need a re-wear? The participant did not wear the Actigraph for enough days. In this case, the recruiter needs to call the participant and see if they will wear the Actigraph again and fill out another log to make up for the missing data. Accelerometer Manual | 34 2. The participant wore the Actigraph for enough days, but for not enough valid hours in each day. In this case, the recruiter needs to call and have the participant wear the Actigraph again and fill out another log for how many days they’re missing. Emphasize that the Actigraph needs to be worn the entire day, and not just for a few hours. 3. Computer/Equipment failure. The recruiter needs to call and ask the participant to re-wear the Actigraph. $10 can be offered as compensation for the inconvenience. ← M. Re-wear Call Script Hi, this is [First Name] from the [study name]. Is [participant’s first name] available? Hi [participant’s first name]! I’m calling because we received your materials back in the mail – thank you for sending those back to us! Unfortunately, we took a look at the meter data and it looks like we don’t have enough data. [Explain how many valid days are needed, discuss reasons for non-valid days, not enough hours, etc.] I’m calling to see if you would be able to wear the meter again for [amount of time needed] full days. Thank you! We really appreciate your help. I will send you a meter today and will give you a call in a couple of days to check in. 1. 2. 3. 4. Accelerometer Manual | 35 5. Cleaning and Scoring Data Before the scoring process can proceed, screened files called MeterPlus data (MPD) files must be created from DAT files. This feature allows the user to exclude days when the Actigraph was not being worn, was in the mail, etc. and deals with non-wearing time within valid days. ← A. Configuring MeterPlus to Clean Data Configuration Setting Hours required for a valid day MINUTES of consecutive zeros to define non-wear time Value to use for undefined field Replace strings of zeros with the following value (default Description The minimum number of valid hours recorded in the raw data file for a day to make the day valid for scoring purposes. The Actigraph will record a “0” count value for an epoch if there was no movement. This setting will cause MeterPlus to replace a zero count value with the “Replace strings of zeros” setting value if at least this number of minutes of consecutive zero counts were recorded. This is so the correct differentiation is made between a “not wearing” and a “sedentary, but wearing” value. Data files being processed in the same folder can have varying amounts of data in them. This setting determines how to deal with the missing hours or days of data. User can select NULL or another missing data value. Zero counts that have been classified as “not wearing” by the “Number of zeros in a row to define non-wear Accelerometer Manual | 36 is -999 – do not change). time” setting are replaced with this value. Note: this value needs to be defined as an activity category in the Categories tab. Output Totals for Valid Days Only Totals for Valid and Invalid Days Totals and Daily for Valid and Invalid Days Daily for Valid Hours Only Hourly for Valid and Invalid Days Parameter Directory to save new data files Specifies the level of output that is produced from the batch of MPD files: Totals for Valid Days Only, Totals for Valid and Invalid Days, Totals and Daily for Valid and Invalid Days, Daily for Valid Hours Only, and Hourly for Valid and Invalid Days. Selecting this option provides overall summary data for valid days only. Selecting this option provides overall summary data for valid and invalid days. Selecting this option provides overall summary and daily summary variables for valid and invalid days. Selecting this option provides daily summary variables only for hours that are valid as defined in the ‘Number of zeros in a row to make an hour invalid’. Selecting this option provides daily summary and hourly data for valid and invalid days. This option creates the largest number of variables. Specifies the type of data that is batch scored. The default, “select” will score all types of MPD files located in the specified folder. “Activity” refers to single-axis activity. This is the full path to the directory where screened files (MPD files) are saved for eventual scoring. The batch scoring process requires all files to be located in the same folder so any group of files that will be scored with the same scoring options should be placed together in the same folder. Accelerometer Manual | 37 ← B. Selecting Days to be Scored (Creating MPD files) When the wearing days have been selected and any desired overrides to the valid day criteria have been made, these days will need to be saved as an MPD file by clicking on the “Save Selected Days” button. If all days are to be saved, the user can click on the “Save All” button. A message will confirm how many days were saved and the location of the file. The location of the MPD files is selected in the Score Data tab. Note that valid and/or invalid days can be saved to this file. The valid or invalid designation is used to code each day as a valid or invalid day in the final output. The user selects whether to include invalid days of data in the output in the Score Data tab. This selection is applied during the batch-scoring process, not here. We recommend saving ALL WEARING TIME, not just valid days at this stage! ← C. Preparing Re-wear files for Scoring If a participant has more than one file in the first or second part, such as a re-wear meter file, the data for each part need to be combined prior to batch scoring. • • • • Open the re-wear MPD file in Notepad, indicated by a “(1)” at the end of the file name (314509001029_1(1).mpd). Make a note of the number of days in this file (Header: NumberOfDays,). Copy all of the data after the header which starts with a date (DATE, 0818-2003). Close file. Open the original file in Notepad (314509001029_1.mpd). Paste the data from the re-wear file to the end of this file. Change the NumberOfDays in the header to reflect the data added from the re-wear file. For example, if 3 days of re-wear data are added to 4 Accelerometer Manual | 38 • • ← days in the original file, change the NumberOfDays, 4 to NumberOfDays, 7. Save the new file containing data from both wearings. Delete the re-wear MPD file. D. Configuring MeterPlus to Score Data See MeterPlus User’s Manual, Sections 8-12 for detailed instructions. The information in these sections pertains to how MeterPlus processes MeterPlus Data (MPD) files during the batch scoring process as it creates a final scored, comma-delimited data file. Cut points Filename Accelerometer Manual | 39 Bouts Bouts of activity are sustained periods of elevated counts to identify exercise times. MeterPlus will provide information on bouts of activity such as the frequency, when the bouts occurred, and how long they lasted. The user can designate the intensity that must be maintained, the minimum length of the bout and the tolerance for gaps within the bout. 10 minute bout Moderate activity lower threshold cut-point for adults (Freedson) for 60s epoch Moderate activity upper threshold cut-point for adults (Freedson) for 60s epoch 2 minute interruption Energy Expenditure Note: MeterPlus can calculate these variables from 5, 10, 15, 20, 30 or 60 second epoch data. There is no need to convert to 60-second files prior to analyzing energy expenditure. Accelerometer Manual | 40 Time Filters ← E. Scoring Using Meter Plus See MeterPlus User’s Manual, Section 13 for more details. 1. 2. 3. 4. 5. Select your group of cut-points or create your age file to use age-specific scoring. Create your participant weight file to use in energy expenditure calculations and/or select a default weight (in kgs). Browse for the folder that contains your .mpd files and browse for the location to save your output. Name your output file. Score For explanations of scored variables and files, see MeterPlus User’s Manual, Section 14. Accelerometer Manual | 41 6. Management and Training ← A. Hiring Qualities to look for in Data Collectors: When hiring data collectors, it is important to look for certain qualities that would make for an effective data collector. o The obvious - look for data collectors who are reliable, trustworthy, and hardworking. o Resilient–they can’t take rejection personally o Personable, likeable, outgoing o Come across as professional and knowledgeable o Ability to think on their feet o Not as easy as it may seem! o Remember that data collectors may be interacting with participants so it is important to have data collectors who participants feel comfortable with. A data collector who possesses these qualities and comes across as a professional would be a great addition to the team. Qualities to look for in a Data Manager: The main role of a data manager is to manage data collection efforts and to monitor that data are being collected according to protocol. • Attention to detail!!! • Invested in getting quality data above all else • Organized – can manage incoming, outgoing, re-wears, screening, calls from participants, questions from data collectors… at the same time • Confident to make decisions based on training & experience, but not so confident that won’t ask for a 2nd opinion. • Comfortable looking at numbers, figuring out the puzzle… • We have a test exercise we use when hiring to try to assess these qualities in potential candidates ← B. Delivery and Compliance Training • As part of their training, data collectors must wear an Actigraph for several days. This allows the data collectors to speak from experience when interacting with study participants. • Provide opportunities for data collectors to role play- delivery of Actigraph and compliance, re-wear requests. Accelerometer Manual | 42 ← ← • Provide a checklist of talking points, but not necessarily a script • Emphasize the importance of details such as serial numbers, participant IDs, dates etc. C. Checking (Quality Control) • The recruitment database should be checked weekly for cases that may have fallen between the cracks. • Outstanding units should also be queried periodically and reviewed to be sure that appropriate action is being taken to retrieve them. • When surveys are completed, they should be screened for completeness before data entry. Multiple quality check points are important to avoid any mistakes in the data. • Data entry should be done in duplicate or all data entry should be checked by a supervisor until a person is ‘certified’ (< 0.0125 error rate; # errors/#keystrokes in survey) • Ideally, the same person should screen and score all the data. Regular reliability checks should be conducted by managers and investigators. Managers and investigators should be available to evaluate ambiguous files. Remember that nobody becomes an expert in a few months so we encourage and expect staff to consult you about ambiguous files and cases. D. Electronic Tracking Review the electronic database- forms, queries, reports. Accelerometer Manual | 43 Examples of recruitment and data collection database forms* *Copies of tracking and recruitment Access databases are available upon request. Accelerometer Manual | 44 7. Troubleshooting ← A. Equipment (older models) Below are some of the more common occurrences. 1. Downloading the older model Actigraph results in the error that the .ini file for this meter is missing. If you think that there should be an .ini file for this meter, choose CANCEL to try to locate the original file. If it is not available, you will need to create a new .ini file, using the start date and time from the meter Access database. Press OK to create a new .ini file (you will receive a notice that the file may not be exactly as the one initially created for this monitor. The program will lead you through the process of creating a new file. Be sure to use the start date and time from the meter Access database. 2. Checking the battery, initializing, downloading - performing any of these functions results in the error “activity monitor did not respond.” First check to make sure that the meter is firmly placed in the carriage and then try it again. The Actigraphs are sensitive, so sometimes the carriage cannot read the information on the first try. If the problems persist, wiggle the wires connected to the carriage to ensure they haven’t come loose. Also, you can blow gently on the carriage and try it again; sometimes, dust or dirt will stop the meter from being read. 3. When you place a meter in the carriage to download, the red light is not rapidly flashing like it should be if it’s still recording data. The first step is always to attempt to download the meter anyway. a. If the meter still flashes the 1-2-3 sequence, it means the meter never initialized in the first place. Check the .ini file to verify the meter was initialized correctly and for the correct date and time. If the .ini file is correct, this could indicate a serious problem with the computer or software. Contact MTI and your IT person to help troubleshoot the problem. b. If the meter is flashing the slow 1-1-1 sequence, it means the meter was either never initialized (check .ini file) or it means the meter is full of data and is no longer recording. The short-term 7164 meters record for 22 days, and the long-term 71256 meters for 91 days. If the meter has been recording for longer than the maximum time, the data will not be lost. Continue downloading the meter as usual. 1. If the meter is flashing the slow 1-1-1 sequence but the meter has not been out longer than its run time (22 or 91 days) and it did indeed get initialized, something else may be wrong. Download the meter. An error saying the “current memory address is zero” may appear. This indicates a problem with the meter, and regardless of the outcome, you will need to send the meter for repairs. In order to attempt to retrieve the data, go to “Admin”, then “Recovery Mode”. You will then have to select the number of epochs to download. Calculate the number of epochs by multiplying the number of days it has been running by 1440 (the number of minutes in one day). Enter that number into the program and hit “return” to begin downloading. 2. Whenever you have a 0 memory address in a file, the data need to be scrutinized carefully. This means that at some point, the unit stopped collecting new data and the file contains a combination of old and new data. Accelerometer Manual | 45 You will have to determine the point at which the malfunction occurred by comparing data files from previous wearings side by side. 3. Whenever you have to “force” a download, check the battery life. If the battery life has increased from the time the meter was sent out to the time it was received, the meter needs to be sent to MTI for repair. 4. In the downloading process, the Actigraph software gives you an error that reads “the Actigraph is no longer sending data... do you want to save this data anyway?” You will select no, although the software will save a version regardless. You will need to then go into the “files” folder to delete the .dat file for this meter (first check that it is in fact empty), then proceed to download again. This happens from time to time, mostly when multiple programs/tasks are happening simultaneously on the computer while downloading. Most of the time, it will download properly after this error. Here are some other specific issues and troubleshooting advice based on our experiences. Question: I set up the RIU using the USB connection, and I also installed the driver for the USB adapter as recommended for computers with window XP. Putting the actigraph in the RIU unit shows continuous flash rate on the reflective surface of the reader unit but no information displays on the INFO column in the bottom corner of the Actisoft Analysis Software screen. Clicking the Actigraph info or initialize from the left hand menu bar of the screen display "No Actigraph in Reader OR default port has changed" or "Error-Actigraph Initialization Failed. Ensure Actigraph is in Reader" respectively. However, clicking initialize display the number of battery hours in the bottom right hand corner of the Actisoft Software screen says 4000 for most of the actigraphs. Answer: This error before and it usually means one of two things. 1. You may have a dead battery that has been dead for a long time. When this happens, the light will still flash and you may get a misleading reading of 4000 hours. You can put a fresh battery in one of the units and try again. 2. Your computer is not recognizing the port you have used for the RIU reader/USB cord or hub. Here is a trick from Actigraph to help resolve this issue. Go to your Start Menu, Control Panel, System, Hardware, Device Manager, expand the Ports and USB controllers, and select each one. Nothing will change when you select them but sometimes the act of clicking on them will wake them up. Close the Device Manager and try again. You can also try right clicking on the port, go to Properties, Port Settings, Advanced and change the Port to 2 (regardless of what is says currently). Restarting your computer is another trick that works sometimes. Accelerometer Manual | 46 ← B. Equipment (new models) Various problems can arise during different stages of Actigraph use. With newer models (GT1M, GT3X, GT3x+), most of these problems have been eliminated. The common problems we have experienced with these models relate to faulty batteries that don't hold their charge for more than a few days. This is usually identified within the first few uses of the device and can be sent back to Actigraph for repair under warranty. The Actigraph Operation Manual is sometimes helpful. For problems cannot be resolved, e-mail device support at [email protected], or e-mail the Actigraph technical representative directly: John Schneider at [email protected]. Also, the website of Actigraph is http://www.theactigraph.com/. ← C. MeterPlus Questions Questions about the use of data screening or scoring using MeterPlus may be answered using the MeterPlus User's Manual. You can also contact Kelli Cain at [email protected] If you are interested in purchasing MeterPlus or in our data collection and scoring service you can visit the website at www.meterplussoftware.com. ← D. IPEN Questions If you have questions about the IPEN accelerometer protocol or general IPEN procedures, contact Kelli Cain at [email protected]. If you are interested in joining IPEN, contact [email protected] The IPEN network-wide website can be accessed at www.ipenproject.org. Accelerometer Manual | 47 ← 8. References Select study publications Kerr, J., Sallis, J.F., Owen, N., Bourdeaudhuij, I., Cerin, E., Reis, R, Sarmiento, O., Frömel , K., Mitáš , J., Troelsen , J., Christiansen , LB, Macfarlane , M., Salvo , D., Schofield , G., Badland , H., Guillen-Grima , F., , Aguinaga-Ontoso , I., Davey , R., Bauman , A., Saelens . B., Riddoch, C., Ainsworth , B., Pratt, M., Schmid, T., Frank, L.D., Adams, M.A., Conway, T.L., Cain, K.L, Van Dyck , D., Bracy, N.L. (in press). Advancing Science and Policy through a Coordinated International Study of Physical Activity and Built Environments: IPEN Methods. Journal of Physical Activity and Health. Kozo, J., Sallis, J.F., Conway, T.L., Kerr, J., Cain, K., Saelens, B.E., Frank, L.D., and Owen, N. (in press). Sedentary behaviors of adults in relation to neighborhood walkability and income. Health Psychology. King, A.C., Sallis, J.F., Frank, L.D., Saelens, B.E., Cain, K., Conway, T.L., Chapman, J.E., Ahn, D.K., Kerr, J.. Aging in Neighborhoods Differing in Walkability and Income: Associations with Physical Activity and Obesity in Older Adults. Social Science and Medicine (in press). Buman, M., Hekler, E., Haskell, W., Pruitt, L., Conway, T., Cain, K., Sallis, J., Saelens, B., Frank., L., King, A. (2010). Evaluating Physical Activity Intensity Threshold Associations with Rated Health and WellBeing in Older Adults. American Journal of Epidemiology, 172(10):1155-65. Sallis, J., Saelens, B., Frank, L., Conway, T., Slymen, D., Cain, K., Chapman, J., and Kerr, J. (2009). Neighborhood built environment and income: Examining multiple health outcomes. Social Science and Medicine, 68, 1285-1293. doi:10.1016/j.socscimed.2009.01.017 Methods or scoring procedures Cain KL, Sallis JF, Conway TL, Van Dyck D, Calhoon L. (in press). Using Accelerometers in Youth Physical Activity Studies: A Review of Methods. Journal of Physical Activity and Health. Yıldırım M, Verloigne M, de Bourdehaudhuij I, Androutsos O, Manios Y, Felso R, Kovacs E, Doessegger A, Bringolf-Isler B, te Velde SJ, Brug J, Chinapaw MJM. Study protocol of physical activity and sedentary behaviour measurement among school-children by accelerometry – Cross-sectional survey as part of the ENERGY project. BMC Public Health 2011, 11; 182 Edwardson CL, Gorely T. Epoch Length and Its Effect on Physical Activity Intensity. Med Sci Sports Exerc. 2010;42(5):928–934. Penpraze V, Reilly J, MacLean C, et al. Monitoring of physical activity in young children: how much is enough? Pediatr Exerc Sci. 2006;18:483–491. McClain JJ, Abraham T, Brusseau T, Tudor-Locke C. Epoch Length and Accelerometer Outputs in Children: Comparison to Direct Observation. Med Sci Sports Exerc. 2008; 40(12):2080-2087. Baquet G, Stratton G, Van Praagh E, Berthoin S. Improving physical activity assessment in prepubertal children with high-frequency accelerometry monitoring: a methodological issue. Prev Med. 2007;44(2):143-147. Vale S, Santos R, Silva P, Soares-Miranda L, Mota J. Preschool children physical activity measurement: importance of epoch length choice. Pediatr Exerc Sci. 2009;21(4):413-420. Sirard JR, Slater ME. Compliance with Wearing Physical Activity Accelerometers in High School Students. J Phys Act Health. 2009;6(1Suppl):S148-S55. Masse, LC, Fuemmeler, BF, Anderson, CB, Matthews, C E, Trost, SG, Catellier, DJ, et al. (2005). Accelerometer data reduction: a comparison of four reduction algorithms on select outcome variables. Med Sci Sports Exerc, 37(11 Suppl), S544-554. Catellier DJ, Hannan PJ, Murray DM et al. Imputation of missing data when measuring physical activity by accelerometry. Med Sci Sports Exerc. 2005;37(11 Suppl):S555-S562. Welk, G. J., Schaben, J. A., & Morrow, J. R., Jr. (2004). Reliability of accelerometry-based activity monitors: a generalizability study. Med Sci Sports Exerc, 36(9), 1637-1645. Yngve, A., Nilsson, A., Sjostrom, M., & Ekelund, U. (2003). Effect of monitor placement and of activity setting on the MTI accelerometer output. Med Sci Sports Exerc, 35(2), 320-326. Accelerometer Manual | 48 Troiano, R. P., Berrigan, D., Dodd, K. W., Masse, L. C., Tilert, T., & McDowell, M. (2008). Physical activity in the United States measured by accelerometer. Med Sci Sports Exerc, 40(1), 181-188. Ward, D. S., Evenson, K. R., Vaughn, A., Rodgers, A. B., & Troiano, R. P. (2005). Accelerometer use in physical activity: best practices and research recommendations. Med Sci Sports Exerc, 37(11 Suppl), S582-588. Mattocks C, Ness A, Leary S, et al. Use of accelerometers in a large field-based study of children: protocols, design issues, and effects on precision. J Phys Act Health. 2008;5(1Suppl):S98-S111. Trost SG, Pate RR, Freedson PS, Sallis JF, Taylor WC. Using objective physical activity measures with youth:How many days of monitoring are needed? Med Sci Sports Exerc. 2000; 32(2):426-431 Nillson A, Ekelund U, Yngve A, Sjöström M. Assessing physical activity among children with accelerometers using different time sampling intervals and placements. Pediatr Exerc Sci. 2002;14:87-96. Esliger DW, Copeland JL, Barnes, JD, Tremblay, MS. Standardizing and optimizing the use of accelerometer data for free living physical activity monitoring. J Phys Act Health. 2005;3:366-383. Calibration studies for adult and senior cut points Freedson, P. S., Melanson, E., & Sirard, J. (1998). Calibration of the Computer Science and Applications, Inc. accelerometer. Med Sci Sports Exerc, 30(5), 777-781. Matthews, CE., Chen KY, Freedson PS, Buchowski MS, Beech BM, Pate RR, Troiano RP. Amount of Time Spent in Sedentary Behaviors in the United States, 2003-2004. American Journal Of Epidemiology 167, no. 7 (2008): 875-81. Sasaki, J. John D., & Freedson, P. (2010). Calibration of the Actigraph GT3X Activity Monitor. ICPAPH conference. Pruitt LA, Glynn NW, King AC, et al. Use of accelerometry to measure physical activity in older adults at risk for mobility disability. Journal of Aging & Physical Activity. 2008;16(4):416-434. Copeland JL, Esliger DW. Accelerometer assessment of physical activity in active, healthy older adults. Journal of Aging & Physical Activity. 2009;17(1):17-30. Calibration studies for youth cut points Trost SG, Loprinzi PD, Moore R, Pfeiffer KA. Comparison of accelerometer cut points for predicting activity intensity in youth. Med Sci Sports Exerc. 2011;43(7):1360-1368. Van Cauwenberghe E, Labarque V, Trost SG, Bourdeaudhuij I de, Cardon G. Calibration and comparison of accelerometer cut points in preschool children. Int J Pediatr Obes. 2011;6(2-2):e582-e589. Catellier, D. J., Hannan, P. J., Murray, D. M., Addy, C. L., Conway, T. L., Yang, S., et al. (2005). Imputation of missing data when measuring physical activity by accelerometry. Med Sci Sports Exerc, 37(11 Suppl), S555-562. Evenson, K.R., Catellier, D.J., Gill, K., Ondrak, K.S. and McMurray, R. (2008). Calibration of two objective measures of physical activity for children. Journal of Sports Sciences, 26(14), 1557-1565. Mattocks C, Leary S, Ness A, et al. Calibration of an accelerometer during free-living activities in children. Int J Pediatr Obes. 2007;2(4):218-226. Sirard JR, Trost SG, Pfeiffer KA, Dowda M, Pate R. Calibration and evaluation of an objective measure of physical activity in preschool children. J Phys Act Health. 2005;3:345-357. Pate RR, Almeida MJ, McIver KL, Pfeiffer KA, Dowda M. Validation and calibration of an accelerometer in preschool children. Obesity. 2006;14:2000-2006. Reilly JJ, Coyle J, Kelly L, Burke G, Grant S, Paton JY. An Objective Method for Measurement of Sedentary Behavior in 3- to 4-Year Olds. Obesity. 2003;11:1155-1158. Treuth, M.S., Schmitz, K., Catellier, D.J., McMurray, R.G., Murray, D., Almeida, M.J., Going, S., Norman, J.E. and Pate, R. (2004). Defining accelerometer thresholds for activity intensities in adolescent girls. Medicine & Science in Sports & Exercise, 36(7), 1259-1266 Freedson PS, Sirard J, Debold E, et al. Calibration of the Computer Science and Applications, Inc. (CSA) accelerometer. Med Sci Sports Exerc. 1997;29(suppl):45. Puyau, MR, Adolph, AL, Vohra FA, Butte NF. Validation and calibration of physical activity monitors in children. Obes Res. 2002;10:150-157. Accelerometer Manual | 49 Trost SG, Pate RR, Sallis JF, et al. Age and gender differences in objectively measured physical activity in youth. Med Sci Sports Exerc. 2002;34:350–355. Guinhouya CB, Hubert H, Soubrier S, et al. Moderate-to-vigorous physical activity among children: discrepancies in accelerometry-based cut-off points. Obesity. 2006; 14(5):774-777. Mota J, Valente M, Aires L, et al. Accelerometer cut points and youth physical activity prevalence. Euro Phys Edu Rev. 2007;13(3):287-299. Non-wear and sedentary time processing methods Winkler EAG, Paul A.; Healy, Genevieve N.; Clark, Bronwyn K.; Sugiyama, Takemi; Matthews, Charles E.; Owen, Neville G. Distinguishing true sedentary from accelerometer nonwearing time: Accuracy of two automated wear-time estimations. Evenson and Terry. Assessment of Differing Definitions of Accelerometer Nonwear Time (2009). Res Quar Exer Sport, 80 (2), 355-362. Rowlands, Esliger, Eady, & Eston (2009). Empirical Evidence to Inform Decisions Regarding Identification of Non-Wear Periods from Accelerometer Habitual Physical Activity. Children And Exercise XXV. Choi, L., Liu, Z., Matthews, C., Buchowski, M. (2011). Validation of Accelerometer Wear and Nonwear Time Classification Algorithm. MSSE, 43 (2), 357-364. Actigraph model comparisons Corder K, Brage S, Ramachandran A, Snehalatha C, Wareham N, Ekelund U. Comparison of two Actigraph models for assessing free-living physical activity in Indian adolescents. J Sports Sci 2007; 25: 16071611. John D, Tyo B, Bassett DR. Comparison of four ActiGraph accelerometers during walking and running. Med Sci Sports Exerc. 2010; 42(2):368-374. Kozey SL, Staudenmayer JW, Troiano RP, Freedson PS. Comparison of the Actigraph 7164 and the Actigraph GT1M during self-paced locomotion (2010). Medicine and Science in Sports and Exercise; 42: 971976. Rothney, M.P., Apker, G.A., Song, Y., and Chen, K.Y. (2008). Comparing the performance of three generations of ActiGraph accelerometers. J Appl Physiol 105: 1091–1097. Accelerometer Manual | 50 ← 9. IPEN Study-specific Guidelines Sample • • • For IPEN, the minimum sample size for valid accelerometer data is 250. Valid accelerometer data is described below. The sample should vary by walkability with roughly equal numbers in each walkability category and with a relatively equal gender distribution. Recruitment should occur simultaneously in high- and low-walkable areas. • Summary of Recommendations for Scoring Actigraphs for IPEN • • • • • Non wear definition = 60 minutes of consecutive zeroes for all Actigraph models --supported by previous studies (Winkler, Rowlands 2009, Evenson 2009) and our in-house validation study. No recommendation for Actical. Manually screen for non-wearing days, especially if using 7164 model. Instructions and examples using MeterPlus are provided in IPEN accelerometer protocol Require 10 hours of wearing time for ‘valid day; however we are asking that ALL wearing days are saved even if less than 10 valid hours. Screenshots with correct MeterPlus settings are below. After screening and identifying valid days, send MPD files to IPEN Coordinating Center for further processing along with raw data files (DAT or CSV files). The IPEN Coordinating Center will score files using these guidelines: • Freedson 1998 cutpoints (>1952 for moderate intensity) • <100 cpm for defining sedentary behavior (Matthews 2008, Treuth 2004, Evenson 2008) • 10-min bouts with 2 min tolerance (possible) • Segmenting day into different time periods (possible) • Will use accelerometer model as covariate in analyses (this will control for differences in sensitivity by model) For countries that have already created MPD files using the previous recommendations (30 minutes to define non-wear), the Coordinating Center will re-create the MPDs with the new recommendations. In this case, please send both MPD and DAT/CSV files to ICC. Accelerometer Manual | 51 IPEN Filenaming We need a consistent convention to identify files at the IPEN CC and to assure we have unique participant ID numbers across countries. • We are requiring that each country add their unique Country Code to the beginning of each filename and participants ID followed by an underscore (e.g., 55_xxxx). • We suggest using a 12-character file name for survey, accelerometer and other relevant files: o Country code (2 characters) followed by “_” = ask IPEN CC for your unique code. o Walkability code (1 character; 1=low walkability; 2=high walkability). o Neighborhood, Tract or City code (6 characters; use the smallest unit available). o ID number within neighborhood, census tract or city (3 characters). Sample filename: 55_1583642001 55=Brazil 1=Low Walkability 583642=Census Tract 001= ID within Census Tract • Feel free to include other information in your filenames. Just let us know when you send your files so we can decipher it. . Biking What about biking? How will we capture this activity if the accelerometer doesn't pick it up well? • We recommend asking participants to complete a bicycling log. Ask each participant to record the amount of time they spent bicycling each day they wore the accelerometer. This self-reported bicycling measure may be used in analyses since this activity is largely missed with the accelerometer. Accelerometer Manual | 52 Other software options Other software packages besides MeterPlus will work if they can meet the following criteria: • • • • • allow for screening for wearing time for compliance and re-wear decisions allow for manually exclusion of mail or other non-wear days clean non-wearing time from sedentary time define non-wear time as a 10-hour valid day and 60 minutes of consecutive zeros provide the IPEN variables of interest in the output such as total MVPA, total sedentary time, # valid days, # valid wearing hours, etc. Accelerometer Manual | 53 ← 10. Appendices Accelerometer Manual | 54 ← HOW LONG SHOULD I WEAR MY MOVEMENT METER? When you send your meter back, we will see how many hours you wore it each day. If we see that you didn’t wear it for at least 7 days, for at least 12 hours per day, we may have to ask you to wear it again. We determine how long you wore the device by looking at a graph that we download from your meter. Below are some examples. The top graph is from a person who wore the movement meter for a sufficient amount of time. The bottom graph is from a person who didn’t wear the meter for long enough and had to wear it again. This person did a great job of wearing their meter! As you can see on the graph, they put it on when they woke up at about 7:30 in the morning, and kept it on until about 8:30 at night. This person would have to wear the meter again. They put it on when they woke up at about 9:00 in the morning, but took it off at about 2:00 in the afternoon. If you have any questions about your meter, or if you would like your own copy of your graph, please let us know by calling 1-619-XXX-XXXX. We would be glad to help! Accelerometer Manual | 55 ← Wear the movement meter for seven (7) consecutive days.* In the table below, write down the dates and days on which you wear the meter. Note the times, including “a.m.” or “p.m.,” that you put it on and take it off during each day. Also note the reason you took it off. Below is a sample entry: Date Day Feb. 26, 2005 Saturday On Off 7:30 AM 1:00 PM Swimming 1:45 PM 10:45 PM We have included extra spaces/rows in case you need to take off the meter during the course of the day. If you take the meter off for more than 5 minutes, such as showering, record when you take it off and put it back on. Date Day On Off On Off On Off On Off On Off On Off *If you are unable to wear the meter for seven (7) consecutive days, add additional days at the end of the week. FOR OFFICE USE ONLY Participant ID Serial Number Date Initialized Recruiter Valid Days On Off ← METER COVER LETTER Dear Participant, Thank you for participating in the [name] Study. We appreciate your interest and hope that your involvement will be a positive experience. Enclosed you will find a movement meter. You will wear it for seven complete days, beginning when you wake up tomorrow morning. Here are a few things you should know: • • • Please take care of the meter. It contains valuable information that is important to our study. It is not waterproof, but is water resistant. So, it should not be immersed in water, so please don’t wear the meter while showering, bathing, or swimming. If it gets slightly wet, please dry it off and it should be fine. When you have completed wearing the meter, please send it back as soon as possible. The meter runs on a battery, and if not returned promptly, the data will be lost. You will find a log in the package to record the dates and times that you put on and take off the meter. Please keep the log in a place where you will see it every day (perhaps next to where you put the meter when you are sleeping), to remind you to keep track daily. If you chose to complete the survey in writing, you also find the written survey in the package. If you chose to complete the survey online, you will receive an emailed link to the beginning of the survey in a few days. If you chose to complete the survey over the phone, a staff member will be calling you in a few days to schedule this. Please do not fill out the survey until you are finished wearing the meter for 7 full days. When you have completed the survey and finished wearing the meter, please return everything (meter, survey, and meter log) in the enclosed stamped envelope as soon as possible. It is important that we receive your materials in a timely manner, so that we can send you your [incentive]. It is also important to note that it may take up to 2-3 months for you to receive your check. We will call you in a couple of days to answer any questions you might have. If you need any assistance, please call us at [tel number] or go to our website at [web site address]. Please remember to start wearing the meter tomorrow morning. Thank you, The [Project] staff ← REWARD LETTER Dear . We are writing because we have not received your activity meter. We have made numerous attempts to contact you by phone. The meters are very valuable to us, and other participants are waiting to wear the meter. If you have temporarily misplaced the meter, please make every effort to locate it. To stress the importance of you getting the meter back to us, we will pay you $50.00 to send the meter back in the enclosed envelope, regardless of whether you have worn it. Please return the meter even if you have not yet worn it because the battery has expired and it is no longer recording anything. We will continue to contact you if we do not receive the meter very soon. If you have any questions, please call us at our toll free number, [number] Thank You, The [Project Team] Accelerometer Manual | 58 ← LOST MAIL LETTER Mail Recovery Center P.O. Box 7872 San Francisco, CA 94120-7872 To Whom It May Concern: The Neighborhood Quality of Life Study is a research study based in San Diego, CA and Cincinnati, OH, and we are currently studying neighborhoods in Seattle, WA (King County). Our study relies heavily upon the mail system, and we send and receive letters and packages on a daily basis. One package that we mail to our participants, and that we later receive back from them, is particularly important to our study. We estimate that five packages have been lost in the mail in the past six months. The missing packages have been mailed from Seattle in 7 ½” x 10 ½” padded envelopes, clearly labeled with either our Cincinnati or San Diego address. The packages contain an Actigraph, a nylon belt, a log sheet (single sheet of paper), and a survey. The Actigraph is approximately half the size of a pager and is either off-white or blue, has no visible buttons or knobs, and should have a label on one side with the name of the project, address (either Cincinnati or San Diego), and a contact phone number. It is also possible that the Actigraph never reached its destination when originally mailed to Seattle. In that case, the package would be a 9” x 12” flat manila envelope addressed to an individual in Seattle, with the Neighborhood Quality of Life Study’s return address clearly labeled on the package. The package contains the Actigraph, the nylon belt, the log sheet, instructions on how to wear the device properly, and a 7 ½” x 10 ½” padded envelope for the recipient to use as the return envelope later. Again, these Actigraphs are essential to our study, and any help your office can provide in locating the lost packages will be greatly appreciated. Enclosed please find samples of the two envelopes, as well as a photocopied picture of the Actigraph. Please contact at for any further information, or if these packages have been recovered. Our mailing address is: We look forward to hearing from you soon. Sincerely, The Neighborhood Quality of Life Study Accelerometer Manual | 59 ← CHECKLIST FOR ACTIVITY METER DELIVERY Meter Delivery - CHECKLIST Make link between device serial number and participant Show participant the graphs of compliant and noncompliant data patterns Offer to provide personalized graphs to participants when they are done Adjust belt to fit participant and show them how to wear it Make sure participant can start right away – no travel plans Give participant meter log and explain Give participant meter instructions and review Give participant your contact information Make sure all talking points are covered How to wear the meter □ Wear for 7 complete days □ Wear for 12 hours every day! □ Wear during waking time, don’t wear it to bed at night □ Need to start right away – battery will only last 10 days □ Will ask for re-wear if don’t get enough wearing time □ Go about your normal activities - don't do anything different Tips for compliance □ Put next to bed or cell phone where you will see it first thing each morning □ Complete meter log each day as a reminder How to care for meter □ Valuable for research; no monetary value □ Don’t get meter wet! □ Don’t let anyone else wear it – it’s only for you. Stay in contact □ Someone from our office will call you the day after tomorrow to check on you □ Call with any questions □ Call us if you miss a day and we’ll let you know what to do Accelerometer Manual | 60 ← Meter Calibration (7164 and 71256 models only) Every time the meter’s battery is changed, check its calibration using the Actigraph calibrator (pictured here). Proceed with changing the battery as normally, but leave the screws off afterward. a. Place the meter in the calibrator, notch-side facing down (serial number side facing down). Open the DOS program named CAL2000 (located in the SWAM folder). The calibrator will immediately start its process, and will show the current battery life. Verify that the battery life is close to 4000 hours, as you will have just changed the battery. The calibrator will then spin the meter. Do not interfere with the calibrator during this time. b. When it has finished spinning, you will see a read-out graph along with a. Readings between .57 and .63 are considered within calibration. If the reading is within this range, remove the meter, attach the screws and use it normally. c. If the reading falls outside of this range, you will need to adjust the meter. Remove it from the calibrator and remove the back of the meter. Using a small flat-head screwdriver, turn the calibrating screw (turning the screw clockwise adjusts the range down, and turning the screw counter-clockwise adjusts it up). Re-attach the meter backing and check its calibration (Step 1). Adjust again as necessary. d. Calibration should be recorded in the Meter Database, in the Master Meter Form. Find the meter, and record the date and calibration reading. Accelerometer Manual | 61 ← NQLS-SENIOR CUT-POINT MEMORANDUM March 13, 2008 From: Terry Conway & Kelli Cain Subject: NQLS-Senior proposed cut-points for accelerometer counts/minute for different physical activity (PA) intensity categories To come up with proposed ranges of accelerometer counts/minute for different PA intensity categories in the NQLS-Senior study of older adults 66+ years of age, we compared cut-point ranges previously used in the NQLS-Prime study of adults 18-65 years of age, Troiano et al.’s (2007) study of a national sample of adults 18-70+ years of age, and data from the LIFE-P study of somewhat impaired older adults 70-85 years of age who completed a 400m walk test. When considering what ranges of accelerometer counts/minute would be best to reflect PA intensity levels in NQLS-Seniors, we had 2 primary criteria: (1) maintain sufficient consistency with cut-point ranges used in NQLS-Prime so that samples in the Prime and Senior studies could be combined and compared if desired at a later point (e.g., to compare PA and relationships across a broad range of age groups), and (2) make adjustments in the categories to capture lower intensity PA levels in seniors that might be important for functioning and well-being. To meet these criteria we propose to add intermediate categories, while also maintaining cutpoints that would allow for aggregation in the senior sample for comparison with the Prime adult sample, if desired at some future point. Thus, for NQLS-Senior we would split the “light” PA intensity range used in NQLS-Prime into “low light” and “high light” categories; and we would also split the “moderate” PA intensity range used in NQLS-Prime into “low moderate” and “high moderate” categories; and we would keep the same cut-point for “vigorous/hard” intensity used in NQLS-Prime. Having 4 categories in the light and moderate range for Seniors, rather than only 2 in this range for Prime, should allow us to examine associations with lower-intensity PA levels in Seniors, while still maintaining standardization for comparison with the Prime adult sample. Lastly, the new “low light,” “high light,” “low moderate,” and “high moderate” ranges of accelerometer counts/minute are reasonably consistent with the distribution of counts/minute found in LIFE-P participants completing a 400m walk. For example (see notes in attached table), to be classified as “sedentary” in NQLS-Senior, accelerometer counts/minute would have to be below the minimum observed in even the slowest LIFE-P senior doing the walk test; to be classified as “high light” in NQLS-Senior, counts/minute would be consistent with the interquartile range (middle 50%) of values found in the somewhat impaired LIFE-P walkers; to be classified as “low moderate,” counts/minute would have to be in roughly the upper quartile of LIFE-P walkers; and to be classified as “high moderate,” counts/minute would have to exceed the maximum value seen in the somewhat impaired LIFE-P seniors who were instructed to “walk at their usual pace without overexertion.” Accelerometer Manual | 62 Comparison of accelerometer counts/minute cut-points for different physical activity intensity categories. Study NQLS-Senior (proposed categories) LIFE-P NQLS-Prime Troiano et al. 2007 Study Population Seniors: 66+ years Seniors: 70 – 85 years Counts per Minute for Intensity Ranges Sedentary Low Light † High Light † ≤100 101 – 929 930 – 1952 threshold is below 149 counts/min, which was minimum value in 400m walk (middle 50%) 25th – 75th %tiles = 929 1831 counts/mi n in 400m walk th 25 %tile value= 929 counts/mi n in 400m walk Low Moderate High Moderate † † Vigorous/ Hard 1953 – 3299 3300 – 5724 5725+ 78%tile ≈ 1960 counts/min in 400m walk threshold is above 3133 counts/min, which was maximum value in 400m walk n/a Light Moderate Vigorous Adults: 18 – 65 years ≤100 101 – 1952 1953 – 5724 ‡ 5725+ ‡ Adults: 18 – 70+ years (national sample) -- -- 2020 – 5998 5999+ Accelerometer Manual | 63 ← Wearing Time Guidelines, Compliance Rates, Return Time, Equipment Loss Rate and Device Malfunction Rate for Studies in Adults, Seniors, Children and Adolescents Study Delivery/ Retrieval Method Actigraph Model Seniors Mail/Mail 7164/71256 Adults Mail/Mail 7164/71256 Teens Mail/Mail Children In-person/Mail 7164/71256 GT1M Valid Wearing Compliance Time with 1st Guidelines wearing 5 valid days, <45 minutes of consecutive “0” counts per hour 5 valid days, <30 minutes 5 valid days, <60 minutes 5 valid days (1 weekend), <30 minutes 3 valid days <30 minutes 6 valid days (1 weekend), <20 minutes 3 valid days <20 minutes Compliance Return Equipment Device after Time Loss Rate Malfunction rewears (median, Rate mean) 81.0% 96.5% 20 days 26.6 days 1.3% 2.6% 81.0% 94.3% 20 days 32.0 days 2.6% 3.1% 66.4% 85.5% 23 days 32.3 days 1.8% 2.0% 81.0% 92.3% 19 days 28.6 days 1.6% 1.7% 86.6% 96.3% 68.7% 89.5% Accelerometer Manual | 64