1
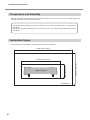
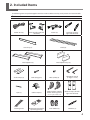
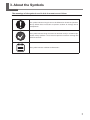
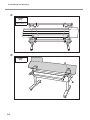
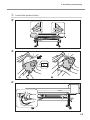
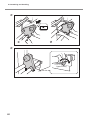
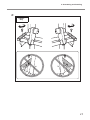
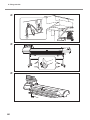
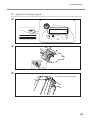
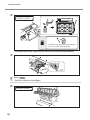
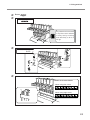
Setup Guide Thank you very much for purchasing this product. - To ensure correct and safe usage with a full understanding of this product's performance, please be sure to read through this manual completely and store it in a safe location. - Unauthorized copying or transferral, in whole or in part, of this manual is prohibited. - The contents of this manual and the specifications of this product are subject to change without notice. - This manual and the product have been prepared and tested as much as possible. If you find any misprint or error, please inform us. - Roland DG Corp. assumes no responsibility for any direct or indirect loss or damage which may occur through use of this product, regardless of any failure to perform on the part of this product. - Roland DG Corp. assumes no responsibility for any direct or indirect loss or damage which may occur with respect to any article made using this product. Contents Contents.........................................................................................................1 1. Installation Environment.............................................................................3 Deciding on an Installation Site................................................................................................... 3 Temperature and Humidity........................................................................................................... 4 Installation Space.............................................................................................................................. 4 2. Included Items............................................................................................5 3. About the Symbols.....................................................................................7 4. Assembling and Installing...........................................................................8 Assembling and Installing.............................................................................................................. 8 5. Filling with Ink...........................................................................................20 Filling with Ink for the First Time................................................................................................20 6. Network Settings......................................................................................36 Step 1: Make the Network Settings for the Computer.......................................................36 Step 2: Make the Network Settings on the Machine..........................................................38 Step 3: Make the Port Settings for the Software RIP...........................................................39 Company names and product names are trademarks or registered trademarks of their respective holders. Copyright © 2014 Roland DG Corporation http://www.rolanddg.com/ 2 1. Installation Environment Deciding on an Installation Site Install in a quiet, stable location offering good operating conditions. An unsuitable location can cause accident, fire, faulty operation, or breakdown. WARNING Install the machine in a location that is level, stable, and able to bear the weight of the machine. The total weight may reach over 241 kg (518 lbs). Installation in an unsuitable location may cause a major accident, including tip over, fall, or collapse. WARNING Never install out of doors or in any location where exposure to water or high humidity may occur. Current leakage may cause electrical shock, electrocution, or combustion and fire. WARNING Never install close to any flammable object or in a gas-filled location. Combustion or explosion may be a danger. WARNING Install in a clean, brightly lit location. Conduct operations in a clean, brightly lit location. Working in a location that is dark or cluttered may lead to an accident, such as becoming caught in the machine as the result of an inadvertent stumble. WARNING Position so that the power plug is within immediate reach at all times. This is to enable quick disconnection of the power plug in the event of an emergency. Install the machine next to an electrical outlet. Also, provide enough empty space to allow immediate access to the electrical outlet. CAUTION Ensure adequate ventilation for the work area. Failing to perform ventilation may result in a health hazard or danger of combustion due to ink fumes. Unsuitable Installation Sites Locations subject to large fluctuations in temperature or humidity Locations subject to shaking or vibration Locations where the floor is tilted, not level, or unstable Dusty locations Locations exposed to direct sunlight Locations exposed to direct near air-conditioning or heating equipment Locations exposed to water or moving air Locations exposed to considerable electrical or magnetic noise, or other forms of electromagnetic energy 3 1. Installation Environment Temperature and Humidity Maintain the specified temperature and humidity even when the machine is not in use. If temperatures are too high or too low, it may cause malfunction. During operation: Temperature 18 to 25˚C (64.4 to 77 ˚F), relative humidity 35 to 65 % RH (no condensation) During non-operation: Temperature 15 to 30˚C (59 to 86 ˚F), relative humidity 20 to 80% (no condensation) Installation Space The space shown in the figure is required in order to use this machine. 3,600 mm (141.8 in) Work Space 4 2,000 mm (78.8 in) Machine Space 800 mm (31.5 in) 2,600 mm (102.4 in) 2. Included Items The following items are packed together with the machine. Make sure they are all present and accounted for. Printer unit Power cord (1) Arms (one for right and left each) Stand legs (one for right and left each) Casters (2) Stand stay (1) Shafts (2) Feed adjusters (2) Feed adjuster stays (2) Shaft clamps (2) Bolts (long) (38) Bolts (short) (8) Pipe (1) Cable clamp (1) Media holders / Media holder retaining screws (one for right and left each) Cleaning sticks Replacement blades for separating knife (1) Drain bottles (2) Hexagonal wrench (1 large, 1 small) Media clamps* (one for right and left each) Tweezers (1) 5 2. Included Items Ink color labels (1) Tube caps (for 8 colors)* Replacement wiper (1) Replacement felt wiper (1) Software RIP (1) User's Manual (1) Setup Guide (This document) (1) Read this first (1) INKJET PRINTER MAINTENANCE GUIDE (1) * Not required when using four colors (cyan, magenta, yellow, and black). Roland Ink System Ink pouch holder (1) Ink tube cover (top) (1) Square bushes (4) 6 Y-shaped tubes (8) Subtank guard (1) Ink tube covers (bottom) (one for right and left each) Screws (11) Subtank cartridges (8) Ink color labels (1) 3. About the Symbols The meanings of the symbols used in this document are as follows. The symbol indicates things that must be followed in relation to operation. Always follow these instructions to prevent accident or damage due to misoperation. The symbol indicates things that must be checked visually in relation to operation. Always perform a visual check to prevent accident or damage due to failure to check. The symbol indicates "additional information". 7 4. Assembling and Installing Completed drawing About the picture Tighten temporary Tighten fully Assembling and Installing WARNING Perform this task with all power switches left switched off. Otherwise sudden movement of the machine may cause injury. CAUTION Unpacking and installation must be carried out by six or more personnel. Otherwise the machine or the stand may fall, resulting in injury. Necessary tools Included items Hexagonal Wrench (large) 8 Hexagonal Wrench (small) Commercial item Pipe (Use this pipe if the hexagonal wrench is too short to tighten the bolt) Phillips screwdriver 4. Assembling and Installing When tightening the bolts fully, tighten them securely. Loose bolts may cause the stand to wobble. 1. Assemble the stand. Tighten temporary Bolts (long): 8 9 4. Assembling and Installing w View from right above x Tighten fully 10 4. Assembling and Installing y Tighten fully z Tighten fully Pipe Bolts (long): 8 Tighten fully Bolts (long): 8 FRONT 11 4. Assembling and Installing Tighten fully Bolts (long): 4 12 4. Assembling and Installing 2. Installing the feed adjusters. Tighten temporary Tighten fully Bolts (long): 2 Bolts (long): 2 Only bolts on left side are tightened fully. Bolts on right side are tightened temporarily. Tighten fully Bolts (short): 4 上面 下面 As feed adjusters do not have a back or a front, they may be installed in either direction. However they do have a top and a bottom, so take care to install them with the correct orientation. 13 4. Assembling and Installing Tighten fully Bolts (short): 4 Tighten fully 14 4. Assembling and Installing 3. Install the media holder. Tighten loosely. Tighten loosely. 15 4. Assembling and Installing x y Tighten loosely. 16 4. Assembling and Installing z Tighten fully 17 4. Assembling and Installing 4. Install the drain bottle. Be careful as the fluid used in the inspection may still remain when removing it. Turn the bottle without applying excessive force. Remove it only when you are disposing of collected ink. 18 4. Assembling and Installing 5. Remove the retainers. Store the retainers because they are needed again when transporting the machine. 19 5. Filling with Ink About the picture Direction mark You can select settings and switch screens by pressing the cursor keys indicating directions. ENTER mark When you press [ENTER], you can set the selected setting and execute the processing. Press MENU button once Press SUB MENU MAINTENANCE button several times The screen on the left is displayed Press button once MAINTENANCE REPLACE FELT Press ENTER button once Filling with Ink for the First Time About this procedure This procedure must be performed by a suitably qualified service technician. Never attempt to perform this procedure yourself. CAUTION Leave this work to a suitably qualified worker. This procedure includes work near sources of electrical danger and complex assembly work. Incorrect work may result in injury and mechanical malfunction. Items used in this procedure Roland Ink System Printer unit accessories Items supplied by service technician 20 1 set Tube caps Cleaning stick Cleaning liquid, gloves (anti-slip), spare tubes, other general tools 5. Filling with Ink 1. Install the ink pouch holder. v w 21 5. Filling with Ink x 2. Replace tubes. Removed tube Included Y-shaped tube for new installation 22 5. Filling with Ink First insert the dotted tube through the square bush. Install the tubes from below in order. Take care to ensure that the tube does not break. If a tube breaks, do not use it. Use a spare supplied by the service technician. Ensure that the dotted end of the tube is at the top. Install tubes with more dots towards the outside and tubes with fewer dots towards the inside. Always use gloves (anti-slip). Hold the tube around 10 mm from the end and insert it straight in so that it does not break. 23 5. Filling with Ink x This procedure is required when using eight colors (cyan, magenta, yellow, black, light cyan, light magenta, orange, and violet). It is not required when using four colors (cyan, magenta, yellow, and black). Order of ink color labels When using four colors When using eight colors 24 5. Filling with Ink 3. Switch on the power switch and make the initial settings. Never insert a telephone cable. Ethernet cable (Category 5 or higher) Ethernet (100Base-TX is recommended.) WARNING Connect to electrical outlet that complies with this machine's ratings (for voltage, frequency, and current). Incorrect voltage or insufficient current may cause fire or electrical shock. WARNING Connect to ground. This can prevent fire or electrical shock due to current leakage in the event of malfunction. WARNING Perform this task with all power switches left switched off. Otherwise sudden movement of the machine may cause injury. CAUTION Never insert your hand or fingers into the opening of the front cover. The print head carriage moves at high speed inside the cover. Hitting may cause injury. 25 5. Filling with Ink w 26 5. Filling with Ink Hold down /'07.#0)7#)' '0).+5* ޓޓ and press the sub power switch. Select the language and the unit of measurement (Length, Temperature) you want. .'0)6*70+6 OOޓޓޓޓOO ޓޓ 6'/270+6 ࠑ%(ࠑޓޓޓޓ ޓޓ 27 5. Filling with Ink 4. Select the ink type. 5'.'%6+0-6;2' 57$.+/#6+10% ޓޓ 57$.+/#6+10% =;'5?ޓ01 ޓޓ +056#.. &4#+0$166.' ޓޓ 28 +056#.. &4#+0$166.' ޓޓ Press . 57$.+/#6+10% =;'5?ޓ01 ޓޓ 5. Filling with Ink 5. Apply the Cleaning Liquid. OPEN COVER R Discharge any static electricity 29 5. Filling with Ink #22.; %.'#0+0).+37+& ޓޓ Area to apply Discard the stick after use. Reusing cleaning sticks may reduce printing quality. * Cleaning liquid will be supplied by the service technician during installation. y z 5. 30 Press . Set the subtank cartridges. 27..+0-217%* *1.&'4(149#4& 5. Filling with Ink Press . SET SUBTANK 12345678 Any subtank can be inserted in any slot. Install a subtank in every slot by inserting each one firmly as far as it will go. 5'657$6#0)7#4& Order of ink color labels When using four colors When using eight colors 31 5. Filling with Ink z Press . +0-5;56'/'4414 6. If there is air left in a subtank at this stage, an error occurs, the message in the illustration is displayed on the screen, and the machine stops. Switch off the sub power, and redo the ink filling procedure from the start. Filling with Ink. Shake the ink pouch for each color gently. The precipitation of the ingredients in the ink disables printing in normal color. *Be sure to use new ink cartridges. *Never, under any circumstances, use anything other than the specified type of ink. Precautions regarding subsequent work Take care not to drop ink pouches. When working, move the ink pouch holders slowly. Ink may leak if the ink pouch holder is subjected to a strong shock, for example if you let go of it partway through. 5'6+0-217%* ޓޓޓ Take care to install ink pouches of the correct color. If an ink pouch of the wrong color is installed, color mixing may occur. In the event you install an ink pouch of the wrong color, contact your authorized Roland DG Corp. dealer. Never touch the area around the ink filling port. Touching this area accidentally may force air into the ink path and cause a malfunction. Take care not to crush the ink pouch when engaging the stopper. 32 5. Filling with Ink Press . 4#+5'+0-217%* *1.&'4 Hold here Do not let go of the ink pouch holders when lifting them. Raise the holders slowly until they click firmly into place. Ink will leak if the ink pouch holder is not returned to the correct position. Press . Filling ink takes about 20 minutes. 27..+0-217%* *1.&'4(149#4& When the screen on the left is displayed, lower all the ink pouch holders and press . Lower the ink pouch holders slowly without letting go of them. 4#+5'+0-217%* *1.&'4 When the screen on the left is displayed, raise all the ink pouch holders and press . Hold here Lower and raise the ink pouch holders slowly without letting go of them. When raising the holders, raise them until they click firmly into place. Ink will leak if the ink pouch holder is not returned to the correct position. 33 5. Filling with Ink Detach the drain bottle, discard the discharged fluid to empty it. CAUTION Before you detach the drain bottle, be sure to wait for the screen to display "EMPTY DRAIN BOTTLE." Failing to follow this procedure may cause discharged fluid to flow out of the tube and spill, soiling your hands or the floor. WARNING Never put discharged fluid or ink closed to fire. Doing so may cause the blaze. CAUTION To store discharged fluid temporarily, keep it in the provided drain bottle or in a durable container such as a metal can or polyethylene tank, and close the cap tightly. Any spillage or vapor leakage make cause fire, odor, or physical distress. Dispose discharged fluid properly, in accordance with the laws in effect in your local. Discharged fluid contains toxic ingredients. Never attempt to incinerate discharged fluid or discard it with ordinary trash. Also, do not dispose of it in sewer systems, rivers, or streams. Doing so may have an adverse impact on the environment. Attach the drain bottle, and then press . (+..+0)+0- 5'6725*''6 34 When this screen appears, filling with ink is finished. 5. Filling with Ink After this, the next step is to adjust the feed adjusters. This procedure will be performed by a Roland DG service technician, so leave it up to them. For information on how to install the take-up system, refer to the take-up system user’s manual. If using the TUC-3, it is necessary to make adjustments by removing springs and other parts from the control box and frame of the TUC-3. For details, refer to the TUC-3 User's Manual.For details, refer to TUC-3 documentation. It is recommended that you use the BACKWARD setting when using the take-up unit with the machine. 35 6. Network Settings Memo The examples used in the procedures for making the settings described in this section assume you are using one computer and one machine. The settings used in this section are merely example settings. The procedures and setting values described here may not be suitable for all operating environments. If the computer you're using is connected to a number of networked devices or to the Internet, incorrect settings may adversely affect the entire network. For detailed information about the settings, consult your network administrator. Step 1: Make the Network Settings for the Computer Log on to Windows as an “Administrator” or a member of the "Administrators" group. Windows 8.1 : From the [Start] menu, click [PC Setting], and click [Control Panel]. Click [Network and Internet], and then click [Network and Sharing Center]. Click the [Ethernet]. Windows 8 : Right-click in a blank area of the Start screen, and at the bottom right of the screen, click [All apps]. Click [Control Panel]. Click [Network and Internet], and then click [Network and Sharing Center]. Click the [Ethernet]. Windows 7 : From the [Start] menu, click [Control Panel]. Click [Network and Internet], and then click [Network and Sharing Center]. Click the [Local Area Connections]. Click [Properties]. The [Ethernet Properties] dialog box will appear. (Windows 7; the [Local Area Connection Properties] dialog box will appear.) Click [Allow] when the [User Account Control] dialog box appears. 36 6. Network Settings Select [Internet Protocol Version 4 (TCP/ IPv4)] and then click [Properties]. If the check box for [Internet Protocol] is unselected, then click and check the box. The [Internet Protocol Version 4(TCP/IPv4)] dialog box will appear. Select [Use the following IP address]. Enter the information as shown below, and then [OK]. [IP address]: 192.168.0.XXX [Subnet mask]: 255.255.255.0 Here, "XXX" can be any number between 1 and 254. However, be sure to avoid the numbers overlapping with those for other computers or devices. Click [OK] in the [Internet Protocol Version 4(TCP/IPv4)] dialog box, click [OK] in the [Ethernet Properties] dialog box (Windows 7; in the [Local Area Connection Properties] dialog box), and then click [Close] in the [Ethernet Status] dialog box (Windows 7; in the [Local Area Connection Status] dialog box). 37 6. Network Settings Step 2: Make the Network Settings on the Machine 1. Set the IP address. NETWORK IP ADDRESS MENU SYSTEM INFO. IP ADDRESS 000.000.000.000 SYSTEM INFO. NETWORK IP ADDRESS 192.168.000.XXX [IP ADDRESS]: 192.168.000.XXX Here, "XXX" can be any number between 1 and 254. For the part corresponding to "192.168.000," apply the same value as the setting of your computer. :Select address number :Move to the next address 2. Set the subnet mask. NETWORK IP ADDRESS NETWORK SUBNET MASK SUBNET MASK 000.000.000.000 Make the setting the same value as the one used by the computer at step 1. SUBNET MASK 255.255.255.000 :Select address number :Move to the next address Press to go back to the original screen. If you use the computer and the machine one-on-one basis, this will complete the settings to make on the machine. Go on to Step 3. If you need to set the gateway address, then go on to the procedure following this one. 38 6. Network Settings 3. Set the gateway address. NETWORK GATEWAY ADDR. MENU SYSTEM INFO. GATEWAY ADDR. 000.000.000.000 SYSTEM INFO. NETWORK GATEWAY ADDR. 255.255.255.255 For the value to enter for your gateway address, consult your network administrator :Select address number :Move to the next address Press to go back to the original screen. Step 3: Make the Port Settings for the Software RIP The settings for the software RIP will be made here. For the setup procedures, refer to the documentation of the instructions for the software RIP. Confirming that a network connection has been established Roland VersaWorks You can check whether the connection to the network has been complete by using the printing-test feature. For the information on the method to conduct a printing test, refer to the documentation for the Roland VersaWorks Other software RIP Refer to the documentation for the software RIP of your own. 39 1000012754 R1-141107