1
\
I
SP_2S0TM
Electronic Time
and Date Stamp
I
- t.~ "
User Guide ...y\
I
ABOUT TIME
1n9 Wens Branch Pkwy.
Ste.#110B 295 ~........
Austin, TX78728 {'"
512 589-6929
. TIME SYSTEMS. , )
4
Icon
4
i
I.
wwwJcontime.com
I
.
1.800. 847.2232
/
, -zc:.
-
'Pt
P10U-Ol
.
I
-,
fsP:~~~;~-~lectronic Ti-~e-'and Date Stamp
~,
\
PRECAUTIONS EPM DIGITAL SYSTEMS, INC., An Oregon Corporation ICON TIME SYS'TtMS
is a registered subsidiary of EPM Digital Systems, Inc.
This User Guide will teach you how to safely and properly operate the
SP-250™ Electronic Time and Date Stamp. Please follow all instructions
to avoid possible damage to yourself, others, or the machine.
Notice: The information contained in this document is subject to change
without notice.
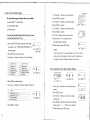
Symbols----------------------------------------------.
The symbols you will ~ee throughout this guide indicate various warnings and cautions.
To ensure your safety and proper operation of the machine, please review the following
explanations.
ICON TIME SYSTEMS MAKES NO WARRANTY OF ANY KIND WITH REGARD TO
THIS MATERIAL, INCLUDING, BUT NOT LIMITED TO, THE IMPLIED WARRANTIES
OF MERCHANTABILITY AND FITNESS FOR A PARTICULAR PURPOSE. ICON TIME
SYSTEMS shall not be liable for errors contained herein, or for incidental
consequential damages in connection with the furnishing, performance,
or use of this material.
10\,
J
This document contains proprietary information that is protected by
copyright. All rights are reserved. No part of the document may be
photocopied, reproduced, or translated to another language without
the prior written consent of EPM Digital Systems, Inc.
it
~
~
Copyright © EPM DIGITAL SYSTEMS, INC. 2006
o
SP-250'" Electronic Time and Date Stamp is a trade""mark of
EPM Digital Systems, Inc.
All other trademarks belong to their respective owners.
(l)
Icon Time Systems
15201 N.W. Greenbrier Parkway, Suite Al
Beaverton, Oregon 97006
971.249.1700
,.
P,I"I~d
flU8USI }(lil/.
on
f"~,s~ )
'-':7
~ l'l'
I
!
~
~
0
0
•
arnlng
Caution
Improper handling may cause bodily accidents, including
serious injury or death.
Improper handling may harm individuals or materials.
Improper handling may cause eleclric
shock DANGER.
"Must do" sign.
Do not disassemble this machine.
Remove the line cord plug from the
outlet.
"Do not" sign.
&.
Warning
Do not disassemble this machine; The inside is high-voltage. and disassembly may lead to
electric shock.
Do not modify this machine. Modifications may cause fire and/or electrical shock.
Unplug the machine immediately and contact your dealer for service if irregularities, such as
heal or smoke generation. or odor emission occur. Further use may cause a fire or electrical
shock.
Do not use any voltage of the power source other than that which is designated. Do not share
a single outlet with another plug. which may lead to fire or shock hazard.
Do not damage, break, or mOdify the power cord. Do not pull. forcefully bend, or place a
heavy object on the cord. Any of these may damage the cord, resulting in potential fire or
electric shock.
j
Contents
~
~
CID
~
~
What's in the Time Stamp at a Glance ............................................................................................ 1 Initialize the Do not plug or unplug the machine with a wet hand, which may result in electric shock.
Set up the .&
~
~
~
~
~
~
~
The Basics
Disconnect the plug from the outlet immediately and contact your delllcJ' for I'crvict II IUII:llIu
mailer including metal, water, or any other liquid enters the machine. FUl1hcl' lI~C 11m)' 1':~lIil ill
fire or electric shock.
3.1 Set the
3.2 Set the
Caution
3.3 Set the Print Order...................................................................................... 3 Do not place the machine on an uneven or tilted surface, which may cause the machine to drop
or fall resulting in injuries.
Advanced Features
4.1 Set 12/24 Hour FormaL· ............................................................................4 Do not place water-filled containers or metal objects on top of machine; Spilled water or
met~llic object slipping inside the machine may cause a fire or shock hazard.
4.2 Set the Print Pattern .......... ·........................................................................ 5 4.3 Set the Pre-programmed Comments...........................................................6 ---
Do not install the machine in a humid or dusty environment, which may cause firc or electric
shock.
4.4 Set the Language .......................................................................................7 Do not place the machine near a kitchen counter or humidifier. The oil, smoke, or stcam in
these areas may present a fire or shock hazard.
4.6 Set the Daylight Savings Time (D.S.T.) ................................................. 9-1O 4.5 Set the Print Method ..................................................................................8 4.7 Set the Number Digits .............................................................................. 11 4.8 Set the Initial Number 12
Do not yank the power cord plug from the outlet, which may damage the cord and lead to
potential fire or electric shOCk.
4.9 Set the Time Table Program
13-14 4.10 Set the Customized Comments ......................................................... 15-16 Remove the line cord plug from the outlet before transferring the machine. Failure to do so may
damage the cord and lead to potential fire or electric shock.
\i Do not touch the printer head, which may cause bums.
Insert the power plug as far as it will go. Improper plug insertion mily lead to fire or shock
hazard. ,
{
I, Do not insert or drop any time card other than that which is specified il1l\) tlK' .iol. SIH'h
may cause fire or electrical shock.
If the machine is dropped or the case is brokon, contnct
Further use may lead to fire or shock hOlzurd.
y01l1'
'
ikukl' lillllli',lIntl'iy till wrI"k,,:
I
17 Replace the Ribbon Cassette ................................................................................... 18
Install the Optional NiCad Battery .....................................................:,................... 19 Troubleshooting.............................................................. ........................................ 20 Alphanumeric Character Code .................................................................................21 Large Characters .............................................................................................22 Small Characters .............................................................................................23 Language-specific Characters ........... , ............................................................. 24 Cautions................... ,................................................................. : ............................ 25 Daily Care
Tum off the power and USc II
IIIIKII~I~
How to Correct Customized Comments ................................................................... 17 Specifications.........................................................................................................25 clulh lit wipl' llil' l'II~I' l'iI'ltll til dllnl und dirt.
,-
Set up_the
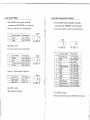
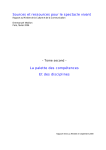
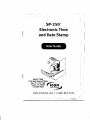
Wha,t's in Box
Two keys
User Guide
h
\.
SP-250 at a
~~an_ce,
$J
-
/
Here is a quick look at the function keys you'll use:
Pownr supply
One ribbon cassette
Clo~k
~'(~
B8:ChaI1!<Ier_
CC;Ctiarac:ter Code
I4,C,V,M,O V,Y.., H'Hlior
'5!\,Q,V,C _
"J),M,Y,C
AYLIGHT
~
I),V.MD.C
'8,CJ)~.Mi1
SAY
.. INGS. TIME
(START/END)
'9,N,M,0,V
2OJW,\l,Y
/
o
23,O,M,V,"
<Front view>
I
t
Cover
AA:,..,
~'.RCV!l
-
2.SENT
AA:Year
I.MD,H,....
10!\,HJ.in
lJ.tO,Y,H./Nl
4,O.II.YJiJ.ll1
3,~
2~
4.OUT
$.CfMD
3.Gemla.'\ 7.Mme1i:
4ftnb
:=
O,USED
8,,,",
BB:PMt~
II.Rigll,
'.'MEIl
~yJ.Ij),H,Min
--~
1.ErIJish SJl3ia.n __
I
24.Y.MD.N
BB:I'MIOrde,
BB'MonIb
CC:D.~
lld
CC:Print_
6,Y,II.O.HI><ItS
)DJi.M01
aJlO'llD.H.Min
9.Y,1I.0
10,11.,0
IIJlO'II.O,M,Y
'2,C,M,Q,V
",C.O!!.V
o
NUMBER
-ligh'
BB_r"",
CC:R&sel
INITIAL
NUMBER
Push bar
CPr~~
nMETAau
'ilOGRAM
<Back view>
-,",
<Cover off>
~d"",,*
-'"
,
oc_
sa""
oc_
aCHANGe.
j·ii,tlIIH'loaitiill!
HtllIl"ll~t
PIIIII IWill1
H ihholl
I 'jj .... "~lhl
C -Ini~i~lize the Clock Before you beg,in this proccdlln:. nlil II Iillwl'ulIl IlilollHh IJIIl SP·250 to test the punch position. To aJjllst lite Itll:lltiull lit Oil' prillt IHINilioli t'mlll the card edge, press and slide the prill! posit illl! Iltljll~h'I, 1III'IIII'd 011 til\! hottom of the machine. 1
Now let's set up the time clock. I.Press the _ button repeatedly to choose the desired program mode. 2.Press the .CHANGEI button to increase the setting value.
3.Press the ICHANGE. button to decrease the setting value,
4.Press the _ button to confirm. Pressing this button again will revert Time Stamp
to the normal operation mode.
S.Press the _ button once to enter the program setting mode. Time Stamp will now
go into the program mode showing the'" on the display labeled "TIME" mark.
2
1
I
{
(
Advanced F~atur~s)
,l
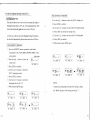
3.1 Set the Time
I. Press the [SELECT) button repeatedly until the .It.
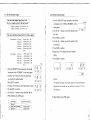
4.1 Set the 12/24 Hour Format
corresponds to the "TIME" on the setti ng panel.
2. Use the [+j[-) buttons to adjust the hour and minute.
3. Press [SET) to confirm. Time
--,-
.
1
"
05-08:25
I\
I
4. When finished, press [SET) again.
e!tl
~
t.'
I + Itlt~.. u I~ I Q'[)
3.2 Set the Date
I. Press the [SELECT) button repeatedly until the .It.
corresponds to the "DATE" on the setting panel.
2. Use the [+][ -] buttons to adjust the current year; Press [SET] to confirm:
3. Use the [+)[ -] button to adjust month and date, Press [SET]
(
OSD:1·
:18
/ I" :J.c.
-] buttons to select the number" 1" for 12-hour mode,
or "2" for 24-hour mode.
Hour
~ (lID
I
~
~
I. Press the [SELECT] button repeatedly, until the .It. corresponds
the suitable print order on the setting panel. 3. Press [SET] to confirm. 2. Use the
1.../
3.3 Set the Print Order
to the "PRINT ORDER" on the setting panel. 2. Use the {+j[ -] buttons to choose the number corresponding to to the "HOUR" on the setting panel.
I
\,
~
to confirm. 4. When finished, press [SET] again.
I
1. Press the [SELECT] button repeatedly until the'" corresponds
1.
Print order
--,-
51n~
........<1> C
~
1+ltkUIllI~1
2.
00
1+!ClWlb.I-1
C!D
~
1+"...,.1-1
Hour Format Options
Display
12 hour
24 hour
PM 3:00
15:00
rno
I
3. Press [SET] to confirm.
4. When finished, press [SET] again.
4. When finished, press [SET] again.
Y=Year, M=Month, D=Date, DOW=Day of the week, H=Hour, Min=Minute, S=Second C=Comment, N=Number i~
1.
2.
2.
4.
5:
6.
7.
8.
9.
10.
II.
12.
13.
14.
Print Order Options
M.D.H.Min
D.M.H.Min
M.D.YH.Min
D.M.Y.H.Min
Y.M.D.H.Min
Y.M.D.H.Min.S
D.H.Min
DOWD.H.Min
Y.M.D
M.D
DOW.D.M.Y
C.M.D.Y
C.D.M.Y
C.Y.M.D
15. M.D.Y.C
3
Print Example
JAN 3110:00
31 JAN 10:00
JAN 31 '06 10:00
31 JAN '0610:00
'06 JAN 31 10:00
'06 JAN 31 10:00:00
31 10:00
FR,311O:00
'06 JAN 31
JAN31
FR, 31 JAN '06
SENT JAN 31 '06
SENT 31 JAN 'OG
SENT 'OG JAN 31
JAN 31 '0(, SENT
~
Print order Opti.ons
16. D.M.Y.C
17. Y.M.D.C
18. C.D.H.Min
19. N.M.D.Y
20. N.D.M.Y
21. N.Y.M.D
22. M.D.Y.N
23. D.M.Y.N
24. Y.M.D.N
25. N.I).H.Min
26. N.M.lHl.Mill
27. N.Y.M.l)Jl.Mill
21:1. N,y',M,n.N.Miu.S
29, N
Print Example
31 JAN '06 SENT
'06 JAN 31 SENT
SENT31 10:00
000123 JAN 31 '06
00012331 JAN '06
(lOOm '06 JAN 31
JAN31 '06000123
31 JAN '06000123
'06 JAN 31000123
00012331 10:00
123 JAN 3] 10:00
\
\
I
1
123 '06 JAN 31 10:00
]23 '06 JAN 31 10:00:00
000123
30. Customiwd Comments (Ref. P.I5)
4
.
t "'l~".
J '
I
4.2 Set the Print Pattern
4.3 Set the Pre-programmed Comments
j
J. Press the [SELECT) button repeatedly, unti[ the .&
corresponds to the "PRINT PATTERN" on the setting panel.
2. Use the [+)[
~
I.
2.
t
] buttons to choose "Year Digit Options."
Prinl pallern
Year Digit Options
2 Digits
4 Dili!:its
Print Example
JAN 31 '0610:00
JAN 31200610:00
J
[~:F~·'11J
~r
1. Press the [SELECT] button repeatedly, until the .A.
corresponds to the "COMMENT" on the setting panel.
2. Use the r+][ -] buttons to choose your comment options.
Comment
----,---;
!lll!iI~@
-1
[ ~·'-··\B
/ I\
3. Press [SET] to confirm.
4. Use the [+)[
~
1.
2.
3.
4.
~
) buttons to choose "Type of Minute.
Type of Minute
1160 Min.
11100
1120 Min.(=51l00 Min
1110 Min.
Print Example
JAN 31200610:10
JAN 31 200610.17
JAN 31 2006 10.15
JAN 31 200610.1
~
Print pattern
1.
J
r-"TI
e
l+lflWlul-1
2.
3.
4.
5.
1----.,
6.
@
7.
5. Use the [+)[ -] buttons to choose "Leading Zero."
~
1.
2.
Print pattern
Leading Zero
ZERO disabled
·ZERO enabled
Print Example
JAN 1 3:00
JAN 0103:00
6. Press [SET] to confirm.
7. When finished, press [SET) again.
T
!lll!iI
1;1,.....1·1
@
~
I
'I
5
8.
9.
10.
11.
12.
13.
~
@
e
(.ltlt.ml-1
@
Comment Options
Print Example
RCVD (Received)
SENT·
JAN 3]
JAN 31
JAN 31
JAN 31
JAN 31
JAN 31
JAN 31
JAN 31
JAN 3 I
JAN 31
JAN 31
JAN 31
JAN31
IN
OUT
CFMD (Confinued)
FILED
PAID
USED
FAXED
VOID
ORION (Original)
APR'D (Approved)
CMPL'D (Completed)
'06 RCVD
'06 SENT
'06 IN
'06 OUT
'06 CFMD
'06 FILED
'06 PAID
'06 USED
'06 FAXED
'06 VOID
'06 ORION
'06APR'D
'06CMPL'D
3. Press [SET] to confirm.
4. After you finish setting, press the [SET] button once again.
6
~---
4.5 Set the Print Method
4.4 Set the Language
1. Press the [SELECT] button repeatedly, until the ...
1. Press the [SELECT] button repeatedly, until the ...
. corresponds to th,e "LANGUAGE" on the setting panel.
corresponds to the "PRINT METHOD" on the setting panel.
"",
2. Use the r+l[-j outtons to choose your printing
language.
'~t
"
Language
[
~
~
1.
~J
1·lmau!-l
(]I)
3.
Print method
T
~
Print
[·1'*'_1-1
I]D
Options
Right
Left
1.
~--!!!!!il
Di{~ct:ion
[ ~t~7]
§!iI
@§El
I]D
3. Press [SET] to confirm.
4. Use the [+][ -] buttons to choose the Print Activation mode.
Print Language Options
Print Example
English
TH, 25 DEC '06
OUT 3110:00
c---
2.
Lang~.ge
2. Use the [+][ -] buttons to select Print Direction.
Spanish
Gennan
----
4.
. French
5.
Italian
6
Portuguese
7
Numeric
--
JU, 25 DIC '06
SAL311O:00
DO, 25 DEZ '06
AUSG 31 10:00
JE, 25 DEC '06
SORT 31 10:00
GI, 25 DIC '06
USC 31 10:00
QI, 25 DEZ '06
_SAIDA 31 10:00
4,25-12 '06
OUT 31 10:00
---
,~
Print Activation Options
~ 1.
2.
3.
4.
Automatic
Semi-automatic
Manual
Combination
Print method
[
€i§
T
?-=:~1
8·M,,1 -I
I]D
Print Activation options and what they mean:
·Automatic - Simply insert a card or piece of paper into the machine to print.
· Semi-automatic -Press the push bar only when a card or piece of paper is
inserted to print.
I
"
· Manual - Press the push bar to print.
· Combination - Print by either pressing the push bar or inserting a card or
3. Press [SET] to confirID.
4. When finished, press [SET] again.
1
I
piece of paper.
5. Once you've selected the option you want, press [SET] to
confirm.
6. When finished, press [SET] again,
I
I 7
T
8
4.6 Set the Daylight Savings Time (D.S.T.)
Now, set thenl:)j.T.n~rI(jD:ateJ
Time
8. Use the [+ H-] buttons to select the D.S.T. ending year.
This function allows you to set the clock to automatically adjust to .
Daylight Savings Time,at 2:00 a.m., on the programmed date. (The .
9. Press [SET] to confirm.
1>.
10. Use the [+][-] buttons to select the D.S.T ending month .
clock will automatically gain one hour to show 3:00 a.m.)
11. Press [SET] to confirm the setting value.
At
a.m. on the
12. Use the [+][
day of the Daylight Savings Time period,
the clock will automatically lose one hour and return to 2:00 a.m.
] buttons to select the D.S.T ending date.
13. Press [SET] to confirm.
14. Whan finised, press [SET] again.
[FIfSt:enter D.S.T. Start Datenl
1. Press the [SELECT] button repeatedly, until the ... corresponds to the "DAYLIGHT SAVINGS TIME" on the, setting panel. tOS)P~n--j
Daylight saving time
2. Press the r+ H -] button to select the §)
~
~
mD
[.. Iell.ulul - I
(]!]
current year. 3. Press [SET] to confirm.
4. Use the [+][
'Os 10~3Q~
] buttons to select the
D.S.T. beginning month.
I
~
5. Press [SET] to confirm.
6. Use
~he
c; I'II"••(! -I
G!D
~
i·jeN4IIGEI-1
@)
.
10:'30
~
~
(]I) [+] [ -] buttons to select the ..
beginning date for D. S. T. NOTE: 7. When finished [SET] again.
To delete/cancel Daylight Savings Time settings, change the "Month" display of the starting setting to "__ ". 'OS-'t(-:
/
....
~
t!ICM3:J
~
-- :J
I '
..u~
[... ItMlI!ul-J
rWl
'Os
Y ;..-'3"-"
/
~
1.I~j~1
,
C!D
'"
fo~ Y~TI/
l
l·I~_G
[ill]
..
~
1+lii"AIIGlI~!
...
9
10
4.7 Set the Number Digits 4.8 Set the Initial Number
I
!
I
You can set the Number Digits from 1 to 8.
Ht;re's an example of how it will look in pri~t:
o time repeat.....
(1st time)
(2nd time)
(3rd time)
(4th time) (5th time) ~
0 to 9. Print;~ampl;;;-l
123456 JAN 31
123456 JAN 31
123457 JAN 31
123457 JAN 31
123458 JAN 31
(Etc.)
I!
2. Use the [+][ -] buttons to select how m<my digits
II
you want for the printed number. 3. Press [SET] to confirm. 6. Use thes [+][
] buttons
4. Use the [+][ -] buttons to select the number of the
second digit.
5. Press [SET] to confirm.
i
6. Repeat step 2-5 to complete the initial number
"
i
setting.
,I
"
7. Press [SET] to confirm.
~
~
I
I
~
l:
(
~
,"
1
-~~ 1» 2
~
l!1i·"~~'~G
Iii:
tI
the Number. I!
@
8. When finished, press [SET] again.
I Execution event
,1
II,.
"
I,!
*
Q!D
depends on the number set you selected in section "4.7 Set
I'
IIt
11 8,,,,,,,·8
to selyct the Reset Options.
Reset Options
"~
L I Disabled
2. ! Return to INITIAL NUMBER
3. I Return to 0
i
~
The number of digits (maximum eight) for "Initial Number,
~.~
I
(]D
NOTE:
;
m
Gli:Ki.'iG
\
12 3
II
I,"
.,
7. When finished, press [SET] again.
I'il
] buttons to select the number of the
3. Press [SET] to confirm.
~',
4. Use the [+][ -] buttons to select repeat times for print [ ,;
5. Use the [SET] to confirm. INITIAL NUMBER" on the
digit.
"
'06
'06
'06 '06
'06
on the setting panel.
2. Use the [+][
1\
Ij
1. Press the [SELECT] button repeatedly, until the .. corresponds to the "NUMBER
I!
setting panel.
II
123456 JAN 31 '06
123456 JAN 31'06
123456 JAN 31 '06 123456 JAN 31 '06
123456 JAN 31 '06
(Etc.)
2 time repeat..... (1 st time)
(2nd time) (3rd time)
(4th time)
(5th time) ,
corresponds to the
rl
~
6DigitsofNum6er 123456 JAN 31 '06
4 Digits of N~rriber 1234 JAN 31 '06
You can set tile Repeat Times from
1. Press the [SELECT] button repeatedly, until the ..
~
!)
it
..
d
4.9 Set the Time Table Program
7. Use the [+] [ -] buttons to select the hours.
The time table program function allows you to enable:
· A special mark
8. Press [SET] to confirm.
"*" when printing
9. Use the [+][
] buttons to select the minute.
10. Press [SET] to confirm.
· An external time signal
11. Use the
· A built-in buzzer
] buttons to select the second.
~UM01VWE
12. Press [SET] to confirm. 13. Use the [+] button, enter the next setting.
You can program these functions for each day... of t.h.. e.. week, I
and each pay period. Here's how.
~.
Monday only
Tuesday only
Wednesday only
Thursday only
Friday only
"I
'
-
6. Saturday only
7. Sunday only
8. .. Monday to Frid,
9. Monday to SatUl
10. Every day
How to Delete the Time Table Program Setting
U
~
S. Use the [+][ -] buttons to select the "Action" for that set.
Y
*
*
-
'O~F
'ON
'<-I'"'\Nllft_-j
~
j + !efl,utu!?J
~]
(]f]
~
_
I "
...
~
r..
le""IICELMJ
(i[)
~
[+I¢UlliEI-1
@J
IJ!!J
number. 01
02
lr /'-~/- 1 I).
1. Use the [+][-] buttons to select the desired set
-------
Special mark n n on
Special mark" n off
External signal on
Built-in buzzer on ......
(02-:$:-
9:00
4. Press [SET] to confirm the date.
_
--=-J
(+-~?I
in buzzer on) the flashing will now last for the duration of ""'" Si~
1.
~ ---
the signal or buzzer setting (maximum 59 seconds). •
2.
3.
4.
17i:=:
Pnl==
If you chose action 3 (external signal on) or action 4 (built - ] button to select the "Day of the Week."
Day of the
Action
/
"ON
EXT
NOTE: ~~
~
Y
~
2. Press [SET] to enter your selection.
3.
4.
l
,.. ./
S:G/iAL
15. When finished, press [SET] again. the setting panel.
"I
01
I ,.
time table program settings. corresponds to the" TIME TABLE PROGRAM" on
I 1.
I 2.
~
101
!W7.1
14. Repeat steps 2-12 to complete the next 1. Press the [SELECT] button repeatedly, until the ...
3. Use the
r
2. Press [SET] to enter.
B
~
SUMOWWETHfRSA
Gi!l
3. Use the
-] buttons ,to select the weekday
setting to be "__ ".
[21 10:09 J
4. Press [SET] to confirm the setting value then the 6. Press (SET] to confirm.
display turns to " -- -- ". Now the set is deleted. 5. When finished, press [SET] again.
13
14
4.10 Set the Customized Comment
The SP-250 allows you to enter Customized Comments under the
8.
to enter the
character for
PRINT ORDER setting. If you select the number "30" while
in this option, you cai"print:
9. Use the
[
]
to select the correct
. Three lines
character code of character to print. (See
. Approximately 25 characters on each line
page 21 for Alphanumeric Character Codes.)
(depending on font size and margin settings)
10. Press button to select the next character
code for setting.
11. Press [SET] to enter.
1. Press the [SELECT] button repeatedly, until 12. Repeat steps 3-6 to complete the setting
the .... corresponds to the" PRINT ORDER" on the 2. Use the
for the fist comment line.
[
] buttons to select "30."
3. Press [SET] to confirm.
4. Use the
[ ] buttons to select Print
Position. 1
2:
3
[iP:~
Print Position
Left Orientated
Center Orientated
Right Orientated 13. Press [SET] once again to enter the second
Print
Print order
l!J~~B
position
Comment
----,--
comment line for setting.
{j
14. Repeat steps 3-6 to complete the setting
~
for the second comment line.
[[2 -:
§El
comment line for setting.
[ 30- -~tJ
~
[i~~H_~:~~~[J
16. Repeat steps 3-6 to complete the setting
[iliJ
5. Press [SET] to confirm.
(}1iJ
Comment
----,--
15. Press [SET] once again to enter the third
Print order
,--
17 b1J
8".~.~'G
[2
~
l!J~~~~
Q!Q
for the third comment line.
I"
17. When finished, press [SET] again.
6. Press the [SELECT] button repeatedly, until the A corresponds to th~ " COMMENT" on the setting panel.
~
8~~?!tJ
U!D
7. When the flashing turns to Cl, press [SET] to enter the first comment line for setting. "
.
15~
16
~w to Correct Customize.~ Comments,
_=:J
Use the code chart below to make changes, such as deleting a
character or inserting a line.
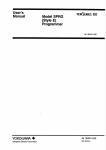
CReP!ace the Ribbon Cassette
.)
1. Using the key, unlock the cover and remove the ribbon cassette.
2. Hold the ribbon cassette by its tab and pull straight out.
------ -
Code
00
01
f-------
F8
F9
f-
FA
Fb
FC
Fd
(
3. Turn the knob of the new cassette in the direction of the arrow Meaning
--
Null
- ---- I
Space
Insert Character
Delete Character
Insert Line
Delete Line
Exchange Line 1 to 2
- Exchange Line 2 to 3
(clockwise) to tighten the ribbon. 4. Place the cassette into the SP-250 as illustrated below: The ribbon
-
will snap into position. (Hint: Turning the knob on the ribbon cassette
may make installation easier.)
----
FE
Exchange Line 1 to~
FF
Delete All
Reset
5. Turn the cassette knob in the direction of the arrow to tighten the ribbon. 6. Replace the cover and lock with key.
)
To return all settings to the factory defaults, use a pointed object such as a pencil, to push the Reset switch (located on the back of the f
machine). NOTE: Pressing the Reset switch will delete all custom settings and revert to factory default settings. To enter new settings, please refer to settings sections of this guide. Re~et
Switch
•
17
18
(
Instal! the Optional NiCad Battery )
C Troubleshooting )
L Using the key, unlock the cover and remove the NiCad battery.
2. Insert the battery connector into the compartment connector.
Number Code
Explanation
3. Replace the cover and lock with key.
E.03 Cannot print. The printer head motor or
the sensor does not operate properly.
E·04 (1)
Cannot print. The printer motor or home
position sensor is not malfunctioning.
ffi-
.....
f
E·05 The card is not inserted in the Time Stamp
1'\)=
properly.
c.)=
(2)
~-
01
"'=
-...1=
0)=
c.o=
ffi
[cA. !-1jiQr£] --=
'--..
Replacing the battery incorrectly may cause risk of explosion. Replace only with the same or equivalent battery type recommended by Icon Time Systems. Dispose of used batteries according to the manufacturer's instructions. 19
20
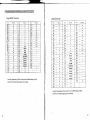
Large (BOLD) Character
Character
Code
02
03
0'-1
Large Character
Code
7b
Character
z
Code
Character
34
35
36
31
38,
39
3A
Code
I
Character
-IC
~~~~- I-~----~~~-
0
1
2
3
~
*4
*5
*6
*7
*8
~~--~
Character
Code
Character
Code
z
A
18
6'-1
'-Ib
0
B
1E
4[
65
7d
1
1F
C
66
4d
I as
1E
06
IF
2
80
D
_67
'-IE
OI
F
20 ~~ ~_~"
*9
3
81
E
68
'-IF
o8('i
2 7
5
*10
4
82
69_
F
50
09
H
22
6
3b
*11
G
83
aA
I
23
7
3[
*12
6A
51
ab
J
2'-1
8
3d
*13-
6
8'-1
H
6b
52
--0(K
25
9
3E
*14
7
6[
85
I
53
ad
L
26
Year
3F
*15 8
J
86
oE
M
27
Month-~a
'
6d
54
I
OF
N
28
Date
'-11 9
81
K
*
6E
55
+
-70
0
29
DOW
42
Year
88
L
6F
56
11
P
2A
HH:MM
l f
Month
89
M
10
51
12
Q _ ~1-21::L
HH:MM:SS
li'-l
I
73
R
2[
Number
liS Date
8A
N
11
58
7'-1
S
2d
Number
"b DOW
8b
0
12
59
15
T
2E ___NumlJer:
'-11 p
8[
HH:MM
SA
13
t--~~---~
~b
~~:::~
~~ !
,
Q
HH:MM:SS
8d
74
5b
I 18
W
31
*1
4A
&
Number
8E
R
15
5[
I
79
X
32
*2
Number
8F
S
76
5d
lA
Y-33*3
Number
T
90
77
f--~E
Number
78
91
u
I-
SF
Number
92
V
79
60
Code=26:2 digits setting of YEAR, Code=2A and 2b:AM/PM setting of HOUR,
*1
W
93
7A
61
Code=2C tb 30: Number diqits depend on the settings,
X
*2
7b
62
7[
*3
Y
63
A
B_ ~~-"I
C
D
E
I~~
~~-
*4
~~----~
*5
*6
-----
------
---
*7
---- I----"'~~ ~ ~
*8
----
*9
t~
I----'=~:.:
~~--~
~~~-
*10
~~-----~~~--
~~- ~
*11
I
*12
----
*13
------
~-----~
*14
------
*15
I
~----~
~c
,.
---
----
---
---
,
+
---
I-~~~~-~~
,
-
---
I
I
:
:
------
----
&
----
------
Code=6F:2 digits setting of YEAR, Code=73 and 74:AM/PM setting of HOUR,
Code=75 to 79: Number digits depend on the settings,
21
22
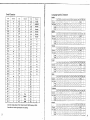
Small Character
Code
Character
9'-1
95
A
~
C
97
D
E
99
F
9R
~
9C
9d
G
9F
RO
R1
R2
R3
R'-I
R5
R5
R7
RB
R9
RR
,----Rb
RC
Rd
i
RE
l---
RF
bO
b1
b2
b3
b'-l
Code
B
9B
~E
Language-specific Character
--
H
I
J
K
L
[1
M
N
0
P
--
Q
R
5
T
U
V
--
W
X
y
z
0
1
2
3
4
5
6
b5
b5
" b7
.. 'bB
b9
bR
bb
bC
bd
bE
bF
CO
C2
C3
C'-I
C5
C5
C7
CB
C9
CR
[b
CC
Cd
CE
CF
dO
d1
' d2_ .
d3
d'-l
d 5---L...,
English
Character
Code
Character
d5
d7
dB
d9
dR
7
8
9
a
b
c
d
-~
e
f
9
h
i
j
k
I
m
n
0
p
q
r
s
t
u
v
w
x
y
z
Year
Month
Date
DOW
dC
dd
dC
dF
EO
E1
E2
E3
E'-I
E5
E5
E7
EB
E9
ER
Eb
EC
Ed
EE
EF
FO
Fl
FO
F3
F'-I
F5
F5
HH:MM
HH;MM;SS
Number
Number
23
*2 *3
*4
*5
*6
*7
*8
*9
*]0 'ill *12 *13 *14 *15
}
I
EURO
Character
#
$
@
r
\
]
1\
Dots Bold
Large
Sma.ll
9
7
6
9
6
6
9
7
8
8
7
6
6
5
6
6
7
6
5
*4
*5
*6
i
N
i
5
4
8
7
5
5
9
7
6
4
7
4
7
7
- f--
6_ ~. .1.-.,L ,-7 '--------
{
6
4
5
4
3
7
6
*7
*8
*9
5
5
4
4
7
6
5
7
6
6
8
7
6
Spanish
Number
Number
Character
Number
*1
*2
--
*3
Dots Bold
Large
Small
*1
Pt
*2 *3
@
$
1l
9
9
7
8
6
i-t-
6 ~
8
4
,
..
*]0 *ll
Ii
}
7
~
5
ilim
*13 *14*15
-
EURO
7
6
6
7
6
8
-
German
*4
*1
*5
Character
-.
*6
#
*2 *3
§
$
9
8
Dots ~Id~ c---2- .
Large 7
6
Small 6
6
*7
*8
7
6
*4 *5
*6
*7
A
0
0
1\
8
8
8
8
7
6
7
6
7
6
6
4
*8
*9
*10 *1l *12 *13 *14 ",,<IS
Ii
0
ij
13 EURO
5
4
3
7
7
5
7
6
5
7
8
7
6
*8
*9
6
5
8
7
6
~
*9
French
,.---------~
*10
----
r-
- - - ---
* 1 *2 *3
*4
*6
§
*7
8
7
6
.
*5
\
4
4
4
8
6
6
7
6
5
*2 *3
@
$
*4
*5
[
7
6
5
Character
#
$
a
*12
Dots Bold
Large
Small
9
7
9
6
6
7
7
6
4
4
*2
*3
*4
$
@
9
6
6
9
7
6
*13
*14
6
,--------c-,-----:--
*5
Ii
7
6
5
,
*11
4
*10 *11 *12 *J3 *14 *15
,.
,
e u e
8
6
4
5
4
3
7
6
5
*6
*7
*8
e
1\
u
*9
ii
8
7
6
4
6
5
7
7
5
*6
*7
*8
*9
\
]
1\
8
6
7
6
5
8
1\
7
6
5
7
6
5
.
Character
*1
#
Dots ~Id_ ~
Large 7
Small 6
Portuguese
+
,
-
EURO
8
E
7
6
7
6
8
*10 *11 *12 *13 *14 *15
0
e
1 EURO
7
7
6
5
6
5
5
4
4
-
.... '
- ._
Character
#
Dots Bold
Large
Small
9
7
9
6
9
7
6
6
6
6
8
7
6
----:--- *10 *11 *12 *13 *14 *15
-
*1
I
~.
-
-
EURO
7
8
6
6
7
5
6
{
I
}
5
7
7
6
4
~
4
3
5
5
4
4
~-
&
9
7
7
Italian
*15
Code=d2: 2 digits setting of YEAR, Code=d6 and D7:AM/PM setting of HOUR, Code=d8 to de: Number digits depend on the settings, --- c----
*1
--
~
6
--
Numeric
,
Character
---::-~--
*1
*2 *3
*4
*5
*6
*7
[
\
]
1\
8
6
6
7
6
5
#
$
@
DolS Bold
9
Large 7
Small, 6
9
6
6
9
7
7
6
5
6
*8
*9
{
8
5
6
4
4
3
*10 *ll ::;02
I
5
7
6
4
5 ,.4
lim
}
-
7
7
8
6
6
5_ 6
7
*14
::;m
EURO
,_~6
24
(------
Cautions
.'"\
Automate payroll:
eliminate risks.
· This machine is for indoor use only. Do not install outdoors, or
where it, may be exposed to rain.
1I
Growth in bUSiness, increased reporting laws, new demands... there are a number of reasons you may decide to automate your payroll functions down the road. Besides the savings of eliminating lost time and errors, Icon Time Systems' Time and Attendance Solutions can you make better management decisions, based on accurate labor information. Here are three ways to streamline your payroll operations: · Keep away from heat radiators, air ducts, moisture, and
mechanical shock vibrati'on.
· Always plug the machine into the correct power source.
· Do not allow any liquid or solid objects to fall ontolinto the
machine.
1) SBA" Employee Time Clock
• An affordable automated solution, which sets up in five minutes. · If machine malfunctions, is damaged in any matter, or has a
damaged cord or plug, do not operate: Return to an authorized
• Eliminates the need for consumables, such as time cards and ribbons. service facility or examination, repair, or adjustment.
• Works with or without a PC!
· If machine malfunctions, unplug it immediately. Do not operate
until checked by authorized service facility.
2)
'~·.rr
".
~
PIN~ Entry Employee Time Clock • Includes everything you need to streamline timekeeping and payroll process. · Place the SP-250 near an easily accessible outlet for plug-in.
...
• Uses unique 10 numbers to clock employees IN or OUT. • Eliminates badges and cards.
• Includes powerful, easy to use Time and Attendance Software. SpeCifications
Power Rating:
110-120V
3) Prox+'· Employee Time
• Clocks employees IN or OUT without even removing the badge from the wallet or purse. refer to label of each machine
Amp:
0.2 Amps
6.5" x 5."x 7.111 in 3 (DxWx H)
Dimensions:
(16.5 x 15 x 18 cm 3 )
Weight:
5.5 Ibs (2.5 kg)
Appropriate Temperature Range: 32°F - 104°F (O°C -40°C)
Conditions:
10-80% RH
• Allows PIN entry at the clock if badge is lost.
• Offers a wide range of upgradeable options. from multi-user software to TCP/IP or modem communications. • Includes powerful, easy to use Time and Attendance Software. f"!!!~!!..} \
25
www.icontime.com
1.800.847.2232
---- ,,-----------