1
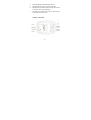
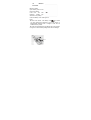
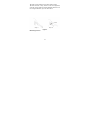
Arm Automatic Blood Pressure Meter (Electronic Sphygmomanometer) User Manual Ø Thank you for purchasing our product. Ø Please read this manual carefully before using the product. Ø Please keep the manual appropriately for future reference. Ø This User Manual is for the model WAP-900A Table of Contents I. General Information ......................................................... 1 II. PRECAUTION FOR USE AND MAINTENANCE ........... 5 III. Name of Each Part ........................................................ 8 Note for LCD display: ..................................................... 10 IV. Measure Procedure..................................................... 11 V. Troubleshooting ........................................................... 22 I. General Information Intended Use WAP-900A Arm Automatic Blood Pressure Meter is intended for use by medical professionals or at home to monitor and display diastolic, systolic blood pressure and pulse rate on adult each time, with an air cuff buckled around one's arm according to the instruction in the user's guide manual. Indications For Use WAP-900A Arm Automatic Blood Pressure Meter is for use by medical professionals or at home and is a non-invasive blood pressure measurement system intended to measure the diastolic and systolic blood pressures and pulse rate of an adult individual by using a non-invasive technique in which an inflatable cuff is wrapped around the arm. The cuff circumference is limited to 8.6614 inches to 12.5984 inches. Specification Product Name Applied Models Arm Automatic Blood Pressure Meter WAP-900A 1 Measurement Principle Oscillography Cuff Soft cuff Cuff size 470mm×130mm (+/-5mm) (18.5 ×5.1) inch (+/-0.2inch) Measurable Wrist Circumference Range About 220~320mm (8.6~12.6inch) Measurement Range Pressure: 40~280mmHg Pulse: 30~160 times/minute Accuracy Pressure: ±5mmHg Pulse: ±5% Power Supply 6V DC (4 “AA” batteries) Battery Life Working Environment Storage Environment Environmental Pressure Electric Shock Approx. 250times(180mmHg, 1 time/day,22°C(71.6°F)) Temperature: 5~40°C (41°F~104°F) Humidity: < 85%RH Temperature: -20~60°C (-4~140°F) Humidity: < 95%RH Atmosphere pressure Internal power unit 2 Protection Safety Classification Type B Equipment Memory Capacity 2 X 60 sets of data including date and time Display Automatic Inflation by internal pump Automatic speed deflation system controlled by internal electromagnetic valve. Pressure, Pulse, Date, Time Switch 3(ON/OFF, Memory, SET) Size 135mm (5.3inch)------(L) 96mm (3.7inch) ------(W) 56mm (2.2inch) -------(H) Weight 241g (0.5 LB) Inflation Deflation Contraindications: 1. Heart disease 2. High blood pressure or other circulatory disease 3. Arm injury n Patient Populations: The device is intended to use for adults. DO NOT use this device on infants. 3 Cleaning Information: 1. If the device is very dirty, wipe it clean with a cloth moistened with sterilizing alcohol or a neutral detergent. Then wipe it with a dry cloth. 2. NEVER clean the blood pressure meter with thinners or benzene, as they may damage it. 3. To clean the cuff, wipe it with a moist cloth. Avoid hard rubbing as this will cause air leakages. Take care also not to get water into the air hose. Nature and Frequency of Maintenance: This product is designed for use over an extended period of time; however, it is generally recommended that it be inspected every two years to ensure proper function and performance. Protect the Nature Environment: Please help to protect natural environment by respecting national and/or local recycling regulations when disposing of the battery and the product at the end of their useful live. 4 II. PRECAUTION FOR USE AND MAINTENANCE Precautions for Use: 1. If you suffer from heart disease, high blood pressure or other circulatory disease, consult your physician before using the device. 2. If the cuff pressure feels abnormal or you experience any other irregularity while using the cuff, reduce the pressure immediately by pressing the “ON/OFF” switch and then consult the sales outlet where you purchased the device. 3. If you think the measurement is abnormal or if measurement makes you feel unwell, discontinue use and consult your physician. 4. Blood pressure measurement may not be possible for anyone with a weak pulse or arrhythmia. 5. Repeated blood pressure measurement may cause problems such as congestion or swelling in some people. 6. Frequently repeated blood pressure measurements will not give accurate results. Allow an interval of about 3 minutes between measurements. 5 7. 8. 9. 10. 11. 12. 13. If you suffer from a severe problem with blood circulation in your arms, consult your physician before using the device. Failure to do so could be hazardous to your health. Measurement may not be possible for anyone with insufficient blood flow to the area where measurements will be taken or who suffers from a frequent irregular heartbeat. Consult your physician for advice on whether to use the device. DO NOT wrap the cuff around an elbow. DO NOT wrap the arm cuff around an elbow in which a drip (intravenous infusion) is inserted or which is being used for blood transfusion as part of medical treatment. Doing so could result in an injury or a serious accident. DO NOT use the device in the vicinity of flammable gases such as those used for anaesthesia. Doing so could ignite the gases and cause an explosion. DO NOT use the device in enriched oxygen environments such as a hospital’s hyperbaric chamber or oxygen tent. Doing so could ignite the oxygen and cause a fire. DO NOT use mobile phones near the device as this could result in a malfunction. 6 14. 15. 16. 17. 18. If you use a cardiac pacemaker, consult your physician before using the device. Be sure to use this device only for measuring blood pressure. DO NOT use it for any other purpose. DO NOT use this device on infants. Blood pressure measurement may not be possible for anyone with common arrhythmias such as a trial or ventricular premature beats or a trial fibrillation. This product contains natural rubber latex which may cause allergic reactions. Precautions for Maintenance: 1. DO NOT store the blood pressure monitor in locations exposed to direct sunlight, high temperatures (over 60°C(140°F)), low temperatures (below -20°C(-4°F)), high relative humidity (over 95%) or excessive amounts of dust. 2. DO NOT drop the blood pressure monitor or subject it to other shocks or vibration. 3. Remove the batteries if the device will be left unused for a long period. 7 4. DO NOT attempt to disassemble the device. 5. DO NOT bend the cuff or air hose excessively. 6. NEVER clean the blood pressure meter with thinners or benzene, as they may damage it. 7. DO NOT hard rub when clean the cuff. Take care not to get water into the air hose. III. Name of Each Part 8 v v v v Figure 1 – Appearance “SET” Button / Clock Setting “MEMORY” Button /AUg/Measured Result recall/ Clock Number Adjusting “ON/OFF” Button LCD Systolic Diastolic v Pulse v v Figure 2 – Display of LCD 9 Note for LCD display: (1) Date: Month - Day (2) Time: Hour - Minute (3) Systolic Blood Pressure (unit: mmHg) (4) Diastolic Blood Pressure (unit: mmHg) (5) Pulse (unit: beat/minute) (6) WHO BP Classification Indicating Bar (7) Inflation / Deflation Indicator (8) Blood Pressure Unit (9) Low Battery (10) Heart Icon (Twinkle when measuring) (11) Memory Record Number 10 IV. Measure Procedure Battery Loading Open battery cover at the back of the device. Load Four “AA” size batteries. Please pay attention to the polarity. Close the battery cover. See Figure 3. Note: ★ When LCD shows “Low Battery” icon , it means you must change the batteries at once. See Figure 4. Rechargeable batteries with a voltage of 5.2V are not suitable for this product. ★ Take out all the batteries if the device will be not used for a long time to avoid battery leakage and relevant damage. 11 Figure 3 Figure 4 Clock Adjusting and Unit Change When the device is turned off, hold pressing the button “SET” for above 3 seconds, the number of year will twinkle on LCD. Press button “SET” continuously, the numbers of month, date, hour, and minute will twinkle in sequence. While the number is twinkling, press button “MEMORY” and the corresponding number will increase by one. Hold on pressing the button “MEMORY” the number will increase fast. After pressing “SET” button the fifth time, numbers on LCD will not twinkle, then you exit the time adjusting mode. See Figure 5. After you change the batteries, you have to readjust the date and time. 12 Figure 5 BP measurement values can be displayed either in mmHg or Kpa, while mmHg is default unit. When the device is turned off, press the button “ON/OFF” more than 5 seconds until mmHg and Kpa selection interface appears. And then you can select mmHg or Kpa in turn by repeatedly pressing “memory” button. Arm Cuff Connecting Be sure to place the arm cuff on bare skin or thin-skinned cloth on left arm, and place the cuff on the center of elbow then warp the arm cuff to keep a distance of 2 – 3 cm with the elbow. See Figure 6. Note: ★ Arm cuff connecting should make arm feel no much tension. Don’t connect too tense (otherwise the measurement will be not precise). 13 ★ Keep up right position on the same height of heart. ★ When the cuff is dirty, detach it from the equipment, wash the cuff by hand with proper detergent and rinse it in the enough cold water, dry in air. Never iron it. Figure 6 Measuring Process 14 Figure 7 After your body is in a comfortable position, press the “ON/OFF” button. The device will verify itself, and LCD will twinkle automatically. After about two seconds, LCD shows one “00”. See Figure 8. If the device has voice function, it will speak out the prompt that “keep silence to take cuff at the same height with your heart”. Then the device begins to pressurize automatically. After measurement, the result of systolic, diastolic and pulse rate will be all displayed on LCD. The result will be 15 automatically memorized by itself. If the device has voice function, it will speak out the displayed blood pressure, heart rate. See Figure 9. Press “ON/OFF” button after measuring, the device will be turned off. The device will be automatically power off after 1 minute of none use. Figure 8 Figure 9 n Assessing High Blood Pressure for Adults The follow standards for assessing high blood pressure (without regard to age or gender) have been established as a guide line according to WHO (World Health Organization) standard. See Figure 10. Please note that other risk factors 16 (e.g. diabetes, obesity, smoking, etc.) need to be taken into consideration and may affect these figures. Consult with your physician for accurate assessment. Figure 10 From the above figure, we can see the classification of blood pressure for adults is as below: The WHO BP Classification Indicating Bar would show out the blood pressure level by the length. 17 Blood Pressure Classification SBP (mmHg) DBP (mmHg) Length of WHO BP Classificati on Bar Optimal <120 <80 1 grid Normal 120-129 80-84 2 grids High-Normal 130-139 85-89 3 grids Stage 1 140-159 90-99 4 grids Hypertension Stage 2 160-179 100-109 5 grids Hypertension Stage 3 ≧180 ≧110 6 grids Hypertension Note: The graph is not exact, but may be used as a guide in understanding non-invasive blood pressure measurements. The device is only intended for use with adults. Reading An Average Of The 3 Most Recent Measurements Result (AUg) Under “OFF” condition, press the button of “MEMORY” to enter the mode of an average of the most 3 recent measurements reading result. In this condition, the LCD will show “AUg” on the right up corner, then an average of the 18 most 3 recent measurements result will be displayed, continuously press the “MEMORY” button, it will enter Memory recall mode, please see on the follow. Reading Memory Results Under “ OFF ” condition, press the button of “MEMORY” after displayed an average of the most 3 recent measurements reading result then press one more time the “MEMORY” button to enter the mode of last memory reading results. LCD will show how many results it has, then the latest result will be displayed, which is 01 for memory number. See Figure 11. Continuously press the “MEMORY” button, the memory number will increase by one. If the device has voice function, it will speak out the last time displayed memory blood pressure, and heart rate. Press “MEMORY” button again after the last memory, the device will power off. Under the memory-displaying mode, it will be automatically power off after ten seconds of none use. Or you can press “ON/OFF” button to shut down the device. If it has no memory, then LCD will show “00” for systolic, diastolic, and pulse rate, and show “00” for the number of memory. While press the “MEMORY” or “ON/OFF”, the device will power off. 19 Figure 11 Delete for all Memories Under the mode of reading memories, holding on pressing “MEMORY” button for three seconds, all memories will be deleted. LCD will show the Figure 12 for two seconds. Figure 12 20 Shut Down After measurement, press button “ON/OFF” to turn off the device. The device will be automatically power off after 1 minute of none use. Person 1 or Person 2 setting function This model can distinguish measurement values of two users and two only. The first time you use the device, please press SET button to select P1 or P2 as your ID before turning on the device. Next time, assume that you’ve selected P1 as your ID, you should select P1 prior to turning on the device. Similarly, prior to checking your memory values, you should also select P1 to see your own memory values. Voice Function The device with voice function can speak out in the following state: Ø The device will speak out the prompt that “keep silence to take a cuff at the same height with your heart” when the measure begin. The device will speak out the displayed blood pressure (systolic and diastolic pressure), heart rate after each measurement finish. The device will speak out the last time displayed memory blood pressure (systolic and diastolic pressure), and heart rate when reading memory result. 21 Note: The voice function is ONLY for the UPDATE model WAP-900A-V. V. Troubleshooting Abnormality LCD shows Low Battery icon Shows abnormal result Reason Checkout Batteries are low. Change new batteries. Cuff is not tightened properly or its position is incorrect. Tighten cuff correctly and refer to “Arm Cuff Connecting”. The arm is moved during measuring. Irregular heartbeat 22 Stay calm, arm remains steady. Do not move during measuring. You can test again for light irregular heartbeat patients. It is inappropriate for serious irregular heartbeat patients to use this device. Speaking, frightened nervous or excited measurement Shows abnormal result LCD shows “Er U” LCD shows “Er H” LCD shows “Er 1” LCD shows “Er 2” LCD shows “Er 3” Wrong position Some interference in inflation or wrong operation during measuring Insufficient inflation Inflation over 305 mmHg Undetectable the pulse Radiation interference Measured result wrong 23 Do not speak, take deep breath 2~3 times to relax yourself. Adjust position; refer to “Wrist Cuff Swathing”. Refer to the inflation step in “Measuring process”. Measure again. Measure again Measure again Away the radiation source Measure again